Chapter 3. Mostly Static Pages
In this chapter, we will begin developing the professional-grade sample application that will serve as our example throughout the rest of this tutorial. Although the sample app will eventually have users, microposts, and a full login and authentication framework, we will begin with a seemingly limited topic: the creation of static pages. Despite its apparent simplicity, making static pages is a highly instructive exercise, rich in implications—a perfect start for our nascent application.
Although Rails is designed for making database-backed dynamic websites, it also excels at making the kind of static pages we might create using raw HTML files. In fact, using Rails even for static pages yields a distinct advantage: we can easily add just a small amount of dynamic content. In this chapter we’ll learn how. Along the way, we’ll get our first taste of automated testing, which will help us be more confident that our code is correct. Moreover, having a good test suite will allow us to refactor our code with confidence, changing its form without changing its function.
3.1 Sample App Setup
As in Chapter 2, before getting started we need to create a new Rails project, this time called sample_app, as shown in Listing 3.1.1
1. If you’re using the cloud IDE, it’s often useful to use the “Goto Anything” command, which makes it easy to navigate the filesystem by typing in partial filenames. In this context, having the hello, toy, and sample apps present in the same project can be inconvenient due to the many common filenames. For example, when searching for a file called “Gemfile”, six possibilities will show up, because each project has matching files called Gemfile and Gemfile.lock. Thus, you may want to consider removing the first two apps before proceeding, which you can do by navigating to the workspace directory and running rm -rf hello_app/ toy_app/ (Table 1.1). (As long as you pushed the corresponding repositories up to Bitbucket, you can always recover them later.)
Listing 3.1: Generating a new sample app.
$ cd ˜/workspace
$ rails _5.0.0_ new sample_app
$ cd sample_app/
(As in Section 2.1, note that users of the cloud IDE can create this project in the same workspace as the applications from the previous two chapters. It is not necessary to create a new workspace.)
Note: For convenience, a reference implementation of the completed Rails Tutorial sample app is available at Bitbucket.2
2. bitbucket.org/railstutorial/sample_app_4th_ed
As in Section 2.1, our next step is to use a text editor to update the Gemfile with the gems needed by our application. Listing 3.2 is identical to Listing 1.5 and Listing 2.1 apart from the gems in the test group, which are needed for the optional advanced testing setup (Section 3.6) and integration testing starting in Section 5.3.4. Note: If you would like to install all the gems needed for the sample application, you should use the code in Listing 13.72 at this time. Important note: For all the Gemfiles in this book, you should use the version numbers listed at gemfiles-4th-ed.railstutorial.org instead of the ones listed below (although they should be identical if you are reading this online).
Listing 3.2: A Gemfile for the sample app.
source 'https://rubygems.org'
gem 'rails', '5.0.0'
gem 'puma', '3.4.0'
gem 'sass-rails', '5.0.5'
gem 'uglifier', '3.0.0'
gem 'coffee-rails', '4.2.1'
gem 'jquery-rails', '4.1.1'
gem 'turbolinks', '5.0.0'
gem 'jbuilder', '2.4.1'
group :development, :test do
gem 'sqlite3', '1.3.11'
gem 'byebug', '9.0.0', platform: :mri
end
group :development do
gem 'web-console', '3.1.1'
gem 'listen', '3.0.8'
gem 'spring', '1.7.2'
gem 'spring-watcher-listen', '2.0.0'
end
group :test do
gem 'rails-controller-testing', '0.1.1'
gem 'minitest-reporters', '1.1.9'
gem 'guard', '2.13.0'
gem 'guard-minitest', '2.4.4'
end
group :production do
gem 'pg', '0.18.4'
end
# Windows does not include zoneinfo files, so bundle the tzinfo-data gem
gem 'tzinfo-data', platforms: [:mingw, :mswin, :x64_mingw, :jruby]
As in the previous two chapters, we run bundle install to install and include the gems specified in the Gemfile, while skipping the installation of production gems using the option --without production:3
3. It’s worth noting that --without production is a “remembered option”, which means it will be included automatically the next time we run bundle install.
$ bundle install --without production
This arranges to skip the pg gem for PostgreSQL in development and use SQLite for development and testing. Heroku recommends against using different databases in development and production, but for the sample application it won’t make any difference, and SQLite is much easier than PostgreSQL to install and configure locally.4 In case you’ve previously installed a version of a gem (such as Rails itself) other than the one specified by the Gemfile, it’s a good idea to update the gems with bundle update to make sure the versions match:
4. I recommend eventually learning how to install and configure PostgreSQL in development, but the chances are now is not that time. When the time comes, Google “install configure postgresql <your system>” and “rails postgresql setup”, and prepare for a challenge. (On the cloud IDE, <your system> is Ubuntu.)
$ bundle update
With that, all we have left is to initialize the Git repository:
$ git init
$ git add -A
$ git commit -m "Initialize repository"
As with the first application, I suggest updating the README file to be more helpful and descriptive by replacing the default contents of README.md with the Markdown shown in Listing 3.3. Note that the README includes instructions for getting started with the application. (We won’t actually need to run rails db:migrate until Chapter 6, but it does no harm to include it now.)
Listing 3.3: An improved README file for the sample app.
README.md
# Ruby on Rails Tutorial sample application
This is the sample application for
[*Ruby on Rails Tutorial:
Learn Web Development with Rails*](http://www.railstutorial.org/)
by [Michael Hartl](http://www.michaelhartl.com/).
## License
All source code in the [Ruby on Rails Tutorial](http://railstutorial.org/)
is available jointly under the MIT License and the Beerware License. See
[LICENSE.md](LICENSE.md) for details.
## Getting started
To get started with the app, clone the repo and then install the needed gems:
```
$ bundle install --without production
```
Next, migrate the database:
```
$ rails db:migrate
```
Finally, run the test suite to verify that everything is working correctly:
```
$ rails test
```
If the test suite passes, you'll be ready to run the app in a local server:
```
$ rails server
```
For more information, see the
[*Ruby on Rails Tutorial* book](http://www.railstutorial.org/book).
Then commit the changes as follows:
$ git commit -am "Improve the README"
You may recall from Section 1.4.4 that we used the Git command git commit -a -m "Message", with flags for “all changes” (-a) and a message (-m). As shown in the second command above, Git also lets us roll the two flags into one using git commit -am "Message".
Since we’ll be using this sample app throughout the rest of the book, it’s a good idea to create a new repository at Bitbucket and push it up:
$ git remote add origin [email protected]:<username>/sample_app.git
$ git push -u origin --all # pushes up the repo and its refs for the first time
To avoid integration headaches later on, it’s also a good idea to deploy the app to Heroku even at this early stage. As in Chapter 1 and Chapter 2, I suggest following the “hello, world!” steps in Listing 3.4 and Listing 3.5. (The main reason for this is that the default Rails page typically breaks at Heroku, which makes it hard to tell if the deployment was successful or not.)
Listing 3.4: Adding a hello action to the Application controller.
app/controllers/application_controller.rb
class ApplicationController < ActionController::Base
protect_from_forgery with: :exception
def hello
render text: "hello, world!"
end
end
Listing 3.5: Setting the root route.
config/routes.rb
Rails.application.routes.draw do
root 'application#hello'
end
Then commit the changes and push up to Bitbucket and Heroku:
$ git commit -am "Add hello"
$ git push
$ heroku create
$ git push heroku master
As in Section 1.5, you may see some warning messages, which you should ignore for now. We’ll deal with them in Section 7.5. Apart from the address of the Heroku app, the result should be the same as in Figure 1.19.
As you proceed through the rest of the book, I recommend pushing and deploying the application regularly, which automatically makes remote backups and lets you catch any production errors as soon as possible. If you run into problems at Heroku, make sure to take a look at the production logs to try to diagnose the problem:
$ heroku logs
Note: If you do end up using Heroku for a real-life application, be sure to follow the production webserver configuration in Section 7.5.
Exercises
Solutions to exercises are available for free at railstutorial.org/aw-solutions with any Rails Tutorial purchase. To see other people’s answers and to record your own, join the Learn Enough Society at learnenough.com/society.
1. Confirm that Bitbucket renders the Markdown for the README in Listing 3.3 as HTML.
2. By visiting the root route on the production server, verify that the deployment to Heroku succeeded.
3.2 Static Pages
With all the preparation from Section 3.1 finished, we’re ready to get started developing the sample application. In this section, we’ll take a first step toward making dynamic pages by creating a set of Rails actions and views containing only static HTML.5 Rails actions come bundled together inside controllers (the C in MVC from Section 1.3.3), which contain sets of actions related by a common purpose. We got a glimpse of controllers in Chapter 2, and will come to a deeper understanding once we explore the REST architecture more fully (starting in Chapter 6). In order to get our bearings, it’s helpful to recall the Rails directory structure from Section 1.3 (Figure 1.4). In this section, we’ll be working mainly in the app/controllers and app/views directories.
5. Our method for making static pages is probably the simplest, but it’s not the only way. The optimal method really depends on your needs; if you expect a large number of static pages, using a Static Pages controller can get quite cumbersome, but in our sample app we’ll only need a few. If you do need a lot of static pages, take a look at the high_voltage gem.
Recall from Section 1.4.4 that, when using Git, it’s a good practice to do our work on a separate topic branch rather than the master branch. If you’re using Git for version control, you should run the following command to checkout a topic branch for static pages:
$ git checkout -b static-pages
3.2.1 Generated Static Pages
To get started with static pages, we’ll first generate a controller using the same Rails generate script we used in Chapter 2 to generate scaffolding. Since we’ll be making a controller to handle static pages, we’ll call it the Static Pages controller, designated by the CamelCase name StaticPages. We’ll also plan to make actions for a Home page, a Help page, and an About page, designated by the lowercase action names home, help, and about. The generate script takes an optional list of actions, so we’ll include actions for the Home and Help pages directly on the command line, while intentionally leaving off the action for the About page so that we can see how to add it (Section 3.3). The resulting command to generate the Static Pages controller appears in Listing 3.6.
Listing 3.6: Generating a Static Pages controller.
$ rails generate controller StaticPages home help
create app/controllers/static_pages_controller.rb
route get 'static_pages/help'
route get 'static_pages/home'
invoke erb
create app/views/static_pages
create app/views/static_pages/home.html.erb
create app/views/static_pages/help.html.erb
invoke test_unit
create test/controllers/static_pages_controller_test.rb
invoke helper
create app/helpers/static_pages_helper.rb
invoke test_unit
invoke assets
invoke coffee
create app/assets/javascripts/static_pages.coffee
invoke scss
create app/assets/stylesheets/static_pages.scss
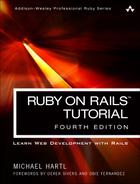
Incidentally, it’s worth noting that rails g is a shortcut for rails generate, which is only one of several shortcuts supported by Rails (Table 3.1). For clarity, this tutorial always uses the full command, but in real life most Rails developers use one or more of the shortcuts shown in Table 3.1.6
6. In fact, many Rails developers also add an alias (as described in Learn Enough Text Editor to Be Dangerous) for the rails command, typically shortening it to just r. This allows us to run, e.g., a Rails server using the compact command r s.
Table 3.1: Some Rails shortcuts.
Before moving on, if you’re using Git it’s a good idea to add the files for the Static Pages controller to the remote repository:
$ git add -A
$ git commit -m "Add a Static Pages controller"
$ git push -u origin static-pages
The final command here arranges to push the static-pages topic branch up to Bitbucket. Subsequent pushes can omit the other arguments and write simply
$ git push
The commit and push sequence above represents the kind of pattern I would ordinarily follow in real-life development, but for simplicity I’ll typically omit such intermediate commits from now on.
In Listing 3.6, note that we have passed the controller name as CamelCase (so called because it resembles the humps of a Bactrian camel), which leads to the creation of a controller file written in snake case, so that a controller called StaticPages yields a file called static_pages_controller.rb. This is merely a convention, and in fact using snake case at the command line also works: the command
$ rails generate controller static_pages ...
also generates a controller called static_pages_controller.rb. Because Ruby uses CamelCase for class names (Section 4.4), my preference is to refer to controllers using their CamelCase names, but this is a matter of taste. (Since Ruby filenames typically use snake case, the Rails generator converts CamelCase to snake case using the underscore method.)
By the way, if you ever make a mistake when generating code, it’s useful to know how to reverse the process. See Box 3.1 for some techniques on how to undo things in Rails.
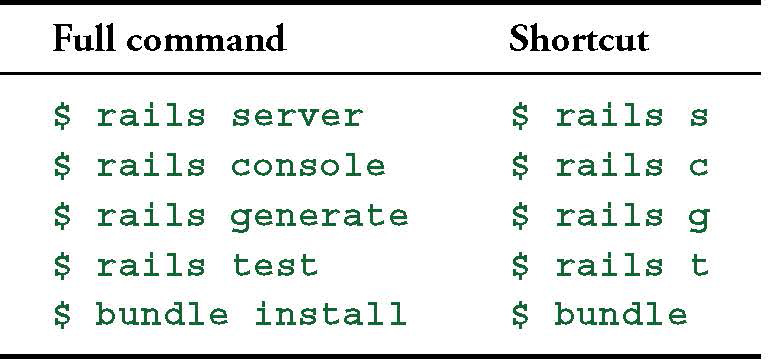
The Static Pages controller generation in Listing 3.6 automatically updates the routes file (config/routes.rb), which we saw briefly in Section 1.3.4. The routes file is responsible for implementing the router (seen in Figure 2.11) that defines the correspondence between URLs and web pages. The routes file is located in the config directory, where Rails collects files needed for the application configuration (Figure 3.1).
Since we included the home and help actions in Listing 3.6, the routes file already has a rule for each one, as seen in Listing 3.7.
Listing 3.7: The routes for the home and help actions in the Static Pages controller.
config/routes.rb
Rails.application.routes.draw do
get 'static_pages/home'
get 'static_pages/help'
root 'application#hello'
end
Here the rule
get 'static_pages/home'
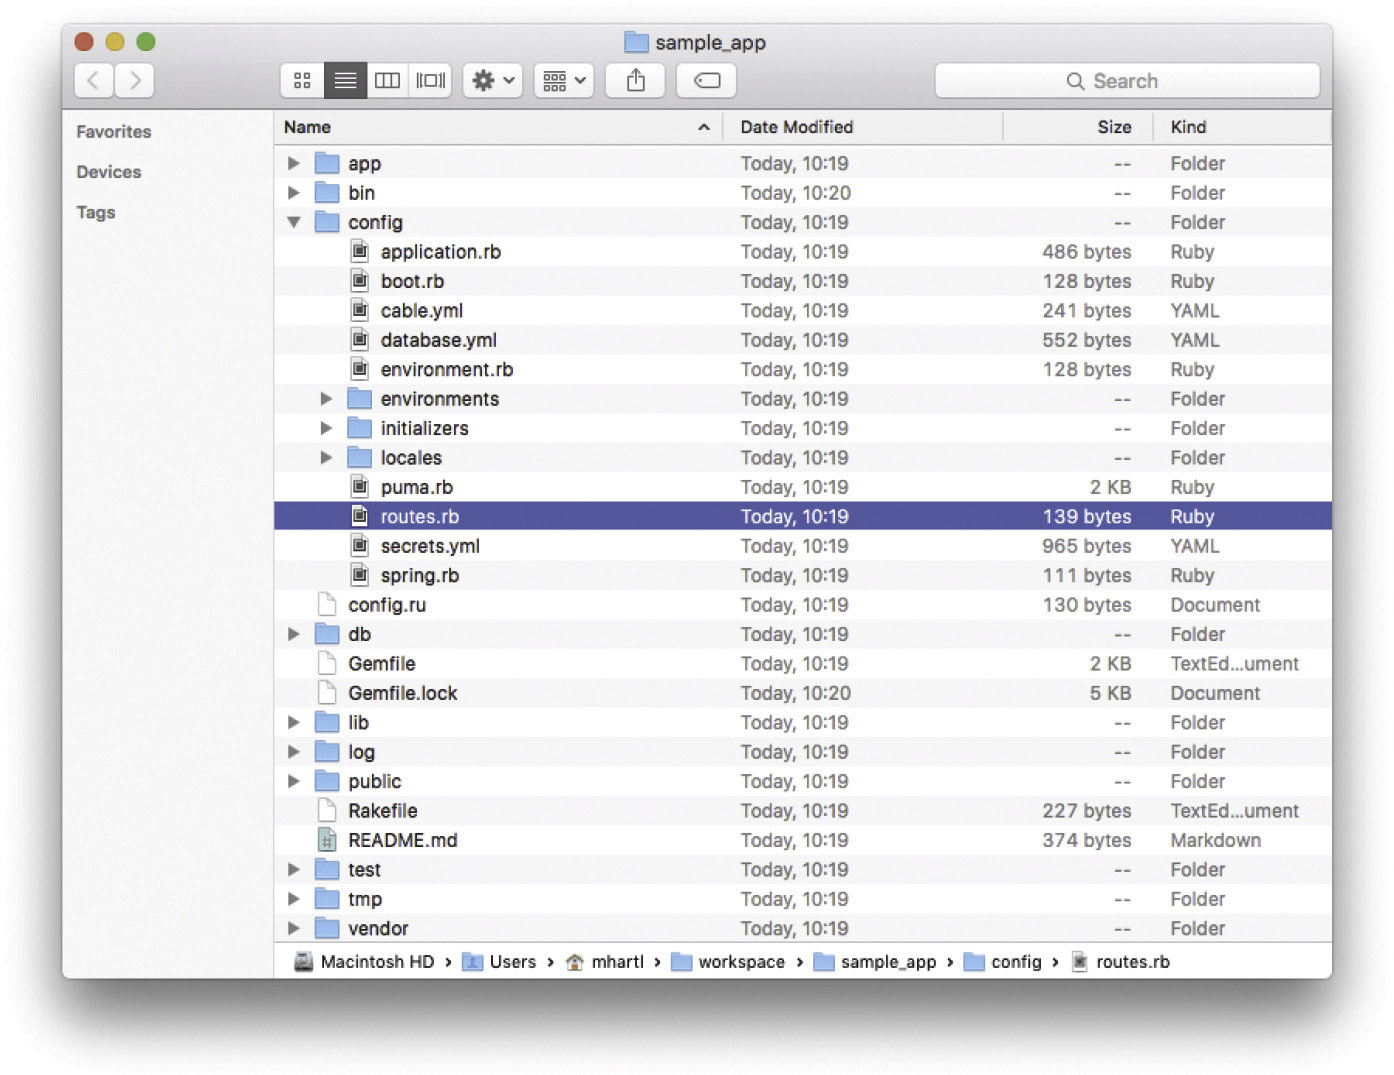
maps requests for the URL /static_pages/home to the home action in the Static Pages controller. Moreover, by using get we arrange for the route to respond to a GET request, which is one of the fundamental HTTP verbs supported by the hypertext transfer protocol (Box 3.2). In our case, this means that when we generate a home action inside the Static Pages controller we automatically get a page at the address /static_pages/home. To see the result, start a Rails development server as described in Section 1.3.2:
$ rails server -b $IP -p $PORT # Use `rails server` if running locally.
Then navigate to /static_pages/home (Figure 3.2).
To understand where this page comes from, let’s start by taking a look at the Static Pages controller in a text editor, which should look something like Listing 3.8. You may note that, unlike the demo Users and Microposts controllers from Chapter 2, the Static Pages controller does not use the standard REST actions. This is normal for a collection of static pages: the REST architecture isn’t the best solution to every problem.
Listing 3.8: The Static Pages controller made by Listing 3.6.
app/controllers/static_pages_controller.rb
class StaticPagesController < ApplicationController
def home
end
def help
end
end
We see from the class keyword in Listing 3.8 that static_pages_controller.rb defines a class, in this case called StaticPagesController. Classes are simply a convenient way to organize functions (also called methods) like the home and help actions, which are defined using the def keyword. As discussed in Section 2.3.4, the angle bracket < indicates that StaticPagesController inherits from the Rails class ApplicationController; as we’ll see in a moment, this means that our pages come equipped with a large amount of Rails-specific functionality. (We’ll learn more about both classes and inheritance in Section 4.4.)
In the case of the Static Pages controller, both of its methods are initially empty:
def home
end
def help
end
In plain Ruby, these methods would simply do nothing. In Rails, the situation is different—StaticPagesController is a Ruby class, but because it inherits from ApplicationController the behavior of its methods is specific to Rails. Thus when visiting the URL /static_pages/home, Rails looks in the Static Pages controller and executes the code in the home action, and then renders the view (the V in MVC from Section 1.3.3) corresponding to the action. In the present case, the home action is empty, so all visiting /static_pages/home does is render the view. So, what does a view look like, and how do we find it?
If you take another look at the output in Listing 3.6, you might be able to guess the correspondence between actions and views: an action like home has a corresponding view called home.html.erb. We’ll learn in Section 3.4 what the .erb part means; from the .html part you probably won’t be surprised that it basically looks like HTML (Listing 3.9).
Listing 3.9: The generated view for the Home page.
app/views/static_pages/home.html.erb
<h1>StaticPages#home</h1>
<p>Find me in app/views/static_pages/home.html.erb</p>
The view for the help action is analogous (Listing 3.10).
Listing 3.10: The generated view for the Help page.
app/views/static_pages/help.html.erb
<h1>StaticPages#help</h1>
<p>Find me in app/views/static_pages/help.html.erb</p>
Both of these views are just placeholders: they have a top-level heading (inside the h1 tag) and a paragraph (p tag) with the full path to the corresponding file.
Exercises
Solutions to exercises are available for free at railstutorial.org/aw-solutions with any Rails Tutorial purchase. To see other people’s answers and to record your own, join the Learn Enough Society at learnenough.com/society.
1. Generate a controller called Foo with actions bar and baz.
2. By applying the techniques described in Box 3.1, destroy the Foo controller and its associated actions.
3.2.2 Custom Static Pages
We’ll add some (very slightly) dynamic content starting in Section 3.4, but as they stand, the files shown in Listing 3.9 and Listing 3.10 underscore an important point: Rails views can simply contain static HTML. This means we can begin customizing the Home and Help pages even with no knowledge of Rails, as shown in Listing 3.11 and Listing 3.12.
Listing 3.11: Custom HTML for the Home page.
app/views/static_pages/home.html.erb
<h1>Sample App</h1>
<p>
This is the home page for the
<a href="http://www.railstutorial.org/">Ruby on Rails Tutorial</a>
sample application.
</p>
Listing 3.12: Custom HTML for the Help page.
app/views/static_pages/help.html.erb
<h1>Help</h1>
<p>
Get help on the Ruby on Rails Tutorial at the
<a href="http://www.railstutorial.org/help">Rails Tutorial help page</a>.
To get help on this sample app, see the
<a href="http://www.railstutorial.org/book"><em>Ruby on Rails Tutorial</em>
book</a>.
</p>
The results of Listing 3.11 and Listing 3.12 are shown in Figure 3.3 and Figure 3.4.


Having created and filled in the Home and Help pages for our sample app (Section 3.2.2), now we’re going to add an About page as well. When making a change of this nature, it’s a good practice to write an automated test to verify that the feature is implemented correctly. Developed over the course of building an application, the resulting test suite serves as a safety net and as executable documentation of the application source code. When done right, writing tests also allows us to develop faster despite requiring extra code, because we’ll end up wasting less time trying to track down bugs. This is true only once we get good at writing tests, though, which is one reason it’s important to start practicing as early as possible.
Although virtually all Rails developers agree that testing is a good idea, there is a diversity of opinion on the details. There is an especially lively debate over the use of test-driven development (TDD),7 a testing technique in which the programmer writes failing tests first, and then writes the application code to get the tests to pass. The Ruby on Rails™ Tutorial takes a lightweight, intuitive approach to testing, employing TDD when convenient without being dogmatic about it (Box 3.3).
7. See, e.g., “TDD is dead. Long live testing.” by Rails creator David Heinemeier Hansson.
Our main testing tools will be controller tests (starting in this section), model tests (starting in Chapter 6), and integration tests (starting in Chapter 7). Integration tests are especially powerful, as they allow us to simulate the actions of a user interacting with our application using a web browser. Integration tests will eventually be our primary testing technique, but controller tests give us an easier place to start.
3.3.1 Our First Test
Now it’s time to add an About page to our application. As we’ll see, the test is short and simple, so we’ll follow the guidelines from Box 3.3 and write the test first. We’ll then use the failing test to drive the writing of the application code.
Getting started with testing can be challenging, requiring extensive knowledge of both Rails and Ruby. At this early stage, writing tests might thus seem hopelessly intimidating. Luckily, Rails has already done the hardest part for us, because rails generate controller (Listing 3.6) automatically generated a test file to get us started:
$ ls test/controllers/
static_pages_controller_test.rb
Let’s take a look at it (Listing 3.13).
Listing 3.13: The default tests for the StaticPages controller. GREEN
test/controllers/static_pages_controller_test.rb
require 'test_helper'
class StaticPagesControllerTest < ActionDispatch::IntegrationTest
test "should get home" do
get static_pages_home_url
assert_response :success
end
test "should get help" do
get static_pages_help_url
assert_response :success
end
end
It’s not important at this point to understand the syntax in Listing 3.13 in detail, but we can see that there are two tests, one for each controller action we included on the command line in Listing 3.6. Each test simply gets a URL and verifies (via an assertion) that the result is a success. Here the use of get indicates that our tests expect the Home and Help pages to be ordinary web pages, accessed using a GET request (Box 3.2). The response :success is an abstract representation of the underlying HTTP status code (in this case, 200 OK). In other words, a test like
test "should get home" do
get static_pages_home_url
assert_response :success
end
says “Let’s test the Home page by issuing a GET request to the Static Pages home URL and then making sure we receive a ‘success’ status code in response.”
To begin our testing cycle, we need to run our test suite to verify that the tests currently pass. We can do this with the rails command as follows:
$ rails test
2 tests, 2 assertions, 0 failures, 0 errors, 0 skips
As required, initially our test suite is passing (GREEN). (You won’t actually see the color green unless you add the minitest reporters from the optional Section 3.6.1, but the terminology is common even when literal colors aren’t involved.) On some systems, the tests can take a relatively long time to start, which is due to two factors: (1) starting the Spring server to preload parts of the Rails environment, which only happens the first time; and (2) overhead associated with Ruby startup time. (The second factor is ameliorated when using Guard as suggested in Section 3.6.2.)
3.3.2 Red
As noted in Box 3.3, test-driven development involves writing a failing test first, writing the application code needed to get it to pass, and then refactoring the code if necessary. Because many testing tools represent failing tests with the color red and passing tests with the color green, this sequence is sometimes known as the “Red, Green, Refactor” cycle. In this section, we’ll complete the first step in this cycle, getting to RED by writing a failing test. Then we’ll get to GREEN in Section 3.3.3, and refactor in Section 3.4.3.8
8. By default, rails test shows red when the tests fail, but doesn’t show green when the tests pass. To arrange for a true Red–Green cycle, see Section 3.6.1.
Our first step is to write a failing test for the About page. Following the models from Listing 3.13, you can probably guess the right test, which is shown in Listing 3.15.
Listing 3.15: A test for the About page. RED
test/controllers/static_pages_controller_test.rb
require 'test_helper'
class StaticPagesControllerTest < ActionDispatch::IntegrationTest
test "should get home" do
get static_pages_home_url
assert_response :success
end
test "should get help" do
get static_pages_help_url
assert_response :success
end
test "should get about" do
get static_pages_about_url
assert_response :success
end
end
We see from the highlighted lines in Listing 3.15 that the test for the About page is the same as the Home and Help tests with the word “about” in place of “home” or “help”.
As required, the test initially fails:
$ rails test
3 tests, 2 assertions, 0 failures, 1 errors, 0 skips
3.3.3 Green
Now that we have a failing test (RED), we’ll use the failing test’s error messages to guide us to a passing test (GREEN), thereby implementing a working About page.
We can get started by examining the error message output by the failing test:
$ rails test
NameError: undefined local variable or method `static_pages_about_url'
The error message here says that the Rails code for the About page URL is undefined, which is a hint that we need to add a line to the routes file. We can accomplish this by following the pattern in Listing 3.7, as shown in Listing 3.18.
Listing 3.18: Adding the about route. RED
config/routes.rb
Rails.application.routes.draw do
get 'static_pages/home'
get 'static_pages/help'
get 'static_pages/about'
root 'application#hello'
end
The highlighted line in Listing 3.18 tells Rails to route a GET request for the URL /static_pages/about to the about action in the Static Pages controller. This automatically creates a helper called
static_pages_about_url
Running our test suite again, we see that it is still RED, but now the error message has changed:
$ rails test
AbstractController::ActionNotFound:
The action 'about' could not be found for StaticPagesController
The error message now indicates a missing about action in the Static Pages controller, which we can add by following the model provided by home and help in Listing 3.8, as shown in Listing 3.20.
Listing 3.20: The Static Pages controller with added about action. RED
app/controllers/static_pages_controller.rb
class StaticPagesController < ApplicationController
def home
end
def help
end
def about
end
end
As before, our test suite is still RED, but the error message has changed again:
$ rails test
ActionController::UnknownFormat: StaticPagesController#about is missing
a template for this request format and variant.
This indicates a missing template, which in the context of Rails is essentially the same thing as a view. As described in Section 3.2.1, an action called home is associated with a view called home.html.erb located in the app/views/static_pages directory, which means that we need to create a new file called about.html.erb in the same directory.
The way to create a file varies by system setup, but most text editors will let you control-click inside the directory where you want to create the file to bring up a menu with a “New File” menu item. Alternately, you can use the File menu to create a new file and then pick the proper directory when saving it. Finally, you can use my favorite trick by applying the Unix touch command as follows:
$ touch app/views/static_pages/about.html.erb
As mentioned in Learn Enough Command Line to Be Dangerous, touch is designed to update the modification timestamp of a file or directory without otherwise affecting it, but as a side-effect it creates a new (blank) file if one doesn’t already exist. (If using the cloud IDE, you may have to refresh the file tree as described in Section 1.3.1. This is a good example of technical sophistication [Box 1.1].)9
9. You can also use the c9 command via c9 open <filename> to create and open a file at the same time.
Once you’ve created the about.html.erb file in the right directory, you should fill it with the contents shown in Listing 3.21.
Listing 3.21: Code for the About page. GREEN
app/views/static_pages/about.html.erb
<h1>About</h1>
<p>
The <a href="http://www.railstutorial.org/"><em>Ruby on Rails
Tutorial</em></a> is a
<a href="http://www.railstutorial.org/book">book</a> and
<a href="http://screencasts.railstutorial.org/">screencast series</a>
to teach web development with
<a href="http://rubyonrails.org/">Ruby on Rails</a>.
This is the sample application for the tutorial.
</p>
At this point, running rails test should get us back to GREEN:
$ rails test
3 tests, 3 assertions, 0 failures, 0 errors, 0 skips
Of course, it’s never a bad idea to take a look at the page in a browser to make sure our tests aren’t completely crazy (Figure 3.5).
3.3.4 Refactor
Now that we’ve gotten to GREEN, we are free to refactor our code with confidence. When developing an application, often code will start to “smell”, meaning that it gets ugly, bloated, or filled with repetition. The computer doesn’t care what the code looks like, of course, but humans do, so it is important to keep the code base clean by refactoring frequently. Although our sample app is a little too small to refactor right now, code smell seeps in at every crack, and we’ll get started refactoring in Section 3.4.3.

3.4 Slightly Dynamic Pages
Now that we’ve created the actions and views for some static pages, we’ll make them slightly dynamic by adding some content that changes on a per-page basis: we’ll have the title of each page change to reflect its content. Whether a changing title represents truly dynamic content is debatable, but in any case it lays the necessary foundation for unambiguously dynamic content in Chapter 7.
Our plan is to edit the Home, Help, and About pages to make page titles that change on each page. This will involve using the <title> tag in our page views. Most browsers display the contents of the title tag at the top of the browser window, and it is also important for search-engine optimization. We’ll be using the full “Red, Green, Refactor” cycle: first by adding simple tests for our page titles (RED), then by adding titles to each of our three pages (GREEN), and finally using a layout file to eliminate duplication
Table 3.2: The (mostly) static pages for the sample app.

(Refactor). By the end of this section, all three of our static pages will have titles of the form “<page name> | Ruby on Rails Tutorial Sample App”, where the first part of the title will vary depending on the page (Table 3.2).
The rails new command (Listing 3.1) creates a layout file by default, but it’s instructive to ignore it initially, which we can do by changing its name:
$ mv app/views/layouts/application.html.erb layout_file # temporary change
You wouldn’t normally do this in a real application, but it’s easier to understand the purpose of the layout file if we start by disabling it.
3.4.1 Testing Titles (Red)
To add page titles, we need to learn (or review) the structure of a typical web page, which takes the form shown in Listing 3.23. (This is covered in much more depth in Learn Enough HTML to Be Dangerous.)
Listing 3.23: The HTML structure of a typical web page.
<!DOCTYPE html>
<html>
<head>
<title>Greeting</title>
</head>
<body>
<p>Hello, world!</p>
</body>
</html>
The structure in Listing 3.23 includes a document type, or doctype, declaration at the top to tell browsers which version of HTML we’re using (in this case, HTML5);10 a head section, in this case with “Greeting” inside a title tag; and a body section, in this case with “Hello, world!” inside a p (paragraph) tag. (The indentation is optional— HTML is not sensitive to whitespace, and ignores both tabs and spaces—but it makes the document’s structure easier to see.)
10. HTML changes with time; by explicitly making a doctype declaration we make it likelier that browsers will render our pages properly in the future. The simple doctype <!DOCTYPE html> is characteristic of the latest HTML standard, HTML5.
We’ll write simple tests for each of the titles in Table 3.2 by combining the tests in Listing 3.15 with the assert_select method, which lets us test for the presence of a particular HTML tag (sometimes called a “selector”, hence the name):11
11. For a list of common minitest assertions, see the table of available assertions in the Rails Guides testing article.
assert_select "title", "Home | Ruby on Rails Tutorial Sample App"
In particular, the code above checks for the presence of a <title> tag containing the string “Home | Ruby on Rails Tutorial Sample App”. Applying this idea to all three static pages gives the tests shown in Listing 3.24.
Listing 3.24: The Static Pages controller test with title tests. RED
test/controllers/static_pages_controller_test.rb
require 'test_helper'
class StaticPagesControllerTest < ActionDispatch::IntegrationTest
test "should get home" do
get static_pages_home_url
assert_response :success
assert_select "title", "Home | Ruby on Rails Tutorial Sample App"
end
test "should get help" do
get static_pages_help_url
assert_response :success
assert_select "title", "Help | Ruby on Rails Tutorial Sample App"
end
test "should get about" do
get static_pages_about_url
assert_response :success
assert_select "title", "About | Ruby on Rails Tutorial Sample App"
end
end
With the tests from Listing 3.24 in place, you should verify that the test suite is currently RED:
$ rails test
3 tests, 6 assertions, 3 failures, 0 errors, 0 skips
3.4.2 Adding Page Titles (Green)
Now we’ll add a title to each page, getting the tests from Section 3.4.1 to pass in the process. Applying the basic HTML structure from Listing 3.23 to the custom Home page from Listing 3.11 yields Listing 3.26.
Listing 3.26: The view for the Home page with full HTML structure. RED
app/views/static_pages/home.html.erb
<!DOCTYPE html>
<html>
<head>
<title>Home | Ruby on Rails Tutorial Sample App</title>
</head>
<body>
<h1>Sample App</h1>
<p>
This is the home page for the
<a href="http://www.railstutorial.org/">Ruby on Rails Tutorial</a>
sample application.
</p>
</body>
</html>

The corresponding web page appears in Figure 3.6.12
12. Most of the screenshots in this book use Google Chrome, but Figure 3.6 uses Safari because Chrome doesn’t display the full page title. (As of this writing, Safari displays the page title only if you include an additional tab, which explains the second tab shown in Figure 3.6.) Also note that the URL in Figure 3.6 is actually /static_pages/home, but Safari displays only the base URL, which in this case is my development server at Cloud9.
Following this model for the Help page (Listing 3.12) and the About page (Listing 3.21) yields the code in Listing 3.27 and Listing 3.28.
Listing 3.27: The view for the Help page with full HTML structure. RED
app/views/static_pages/help.html.erb
<!DOCTYPE html>
<html>
<head>
<title>Help | Ruby on Rails Tutorial Sample App</title>
</head>
<body>
<h1>Help</h1>
<p>
Get help on the Ruby on Rails Tutorial at the
<a href="http://www.railstutorial.org/help">Rails Tutorial help
page</a>.
To get help on this sample app, see the
<a href="http://www.railstutorial.org/book"><em>Ruby on Rails
Tutorial</em> book</a>.
</p>
</body>
</html>
Listing 3.28: The view for the About page with full HTML structure. GREEN
app/views/static_pages/about.html.erb
<!DOCTYPE html>
<html>
<head>
<title>About | Ruby on Rails Tutorial Sample App</title>
</head>
<body>
<h1>About</h1>
<p>
The <a href="http://www.railstutorial.org/"><em>Ruby on Rails
Tutorial</em></a> is a
<a href="http://www.railstutorial.org/book">book</a> and
<a href="http://screencasts.railstutorial.org/">screencast series</a>
to teach web development with
<a href="http://rubyonrails.org/">Ruby on Rails</a>.
This is the sample application for the tutorial.
</p>
</body>
</html>
At this point, the test suite should be back to GREEN:
$ rails test
3 tests, 6 assertions, 0 failures, 0 errors, 0 skips
Exercises
Solutions to exercises are available for free at railstutorial.org/aw-solutions with any Rails Tutorial purchase. To see other people’s answers and to record your own, join the Learn Enough Society at learnenough.com/society.
Beginning in this section, we’ll start making modifications to the applications in the exercises that won’t generally be reflected in future code listings. The reason is so that the text makes sense to readers who don’t complete the exercises, but as a result your code will diverge from the main text if you do solve them. Learning to resolve small discrepancies like this is an excellent example of technical sophistication (Box 1.1).
1. You may have noticed some repetition in the Static Pages controller test (Listing 3.24). In particular, the base title, “Ruby on Rails Tutorial Sample App”, is the same for every title test. Using the special function setup, which is automatically run before every test, verify that the tests in Listing 3.30 are still GREEN. (Listing 3.30 uses an instance variable, seen briefly in Section 2.2.2 and covered further in Section 4.4.5, combined with string interpolation, which is covered further in Section 4.2.2.)
Listing 3.30: The Static Pages controller test with a base title. GREEN
test/controllers/static_pages_controller_test.rb
require 'test_helper'
class StaticPagesControllerTest < ActionDispatch::IntegrationTest
def setup
@base_title = "Ruby on Rails Tutorial Sample App"
end
test "should get home" do
get static_pages_home_url
assert_response :success
assert_select "title", "Home | #{@base_title}"
end
test "should get help" do
get static_pages_help_url
assert_response :success
assert_select "title", "Help | #{@base_title}"
end
test "should get about" do
get static_pages_about_url
assert_response :success
assert_select "title", "About | #{@base_title}"
end
end
3.4.3 Layouts and Embedded Ruby (Refactor)
We’ve achieved a lot already in this section, generating three valid pages using Rails controllers and actions, but they are purely static HTML and hence don’t show off the power of Rails. Moreover, they suffer from terrible duplication:
• The page titles are almost (but not quite) exactly the same.
• “Ruby on Rails Tutorial Sample App” is common to all three titles.
• The entire HTML skeleton structure is repeated on each page.
This repeated code is a violation of the important “Don’t Repeat Yourself” (DRY) principle; in this section we’ll “DRY out our code” by removing the repetition. At the end, we’ll re-run the tests from Section 3.4.2 to verify that the titles are still correct.
Paradoxically, we’ll take the first step toward eliminating duplication by first adding some more: we’ll make the titles of the pages, which are currently quite similar, match exactly. This will make it much simpler to remove all the repetition at a stroke.
The technique involves using embedded Ruby in our views. Since the Home, Help, and About page titles have a variable component, we’ll use a special Rails function called provide to set a different title on each page. We can see how this works by replacing the literal title “Home” in the home.html.erb view with the code in Listing 3.31.
Listing 3.31: The view for the Home page with an embedded Ruby title. GREEN
app/views/static_pages/home.html.erb
<% provide(:title, "Home") %>
<!DOCTYPE html>
<html>
<head>
<title><%= yield(:title) %> | Ruby on Rails Tutorial Sample App</title>
</head>
<body>
<h1>Sample App</h1>
<p>
This is the home page for the
<a href="http://www.railstutorial.org/">Ruby on Rails Tutorial</a>
sample application.
</p>
</body>
</html>
Listing 3.31 is our first example of embedded Ruby, also called ERb. (Now you know why HTML views have the file extension .html.erb.) ERb is the primary template system for including dynamic content in web pages.13 The code
13. There is a second popular template system called Haml (note: not “HAML”), which I personally love, but it’s not quite standard enough for use in an introductory tutorial.
<% provide(:title, "Home") %>
indicates using <% ... %> that Rails should call the provide function and associate the string "Home" with the label :title.14 Then, in the title, we use the closely related notation <%= ... %> to insert the title into the template using Ruby’s yield function:15
14. Experienced Rails developers might have expected the use of content_for at this point, but it doesn’t work well with the asset pipeline. The provide function is its replacement.
15. If you’ve studied Ruby before, you might suspect that Rails is yielding the contents to a block, and your suspicion would be correct. But you don’t need to know this to develop applications with Rails.
<title><%= yield(:title) %> | Ruby on Rails Tutorial Sample App</title>
(The distinction between the two types of embedded Ruby is that <% ... %> executes the code inside, while <%= ... %> executes it and inserts the result into the template.) The resulting page is exactly the same as before, only now the variable part of the title is generated dynamically by ERb.
We can verify that all this works by running the tests from Section 3.4.2 and see that they are still GREEN:
$ rails test
3 tests, 6 assertions, 0 failures, 0 errors, 0 skips
Then we can make the corresponding replacements for the Help and About pages (Listing 3.33 and Listing 3.34).
Listing 3.33: The view for the Help page with an embedded Ruby title. GREEN
app/views/static_pages/help.html.erb
<% provide(:title, "Help") %>
<!DOCTYPE html>
<html>
<head>
<title><%= yield(:title) %> | Ruby on Rails Tutorial Sample App</title>
</head>
<body>
<h1>Help</h1>
<p>
Get help on the Ruby on Rails Tutorial at the
<a href="http://www.railstutorial.org/help">Rails Tutorial help
section</a>.
To get help on this sample app, see the
<a href="http://www.railstutorial.org/book"><em>Ruby on Rails
Tutorial</em> book</a>.
</p>
</body>
</html>
Listing 3.34: The view for the About page with an embedded Ruby title. GREEN
app/views/static_pages/about.html.erb
<% provide(:title, "About") %>
<!DOCTYPE html>
<html>
<head>
<title><%= yield(:title) %> | Ruby on Rails Tutorial Sample App</title>
</head>
<body>
<h1>About</h1>
<p>
The <a href="http://www.railstutorial.org/"><em>Ruby on Rails
Tutorial</em></a> is a
<a href="http://www.railstutorial.org/book">book</a> and
<a href="http://screencasts.railstutorial.org/">screencast series</a>
to teach web development with
<a href="http://rubyonrails.org/">Ruby on Rails</a>.
This is the sample application for the tutorial.
</p>
</body>
</html>
Now that we’ve replaced the variable part of the page titles with ERb, each of our pages looks something like this:
<% provide(:title, "The Title") %>
<!DOCTYPE html>
<html>
<head>
<title><%= yield(:title) %> | Ruby on Rails Tutorial Sample App</title>
</head>
<body>
Contents
</body>
</html>
In other words, all the pages are identical in structure, including the contents of the title tag, with the sole exception of the material inside the body tag.
In order to factor out this common structure, Rails comes with a special layout file called application.html.erb, which we renamed in the beginning of this section (Section 3.4) and which we’ll now restore:
$ mv layout_file app/views/layouts/application.html.erb
To get the layout to work, we have to replace the default title with the embedded Ruby from the examples above:
<title><%= yield(:title) %> | Ruby on Rails Tutorial Sample App</title>
The resulting layout appears in Listing 3.35.
Listing 3.35: The sample application site layout. GREEN
app/views/layouts/application.html.erb
<!DOCTYPE html>
<html>
<head>
<title><%= yield(:title) %> | Ruby on Rails Tutorial Sample App</title>
<%= csrf_meta_tags %>
<%= stylesheet_link_tag 'application', media: 'all',
'data-turbolinks-track': 'reload' %>
<%= javascript_include_tag 'application', 'data-turbolinks-track': 'reload' %>
</head>
<body>
<%= yield %>
</body>
</html>
Note here the special line
<%= yield %>
This code is responsible for inserting the contents of each page into the layout. It’s not important to know exactly how this works; what matters is that using this layout ensures that, for example, visiting the page /static_pages/home converts the contents of home.html.erb to HTML and then inserts it in place of <%= yield %>.
It’s also worth noting that the default Rails layout includes several additional lines:
<%= csrf_meta_tags %>
<%= stylesheet_link_tag ... %>
<%= javascript_include_tag "application", ... %>
This code arranges to include the application stylesheet and JavaScript, which are part of the asset pipeline (Section 5.2.1), together with the Rails method csrf_meta_tags, which prevents cross-site request forgery (CSRF), a type of malicious web attack.
Of course, the views in Listing 3.31, Listing 3.33, and Listing 3.34 are still filled with all the HTML structure included in the layout, so we have to remove it, leaving only the interior contents. The resulting cleaned-up views appear in Listing 3.36, Listing 3.37, and Listing 3.38.
Listing 3.36: The Home page with HTML structure removed. GREEN
app/views/static_pages/home.html.erb
<% provide(:title, "Home") %>
<h1>Sample App</h1>
<p>
This is the home page for the
<a href="http://www.railstutorial.org/">Ruby on Rails Tutorial</a>
sample application.
</p>
Listing 3.37: The Help page with HTML structure removed. GREEN
app/views/static_pages/help.html.erb
<% provide(:title, "Help") %>
<h1>Help</h1>
<p>
Get help on the Ruby on Rails Tutorial at the
<a href="http://www.railstutorial.org/help">Rails Tutorial help section</a>.
To get help on this sample app, see the
<a href="http://www.railstutorial.org/book"><em>Ruby on Rails Tutorial</em>
book</a>.
</p>
Listing 3.38: The About page with HTML structure removed. GREEN
app/views/static_pages/about.html.erb
<% provide(:title, "About") %>
<h1>About</h1>
<p>
The <a href="http://www.railstutorial.org/"><em>Ruby on Rails
Tutorial</em></a> is a
<a href="http://www.railstutorial.org/book">book</a> and
<a href="http://screencasts.railstutorial.org/">screencast series</a>
to teach web development with
<a href="http://rubyonrails.org/">Ruby on Rails</a>.
This is the sample application for the tutorial.
</p>
With these views defined, the Home, Help, and About pages are the same as before, but they have much less duplication.
Experience shows that even fairly simple refactoring is error-prone and can easily go awry. This is one reason why having a good test suite is so valuable. Rather than doublechecking every page for correctness—a procedure that isn’t too hard early on but rapidly becomes unwieldy as an application grows—we can simply verify that the test suite is still GREEN:
$ rails test
3 tests, 6 assertions, 0 failures, 0 errors, 0 skips
This isn’t a proof that our code is still correct, but it greatly increases the probability, thereby providing a safety net to protect us against future bugs.
Exercises
Solutions to exercises are available for free at railstutorial.org/aw-solutions with any Rails Tutorial purchase. To see other people’s answers and to record your own, join the Learn Enough Society at learnenough.com/society.
1. Make a Contact page for the sample app.16 Following the model in Listing 3.15, first write a test for the existence of a page at the URL /static_pages/contact by testing for the title “Contact | Ruby on Rails Tutorial Sample App”. Get your test to pass by following the same steps as when making the About page in Section 3.3.3, including filling the Contact page with the content from Listing 3.40.
16. This exercise is solved in Section 5.3.1.
Listing 3.40: Code for a proposed Contact page.
app/views/static_pages/contact.html.erb
<% provide(:title, "Contact") %>
<h1>Contact</h1>
<p>
Contact the Ruby on Rails Tutorial about the sample app at the
<a href="http://www.railstutorial.org/contact">contact page</a>.
</p>
3.4.4 Setting the Root Route
Now that we’ve customized our site’s pages and gotten a good start on the test suite, let’s set the application’s root route before moving on. As in Section 1.3.4 and Section 2.2.2, this involves editing the routes.rb file to connect / to a page of our choice, which in this case will be the Home page. (At this point, I also recommend removing the hello action from the Application controller if you added it in Section 3.1.) As shown in Listing 3.41, this means changing the root route from
root 'application#hello'
to
root 'static_pages#home'
This arranges for requests for / to be routed to the home action in the Static Pages controller. The resulting routes file is shown in Figure 3.7.
Listing 3.41: Setting the root route to the Home page.
config/routes.rb
Rails.application.routes.draw do
root 'static_pages#home'
get 'static_pages/home'
get 'static_pages/help'
get 'static_pages/about'
end

Exercises
Solutions to exercises are available for free at railstutorial.org/aw-solutions with any Rails Tutorial purchase. To see other people’s answers and to record your own, join the Learn Enough Society at learnenough.com/society.
1. Adding the root route in Listing 3.41 leads to the creation of a Rails helper called root_url (in analogy with helpers like static_pages_home_url). By filling in the code marked FILL_IN in Listing 3.42, write a test for the root route.
2. Due to the code in Listing 3.41, the test in the previous exercise is already GREEN. In such a case, it’s harder to be confident that we’re actually testing what we think we’re testing, so modify the code in Listing 3.41 by commenting out the root route to get to RED (Listing 3.43). (We’ll talk more about Ruby comments in Section 4.2.1.) Then uncomment it (thereby restoring the original Listing 3.41) and verify that you get back to GREEN.
Listing 3.42: A test for the root route. GREEN
test/controllers/static_pages_controller_test.rb
require 'test_helper'
class StaticPagesControllerTest < ActionDispatch::IntegrationTest
test "should get about" do
get FILL_IN
assert_response FILL_IN
end
test "should get home" do
get static_pages_home_url
assert_response :success
end
test "should get help" do
get static_pages_help_url
assert_response :success
end
test "should get about" do
get static_pages_about_url
assert_response :success
end
end
Listing 3.43: Commenting out the root route to get a failing test. RED
config/routes.rb
Rails.application.routes.draw do
# root 'static_pages#home'
get 'static_pages/home'
get 'static_pages/help'
get 'static_pages/about'
end
3.5 Conclusion
Seen from the outside, this chapter hardly accomplished anything: we started with static pages, and ended with… mostly static pages. But appearances are deceiving: by developing in terms of Rails controllers, actions, and views, we are now in a position to add arbitrary amounts of dynamic content to our site. Seeing exactly how this plays out is the task for the rest of this tutorial.
Before moving on, let’s take a minute to commit the changes on our topic branch and merge them into the master branch. Back in Section 3.2 we created a Git branch for the development of static pages. If you haven’t been making commits as we’ve been moving along, first make a commit indicating that we’ve reached a stopping point:
$ git add -A
$ git commit -m "Finish static pages"
Then merge the changes back into the master branch using the same technique as in Section 1.4.4:17
17. If you get an error message saying that the Spring process id (pid) file would be overwritten by the merge, just remove the file using rm -f *.pid at the command line.
$ git checkout master
$ git merge static-pages
Once you reach a stopping point like this, it’s usually a good idea to push your code up to a remote repository (which, if you followed the steps in Section 1.4.3, will be Bitbucket):
$ git push
I also recommend deploying the application to Heroku:
$ rails test
$ git push heroku
Here we’ve taken care to run the test suite before deploying, which is a good habit to develop.
3.5.1 What We Learned in This Chapter
• For a third time, we went through the full procedure of creating a new Rails application from scratch, installing the necessary gems, pushing it up to a remote repository, and deploying it to production.
• The rails script generates a new controller with rails generate controller ControllerName <optional action names>.
• New routes are defined in the file config/routes.rb.
• Rails views can contain static HTML or embedded Ruby (ERb).
• Automated testing allows us to write test suites that drive the development of new features, allow for confident refactoring, and catch regressions.
• Test-driven development uses a “Red, Green, Refactor” cycle.
• Rails layouts allow the use of a common template for pages in our application, thereby eliminating duplication.
3.6 Advanced Testing Setup
This optional section describes the testing setup used in the Ruby on Rails Tutorial screencast series. There are two main elements: an enhanced pass/fail reporter (Section 3.6.1), and an automated test runner that detects file changes and automatically runs the corresponding tests (Section 3.6.2). The code in this section is advanced and is presented for convenience only; you are not expected to understand it at this time.
The changes in this section should be made on the master branch:
$ git checkout master
3.6.1 Minitest Reporters
To get the default Rails tests to show RED and GREEN at the appropriate times, I recommend adding the code in Listing 3.44 to your test helper file,18 thereby making use of the minitest-reporters gem included in Listing 3.2.
18. The code in Listing 3.44 mixes single- and double-quoted strings. This is because rails new generates single-quoted strings, whereas the minitest reporters documentation uses double-quoted strings. This mixing of the two string types is common in Ruby; see Section 4.2.2 for more information.
Listing 3.44: Configuring the tests to show RED and GREEN.
test/test_helper.rb
ENV['RAILS_ENV'] ||= 'test'
require File.expand_path('../../config/environment', __FILE__ )
require 'rails/test_help'
require "minitest/reporters"
Minitest::Reporters.use!
class ActiveSupport::TestCase
# Setup all fixtures in test/fixtures/*.yml for all tests in alphabetical order.
fixtures :all
# Add more helper methods to be used by all tests here...
end
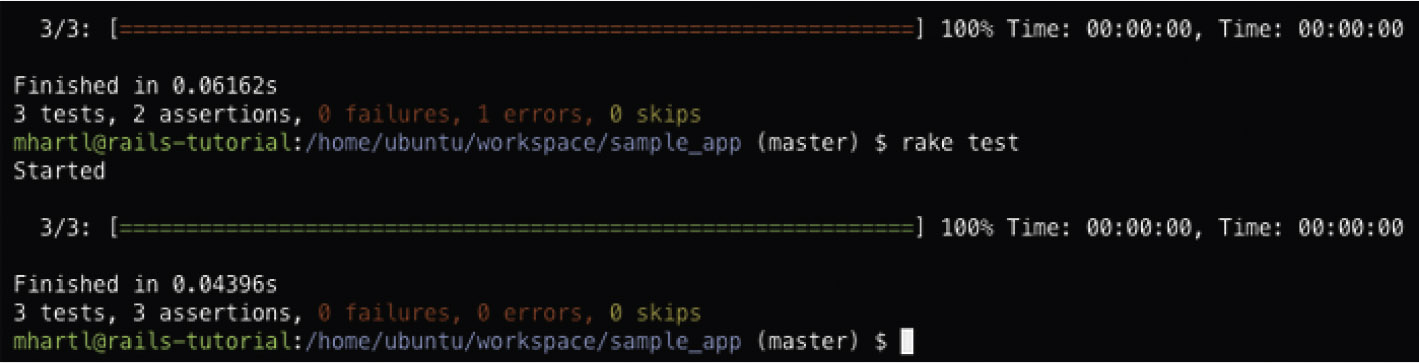
The resulting transition from RED to GREEN in the cloud IDE appears as in Figure 3.8.19
19. The screenshot was taken using Rails 4.2, which as noted in Box 2.1 uses rake test in place of rails test. Resolving such minor discrepancies is a good exercise in technical sophistication (Box 1.1).
3.6.2 Automated Tests with Guard
One annoyance associated with using the rails test command is having to switch to the command line and run the tests by hand. To avoid this inconvenience, we can use Guard to automate the running of the tests. Guard monitors changes in the filesystem so that, for example, when we change the static_pages_controller_test.rb file, only those tests get run. Even better, we can configure Guard so that when, say, the home.html.erb file is modified, the static_pages_controller_test.rb automatically runs.
The Gemfile in Listing 3.2 has already included the guard gem in our application, so to get started we just need to initialize it:
$ bundle exec guard init
Writing new Guardfile to /home/ubuntu/workspace/sample_app/Guardfile
00:51:32 INFO minitest guard added to Guardfile, feel free to edit it
We then edit the resulting Guardfile so that Guard will run the right tests when the integration tests and views are updated (Listing 3.45). (Given its length and advanced nature, I recommend just copy-and-pasting the contents of Listing 3.45.)
Note: As of this writing, there is an interaction bug between Guard and Spring that causes all the tests to run every time. I’m keeping an eye on the issue and will update this section when it’s resolved.
Listing 3.45: A custom Guardfile.
# Defines the matching rules for Guard.
guard :minitest, spring: "bin/rails test", all_on_start: false do
watch(%r{^test/(.*)/?(.*)_test.rb$})
watch('test/test_helper.rb') { 'test' }
watch('config/routes.rb') { integration_tests }
watch(%r{^app/models/(.*?).rb$}) do |matches|
"test/models/#{matches[1]}_test.rb"
end
watch(%r{^app/controllers/(.*?)_controller.rb$}) do |matches|
resource_tests(matches[1])
end
watch(%r{^app/views/([^/]*?)/.*.html.erb$}) do |matches|
["test/controllers/#{matches[1]}_controller_test.rb"] +
integration_tests(matches[1])
end
watch(%r{^app/helpers/(.*?)_helper.rb$}) do |matches|
integration_tests(matches[1])
end
watch('app/views/layouts/application.html.erb') do
'test/integration/site_layout_test.rb'
end
watch('app/helpers/sessions_helper.rb') do
integration_tests << 'test/helpers/sessions_helper_test.rb'
end
watch('app/controllers/sessions_controller.rb') do
['test/controllers/sessions_controller_test.rb',
'test/integration/users_login_test.rb']
end
watch('app/controllers/account_activations_controller.rb') do
'test/integration/users_signup_test.rb'
end
watch(%r{app/views/users/*}) do
resource_tests('users') +
['test/integration/microposts_interface_test.rb']
end
end
# Returns the integration tests corresponding to the given resource.
def integration_tests(resource = :all)
if resource == :all
Dir["test/integration/*"]
else
Dir["test/integration/#{resource}_*.rb"]
end
end
# Returns the controller tests corresponding to the given resource.
def controller_test(resource)
"test/controllers/#{resource}_controller_test.rb"
end
# Returns all tests for the given resource.
def resource_tests(resource)
integration_tests(resource) << controller_test(resource)
end
Here the line
guard :minitest, spring: "bin/rails test", all_on_start: false do
causes Guard to use the Spring server supplied by Rails to speed up loading times, while also preventing Guard from running the full test suite upon starting.
To prevent conflicts between Spring and Git when using Guard, you should add the spring/ directory to the .gitignore file used by Git to determine what to ignore when adding files or directories to the repository. The way to do this using the cloud IDE is as follows:
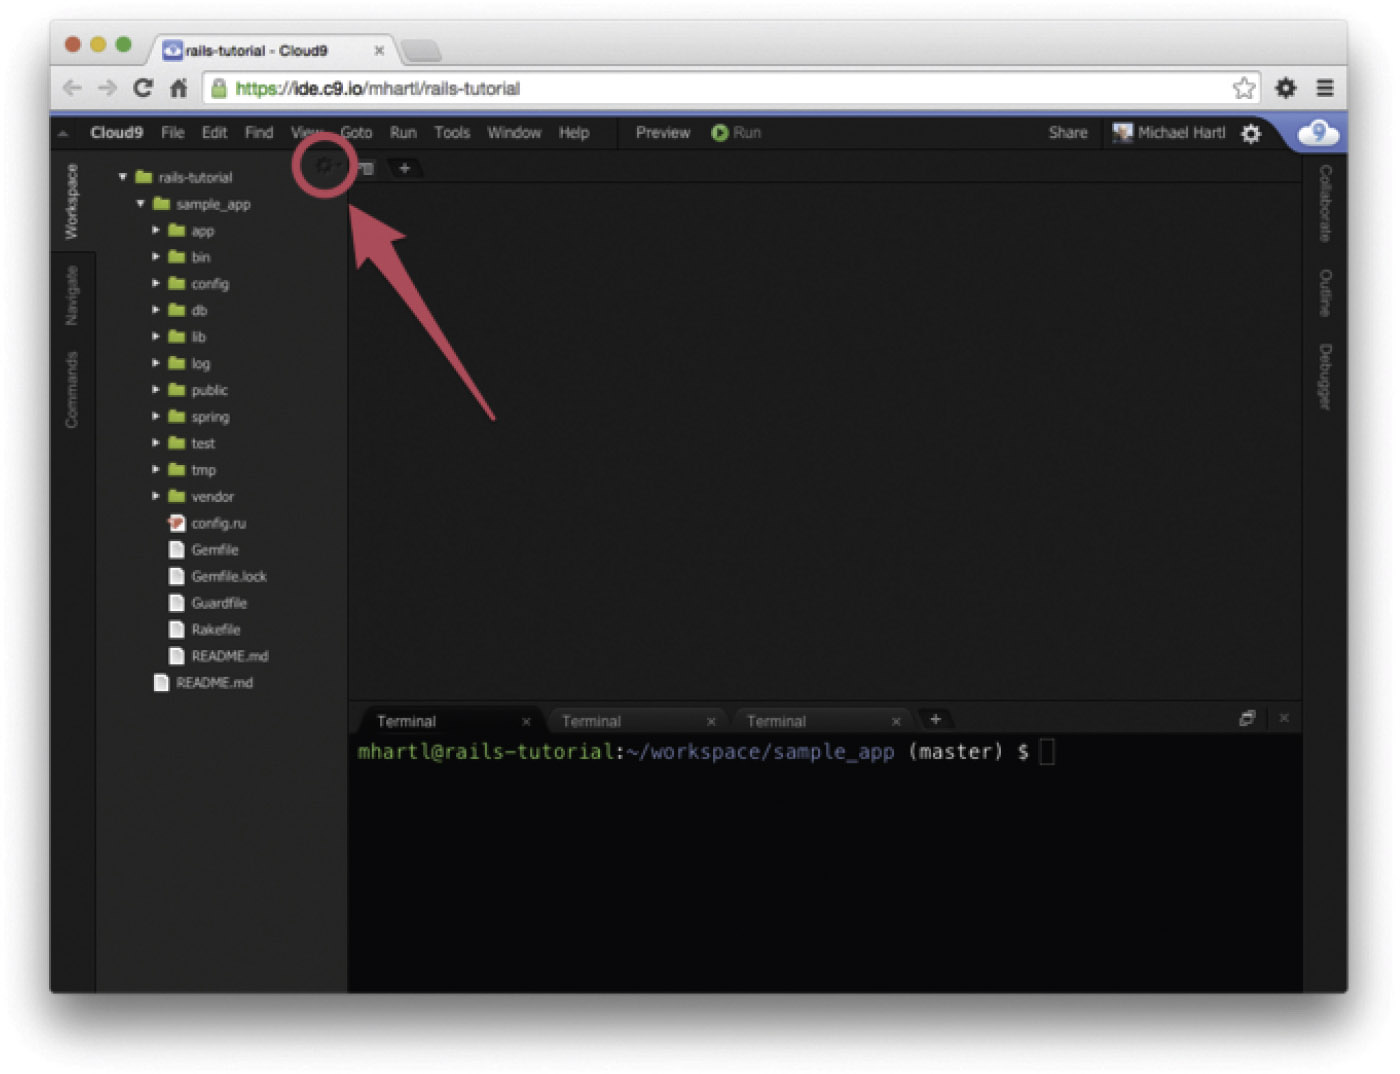
1. Click on the gear icon in the upper right part of the file navigation pane (Figure 3.9).
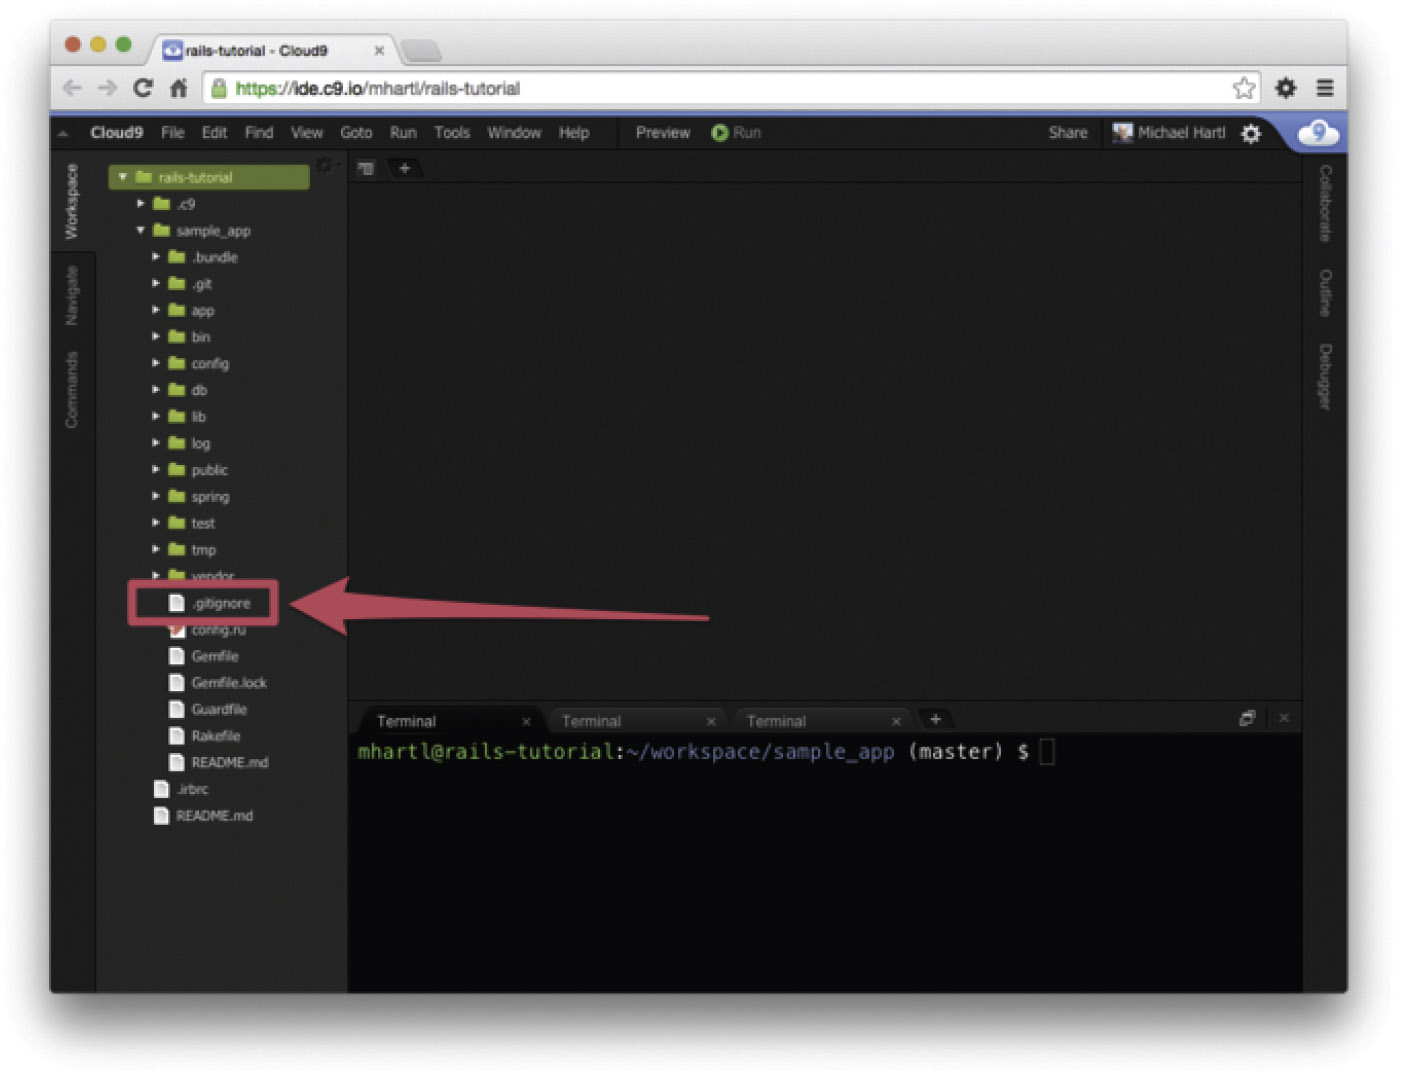
2. Select “Show hidden files” to show the .gitignore file in the application’s root directory (Figure 3.10).
3. Double-click on the .gitignore file (Figure 3.11) to open it, and then fill it with the contents of Listing 3.46.
Listing 3.46: Adding Spring to the .gitignore file.
# See https://help.github.com/articles/ignoring-files for more about
# ignoring files.
#
# If you find yourself ignoring temporary files generated by your text editor
# or operating system, you probably want to add a global ignore instead:
# git config --global core.excludesfile '˜/.gitignore_global'
# Ignore bundler config.
/.bundle
# Ignore the default SQLite database.
/db/*.sqlite3
/db/*.sqlite3-journal
# Ignore all logfiles and tempfiles.
/log/*
/tmp/*
!/log/.keep
!/tmp/.keep
# Ignore Byebug command history file.
.byebug_history
# Ignore Spring files.
/spring/*.pid

The Spring server is still a little quirky as of this writing, and sometimes Spring processes will accumulate and slow performance of your tests. If your tests seem to be getting unusually sluggish, it’s thus a good idea to inspect the system processes and kill them if necessary (Box 3.4).
Once Guard is configured, you should open a new terminal and (as with the Rails server in Section 1.3.2) run it at the command line as follows:
$ bundle exec guard
The rules in Listing 3.45 are optimized for this tutorial, automatically running (for example) the integration tests when a controller is changed. To run all the tests, hit return at the guard> prompt. (This may sometimes give an error indicating a failure to connect to the Spring server. To fix the problem, just hit return again.)
To exit Guard, press Ctrl-D. To add additional matchers to Guard, refer to the examples in Listing 3.45, the Guard README, and the Guard wiki.
Before proceeding, you should add your changes and make a commit: