
Chapter 14. Following Users
In this chapter, we will complete the Rails Tutorial sample application by adding a social layer that allows users to follow (and unfollow) other users, resulting in each user’s Home page displaying a status feed of the followed users’ microposts. We’ll start by learning how to model relationships between users in Section 14.1, and we’ll build the corresponding web interface in Section 14.2 (including an introduction to Ajax). We’ll end by developing a fully functional status feed in Section 14.3.
This final chapter contains some of the most challenging material in the tutorial, including some Ruby/SQL trickery to make the status feed. Through these examples, you will see how Rails can handle even rather intricate data models, which should serve you well as you go on to develop your own applications with their own specific requirements. To help with the transition from tutorial to independent development, Section 14.4 offers some pointers to more advanced resources.
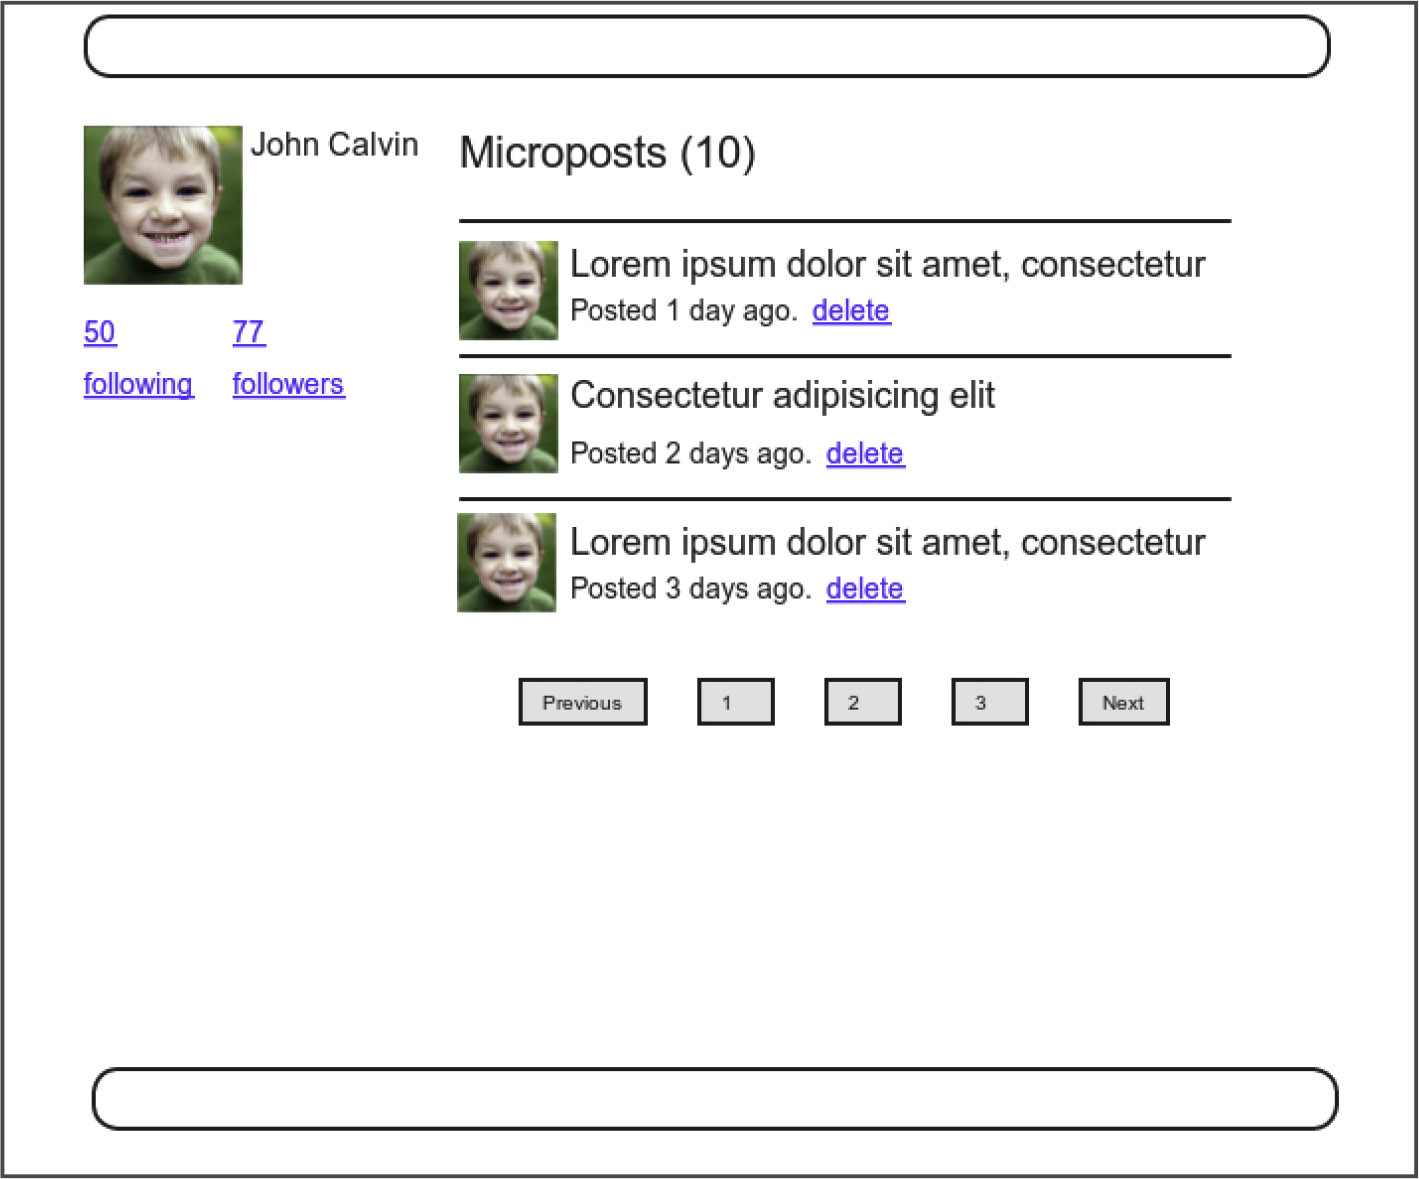
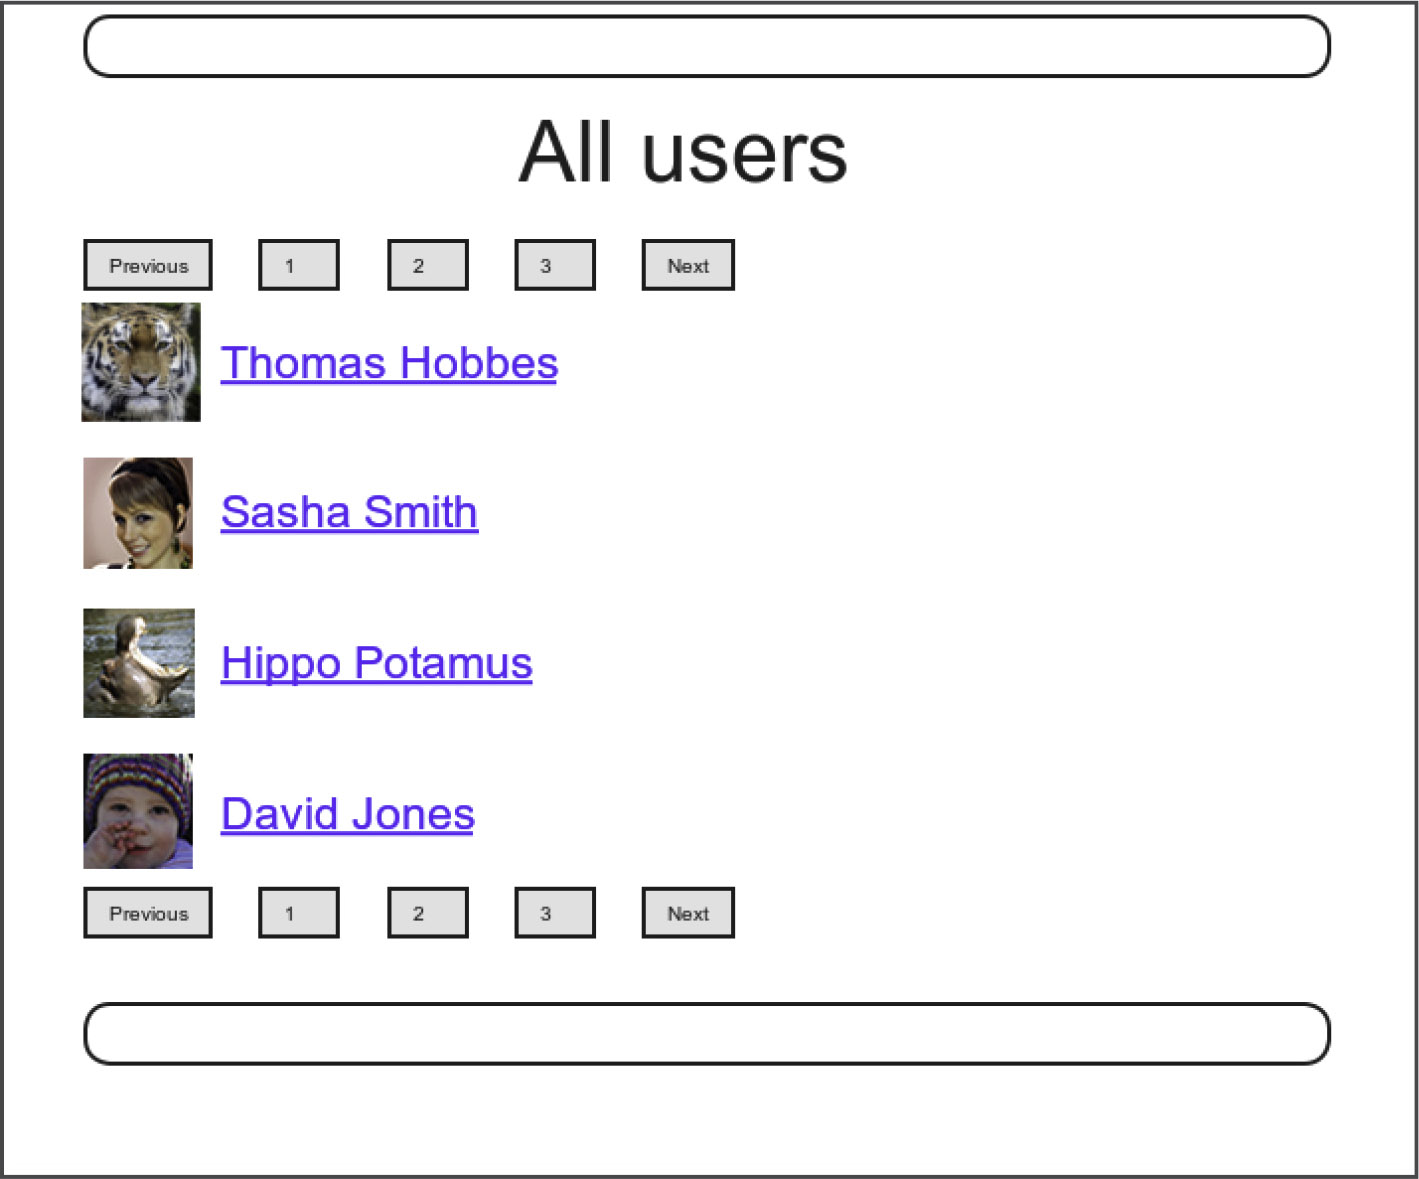
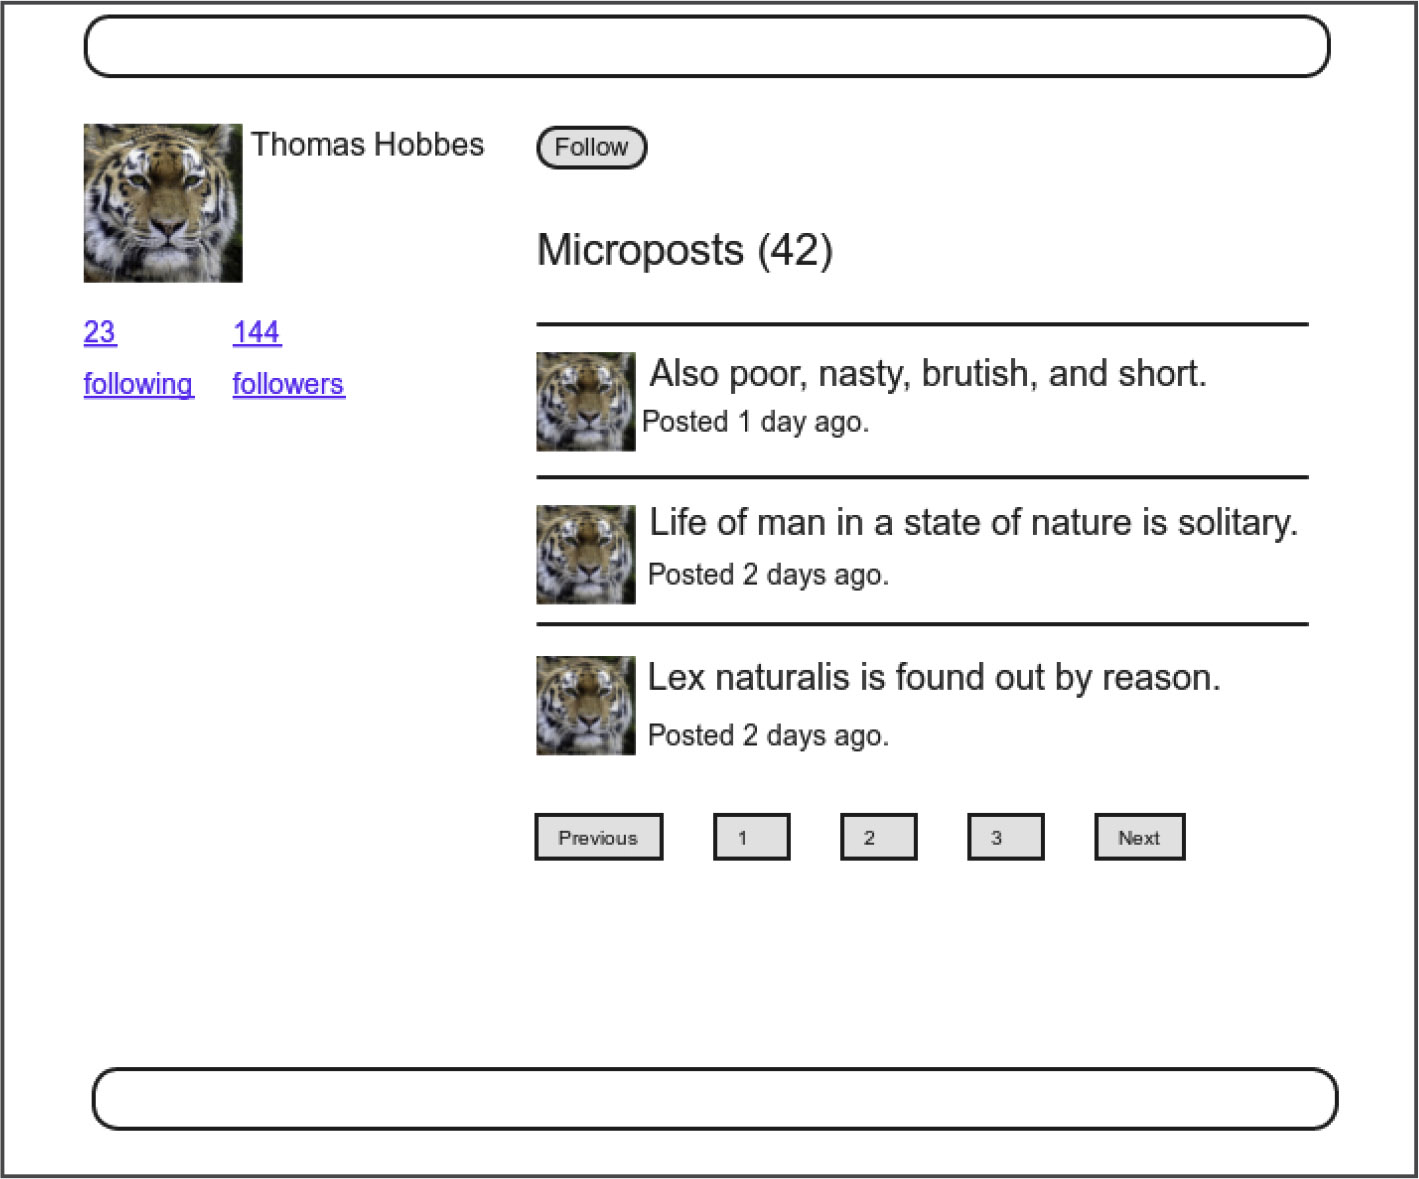
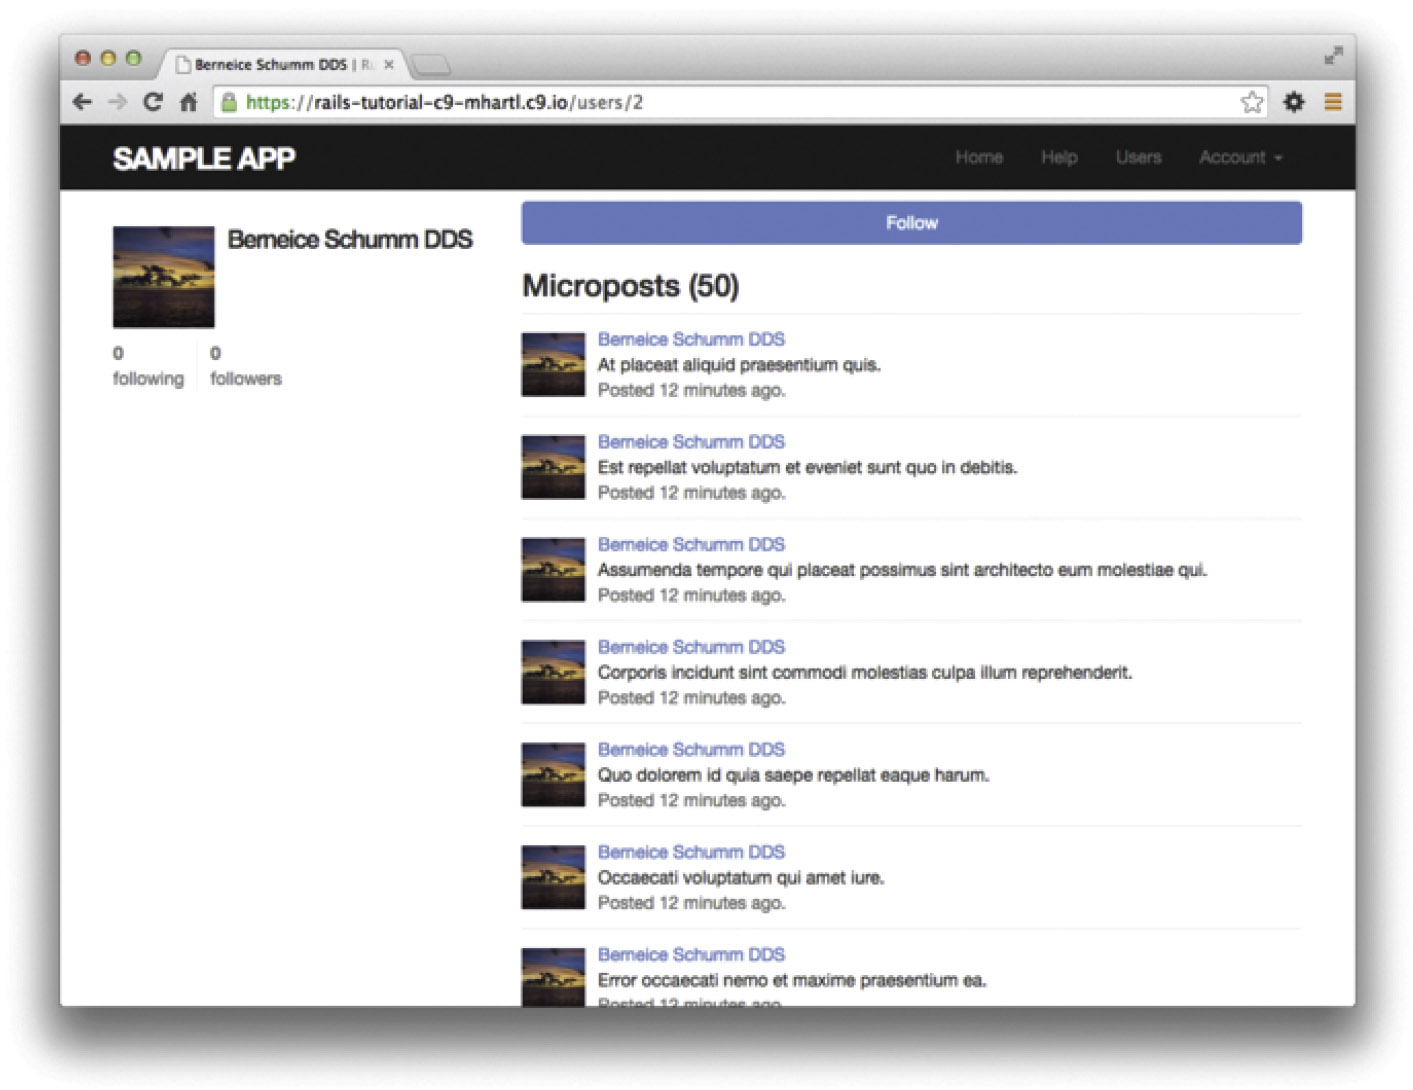
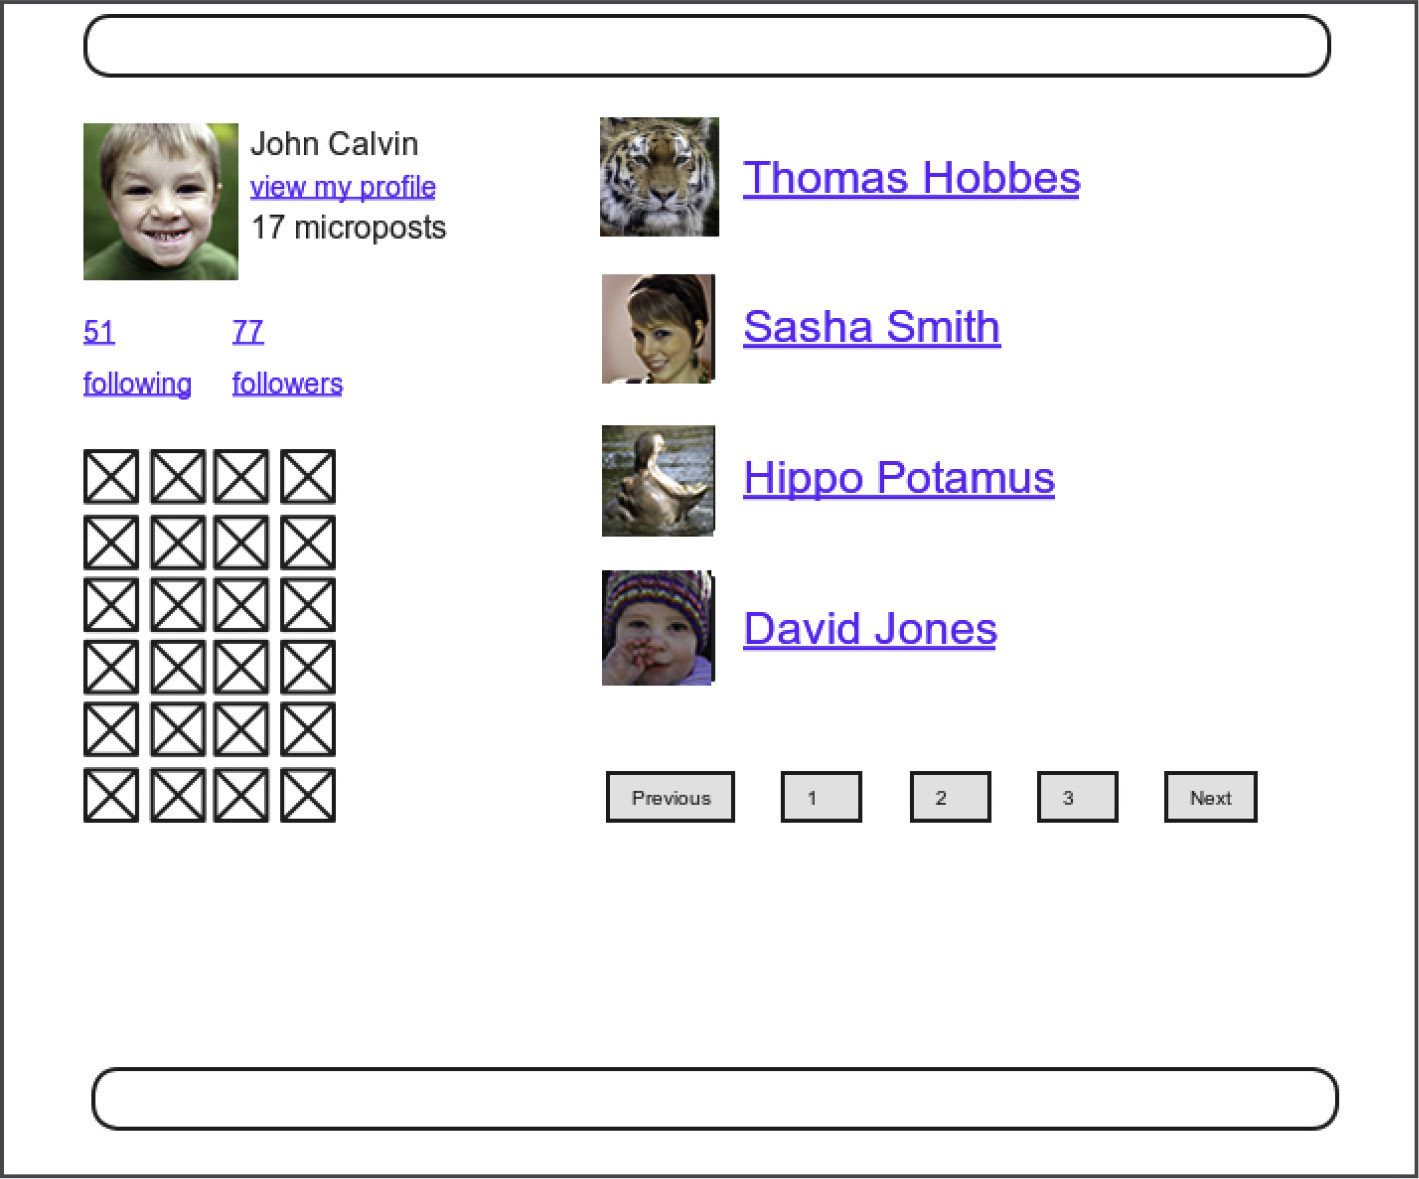
Because the material in this chapter is particularly challenging, before writing any code we’ll pause for a moment and take a tour of the interface. As in previous chapters, at this early stage we’ll represent pages using mockups.1 The full page flow runs as follows: a user (John Calvin) starts at his profile page (Figure 14.1) and navigates to the Users page (Figure 14.2) to select a user to follow. Calvin navigates to the profile of a second user, Thomas Hobbes (Figure 14.3, page 682), clicking on the “Follow” button to follow that user. This changes the “Follow” button to “Unfollow” and increments Hobbes’s “followers” count by one (Figure 14.4, page 683). Navigating to his home page, Calvin now sees an incremented “following” count and finds Hobbes’s microposts in his status feed (Figure 14.5, page 684). The rest of this chapter is dedicated to making this page flow actually work.
1. Image of child retrieved from http://www.flickr.com/photos/john_lustig/2518452221/ on 2013-12-16. Copyright © 2008 by John Lustig and used unaltered under the terms of the Creative Commons Attribution 2.0 Generic license. Image of tiger retrieved from https://www.flickr.com/photos/renemensen/9187111340 on 2014-08-15. Copyright © 2013 by Rene Mesen and used unaltered under the terms of the Creative Commons Attribution 2.0 Generic license.
14.1 The Relationship Model
Our first step in implementing following users is to construct a data model, which is not as straightforward as it seems. Naïvely, it seems that a has_many relationship would do: a user has_many followed users and has_many followers. As we will see, there is a problem with this approach, and we’ll learn how to fix it using has_many :through.
As usual, Git users should create a new topic branch:
$ git checkout -b following-users
14.1.1 A Problem with the Data Model (and a Solution)
As a first step toward constructing a data model for following users, let’s examine a typical case. For instance, consider a user who follows a second user: we could say that, e.g., Calvin is following Hobbes, and Hobbes is followed by Calvin, so that Calvin is the follower and Hobbes is followed. Using Rails’ default pluralization convention, the set of all users following a given user is that user’s followers, and hobbes.followers is an array of those users. Unfortunately, the reverse doesn’t work: by default, the set of all followed users would be called the followeds, which is ungrammatical and clumsy. We’ll adopt Twitter’s convention and call them following (as in “50 following, 75 followers”), with a corresponding calvin.following array.
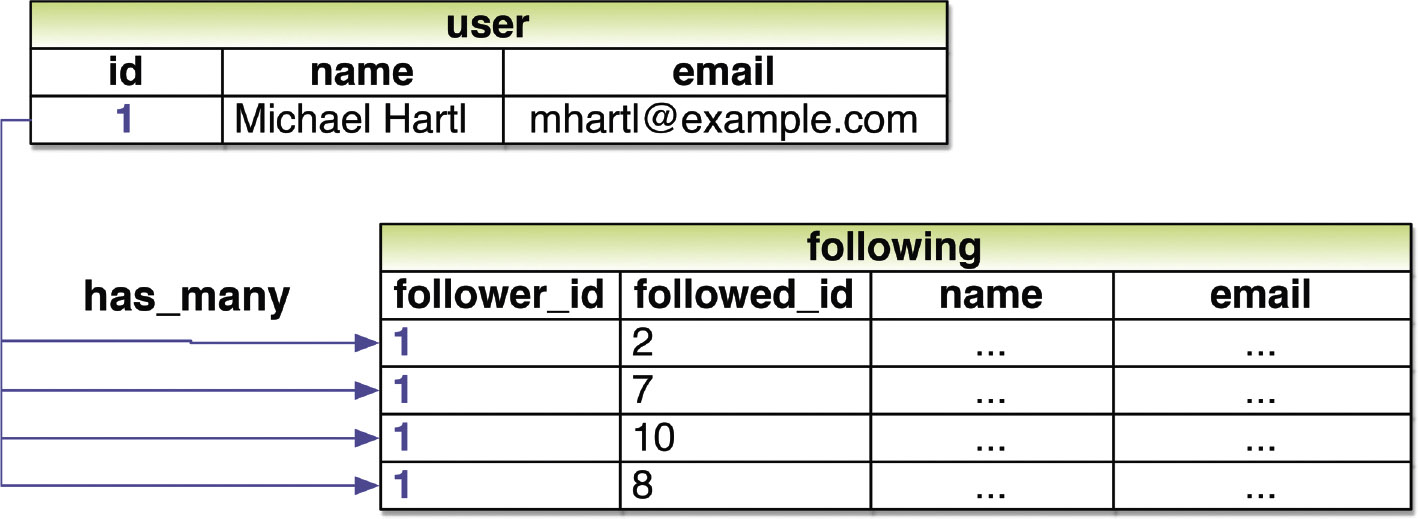
This discussion suggests modeling the followed users as in Figure 14.6, with a following table and a has_many association. Since user.following should be a collection of users, each row of the following table would need to be a user, as identified by the followed_id, together with the follower_id to establish the association.2 In addition, since each row is a user, we would need to include the user’s other attributes, including the name, email, password, etc.
2. For simplicity, Figure 14.6 omits the following table’s id column.

The problem with the data model in Figure 14.6 is that it is terribly redundant: each row contains not only each followed user’s id, but all their other information as well—all of which is already in the users table. Even worse, to model user followers we would need a separate, similarly redundant followers table. Finally, this data model is a maintainability nightmare: each time a user changed (say) their name, we would need to update not just the user’s record in the users table but also every row containing that user in both the following and followers tables.
The problem here is that we are missing an underlying abstraction. One way to find the proper model is to consider how we might implement the act of following in a web application. Recall from Section 7.1.2 that the REST architecture involves resources that are created and destroyed. This leads us to ask two questions: When a user follows another user, what is being created? When a user unfollows another user, what is being destroyed? Upon reflection, we see that in these cases the application should either create or destroy a relationship between two users. A user then has many relationships and has many following (or followers) through these relationships.

There’s an additional detail we need to address regarding our application’s data model: unlike symmetric Facebook-style friendships, which are always reciprocal (at least at the data-model level), Twitter-style following relationships are potentially asymmetric—Calvin can follow Hobbes without Hobbes following Calvin. To distinguish between these two cases, we’ll adopt the terminology of active and passive relationships: if Calvin is following Hobbes but not vice versa, Calvin has an active relationship with Hobbes and Hobbes has a passive relationship with Calvin.3
3. Thanks to reader Paul Fioravanti for suggesting this terminology.
We’ll focus now on using active relationships to generate a list of followed users and consider the passive case in Section 14.1.5. Figure 14.6 suggests how to implement it: since each followed user is uniquely identified by followed_id, we could convert following to an active_relationships table, omit the user details, and use followed_id to retrieve the followed user from the users table. A diagram of the data model appears in Figure 14.7.
Because we’ll end up using the same database table for both active and passive relationships, we’ll use the generic term relationship for the table name, with a corresponding Relationship model. The result is the Relationship data model shown in Figure 14.8. We’ll see starting in Section 14.1.4 how to use the Relationship model to simulate both Active Relationship and Passive Relationship models.

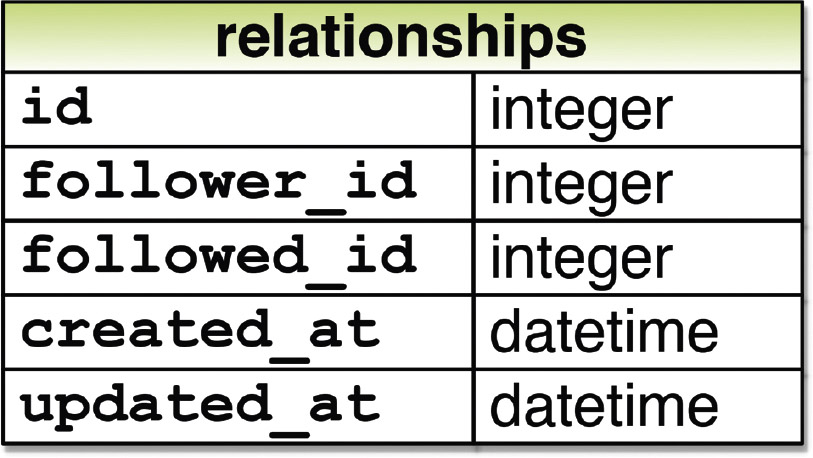
To get started with the implementation, we first generate a migration corresponding to Figure 14.8:
$ rails generate model Relationship follower_id:integer followed_id:integer
Because we will be finding relationships by follower_id and by followed_id, we should add an index on each column for efficiency, as shown in Listing 14.1.
Listing 14.1: Adding indices for the relationships table.
db/migrate/[timestamp]_create_relationships.rb
class CreateRelationships < ActiveRecord::Migration[5.0]
def change
create_table :relationships do |t|
t.integer :follower_id
t.integer :followed_id
t.timestamps
end
add_index :relationships, :follower_id
add_index :relationships, :followed_id
add_index :relationships, [:follower_id, :followed_id], unique: true
end
end
Listing 14.1 also includes a multiple-key index that enforces uniqueness on (follower_ id, followed_id) pairs, so that a user can’t follow another user more than once. (Compare to the email uniqueness index from Listing 6.29 and the multiple-key index in Listing 13.3.) As we’ll see starting in Section 14.1.4, our user interface won’t allow this to happen, but adding a unique index arranges to raise an error if a user tries to create duplicate relationships anyway (for example, by using a command-line tool such as curl).
To create the relationships table, we migrate the database as usual:
$ rails db:migrate
Exercises
Solutions to exercises are available for free at railstutorial.org/solutions with any Rails Tutorial purchase. To see other people’s answers and to record your own, join the Learn Enough Society at learnenough.com/society.
1. For the user with id equal to 1 from Figure 14.7, what would the value of user.following.map(&:id) be? (Recall the map(&:method_name) pattern from Section 4.3.2; user.following.map(&:id) just returns the array of ids.)
2. By referring again to Figure 14.7, determine the ids of user.following for the user with id equal to 2. What would the value of user.following.map(&:id) be for this user?
14.1.2 User/Relationship Associations
Before implementing user following and followers, we first need to establish the association between users and relationships. A user has_many relationships, and—since relationships involve two users—a relationship belongs_to both a follower and a followed user.
As with microposts in Section 13.1.3, we will create new relationships using the user association, with code such as
user.active_relationships.build(followed_id: ...)
At this point, you might expect application code as in Section 13.1.3, and it’s similar, but there are two key differences.
First, in the case of the user/micropost association we could write
class User < ApplicationRecord
has_many :microposts
.
.
.
end
This works because by convention Rails looks for a Micropost model corresponding to the :microposts symbol.4 In the present case, though, we want to write
4. Technically, Rails converts the argument of has_many to a class name using the classify method, which converts "foo_bars" to "FooBar".
has_many :active_relationships
even though the underlying model is called Relationship. We will thus have to tell Rails the model class name to look for.
Second, before we wrote
class Micropost < ApplicationRecord
belongs_to :user
.
.
.
end
in the Micropost model. This works because the microposts table has a user_id attribute to identify the user (Section 13.1.1). An id used in this manner to connect two database tables is known as a foreign key, and when the foreign key for a User model object is user_id, Rails infers the association automatically: by default, Rails expects a foreign key of the form <class>_id, where <class> is the lowercase version of the class name.5 In the present case, although we are still dealing with users, the user following another user is now identified with the foreign key follower_id, so we have to tell that to Rails.
5. Technically, Rails uses the underscore method to convert the class name to an id. For example, "FooBar".underscore is "foo_bar", so the foreign key for a FooBar object would be foo_bar_id.
The result of the above discussion is the user/relationship association shown in Listing 14.2 and Listing 14.3.
Listing 14.2: Implementing the active relationships has_many association.
app/models/user.rb
class User < ApplicationRecord
has_many :microposts, dependent: :destroy
has_many :active_relationships, class_name: "Relationship",
foreign_key: "follower_id",
dependent: : destroy
.
.
.
end
(Since destroying a user should also destroy that user’s relationships, we’ve added dependent: :destroy to the association.)
Listing 14.3: Adding the follower belongs_to association to the Relationship model.
app/models/relationship.rb
class Relationship < ApplicationRecord
belongs_to :follower, class_name: "User"
belongs_to :followed, class_name: "User"
end
The followed association isn’t actually needed until Section 14.1.4, but the parallel follower/followed structure is clearer if we implement them both at the same time.
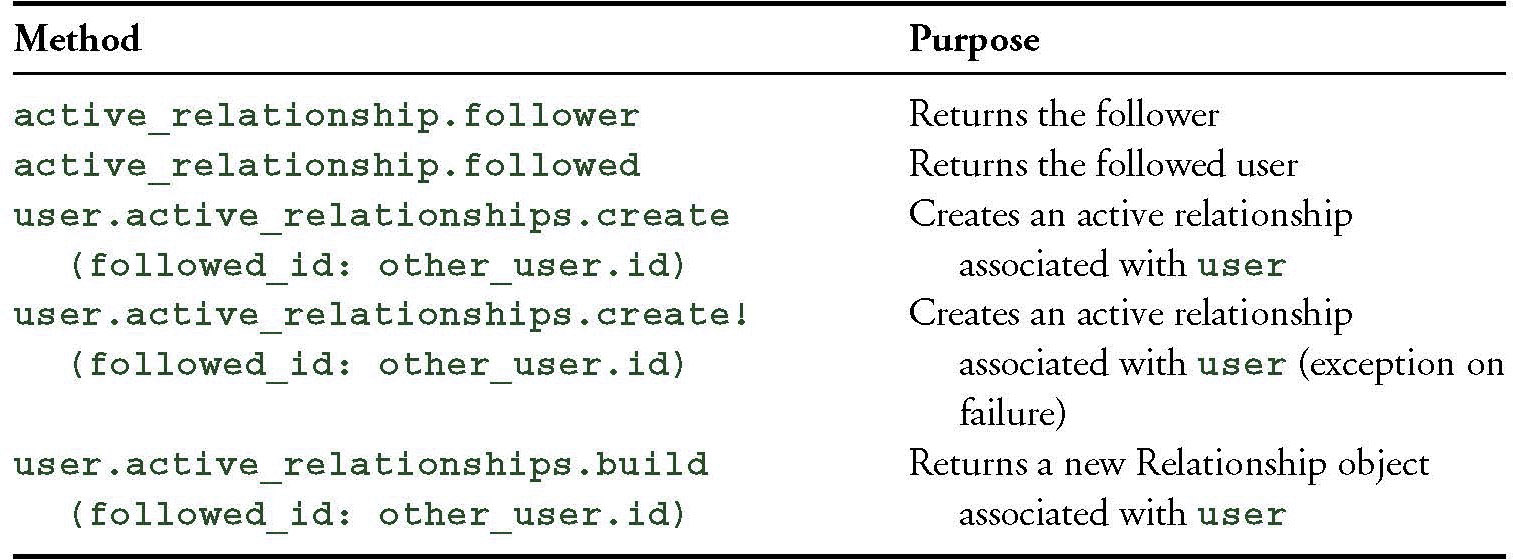
The relationships in Listing 14.2 and Listing 14.3 give rise to methods analogous to the ones we saw in Table 13.1, as shown in Table 14.1.
Exercises
Solutions to exercises are available for free at railstutorial.org/solutions with any Rails Tutorial purchase. To see other people’s answers and to record your own, join the Learn Enough Society at learnenough.com/society.
1. Using the create method from Table 14.1 in the console, create an active relationship for the first user in the database where the followed id is the second user.
2. Confirm that the values for active_relationship.followed and active_relationship.follower are correct.
Table 14.1: A summary of user/active relationship association methods.
14.1.3 Relationship Validations
Before moving on, we’ll add a couple of Relationship model validations for completeness. The tests (Listing 14.4) and application code (Listing 14.5) are straightforward. As with the generated user fixture from Listing 6.30, the generated relationship fixture also violates the uniqueness constraint imposed by the corresponding migration (Listing 14.1). The solution—removing the fixture contents as in Listing 6.31—is also the same, as seen in Listing 14.6.
Listing 14.4: Testing the Relationship model validations.
test/models/relationship_test.rb
require 'test_helper'
class RelationshipTest < ActiveSupport::TestCase
def setup
@relationship = Relationship.new(follower_id: users(:michael).id,
followed_id: users(:archer).id)
end
test "should be valid" do
assert @relationship.valid?
end
test "should require a follower_id" do
@relationship.follower_id = nil
assert_not @relationship.valid?
end
test "should require a followed_id" do
@relationship.followed_id = nil
assert_not @relationship.valid?
end
end
Listing 14.5: Adding the Relationship model validations.
app/models/relationship.rb
class Relationship < ApplicationRecord
belongs_to :follower, class_name: "User"
belongs_to :followed, class_name: "User"
validates :follower_id, presence: true
validates :followed_id, presence: true
end
Listing 14.6: Removing the contents of the relationship fixture. GREEN
test/fixtures/relationships.yml
# empty
At this point, the tests should be GREEN:
$ rails test
Exercises
Solutions to exercises are available for free at railstutorial.org/solutions with any Rails Tutorial purchase. To see other people’s answers and to record your own, join the Learn Enough Society at learnenough.com/society.
1. Verify by commenting out the validations in Listing 14.5 that the tests still pass. (This is a change as of Rails 5, and in previous versions of Rails the validations are required. We’ll plan to leave them in for completeness, but it’s worth bearing in mind that you may see these validations omitted in other people’s code.)
14.1.4 Followed Users
We come now to the heart of the Relationship associations: following and followers. Here we will use has_many :through for the first time: a user has many following through relationships, as illustrated in Figure 14.7. By default, in a has_many :through association Rails looks for a foreign key corresponding to the singular version of the association. In other words, with code like
has_many :followeds, through: :active_relationships
Rails would see “followeds” and use the singular “followed”, assembling a collection using the followed_id in the relationships table. But, as noted in Section 14.1.1, user.followeds is rather awkward, so we’ll write user.following instead. Naturally, Rails allows us to override the default, in this case using the source parameter (as shown in Listing 14.8), which explicitly tells Rails that the source of the following array is the set of followed ids.
Listing 14.8: Adding the User model following association.
app/models/user.rb
class User < ApplicationRecord
has_many :microposts, dependent: :destroy
has_many :active_relationships, class_name: "Relationship",
foreign_key: "follower_id",
dependent: :destroy
has_many :following, through: :active_relationships, source: :followed
.
.
.
end
The association defined in Listing 14.8 leads to a powerful combination of Active Record and array-like behavior. For example, we can check if the followed users collection includes another user with the include? method (Section 4.3.1), or find objects through the association:
user.following.include?(other_user)
user.following.find(other_user)
Although in many contexts we can effectively treat following as an array, Rails is smart about how it handles things under the hood. For example, code like
following.include?(other_user)
looks like it might have to pull all the followed users out of the database to apply the include? method, but in fact for efficiency Rails arranges for the comparison to happen directly in the database. (Compare to the code in Section 13.2.1, where we saw that
user.microposts.count
performs the count directly in the database.)
To manipulate following relationships, we’ll introduce follow and unfollow utility methods so that we can write, e.g., user.follow(other_user). We’ll also add an associated following? boolean method to test if one user is following another.6
6. Once you have a lot of experience modeling a particular domain, you can often guess such utility methods in advance, and even when you can’t you’ll often find yourself writing them to make the tests cleaner. In this case, though, it’s OK if you wouldn’t have guessed them. Software development is usually an iterative process— you write code until it starts getting ugly, and then you refactor it—but for brevity the tutorial presentation is streamlined a bit.
This is exactly the kind of situation where I like to write some tests first. The reason is that we are quite far from writing a working web interface for following users, but it’s hard to proceed without some sort of client for the code we’re developing. In this case, it’s easy to write a short test for the User model, in which we use following? to make sure the user isn’t following the other user, use follow to follow another user, use following? to verify that the operation succeeded, and finally unfollow and verify that it worked. The result appears in Listing 14.9.
Listing 14.9: Tests for some “following” utility methods. RED
test/models/user_test.rb
require 'test_helper'
class UserTest < ActiveSupport::TestCase
.
.
.
test "should follow and unfollow a user" do
michael = users(:michael)
archer = users(:archer)
assert_not michael.following?(archer)
michael.follow(archer)
assert michael.following?(archer)
michael.unfollow(archer)
assert_not michael.following?(archer)
end
end
By referring to the methods in Table 14.1, we can write the follow, unfollow, and following? methods using the association with following, as shown in Listing 14.10. (Note that we have omitted the user self variable whenever possible.)
Listing 14.10: Utility methods for following. GREEN
app/models/user.rb
class User < ApplicationRecord
.
.
.
def feed
.
.
.
end
# Follows a user.
def follow(other_user)
active_relationships.create(followed_id: other_user.id)
end
# Unfollows a user.
def unfollow(other_user)
active_relationships.find_by(followed_id: other_user.id).destroy
end
# Returns true if the current user is following the other user.
def following?(other_user)
following.include?(other_user)
end
private
.
.
.
end
With the code in Listing 14.10, the tests should be GREEN:
$ rails test
Exercises
Solutions to exercises are available for free at railstutorial.org/solutions with any Rails Tutorial purchase. To see other people’s answers and to record your own, join the Learn Enough Society at learnenough.com/society.
1. At the console, replicate the steps shown in Listing 14.9.
2. What is the SQL for each of the commands in the previous exercise?
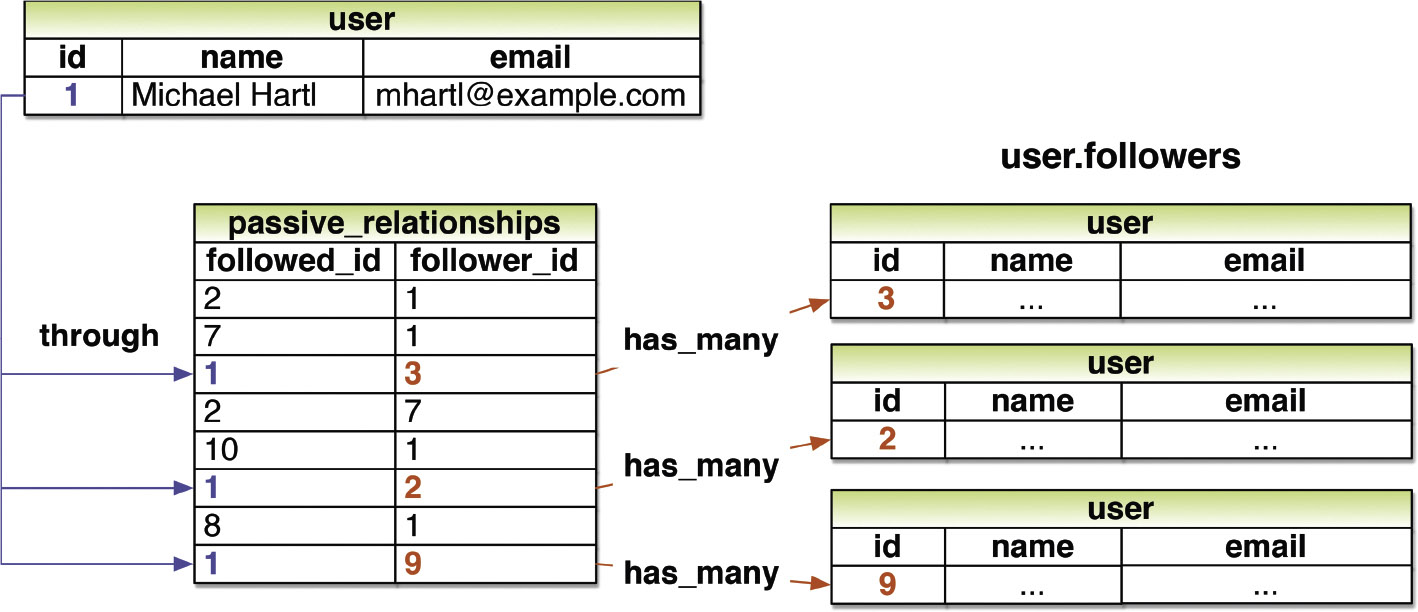
14.1.5 Followers
The final piece of the relationships puzzle is to add a user.followers method to go with user.following. You may have noticed from Figure 14.7 that all the information needed to extract an array of followers is already present in the relationships table (which we are treating as the active_relationships table via the code in Listing 14.2). Indeed, the technique is exactly the same as for followed users, with the roles of follower_id and followed_id reversed, and with passive_relationships in place of active_relationships. The data model then appears as in Figure 14.9.
The implementation of the data model in Figure 14.9 parallels Listing 14.8 exactly, as seen in Listing 14.12.
Listing 14.12: Implementing user.followers using passive relationships.
app/models/user.rb
class User < ApplicationRecord
has_many :microposts, dependent: :destroy
has_many :active_relationships, class_name: "Relationship",
foreign_key: "follower_id",
dependent: :destroy
has_many :passive_relationships, class_name: "Relationship",
foreign_key: "followed_id",
dependent: :destroy
has_many :following, through: :active_relationships, source: :followed
has_many :followers, through: :passive_relationships, source: :follower
.
.
.
end
It’s worth noting that we could actually omit the :source key for followers in Listing 14.12, using simply
has_many :followers, through: :passive_relationships
This is because, in the case of a :followers attribute, Rails will singularize “followers” and automatically look for the foreign key follower_id in this case. Listing 14.12 keeps the :source key to emphasize the parallel structure with the has_many :following association.
We can conveniently test the data model above using the followers.include? method, as shown in Listing 14.13. (Listing 14.13 might have used a followed_by? method to complement the following? method, but it turns out we won’t need it in our application.)
Listing 14.13: A test for followers. GREEN
test/models/user_test.rb
require 'test_helper'
class UserTest < ActiveSupport::TestCase
.
.
.
test "should follow and unfollow a user" do
michael = users(:michael)
archer = users(:archer)
assert_not michael.following?(archer)
michael.follow(archer)
assert michael.following?(archer)
assert archer.followers.include?(michael)
michael.unfollow(archer)
assert_not michael.following?(archer)
end
end
Listing 14.13 adds only one line to the test from Listing 14.9, but so many things have to go right to get it to pass that it’s a very sensitive test of the code in Listing 14.12.
At this point, the full test suite should be GREEN:
$ rails test
Exercises
Solutions to exercises are available for free at railstutorial.org/solutions with any Rails Tutorial purchase. To see other people’s answers and to record your own, join the Learn Enough Society at learnenough.com/society.
1. At the console, create several followers for the first user in the database (which you should call user). What is the value of user.followers.map(&:id)?
2. Confirm that user.followers.count matches the number of followers you created in the previous exercise.
3. What is the SQL used by user.followers.count? How is this different from user.followers.to_a.count? Hint: Suppose that the user had a million followers.
14.2 A Web Interface for Following Users
Section 14.1 placed some rather heavy demands on our data modeling skills, and it’s fine if it takes a while to soak in. In fact, one of the best ways to understand the associations is to use them in the web interface.
In the introduction to this chapter, we saw a preview of the page flow for user following. In this section, we will implement the basic interface and following/unfollowing functionality shown in those mockups. We will also make separate pages to show the user following and followers arrays. In Section 14.3, we’ll complete our sample application by adding the user’s status feed.
14.2.1 Sample Following Data
As in previous chapters, we will find it convenient to use rails db:seed to fill the database with sample relationships. This will allow us to design the look and feel of the web pages first, deferring the back-end functionality until later in this section.
Code to seed the following relationships appears in Listing 14.14. Here we somewhat arbitrarily arrange for the first user to follow users 3 through 51, and then have users 4 through 41 follow that user back. The resulting relationships will be sufficient for developing the application interface.
Listing 14.14: Adding following/follower relationships to the sample data.
db/seeds.rb
# Users
User.create!(name: "Example User",
email: "[email protected]",
password: "foobar",
password_confirmation: "foobar",
admin: true,
activated: true,
activated_at: Time.zone.now)
99.times do |n|
name = Faker::Name.name
email = "example-#{n+1}@railstutorial.org"
password = "password"
User.create!(name: name,
email: email,
password: password,
password_confirmation: password,
activated: true,
activated_at: Time.zone.now)
end
# Microposts
users = User.order(:created_at).take(6)
50. times do
content = Faker::Lorem.sentence(5)
users.each { |user| user.microposts.create!(content: content) }
end
# Following relationships
users = User.all
user = users.first
following = users[2..50]
followers = users[3..40]
following.each { |followed| user.follow(followed) }
followers.each { |follower| follower.follow(user) }
To execute the code in Listing 14.14, we reset and reseed the database as usual:
$ rails db:migrate:reset
$ rails db:seed
Exercises
Solutions to exercises are available for free at railstutorial.org/solutions with any Rails Tutorial purchase. To see other people’s answers and to record your own, join the Learn Enough Society at learnenough.com/society.
1. Using the console, confirm that User.first.followers.count matches the value expected from Listing 14.14.
2. Confirm that User.first.following.count is correct as well.
14.2.2 Stats and a Follow Form
Now that our sample users have both followed users and followers, we need to update the profile page and Home page to reflect this. We’ll start by making a partial to display the following and follower statistics on the profile and home pages. We’ll next add a follow/unfollow form, and then make dedicated pages for showing “following” (followed users) and “followers”.
As noted in Section 14.1.1, we’ll adopt Twitter’s convention of using “following” as a label for followed users, as in “50 following”. This usage is reflected in the mockup sequence starting in Figure 14.1 and shown in close-up in Figure 14.10.
The stats in Figure 14.10 consist of the number of users the current user is following and the number of followers, each of which should be a link to its respective dedicated display page. In Chapter 5, we stubbed out such links with the dummy text '#', but that was before we had much experience with routes. This time, although we’ll defer the actual pages to Section 14.2.3, we’ll make the routes now, as seen in Listing 14.15. This code uses the :member method inside a resources block, which we haven’t seen before, but see if you can guess what it does.
Listing 14.15: Adding following and followers actions to the Users controller.
config/routes.rb
Rails.application.routes.draw do
root 'static_pages#home'
get '/help', to: 'static_pages#help'
get '/about', to: 'static_pages#about'
get '/contact', to: 'static_pages#contact'
get '/signup', to: 'users#new'
get '/login', to: 'sessions#new'
post '/login', to: 'sessions#create'
delete '/logout', to: 'sessions#destroy'
resources :users do
member do
get :following, :followers
end
end
resources :account_activations, only: [:edit]
resources :password_resets, only: [:new, :create, :edit, :update]
resources :microposts, only: [:create, :destroy]
end

You might suspect that the URLs for following and followers will look like /users/1/following and /users/1/followers, and that is exactly what the code in Listing 14.15 arranges. Since both pages will be showing data, the proper HTTP verb is a GET request, so we use the get method to arrange for the URLs to respond appropriately. Meanwhile, the member method arranges for the routes to respond to URLs containing the user id. The other possibility, collection, works without the id, so that
resources :users do
collection do
get :tigers
end
end
would respond to the URL /users/tigers (presumably to display all the tigers in our application).7
7. For more details on such routing options, see the Rails Guides article on “Rails Routing from the Outside In”.
A table of the routes generated by Listing 14.15 appears in Table 14.2. Note the named routes for the followed user and followers pages, which we’ll put to use shortly.
With the routes defined, we are now in a position to define the stats partial, which involves a couple of links inside a div, as shown in Listing 14.16.
Table 14.2: RESTful routes provided by the custom rules in resource in Listing 14.15.

Listing 14.16: A partial for displaying follower stats.
app/views/shared/_stats.html.erb
<% @user ||= current_user %>
<div class="stats">
<a href="<%= following_user_path(@user) %>">
<strong id="following" class="stat">
<%= @user.following.count %>
</strong>
following
</a>
<a href="<%= followers_user_path(@user) %>">
<strong id="followers" class="stat">
<%= @user.followers.count %>
</strong>
followers
</a>
</div>
Since we will be including the stats on both the user show pages and the home page, the first line of Listing 14.16 picks the right one using
<% @user ||= current_user %>
As discussed in Box 8.1, this does nothing when @user is not nil (as on a profile page), but when it is (as on the Home page) it sets @user to the current user. Note also that the following/follower counts are calculated through the associations using
@user.following.count
and
@user.followers.count
Compare these to the microposts count from Listing 13.24, where we wrote
@user.microposts.count
to count the microposts. As in that case, Rails calculates the count directly in the database for efficiency.
One final detail worth noting is the presence of CSS ids on some elements, as in
<strong id="following" class="stat">
...
</strong>
This is for the benefit of the Ajax implementation in Section 14.2.5, which accesses elements on the page using their unique ids.
With the partial in hand, including the stats on the Home page is easy, as shown in Listing 14.17.
Listing 14.17: Adding follower stats to the Home page.
app/views/static_pages/home.html.erb
<% if logged_in? %>
<div class="row">
<aside class="col-md-4">
<section class="user_info">
<%= render 'shared/user_info' %>
</section>
<section class="stats">
<%= render 'shared/stats' %>
</section>
<section class="micropost_form">
<%= render 'shared/micropost_form' %>
</section>
</aside>
<div class="col-md-8">
<h3>Micropost Feed</h3>
<%= render 'shared/feed' %>
</div>
</div>
<% else %>
.
.
.
<% end %>
To style the stats, we’ll add some SCSS, as shown in Listing 14.18 (which contains all the stylesheet code needed in this chapter). The resulting Home page appears in Figure 14.11.
Listing 14.18: SCSS for the Home page sidebar.
app/assets/stylesheets/custom.scss
.
.
.
/* sidebar */
.
.
.
.gravatar {
float: left;
margin-right: 10px;
}
.gravatar_edit {
margin-top: 15px;
}
.stats {
overflow: auto;
margin-top: 0;
padding: 0;
a {
float: left;
padding: 0 10px;
border-left: 1px solid $gray-lighter;
color: gray;
&:first-child {
padding-left: 0;
border: 0;
}
&:hover {
text-decoration: none;
color: blue;
}
}
strong {
display: block;
}
}
.user_avatars {
overflow: auto;
margin-top: 10px;
.gravatar {
margin: 1px 1px;
}
a {
padding: 0;
}
}
.users.follow {
padding: 0;
}
/* forms */
.
.
.
We’ll render the stats partial on the profile page in a moment, but first let’s make a partial for the follow/unfollow button, as shown in Listing 14.19.
Listing 14.19: A partial for a follow/unfollow form.
app/views/users/_follow_form.html.erb
<% unless current_user?(@user) %>
<div id="follow_form">
<% if current_user.following?(@user) %>
<%= render 'unfollow' %>
<% else %>
<%= render 'follow' %>
<% end %>
</div>
<% end %>
This does nothing but defer the real work to follow and unfollow partials, which need new routes for the Relationships resource, which follows the Microposts resource example (Listing 13.30), as seen in Listing 14.20.
Listing 14.20: Adding the routes for user relationships.
config/routes.rb
Rails.application.routes.draw do
root 'static_pages#home'
get 'help' => 'static_pages#help'
get 'about' => 'static_pages#about'
get 'contact' => 'static_pages#contact'
get 'signup' => 'users#new'
get 'login' => 'sessions#new'
post 'login' => 'sessions#create'
delete 'logout' => 'sessions#destroy'
resources :users do
member do
get :following, :followers
end
end
resources :account_activations, only: [:edit]
resources :password_resets, only: [:new, :create, :edit, :update]
resources :microposts, only: [:create, :destroy]
resources :relationships, only: [:create, :destroy]
end
The follow/unfollow partials themselves are shown in Listing 14.21 and Listing 14.22.
Listing 14.21: A form for following a user.
app/views/users/_follow.html.erb
<%= form_for(current_user.active_relationships.build) do |f| %>
<div><%= hidden_field_tag :followed_id, @user.id %></div>
<%= f.submit "Follow", class: "btn btn-primary" %>
<% end %>
Listing 14.22: A form for unfollowing a user.
app/views/users/_unfollow.html.erb
<%= form_for(current_user.active_relationships.find_by(followed_id: @user.id),
html: method: :delete ) do |f| %>
<%= f.submit "Unfollow", class: "btn" %>
<% end %>
These two forms both use form_for to manipulate a Relationship model object; the main difference between the two is that Listing 14.21 builds a new relationship, whereas Listing 14.22 finds the existing relationship. Naturally, the former sends a POST request to the Relationships controller to create a relationship, while the latter sends a DELETE request to destroy a relationship. (We’ll write these actions in Section 14.2.4.) Finally, you’ll note that the follow form doesn’t have any content other than the button, but it still needs to send the followed_id to the controller. We accomplish this with the hidden_field_tag method in Listing 14.21, which produces HTML of the form
<input id="followed_id" name="followed_id" type="hidden" value="3" />
As we saw in Section 12.3 (Listing 12.14), the hidden input tag puts the relevant information on the page without displaying it in the browser.
We can now include the follow form and the following statistics on the user profile page simply by rendering the partials, as shown in Listing 14.23. Profiles with follow and unfollow buttons, respectively, appear in Figure 14.12 and Figure 14.13.
Listing 14.23: Adding the follow form and follower stats to the user profile page.
app/views/users/show.html.erb
<% provide(:title, @user.name) %>
<div class="row">
<aside class="col-md-4">
<section>
<h1>
<%= gravatar_for @user %>
<%= @user.name %>
</h1>
</section>
<section class="stats">
<%= render 'shared/stats' %>
</section>
</aside>
<div class="col-md-8">
<%= render 'follow_form' if logged_in? %>
<% if @user.microposts.any? %>
<h3>Microposts (<%= @user.microposts.count %>)</h3>
<ol class="microposts">
<%= render @microposts %>
</ol>
<%= will_paginate @microposts %>
<% end %>
</div>
</div>
We’ll get these buttons working soon enough—in fact, we’ll do it two ways, the standard way (Section 14.2.4) and using Ajax (Section 14.2.5)—but first we’ll finish the HTML interface by making the following and followers pages.

Exercises
Solutions to exercises are available for free at railstutorial.org/solutions with any Rails Tutorial purchase. To see other people’s answers and to record your own, join the Learn Enough Society at learnenough.com/society.
1. Verify that /users/2 has a follow form and that /users/5 has an unfollow form. Is there a follow form on /users/1?
2. Confirm in the browser that the stats appear correctly on the Home page and on the profile page.
3. Write tests for the stats on the Home page. Hint: Add to the test in Listing 13.28. Why don’t we also have to test the stats on the profile page?
14.2.3 Following and Followers Pages
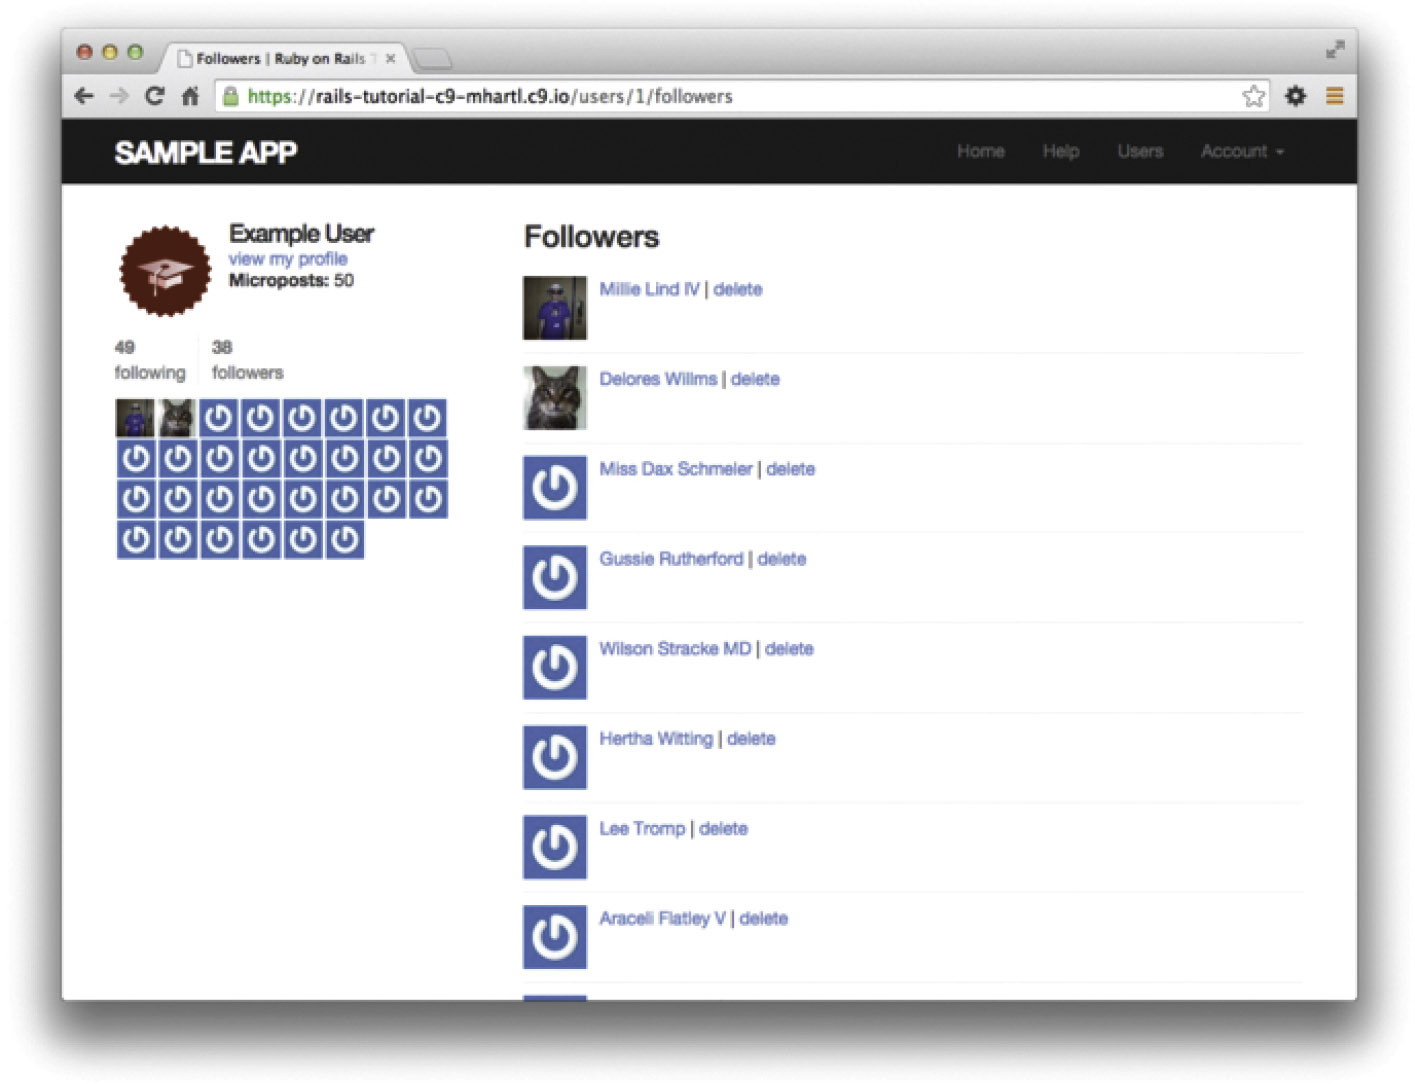
Pages to display followed users and followers will resemble a hybrid of the user profile page and the user index page (Section 10.3.1), with a sidebar of user information (including the following stats) and a list of users. In addition, we’ll include a raster of smaller user profile image links in the sidebar. Mockups matching these requirements appear in Figure 14.14 (following) and Figure 14.15 (followers).
Our first step is to get the following and followers links to work. We’ll follow Twitter’s lead and have both pages require user login. As with most previous examples of access control, we’ll write the tests first, as shown in Listing 14.24. Note that Listing 14.24 uses the named routes from Table 14.2.
Listing 14.24: Tests for the authorization of the following and followers pages. RED
test/controllers/users_controller_test.rb
require 'test_helper'
class UsersControllerTest < ActionDispatch::IntegrationTest
def setup
@user = users(:michael)
@other_user = users(:archer)
end
.
.
.
test "should redirect following when not logged in" do
get following_user_path(@user)
assert_redirected_to login_url
end
test "should redirect followers when not logged in" do
get followers_user_path(@user)
assert_redirected_to login_url
end
end
The only tricky part of the implementation is realizing that we need to add two new actions to the Users controller. Based on the routes defined in Listing 14.15, we need to call them following and followers. Each action needs to set a title, find the user, retrieve either @user.following or @user.followers (in paginated form), and then render the page. The result appears in Listing 14.25.

Listing 14.25: The following and followers actions. GREEN
app/controllers/users_controller.rb
class UsersController < ApplicationController
before_action :logged_in_user, only: [:index, :edit, :update, :destroy,
:following, :followers]
.
.
.
def following
@title = "Following"
@user = User.find(params[:id])
@users = @user.following.paginate(page: params[:page])
render 'show_follow'
end
def followers
@title = "Followers"
@user = User.find(params[:id])
@users = @user.followers.paginate(page: params[:page])
render 'show_follow'
end
private
.
.
.
end
As we’ve seen throughout this tutorial, the usual Rails convention is to implicitly render the template corresponding to an action, such as rendering show.html.erb at the end of the show action. In contrast, both actions in Listing 14.25 make an explicit call to render, in this case rendering a view called show_follow, which we must create. The reason for the common view is that the ERb is nearly identical for the two cases, and Listing 14.26 covers them both.
Listing 14.26: The show_follow view used to render following and followers. GREEN
app/views/users/show_follow.html.erb
<% provide(:title, @title) %>
<div class="row">
<aside class="col-md-4">
<section class="user_info">
<%= gravatar_for @user %>
<h1><%= @user.name %></h1>
<span><%= link_to "view my profile", @user %></span>
<span><b>Microposts:</b> <%= @user.microposts.count %></span>
</section>
<section class="stats">
<%= render 'shared/stats' %>
<% if @users.any? %>
<div class="user_avatars">
<% @users.each do |user| %>
<%= link_to gravatar_for(user, size: 30), user %>
<% end %>
</div>
<% end %>
</section>
</aside>
<div class="col-md-8">
<h3><%= @title %></h3>
<% if @users.any? %>
<ul class="users follow">
<%= render @users %>
</ul>
<%= will_paginate %>
<% end %>
</div>
</div>
The actions in Listing 14.25 render the view from Listing 14.26 in two contexts, “following” and “followers”, with the results shown in Figure 14.16 and Figure 14.17. Note that nothing in the above code uses the current user, so the same links work for other users, as shown in Figure 14.18.
At this point, the tests in Listing 14.24 should be GREEN due to the before filter in Listing 14.25.

$ rails test
To test the show_follow rendering, we’ll write a couple of short integration tests that verify the presence of working following and followers pages. They are designed to be a sanity check, not to be comprehensive. Indeed, as noted in Section 5.3.4, comprehensive tests of things like HTML structure are likely to be brittle and thus counterproductive. Our plan in the case of following/followers pages is to check the number is correctly displayed and that links with the right URLs appear on the page.

To get started, we’ll generate an integration test as usual:
$ rails generate integration_test following
invoke test_unit
create test/integration/following_test.rb
Next, we need to assemble some test data, which we can do by adding some relationships fixtures to create following/follower relationships. Recall from Section 13.2.3 that we can use code like
orange:
content: "I just ate an orange!"
created_at: <%= 10.minutes.ago %>
user: michael
to associate a micropost with a given user. In particular, we can write
user: michael
instead of
user_id: 1
Applying this idea to the relationships fixtures gives the associations in Listing 14.28.
Listing 14.28: Relationships fixtures for use in following/follower tests.
test/fixtures/relationships.yml
one:
follower: michael
followed: lana
two:
follower: michael
followed: malory
three:
follower: lana
followed: michael
four:
follower: archer
followed: michael
The fixtures in Listing 14.28 first arrange for Michael to follow Lana and Malory, and then arrange for Michael to be followed by Lana and Archer. To test for the right count, we can use the same assert_match method we used in Listing 13.28 to test for the display of the number of microposts on the user profile page. Adding in assertions for the right links yields the tests shown in Listing 14.29.
Listing 14.29: Tests for following/follower pages. GREEN
test/integration/following_test.rb
require 'test_helper'
class FollowingTest < ActionDispatch::IntegrationTest
def setup
@user = users(:michael)
log_in_as(@user)
end
test "following page" do
get following_user_path(@user)
assert_not @user.following.empty?
assert_match @user.following.count.to_s, response.body
@user.following.each do |user|
assert_select "a[href=?]", user_path(user)
end
end
test "followers page" do
get followers_user_path(@user)
assert_not @user.followers.empty?
assert_match @user.followers.count.to_s, response.body
@user.followers.each do |user|
assert_select "a[href=?]", user_path(user)
end
end
end
In Listing 14.29, note that we include the assertion
assert_not @user.following.empty?
which is included to make sure that
@user.following.each do |user|
assert_select "a[href=?]", user_path(user)
end
isn’t vacuously true (and similarly for followers). In other words, if @user. following.empty? were true, not a single assert_select would execute in the loop, leading the tests to pass and thereby give us a false sense of security.
The test suite should now be GREEN:
$ rails test
Exercises
Solutions to exercises are available for free at railstutorial.org/solutions with any Rails Tutorial purchase. To see other people’s answers and to record your own, join the Learn Enough Society at learnenough.com/society.
1. Verify in a browser that /users/1/followers and /user/1/following work. Do the image links in the sidebar work as well?
2. Comment out the application code needed to turn the assert_select tests in Listing 14.29 RED to confirm they’re testing the right thing.
14.2.4 A Working Follow Button the Standard Way
Now that our views are in order, it’s time to get the follow/unfollow buttons working. Because following and unfollowing involve creating and destroying relationships, we need a Relationships controller, which we generate as usual
$ rails generate controller Relationships
As we’ll see in Listing 14.32, enforcing access control on the Relationships controller actions won’t much matter, but we’ll still follow our previous practice of enforcing the security model as early as possible. In particular, we’ll check that attempts to access actions in the Relationships controller require a logged-in user (and thus get redirected to the login page), while also not changing the Relationship count, as shown in Listing 14.31.
Listing 14.31: Basic access control tests for relationships. RED
test/controllers/relationships_controller_test.rb
require 'test_helper'
class RelationshipsControllerTest < ActionDispatch::IntegrationTest
test "create should require logged-in user" do
assert_no_difference 'Relationship.count' do
post relationships_path
end
assert_redirected_to login_url
end
test "destroy should require logged-in user" do
assert_no_difference 'Relationship.count' do
delete relationship_path(relationships(:one))
end
assert_redirected_to login_url
end
end
We can get the tests in Listing 14.31 to pass by adding the logged_in_user before filter (Listing 14.32).
Listing 14.32: Access control for relationships. GREEN
app/controllers/relationships_controller.rb
class RelationshipsController < ApplicationController
before_action :logged_in_user
def create
end
def destroy
end
end
To get the follow and unfollow buttons to work, all we need to do is find the user associated with the followed_id in the corresponding form (i.e., Listing 14.21 or Listing 14.22), and then use the appropriate follow or unfollow method from Listing 14.10. The full implementation appears in Listing 14.33.
Listing 14.33: The Relationships controller.
app/controllers/relationships_controller.rb
class RelationshipsController < ApplicationController
before_action :logged_in_user
def create
user = User.find(params[:followed_id])
current_user.follow(user)
redirect_to user
end
def destroy
user = Relationship.find(params[:id]).followed
current_user.unfollow(user)
redirect_to user
end
end
We can see from Listing 14.33 why the security issue mentioned above is minor: if an unlogged-in user were to hit either action directly (e.g., using a command-line tool like curl), current_user would be nil, and in both cases the action’s second line would raise an exception, resulting in an error but no harm to the application or its data. It’s best not to rely on that, though, so we’ve taken the extra step and added an additional layer of security.
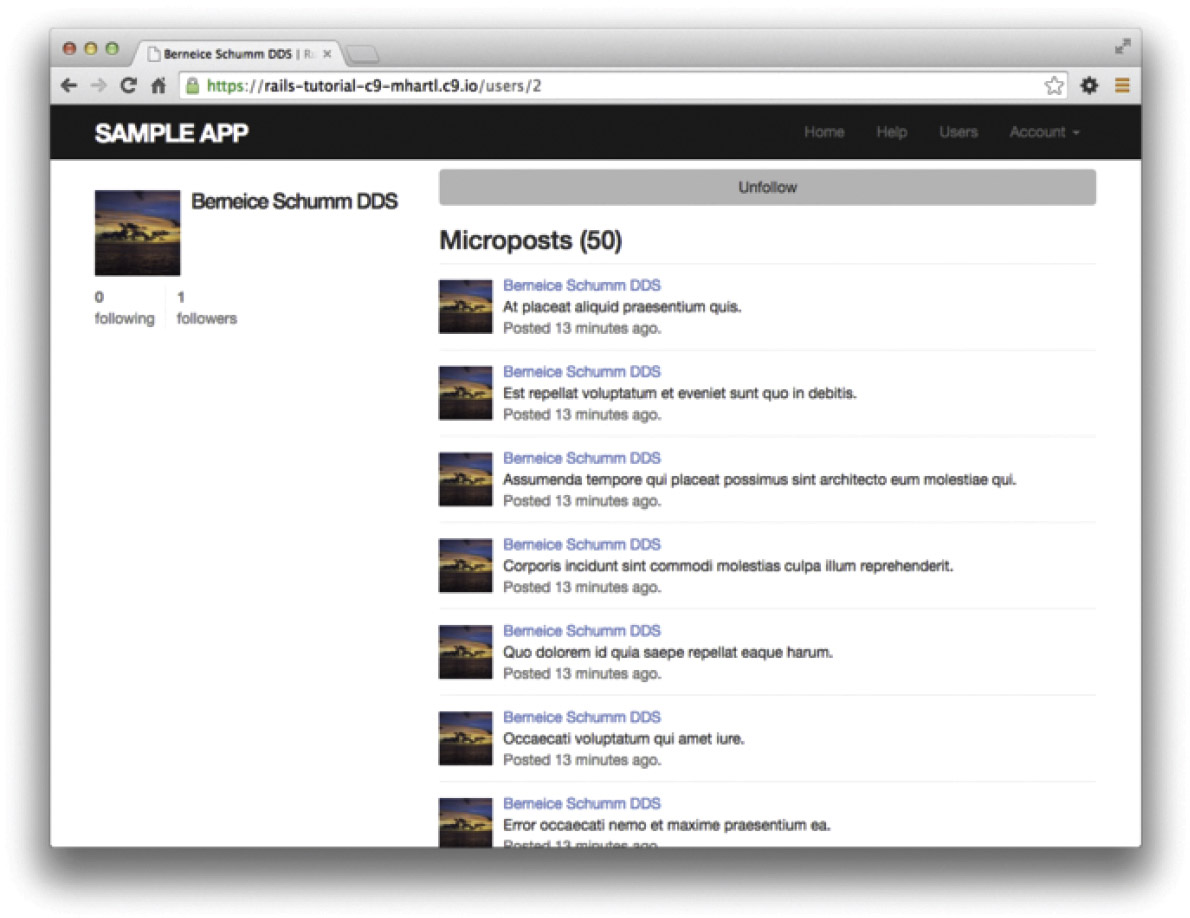
With that, the core follow/unfollow functionality is complete, and any user can follow or unfollow any other user, as you can verify by clicking the corresponding buttons in your browser. (We’ll write integration tests to verify this behavior in Section 14.2.6.) The result of following user #2 is shown in Figure 14.19 and Figure 14.20.
Exercises
Solutions to exercises are available for free at railstutorial.org/solutions with any Rails Tutorial purchase. To see other people’s answers and to record your own, join the Learn Enough Society at learnenough.com/society.
1. Follow and unfollow /users/2 through the web. Did it work?
2. According to the server log, which templates are rendered in each case?

14.2.5 A Working Follow Button with Ajax
Although our user following implementation is complete as it stands, we have one bit of polish left to add before starting work on the status feed. You may have noticed in Section 14.2.4 that both the create and destroy actions in the Relationships controller simply redirect back to the original profile. In other words, a user starts on another user’s profile page, follows the other user, and is immediately redirected back to the original page. It is reasonable to ask why the user needs to leave that page at all.
This is exactly the problem solved by Ajax, which allows web pages to send requests asynchronously to the server without leaving the page.8 Because adding Ajax to web forms is a common practice, Rails makes Ajax easy to implement. Indeed, updating the follow/unfollow form partials is trivial: just change
8. Because it is nominally an acronym for asynchronous JavaScript and XML, Ajax is sometimes misspelled “AJAX”, even though the original Ajax article spells it as “Ajax” throughout.
form_for
to
form_for ..., remote: true
and Rails automagically uses Ajax. The updated partials appear in Listing 14.34 and Listing 14.35.
Listing 14.34: A form for following a user using Ajax.
app/views/users/_follow.html.erb
<%= form_for(current_user.active_relationships.build, remote: true) do |f| %>
<div><%= hidden_field_tag :followed_id, @user.id %></div>
<%= f.submit "Follow", class: "btn btn-primary" %>
<% end %>
Listing 14.35: A form for unfollowing a user using Ajax.
app/views/users/_unfollow.html.erb
<%= form_for(current_user.active_relationships.find_by(followed_id: @user.id),
html: method: :delete ,
remote: true) do |f| %>
<%= f.submit "Unfollow", class: "btn" %>
<% end %>
The actual HTML generated by this ERb isn’t particularly relevant, but you might be curious, so here’s a peek at a schematic view (details may differ):
<form action="/relationships/117" class="edit_relationship" data-remote="true"
id="edit_relationship_117" method="post">
.
.
.
</form>
This sets the variable data-remote="true" inside the form tag, which tells Rails to allow the form to be handled by JavaScript. By using a simple HTML property instead of inserting the full JavaScript code (as in previous versions of Rails), Rails follows the philosophy of unobtrusive JavaScript.
Having updated the form, we now need to arrange for the Relationships controller to respond to Ajax requests. We can do this using the respond_to method, responding appropriately depending on the type of request. The general pattern looks like this:
respond_to do |format|
format.html { redirect_to user }
format.js
end
The syntax is potentially confusing, and it’s important to understand that in the code above only one of the lines gets executed. (In this sense, respond_to is more like an if-then-else statement than a series of sequential lines.) Adapting the Relationships controller to respond to Ajax involves adding respond_to as above to the create and destroy actions from Listing 14.33. The result appears as in Listing 14.36. Note the change from the local variable user to the instance variable @user; in Listing 14.33 there was no need for an instance variable, but now such a variable is necessary for use in Listing 14.34 and Listing 14.35.
Listing 14.36: Responding to Ajax requests in the Relationships controller.
app/controllers/relationships_controller.rb
class RelationshipsController < ApplicationController
before_action :logged_in_user
def create
@user = User.find(params[:followed_id])
current_user.follow(@user)
respond_to do |format|
format.html redirect_to @user
format.js
end
end
def destroy
@user = Relationship.find(params[:id]).followed
current_user.unfollow(@user)
respond_to do |format|
format.html { redirect_to @user }
format.js
end
end
end
The actions in Listing 14.36 degrade gracefully, which means that they work fine in browsers that have JavaScript disabled (although a small amount of configuration is necessary, as shown in Listing 14.37).
Listing 14.37: Configuration needed for graceful degradation of form submission.
config/application.rb
require File.expand_path('../boot', __FILE__ )
.
.
.
module SampleApp
class Application < Rails::Application
.
.
.
# Include the authenticity token in remote forms.
config.action_view.embed_authenticity_token_in_remote_forms = true
end
end
On the other hand, we have yet to respond properly when JavaScript is enabled. In the case of an Ajax request, Rails automatically calls a JavaScript embedded Ruby (.js.erb) file with the same name as the action, i.e., create.js.erb or destroy.js.erb. As you might guess, such files allow us to mix JavaScript and embedded Ruby to perform actions on the current page. It is these files that we need to create and edit in order to update the user profile page upon being followed or unfollowed.
Inside a JS-ERb file, Rails automatically provides the jQuery JavaScript helpers to manipulate the page using the Document Object Model (DOM). The jQuery library (which we saw briefly in Section 13.4.2) provides a large number of methods for manipulating the DOM, but here we will need only two. First, we will need to know about the dollar-sign syntax to access a DOM element based on its unique CSS id. For example, to manipulate the follow_form element, we will use the syntax
$("#follow_form")
(Recall from Listing 14.19 that this is a div that wraps the form, not the form itself.) This syntax, inspired by CSS, uses the # symbol to indicate a CSS id. As you might guess, jQuery, like CSS, uses a dot . to manipulate CSS classes.
The second method we’ll need is html, which updates the HTML inside the relevant element with the contents of its argument. For example, to replace the entire follow form with the string "foobar", we would write
$("#follow_form").html("foobar")
Unlike plain JavaScript files, JS-ERb files also allow the use of embedded Ruby, which we apply in the create.js.erb file to update the follow form with the unfollow partial (which is what should show after a successful following) and update the follower count. The result is shown in Listing 14.38. This uses the escape_javascript method, which is needed to escape out the result when inserting HTML in a JavaScript file.
Listing 14.38: The JavaScript embedded Ruby to create a following relationship.
app/views/relationships/create.js.erb
$("#follow_form").html("<%= escape_javascript(render('users/unfollow')) %>");
$("#followers").html('<%= @user.followers.count %>');
Note the presence of line-ending semicolons, which are characteristic of languages with syntax descended from ALGOL.
The destroy.js.erb file is analogous (Listing 14.39).
Listing 14.39: The Ruby JavaScript (RJS) to destroy a following relationship.
app/views/relationships/destroy.js.erb
$("#follow_form").html("<%= escape_javascript(render('users/follow')) %>");
$("#followers").html('<%= @user.followers.count %>');
With that, you should navigate to a user profile page and verify that you can follow and unfollow without a page refresh.
Exercises
Solutions to exercises are available for free at railstutorial.org/solutions with any Rails Tutorial purchase. To see other people’s answers and to record your own, join the Learn Enough Society at learnenough.com/society.
1. Unfollow and refollow /users/2 through the web. Did it work?
2. According to the server log, which templates are rendered in each case?
14.2.6 Following Tests
Now that the follow buttons are working, we’ll write some simple tests to prevent regressions. To follow a user, we post to the relationships path and verify that the number of followed users increases by 1:
assert_difference '@user.following.count', 1 do
post relationships_path, params: followed_id: @other.id
end
This tests the standard implementation, but testing the Ajax version is almost exactly the same; the only difference is the addition of the option xhr: true:
assert_difference '@user.following.count', 1 do
post relationships_path, params: followed_id: @other.id , xhr: true
end
Here xhr stands for XmlHttpRequest; setting the xhr option to true issues an Ajax request in the test, which causes the respond_to block in Listing 14.36 to execute the proper JavaScript method.
The same parallel structure applies to deleting users, with delete instead of post. Here we check that the followed user count goes down by 1 and include the relationship and followed user’s id:
assert_difference '@user.following.count', -1 do
delete relationship_path(relationship)
end
and
assert_difference '@user.following.count', -1 do
delete relationship_path(relationship), xhr: true
end
Putting the two cases together gives the tests in Listing 14.40.
Listing 14.40: Tests for the follow and unfollow buttons. GREEN
test/integration/following_test.rb
require 'test_helper'
class FollowingTest < ActionDispatch::IntegrationTest
def setup
@user = users(:michael)
@other = users(:archer)
log_in_as(@user)
end
.
.
.
test "should follow a user the standard way" do
assert_difference '@user.following.count', 1 do
post relationships_path, params: { followed_id: @other.id }
end
end
test "should follow a user with Ajax" do
assert_difference '@user.following.count', 1 do
post relationships_path, xhr: true, params: { followed_id: @other.id }
end
end
test "should unfollow a user the standard way" do
@user.follow(@other)
relationship = @user.active_relationships.find_by(followed_id: @other.id)
assert_difference '@user.following.count', -1 do
delete relationship_path(relationship)
end
end
test "should unfollow a user with Ajax" do
@user.follow(@other)
relationship = @user.active_relationships.find_by(followed_id: @other.id)
assert_difference '@user.following.count', -1 do
delete relationship_path(relationship), xhr: true
end
end
end
At this point, the tests should be GREEN:
$ rails test
Exercises
Solutions to exercises are available for free at railstutorial.org/solutions with any Rails Tutorial purchase. To see other people’s answers and to record your own, join the Learn Enough Society at learnenough.com/society.
1. By commenting and uncommenting each of the lines in the respond_to blocks (Listing 14.36), verify that the tests are testing the right things. Which test fails in each case?
2. What happens if you delete one of the occurrences of xhr: true in Listing 14.40? Explain why this is a problem, and why the procedure in the previous exercise would catch it.
14.3 The Status Feed
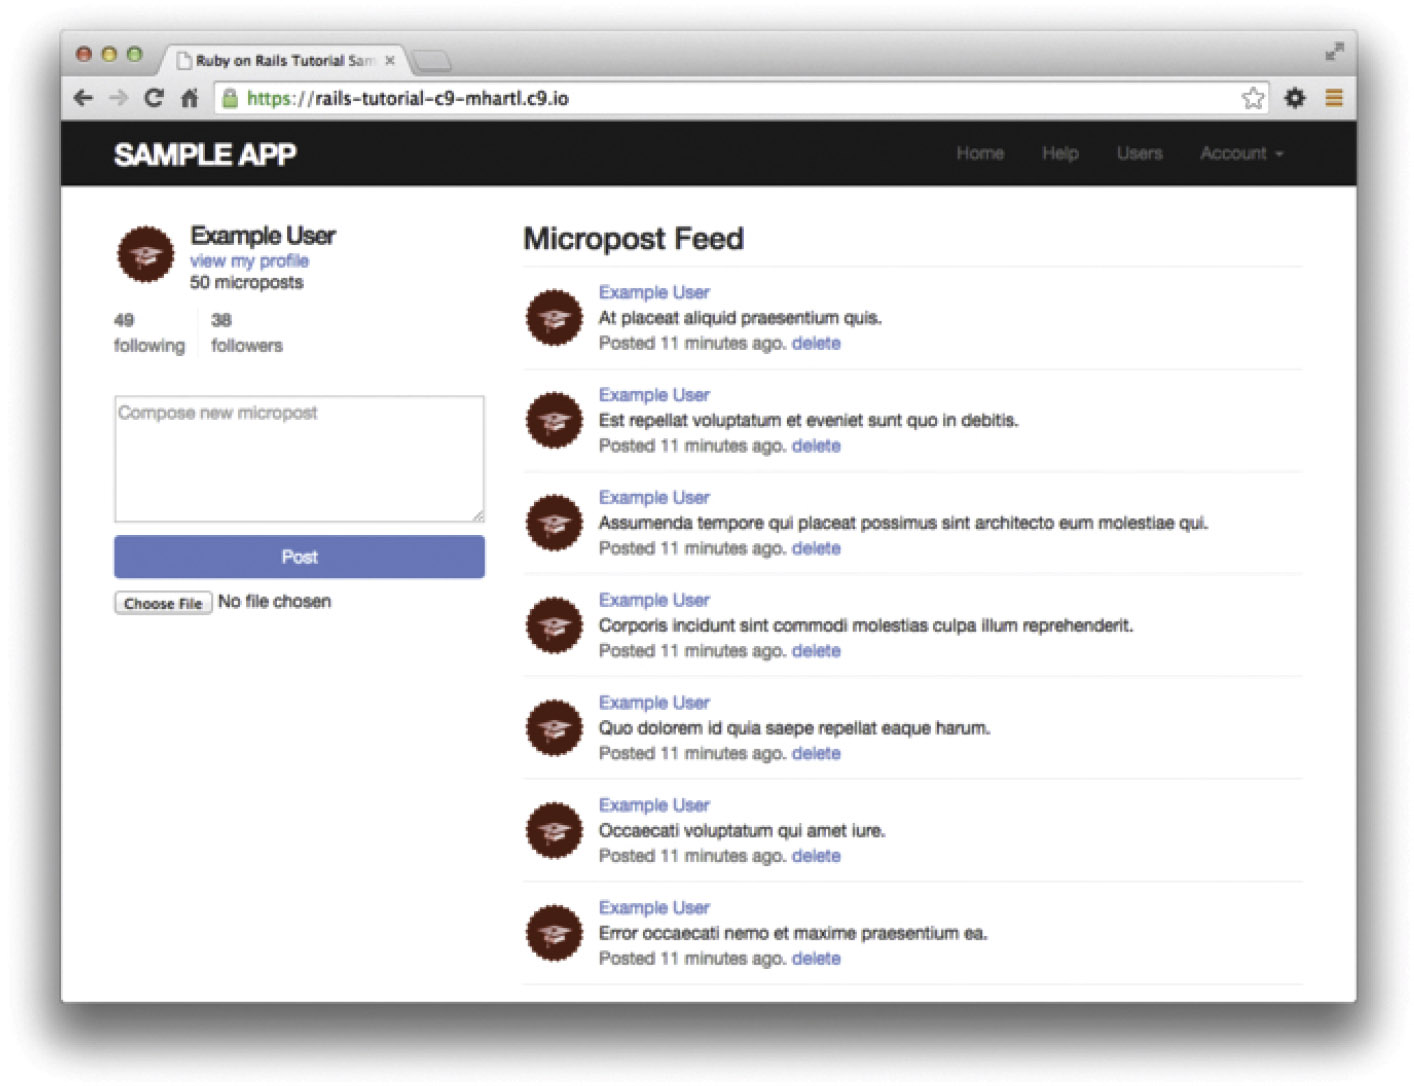
We come now to the pinnacle of our sample application: the status feed of microposts. Appropriately, this section contains some of the most advanced material in the entire tutorial. The full status feed builds on the proto-feed from Section 13.3.3 by assembling an array of the microposts from the users being followed by the current user, along with the current user’s own microposts. Throughout this section, we’ll proceed through a series of feed implementations of increasing sophistication. To accomplish this, we will need some fairly advanced Rails, Ruby, and even SQL programming techniques.
Because of the heavy lifting ahead, it’s especially important to review where we’re going. A recap of the final status feed, shown in Figure 14.5, appears again in Figure 14.21.


14.3.1 Motivation and Strategy
The basic idea behind the feed is simple. Figure 14.22 shows a sample microposts database table and the resulting feed. The purpose of a feed is to pull out the microposts whose user ids correspond to the users being followed by the current user (and the current user itself), as indicated by the arrows in the diagram.
Although we don’t yet know how to implement the feed, the tests are relatively straightforward, so (following the guidelines in Box 3.3) we’ll write them first. The key is to check all three requirements for the feed: microposts for both followed users and the user itself should be included in the feed, but a post from an unfollowed user should not be included. Based on the fixtures in Listing 10.47 and Listing 13.53, this means that Michael should see Lana’s posts and his own posts, but not Archer’s posts. Converting these requirements to assertions and recalling that the feed is in the User model (Listing 13.46) gives the updated User model test shown in Listing 14.42.
Listing 14.42: A test for the status feed. RED
test/models/user_test.rb
require 'test_helper'
class UserTest < ActiveSupport::TestCase
.
.
.
test "feed should have the right posts" do
michael = users(:michael)
archer = users(:archer)
lana = users(:lana)
# Posts from followed user
lana.microposts.each do |post_following|
assert michael.feed.include?(post_following)
end
# Posts from self
michael.microposts.each do |post_self|
assert michael.feed.include?(post_self)
end
# Posts from unfollowed user
archer.microposts.each do |post_unfollowed|
assert_not michael.feed.include?(post_unfollowed)
end
end
end
Of course, the current implementation is just a proto-feed, so the new test is initially RED:
Listing 14.43: RED
$ rails test
Exercises
Solutions to exercises are available for free at railstutorial.org/solutions with any Rails Tutorial purchase. To see other people’s answers and to record your own, join the Learn Enough Society at learnenough.com/society.
1. Assuming the micropost’s ids are numbered sequentially, with larger numbers being more recent, what would user.feed.map(&:id) return for the feed shown in Figure 14.22? Hint: Recall the default scope from Section 13.1.4.
14.3.2 A First Feed Implementation
With the status feed design requirements captured in the test from Listing 14.42, we’re ready to start writing the feed. Since the final feed implementation is rather intricate, we’ll build up to it by introducing one piece at a time. The first step is to think of the kind of query we’ll need. We need to select all the microposts from the microposts table with ids corresponding to the users being followed by a given user (or the user itself). We might write this schematically as follows:
SELECT * FROM microposts
WHERE user_id IN (<list of ids >) OR user_id = <user id>
In writing this code, we’ve guessed that SQL supports an IN keyword that allows us to test for set inclusion. (Happily, it does.)
Recall from the proto-feed in Section 13.3.3 that Active Record uses the where method to accomplish the kind of select shown above, as illustrated in Listing 13.46. There, our select was very simple; we just picked out all the microposts with user id corresponding to the current user:
Micropost.where("user_id = ?", id)
Here, we expect it to be more complicated, something like this:
Micropost.where("user_id IN (?) OR user_id = ?", following_ids, id)
We see from these conditions that we’ll need an array of ids corresponding to the users being followed. One way to do this is to use Ruby’s map method, available on any “enumerable” object, i.e., any object (such as an Array or a Hash) that consists of a collection of elements.9 We saw an example of this method in Section 4.3.2; as another example, we’ll use map to convert an array of integers to an array of strings:
9. The main requirement is that enumerable objects must implement an each method to iterate through the collection.
$ rails console
>> [1, 2, 3, 4].map { |i| i.to_s }
=> ["1", "2", "3", "4"]
Situations like the one illustrated above, where the same method gets called on each element in the collection, are common enough that there’s a shorthand notation for it (seen briefly in Section 4.3.2) that uses an ampersand & and a symbol corresponding to the method:
>> [1, 2, 3, 4].map(&:to_s)
=> ["1", "2", "3", "4"]
Using the join method (Section 4.3.1), we can create a string composed of the ids by joining them on comma-space :
>> [1, 2, 3, 4].map(&:to_s).join(', ')
=> "1, 2, 3, 4"
We can use the above method to construct the necessary array of followed user ids by calling id on each element in user.following. For example, for the first user in the database this array appears as follows:
>> User.first.following.map(&:id)
=> [3, 4, 5, 6, 7, 8, 9, 10, 11, 12, 13, 14, 15, 16, 17, 18, 19, 20, 21, 22,
23, 24, 25, 26, 27, 28, 29, 30, 31, 32, 33, 34, 35, 36, 37, 38, 39, 40, 41, 42,
43, 44, 45, 46, 47, 48, 49, 50, 51]
In fact, because this sort of construction is so useful, Active Record provides it by default:
>> User.first.following_ids
=> [3, 4, 5, 6, 7, 8, 9, 10, 11, 12, 13, 14, 15, 16, 17, 18, 19, 20, 21, 22,
23, 24, 25, 26, 27, 28, 29, 30, 31, 32, 33, 34, 35, 36, 37, 38, 39, 40, 41, 42,
43, 44, 45, 46, 47, 48, 49, 50, 51]
Here the following_ids method is synthesized by Active Record based on the has_many :following association (Listing 14.8); the result is that we need only append _ids to the association name to get the ids corresponding to the user.following collection. A string of followed user ids then appears as follows:
>> User.first.following_ids.join(', ')
=> "3, 4, 5, 6, 7, 8, 9, 10, 11, 12, 13, 14, 15, 16, 17, 18, 19, 20, 21, 22,
23, 24, 25, 26, 27, 28, 29, 30, 31, 32, 33, 34, 35, 36, 37, 38, 39, 40, 41, 42,
43, 44, 45, 46, 47, 48, 49, 50, 51"
When inserting into an SQL string, though, you don’t need to do this; the ?
interpolation takes care of it for you (and in fact eliminates some database-dependent incompatibilities). This means we can use following_ids by itself. As a result, the initial guess of
Micropost.where("user_id IN (?) OR user_id = ?", following_ids, id)
actually works! The result appears in Listing 14.44.
Listing 14.44: The initial working feed. GREEN
app/models/user.rb
class User < ApplicationRecord
.
.
.
# Returns true if a password reset has expired.
def password_reset_expired?
reset_sent_at < 2.hours.ago
end
# Returns a user's status feed.
def feed
Micropost.where("user_id IN (?) OR user_id = ?", following_ids, id)
end
# Follows a user.
def follow(other_user)
active_relationships.create(followed_id: other_user.id)
end
.
.
.
end
The test suite should be GREEN:
$ rails test
In some applications, this initial implementation might be good enough for most practical purposes, but Listing 14.44 isn’t the final implementation; see if you can make a guess about why not before moving on to the next section. (Hint: What if a user is following 5000 other users?)
Exercises
Solutions to exercises are available for free at railstutorial.org/solutions with any Rails Tutorial purchase. To see other people’s answers and to record your own, join the Learn Enough Society at learnenough.com/society.
1. In Listing 14.44, remove the part of the query that finds the user’s own posts. Which test in Listing 14.42 breaks?
2. In Listing 14.44, remove the part of the query that finds the followed users’ posts. Which test in Listing 14.42 breaks?
3. How could you change the query in Listing 14.44 to have the feed erroneously return microposts of unfollowed users, thereby breaking the third test in Listing 14.42? Hint: Returning all the microposts would do the trick.
14.3.3 Subselects
As hinted at in the last section, the feed implementation in Section 14.3.2 doesn’t scale well when the number of microposts in the feed is large, as would likely happen if a user were following, say, 5000 other users. In this section, we’ll reimplement the status feed in a way that scales better with the number of followed users.
The problem with the code in Section 14.3.2 is that following_ids pulls all the followed users’ ids into memory, and creates an array the full length of the followed users array. Since the condition in Listing 14.44 actually just checks inclusion in a set, there must be a more efficient way to do this, and indeed SQL is optimized for just such set operations. The solution involves pushing the finding of followed user ids into the database using a subselect.
We’ll start by refactoring the feed with the slightly modified code in Listing 14.46.
Listing 14.46: Using key-value pairs in the feed’s where method. GREEN
app/models/user.rb
class User < ApplicationRecord
.
.
.
# Returns a user's status feed.
def feed
Micropost.where("user_id IN (:following_ids) OR user_id = :user_id",
following_ids: following_ids, user_id: id)
end
.
.
.
end
As preparation for the next step, we have replaced
Micropost.where("user_id IN (?) OR user_id = ?", following_ids, id)
with the equivalent
Micropost.where("user_id IN (:following_ids) OR user_id = :user_id",
following_ids: following_ids, user_id: id)
The question mark syntax is fine, but when we want the same variable inserted in more than one place, the second syntax is more convenient.
The above discussion implies that we will be adding a second occurrence of user_id in the SQL query. In particular, we can replace the Ruby code
following_ids
with the SQL snippet
following_ids = "SELECT followed_id FROM relationships
WHERE follower_id = :user_id"
This code contains an SQL subselect, and internally the entire select for user 1 would look something like this:
SELECT * FROM microposts
WHERE user_id IN (SELECT followed_id FROM relationships
WHERE follower_id = 1)
OR user_id = 1
This subselect arranges for all the set logic to be pushed into the database, which is more efficient.
With this foundation, we are ready for a more efficient feed implementation, as seen in Listing 14.47. Note that because it is now raw SQL, the following_ids string is interpolated, not escaped.
Listing 14.47: The final implementation of the feed. GREEN
app/models/user.rb
class User < ApplicationRecord
.
.
.
# Returns a user's status feed.
def feed
following_ids = "SELECT followed_id FROM relationships
WHERE follower_id = :user_id"
Micropost.where("user_id IN (#{following_ids})
OR user_id = :user_id", user_id: id)
end
.
.
.
end
This code has a formidable combination of Rails, Ruby, and SQL, but it does the job and does it well:
$ rails test
Of course, even the subselect won’t scale forever. For bigger sites, you would probably need to generate the feed asynchronously using a background job, but such scaling subtleties are beyond the scope of this tutorial.
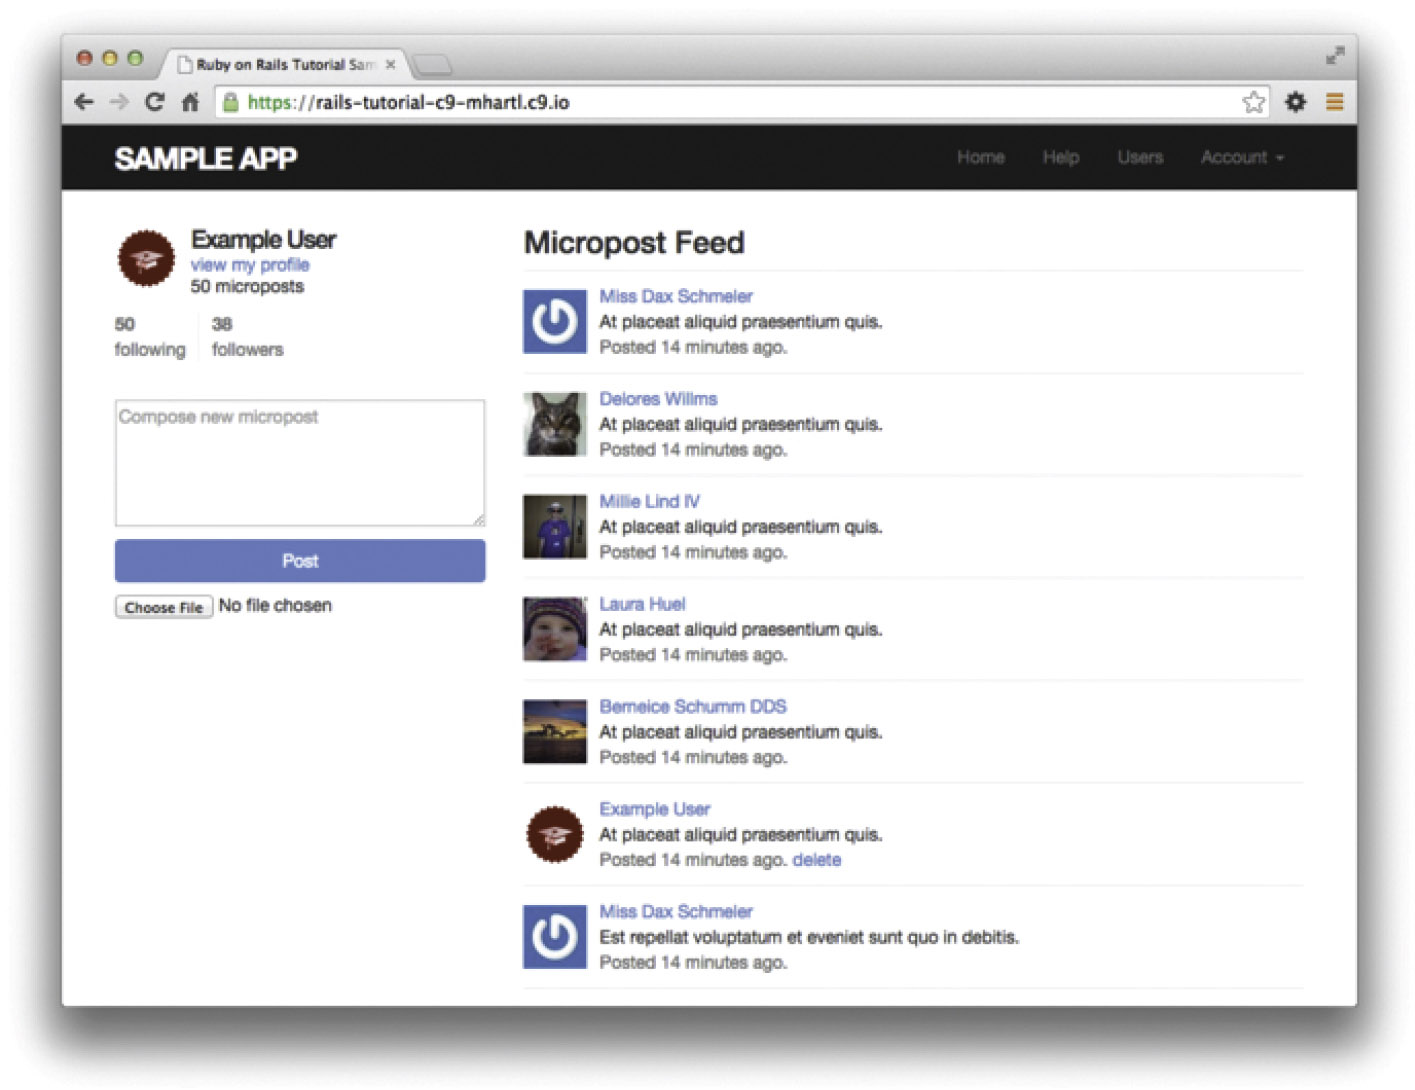
With the code in Listing 14.47, our status feed is now complete. Recall from Section 13.3.3 that the Home page already includes the feed. In Chapter 13, the result was only a proto-feed (Figure 13.14), but with the implementation in Listing 14.47 as seen in Figure 14.23 the Home page now shows the full feed.
At this point, we’re ready to merge our changes into the master branch:
$ rails test
$ git add -A
$ git commit -m "Add user following"
$ git checkout master
$ git merge following-users
We can then push the code to the remote repository and deploy the application to production:
$ git push
$ git push heroku
$ heroku pg:reset DATABASE
$ heroku run rails db:migrate
$ heroku run rails db:seed
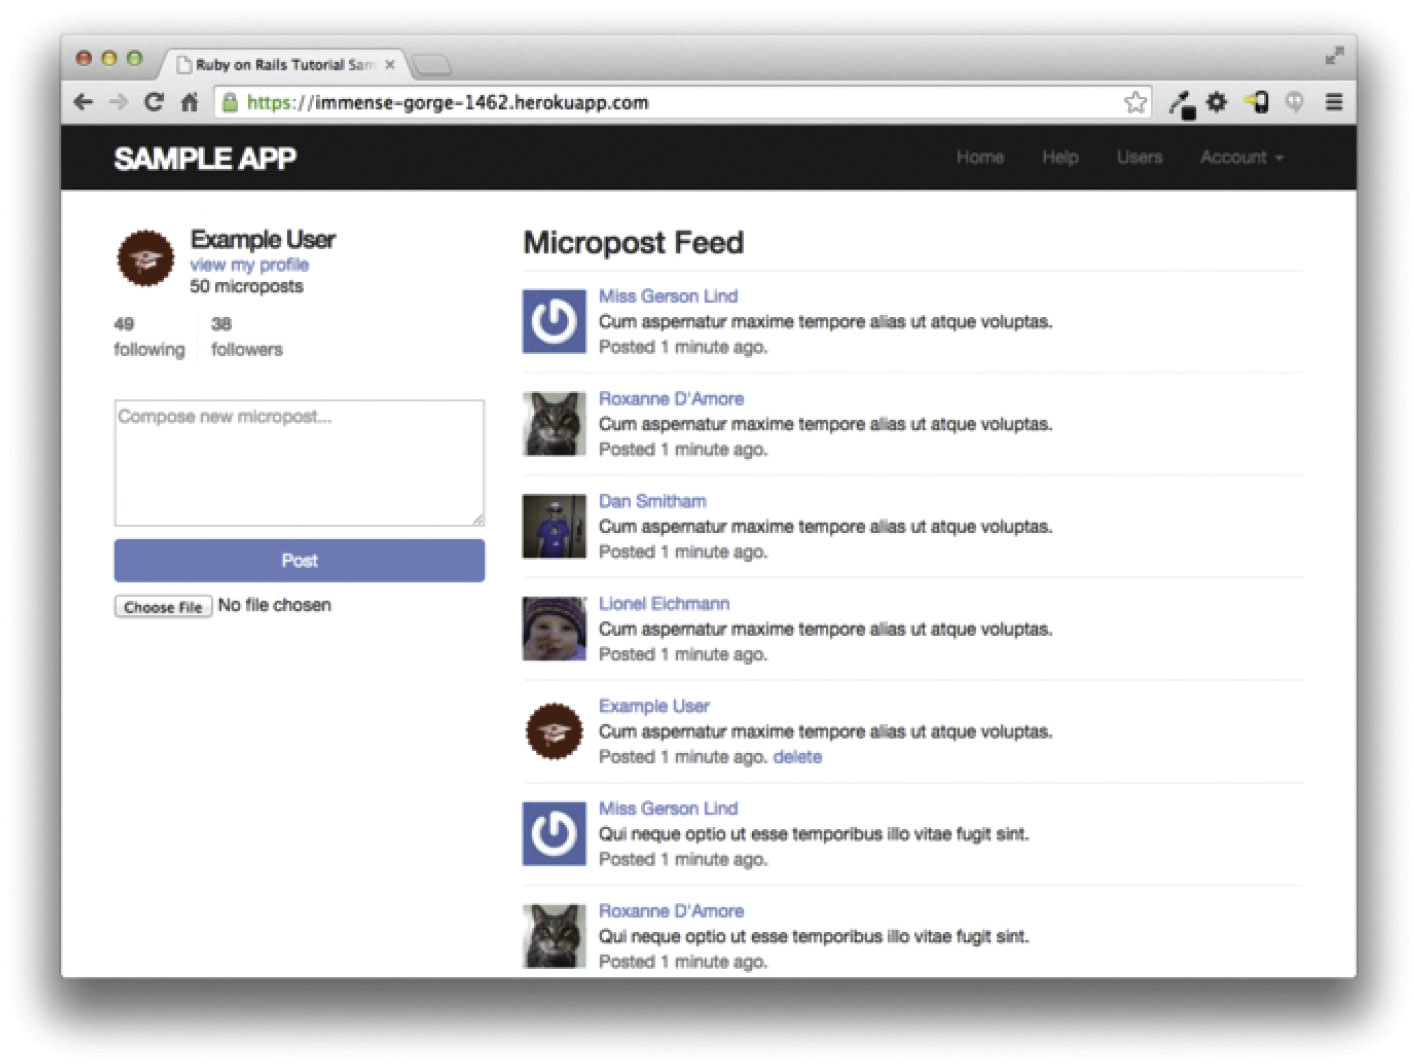
The result is a working status feed on the live web (Figure 14.24).
Exercises
Solutions to exercises are available for free at railstutorial.org/solutions with any Rails Tutorial purchase. To see other people’s answers and to record your own, join the Learn Enough Society at learnenough.com/society.
1. Write an integration test to verify that the first page of the feed appears on the Home page as required. A template appears in Listing 14.49.
2. Note that Listing 14.49 escapes the expected HTML using CGI.escapeHTML (which is closely related to the CGI.escape method we used in Section 11.2.3 to escape URLs). Why is escaping the HTML necessary in this case? Hint: Try removing the escaping and carefully inspect the page source for the micropost content that doesn’t match. Using the search feature of your terminal shell (Cmd-F on Ctrl-F on most systems) to find the word “sorry” may prove particularly helpful.
Listing 14.49: Testing the feed HTML. GREEN
test/integration/following_test.rb
require 'test_helper'
class FollowingTest < ActionDispatch::IntegrationTest
def setup
@user = users(:michael)
log_in_as(@user)
end
.
.
.
test "feed on Home page" do
get root_path
@user.feed.paginate(page: 1).each do |micropost|
assert_match CGI.escapeHTML(FILL_IN), FILL_IN
end
end
end
14.4 Conclusion
With the addition of the status feed, we’ve finished the sample application for the Ruby on Rails™ Tutorial. This application includes examples of all the major features of Rails, including models, views, controllers, templates, partials, filters, validations, callbacks, has_many/belongs_to and has_many :through associations, security, testing, and deployment.
Despite this impressive list, there is still much to learn about web development. As a first step in this process, this section contains some suggestions for further learning.
14.4.1 Guide to Further Resources
There is a wealth of Rails resources in stores and on the web—indeed, the supply is so rich that it can be overwhelming. The good news is that, having gotten this far, you’re ready for almost anything else out there. Here are some suggestions for further learning:
• The Learn Enough Society: Premium subscription service that includes a special enhanced version of the Ruby on Rails™ Tutorial book and 15+ hours of streaming screencast lessons filled with the kind of tips, tricks, and live demos that you can’t get from reading a book. Also includes text and videos for the other Learn Enough tutorials. Scholarship discounts are available.
• Launch School: Lots of in-person developer bootcamps have sprung up in recent years, and I recommend looking for one in your area, but Launch School is available online and so can be taken from anywhere. Launch School is an especially good choice if you want instructor feedback within the context of a structured curriculum.
• The Turing School of Software & Design: A full-time, 27-week Ruby/Rails/JavaScript training program in Denver, Colorado. Most of their students start with limited programming experience but have the determination and drive needed to pick it up quickly. Turing guarantees its students will find a job after graduating or they’ll refund the cost of tuition.
• Bloc: An online bootcamp with a structured curriculum, personalized mentorship, and a focus on learning through concrete projects. Use the coupon code BLOCLOVESHARTL to get $500 off the enrollment fee.
• Firehose Project: A mentor-driven, online coding bootcamp focused on real-world programming skills like test-driven development, algorithms, and building an advanced web application as part of an agile team. Two-week free intro course.
• Thinkful: An online class that pairs you with a professional engineer as you work through a project-based curriculum. Subjects include Ruby on Rails, front-end development, web design, and data science.
• Pragmatic Studio: Online Ruby and Rails courses from Mike and Nicole Clark.
• RailsApps: Instructive sample Rails apps
• Code School: A large variety of interactive programming courses
14.4.2 What We Learned in This Chapter
• Rails’ has_many :through allows the modeling of complicated data relationships.
• The has_many method takes several optional arguments, including the object class name and the foreign key.
• Using has_many and has_many :through with properly chosen class names and foreign keys, we can model both active (following) and passive (being followed) relationships.
• Rails routing supports nested routes.
• The where method is a flexible and powerful way to create database queries.
• Rails supports issuing lower-level SQL queries if needed.
• By putting together everything we’ve learned in this book, we’ve successfully implemented user following with a status feed of microposts from followed users.