Chapter 12
![]()
Blocking Analysis
You would ideally like your database application to scale linearly with the number of database users and the volume of data. However, it is common to find that performance degrades as the number of users increases and as the volume of data grows. One cause for degradation is blocking. In fact, database blocking is usually the biggest enemy of scalability for database applications.
In this chapter, I cover the following topics:
- The fundamentals of blocking in SQL Server
- The ACID properties of a transactional database
- Database lock granularity, escalation, modes, and compatibility
- ANSI isolation levels
- The effect of indexes on locking
- The information necessary to analyze blocking
- SQL script to collect blocking information
- Resolutions and recommendations to avoid blocking
- Techniques to automate the blocking detection and information collection processes
Blocking Fundamentals
In an ideal world, every SQL query would be able to execute concurrently, without any blocking by other queries. However, in the real world, queries do block each other, similar to the way a car crossing through a green traffic signal at an intersection blocks other cars waiting to cross the intersection. In SQL Server, this traffic management takes the form of the lock manager, which controls concurrent access to a database resource to maintain data consistency. The concurrent access to a database resource is controlled across multiple database connections.
I want to make sure things are clear before moving on. Three terms are used within databases that sound the same and are interrelated but have different meanings. These are frequently confused, and people often use the terms incorrectly. These terms are locking, blocking, and deadlocking. Locking is an integral part of the process of SQL Server managing multiple sessions. When a session needs access to a piece of data, a lock of some type is placed on it. This is different from blocking, which is when one session, or thread, needs access to a piece of data and has to wait for another session’s lock to clear. Finally, deadlocking is when two sessions, or threads, form what is sometimes referred to as a deadly embrace. They are each waiting on the other for a lock to clear. Deadlocking could also be referred to as a permanent blocking situation, but one that won’t resolve by waiting any period of time. Deadlocking will be covered in more detail in Chapter 13. Please understand the differences between these terms and use them correctly. It will help in your understanding of the system, your ability to troubleshoot, and your ability to communicate with other database administrators and developers.
In SQL Server, a database connection is identified by a session ID. Connections may be from one or many applications and one or many users on those applications; as far as SQL Server is concerned, every connection is treated as a separate session. Blocking between two sessions accessing the same piece of data at the same time is a natural phenomenon in SQL Server. Whenever two sessions try to access a common database resource in conflicting ways, the lock manager ensures that the second session waits until the first session completes its work in conjunction with the management of transactions within the system. For example, a session might be modifying a table record while another session tries to delete the record. Since these two data access requests are incompatible, the second session will be blocked until the first session completes its task.
On the other hand, if the two sessions try to read a table concurrently, both requests are allowed to execute without blocking, since these data access requests are compatible with each other.
Usually, the effect of blocking on a session is quite small and doesn’t affect its performance noticeably.
At times, however, because of poor query and/or transaction design (or maybe bad luck), blocking can affect query performance significantly. In a database application, every effort should be made to minimize blocking and thereby increase the number of concurrent users that can use the database.
Understanding Blocking
In SQL Server, a database query can execute as a logical unit of work in itself, or it can participate in a bigger logical unit of work. A bigger logical unit of work can be defined using the BEGIN TRANSACTION statement along with COMMIT and/or ROLLBACK statements. Every logical unit of work must conform to a set of four properties called ACIDproperties:
- Atomicity
- Consistency
- Isolation
- Durability
I cover these properties in the sections that follow because understanding how transactions work is fundamental to understanding blocking.
A logical unit of work must be atomic. That is, either all the actions of the logical unit of work are completed or no effect is retained. To understand the atomicity of a logical unit of work, consider the following example (--atomicity in the download):
--Create a test table
IF (SELECT OBJECT_ID('dbo.ProductTest')
) IS NOT NULL
DROP TABLE dbo.ProductTest ;
GO
CREATE TABLE dbo.ProductTest
(ProductID INT CONSTRAINT ValueEqualsOne CHECK (ProductID = 1)
) ;
GO
--All ProductIDs are added into t1 as a logical unit of work
INSERT INTO dbo.ProductTest
ELECT p.ProductID
FROM Production.Product AS p ;
GO
SELECT *
FROM dbo.ProductTest ; --Returns 0 rows
UPDATE
SQL Server treats the preceding INSERT statement as a logical unit of work. The CHECK constraint on column c1 of thedbo.t1 tableallows only the value of 1. Although the ProductID column in the Production.Product table starts with the value of 1, it also contains other values. For this reason, the INSERT statement won’t add any records at all to the dbo.t1 table, and an error is raised because of the CHECK constraint. This atomicity is automatically ensured by SQL Server.
So far, so good. But in the case of a bigger logical unit of work, you should be aware of an interesting behavior of SQL Server. Imagine that the previous insert task consists of multiple INSERT statements. These can be combined to form a bigger logical unit of work, as follows (--logical in the download):
BEGIN TRAN
--Start: Logical unit of work
--First:
INSERT INTO dbo.ProductTest
SELECT p.ProductID
FROM Production.Product AS p ;
--Second:
INSERT INTO dbo.ProductTest
VALUES (1);
COMMIT --End: Logical unit of work
GO
With the dbo.ProductTest tablealready created in the --atomicity script, the BEGIN TRAN and COMMIT pair of statements defines a logical unit of work, suggesting that all the statements within the transaction should be atomic in nature. However, the default behavior of SQL Server doesn’t ensure that the failure of one of the statements within a user-defined transaction scope will undo the effect of the prior statement(s). In the preceding transaction, the first INSERT statement will fail as explained earlier, whereas the second INSERT is perfectly fine. The defaultbehavior of SQL Server allows the second INSERT statement to execute, even though the first INSERT statement fails. A SELECT statement, as shown in the following code, will return the row inserted by the second INSERT statement:
SELECT *
FROM dbo.ProductTest ; --Returns a row with t1.c1 = 1
The atomicity of a user-defined transaction can be ensured in the following two ways:
- SET XACT_ABORT ON
- Explicit rollback
Let’s look at these quickly.
You can modify the atomicity of the INSERT task in the preceding section using the SET XACT_ ABORT ON statement:
SET XACT_ABORT ON
GO
BEGIN TRAN
--Start: Logical unit of work
--First:
INSERT INTO dbo.ProductTest
SELECT p.ProductID
FROM Production.Product AS p
--Second:
INSERT INTO dbo.ProductTest
VALUES (1)
COMMIT
--End: Logical unit of work GO
SET XACT_ABORT OFF
GO
The SET XACTABORT statement specifies whether SQL Server should automatically roll back and abort an entire transaction when a statement within the transaction fails. The failure of the first INSERT statement will automatically suspend the entire transaction, and thus the second INSERT statement will not be executed. The effect of SET XACTABORT is at the connection level, and it remains applicable until it is reconfigured or the connection is closed. By default, SET XACT_ABORT is OFF.
Explicit Rollback
You can also manage the atomicity of a user-defined transaction by using the TRY/CATCH error-trapping mechanism within SQL Server. If a statement within the TRY block of code generates an error, then the CATCH block of code will handle the error. If an error occurs and the CATCH block is activated, then the entire work of a user-defined transaction can be rolled back, and further statements can be prevented from execution, as follows (rollback.sql in the download):
BEGIN TRY
BEGIN TRAN --Start: Logical unit of work --First:
INSERT INTO dbo.t1
SELECT p.ProductID
FROM Production.Product AS p
Second:
INSERT INTO dbo.t1
VALUES (1)
COMMIT --End: Logical unit of work
END TRY
BEGIN CATCH
ROLLBACK
PRINT 'An error occurred'
RETURN
END CATCH
The ROLLBACK statement rolls back all the actions performed in the transaction until that point. For a detailed description of how to implement error handling in SQL Server-based applications, please refer to the MSDN Library article titled “Using TRY…CATCH in Transact SQL”(http://msdn.microsoft.com/en-us/library/ms179296.aspx)or to the introductory article titled “SQL Server Error Handling Workbench”(http://www.simple-talk.com/sql/t-sql-programming/sql-server-error-handling-workbench/).
Since the atomicity property requires that either all the actions of a logical unit of work are completed or no effects are retained, SQL Server isolates the work of a transaction from that of others by granting it exclusive rights on the affected resources. This means that the transaction can safely roll back the effect of all its actions, if required. The exclusive rights granted to a transaction on the affected resources block all other transactions (or database requests) trying to access those resources during that time period. Therefore, although atomicity is required to maintain the integrity of data, it introduces the undesirable side effect of blocking.
A logical unit of work should cause the state of the database to travel from one consistent state to another.
At the end of a transaction, the state of the database should be fully consistent. SQL Server always ensures that the internal state of the databases is correct and valid by automatically applying all the constraints of the affected database resources as part of the transaction. SQL Server ensures that the state of internal structures, such as data and index layout, are correct after the transaction. For instance, when the data of a table is modified, SQL Server automatically identifies all the indexes, constraints, and other dependent objects on the table and applies the necessary modifications to all the dependent database objects as part of the transaction.
The logical consistency of the data required by the business rules should be ensured by a database developer. A business rule may require changes to be applied on multiple tables. The database developer should accordingly define a logical unit of work to ensure that all the criteria of the business rules are taken care of. SQL Server provides different transaction management features that the database developer can use to ensure the logical consistency of the data.
As just explained, maintaining a consistent logical state requires the use of transactions to define the logical unit of work per the business rules. Also, to maintain a consistent physical state, SQL Server identifies and works on the dependent database objects as part of the logical unit of work. The atomicity characteristic of the logical unit of work blocks all other transactions (or database requests) trying to access the affected object(s) during that time period. Therefore, even though consistency is required to maintain a valid logical and physical state of the database, it also introduces the undesirable side effect of blocking.
In a multiuser environment, more than one transaction can be executed simultaneously. These concurrent transactions should be isolated from one another, so that the intermediate changes made by one transaction don’t affect the data consistency of other transactions. The degree of isolation required by a transaction can vary. SQL Server provides different transaction isolation features to implement the degree of isolation required by a transaction.
![]() Note Transaction isolation levels are explained later in the chapter in the “Isolation Levels” section.
Note Transaction isolation levels are explained later in the chapter in the “Isolation Levels” section.
The isolation requirements of a transaction operating on a database resource can block other transactions trying to access the resource. In a multiuser database environment, multiple transactions are usually executed simultaneously. It is imperative that the data modifications made by an ongoing transaction be protected from the modifications made by other transactions. For instance, suppose a transaction is in the middle of modifying a few rows in a table. During that period, to maintain database consistency, you must ensure that other transactions do not modify or delete the same rows. SQL Server logically isolates the activities of a transaction from that of others by blocking them appropriately, which allows multiple transactions to execute simultaneously without corrupting one another’s work.
Excessive blocking caused by isolation can adversely affect the scalability of a database application.
A transaction may inadvertently block other transactions for a long period of time, thereby hurting database concurrency. Since SQL Server manages isolation using locks, it is important to understand the locking architecture of SQL Server. This helps you analyze a blocking scenario and implement resolutions.
![]() Note The fundamentals of database locks are explained later in the chapter in the “Capturing Blocking Information” section.
Note The fundamentals of database locks are explained later in the chapter in the “Capturing Blocking Information” section.
Once a transaction is completed, the changes made by the transaction should be durable. Even if the electrical power to the machine is tripped off immediately after the transaction is completed, the effect of all actions within the transaction should be retained. SQL Server ensures durability by keeping track of all pre- and post-images of the data under modification in a transaction log as the changes are made. Immediately after the completion of a transaction, SQL Server ensures that all the changes made by the transaction are retained even if SQL Server, the operating system, or the hardware fails (excluding the log disk). During restart, SQL Server runs its database recovery feature, which identifies the pending changes from the transaction log for completed transactions and applies them tothe database resources. This database feature is called roll forward.
The recovery interval period depends on the number of pending changes that need to be applied to the database resources during restart. To reduce the recovery interval period, SQL Server intermittently applies the intermediate changes made by the running transactions as configured by the recovery interval option. The recovery interval option can be configured using the spconfigure statement. The process of intermittently applying the intermediate changes is referred to as the checkpoint process. During restart, the recovery process identifies all uncommitted changes and removes them from the database resources by using the pre-images of the data from the transaction log.
The durability property isn’t a direct cause of blocking since it doesn’t require the actions of a transaction to be isolated from those of others. But in an indirect way, it increases the duration of the blocking. Since the durability property requires saving the pre- and post-images of the data under modification to the transaction log on disk, it increases the duration of the transaction and blocking.
![]() Note Out of the four ACID properties, the isolation property, which is alsoused to ensure atomicity and consistency, is the main cause of blocking in a SQL Server database. In SQL Server, isolation is implemented using locks, as explained in the nextsection.
Note Out of the four ACID properties, the isolation property, which is alsoused to ensure atomicity and consistency, is the main cause of blocking in a SQL Server database. In SQL Server, isolation is implemented using locks, as explained in the nextsection.
When a session executes a query, SQL Server determines the database resources that need to be accessed; and, if required, the lock manager grants database locks to the session. The query is blocked if another session has already been granted the locks; however, to provide both transaction isolation and concurrency, SQL Server uses different lock granularities, as explained in the sections that follow.
Lock Granularity
SQL Server databases are maintained as files on the physical disk. In the case of a nondatabase file such as an Excel file, the file may be written to by only one user at a time. Any attempt to write to the file by other users fails. However, unlike the limited concurrency on a nondatabase file, SQL Server allows multiple users to modify (or access) contents simultaneously, as long as they don’t affect one another’s data consistency. This decreases blocking and improves concurrency among the transactions.
To improve concurrency, SQL Server implements lock granularities at the following resource levels and in this order:
- Row (RID)
- Key (KEY)
- Page (PAG)
- Extent (EXT)
- Heap or B-tree (HoBT)
- Table (TAB)
- File (FIL)
- Application (APP)
- MetaData (MDT)
- Allocation Unit (AU)
- Database (DB)
Let’s take a look at these lock levels in more detail.
This lock is maintained on a single row within a table and is the lowest level of lock on a database table. When a query modifies a row in a table, an RID lock is granted to the query on the row. For example, consider the transaction on the following test table (--rowlock):
--rowlock
--Create a test table
IF (SELECT OBJECT_ID('dbo.Test1')
) IS NOT NULL
DROP TABLE dbo.Test1 ;
GO
CREATE TABLE dbo.Test1 (C1 INT) ;
INSERT INTO dbo.Test1
VALUES (1) ;
GO
BEGIN TRAN
DELETE dbo.Test1
WHERE C1 = 1 ;
SELECT dtl.request_session_id,
dtl.resource_database_id,
dtl.resource_associated_entity_id,
dtl.resource_type,
dtl.resource_description,
dtl.request_mode,
dtl.request_status
FROM sys.dm_tran_locks AS dtl
WHERE dtl.request_session_id = SPID;
ROLLBACK
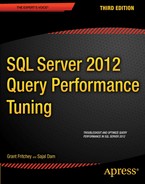
The dynamic management view,sys.dm_tran_locks, can be used to display the lock status. The query against sys.dm_tran_locks in Figure 12-1 shows that the DELETE statement acquired an exclusive RID lock on the row to be deleted.

Figure 12-1. Output from sys.dm_tran_locks showing the row-level lock granted to the DELETE statement
![]() Note Iexplainlockmodeslaterinthechapterinthe“LockModes”section.
Note Iexplainlockmodeslaterinthechapterinthe“LockModes”section.
Granting an RID lock to the DELETE statement prevents other transactions from accessing the row.
The resource locked by the RID lock can be represented in the following format from the resource_description column:
DatabaseID:FileID:PageID:Slot(row)
In the output from the query against sys.dm_tran_locks in Figure 12-1, the DatabaselD is displayed separately under the resource_database_id column. The resource_description column value for the RID type represents the remaining part of the RID resource as 1:23593:0. In this case, a FilelD of 1 is the primary data file, a PagelD of 23593 is a page belonging tothe dbo.Test1 tableidentified by the Obi_Id column, and a Slot (row) of 0 represents the row position within the page. You can obtain the table name and the database name by executing the following SQL statements:
SELECT OBJECT_NAME(176719682),
DB_NAME(9) ;
The row-level lock provides very high concurrency since blocking is restricted to the row under effect.
This is a row lock within an index, and it is identified as a KEY lock. As you know, for a table with a clustered index, the data pages of the table and the leaf pages of the clustered index are the same. Since both of the rows are the same for a table with a clustered index, only a KEY lock is acquired on the clustered index row, or limited range of rows, while accessing the row(s) from the table (or the clustered index). For example, consider having a clustered index on the Test1 table (--keylock):
CREATE CLUSTERED INDEX TestIndex ON dbo.Test1(C1) ;
Next, rerun the following code:
BEGIN TRAN
DELETE dbo.Test1
WHERE C1 = 1 ;
SELECT dtl.request_session_id,
dtl.resource_database_id,
dtl.resource_associated_entity_id,
dtl.resource_type,
dtl.resource_description,
dtl.request_mode,
dtl.request_status
FROM sys.dm_tran_locks AS dtl
WHERE dtl.request_session_id = SPID ;
ROLLBACK
The corresponding output from sys.dm_tran_locks shows a KEY lock instead of the RID lock, as you can see in Figure 12-2.

Figure 12-2. Output from sys.dm_tran_locks showing the key-level lock granted to the DELETE statement
When you are querying sys.dm_tran_locks,you will be able to retrieve the database identifier, resource_database_id. You can also get information about what is being locked fromresource_associated_entity_id; however, to get to the particular resource (in this case, the page on the key), you have to go to the resource_ description column for the value, which is (1:23316). In this case, the Indld of 1 is the clustered index on thedbo.Test1 table. You also see the types of requests that are made: S, Sch-S, X, and so on. I cover these in more detail in the upcoming“Lock Modes” section.
![]() Note You’ll learn about different values for the IndId column and how to determine the corresponding index name in this chapter’s “Effect of Indexes on Locking” section.
Note You’ll learn about different values for the IndId column and how to determine the corresponding index name in this chapter’s “Effect of Indexes on Locking” section.
Like the row-level lock, the key-level lock provides very high concurrency.
A page-level lock is maintained on a single page within a table or an index, and it is identified as a PAG lock. When a query requests multiple rows within a page, the consistency of all the requested rows can be maintained by acquiring either RID/KEY locks on the individual rows or a PAG lock on the entire page. From the query plan, the lock manager determines the resource pressure of acquiring multiple RID/KEY locks; and if the pressure is found to be high, the lock manager requests a PAG lock instead.
The resource locked by the PAG lock may be represented in the following format in the resource_description column of sys.dm_tran_locks:
DatabaseID:FileID:PageID
The page-level lock increases the performance of an individual query by reducing its locking overhead, but it hurts the concurrency of the database by blocking access to all the rows in the page.
An extent-level lockis maintained on an extent (a group of eight contiguous data or index pages), and it is identified as an EXT lock. This lock is used, for example, when an ALTER INDEX REBUILD command is executed on a table and the pages of the table may be moved from an existing extent to a new extent. During this period, the integrity of the extents is protected using EXT locks.
A heap or B-tree lock is used to describe when a lock to either type of object could be made. The target object could be an unordered heap table, a table without a clustered index, or a B-tree object, usually referring to partitions. A setting within the ALTER TABLE function allows you to exercise a level of control over how locking escalation (covered in the “Lock Escalation” section) is affected with the partitions. Because partitions are stored across multiple filegroups, each one has to have its own data allocation definition. This is where the HoBT comes into play. It acts like a table-level lock, but on a partition instead of on the table itself.
This is the highest level of lock on a table, and it is identified as a TAB lock. A table-level lock on a table reserves access to the complete table and all its indexes.
When a query is executed, the lock manager automatically determines the locking overhead of acquiring multiple locks at the lower levels. If the resource pressure of acquiring locks at the row level or the page level is determined to be high, then the lock manager directly acquires a table-level lock for the query.
The resource locked by the TAB lock will be represented in resourcedescription in the following format:
DatabaselD:ObjectID
A table-level lock requires the least overhead compared to the other locks and thus improves the performance of the individual query. On the other hand, since the table-level lock blocks all write requests on the entire table (including indexes), it can significantly hurt database concurrency.
Sometimes an application feature may benefit from using a specific lock level for a table referred to in a query. For instance, if an administrative query is executed during nonpeak hours, then a table-level lock may not impact the users of the system too much; however, it can reduce the locking overhead of the query and thereby improve its performance. In such cases, a query developer may override the lock manager’s lock level selection for a table referred to in the query by using locking hints:
SELECT * FROM <TableName> WITH(TABLOCK)
A database-level lock is maintained on a database and is identified as a DB lock. When an application makes a database connection, the lock manager assigns a database-level shared lock to the corresponding SPID. This prevents a user from accidentally dropping or restoring the database while other users are connected to it.
SQL Server ensures that the locks requested at one level respect the locks granted at other levels. For instance, oncea user acquires a row-level lock on a table row, another user can’t acquire a lock at any other level that may affect the integrity of the row. The second user may acquire a row-level lock on other rows or a page-level lock on other pages, but an incompatible page- or table-level lock containing the row won’t be granted to other users.
The level at which locks should be applied need not be specified by a user or database administrator; the lock manager determines that automatically. It generally prefers row-level and key-level locks when accessing a small number of rows to aid concurrency. However, if the locking overhead of multiple low-level locks turns out to be very high, the lock manager automatically selects an appropriate higherlevel lock.
Lock Operations and Modes
Because of the variety of operations that SQL Server needs to perform, an equally large and complex set of locking mechanisms are maintained. In addition to the different types of locks, there is an escalation path to change from one type of lock to another. The following sections describe these modes and processes, as well as their uses.
When a query is executed, SQL Server determines the required lock level for the database objects referred to in the query, and it starts executing the query after acquiring the required locks. During the query execution, the lock manager keeps track of the number of locks requested by the query to determine the need to escalate the lock level from the current level to a higher level.
The lock escalation threshold is dynamically determined by SQL Server during the course of a transaction. Row locks and page locks are automatically escalated to a table lock when a transaction exceeds its threshold. After the lock level is escalated to a table-level lock, all the lowerlevel locks on the table are automatically released. This dynamic lock escalation feature of the lock manager optimizes the locking overhead of a query.
It is possible to establish a level of control over the locking mechanisms on a given table. For example, you can control whether lock escalation occurs. Following is the T-SQL syntax to make that change:
ALTER TABLE schema.table
SET (LOCK_ESCALATION = DISABLE)
This syntax will disable lock escalation on the table entirely (except for a few special circumstances). You can also set it to TABLE, which will cause the escalation to go to a table lock every single time. You can also set lock escalation on the table to AUTO, which will allow SQL Server to make the determination for the locking schema and any escalation necessary. If that table is partitioned, you may see the escalation change to the partition level.
Lock Modes
The degree of isolation required by different transactions may vary. For instance, consistency of data is not affected if two transactions read the data simultaneously; however, the consistency is affected if two transactions are allowed to modify the data simultaneously. Depending on the type of access requested, SQL Server uses different lock modes while locking resources:
- Shared (S)
- Update (U)
- Exclusive (X)
- Intent:
- Intent Shared (IS)
- Intent Exclusive (IX)
- Shared with Intent Exclusive (SIX)
- Schema:
- Schema Modification (Sch-M)
- Schema Stability (Sch-S)
- Bulk Update (BU)
- Key-Range
Shared Mode is used for read-only queries, such as a SELECT statement. It doesn’t prevent other read-only queries from accessing the data simultaneously because the integrity of the data isn’t compromised by the concurrent reads. However,concurrent data modification queries on the data are prevented to maintain data integrity. The (S) lock is held on the data until the data is read. By default, the (S) lock acquired by a SELECT statement is released immediately after the data is read. For example, consider the following transaction:
BEGIN TRAN
SELECT *
FROM Production.Product AS p
WHERE p.ProductID = 1 ;
--Other queries
COMMIT
The (S) lock acquired by the SELECT statement is not held until the end of the transaction; instead, it is released immediately after the data is read by the SELECT statement under read_ committed, the default isolation level. This behavior of the (S) lock can be altered by using a higher isolation level or a lock hint.
Update Mode may be considered similar to the (S) lock, but it also includes an objective to modify the data as part of the same query. Unlike the (S) lock, the (U) lock indicates that the data is read for modification. Since the data is read with an objective to modify it, SQL Server does not allow more than one (U) lock on the data simultaneously. This rule helps to maintain data integrity. Note that concurrent (S) locks on the data are allowed. The (U) lock is associated with an UPDATE statement, and the action of an UPDATE statement actually involves two intermediate steps:
1. Read the data to be modified.
2. Modify the data.
Different lock modes are used in the two intermediate steps to maximize concurrency. Instead of acquiring an exclusive right while reading the data, the first step acquires a (U) lock on the data. In the second step, the (U) lock is converted to an exclusive lock for modification. If no modification is required, then the (U) lock is released; in other words, it’s not held until the end of the transaction. Consider the following example, which demonstrates the locking behavior of the UPDATE statement (--updatelock in the download):
BEGIN TRANSACTION LockTran1
UPDATE Sales.Currency
SET Name = 'Euro'
WHERE CurrencyCode = 'EUR' ;
COMMIT
To understand the locking behavior of the intermediate steps of the UPDATE statement, you need to obtain data from sys.dm_tran_locks at the end of each step. You can obtain the lock status after each step of the UPDATE statement by following the steps outlined next. You’re going have three connections open that I’ll refer to as Connection 1, Connection 2, and Connection 3. This will requirethree different query windows in Management Studio. You’ll run the queries in the connections I list in the order that I specify to arrive at a blocking situation; the point of this is to observe those blocks as they occur. The initial query, which was listed previously, is in Connection 1:
1. Block the second step of the UPDATE statement by first executing a transaction from asecond connection (--updatelock2 in the download), Connection 2:
--Execute from a second connection
BEGIN TRANSACTION LockTran2
--Retain an (S) lock on the resource
SELECT *
FROM Sales.Currency AS c WITH (REPEATABLEREAD)
WHERE c.CurrencyCode = 'EUR' ;
--Allow sp_lock to be executed before second step of
-- UPDATE statement is executed by transaction LockTran1
WAITFOR DELAY '00:00:01' ;
COMMIT
The REPEATABLEREAD locking hint, running in Connection 2, allows the SELECT statement to retain the (S) lock on the resource.
2. While the transaction Tx2 is executing, execute the UPDATE transaction,updatelock, from the first connection (repeated here for clarity), Connection 1:
BEGIN TRANSACTION LockTran1
UPDATE Sales.Currency
SET Name = 'Euro'
WHERE CurrencyCode = 'EUR' ;
-- NOTE: We're not committing yet
--COMMIT
3. While the UPDATE statement is blocked, query the sys.dm_tran_locks DMV from a thirdconnection, Connection 3, as follows:
SELECT dtl.request_session_id,
dtl.resource_database_id,
dtl.resource_associated_entity_id,
dtl.resource_type,
dtl.resource_description,
dtl.request_mode,
dtl.request_status
FROM sys.dm_tran_locks AS dtl
ORDER BY dtl.request_session_id ;
The output from sys.dmtranlocks in Connection 3 will provide the lock status after the first step of the UPDATE statement since the lock conversion to an exclusive (X) lock by the UPDATE statement is blocked by the SELECT statement.
4. The lock status after the second step of the UPDATE statement will be provided by rerunning the query against sys.dm_tran_locks in Connection 3.
Next, let’s look at the lock status provided by sys.dm_tran_locks as you go through the individual steps of the UPDATE statement:
- Figure 12-3 shows the lock status after Step 1 of the UPDATE statement (obtained from the output from sys.dm_tran_locks executed on the third connection, Connection 3, as explained previously).
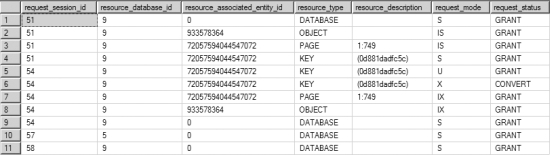
Figure 12-3. Output from sys.dm_tran_locks showing the lock conversion state of an UPDATE statement
![]() Note The order of these rows is not that important. I’ve ordered by session_id in order to group the locks from each query.
Note The order of these rows is not that important. I’ve ordered by session_id in order to group the locks from each query.
Figure 12-4 shows the lock status after Step 2 of the UPDATE statement.

Figure 12-4. Output from sys.dm_tran_locks showing the final lock status held by the UPDATE statement
From the sys.dm_tran_locks output after the first step of the UPDATE statement, you can note the following:
- A (U) lock is granted to the SPID on the data row.
- A conversion to an (X) lock on the data row is requested.
From the output of sys.dm_tran_locks after the second step of the UPDATE statement, you can see that the UPDATE statement holds only an (X) lock on the data row. Essentially, the (U) lock on the data row is converted to an (X) lock.
By not acquiring an exclusive lock at the first step, an UPDATE statement allows other transactions to read the data using the SELECT statement during that period. This is possible because (U) and (S) locks are compatible with each other. This increases database concurrency.
![]() Note I discuss lock compatibility among different lock modes later in this chapter.
Note I discuss lock compatibility among different lock modes later in this chapter.
You may be curious to learn why a (U) lock is used instead of an (S) lock in the first step of the UPDATE statement. To understand the drawback of using an (S) lock instead of a (U) lock in the first step of the UPDATE statement, let’s break the UPDATE statement into two steps:
1. Read the data to be modified using an (S) lock instead of a (U) lock.
2. Modify the data by acquiring an (X) lock.
Consider the following code (splitupdate.sql in the download):
BEGIN TRAN
--1.Read data to be modified using (S)lock instead of (U)lock.
--Retain the (S)lock using REPEATABLEREAD locking hint, since
--the original (U)lock is retained until the conversion to
--(X)lock.
SELECT *
FROM Sales.Currency AS c WITH (REPEATABLEREAD)
WHERE c.CurrencyCode = 'EUR' ;
--Allow another equivalent update action to start concurrently
WAITFOR DELAY '00:00:10' ;
--2. Modify the data by acquiring (X)lock
UPDATE Sales.Currency WITH (XLOCK)
SET Name = 'EURO'
WHERE CurrencyCode = 'EUR' ;
COMMIT
If this transaction is executed from two connections simultaneously, then it causes a deadlock, as follows:
Msg 1205, Level 13, State 51, Line 13
Transaction (Process ID 58) was deadlocked on lock resources with another process and has been chosen as the deadlock victim. Rerun the transaction.
Both transactions read the data to be modified using an (S) lock and then request an (X) lock for modification. When the first transaction attempts the conversion to the (X) lock, it is blocked by the (S) lock held by the second transaction. Similarly, when the second transaction attempts the conversion from (S) lock to the (X) lock, it is blocked by the (S) lock held by the first transaction, which in turn is blocked by the second transaction. This causes a circular block—and therefore, a deadlock.
![]() Note Deadlocks are covered in more detail in Chapter 13.
Note Deadlocks are covered in more detail in Chapter 13.
To avoid this typical deadlock, the UPDATE statement uses a (U) lock instead of an (S) lock at its first intermediate step. Unlike an (S) lock, a (U) lock doesn’t allow another (U) lock on the same resource simultaneously. This forces the second concurrent UPDATE statement to wait until the first UPDATE statement completes.
Exclusive Mode provides an exclusive right on a database resource for modification by data manipulation queries such as INSERT, UPDATE, and DELETE. It prevents other concurrent transactions from accessing the resource under modification. Both the INSERT and DELETE statements acquire (X) locks at the very beginning of their execution. As explained earlier, the UPDATE statement converts to the (X) lock after the data to be modified is read. The (X) locks granted in a transaction are held until the end of the transaction.
The (X) lock serves two purposes:
- It prevents other transactions from accessing the resource under modification, so that they see a value either before or after the modification, not a value undergoing modification.
- It allows the transaction modifying the resource to safely roll back to the original value before modification, if needed, since no other transaction is allowed to modify the resource simultaneously.
Intent Shared (IS), Intent Exclusive (IX), and Shared
with Intent Exclusive (SIX) Modes
Intent Shared, Intent Exclusive, and Shared with Intent Exclusive locks indicate that the query intends to grab a corresponding (S) or (X) lock at a lower lock level. For example, consider the following transaction on the Sales. Currency table (--isix in the download):
BEGIN TRAN
DELETE Sales.Currency
WHERE CurrencyCode = 'ALL' ;
SELECT tl.request_session_id,
tl.resource_database_id,
tl.resource_associated_entity_id,
tl.resource_type,
tl.resource_description,
tl.request_mode,
tl.request_status
FROM sys.dm_tran_locks tl ;
ROLLBACK TRAN
Figure 12-5 shows the output from sys.dmtranlocks.

Figure 12-5. Output from sys.dm_tran_locks showing the intent locks granted at higher levels
The (IX) lock at the table level (PAGE) indicates that the DELETE statement intends to acquire an (X) lock at a page, row, or key level. Similarly, the (IX) lock at the page level (PAGE) indicates that the query intends to acquire an (X) lock on a row in the page. The (IX) locks at the higher levels prevent another transaction from acquiring an incompatible lock on the table or on the page containing the row.
Flagging the intent lock—(IS) or (IX)—at a corresponding higher level by a transaction, while holding the lock at a lower level, prevents other transactions from acquiring an incompatible lock at the higher level. If the intent locks were not used, then a transaction trying to acquire a lock at a higher level would have to scan through the lower levels to detect the presence of lowerlevel locks. While the intent lock at the higher levels indicates the presence of a lowerlevel lock, the locking overhead of acquiring a lock at a higher level is optimized. The intent locks granted to a transaction are held until the end of the transaction.
Only a single (SIX) lock can be placed on a given resource at once. This prevents updates made by other transactions. Other transactions can place (IS) locks on the lowerlevel resources while the (SIX) lock is in place.
Furthermore, there can be a combination of locks requested (or acquired) at a certain level and the intention of having a lock (or locks) at a lower level. For example, there can be (SIU) and (UIX) lock combinations indicating that an (S) or a (U) lock has beenacquired at the corresponding level and that (U) or (X) lock(s) are intended at a lower level.
Schema Modification (Sch-M) and Schema Stability (Sch-S) Modes
Schema Modification and Schema Stability locks are acquired on a table by SQL statements that depend on the schema of the table. A DDL statement, working on the schema of a table, acquires an (Sch-M) lock on the table and prevents other transactions from accessing the table.An (Sch-S) lock is acquired for database activities that depend on the schemabtable,but do not modify the schema, such as a query compilation. It prevents an (Sch-M) lock on the table, but it allows other locks to be granted on the table.
Since, on a production database, schema modifications are infrequent, (Sch-M) locks don’t usually become a blocking issue. And because (Sch-S) locks don’t block other locks except (Sch-M) locks, concurrency is generally not affected by (Sch-S) locks either.
The Bulk Update lock mode is unique to bulk load operations. These operations are the older-style bcp (bulk copy), the BULK INSERT statement, and inserts from the OPENROWSET using the BULK option. As a mechanism for speeding up these processes, you can provide a TABLOCK hint or set the option on the table for it to lock on bulk load. The key to (BU) locking mode is that it will allow multiple bulk operations against the table being locked, but prevent other operations while the bulk process is running.
The Key-Range mode is applicable only while the isolation level is set to Serializable (you’ll learn more abouttransaction isolation levels in the later “Isolation Levels” section). The Key-Range locks are applied to a series, or range, of key values that will be used repeatedly while the transaction is open. Locking a range during a serializable transaction ensures that other rows are not inserted within the range, possibly changing result sets within the transaction. The range can be locked using the other lock modes, making this more like a combined locking mode rather than a distinctively separate locking mode. For the Key-Range lock mode to work, an index must be used to define the values within the range.
Lock Compatibility
SQL Server provides isolation to a transaction by preventing other transactions from accessing the same resource in an incompatible way. However, if a transaction attempts a compatible task on the same resource, then, to increase concurrency, it won’t be blocked by the first transaction. SQL Server ensures this kind of selective blocking by preventing a transaction from acquiring an incompatible lock on a resource held by another transaction. For example, an (S) lock acquired on a resource by a transaction allows other transactions to acquire an (S) lock on the same resource. However, an (Sch-M) lock on a resource by a transaction prevents other transactions from acquiring any lock on that resource.
Isolation Levels
The lock modes explained in the previous section help a transaction protect its data consistency from other concurrent transactions. The degree of data protection or isolation a transaction gets depends, not only on the lock modes, but also on the isolation level of the transaction. This level influences the behavior of the lock modes. For example, by default an (S) lock is released immediately after the data is read; it isn’t held until the end of the transaction. This behavior may not be suitable for some application functionality. In such cases, you can configure the isolation level of the transaction to achieve the desired degree of isolation.
SQL Server implements six isolation levels, four of them as defined by ISO:
- Read Uncommitted
- Read Committed
- Repeatable Read
- Serializable
Two other isolation levels provide row versioning, which is a mechanism whereby a version of the row is created as part of data manipulation queries. This extra version of the row allows read queries to access the data without acquiring locks against it. The extra two isolation levels are as follows:
- Read Committed Snapshot (actually part of the Read Committed isolation)
- Snapshot
The four ISO isolation levels are listed in increasing order of degree of isolation. You can configure them at either the connection or query level by using the SET TRANSACTION ISOLATION LEVEL statement or the locking hints, respectively. The isolation level configuration at the connection level remains effective until the isolation level is reconfigured using the SET statement or until the connection is closed. All the isolation levels are explained in the sections that follow.
Read Uncommitted is the lowest of the four isolation levels, and it allows SELECT statements to read data without requesting an (S) lock. Since an (S) lock is not requested by a SELECT statement, it neither blocks nor is blocked by the (X) lock. It allows a SELECT statement to read data while the data is under modification. This kind of data read is called a dirty read.
Assume you have an application in which the amount of data modification is extremely minimal and that your application doesn’t require much in the way of accuracy from the SELECT statement it issues to read data.. In this case, you can use the Read Uncommitted isolation level to avoid having some other data modification activity block the SELECT statement.
You can use the following SET statement to configure the isolation level of a database connection to the Read Uncommitted isolation level:
SET TRANSACTION ISOLATION LEVEL READ UNCOMMITTED
You can also achieve this degree of isolation on a query basis using the NOLOCK locking hint:
SELECT * FROM Production.Products WITH(NOLOCK);
The effect of the locking hint remains applicable for the query and doesn’t change the isolation level of the connection.
The Read Uncommitted isolation level avoids the blocking caused by a SELECT statement, but you should not use it if the transaction depends on the accuracy of the data read by the SELECT statement or if the transaction cannot withstand a concurrent change of data by another transaction.
It’s very important to understand what is meant by a dirty read. Lots of people think this means that, while a field is being updated from Tusa to Tulsa, a query can still read the previous value or even the updated value, prior to the commit. Although that is true, much more egregious data problems could occur. Since no locks are placed while reading the data, indexes may be split. This can result in extra ormissing rows of data returned to the query. To be very clear, using Read Uncommitted in any environment where data manipulation is occurring as well as data reads can result in unanticipated behaviors. The intention of this isolation level is for systems primarily focused on reporting and business intelligence, not online transaction processing.
The Read Committed isolation level prevents the dirty read caused by the Read Uncommitted isolation level. This means that (S) locks are requested by the SELECT statements at this isolation level. This is the default isolation level of SQL Server. If needed, you can change the isolation level of a connection to Read Committed by using the following SET statement:
SET TRANSACTION ISOLATION LEVEL READ COMMITTED
The Read Committed isolation level is good for most cases, but since the (S) lock acquired by the SELECT statement isn’t held until the end of the transaction, it can cause nonrepeatable read or phantom read issues, as explained in the sections that follow.
The behavior of the Read Committed isolation level can be changed by theREAD_COMMITTED_SNAPSHOT database option. When this is set to ON, row versioning is used by data manipulation transactions. This places an extra load on tempdb because previous versions of the rows being changed are stored there while the transaction is uncommitted. This allows other transactions to access data for reads without having to place locks on the data, which can improve the speed and efficiency of all the queries in the system.
Next, modify the AdventureWorks2008R2 database so that READ_COMMITTED_SNAPSHOT is turned on:
ALTER DATABASE AdventureWorks2008R2
SET READ_COMMITTED_SNAPSHOT ON ;
Now imagine a business situation. The first connection and transaction will be pulling data from the Production.Product table, acquiring the color of a particular item (--read_committed):
BEGIN TRANSACTION ;
SELECT p.Color
FROM Production.Product AS p
WHERE p.ProductID = 711 ;
A second connection is made with a new transaction that will be modifying the color of the same item (--change_color):
BEGIN TRANSACTION ;
UPDATE Production.Product
SET Color = 'Coyote'
WHERE ProductID = 711 ;
SELECT p.Color
FROM Production.Product AS p
WHERE p.ProductID = 711 ;
Running the SELECT statement after updating the color, you can see that the color was updated. But if you switch back to the first connection and rerun the original SELECT statement (don’t run the BEGIN TRAN statement again), you’ll still see the color as Blue. Switch back to the second connection, and finish the transaction:
COMMIT TRANSACTION ;
Switching again to the first transaction, commit that transaction, and then rerun the original SELECT statement. You’ll see the new color updated for the item, Coyote. You can reset the isolation level on AdventureWorks2008R2 before continuing:
ALTER DATABASE AdventureWorks2008R2
SET READ_COMMITTED_SNAPSHOT OFF ;
![]() Note If the tempdb is filled, data modification using row versioning will continue to succeed, butreads may fail since the versioned row will not be available. If you enable any type of row versioning isolation within your database, you must take extra care to maintain free space within tempdb.
Note If the tempdb is filled, data modification using row versioning will continue to succeed, butreads may fail since the versioned row will not be available. If you enable any type of row versioning isolation within your database, you must take extra care to maintain free space within tempdb.
The Repeatable Read isolation level allows a SELECT statement to retain its (S) lock until the end of the transaction, thereby preventing other transactions from modifying the data during that time. Database functionality may implement a logical decision inside a transaction based on the data read by a SELECT statement within the transaction. If the outcome of the decision is dependent on the data read by the SELECT statement, then you should consider preventing modification of the data by other concurrent transactions. For example, consider the following two transactions:
- Normalize the price for ProductID = 1: For ProductID = 1, if Price > 10, then decrease theprice by 10.
- Apply a discount: For Products with Price > 10, apply a discount of 40 percent.
Now consider the following test table (repeatable.sql in the download):
IF (SELECT OBJECT_ID('dbo.MyProduct')
) IS NOT NULL
DROP TABLE dbo.MyProduct ;
GO
CREATE TABLE dbo.MyProduct
(ProductID INT,
Price MONEY
) ;
INSERT INTO dbo.MyProduct
VALUES (1, 15.0) ;
You can write the two transactions like this (--repeatabletrans):
DECLARE @Price INT ;
BEGIN TRAN NormailizePrice
SELECT @Price = mp.Price
FROM dbo.MyProduct AS mp
WHERE mp.ProductID = 1 ;
/*Allow transaction 2 to execute*/
WAITFOR DELAY '00:00:10' ;
IF @Price > 10
UPDATE dbo.MyProduct
SET Price = Price - 10
WHERE ProductID = 1 ;
COMMIT
--Transaction 2 from Connection 2
BEGIN TRAN ApplyDiscount
UPDATE dbo.MyProduct
SET Price = Price * 0.6 --Discount = 40%
WHERE Price > 10 ;
COMMIT
On the surface, the preceding transactions may look good; and yes, they do work in a single-user environment. But in a multiuser environment, where multiple transactions can be executed concurrently, you have a problem here!
To figure out the problem, let’s execute the two transactions from different connections in the following order:
1. Start transaction 1 first.
2. Start transaction 2 within tenseconds of the start of transaction 1.
As you may have guessed, at the end of the transactions, the new price of the product (with ProductID = 1) will be -1.0. Ouch—it appears that you’re ready to go out of business!
The problem occurs because transaction 2 is allowed to modify the data while transaction 1 has finished reading the data and is about to make a decision on it. Transaction 1 requires a higher degree of isolation than that provided by the default isolation level (Read Committed).
As a solution, you want to prevent transaction 2 from modifying the data while transaction 1 is working on it. In other words, provide transaction 1 with the ability to read the data again later in the transaction without being modified by others. This feature is called repeatable read. Considering the context, the implementation of the solution is probably obvious. After re-creating the sample table, you can write this:
SET TRANSACTION ISOLATION LEVEL REPEATABLE READ ;
GO
--Transaction 1 from Connection 1
DECLARE @Price INT ;
BEGIN TRAN NormalizePrice
SELECT @Price = Price
FROM dbo.MyProduct AS mp
WHERE mp.ProductID = 1 ;
/*Allow transaction 2 to execute*/
WAITFOR DELAY '00:00:10' ;
IF @Price > 10
UPDATE dbo.MyProduct
SET Price = Price - 10
WHERE ProductID = 1 ;
COMMIT
GO
SET TRANSACTION ISOLATION LEVEL READ COMMITTED --Back to default
GO
Increasing the isolation level of transaction 1 to Repeatable Read will prevent transaction 2 from modifying the data during the execution of transaction 1. Consequently, you won’t have an inconsistency in the price of the product. Since the intention isn’t to release the (S) lock acquired by the SELECT statement until the end of the transaction, the effect of setting the isolation level to Repeatable Read can also be implemented at the query level using the lock hint:
DECLARE @Price INT ;
BEGIN TRAN NormaalizePrice
SELECT @Price = Price
FROM dbo.MyProduct AS mp WITH (REPEATABLEREAD)
WHERE mp.ProductID = 1 ;
/*Allow transaction 2 to execute*/
WAITFOR DELAY '00:00:10'
IF @Price > 10
UPDATE dbo.MyProduct
SET Price = Price - 10
WHERE ProductID = 1 ;
COMMIT
This solution prevents the data inconsistency of MyProduct.Price, but it introduces another problem to this scenario. On observing the result of transaction 2, you realize that it could cause a deadlock. Therefore, although the preceding solution prevented the datainconsistency, it is not a complete solution. Looking closely at the effect of the Repeatable Read isolation level on the transactions, you see that it introduced the typical deadlock issue avoided by the internal implementation of an UPDATE statement, as explained previously. The SELECT statement acquired and retained an (S) lock instead of a (U) lock, even though it intended to modify the data later within the transaction. The (S) lock allowed transaction 2 to acquire a (U) lock, but it blocked the (U) lock’s conversion to an (X) lock. The attempt of transaction 1 to acquire a (U) lock on the data at a later stage caused a circular blocking, resulting in a deadlock.
To prevent the deadlock and still avoid data corruption, you can use an equivalent strategy as adopted by the internal implementation of the UPDATE statement. Thus, instead of requesting an (S) lock, transaction 1 can request a (U) lock by using an UPDLOCK locking hint when executing the SELECT statement:
DECLARE @Price INT ;
BEGIN TRAN NormailizePrice
SELECT @Price = Price
FROM dbo.MyProduct AS mp WITH (UPDLOCK)
WHERE mp.ProductID = 1 ;
/*Allow transaction 2 to execute*/
WAITFOR DELAY '00:00:10'
IF @Price > 10
UPDATE dbo.MyProduct
SET Price = Price - 10
WHERE ProductID = 1 ;
COMMIT
This solution prevents both data inconsistency and the possibility of the deadlock. If the increase of the isolation level to Repeatable Read had not introduced the typical deadlock, then it would have done the job. Since there is a chance of a deadlock occurring because of the retention of an (S) lock until the end of a transaction, it is usually preferable to grab a (U) lock instead of holding the (S) lock, as just illustrated.
Serializable is the highest of the six isolation levels. Instead of acquiring a lock only on the row to be accessed, the Serializable isolation level acquires a range lock on the row and the next row in the order of the data set requested. For instance, a SELECT statement executed at the Serializable isolation level acquires a (RangeS-S) lock on the row to be accessed and the next row in the order. This prevents the addition of rows by other transactions in the data set operated on by the first transaction, and it protects the first transaction from finding new rows in its data set within its transaction scope. Finding new rows in a data set within a transaction is also called a phantom read.
To understand the need for a Serializable isolation level, let’s consider an example. Suppose a group (with GroupID = 10) in a company has a fund of $100 to be distributed among the employees in the group as a bonus. The fund balance after the bonus payment should be $0. Consider the following test table (--serializable in the download):
IF (SELECT OBJECT_ID('dbo.MyEmployees')
) IS NOT NULL
DROP TABLE dbo.MyEmployees ;
GO
CREATE TABLE dbo.MyEmployees
(EmployeeID INT,
GroupID INT,
Salary MONEY
) ;
CREATE CLUSTERED INDEX i1 ON dbo.MyEmployees (GroupID) ;
--Employee 1 in group 10
INSERT INTO dbo.MyEmployees
VALUES (1, 10, 1000) ;
--Employee 2 in group 10
INSERT INTO dbo.MyEmployees
VALUES (2, 10, 1000) ;
--Employees 3 & 4 in different groups
INSERT INTO dbo.MyEmployees
VALUES (3, 20, 1000) ;
INSERT INTO dbo.MyEmployees
VALUES (4, 9, 1000) ;
The preceding business functionality may be implemented as follows (--bonus in the download):
DECLARE @Fund MONEY = 100,
@Bonus MONEY,
@NumberOfEmployees INT ;
BEGIN TRAN PayBonus
SELECT @NumberOfEmployees = COUNT(*)
FROM dbo.MyEmployees
WHERE GroupID = 10 ;
/*Allow transaction 2 to execute*/
WAITFOR DELAY '00:00:10' ;
IF @NumberOfEmployees > 0
BEGIN
SET @Bonus = @Fund / @NumberOfEmployees ;
UPDATE dbo.MyEmployees
SET Salary = Salary + @Bonus
WHERE GroupID = 10 ;
PRINT 'Fund balance =
' + CAST((@Fund - (ROWCOUNT * @Bonus)) AS VARCHAR(6)) + ' $' ;
END
COMMIT
You’ll see the returned value as a fund balance of $0 since the updates complete successfully. The PayBonus transaction works well in a single-user environment. However, in a multiuser environment, there is a problem.
Consider another transaction that adds a new employee to GroupID = 10 as follows (--new_ employee in the download) and is executed concurrently (immediately after the start of the PayBonus transaction) from a second connection:
BEGIN TRAN NewEmployee
INSERT INTO MyEmployees
VALUES (5, 10, 1000) ;
COMMIT
The fund balance after the PayBonus transaction will be -$50! Although the new employee may like it, the group fund will be in the red. This causes an inconsistency in the logical state of the data.
To prevent this data inconsistency, the addition of the new employee to the group (or data set) under operation should be blocked. Of the five isolation levels discussed, only Snapshot isolation can provide a similar functionality, since the transaction has to be protected not only on the existing data, but also from the entry of new data in the data set. The Serializable isolation level can provide this kind of isolation by acquiring a range lock on the affected row and the next row in the order determined by the il index on the GroupID column. Thus, the data inconsistency of the PayBonus transaction can be prevented by setting the transaction isolation level to Serializable.
Remember to re-create the table first:
SET TRANSACTION ISOLATION LEVEL SERIALIZABLE ;
GO
DECLARE @Fund MONEY = 100,
@Bonus MONEY,
@NumberOfEmployees INT ;
BEGIN TRAN PayBonus
SELECT @NumberOfEmployees = COUNT(*)
FROM dbo.MyEmployees
WHERE GroupID = 10 ;
/*Allow transaction 2 to execute*/
WAITFOR DELAY '00:00:10' ;
IF @NumberOfEmployees > 0
BEGIN
SET @Bonus = @Fund / @NumberOfEmployees ;
UPDATE dbo.MyEmployees
SET Salary = Salary + @Bonus
WHERE GroupID = 10 ;
PRINT 'Fund balance =
' + CAST((@Fund - (ROWCOUNT * @Bonus)) AS VARCHAR(6)) + ' $' ;
END
COMMIT
GO
--Back to default
SET TRANSACTION ISOLATION LEVEL READ COMMITTED ;
GO
The effect of the Serializable isolation level can also be achieved at the query level by using the HOLDLOCK locking hint on the SELECT statement, as shown here:
DECLARE @Fund MONEY = 100,
@Bonus MONEY,
@NumberOfEmployees INT ;
BEGIN TRAN PayBonus
SELECT @NumberOfEmployees = COUNT(*)
FROM dbo.MyEmployees WITH (HOLDLOCK)
WHERE GroupID = 10 ;
/*Allow transaction 2 to execute*/
WAITFOR DELAY '00:00:10' ;
IF @NumberOfEmployees > 0
BEGIN
SET @Bonus = @Fund / @NumberOfEmployees
UPDATE dbo.MyEmployees
SET Salary = Salary + @Bonus
WHERE GroupID = 10 ;
PRINT 'Fund balance =
' + CAST((@Fund - (ROWCOUNT * @Bonus)) AS VARCHAR(6)) + ' $' ;
END
COMMIT
You can observe the range locks acquired by the PayBonus transaction by querying sys.dm_tran_locks from another connection while the PayBonus transaction is executing, as shown in Figure 12-6.
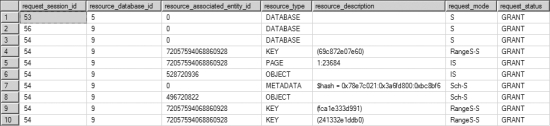
Figure 12-6. Output from sys.dm_tran_locks showing range locks granted to the serializable transaction
The output of sys.dm_tran_locks shows that shared-range (RangeS-S) locks are acquired on three index rows: the first employee in GroupID = 10, the second employee in GroupID = 10, and the third employee in GroupID = 20. These range locks prevent the entry of any new employee in GroupID = 10.
The range locks just shown introduce a few interesting side effects:
- No new employee with a GroupID between 10 and 20 can be added during this period.For instance, an attempt to add a new employee with a GroupID of 15 will be blocked bythe PayBonus transaction:
BEGIN TRAN NewEmployee
INSERT INTO dbo.MyEmployees
VALUES (6, 15, 1000) ;
COMMIT
- If the data set of the PayBonus transaction turns out to be the last set in the existing dataordered by the index, then the range lock required on the row, after the last one in thedata set, is acquired on the last possible data value in the table.
- To understand this behavior, let’s delete the employees with a GroupID > 10 to make the GroupID = 10 data set the last data set in the clustered index (or table):
DELETE dbo.MyEmployees
WHERE GroupID > 10 ;
Run the updated bonus and newemployee again. Figure 12-7 shows the resultant output of sys.dm_tran_locks for the PayBonus transaction.
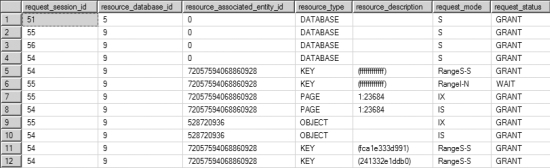
Figure 12-7. Output from sys.dm_tran_locks showing extended range locks granted to the serializable transaction
The range lock on the last possible row (KEY = ffffffffffff) in the clustered index, as shown in
Figure 12-7, will block the addition of employees with all GroupIDs greater than or equal to 10. You know that the lock is on the last row, not because it’s displayed in a visible fashion in the output of sys.dm_tran_locks, but because you cleaned out everything up to that row previously. For example, an attempt to add a new employee with GroupID = 999 will be blocked by the PayBonus transaction:
BEGIN TRAN NewEmployee
INSERT INTO dbo.MyEmployees
VALUES (7, 999, 1000) ;
COMMIT
Guess what will happen if the table doesn’t have an index on the GroupID column (i.e., the column in the WHERE clause)? While you’re thinking, I’ll re-create the table with the clustered index on a different column:
IF (SELECT OBJECT_ID('dbo.MyEmployees')
) IS NOT NULL
DROP TABLE dbo.MyEmployees ;
GO
CREATE TABLE dbo.MyEmployees
(EmployeeID INT,
GroupID INT,
Salary MONEY
) ;
CREATE CLUSTERED INDEX i1 ON dbo.MyEmployees (EmployeeID) ;
--Employee 1 in group 10
INSERT INTO dbo.MyEmployees
VALUES (1, 10, 1000) ;
--Employee 2 in group 10
INSERT INTO dbo.MyEmployees
VALUES (2, 10, 1000) ;
--Employees 3 & 4 in different groups
INSERT INTO dbo.MyEmployees
VALUES (3, 20, 1000) ;
INSERT INTO dbo.MyEmployees
VALUES (4, 9, 1000) ;
Now rerun the updated bonus.sql and newemployee.sql. Figure 12-8 shows the resultant output of
sys.dm_tran_locks for the PayBonus transaction.
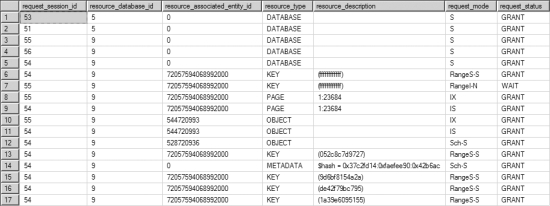
Figure 12-8. Output from sys.dm_tran_locks showing range locks granted to the serializable transaction with no index on the WHERE clause column
Once again, the range lock on the last possible row (KEY = ffffffffffff) in the new clustered index, as shown in Figure 12-8, will block the addition of any new row to the table. I will discuss the reason behind this extensive locking later in the chapter in the “Effect of Indexes on the Serializable Isolation Level” section.
As you’ve seen, the Serializable isolation level not only holds the share locks until the end of the transaction like the Repeatable Read isolation level, but it also prevents any new row from appearing in the data set by holding range locks. Because this increased blocking can hurt database concurrency, you should avoid the Serializable isolation level. If you have to use Serializable, then be sure that you have good indexes and queries in place to optimize performance in order to minimize the size and length of your transactions.
Snapshot isolation is the second of the row-versioning isolation levels available in SQL Server 2012. Unlike Read Committed Snapshot isolation, Snapshot isolation requires an explicit call to SET TRANSACTION ISOLATION LEVEL at the start of the transaction. It also requires setting the isolation level on the database. Snapshot isolation is meant as a more stringent isolation level than the Read Committed Snapshot isolation. Snapshot isolation
will attempt to put an exclusive lock on the data it intends to modify. If that data already has a lock on it, the snapshot transaction will fail. It provides transaction-level read consistency, which makes it more applicable
to financial-type systems than Read Committed Snapshot.
Effect of Indexes on Locking
Indexes affect the locking behavior on a table. On a table with no indexes, the lock granularities are RID, PAG (on the page containing the RID), and TAB. Adding indexes to the table affects the resources to be locked. For example, consider the following test table with no indexes (--indexlocktest inthedownload):
IF (SELECT OBJECT_ID('dbo.Test1')
) IS NOT NULL
DROP TABLE dbo.Test1 ;
GO
CREATE TABLE dbo.Test1 (C1 INT, C2 DATETIME) ;
INSERT INTO dbo.Test1
VALUES (1, GETDATE()) ;
Next, observe the locking behavior on the table for the transaction (--indexlock in the download):
BEGIN TRAN LockBehavior
UPDATE dbo.Test1 WITH (REPEATABLEREAD) --Hold all acquired locks
SET C2 = GETDATE()
WHERE C1 = 1 ;
--Observe lock behavior from another connection
WAITFOR DELAY '00:00:10' ;
COMMIT
Figure 12-9 shows the output of sys.dm_tran_locks applicable to the test table.

Figure 12-9. Output from sys.dm_tran_locks showing the locks granted on a table with no index
The following locks are acquired by the transaction:
- An (IX) lock on the table
- An (IX) lock on the page containing the data row
- An (X) lock on the data row within the table
When the resource_type is an object, the resource_associated_entity_id column value in sys.dm_tran_locks indicates the objectid of the object on which the lock is placed. You can obtain the specific object name on which the lock is acquired from the sys.object system table, as follows:
SELECT OBJECT_NAME(<object_id>);
The effect of the index on the locking behavior of the table varies with the type of index on the WHERE clause column. The difference arises from the fact that the leaf pages of the nonclustered and clustered indexes have a different relationship with the data pages of the table. Let’s look into the effect of these indexes on the locking behavior of the table.
Effect of a Nonclustered Index
Because the leaf pages of the nonclustered index are separate from the data pages of the table, the resources associated with the nonclustered index are also protected from corruption. SQL Server automatically ensures this. To see this in action, create a nonclustered index on the test table:
CREATE NONCLUSTERED INDEX iTest ON dbo.Test1(C1) ;
On running the LockBehavior transaction (indexlock) again and querying sys.dm_tranlocks from a separate connection, you get the result shown in Figure 12-10.
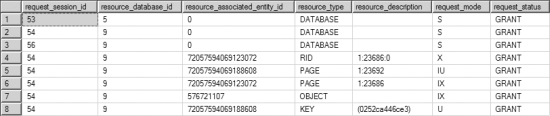
Figure 12-10. Output from sys.dm_tran_locks showing the effect of a nonclustered index on locking behavior
The following locks are acquired by the transaction:
- An (IU) lock on the page containing the nonclustered index row, (Indld = 2)
- A (U) lock on the nonclustered index row within the index page, (Indld = 2)
- An (IX) lock on the table, (Indld = 0)
- An (IX) lock on the page containing the data row, (Indld = 0)
- An (X) lock on the data row within the data page, (Indld = 0)
Note that only the row-level and page-level locks are directly associated with the non-clustered index. The next higher level of lock granularity for the nonclustered index is the table-level lock on the corresponding table.
Thus, nonclustered indexes introduce an additional locking overhead on the table. You can avoid the locking overhead on the index by using the ALL0W_R0W_L0CKS and ALL0W_PAGE_LOCKS options in ALTER INDEX. Understand though, this is a tradeoff that could involve a loss of performance and requires careful testing to ensure it doesn’t negatively impact your system (indexoption in the download):
ALTER INDEX iTest ON dbo.Test1
SET (ALLOW_ROW_LOCKS = OFF ,ALLOW_PAGE_LOCKS= OFF) ;
BEGIN TRAN LockBehavior
UPDATE dbo.Test1 WITH (REPEATABLEREAD) --Hold all acquired locks
SET C2 = GETDATE()
WHERE C1 = 1 ;
--Observe lock behavior using sys.dm_tran_locks
--from another connection
WAITFOR DELAY '00:00:10' ;
COMMIT
ALTER INDEX iTest ON dbo.Test1
SET (ALLOW_ROW_LOCKS = ON ,ALLOW_PAGE_LOCKS= ON) ;
You can use these options when working with an index to enable/disable the KEY locks and PAG locks on the index. Disabling just the KEY lock causes the lowest lock granularity on the index to be the PAG lock. Configuring lock granularity on the index remains effective until it is reconfigured.
![]() Note Modifying locks like this should be a last resort after many other options have been tried. This could cause significant locking overhead that would seriously impact the performance of the system.
Note Modifying locks like this should be a last resort after many other options have been tried. This could cause significant locking overhead that would seriously impact the performance of the system.
Figure 12-11 displays the output of sys.dm_tran_locks executed from a separate connection.

Figure 12-11. Output from sys.dm_tran_locks showing the effect of sp_indexoption on lock granularity
The only lock acquired by the transaction on the test table is an (X) lock on the table (Indld = 0).
You can see from the new locking behavior that disabling the KEY lock escalates lock granularity to the table level. This will block every concurrent access to the table or to the indexes on the table;consequently, it can seriouslyhurt the database concurrency. However, if a nonclustered index becomes a point of contention in a blocking scenario, then it may be beneficial to disable the PAG locks on the index, thereby allowing only KEY locks on the index.
![]() Note Using this option can have serious side effects. You should use it only as alastresort.
Note Using this option can have serious side effects. You should use it only as alastresort.
Effect of a Clustered Index
Since for a clustered index the leaf pages of the index and the data pages of the table are the same, the clustered index can be used to avoid the overhead of locking additional pages (leaf pages) and rows introduced by a nonclustered index. To understand the locking overhead associated with a clustered index, convert the preceding nonclustered index to a clustered index:
CREATE CLUSTERED INDEX iTest ON dbo.Test1(C1) WITH DROP_EXISTING ;
If you run indexlock.sql again and query sys.dm_tran_locks in a different connection, you should see the resultant output for the LockBehavior transaction on tl shown in Figure 12-12.
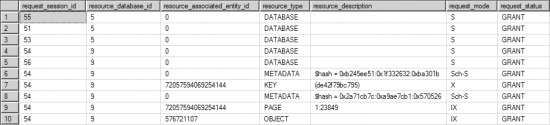
Figure 12-12. Output from sys.dm_tran_locks showing the effect of a clustered index on locking behavior
The following locks are acquired by the transaction:
- An (IX) lock on the table, (Indld = 0)
- An (IX) lock on the page containing the clustered index row (Indld = 1)
- An (X) lock on the clustered index row within the table or clustered index(Indld = 1)
The locks on the clustered index row and the leaf page are actually the locks on the data row and data page, too, since the data pages and the leaf pages are the same. Thus, the clustered index reduced the locking overhead on the table compared to the nonclustered index.
Reduced locking overhead of a clustered index is another benefit of using a clustered index over a nonclustered index.
Effect of Indexes on the Serializable Isolation Level
Indexes play a significant role in determining the amount of blocking caused by the Serializable isolation level. The availability of an index on the WHERE clause column (that causes the data set to be locked) allows SQL Server to determine the order of the rows to be locked. For instance, consider the example used in the section on the Serializable isolation level. The SELECT statement uses a GroupID filter column to form its data set, like so:
DECLARE @NumberOfEmployees INT;
SELECT @NumberOfEmployees = COUNT(*)
FROM dbo.MyEmployees WITH (HOLDLOCK)
WHERE GroupID = 10;
A clustered index is available on the GroupID column, allowing SQL Server to acquire a (RangeS-S) lock on the row to be accessed and the next row in the correct order.
If the index on the GroupID column is removed, then SQL Server cannot determine the rows on which the range locks should be acquired, since the order of the rows is no longer guaranteed. Consequently, the SELECT statement acquires an (IS) lock at the table level instead of acquiring lower-granularity locks at the row level, as shown in Figure 12-13.
![]()
Figure 12-13. Output from sys.dm_tran_locks showing the locks granted to a SELECT statement with no index on the WHERE clause column
By failing to have an index on the filter column, you significantly increase the degree of blocking caused by the Serializable isolation level. This is another good reason to have an index on the WHERE clause columns.
Capturing Blocking Information
Although blocking is necessary to isolate a transaction from other concurrent transactions, sometimes it may rise to excessive levels, adversely affecting database concurrency. In the simplest blocking scenario, the lock acquired by a session on a resource blocks another session requesting an incompatible lock on the resource. To improve concurrency, it is important to analyze the cause of blocking and apply the appropriate resolution.
In a blocking scenario, you need the following information to have a clear understanding of the cause of the blocking:
- The connection information of the blocking and blocked sessions: You can obtain this information from the sys.dm_os_waiting_tasks dynamic management view or the sp_who2 system stored procedure.
- The lock information of the blocking and blocked sessions: You can obtain this information from the sys.dm_tran_locks DMO.
- The SQL statements last executed by the blocking and blocked sessions: You can use the sys.dm_exec_requests DMV combined with sys.dm_exec_sql_text and sys.dm_exec_queryplan or Extended Events to obtain this information.
You can also obtain the following information from the SQL Server Management Studio by running the Activity Monitor. The Processes page provides connection information of all SPIDs. This shows blocked SPIDS, the process blocking them, and the head of any blocking chain with details on how long the process has been running, its SPID, and other information. It is possible to put Extended Events to work using the blocking report to gather a lot of the same information. For immediate checks on locking, use the DMOs; but for extended monitoring and historical tracking, you’ll want to use the Extended Events. You can find more on this in the “Extended Events and the blocked_process_report Event” section.
To provide more power and flexibility to the process of collecting blocking information, a SQL Server administrator can use SQL scripts to provide the relevant information listed here.
Capturing Blocking Information with SQL
To arrive at enough information about blocked and blocking processes, you can bring several dynamic management views into play. This query will show information necessary to identify blocked processes based on those that are waiting. You can easily add filtering to only access processes blocked for a certain period of time or only within certain databases, among other options(--blocker):
SELECT dtl.request_session_id AS WaitingSessionID,
der.blocking_session_id AS BlockingSessionID,
dowt.resource_description,
der.wait_type,
dowt.wait_duration_ms,
DB_NAME(dtl.resource_database_id) AS DatabaseName,
dtl.resource_associated_entity_id AS WaitingAssociatedEntity,
dtl.resource_type AS WaitingResourceType,
dtl.request_type AS WaitingRequestType,
dest.[text] AS WaitingTSql,
dtlbl.request_type BlockingRequestType,
destbl.[text] AS BlockingTsql
FROM sys.dm_tran_locks AS dtl
JOIN sys.dm_os_waiting_tasks AS dowt
ON dtl.lock_owner_address = dowt.resource_address
JOIN sys.dm_exec_requests AS der
ON der.session_id = dtl.request_session_id
CROSS APPLY sys.dm_exec_sql_text(der.sql_handle) AS dest
LEFT JOIN sys.dm_exec_requests derbl
ON derbl.session_id = dowt.blocking_session_id
OUTER APPLY sys.dm_exec_sql_text(derbl.sql_handle) AS destbl
LEFT JOIN sys.dm_tran_locks AS dtlbl
ON derbl.session_id = dtlbl.request_session_id ;
To understand how to analyze a blocking scenario and the relevant information provided by the blocker script, consider the following example (--blockit in the download). First, create a test table:
IF (SELECT OBJECT_ID('dbo.BlockTest')
) IS NOT NULL
DROP TABLE dbo.BlockTest ;
GO
CREATE TABLE dbo.BlockTest
(C1 INT,
C2 INT,
C3 DATETIME
) ;
INSERT INTO dbo.BlockTest
VALUES (11, 12, GETDATE()),
(21, 22, GETDATE()) ;
Now open three connections and run the following two queries concurrently. Once yourun them, use the blockerscript in the third connection. Execute the code in Listing 12-1 first.
Listing 12-1. Connection 1
BEGIN TRAN User1
UPDATE dbo.BlockTest
SET C3 = GETDATE() ;
Next, execute Listing 12-2 while the User1 transaction is executing.
Listing 12-2. Connection 2
BEGIN TRAN User2
SELECT C2
FROM dbo.BlockTest
WHERE C1 = 11 ;
COMMIT
This creates a simple blocking scenario where the User1 transaction blocks the User2 transaction.
The output of the blocker script provides information immediately useful to begin resolving blocking issues. First, you can identify the specific session information, including the session ID of both the blocking and waiting sessions. You get an immediate resource description from the waiting resource, the wait type, and the length of time in milliseconds that the process has been waiting. It’s that value that allows you to provide a filter to eliminate short-term blocks, which are part of normal processing.
The database name is supplied because blocking can occur anywhere in the system, not just in AdventureWorks2008R2. You’ll want to identify it where it occurs. The resources and types from the basic locking information are retrieved for the waiting process.
The blocking request type is displayed, and both the waiting T-SQL and blocking T-SQL, if available, are displayed. Once you have the object where the block is occurring, having the T-SQL so that you can understand exactly where and how the process is either blocking or being blocked is a vital part of the process of eliminating or reducing the amount of blocking. All this information is available from one simple query. Figure 12-14 shows the sample output from the earlier blocked process.
![]()
Figure 12-14. Output from the blocker script
Be sure to go back to Connection 1 and commit or roll back the transaction.
Extended Events and the blocked_process_report Event
Extended Events provide an event called blocked_process_report. This event works off the blocked process threshold that you need to provide to the system configuration. This script sets the threshold to five seconds:
EXEC sp_configure
'blocked process threshold',
5 ;
RECONFIGURE ;
That would normally be a very low value in most systems. If you have an established performance service-level agreement (SLA), you could use that as the threshold. Once the value is set, you can configure alerts so that emails, tweets, or instant messages are sent if any process is blocked longer than the value you set. It also acts as a trigger for the extended event.
To set up a session that captures the blocked_process_report, first open the Extended Event session properties window. (Although you should use scripts to set up this event in a production environment, I’ll show how to use the GUI.) Provide the session with a name then navigate to the Events page. You can type “block” into the Event library text box. That will find the blocked_process_report event. Select that event by clicking the right arrow. You should see something similar to Figure 12-15.
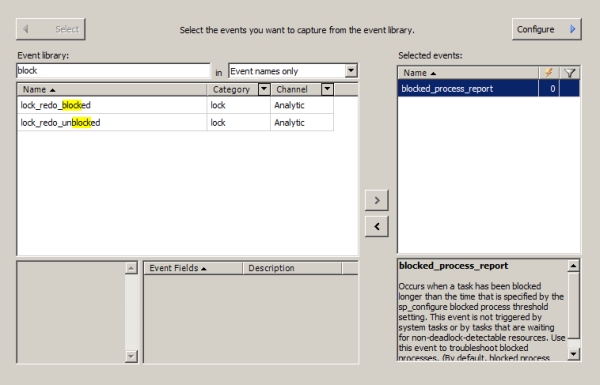
Figure 12-15. The blocked process report event selected in the Extended Event window
The event fields are all pre-selected for you. If you still have the queries running from the previous section that created the block, all you need to do now is click the Run button to capture the event. Otherwise, go back to Listings 12-1 and 12-2 and run them in two different connections. After the blocked process threshold is passed, you’ll see the event fire. And fire. It will fire every five seconds if that’s how you’ve configured it, and you’re leaving the connections running from Listings 12-1 and 12-2. The output in the Live Data stream looks like Figure 12-16.
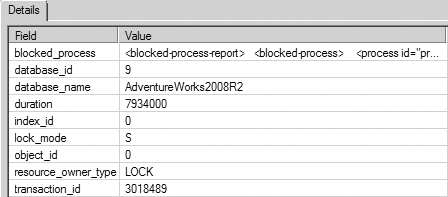
Figure 12-16. Output from the blocked_process_report event
Some of the information is self-explanatory; but to get into the details, you need to look at the XML generated in the blocked_process field:
<blocked-process-report>
<blocked-process>
<process id="processf72da928" taskpriority="0" logused="0" waitresource="RID: 9:1:23848:0" waittime="7934" ownerId="3018489" transactionname="User2" lasttranstarted="2012-01-15T11:22:16.350" XDES="0xee4d2d08" lockMode="S" schedulerid="1" kpid="3024" status="suspended" spid="57" sbid="0" ecid="0" priority="0" trancount="1" lastbatchstarted="2012-01-15T11:22:16.347" lastbatchcompleted="2012-01-15T11:22:16.347" lastattention="2012-01-15T11:04:00.473" clientapp="Microsoft SQL Server Management Studio - Query" hostname="DOJO" hostpid="2376" loginname="NEVERNEVERgrant" isolationlevel="read committed (2)" xactid="3018489" currentdb="9" lockTimeout="4294967295" clientoption1="671098976" clientoption2="390200">
<executionStack>
<frame line="2" stmtstart="16" sqlhandle="0x020000002a6f05353077f6dbaa7bbe96cfee8ff96aec32750000000000000000000000000000000000000000" />
<frame line="2" stmtstart="36" stmtend="142" sqlhandle="0x020000003026cd11ca472917c7f1c1bf648be7cfbe2ae0cd0000000000000000000000000000000000000000" />
</executionStack>
<inputbuf>
BEGIN TRAN User2
SELECT C2
FROM dbo.BlockTest
WHERE C1 = 11 ;
COMMIT
</inputbuf>
</process>
</blocked-process>
<blocking-process>
<process status="sleeping" spid="54" sbid="0" ecid="0" priority="0" trancount="1" lastbatchstarted="2012-01-15T11:22:13.017" lastbatchcompleted="2012-01-15T11:22:13.017" lastattention="2012-01-15T10:29:22.713" clientapp="Microsoft SQL Server Management Studio - Query" hostname="DOJO" hostpid="2376" loginname="NEVERNEVERgrant" isolationlevel="read committed (2)" xactid="3018448" currentdb="9" lockTimeout="4294967295" clientoption1="671098976" clientoption2="390200">
<executionStack />
<inputbuf>
DECLARE @edition sysname; SET @edition = cast(SERVERPROPERTY(N'EDITION') as sysname); select case when @edition = N'SQL Azure' then 2 else 1 end as 'DatabaseEngineType' </inputbuf>
</process>
</blocking-process>
</blocked-process-report>
The elements are clearif you look through this XML. <blocked-process> shows information about the process that was blocked, including familiar information such as the session id (labeled with the old fashioned SPID here), the database ID, and so on. You can see the query in the <inputbuf> element. Details like the lockMode are available within the <process> element.Note that the XML doesn’t include some of the other information that you can easily get from T-SQL queries, such as the query string of the blocked and waiting process. But with the SPID available, you can get them from the cache, if available, or you can combine the Blocked Process report with other events such as rpc_starting to show the query information. However, doing so will add to the overhead of using those events long term within your database. If you know you have a blocking problem, this can be part of a short-term monitoring project to capture the necessary blocking information.
Once you’ve analyzed the cause of a block, the next step is to determine any possible resolutions. Here are a few techniques you can use to do this:
- Optimize the queries executed by blocking and blocked SPIDs.
- Decrease the isolation level.
- Partition the contended data.
- Use a covering index on the contended data.
![]() Note A detailed list of recommendations to avoid blocking appears later in the chapter in the “Recommendations to Reduce Blocking”section.
Note A detailed list of recommendations to avoid blocking appears later in the chapter in the “Recommendations to Reduce Blocking”section.
To understand these resolution techniques, let’s apply them in turn to the preceding blocking scenario.
Optimize the Queries
Optimizing the queries executed by the blocking and blocked processes helps reduce the blocking duration. In the blocking scenario, the queries executed by the processes participating in the blocking are as follows:
- Blocking process:
BEGIN TRAN User1
UPDATE dbo.BlockTest
SET C3 = GETDATE() ;
- Blocked process:
BEGIN TRAN User2
SELECT C2
FROM dbo.BlockTest
WHERE C1 = 11 ;
COMMIT
Next, let’s analyze the individual SQL statements executed by the blocking and blocked SPIDs to optimize their performance:
- The UPDATE statement of the blocking SPID accesses the data without a WHERE clause. This makes the query inherently costly on a large table. If possible, break the action of the UPDATE statement into multiple batches using appropriate WHERE clauses. Remember to try to use set-based operations such as a TOP statement to limit the rows. If the individual UPDATE statements of the batch are executed in separate transactions, then fewer locks will be held on the resource within one transaction, and for shorter time periods.
- The SELECT statement executed by the blocked SPID has a WHERE clause on the c1 column. From the index structure on the test table, you can see that there is no index on this column. To optimize the SELECT statement, you could create a clustered index on the c1 column:
CREATE CLUSTERED INDEX i1 ON dbo.BlockTest(c1) ;
![]() Note Since the example table fits with in one page, adding the clustered index won’t make much difference to the query performance. However, as the number of rows in the table increases, the beneficial effect of the index will become more pronounced.
Note Since the example table fits with in one page, adding the clustered index won’t make much difference to the query performance. However, as the number of rows in the table increases, the beneficial effect of the index will become more pronounced.
Optimizing the queries reduces the duration for which the locks are held by the processes. The query optimization reduces the impact of blocking, but it doesn’t prevent the blocking completely. However, as long as the optimized queries execute within acceptable performance limits, a small amount of blocking may be ignored.
Another approach to resolve blocking can be to use a lower isolation level, if possible. The SELECT statement of the User2 transaction gets blocked while requesting an (S) lock on the data row. The isolation level of this transaction can be decreased to Read Uncommitted, so that the (S) lock is not requested by the SELECT statement. The Read Uncommitted isolation level can be configured for the connection using the SET statement:
SET TRANSACTION ISOLATION LEVEL READ UNCOMMITTED ;
GO
BEGIN TRAN User2
SELECT C2
FROM dbo.BlockTest
WHERE C1 = 11 ;
COMMIT
GO
--Back to default GO
SET TRANSACTION ISOLATION LEVEL READ COMMITTED ;
The Read Uncommitted isolation level can also be configured for the SELECT statement at a query level by using the NOLOCK locking hint:
BEGIN TRAN User2
SELECT C2
FROM dbo.BlockTest WITH (NOLOCK)
WHERE C1 = 11 ;
COMMIT
The Read Uncommitted isolation level avoids the blocking faced by the User2 transaction.
This example shows the utility of reducing the isolation level. However, as a production solution, this has severe problems. Not only can you get dirty reads, which means that the data returned by the select statement is changing or changed, but you can get inconsistent reads. It’s possible while reading uncommitted data to get extra rows or fewer rows as pages are split and rearranged by the actions of other queries. Reading uncommitted data is a very popular way to reduce contention and increase performance on the database, but it comes at a very high cost in terms of data accuracy. Be very aware of these costs prior to attempting to use this as an active solution within your database.
When dealing with very large data sets or data that can be very discretely stored, it is possible to apply table partitioning to the data. Partitioned data is split horizontally; that is, by certain values (e.g., splitting sales data up by month). This allows the transactions to execute concurrently on the individual partitions, without blocking each other. These separate partitions are treated as a single unit for querying, updating, and inserting; only the storage and access are separated out by SQL Server. It should be noted that partitioning is available only in the Developer Edition and Enterprise Edition of SQL Server.
In the preceding blocking scenario, the data could be separated by date. This would entail setting up multiple filegroups and splitting the data per a defined rule. Once the UPDATE statement gets a WHERE clause, then it and the original SELECT statement will be able to execute concurrently on two separate partitions.
![]() Note Partitioning the table does add some overhead to maintaining integrity between the parts of the table. However, if done properly, it can improve both performance and concurrency on very large data sets.
Note Partitioning the table does add some overhead to maintaining integrity between the parts of the table. However, if done properly, it can improve both performance and concurrency on very large data sets.
In a blocking scenario, you should analyze whether the query of the blocking or the blocked process can be fully satisfied using a covering index. If the query of one of the processes can be satisfied using a covering index, then it will prevent the process from requesting locks on the contended resource. Also, if the other process doesn’t need a lock on the covering index (to maintain data integrity), then both processes will be able to execute concurrently without blocking each other.
For instance, in the preceding blocking scenario, the SELECT statement by the blocked process can be fully satisfied by a covering index on the cl and c2 columns:
CREATE NONCLUSTERED INDEX iAvoidBlocking ON dbo.BlockTest(C1, C2) ;
The transaction of the blocking process need not acquire a lock on the covering index since it accesses only the c3 column of the table. The covering index will allow the SELECT statement to get the values for thecl and c2 columns without accessing the base table. Thus, the SELECT statement of the blocked process can acquire an (S) lock on the covering-index row without being blocked by the (X) lock on the data row acquired by the blocking process. This allows both transactions to execute concurrently without any blocking.
Consider a covering index as a mechanism to “duplicate” part of the table data in whichconsistency is automatically maintained by SQL Server. This covering index, if mostly read-only, can allow some transactions to be served from the “duplicate” data while the base table (and other indexes) can continue to serve other transactions.
Recommendations to Reduce Blocking
Single-user performance and the ability to scale with multiple users are both important for a database application. In a multiuser environment, it is important to ensure that the database operations don’t hold database resources for a long time. This allows the database to support a large number of operations (or database users) concurrently without serious performance degradation. The following is a list of tips to reduce/avoid database blocking:
- Keep transactions short:
- Perform the minimum steps/logic within a transaction.
- Do not perform costly external activity within a transaction, such as sending acknowledgment email or performing activities driven by the end user.
- Optimize queries using indexes:
- Create indexes as required to ensure optimal performance of the queries within the system.
- Avoid a clustered index on frequently updated columns. Updates to clustered index key columns require locks on the clustered index and all nonclustered indexes (since their row locator contains the clustered index key).
- Consider using a covering index to serve the blocked SELECT statements.
- Consider partitioning a contended table.
- Use query timeouts or a resource governor to control runaway queries.
- Avoid losing control over the scope of the transactions because of poor error-handling routines or application logic:
- Use SET XACTABORT ON to avoid a transaction being left open on an error condition within the transaction.
- Execute the following SQL statement from a client error handler (TRY/CATCH) after executing a SQL batch or stored procedure containing a transaction:
IF @@TRANCOUNT > 0 ROLLBACK
- Use the lowest isolation level required:
- Use the default isolation level (Read Committed).
- Consider using row versioning to help reduce contention.
Automation to Detect and Collect Blocking Information
In addition to capturing information using extended events, you can automate the process of detecting a blocking condition and collecting the relevant information using SQL Server Agent. SQL Server provides the Performance Monitor counters shown in Table 12-1 to track the amount of wait time.
Table 12-1. Performance Monitor Counters
|
Object |
Counter |
Instance |
Description |
|
SQLServer:Locks (For SOL Server named instance MSSOL$<InstanceName>:Locks) |
Average Wait Time(ms) |
_Total |
The average amount of wait time for each lock that resulted in a wait |
|
Lock Wait Time (ms) |
_Total |
Total wait time for locks |
You can create a combination of SQL Server alerts and jobs to automate the following process:
1. Determine when the average amount of wait time exceeds an acceptable amount of blocking using the Average Wait Time (ms) counter. Based on your preferences, you can use the Lock Wait Time (ms) counter instead.
2. Once you’ve established the minimum wait, set Blocked Process Threshold. When the average wait time exceeds the limit, notify the SQL Server DBA of the blocking situation through e-mail.
3. Automatically collect the blocking information using the blocker script or a trace that relies onthe Blocked Process report for a certain period of time.
To set up the Blocked Process report to run automatically, first create the SQL Server job, called Blocking Analysis, so that it can be used by the SQL Server alert you’ll create later. You can create this SQL Server job from SQL Server Management Studio to collect blocking information by following these steps:
1. Generate an extended events script (as detailed in Chapter 3) using the blocked_process_report event.
2. Run the script to create the session on the server, but don’t start it yet.
3. In Management Studio, expand the server by selecting <ServerName> ![]() SQL Server Agent
SQL Server Agent ![]() Jobs. Finally, right-click and select New Job.
Jobs. Finally, right-click and select New Job.
4. On the General page of the New Job dialog box, enter the job name and other details.
5. On the Steps page, click New and enter the command to start and stop the sessionthrough T-SQL, as shown in Figure 12-17.
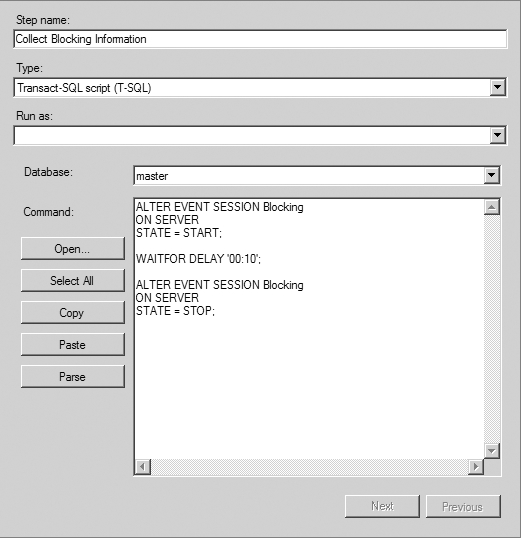
Figure 12-17. Entering the command to run the blocker script
You can do this using the following command:
ALTER EVENT SESSION Blocking
ON SERVER
STATE = START;
WAITFOR DELAY '00:10’;
ALTER EVENT SESSION Blocking
ON SERVER
STATE = STOP;
The output of the session is determined by how you defined it when you created it.
6. Return to the New Job dialog box by clicking OK.
7. Click OK to create the SQL Server job. The SQL Server job will be created with an enabled and runnable state to collect blocking information for ten minutes using the trace script.
You can create a SQL Server alert to automate the following tasks:
- Inform the DBA via email, SMS text, or pager.
- Execute the Blocking Analysis job to collect blocking information for ten minutes.
You can create the SQL Server alert from SQL Server Enterprise Manager by following these steps:
1. In Management Studio, while still in the SQL Agent area of the Object Explorer,
right-click Alerts and select New Alert.
2. On the General page of the new alert’s Properties dialog box, enter the alert name and other details, as shown in Figure 12-18. The specific object you need to capture information from for your instance is Locks (MSSQL$GF2008:Locks in Figure 12-18).
I chose 500ms as an example of a stringent SLA that wants to know when queries extend beyond that value.

Figure 12-18. Entering the alert name and other details
3. On the Response page, define the response you think appropriate, such as alerting an operator.
4. Return to the new alert’s Properties dialog box by clicking OK.
5. On the Response page, enter the remaining information shown in Figure 12-19.
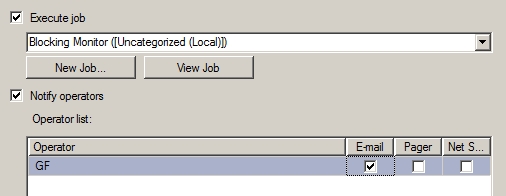
Figure 12-19. Entering the actions to beperformed when the alert is triggered
6. The Blocking Analysis job is selected to automatically collect the blocking information.
7. Once you’ve finished entering all the information, click OK to create the SQL Server alert. The SQL Server alert will be created in the enabled state to perform the intended tasks.
8. Ensure that the SQL Server Agent is running.
Together, the SQL Server alert and the job will automate the blocking detection and the information-collection process. This automatic collection of the blocking information will ensure that a good amount of the blocking information will be available whenever the system gets into a massive blocking state.
Summary
Even though blocking is inevitable and is in fact essential to maintain isolation among transactions, it can sometimes adversely affect database concurrency. In a multiuser database application, you must minimize blocking among concurrent transactions.
SQL Server provides different techniques to avoid/reduce blocking, and a database application should take advantage of these techniques to scale linearly as the number of database users increases. When an application faces a high degree of blocking, you can collect the relevant blocking information using various tools to understand the root cause of the blocking. The next step is to use an appropriate technique to either avoid or reduce blocking.
Blocking can not only hurt concurrency, but lead to an abrupt termination of a database request in the case of mutual blocking between processes or even within a process. We will cover this event, known as adeadlock, in the next chapter.