One of the new tasks in DTS for SQL Server 2000 is the Message Queue Task. This task is designed to allow DTS to participate in all design situations in which message queues are useful.
Message queuing is all about moving data between loosely coupled, highly distributed applications and systems. Message queuing has an infrastructure in many ways similar to email systems, but instead of sending mail to people, you send messages to queues. Instead of people looking in their inboxes for mail, applications monitor a queue. When a message arrives, the application can open the message and extract any embedded data, perform actions on the data, and return the message with new data back to the sender. Queue messages can be encrypted and auto-returned if they are not picked up in a predefined amount of time. Best of all, the systems do not have to have reliable communication lines for queues to work.
Message queues are useful in many situations:
When communication lines are unreliable and the sender is not dependent on a reply from the recipient. The sender sends the message and then moves on to do additional work. If the communication lines are down, the messages will stack up and wait until the communication lines come up again. When the lines are open, the messages move on to their intended recipient queues. An example is a Web site that takes orders and sends the transactions to the accounting system or an order-processing system. We will build this example in this chapter.
When the time to reply does not need to be immediate, but you do need a processed reply back with contained data, such as in an order-processing system that needs to do a credit-rating check before proceeding. The system can send the request for the customer’s credit rating and then continue working on other tasks. When the reply message comes back with the customer’s actual credit rating, the system will continue processing the order.
When the recipient may not be able to keep up during high peak times. Messages will stack up in the queue and wait until the recipient can get around to processing them.
In load-balancing situations. You can have several computers monitor the same queue, and as a computer is available for work, it will take the next available message and start processing it.
When you want to pass information to several systems. The information can be identical or different. The sender just sends a message with the appropriate data to each recipient. For example, if a repair-order message has been received, the main processing system can send a work-order notification to the accounting system, send a work schedule to the scheduling system, and send a replacementpart request to the inventory control system.
In cross-platform situations. With the products already on the market, you can send messages across Windows, UNIX, AS/400, Tandem, Digital, VMS, CICS/MVS, and more.
These are just some of the situations in which message queues have been useful in today’s environment.
To work this example, you must have access to a Microsoft message queue. If you are working on Windows 2000 or Windows NT 4.0 with the option pack installed, you can create a private queue that can work with this example.
Discussing how to install message queuing or create a message-queue domain is beyond the scope of this book. However, at the Microsoft Message Queue Home Page (www.microsoft.com/msmq/), you will find great information, including demos, white papers, case studies, and links to technical information. We will discuss how to create a private queue that can be used during a package’s execution phase, a package that sends data via a queue, and a package that listens to a queue to pick up the messages and processes the contained data.
In the example used here, the Web server is selling products. But the server is in a different geographic location from the manufacturing database. You are concerned that the network communication lines between the two systems may be down sometimes; you also are concerned about workload. You do not want to slow down the e-commerce service if the manufacturing database starts to slow down and choke on the high volumes. Also, you want to have the orders coming in as they are placed, one transaction at a time.
Figure 15.1 shows the process this example will follow. The e-commerce site (DTS Package Queue Sender) will take the order, pack it into an XML document, and send it to the manufacturing database via a message-queue message. The manufacturing database has a DTS package (Queue Receiver) that is monitoring the queue and loads the order data into the correct tables as they arrive. For this exercise, you will need the new SQL Server 2000 feature OpenXML to insert the data into multiple tables.
Because you don’t have a real Web site that creates orders, the first of two packages will simulate the e-commerce site by creating and sending multiple product orders. To better represent a transaction system, this first package will contain a loop and issue 10 orders at a time, each for a different customer.
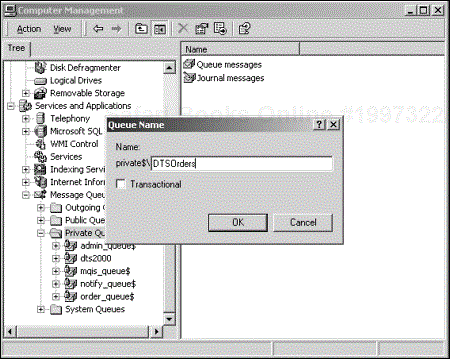
To create a queue in Windows 2000, you need to go to the Computer Management window. If message queuing is installed, you will see a Message Queuing node inside the Services and Applications node. Select Private Queue. Then choose New from the Action menu and Private Queue from the submenu. The Queue Name dialog box opens. Type the queue name in the text box. For this example, type DTSOrders. Do not check the Transactional check box. Then click OK to create the queue (see Figure 15.2).
Creating a Queue in Windows NT 4.0
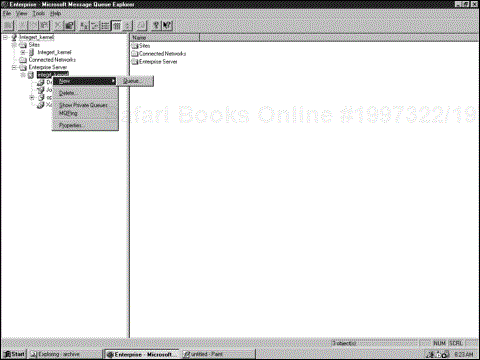
NT 4.0 did not include message queuing in the basic installation, but you can add it through the option pack, which is available free from Microsoft (www.microsoft.com/ntserver/nts/downloads/recommended/nt4optpk). After message queuing is installed, you can access it through the Start menu; choose Programs > Windows NT 4.0 Option Pack > Microsoft Message Queue > Explorer. When the MSMQ Explorer tool opens, you can click on your server’s node to select it. Right-click on the server node object to display the shortcut menu, choose New, and then select Queue (see Figure 15.3). In the Create New Queue dialog box, type the queue name. For this example, type DTSOrders.
Now we need to insert an order into a SQL Server-based manufacturing database. Using the SQL Server Enterprise Manager, create a new database called
Manufacturing. Then use the Data Import Wizard to import all the tables and data from the Access database C:DTS2000DataManufacturing.mdb [1] . You will be bringing in 17 tables from Access.
Create a new, empty DTS package, and save it as Queue Sender. Next, you need to create a global variable that will count the number of orders sent. Right-click the package and choose Package Properties from the shortcut menu to open the Package Properties dialog box. Click the Global Variables tab. Create one global variable called Counter, and set the type as integer with a value of 0.
Create an ActiveX Script task called Order Generator to create an order, and save it as an XML document. This task will create a random order with data for customer, freight expense, order data, and required date; then it will generate multiple-order detail records containing product, quantity, and unit price. The task will package the order in an XML string and save it to disk. The really cool feature about using XML is that with one XML document, you can create a new order that will update multiple tables.
The key components of the script will generate random numbers and create the XML string. Generating random numbers is easy with VBScript. First, you initialize the randomization engine by using the Randomize command. Then you can create any integer value between two numbers by using the Rnd function in the following algorithm:
Int((HighValue * Rnd) + LowValue )
For instance if you want to generate a random integer between 18 and 136, the formula is:
Int((136 * Rnd) + 18)
XML
Extensible Markup Language (XML) is a hypertext programming language used to describe the contents of a set of data. XML can even contain information about how the data should be displayed. Like the other markup languages, XML uses tags to explain the data. XML is flexible enough to represent an unlimited variation of data relationships.
Listing 15.1 shows customers and their corresponding orders. The first Customer is Company1, the CustomerID is XYZZ, and the Contact is Joe. Company1 placed an order on August 8 and one on October 3. The second customer is Company2, with only one order on June 13. You can see that each topic or node has a begin and end tag. For example, "<Customer" is the topic and the field name is CustomerID. CustomerID is followed by the CustomerID value XYZAA. The customer-related data ends with the </Customer> tag. The whole string begins with the <root> tag and ends with the </root> tag. As you can see, XML easily (and in a somewhat readable format) represents the data that would be split into several tables in a normalized RDBMS.
Example 15.1. Sample XML Document That Contains Several Orders
<ROOT>
     <Customers CustomerID="XYZAA" ContactName="Joe" CompanyName="Company1">
      <Orders CustomerID="XYZAA" OrderDate="2000-08-25T00:00:00"/>
      <Orders CustomerID="XYZAA" OrderDate="2000-10-03T00:00:00"/>
     </Customers>
     <Customers CustomerID="XYZBB" ContactName="Steve" CompanyName="Company2">
      <Orders CustomerID=" XYZBB " OrderDate="2000-06-13T00:00:00"/>
     </Customers>
</ROOT>
The XML string that you will need to create looks like this:
<OrderRoot><OrderData CustomerID="5" Freight="37.47" OrderDate="03/24/1998"
RequiredDate="5/29/1998"><OrderDetailData OrderID="??OrderID??" ProductID="11"
Quantity="361"/><OrderDetailData OrderID="??OrderID??" ProductID="14"
Quantity="76"/><OrderDetailData OrderID="??OrderID??" ProductID="10"
Quantity="71"/></OrderData></OrderRoot>
The string starts with <OrderRoot> and ends with </OrderRoot>. The order header data starts with the tag <OrderData>, which maps into the Order table at the recipient system. The Order table needs CustomerID, Freight Expense, OrderDate, and Required Date. Two fields in the recipient system, EmployeeID and Shipdate, cannot be filled in, because the product was sold via the Web and the product hasn’t been shipped yet
The next part of the XML string contains the OrderDetailData for three items. This information maps to the OrderDetail table in the recipient system. That table has a foreign-key reference to the Order table, using the OrderID, and needs ProductID, Quantity, and UnitPrice. This order is closed with the </OrderData> tag.
Careful inspection will show that XML can easily represent many items in one order and even many orders all within one string. To be closer to a real-life situation, we will allow up to 20 items per order. You will notice that there is no OrderID in the OrderDetailData string; you have it filled with the keyword OrderID, wrapped by question marks before and after. This keyword holds the place for the OrderID. When the order is placed, you will have the actual ID value, and you can replace the string with the ID and then update the order detail items.
To build the XML document, you will use the Microsoft XML Document Object Model (DOM). The object model lets you create node objects to which you can assign a name and values, and nest these objects in parent–child relationships, as order details are nested inside an order. The DOM will handle the XML syntax and make sure that all the beginning and ending tags are in place. To build the document, follow these steps:
Create an empty document, as follows:
Set oDoc = CreateObject("MSXML.DOMDocument")Create the root node called Order Root, and add it to the document by using the Append Child method, as follows:
  Set nodBase = oDoc.createNode(1, "OrderRoot", "")
oDoc.appendChild nodBase
Create the order header node called OrderData, as follows:
Set nodOrder = oDoc.createNode(1, "OrderData", "")
You will not add this node to the document until after you add all the data to the order.
Add data fields and values for the order (such as Customer, Purchase Date, and Required Date), as follows:
Set nodDataValue = oDoc.createAttribute("CustomerID")
nodDataValue.Text = Int((21 * Rnd) + 1 )
nodOrder.Attributes.setNamedItem nodDataValue
For example, you will add Customer by creating the Customer node, adding the CustomerID to the Text property of the node, and then adding the CustomerID node to the OrderData node.
After you populate the Order header, you need to populate the order details (such as Product, Purchase Price, and Quantity):
Set nodOrderDetail = oDoc.createNode(1, "OrderDetailData", "")
To hold the data, first to create an Order Detail node, just as you would need to create an Order Detail table in a normalized database.
Create the order detail data (such as ProductID), as follows:
'Create a random Product(between 1-16)
    Set nodDataValue = oDoc.createAttribute("ProductID")
    nodDataValue.Text = Int((16 * Rnd) + 1 )
    nodOrderDetail.Attributes.setNamedItem nodDataValue
You create this data the way you did the order header data: create the node, assign it a value, and then add the node to the OrderDetailData node.
Save the file to disk.
DTS provides three ways to pack data into a message: string, global variable, and data file. The data file allows you to transport the largest amount of data (up to 4MB) and therefore is the best choice. To generate the XML data file, all you need to do is execute the Save method on the DOM and specify the file location and name, as follows:
oDoc.save "C:DTS2000DataOrderOut.XML"
Listing 15.2 shows the full code to generate a purchase order randomly and persist it to file.
Example 15.2. VBScript to Create an XML-Based Order by Using the Microsoft XML Document Object
Function Main
  Dim iRandomValue
  Dim iTotalItemCount
  Dim i
  Dim sTransDate
  Dim oDoc
  Dim nodBase
  Dim nodOrder
  Dim nodDataValue
  Dim nodOrderDetail

  'Create an initiate of the random-number generator.
  Randomize

    'Create an instance of the Microsoft XML Document Object
  Set oDoc = CreateObject("MSXML.DOMDocument")

  Set nodBase = oDoc.createNode(1, "OrderRoot", "")
  oDoc.appendChild nodBase

  Set nodOrder = oDoc.createNode(1, "OrderData", "")

  'Create a random Customer(between 1-21)
  Set nodDataValue = oDoc.createAttribute("CustomerID")
  nodDataValue.Text = Int((21 * Rnd) + 1 )
  nodOrder.Attributes.setNamedItem nodDataValue

  'Create a random Freight Expense(between $10.00 and $100.00)
  Set nodDataValue = oDoc.createAttribute("Freight")
  nodDataValue.Text = Int((10000 * Rnd) + 1000 ) / 100
  nodOrder.Attributes.setNamedItem nodDataValue

  'For the OrderDate we will send all the transactions during May 1998. Format is
03/DD/1998
  Set nodDataValue = oDoc.createAttribute("OrderDate")
  sTransDate = "03/" & Int((31 * Rnd) + 1 ) & "/1998"
  nodDataValue.Text = sTransDate
  nodOrder.Attributes.setNamedItem nodDataValue

  'Required Date will be between 5 and 100 days from Order Date
  Set nodDataValue = oDoc.createAttribute("RequiredDate")
  nodDataValue.Text = DateAdd( "d" ,Int((100 * Rnd) + 5 ) , sTransDate )
  nodOrder.Attributes.setNamedItem nodDataValue

  'Append the Order Items for the Order. There can be from 1 to 20 items ordered
per order
  iTotalItemCount = Int((20 * Rnd) + 1)
  For i = 1 to iTotalItemCount

    Set nodOrderDetail = oDoc.createNode(1, "OrderDetailData", "")

    'We don't know the OrderID but we can put in a placeholder until we do
    Set nodDataValue = oDoc.createAttribute("OrderID")
    nodDataValue.Text = "??OrderID??"
    nodOrderDetail.Attributes.setNamedItem nodDataValue
    'Create a random Product(between 1-16)
     Set nodDataValue = oDoc.createAttribute("ProductID")
     nodDataValue.Text = Int((16 * Rnd) + 1 )
     nodOrderDetail.Attributes.setNamedItem nodDataValue

    'Create a random Quantity Order (between 5-100 Units)
    Set nodDataValue = oDoc.createAttribute("Quantity")
    nodDataValue.Text = Int((100 * Rnd) + 5 )
    nodOrderDetail.Attributes.setNamedItem nodDataValue
    nodOrder.appendChild nodOrderDetail

    'Create a random Unit Price (between 25-500 Dollars)
    Set nodDataValue = oDoc.createAttribute("UnitPrice")
    nodDataValue.Text =Int((500 * Rnd) + 25 )
    nodOrderDetail.Attributes.setNamedItem nodDataValue
    nodOrder.appendChild nodOrderDetail
  Next

  nodBase.appendChild nodOrder
  oDoc.save "C:DTS2000DataOrderOut.XML"

  Main = DTSTaskExecResult_Success

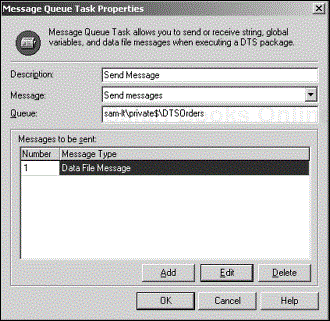
End Function In the DTS Designer, add the Message Queue task to the package. Set the description to “Send Order,” the message property to Send Message, and the queue to Computer NameQueue TypeQueue Name—in this case, sam-ltprivate$DTSOrders. Remember to add the dollar sign ($) after the queue type. Figure 15.4 shows the Message Queue Task Properties screen.
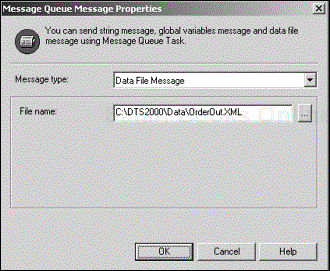
To create the message to send, click the Add button to open the Message Queue Message Properties dialog box. Type Data File Message in the Message Type text box; then, in the File Name text box, type the path and filename that you entered in the VBScript earlier: C:DTS2000DataOrderOut.XML (see Figure 15.5).
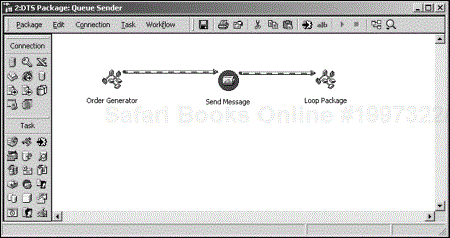
Connect the Order Generator Task with the Send Message Task by using an On Completion workflow connection. If you run the package now, the tasks will create a single order and send it to the queue. To better simulate a real system, you need to generate multiple orders. Therefore, you need to make the package loop many times.
To keep things contained, you will have the package loop 10 times (creating 10 orders) every time you run the package. To do so, you need to add an ActiveX Script Task and have it reset the execution status of the Order Generator Task waiting to execute DTSStepExecStat_Waiting. This setting restarts the task and has it generate another purchase order. You do this for 10 iterations, using the global variable Counter and increasing the count every time work comes to this ActiveX Script Task.
Drag an ActiveX Script Task from the taskbar, and place it to the right of the Message Queue Task. Double-click the new task, and set the description to Loop Package. Add the script in Listing 15.3 to make the package loop 10 times.
Example 15.3. VBScript to Loop a Package 10 Times
Function Main()

   Dim oPkg
   DTSGlobalVariables("Counter").Value = _
   DTSGlobalVariables("Counter").Value + 1

   If DTSGlobalVariables("Counter").Value < 10 THEN
     Set oPkg = DTSGlobalVariables.Parent

     'Set the Order Generator Step to Waiting
oPkg.Steps("DTSStep_DTSActiveScriptTask_1").ExecutionStatus = _
      DTSStepExecStat_Waiting

   Else
     DTSGlobalVariables("Counter").Value = 0
   END IF

         Main = DTSTaskExecResult_Success

End Function
The steps involved with setting another task’s status is to first get an instance of the current package object using the following code.
"Set oPkg = DTSGlobalVariables.Parent".
Then set the step’s execution status to waiting, as follows:
oPkg.Steps("DTSStep_DTSActiveScriptTask_1").ExecutionStatus = _
 DTSStepExecStat_Waiting
To know how to reference the step name for a task, right-click the task, choose Workflow from the shortcut menu, and then choose Workflow Properties to bring up the Workflow Properties dialog box. The Options tab has a read-only name property that contains the step name you need to reference—in this case, DTSStep_DTSActiveScriptTask_1. Finally, be sure to reset the global variable Counter back to zero. After the package has run 10 times, set Counter = 0.
After the code is entered and parsed for syntax correctness, click OK to get back to the package; then add an On Completion workflow from Send Message to Loop Package. Save the package and run it a few times to stack up messages in the queue. The completed package should look like Figure 15.6.
The second package you need to create is the Queue Receiver package, which will listen to the message queue and process the orders as they come in. The basic workflow of this package will be to have a Message Queue Task listen to the queue. When an appropriate message arrives, the package saves the data file to disk and loads the XML document into the appropriate tables by using one of SQL Server 2000’s new XML features.
The stored procedure will process the XML string. Before you start working on the package, create the stored procedure that will process the XML document. The stored procedure named LoadXMLData takes one parameter: the XML document. The stored procedure then uses the sp_xml_preparedocument stored procedure in SQL Server to parse the text by using the MSXML parser (msxml2.dll) in a form that can be referenced. The sp_xml_preparedocument system stored procedure will return a handle for use throughout the current connection.
SQL Server and XML
SQL Server 2000 supports both XML composition and decomposition. The composition is done through the SELECT statement clause for XML. This easy-to-use clause tells SQL Server to convert the return data to an XML string that is complete with all the tags.
The decomposition is done through OpenXML. OpenXML provides a mechanism to parse and store an XML document in a SQL Sever internal cache and then query the document much like you query a table or view. You can do regular selects to get data from the cached documents or, better yet, insert or update data in your database based on the data contained in the cached documents. But be careful: OpenXML will use one-eighth of the memory available to SQL Server. Always release the documents when you are done working with them.
After the document has the internal reference, you execute an INSERT SQL statement specifying the XML document reference and the portion of the XML document that is applicable. In this case, the section tagged OrdersData is what you want to insert. You can do this easily, because the field names match in the XML document and the table. This is not a requirement; you can create a field mapping to do the translation. This topic is covered well in BOL.
After the order has been created, you need to pick up the newly created Order ID and place it inside the XML document for the order detail item. From there, you can use the replace function to replace the ??OrderID?? key with the correct ID. You then have to pass the XML document back through the parser and create the internal representation with the correct IDs for order detail items.
Now you can load all the order item details into the OrderDetail table. This is done just like the INSERT into Orders statement, but with the OrderDetail table referencing the <OrderDetailData> tag. If you had multiple order items in the XML document, SQL Server will load them all with this single command.
The final step in this stored procedure is to free up the resources and remove the documents from memory by using the sp_xml_remove document system stored Procedure. The handle to the document is provided as an input parameter to the sp_xml_remove_document stored procedure. Listing 15.4 shows the full stored-procedure text.
Example 15.4. Stored Procedure that Accepts an XML Document and Decomposes it into Multiple SQL Server Tables
CREATE PROCEDURE LoadXMLData @xmldoc varchar(1000) AS

Declare @h int
— Create an internal representation of the XML Document
EXEC sp_xml_preparedocument @h OUTPUT, @xmldoc

—Insert the data from the XML Document directly into the Orders Table
Insert into Orders
select * from OpenXML(@h, '//OrderData',1) with Orders

—Set the OrderID for the newly created order in each OrderItem
Set @xmldoc= Replace (@xmldoc,'??OrderID??',@@Identity)

—Reload the XML Document into the Internal Representation
EXEC sp_xml_preparedocument @h OUTPUT, @xmldoc

—Insert the Orders Details directly into the Order Detail Table
Insert into OrderDetails
select * from OpenXML(@h, '//OrderDetailData',1) with OrderDetails

—Free up resources by removing the internal representation of the document
EXEC sp_xml_removedocument @h
GO
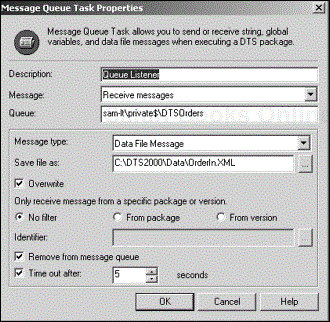
Create a new package to monitor a message queue for messages, and name it Queue Receiver. Next, create a Message Queue Task, and name it Queue Listener. Set the Messages property to ReceiveMessages. Specify the same queue as you did in the Queue Sender: sam-ltprivate$DTSOrders. Set the message type to Data File Message, and fill in the path and filename to specify a location for the file. For this example, type C:DTS2000DataOrderIn.XML.
You can also specify a filter—such as pick up messages only from a particular pack-age. Filters are handy when you have several packages or applications monitoring one queue for messages. You won’t have worry about that here. However, you are doing some filtering. Because you set the message type to Data Files, this task will ignore all other messages except ones that are from a DTS package and that contain a data file.
Be sure to check the Remove from Message queue so that you don’t process the same order over and over. Also, put in a time to live of 5 seconds to make sure that the package doesn’t sit forever when the queue is empty of messages (see Figure 15.7).
Before you can add the Text File Source connection, you need to add a dummy text file to point to. All you need to do is use Notepad to save a file with the word XMLData (anything will do). Then press Enter to put in a carriage return and line feed, and save the file in the directory where your Message Queue Task is saving the incoming data files: C:DTS2000DataOrderIn.XML. Now you can add a Text File Source connection. Set the name as Order XML Doc, and set it to read the file you just created (see Figure 15.8).
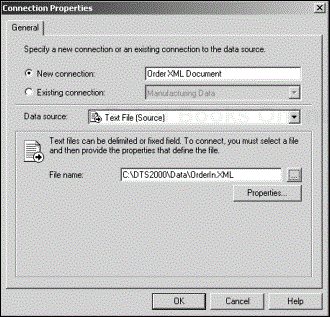
Figure 15.8. The Text File Source Data connection set to load the XML document saved by the Message Queue Task.
Inside the Connection Properties dialog box, click on the Properties button, set the file format to Delimited, and set the Text Qualifier to <none>. Click on Next, and set the delimiter to Tab. You want to make sure that you read the whole document as one long string. Now click on Finish and OK to return to the Designer.
Next, add a SQL Server Data connection, set the database to the Manufacturing database that you have created, and call the connection Manufacturing Data.
Add a Transform Data connection from the Text File Source to the SQL Server Manufacturing Destination. Inside the Transform Data Task Properties dialog box, click on the Source tab, set the Description to Load Orders. Next, click on the Destination tab, set the Destination Table to Orders.
Before you create the script to process the orders, you need to create a lookup query that will run the LoadXMLData stored procedure and pass in the XML docu-ment. Inside the Transform Data Task Properties dialog box, click on the Lookups tab; then click on Add. Set the name to InsertOrder, make the connection Manufacturing Data, and click on the ellipsis button (…) to enter your SQL statement. Because all you are doing is executing the stored procedure that you created, just type Execute LoadXMLData in the SQL pane of the Data Transformation Services Query Designer dialog box.
When you try to close the Query Designer, you receive the error message: “The Query Designer does not support the EXECUTE SQL construct.” Click OK.This error comes from the fact that the Designer cannot graphically display the Execute SQL. If you hide the Diagram pane, you will not receive this error message.This returns you to the Transform Data Task Properties dialog box.
Now you are ready to write the ActiveX Script that will grab the source text file containing the XML document and pass it to the stored procedure LoadXMLData. At the Transform Data Task Properties dialog box, click on the Transformation tab, and click on col1 in Source Columns to select it. Click on the New Transformation but-ton and select ActiveX Script from the Create New Transformations dialog box. Type Pass on XML Documents in the Name field located in the Transformations dialog box. Now click on the Destination Columns tab, and make sure no Destination columns appear.These columns are not necessary, because you will use the lookup query and stored procedure to insert the data.
Click OK to return to the Transformation Options dialog box. Click on the Properties button.The script that you need is very short. All you need to do is execute the lookup query InsertOrder and pass in source column, Col001. First make sure that the Language tab is selected in the ActiveX Script Transformations Properties dia-log box. Next, type the following code from Listing 15.5 in the right window pane. Close the script by letting the data pump know that everything is OK (see Listing 15.5). Click OK three times to get back to the Designer.
Create a looping mechanism to process all messages in the queue. In the first package, you created a workflow script to loop the package, and you can do the same thing in this step. Because you do not need to keep track of the count, you can use the Dynamic Properties Task to create the looping.
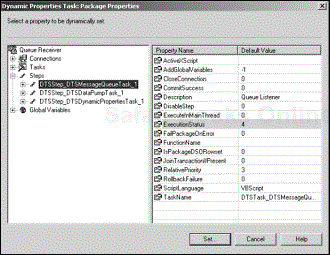
Add a Dynamic Properties Task to the package. Inside the Dynamic Properties Task Properties dialog box, type Loop in the Description field. Click on the Add button and double-click on Steps to expand it. Double-click on the DTSSTep_DTSMessageQueueTask_1 step to expand it. Click on Execution Status Line in the right pane; then click on the Set button. In the Add/Edit Assignment dialog box, change the Source to Constant, set the Constant value to 1 (Waiting), and click OK twice (see Figure 15.9).
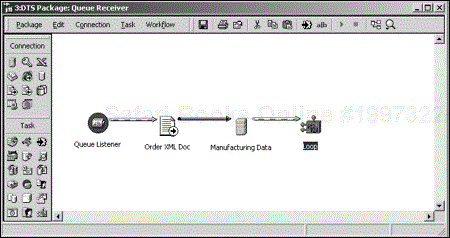
Add an On Success workflow from Queue Listener to Order XML Doc. Then add an On Success workflow from Manufacturing Data to Loop (see Figure 15.10).
Now all you have to do is run the Queue Sender package and the Queue Receiver package.
If you want, you can have the receiver package run with no Message Queue Task timeout, or you can have it scheduled to run every so many minutes or hours to process all the accumulated messages.
Although the DTS Message Queue task does not expose all the features and properties available, you can work around that situation easily by using the ActiveX Script task to interact with message queues or by building a custom task that exposes the particular properties that interest you. The major design issue you need to be aware of is that the creator and the consumer must have a common understanding of the tags in the XML document. If the creator uses CID for CustomerID, the consumer must know what that term means.
Combining message queuing and DTS into a solution can have a great impact on your system’s flexibility and reliability. You can use one package to send many messages to different queues, and you can have many packages monitor a queue from many senders. You can even use message queues within transactions; the sending system waits for a reply message either with a transaction-completion notice or with processed return data.
[1] All data files and scripts used in the book are available to be downloaded from http://www.magenic.com/publications or http://www.newriders.com. The self-extracting ZIP file will create a directory structure starting with DTS2000. You can extract the files to any drive or directory, but all file references in this book will be based on C:DTS2000.


