It probably wouldn’t surprise you if you were told that DTS is written with Microsoft’s Component Object Model (COM) technology. Because of COM, many of the features inside DTS can be extended using any programming environment that supports COM. In fact, some of the “built-in” features of DTS are mere extensions of a base COM object, which certainly is true for tasks. All the DTS tasks that were introduced in Chapter 4, “DTS Tasks,” and Chapter 5, “More DTS Tasks,” are COM objects that implement interfaces defined in the base DTS task object. As such, they really are just another regular custom task, which means that you can create your very own DTS task and add it to DTS Designer or use it as a component in a DTS application that you are developing. This chapter will show you how to build a custom task.
DTS Applications
A DTS application is an application that creates instances of DTS objects outside the DTS Designer environment. The application can then execute tasks by calling the Execute method of the package under its control and destroy them when it’s done.
You have plenty of options when deciding which development tool to use, because many tools support COM. Among the Microsoft offerings, Visual Basic and Visual C++ are popular choices. For high performance and more control of all programming aspects,Visual C++ is the choice. For example, if you want to create a custom task that needs to gain access to OLE DB—as in enumerating the available servers, databases, and tables—you will need to develop with Visual C++.
Note that Visual Basic support for multithreading is limited to apartment threading, a topic that is well beyond the scope of this book. Suffice it to say that you need to evaluate carefully whether VB’s apartment threading is sufficient for your needs. If not, consider developing your custom task with Visual C++.
For less complex tasks,Visual Basic usually is sufficient. The example presented in this chapter is developed using Visual Basic. The custom-task example will take ADO recordset data previously saved (by an Execute SQL task) in a global variable. The custom task will generate an HTML table containing the recordset data and write the HTML text to a text file. Then you can include the file in a Web page and display it easily.
The custom task has a custom Properties dialog box that allows the user to select the global variable to be accessed by the custom task. This window also allows the user to specify the filename and the location where the HTML text will be saved.
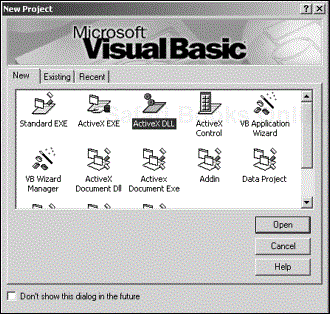
It is very easy to use Microsoft’s Visual Basic (VB) development environment to create a custom task. Open VB, and double-click the ActiveX DLL icon to create a new Microsoft ActiveX DLL project (see Figure 16.1).
This will create an in-process COM server, which you can add to the DTS Designer environment in SQL Server’s Enterprise Manager.
DTS Designer Requires an In-Process COM Server
When creating the VB project, you must choose ActiveX DLL to make it an in-process COM server. This is required if you want to add the custom task to the DTS Designer environment.
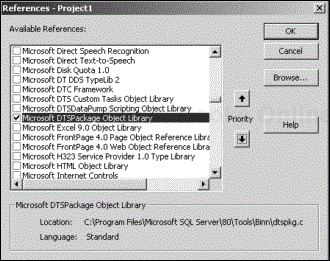
Next, you need to add a reference to the DTS object library so that VB (and your custom task) will know how to access the DTS objects. From the Project menu, click on References to bring up the References dialog box (see Figure 16.2).
Make sure that the Microsoft DTSPackage Object Library check box is checked. If you cannot find this option in the Available References window, click the Browse button and find the file named dtspkg.dll. This file is installed during the SQL Server installation and normally is in the folder C:Program FilesMicrosoft SQL Server80ToolsBinn. Click the OK button. Now you should be able to reference DTS objects within your project.
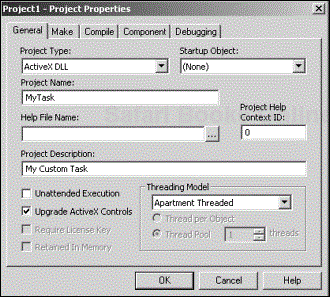
From the Project menu, click on [Project1 Properties], where Project1 is the default name VB gives your newly created project. This will bring up the Project Properties dialog box (see Figure 16.3).
If you want to change the default names that VB assigns to your project and class, now is the time. Change the project name to a more meaningful one, such as MyTask. Change the class name to clsMyTask. Although these names are important to the current project, they do not necessarily affect the naming of the task when you add it to the DTS Designer.
Other housekeeping chores that you need to take care of include the following:
Startup Object—. In the Project Properties dialog box, click on the General tab, and make sure that Startup Object is set to None.
Threading Model—. In the Project Properties dialog box, click on the General tab, and make sure that Threading Model is set to Apartment Threaded.
Version Compatibility—. In the Project Properties dialog box, click on the Component tab, and make sure that Version Compatibility is set to Project Compatibility.
Instancing—. Click on the class object
(clsMyTask), and make sure that its Instancing property is set toMultiUse.
These options will ensure that your COM server is built and instantiated properly. If you save the project now, you should have in your project folder the files named MyTask.vbp and clsMyTask.cls. (We saved our example in C:DTS2000Custom Task).
One of the objects exposed by the DTSPackage Object Library is the DTS task object. This object in turn exposes two COM interfaces: CustomTask and CustomTaskUI.
You use the CustomTask interface to implement the processing to be done by your custom task. You use the CustomTaskUI interface to implement an optional graphical user interface, often called the property page, for setting and saving the property values of your custom task.
If you followed the steps for setting up the Visual Basic development environment earlier in this chapter, you can now implement the COM interface exposed by the base DTS task object. As explained above, you don’t use the task object directly. DTS defines a COM interface called CustomTask, which implements the properties and methods of the base task object. All other custom task implementations derive from this secondary COM interface.
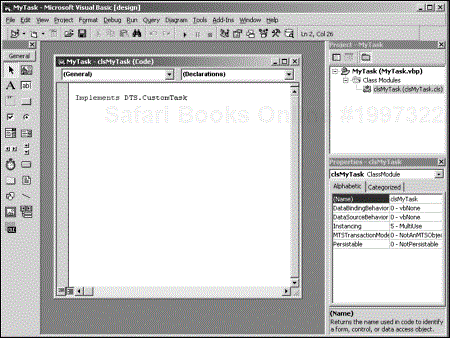
Make sure that clsMyTask is selected in VB’s Project window. Then choose Code from the View menu to open the code editor for your class (see Figure 16.4).
(General) should be shown as the selected item on the Object list box on the left side of the dialog box, and (Declarations) should be the selected item in the Procedure list box on the right side. At the top of the code-editing area, type the code
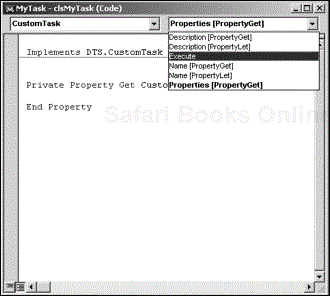
Implements DTS.CustomTask. As soon as you do, CustomTask will be added to the Object list box. Select the CustomTask item, and then open the Procedure list box. This will display all the elements of the CustomTask COM interface, which you must implement (see Figure 16.5).
When you select each one of the interface elements from the Procedure list box, Visual Basic generates placeholder code called event procedures. These procedures are termed placeholders because they are valid Sub or Function procedures even though they don’t do anything. Even if you don’t add any code to these empty functions, they are considered to be implemented. They can be called, but because there is no code inside to execute, they will not do anything. Of course, you need to add code to at least some of these placeholders or your custom task will not be doing much either.
Implementing the COM Interface
Although COM requires that all the interface’s elements be implemented, some of these implementations can be mere placeholders that do nothing. The Visual Basic compiler may strip out the event procedure if it is empty, so be sure that you have at least a comment line inside each placeholder.
The CustomTask COM interface exposes the following interface elements:
A
DescriptionpropertyA
NamepropertyA
PropertiescollectionAn
Executemethod
As you can see, there are two property interface elements, a collection interface element (which is just a special property interface), and a method interface element.
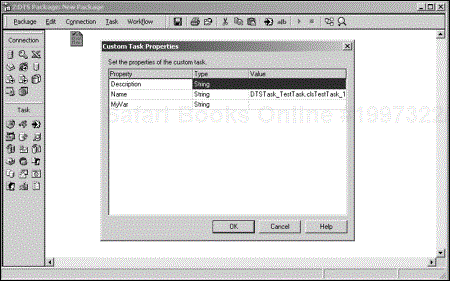
Note that the property interface elements represent the property values of the base DTS custom task, not your custom task. You can have your own public variables and properties for your custom task. If you don’t plan to add a custom user interface to your custom task, DTS provides default services for managing the public variables and properties of your custom task and saving them in a Properties collection. In SQL Server’s Enterprise Manager, the DTS Designer will display a default property page so that these can be updated (see Figure 16.6).
In Figure 16.6, despite the fact that we’ve named the public variables Description and Name, these variables have nothing to do with the similarly named properties of the base DTS custom task; they simply are variables in your custom task. To make the association between your Description and Name variables and the base DTS custom task’s properties, you need to implement those properties and have them point to your variables.
As you’ve seen, if your variables happen to be public, you don’t have to do anything else. The DTS default properties provider will recognize the variables and take care of saving them in the Properties collection. The traditional way to implement property values, however, is to use private variables and declare the property as public. When you make your variables private, DTS will not be able to see them, so you need to declare in your custom task public properties that provide access to those private variables. You will take this approach in building a custom task, and as a result, you will need to take the extra step of declaring your own public property values.
Below the Implements DTS. CustomTask line, type the following:
Private m_strDescription As String
Private m_strName As String
These variables will store the Description and Name properties of the custom task. Now you are ready to implement the base DTS custom task’s properties.
To implement the Description property, select Description [PropertyGet] and Description [PropertyLet] from the Procedure list box. This will generate empty placeholders for the Description property. As noted earlier, this satisfies the minimum COM requirement for implementing this interface element.
You can register the custom task and use it in DTS even with empty placeholders for the Description property. When you add the custom task to a package in DTS Designer, DTS gives the task a label consisting of the name used to register the task in DTS plus the string “undefined”. If you implement an empty placeholder for the Description property, the task will not be able to retain this label.
Implementing an Empty Placeholder for Description
When you use a custom task in DTS Designer, no label will be attached to the icon if you implement empty placeholders for the Description property.
Therefore, you need to properly implement the Description property by adding the following boldfaced statements:
Private Property Let CustomTask_Description(ByVal RHS As String)
     m_strDescription = RHS
End Property

Private Property Get CustomTask_Description() As String
     CustomTask_Description = m_strDescription
End Property
Because these property methods (and the variable where the property value is stored) are private, you need to implement in your custom task a public property that points to the same private variable. This will effectively tie the two Description properties together. Following is the code you use:
Public Property Let Description(ByVal RHS As String)
     m_strDescription = RHS
End Property

Public Property Get Description() As String
     Description = m_strDescription
End Property
The Description property is added to your custom task’s Properties collection, allowing it to be persisted properly in the Custom Task Properties window in DTS Designer. To allow users to set and modify this property with a custom property page, you must implement a CustomTaskUI interface for your custom task (see section, “Using the Custom Task UI ,” later in this chapter).
Within a DTS package, task objects are identified by their Name property. When you add any task to a DTS package, DTS Designer assigns it a unique name. A custom task must save this assigned name, because DTS will use this name to reference the task thereafter. This means that, unlike the Description property, you cannot use a custom task in DTS Designer if you have only empty placeholders for its Name property. Therefore, you must implement fully the Name property of the CustomTask interface.
To do so, select the Name [PropertyGet] and Name [PropertyLet] items from the Procedure list box. This will generate empty placeholders for the Name property. Then add the following boldfaced statements:
Private Property Let CustomTask_Name(ByVal RHS As String)
     m_strName = RHS
End Property

Private Property Get CustomTask_Name() As String
     CustomTask_Name = m_strName
End Property
This will allow the Name property to be persisted properly. Because DTS will always use this preassigned name to refer to the task, you should not allow the name to be changed. Therefore, do not implement a separate public Name
property for your custom task, as you did with the Description property.
Never Expose the Name Property of Your Custom Task
If the custom task will be used in DTS Designer, do not implement a class-specific Name property for your custom task. Instead, implement only the Name property of the CustomTask COM interface.
If you will be using the custom task in a DTS application, you can allow the task’s name to be modified. However, the application must ensure that task names are unique whenever a task is added to the Tasks collection.
When you implement class-specific properties of your custom task (that is, not the CustomTask’s property interface elements), the Property object is stored in the Properties collection. This means that a Properties collection must be implemented somewhere. By now, you should be saying, “Oh, great, just how I was looking to waste my time.” Fortunately, you do not have to deal with property bags and property persistence yourself. As mentioned earlier in this chapter, DTS provides a default properties provider that takes care of it. The bottom line is that you can choose to handle the implementation of the Properties collection yourself or have DTS do it for you.
To implement the Properties collection, select the Properties [PropertyGet] item in the Procedure list box. This will generate an empty placeholder for the Property Get event of the Properties collection. To have DTS take care of managing the task’s properties, return Nothing in this placeholder, as in the following code:
Private Property Get CustomTask_Properties() As DTS.Properties
     Set CustomTask_Properties = Nothing
End Property
This will enable the proper persistence of any property that you define for your custom task through the default properties provider.
The Execute method is where you put all the code that you want the custom task to execute. DTS calls this method at the proper time during package execution. When DTS calls the Execute method, it passes four parameters that you can use within the method: pPackage, pPackageEvents, pPackageLog, and pTaskResult.
The pPackage parameter is a reference to the Package2 object in the DTS object model. (Note that the Package2 object exists only in DTS 2000.) Use this parameter to access other objects in the package where your custom task is used. You can access such objects as the Tasks collection, the Steps collection, and global variables, including the extended properties and methods of a DTS package object.
You must ensure that the parameter is not set to Nothing before you use it within the Execute method.
The pPackageEvents parameter is a reference to a PackageEvents object in the DTS object model. Use this parameter to raise events in the package. You can raise the following events:
OnStart—. Indicates the start of a task or step.OnQueryCancel—. Terminates the task.OnProgress—. Provides information about the progress of the task’s execution.OnFinish—. Indicates completion of a task’s execution.OnError—. Indicates that an error occurred and provides information about the error.
You must ensure that the parameter is not set to Nothing before using it within the method.To use the pPackageEvent parameter, declare a local variable as a DTS PackageEvents object, as follows:
Dim oPkgEvent As DTS.PackageEvents
Set oPkgEvent = [Parameter name specified for pPackageEvents]
You can then use this local variable to raise events from within your custom task. Typically, the first event that you raise is the OnStart event.This event lets the host application know that the step in which your task executes has started, as follows:
oPkgEvent.OnStart "MyTask" 'Declare that MyTask has started
You can notify the host application of the progress in your task’s processing by raising the OnProgress event, as follows:
oPkgEvent.OnProgress "MyTask", "Records Processed", 27, 1, rst.RecordCount
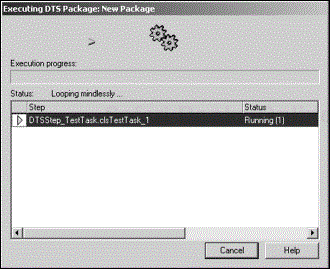
You can verify that DTS actually handles this event.When you execute the package, DTS displays the status as specified by your invocation of OnProgress in the Executing Package status window (see Figure 16.7).
If you want to allow the process to be canceled, you can provide the user with that option by raising the OnQueryCancel event like this:
Dim bCancel As Boolean

oPkgEvent.OnQueryCancel "MyTask", bCancel
If bCancel Then
   pTaskResult = DTSTaskExecResult_Failure
   Exit Sub 'Exits the Execute Method
End If
Again, you can verify that DTS handles this event. In the Executing Package status window (refer to Figure 16.7) if you click the Cancel button, DTS will actually return true to your invocation of OnQueryCancel, which then allows you to terminate the task gracefully by setting pTaskResult and exiting the Execute method.
For error handling, you can use the OnError event (see Listing 16.1) to notify the host application that an error has occurred. The OnError event has many parameters. Listing 16.1 shows an example of how to code an OnError event.
Example 16.1. How to Raise an Error from a Custom Task
Dim bCancel As Boolean

 oPkgEvent.OnError "MyTask", 102, "ADODB", "Unable to open recordset",,, bCancel
 If bCancel Then
   pTaskResult = DTSTaskExecResult_Failure
   Exit Sub 'Exits the Execute Method
End If
As with OnQueryCancel, you need to check the last parameter to see whether you need to terminate the processing within the custom task. The other parameters allow you to provide more information about the error.
The last event that you typically raise is the OnFinish event. This event lets you notify the host application that the step in which your custom task executes has completed its processing. Here is an example of how this event is coded:
oPkgEvent.OnFinish "MyTask" 'Declare that MyTask has finished
A DTS package logs critical events to the msdb database in SQL Server if its LogToSQLServer property is set. You can have your custom task adhere to this convention by implementing logging yourself.
Using the pPackage parameter discussed earlier in this chapter, check whether the LogToSQLServer property is set. If so, you can choose to implement logging within your custom task.
The pPackageLog parameter is a reference to the PackageLog object in the DTS object model. You use this parameter to write log records to a log table in SQL Server’s msdb database.
You must ensure that the parameter is not set to Nothing before you use it within the method. The first thing you need to do is add a log record to the log table. This log record represents the main log for the current execution of your custom task. Here is an example of how to add a log record:
If Not pPackageLog Is Nothing Then
   pPackageLog.WriteTaskRecord 300, "MyCustom Task Error"
End If
After the log record has been added, you can append log strings to this log record. Log strings are accumulated for the step in which the task is being executed.You can append multiple log strings to the log record. Here is an example of how to write a log string:
If Not pPackageLog Is Nothing Then
   pPackageLog.WriteStringToLog "Getting global variables"
End If
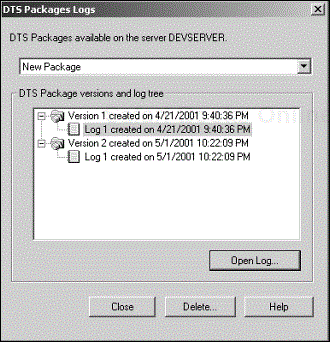
You can see what gets written to the log by viewing the package’s logs in Enterprise Manager. Right-click on the DTS package that contains your custom task, and click on Package Logs to display the DTS Packages Logs window (see Figure 16.8).
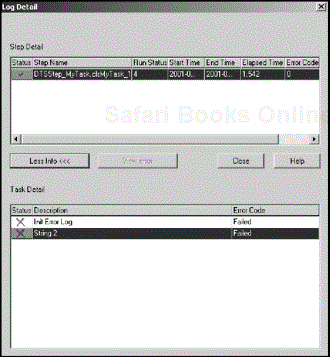
Click on the Open Log button to display the Log Detail window (see Figure 16.9). Click the More Info button to expand the Log Detail window and show the task details.
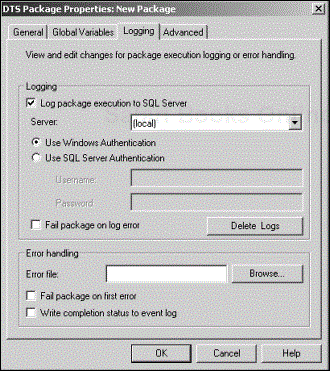
If logging to SQL Server is turned off, you can specify a filename in the Error Handling section of the Logging tab of the DTS Package Properties window (see Figure 16.10). In fact, if you specify a filename here, logs are written to this error file whether or not SQL Server logging is on.
When the Execute method is invoked by DTS, the task must inform DTS of the results of its execution. To facilitate this communication, DTS passes a pTaskResult parameter, which you must set before returning from the Execute method. This parameter is a reference to the DTSTaskExecResult object in the DTS object model. Depending on the result of the custom task’s execution, set the pTaskResult parameter to one of these values:
DTSTaskExecResult_Failure—. Task execution failed.DTSTaskExecResult_RetryStep—. Retry the step that fires the custom task. This parameter effectively repeats the execution of the task.DTSTaskExecResult_Success—. Task executed successfully.
If you do not return a result, DTS assumes that an error occurred, and package execution fails as well.
For example, to tell DTS the that the task executed successfully, use the following code:
Private Sub CustomTask_Execute(ByVal pPackage As Object, _
                            ByVal pPackageEvents As Object, _
                            ByVal pPackageLog as Object, _
                            pTaskResult As DTS.DTSTaskExecResult)
     ...
     (other code here)
     ...
     pTaskResult = DTSTaskExecResult_Success
End Sub For the Generate HTML Task example, you use the Execute method to perform the following steps:
Get the global variable specified by the user
Open the text file for writing
Output the HTML table’s start tag
For each row in the recordset, build the HTML row and then output the row
Output the HTML table’s end tag
Close the text file
Listing 16.2 shows the code to get the global variable.
Example 16.2. Custom Task Accessing a DTS Global Variable
Set oPkg = pPackage

'Get the global variable
For i = 1 To oPkg.GlobalVariables.Count
  If oPkg.GlobalVariables(i).Name = GlobalVarName Then
    Set rst = CreateObject("ADODB.Recordset")
    Set rst = oPkg.GlobalVariables(i).Value
    Exit For
  End If
Next i
Basically, you are iterating through the global-variables collection of the containing package to find the one that the user specified. You need to create the local variable as an ADODB.Recordset before copying the global variable into it.
You can then open the text file for output, like this:
Dim html As String

'Open the HTML file for output
If Mid(Pathname, 2, 1) = ":" Then
  html = Pathname & "" & Filename
Else
  html = Pathname & "/" & Filename
End If
Open html For Output As #1
This code just allows for the possibility of the path being specified in UNC format (//servername/path/filename).
Here is the code for generating the start of the HTML table:
'Generate start of HTML table Print #1, "<TABLE Border='1'>" In Listing 16.3, you see the main code that does most of the work. From accessing therowset data, converting it to HTML script, and then writing it out to the text file, the
code is surprisingly short.
Example 16.3. Creating an HTML Table from an ADODBRecordset
'Generate HTML table rows rst.MoveFirst Do Until rst.EOF 'Build the row td = "" For j = 0 To rst.Fields.Count - 1 tmp = "" If IsObject(rst.Fields(j).Value) Then tmp = " " ElseIf IsEmpty(rst.Fields(j).Value) Then tmp = " " ElseIf IsNull(rst.Fields(j).Value) Then tmp = " " ElseIf IsMissing(rst.Fields(j).Value) Then tmp = " " ElseIf IsArray(rst.Fields(j).Value) Then tmp = " " ElseIf IsNumeric(rst.Fields(j).Value) Then tmp = CStr(rst.Fields(j).Value) ElseIf IsDate(rst.Fields(j).Value) Then tmp = CStr(rst.Fields(j).Value) Else tmp = rst.Fields(j).Value End If td = td & "<TD>" & tmp & "</TD>" Next j 'Write the row Print #1, vbTab & "<TR>" & td & "</TR>" rst.MoveNext Loop
Essentially, in this code, you are going through each field in each row of the recordset. You are taking the value of each field (with the proper conversions to string) to build the row to be displayed. You then “print” the current row before moving on to the next row.
The important part of this code is determining what kind of data is coming in so that the code can handle its conversion to string properly. You will have to anticipate all the possible scenarios if you want the custom task to be robust.
Finally, you need to generate the HTML table’s end tag and close the file:
'Generate end of HTML table
Print #1,"</TABLE>"

'Close the HTML file
Close #1
This section completes the minimum implementation of the CustomTask COM interface. If your custom task requires them, you can easily add more property elements, because they will automatically be added to the Properties collection and managed by the DTS properties provider.
For the example, you will need three more properties:
A
GlobalVarNamepropertyA
PathNamepropertyA
FileNameproperty
The code to handle these properties is shown in Listing 16.4.
Example 16.4. Creating Custom Properties for the Custom Task
Private m_strGlobalVarName As String
Private m_strPathname As String
Private m_strFilename As String

Public Property Let GlobalVarName(ByVal RHS As String)
     m_strGlobalVarName = RHS
End Property

Public Property Get GlobalVarName () As String
     GlobalVarName = m_strGlobalVarName
End Property

Public Property Let Pathname(ByVal RHS As String)
     m_strPathname = RHS
End Property

Public Property Get Pathname () As String
     Pathname = m_strPathname
End Property

Public Property Let Filename(ByVal RHS As String)
     m_strFilename = RHS
End Property

Public Property Get Filename () As String
     Filename = m_strFilename
End Property
Now you can move on to implementing a user interface for your custom task.
A property page is typically used to display all the properties of an object. The default properties provider in DTS Designer will display a default property page if you do not implement a custom task user interface for your custom task. If you plan to provide a user interface for your custom task, now is the time to create the form that will be the property page for that user interface.
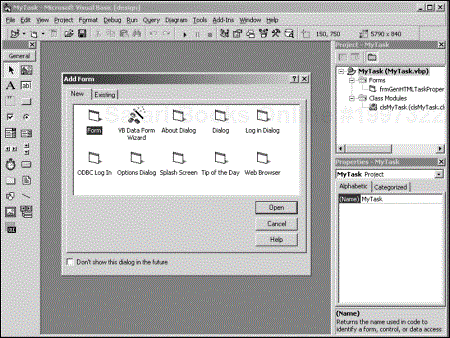
In VB, choose Add Form from the Project menu to bring up the Add Form dialog box (see Figure 16.11).
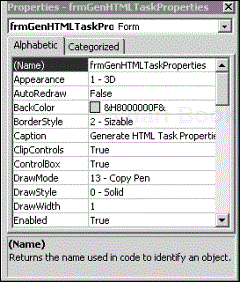
Make sure that the icon named Form is selected; then click on the Open button. This will add a regular form named Form1 to your project. Change the name of the form to frmGenHTMLTaskProperties (or whatever form name you prefer). Also, change the form’s caption to Generate HTML Task Properties.
With the form selected in the Project window, choose Object from the View menu to display the blank form. Add the form elements in Table 16.1 to the form.
Table 16.1. Form Elements for the Property Page
|
Object |
Name |
Text/Caption |
Style |
|---|---|---|---|
|
|
|
Description | |
|
|
|
Source | |
|
|
|
Destination | |
|
|
|
Generate HTML Task: undefined | |
|
|
| ||
|
|
|
GlobalVariable: | |
|
|
|
Filename: | |
|
|
|
2-Drop-down List | |
|
|
| ||
|
|
| ||
|
|
| ||
|
|
|
Cancel | |
|
|
|
Close |
After you add the form elements, the form should look something like Figure 16.12.
The form needs a TaskObject property that will contain the instance of the task object provided to the form during run time.When this property is set, it needs to do several things:
Display the task description in the form
Load the names of global variables into the combo box
Select the current global variable in the combo box (if already set)
Set the drive, path, and filename in
DriveListBox, DirListBox,andFileListBoxDisplay the current filename in the form
Listing 16.5 shows the code that does all these things.
Example 16.5. Initializing a Properties Form for the Custom Task
Private oTask As DTS.Task
Private oCustomTask As clsMyTask

Public Property Set TaskObject (ByVal pTask As DTS.Task)
     Dim oTasks As DTS.Tasks
     Dim oPkg As DTS.Package
     Dim i As Integer
     Dim SaveIndex As Integer

     On Error Resume Next

     If Not pTask Is Nothing Then
        If TypeOf pTask Is DTS.Task Then
          Set oTask = pTask
          Set oCustomTask = pTask.CustomTask

          'Display the custom task's description
          txtDescription.Text = oCustomTask.Description

          'Get a reference to the containing package
          Set oTasks = oTask.Parent
          Set oPkg = oTasks.Parent

          'Load the names of the global variables into the combobox
          For i = 1 To oPkg.GlobalVariables.Count
             'Add only variables of type recordset
             If TypeName(oPkg.GlobalVariables(i).Value) = "Recordset" Then
               cboGlobalVars.AddItem oPkg.GlobalVariables(i).Name
             End If
          Next I

          'Select the current global variable in the combobox
          If oCustomTask.GlobalVarName <> "" Then
             For i = 0 To cboGlobalVars.ListCount - 1
               If cboGlobalVars.List(i) = oCustomTask.GlobalVarName Then
                  cboGlobalVars.ListIndex = I
                  Exit For
               End If
             Next i
          End If
          'Display the current path and file names
          drvDestination.Drive = Left(oCustomTask.Pathname, 1)
          dirDestination.Path = oCustomTask.Pathname
          filDestination.Filename = oCustomTask.Filename
          txtFilename.Text = oCustomTask.Filename
        Else
          Err.Raise 1027 + vbObjectError, Me.Name, "Parameter pTask is not a Task
"
        End If
     Else
        Err.Raise 1027 + vbObjectError, Me.Name, "Parameter pTask is Nothing"
     End If
End Property
When the Cancel button is clicked, the form will have to be unloaded:
Private Sub cmdCancel_Click()
     Unload Me
End Sub
Finally, when the Close button is clicked, the properties have to be updated, and the form has to be unloaded (see Listing 16.6). [1]
Example 16.6. Setting the Custom Task’s Custom Properties
Private Sub cmdClose_Click()
     If txtDescription.Text = "" Then
        MsgBox "Please enter a description.",, "Description"
        Exit Sub
     Else
        oCustomTask.Description = txtDescription.Text
     End If
If cboGlobalVars.Text = "" Then
MsgBox "Please select a global variable.",,"Global Variable"
Exit Sub
Else
oCustomTask.GlobalVarName = cboGlobalVars.Text
End If
oCustomTask.Pathname = dirDestination.Path
If txtFilename.Text = "" Then
MsgBox "Please enter a filename.",, "Filename"
Exit Sub
Else
oCustomTask.Filename = txtFilename.Text
End If
Unload Me
End Sub As noted earlier in this chapter, if you want your users to be able to set some of the properties of your custom task, you have to implement the CustomTaskUI interface. This is the COM interface that displays and saves a property page for your custom task.
The CustomTaskUI COM interface exposes the following interface elements:
An
InitializemethodA
NewmethodAn
EditmethodA
DeletemethodA
HelpmethodA
GetUIInfo methodA
CreateCustomToolTipmethod
When you add your custom task to DTS, the DTS Designer calls these methods appropriately as needed whenever the property page for the custom task is displayed. In a DTS application, you must call these methods yourself.
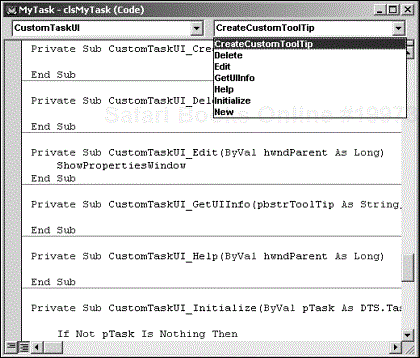
To see these interface elements in your VB project, start with the keyword Implements as you did with the CustomTask COM interface. In the VB code editor, after the line Implements DTS.CustomTask, type the line Implements DTS.Custom TaskUI. This line adds the CustomTaskUI item to the Object list box. Select the CustomTaskUI item; then open the Procedure list box.You should now see the interface elements of the CustomTaskUI COM interface that you need to implement (see Figure 16.13).
As you have done previously, select each of these interface elements to let VB generate the empty placeholder code. Now you are ready to implement each element.
The Initialize method is called whenever the custom task is opened. DTS will call the method automatically when the custom task is dropped on the DTS Designer sheet, when the custom task’s property window is opened, and even when the custom task is deleted. You should note that Initialize is always the first method called. When you add the custom task to a DTS application, make sure that you call this method ahead of all the others to be consistent.
When the Initialize method is called, a task object is passed in as a parameter. You must save this object in a module-level object variable so that you can access the task object’s properties and methods from anywhere within your custom task object. The
Initialize method is also used to set default values for certain properties of your custom task. Typically, you will want to set the Description property to a default description. Listing 16.7 shows the code.
Example 16.7. Code to Allow DTS to Initiate the Display of the Custom Task Property Page
Private m_objTask As DTS.Task

Private Sub CustomTaskUI_Initialize(ByVal pTask As DTS.Task)

     If Not pTask Is Nothing Then
        If TypeOf pTask Is DTS.Task Then
          Set m_objTask = pTask

          If Description = "" Then
             Description = "Generate HTML Table: undefined"
          End If

       ... other code here

        Else
          Err.Raise 1027 + vbObjectError, "CustomTaskUI Initialize", "Parameter
pTask is not a Task "
        End If
     Else
        Err.Raise 1027 + vbObjectError, "CustomTaskUI Initialize", "Parameter
pTask is Nothing"
     End If
End Sub
The New method is called whenever an instance of your custom task is created. In DTS Designer, this happens automatically when a user drops the icon representing your custom task on the DTS Designer sheet.
In a DTS application, you typically create a Tasks collection first and then call its New method to create the custom task. After the custom task object is created, you should call this New method.
Because the custom task object is newly created at this point, it should display all the default property values and let the user customize those that have been configured as user-modifiable. This is usually done with the property page. Because the code to display a property page is shared with the Edit method (discussed later in this chapter), you should create a private Sub procedure to contain it, as shown in Listing 16.8.
Example 16.8. Code to Display the Custom Task Property Page
Private frmProperties As frmGenHTMLTaskProperties
Private Sub ShowPropertiesWindow()
     If Not pTask Is Nothing Then
        If TypeOf pTask Is DTS.Task Then
          Set frmProperties = New frmGenHTMLTaskProperties
          Set frmProperties.TaskObject = m_objTask
          frmProperties.Show vbModal
          DoEvents
          Set frmProperties = Nothing
        Else
          Err.Raise 1027 + vbObjectError, "ShowPropertiesWindow", "Parameter pTask
is not a Task "
        End If
     Else
        Err.Raise 1027 + vbObjectError, "ShowPropertiesWindow", "Parameter pTask
is Nothing"
     End If
End Sub
The code to display the property page from the New method should look like this:
Private Sub CustomTaskUI_New(ByVal hwndParent As Long)
     ShowPropertiesWindow
End Sub
The Edit method is called when the property page needs to be displayed so that property values can be updated. In DTS Designer, DTS calls this method when the user right-clicks on the custom task and chooses Properties from the shortcut menu or when the user double-clicks the task icon. The Edit method displays the property page, using the same procedure invoked by the New method, as follows:
Private Sub CustomTaskUI_Edit(ByVal hwndParent As Long)
     ShowPropertiesWindow
End Sub
The Delete method is called when the custom task is removed from the DTS Designer’s design sheet. If the custom task is used only in DTS Designer, you normally do not have to do anything in this method; it can be a placeholder. In a DTS application, this method gives you the opportunity to perform cleanup code. Here is the Delete method as a placeholder:
Private Sub CustomTaskUI_Delete(ByVal hwndParent As Long)

End Sub
The Help method is called whenever a user right-clicks on the custom task and selects Help from the shortcut menu. This method gives you the opportunity to display a help screen. You can use message boxes, launch a custom help application, or use .hlp files. Here is the code for implementing the Help method:
Private Sub CustomTaskUI_Help(ByVal hwndParent As Long)
     ... code to display help
End Sub
The GetUIInfo method is not called from DTS Designer. You can use this method in a DTS application to obtain a custom task’s description and version information, as well as its ToolTips text.
Private Sub CustomTaskUI_GetUIInfo(pbstrToolTip As String, _
                                   pbstrDescription As String, _
                                   plVersion As Long, _
                                   pFlags As DTS.DTSCustomTaskUIFlags)
    ... code to retrieve the custom task's Description and ToolTipText
End Sub
The GetUIInfo method is also used to return a DTSCustomTaskUIFlag status, which can be one of the following:
DTSCustomTaskUIFlags_Default—. Indicates a default user interface.DTSCustomTaskUIFlags_DoesCustomToolTip—. Indicates that the task supports custom ToolTips.
If you used GetUIInfo to query the custom task (if it supports custom ToolTips), you can use the CreateCustomToolTip method to create the ToolTip. Here is the placeholder for the method:
Private Sub CustomTaskUI_CreateCustomToolTip(ByVal hwndParent As Long,
                                          ByVal x As Long,_
                                          ByVal y As Long,_
                                          plTipWindow As Long)
     ... code to create the custom task's tooltip
End Sub When you register the custom task with DTS Designer, DTS displays an icon associated with your custom task to represent it in the Task toolbar and on the design sheet. If you don’t add a custom icon to your custom task, DTS uses a default icon. You can add a custom icon to your custom task to differentiate it from other custom tasks that may be installed on the server.
You add custom icons by creating a resource file—a container file for bitmaps, icons, cursors, text strings, and other user-interface elements that can be modified without having to recompile the application.
You can create a resource file by using a standard text editor. You will have to learn the syntax, but it’s not complicated. You can find out about the syntax for creating resource files in Resource.txt, located in the Tools directory in which VB is installed.
After you create the resource file, you compile it by using a resource compiler. The resource compiler for VB, called Rc.exe, can be found in the directory ToolsResourceRc32 in which VB is installed.
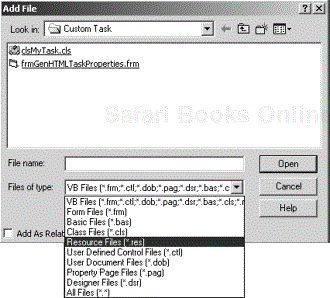
To add the resource file to your custom task VB project, choose Add File from the Project menu to bring up the Add File dialog box (see Figure 16.14).
The compiled resource file has the .res extension. To locate your resource file, you have to specify Resource Files as the file type. Locate your file; then click the Open button to add the resource file to the project.
When you register your custom task with DTS Designer, all icons contained in your resource file will be presented as choices.You can select one to be associated with your custom task in DTS Designer.
After you complete the required elements for the custom task VB project, you need to compile it. This generates the .dll file for the custom task. This file is used to register the custom task with DTS in SQL Server’s Enterprise Manager.
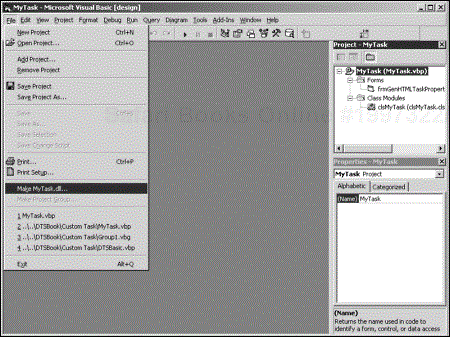
Before you generate the .dll file, first make sure that you have saved the latest version of your VB project by choosing Save Project from the File menu. Then, click on the File menu again and select choose Make MyTask.dll (The name of the file may be different if you chose a different name.) This will compile your VB project and generate the MyTask.dll file (see Figure 16.15).
Now you can register the custom task in DTS Designer.You do so inside a DTS package. Launch SQL Server’s Enterprise Manager, and open the Data Transformation Services folder. Right-click Local Packages; then select New Package from the shortcut menu to open the DTS Designer for a new package.
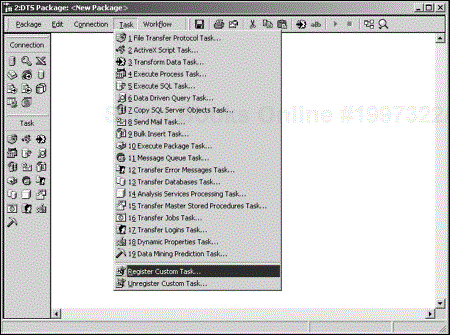
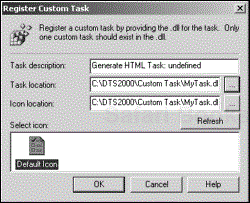
Click on the Task menu and then select Register Custom Task, which is one of the two options at the bottom of the menu (see Figure 16.16). The Register Custom Task dialog box opens (see Figure 16.17).
The description you enter in this dialog box becomes the default description for the custom task, regardless of any default setting done in the VB code. (The default setting in the VB code will apply in a DTS application.) This is because the description is saved in the custom task’s Properties collection. When the custom task is used in a DTS package, the Description property already has a value, and the default-setting code does not execute. Therefore, make sure that the description you set in this dialog box is the one that you really want your custom task to have. Don’t worry, though; if you change your mind later, you can unregister the custom task and register it again.
Registering Overrides Default Task Description
When you register and add the custom task in DTS Designer, the description that you give the task overrides what has been coded as the default in VB.
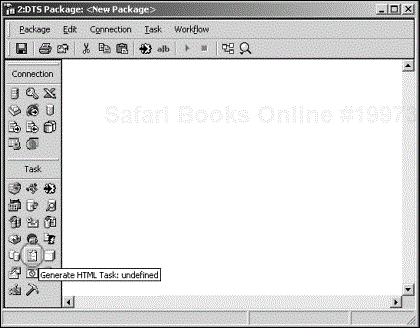
The next thing you need to do is locate the .dll file that contains the custom task. You can enter the location directly or browse to it by clicking the ellipsis (…) button inside the Register Custom Task dialog box. Choose an icon, if you have multiple icons to choose from; then click the OK button. When the icon appears on the Task toolbar on the left side of the window, the custom task has been registered successfully (see Figure 16.18).
That’s it! You should now have a working custom task registered with DTS Designer, complete with its own Properties window.
Component Registration and DTS Caching
When you register your custom task, it becomes one of many components that DTS must keep track of. DTS organizes the information about these components by using the following collections:
OLEDBProviderInfosScriptingLanguageInfosTaskInfosTransformationInfos
Within the TaskInfos collection, a TaskInfo object stores the class information for a task (including your custom task). As efficient as it is in accessing the system registry, DTS allows you to boost performance even more by caching these entries. Even though the cache itself also is in the registry, the membership information has been predetermined and is readily available, making for a more efficient retrieval.
You can turn on this caching by right-clicking on the Data Transformation Services folder in the Enterprise Manager console and selecting Properties from the shortcut menu to bring up the Package Properties dialog box. Then check the Turn On Cache option. DTS will now scan the cache instead of the full registry whenever it needs component information.
When you develop your custom components, be aware that you may find yourself in situations where caching may get in the way. You may need to refresh the cache to have it show up or be removed, depending on what you are doing.
Also, you should know that you also can access the component information programmatically by using the Application object, which owns the collections mentioned earlier in this section. See Chapter 9, “Building a Package Using Visual Basic,” and Chapter 10, “Interacting with a Package Using Visual Basic,” for information about how to use VB to navigate through the DTS object model.
To use the example custom task in a DTS package, add a connection to the package. Create a global variable that can store a rowset—a global variable with the data type <Other>. Next, add an ExecuteSQL task that queries a table and returns a result set. Configure its Parameters setting to store its result set in the global variable you created earlier. Save the package, and give it an appropriate name.
Saving a Package with an <Other> Global Variable
You might see the error “Type Mismatch” when you try to save the package. If so, try executing the package once and then try saving it again.
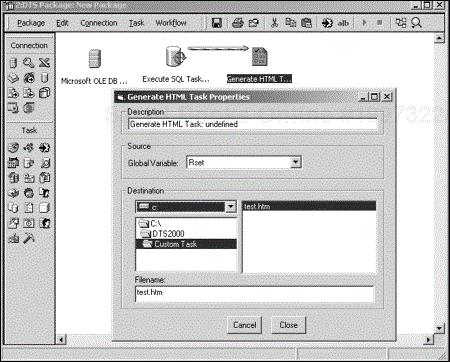
Drag and drop the custom task’s icon to the design sheet to add it to the package. The Connection Properties dialog box appears where you can configure the custom task by selecting the global variable from the drop-down menu and specifying an output file.
Figure 16.19 shows the Generate HTML Task Properties dialog box with a global variable selected and a filename specified for output. You should make sure that the custom task will execute after the ExecuteSQL task by adding a workflow between the two tasks as shown in the figure.
In this chapter, you saw how to set up a Visual Basic project in which to develop a custom task. You learned about the COM interfaces that need to be implemented. You gained a clear understanding of how the custom task is launched and how it communicates with its host application, be it the DTS run-time system or a DTS application. In addition, you learned how a custom task interacts with DTS Designer to display and update its property values. Finally, you saw how a custom task is registered and added to DTS Designer.
[1] You can get the code for the event handlers of the DriveListBox, DirListBox, and FileListBox, together with the full source code for the custom-taskVB project, by downloading CustomTask.Zip from www.newriders.com or www.magenic.com/publications.

