

Tasks define the work units that are performed within a DTS package. They are the means by which you specify what you want to happen when the package executes.
Microsoft SQL Server provides several predefined tasks right out of the box. These tasks enable you to copy and manage data, copy and manage SQL Server databases as well as database objects, execute SQL statements and scripts, send mail, and more.
Table 4.1 lists the built-in tasks that come with SQL Server 2000. Note how the tasks are grouped, starting with the data-movement tasks, whose primary functions are to move and transform data. The Transform Data Task is a high-speed tool for accessing, transforming, and writing data. By contrast, the Data Driven Query Task offers more flexibility in terms of processing but takes a performance hit as a result. The Bulk Insert Task specializes exclusively in high-performance loading of text into SQL Server tables.
Table 4.1. DTS Tasks
|
Icon |
Built-In Task |
|---|---|
|
|
Transform Data Task |
|
|
Data Driven Query Task |
|
|
Bulk Insert Task |
|
|
Execute SQL Task |
|
|
ActiveX Script Task |
|
|
Execute Process Task |
|
|
Execute Package Task |
|
|
Dynamic Properties Task |
|
|
Send Mail Task |
|
|
File Transfer Protocol Task |
|
|
Message Queue Task |
|
|
Transfer SQL Server Objects Task (now called Copy SQL Server Objects Task) |
|
|
Transfer Databases Task |
|
|
Transfer Logins Task |
|
|
Transfer Master Stored Procedures Task |
|
|
Transfer Jobs Task |
|
|
Transfer Error Messages Task |
|
|
Analysis Services Processing Task |
|
|
Data Mining Task |
Following the data-movement tasks are the programming tasks, whose purpose is to give you more flexibility in defining how the work is to be done in a DTS package. If you’re dealing with data that is already in database tables and views, Execute SQL Task allows you to perform virtually any SQL-based processing on the data. The ultimate flexibility, however, is provided by the ActiveX Script Task, which allows you to program your custom processes by using one of several available scripting languages. The Execute Package Task now provides full support for multiple package execution. In SQL 7.0, you either run a batch file from the Execute Process Task (as mentioned next), or use an ActiveX Script Task. The Execute Process Task provides support for running batch files and EXEs. The Dynamic Properties Task enables packages to obtain run-time parameters for execution.
Next are the group of tasks that focus on specialized processes such as sending email, receiving text and binary files, and handling asynchronous messages. The Send Mail Task enables packages to send email as part of its processing. The File Transfer Protocol Task supports the downloading of files from within and outside the local network. (You can also upload, but only within the network.) The Message Queue Task enables packages to deal with asynchronous messaging capabilities, in which the sender and the recipient of messages don’t have to be physically connected to the network at the same time.
These tasks are followed by the database-maintenance tasks, which help you move SQL objects in and out of SQL Server databases.
When you install SQL Server’s Analysis Services option, you get the two OLAP or data-warehousing tasks. The Analysis Services Task assists in automating some of the processing of cubes and other objects contained in Microsoft SQL Server 2000 Analysis Services. The Data Mining Task is used for running prediction queries in data mining models (again, within SQL Server 2000 Analysis Services).
Finally, if you have special needs that none of these tasks can meet, SQL Server allows you to create your own custom tasks. Chapter 16, “Creating Your Own Custom Task,” shows you how to create one by using any programming language that supports COM (such as Visual Basic). It also shows you how to create a user interface complete with its own icon so that you can access your custom task from the DTS Designer window just like any of the built-in tasks.
Table 4.2 lists the original set of tasks available with SQL Server 7.0. The built-in set of tasks in SQL Server 2000 have been expanded significantly.
As the new .NET servers are launched, you will find DTS playing an even bigger role. Just with Commerce Server 2000 (CS2000) alone, the number of DTS tasks will double. This chapter examines the built-in tasks and explores what they have to offer.
To use a built-in task within a DTS package, click one of the task icons in the tool palette on the left side of the DTS Designer window (see Figure 4.1). You can also choose a task from the Task drop-down menu.
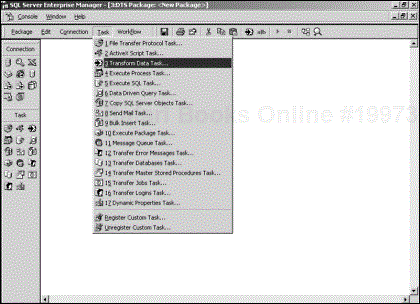
Figure 4.1. The DTS Designer window, showing tasks in the tool palette. Tasks are also listed in the Task drop-down menu.
When you choose a task, an appropriate form pops up that prompts you for information necessary for the proper execution of that task. In some instances, a wizard walks you through the various sets of information needed by the task. Other tasks require you to define a connection first or to configure certain services (such as the MAPI messaging service).
The following sections discuss the data-movement tasks in detail and show you how to use them to support your extraction, transformation, and loading (ETL) processing needs. As you go through these first few tasks, you will notice that you are being introduced to some DTS features that are used elsewhere—in other tasks as well as other areas of DTS. This book will cover each feature thoroughly; keep in mind that you may meet them again as you move on to the rest of the book.
All functions that move and transform data in DTS reside in a DTS component called the data pump. As a COM object, the data pump exposes several interfaces that support high-speed movement of data, specialized and custom transformations of data, and use of scripting to perform and control such transformations. The Transform Data Task is the most fundamental implementation of this data-pump engine. This task supports various types of data sources and data destinations. The most important feature of this task is that it is optimized for inserting data rows into the specified destination. In addition, as it moves the data row by row, the task can apply transformations that you can optionally define on one or more columns.
To use the Transform Data Task, you must have two data connections already defined. You will be asked to click on the source connection first and the destination connection next.
Preselect Your Source Connection
If you happen to have one data connection selected (which is often the case because you most likely will have just created your destination connection), DTS assumes that the connection is your source connection and simply asks you to click on the destination connection. Make sure that the source connection is selected and that none of the data connections are selected before you create the task.
When you click the destination connection, an arrow will be displayed that points from the source to the destination. This arrow is the Transform Data Task. Right-click on the arrow and choose Properties from the shortcut menu to display the Transform Data Task Properties dialog box (see Figure 4.2).
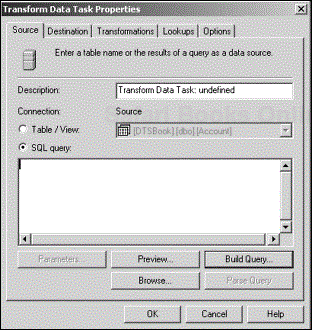
The Transform Data Task Properties dialog box has five tabs that require information to make the task run properly. These tabs are Source, Destination,Transformations, Lookups, and Options.
In the Source tab, you can choose to use a table or a view that exists in your source data connection. You can take a peek at a portion of the actual data by clicking the Preview button. This procedure is a good way to verify that you are accessing the correct data.
If your source connection supports it, you can use a query instead. You can load an existing query from a file by clicking the Browse button. Query files (with the extension .sql) usually are created and saved from an SQL editor such as SQL 2000’s Query Analyzer. If you want to create a new query, you can type it in directly or you can use the Query Designer as discussed in the following section. When the query is ready, you can click the Parse Query button to validate the query’s SQL statement.
About the Query Designer
The Query Designer is one of the common features that is used in various places within DTS. You can use it for building source queries and for building lookup queries, as discussed in the “Performing Lookups” section later in this chapter.
The Query Designer allows you to build your SQL query in a graphical manner. It is similar in many ways to the query builders that you see in many desktop database products, including Microsoft Access and Visual Basic. To use the Query Designer, click the Build Query button to bring up the Query Designer window (see Figure 4.3).
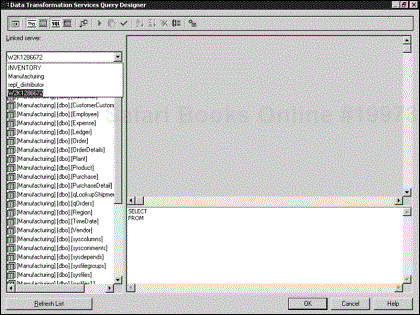
In the left pane, the Linked Server drop-down menu defaults to the server specified by the connection you selected for the query. If you have other linked servers defined that give you access to some other remote servers, you will see those in the drop-down menu as well. Note that even if you defined multiple data source connections in the package, only the server associated with the connection that you selected for the query is listed in the drop-down menu.
About Linked Servers
The Linked Server drop-down menu option is available only when using a Microsoft SQL Server data source connection. For more detailed information on linked servers, see SQL Server Books Online (BOL).
After selecting the server, you see a list of available tables and views that you can use in your query. Drag one of these to the top-right window; the object is displayed with all its available columns. When you click the check boxes that correspond to the column, those columns appear in the SELECT statement in the bottom window.
Because the query is based on a SELECT statement, you are not limited to just one table or view. You can drag one or more tables in and join these tables together. You can even specify if these joins are inner or outer joins. This ability to define a complex query is very important because it potentially can offer higher performance than using lookup queries (see the “Performing Lookups” section later in this chapter).
The graphical drag-and-drop capability really takes away the stress of having to learn or understand the complexities of SQL without limiting the power of the queries that are produced.
Another benefit of using an SQL query is that it allows you to use dynamic data to selectively build the rows in your data source. In SQL, if the OLE DB service provider supports it, you can use question marks (?) as placeholders within a SQL statement, as in this example:
SELECT Customer.CompanyName, Order.OrderID FROM Customer
INNER JOIN Order ON Customer.CustomerID = Order. CustomerID
WHERE Order.ShippedDate > ?
The query expects input data to be provided for these placeholders at the time it executes.
In SQL Server 2000, when you build a query with one or more placeholders in the Query Designer window, DTS creates a Parameters collection and then parses the SQL statement from left to right, inserting an item in the collection for each placeholder. It is essential for you to know that DTS then maps your global variables as input to these parameters. You must ensure that the correct input variable is mapped properly to each parameter so that the proper input data is made available at run time. To do this, close the Query Designer to return to the Source tab of the Transform Data Task Properties dialog box; then click the Parameters button to bring up the Parameter Mapping dialog box (see Figure 4.4).
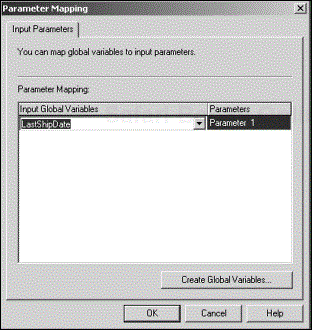
The input variables that the parameters get mapped to are global variables. Global variables belong to the DTS package, not the task, and can be accessed from anywhere within the package. This arrangement makes sense in that it allows you to set the value of these variables outside the current task before its execution, in much the same way that you would set a variable before passing it as a parameter into a function or procedure.
You can choose the variable to map to each parameter from the corresponding drop-down menu. If you want to create a new global variable, click the Create Global Variables button to bring up the Global Variables dialog box (see Figure 4.5).
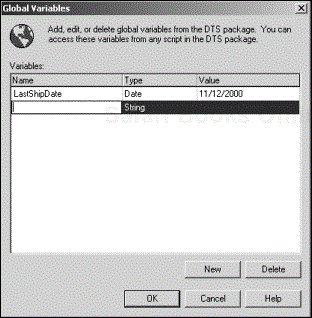
This dialog box is very similar to the Global Variables tab of the DTS Package Properties dialog box, where you can create and manage all global variables used in the DTS package (see Chapter 7, “Package”).
The Destination tab is where you specify the table into which the source rows will be inserted (see Figure 4.6). If the destination table does not exist, DTS offers to create the table for you (assuming that the underlying data source connection supports it). You need to be careful because DTS will create the table as soon as you click the OK button. You can customize the new table by modifying the creation script that DTS offers. If you canceled out of DTS’s initial table-creation offer, you can invoke it again by clicking the Create button. When the table is created, the columns are listed in read-only fashion, meaning that you cannot alter the attributes of the table.
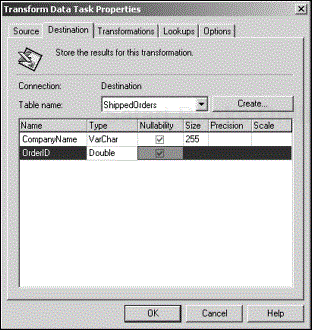
It is important to note that in a Transform Data Task, the destination table is where the data actually ends up.
Transformations specify how each source column is processed and which destination column (if any) such processing will affect. You create and manage transformations in the Transformations tab (see Figure 4.7). Transformations are powerful because they provide you with a wide array of methods for customizing how your data is processed.
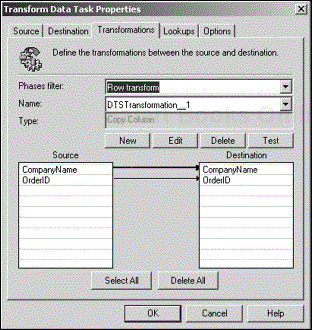
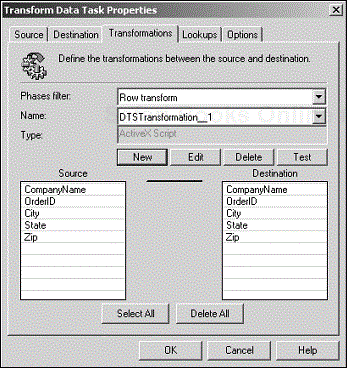
The first time you bring up the Transformations tab in a Transform Data Task, you will see that each column is pre-assigned the default transformation Copy Column. Using the task “as is” provides a great and simple way to copy data from one container to another. However, if you need to do more than just copy a column’s data, you can delete the default transformation and define a new one by choosing from the built-in DTS transformation types.
When SQL 7.0 first came out, the only transformations available were Copy Column and ActiveX Script. SQL 2000 has nine built-in transformation types. To create a new transformation, select the source and destination columns, and click New. This will bring up the Create New Transformation dialog box (see Figure 4.8), which lists all the available transformation types.
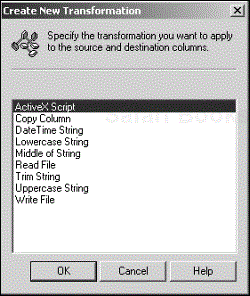
Table 4.3 lists each of these transformation types and explains their general usage.
Table 4.3. Transformation Types
|
Transformation |
Description |
|---|---|
|
ActiveX Script |
Allows you to write scripts to define column-level transformations. |
|
Copy Column |
Copies the data from source to destination. You must map source columns to destination columns. You can map multiple source columns to multiple destination columns. If you specify no columns, DTS performs a sequential One-to-One mapping of all the columns. When text is truncated, no error or notification is reported. |
|
DateTime String |
Allows you to define how date and time values are converted to strings and other formats. You must specify one source column and one destination column, both of which must be compatible with the |
|
Lowercase String |
Converts strings to lowercase. You must specify the same number of source and destination columns, each of which must be of the |
|
Middle of String |
Extracts parts of a string; optionally, converts its case and trims trailing spaces. You must specify the same number of source and destination columns, each of which must be of the |
|
Read File |
Copies into the destination column data from a file specified by the source column. You must specify one source column with the string data type. You also must specify a destination column with either a |
|
Trim String |
Trims leading and trailing spaces; optionally, converts its case. You must specify the same number of source and destination columns, each of which must be of the |
|
Uppercase String |
Converts strings to uppercase. You must specify the same number of source and destination columns, each of which must be of the |
|
Write File |
Writes data from a source column to a file specified by a second source column. You must specify one source column with the |
Most of the transformation types listed in Table 4.3 are self-explanatory and perform relatively simple tasks. However, two of these new transformation types deserve special consideration: Read File and Write File.
If a source column specifies a filename, you can use the Read File transformation to specify the location of this file and copy its contents into the destination column. This transformation can be useful when you are receiving multiple files from different locations, for example, and when you need to load their contents into SQL Server. Save the files in one directory, and list the names of the files in a text file that becomes your data source. When the transformation executes, it opens the file specified by the source column and loads the file’s contents into the destination column.
The Write File transformation, on the other hand, will take data from a source column and write it out to a file specified in a second source column. This can be useful when you need to distribute location-specific data to different locations. Set up your data source so that it has at least two columns: a data column and a filename column. When this transformation executes, data contained in the data column will be written to a file specified in the filename column.
Each transformation that is created can be customized without writing any code by simply using transformation flags. Transformation flags signal DTS to follow certain predefined rules when the transformation is performed. To set a flag for a transformation, use the Transformations tab of the Transform Data Task Properties dialog box. This tab graphically displays all the column mappings between the source and destination that are used in the task.
Right-click on the line representing the column transformation; then click on Flags to bring up the Transformation Flags dialog box (see Figure 4.9).
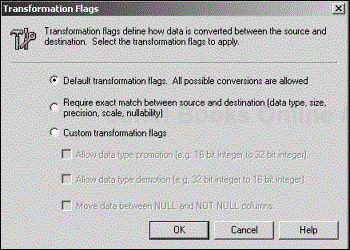
The Default Transformation Flag is the least restrictive option. It allows all possible data conversions to occur. The Require Exact Match Between Source and Destination Flag enforces data type matching between source and destination columns. The Custom Transformation Flag allows you to customize the rules using any combination of three suboptions:
Allow Data Type Promotion—. Allows the transformation to convert 16-bit integers to 32-bit integers.
Allow Data Type Demotion—. Allows the transformation to convert 32-bit integers to 16-bit integers.
Move Data Between NULL and NOT NULL Columns—. Allows the transformation to proceed in case it involves a source that allows nulls and a destination that does not. When a NULL does come through, an exception is reported.
In the data pump, these options are implemented using DTSTransformFlags constants. You can set the data pump’s TransformFlags property programmatically by using these constants. Table 4.4 lists all the possible transformation flags available. As you can see, you can have even tighter control of how the flags are set.
Table 4.4. Transformation Types [1]
|
Flag |
Description |
|---|---|
|
|
Allows the transfer to proceed even if there are potential overflows. Overflows that actually occur during transformation cause the row to be exceptioned. You can specify this value when the source values are all (or mostly) within the range of the destination column. |
|
|
Allows all conversions for which a lossless conversion is possible (for example, Promotion, non-NULLable -> NULLable, unsigned -> signed with field size increase). |
|
|
Allows the transfer to proceed even if the source column allows NULL values and the destination column does not.Any row actually containing NULL is exceptioned, however. |
|
|
Allows the transfer to proceed even when numeric truncation is possible, such as when the source is a floating-point or numeric/decimal type and the destination is an integral type. Loss of significance occurs without error, but integer overflow still causes an error. |
|
|
Allows the transfer to proceed when promotion in the data range occurs when moving from the source to the destination types, such as I2->I4 or I4->float/double. |
|
|
Allows the transfer to proceed even in the event that the source and destination have a signed versus unsigned mismatch. As with |
|
|
Allows column (w)char or byte data to be truncated silently (for example, when moving data from a char(60) to a char(40) column). |
|
|
Includes the default flag combination of |
|
|
Allows the conversion to proceed at all times, even when the source and destination types are fundamentally different; does a bitwise copy when no other conversion is appropriate. |
|
|
Causes the data pump to not clear the destination row storage at the end of row processing. This allows the destination row values to be reused by the next transformation. |
|
|
Requires that the data type of the destination column be exactly the same as the data type of the source column (including length or precision and scale, fixed versus variable length, sign, and nullability). |
|
|
Specifies no flags. The conversion must be between exact types, although conversions between string and nonstring data types is allowed and may cause errors. This value may be overridden by |
[1] This table was copied from Microsoft SQL Server 2000 Version 8.00.000 BOL. This information is available on the SQL Server installation CD. | |
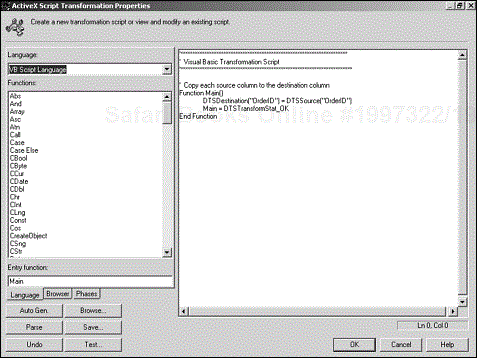
Perhaps the most powerful transformation available to you is the ActiveX Script transformation. This section examines that transformation in more detail. You must use an ActiveX Script transformation if you need to perform special calculations or more complex processing on a column. Right-click on the line representing the column transformation; then click on Properties to bring up the ActiveX Script Transformation Properties dialog box (see Figure 4.10).
ActiveX Script’s Multiple Uses
The ActiveX Script Transformation Properties dialog box is another common feature used throughout DTS. ActiveX scripts are used in transformations as explained here, as well as in customizing workflows (see Chapter 6, “DTS Workflows”). These scripts also may be used on a stand-alone basis in an ActiveX Script Task (see Chapter 5, “More DTS Tasks”).
Click the Language tab to select your scripting language. Microsoft VBScript and JScript are available by default, but any other scripting language you install on your machine should show up here, too. The corresponding language elements are displayed in the left pane.
Installing Third-Party Scripting Languages
You can install a third-party scripting language and use it in an ActiveX script, but you must ensure that the scripting language is installed on the PCs that execute the DTS package. (DTS packages can be run on remote PCs as well as on the server.)
New in SQL 2000 is the Browser tab (see Figure 4.11). In this tab, you can choose constants, columns, and global variables, as well as source and destination columns, and then have DTS insert the corresponding code into the scripting pane on the right side of the dialog box, which is a great help when writing script.
For example, double-clicking the District object under Destination Columns in the Browser pane generates the code DTSDestination("VariableCost") = DTSSource("state") and inserts it at the cursor location on the scripting pane.
Using the scripting language of your choice, you can write script that performs significantly complex processing in your transformation. Remember, however, that the processing that you define in each transformation will occur for each row. Try not to overload transformations if you don’t want performance to suffer.
Performance Hit Posed By Complex Scripts
An important thing to remember is that all the script specified in an ActiveX script transformation gets executed for each row that is processed. This may potentially impact the performance of the task.
ActiveX scripts are used in transformations as explained in this chapter as well as in Chapter 6. You also can use these scripts on a stand-alone basis in an ActiveX Script Task. Wherever ActiveX script is used, you will notice that the default script initially presented to you is in this general format:
Function Main()
   (Optional) {DestinationSpec} = {SourceSpec}
   Main = {Some DTS status constant}
End Function
Functions, as you know, allow the return of a value to the calling program. To return a value from a function, you usually set the name of the function to that value, as in the following code snippet:
Main = {Some DTS status constant} Depending on the context in which the ActiveX script is used, the return status code may have a particular effect on the processing being performed.
The following section examines a particular set of return values associated with DTS transformations.
ActiveX script defined within DTS transformations returns transform status codes (see Table 4.5). Note that some of the status codes are specific to Transform Data Tasks and that others are specific to Data Driven Query Tasks.
Table 4.5. Transform Status Codes [2]
|
Return Value |
Description |
Transform Data Task |
Data Driven Query Task |
|---|---|---|---|
|
|
Terminates all processing at the current row. |
Y |
Y |
|
|
Executes the query that is marked as Delete in the Queries tab, using values from the currently transformed binding row. |
Y | |
|
|
If all transformations return this value, the current row is not written to the destination. |
Y |
Y |
|
|
The current transformation encountered an error. |
Y |
Y |
|
|
Terminates further processing of this row; reports the error but does not write the row to the exception file. |
Y |
Y |
|
|
Terminates further processing of this row; reports the error and writes the row to the exception file. |
Y |
Y |
|
|
The transformation succeeded with additional information that the application can process further. |
Y |
Y |
|
|
Executes the query that is marked as Insert in the Queries tab, using values from the currently transformed binding row. |
Y | |
|
|
Indicates that the current row is the last to be processed. No error is raised. |
Y |
Y |
|
|
The transformation succeeded. Writes the row to the destination if specified. No error is raised. |
Y |
Y |
|
|
The transformation succeeded. Writes the row to the destination if specified. Reports the additional information to the error handler. |
Y |
Y |
|
|
Restarts processing of the current source and destination rows by executing all transformations again. No rows are fetched. |
Y |
Y |
|
|
Does not write the current row to the destination. |
Y |
Y |
|
|
Terminates further processing of this row. |
Y |
Y |
|
|
Terminates further processing of this row; reports additional information to the error handler. |
Y |
Y |
|
|
Executes the query that is marked as Update in the Queries tab, using values from the currently transformed binding row. |
Y | |
|
|
Executes the query that is marked as Select in the Queries tab, using values from the currently transformed binding row. |
Y | |
[2] This table was copied from Microsoft SQL Server 2000 Version 8.00.000 BOL. This information is available on the SQL Server installation CD. | |||
An ActiveX Script transformation, for example, may have the following script:
Function Main()
   DTSDestination("column_name") = DTSSource("column_name")
   Main = DTSTransformStat_OK
End Function
This indicates to the data pump that the transformation succeeded and that the row should be written to the destination table. If, for example, you expect some errors to occur, add error-handling code and return the appropriate status code instead.
Generally, each arrow in the Transformations tab represents a transformation. However, you can configure the mapping of your transformations in several ways.
Use One-to-One column mapping when a transformation requires one source column and one destination column. In a Transform Data Task, this mapping is the default mapping used to generate the Copy Column transformations. When you use this procedure, DTS tries to match columns by name. Thereafter, it maps the first unmatched source column to the first available destination column, regardless of their data types, and repeats this process until all columns have been mapped in one rowset; it ignores any remaining columns in the other rowset. You can apply this type of mapping to the following transformations:
Copy Column
Trim String
Date Time String
Middle of String
Read File
ActiveX Script
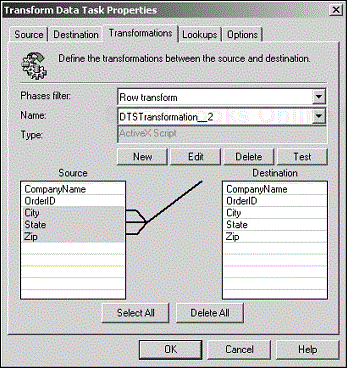
Use N-to-N column mapping when a transformation requires multiple source columns and matching destination columns. In a Data Driven Query Task, this mapping is the default mapping used to generate the single ActiveX Script transformation (see Figure 4.12).
This method works best when the source and destination columns have the same name and they are lined up properly starting from the top. DTS simply starts from the top, maps each pair until it finds no more pairs to map, and it ignores any columns that may remain on either side. Note that no name or data type matching is performed—just a straightforward source column(n)–to–destination column(n) pairing. You can apply this type of mapping to the following types of transformations:
Copy Column
Uppercase String
Lowercase String
ActiveX Script
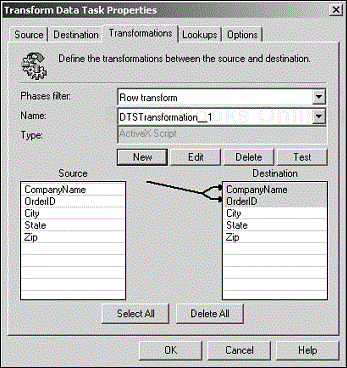
Use N-to-Zero mapping when a transformation requires one or more source columns and no destination column (see Figure 4.13). Only the ActiveX Script and Write File transformations make sense in this method.
To set up N-to-Zero mapping, select the source column(s) you want to use; then make sure that no destination column is selected (click on an empty row to be sure). Click the New button, and choose ActiveX Script or Write File to generate the transformation.
Use Zero-to-N mapping when a transformation requires one or more destination columns and no source column (see Figure 4.14). This mapping can be applied only to an ActiveX Script transformation because all the other transformation types require at least one source column to be defined.
To set up Zero-to-N mapping, select the destination column(s) you want to use; then make sure that no source column is selected (click on an empty row to be sure). Click the New button, and choose ActiveX Script to create the transformation.
Use Zero-to-Zero mapping when a transformation requires neither a source nor a destination column (see Figure 4.15). Because it requires neither a source column nor a destination column, an ActiveX Script transformation is the only one that can have this type of mapping.
To set up Zero-to-Zero mapping, make sure that no source or destination column is selected (click on an empty row on both sides to be sure). Click the New button, and choose ActiveX Script to create the transformation. Note that only one line is used to indicate that one or more transformations with this type of mapping have been created in the task.
You need to be aware of a special case of Zero-to-Zero mapping. If you create a Copy Column transformation by using this mapping type, DTS performs a sequential One-to-One mapping of all columns. In fact, you can create multiple instances of this transformation. But why would you want to copy the columns repeatedly without making any changes?
Finally, you can have N-to-M and M-to-N mappings, in which you have an unequal number of columns between source and destination. A common situation that requires Two-to-One mapping is when you have to populate the destination Full Name field by concatenating First Name with Last Name. This kind of mapping is most appropriate for the ActiveX Script and Copy Column transformations.
To set up N-to-M or M-to-N mapping, select the source column(s); then select the destination column(s). Click the New button, and choose ActiveX Script or Copy Column from the pop-up dialog box to create the transformation. You must ensure that each source column is mapped to a destination column. In an ActiveX Script transformation, the graphical procedures described above are replaced by code. With the Copy Column transformation, some columns may initially be mapped to a column labeled <Ignore>. You must map those columns to specific source or destination columns as appropriate.
One of the most common transformations performed on data involves converting codes into labels or descriptions that are more meaningful. You will recognize this as the process of “performing a lookup”. In DTS, you can achieve this by using an ActiveX Script transformation, as described earlier in this chapter, and writing script that executes a query against a data source. The script would involve establishing a connection to the data source, setting up the query, executing it, and then disconnecting from the data source. Execute all of that for each row, and you can see how much this approach can hurt the performance of the task.
DTS lookups offer a far more efficient way to do this. First, a lookup uses one of the connections that you define in the package; therefore, it doesn’t have to connect/ disconnect for each row. Second, a lookup can cache the lookup data, making it available instantly without further database access.
In this section, you build a lookup query and use it in one of the columns being transformed. You add one or more lookups to your task in the Lookups tab (see Figure 4.16).
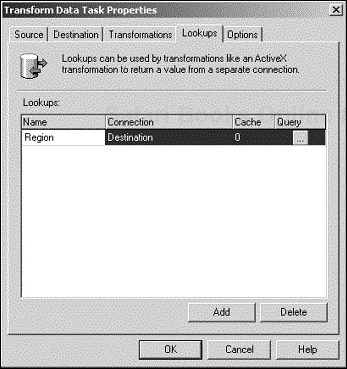
In this tab, you can specify the name of the lookup, which connection to use for the lookup, and how many rows of the lookup table to cache. Click the button below the Query column to bring up the Query Designer window (see Figure 4.17).
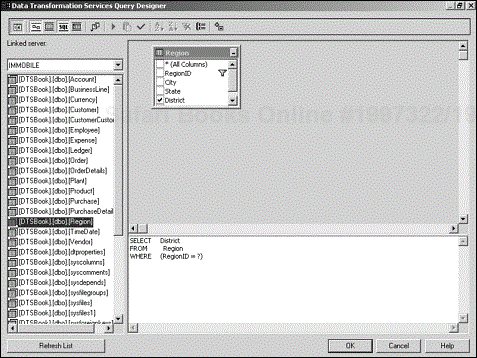
You will be performing a lookup against a table named Region, which you can see in the list on the left side of Figure 4.17. Drag the table to the pane on the right side of the window, and click the check box next to the column named District to add District to the SELECT statement in the pane at the bottom of the window. The last thing you need to do is specify the WHERE clause; in this case, WHERE (RegionID = ?). The question mark is a placeholder for the parameter that will be passed in when the lookup fires.
Considerations for Building Lookup Queries
When you build lookup queries, keep in mind the following considerations:
A SQL join with the lookup table in the source data connection is far more efficient than a lookup query.
If possible, use a data connection other than the source and destination connections in the package.
This data connection must be an OLE DB service provider. (Specifically, it must support the OLE DB command interface.) You cannot look up values from a text file.
If the data connection does not support transactions, updates made by the lookup query could remain committed even if the package rolls back the transaction.
If a lookup query fails, no further processing occurs for the row that was last read from the source connection. The failure counts as one error toward the maximum errors count for the task.
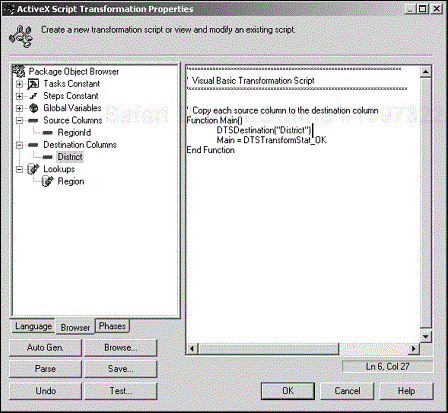
To use the lookup query in a task, create a new transformation, and choose the ActiveX Script transformation type. Do this for the source column Account. In the ActiveX Script Transformation Properties dialog box, you can see that the Browser tab now displays the lookup query that was just created (see Figure 4.18).

The default script in the script window simply copies the source column to the destination column and will have something like the following:
DTSDestination("District") = DTSSource("RegionID") You want to assign to the destination column the values returned by the lookup query. So, you should change the right side of the equation. The new line should look like this instead:
DTSDestination("District") = DTSLookups("Region").Execute(DTSSource("RegionID")) Note that the Execute method of the DTSLookups collection accepts as a parameter the value of the source column. Because the Execute method is a parameter, you can pass any appropriate value to it, including hard-coded values and global variables.
Speaking of global variables, if you define one in the package, it also shows up in the Browser tab. (We created one and named it LastShipDate.) The following code fragments demonstrate how to use a global variable in your script:
DTSDestination("ShippedDate") = DTSGlobalVariables("LastShipDate").Value

DTSDestination("OrderID") =
DTSLookups("Orders").Execute(DTSGlobalVariables("LastShipDate").Value)
The first code fragment shows you how to assign the value of the global variable directly to the destination column. The second example shows you how to pass the value of a global variable to the lookup query.
The term lookup is not exactly accurate because you can do more than just perform a lookup. You can actually have any valid SQL statement in your query, including INSERT, UPDATE, DELETE, and even EXECUTE (a stored procedure). Following is an example of an update query named UpdateEmployee and its corresponding use in an ActiveX script:
SQL query:
UPDATE Employee SET HasTakenVacation = 1 WHERE EmployeeID = ?
ActiveX script:
DTSLookups("UpdateEmployee").Execute(DTSSource("EmployeeID"))
As you can see, DTS makes using lookup queries easy. Keep in mind, however, that the more complex your code is, the bigger the penalty in terms of performance. One way to avoid this performance degradation in lookups is to use a join instead. As mentioned earlier in this chapter, when you create the source connection, you can use a SQL query instead of specifying a table. Join your source table with the lookup table, and you won’t have to perform lookups on each row.
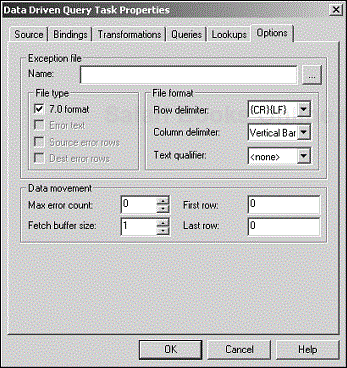
The Options tab has several options that provide additional flexibility and enhance the performance of the task (see Figure 4.19).
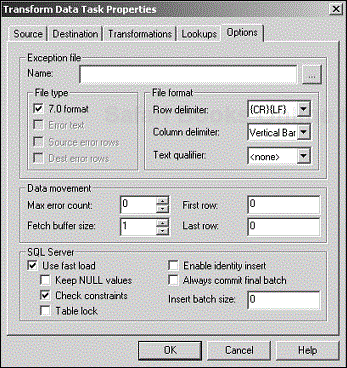
Many of these options are used by other built-in DTS tasks. One reason is that all these tasks share the same basic data-pump engine. However, each task has a unique set of options.
The Options tab is a very busy tab, and you will feel overwhelmed when you first bring it up. However, it is actually organized into sections. So, all you need to do is focus on one section at a time.
Table 4.6 lists the options related to error handling and the use of exception files.
Table 4.6. Exception File Options
|
Option |
Description |
|---|---|
|
Name |
The name of the file where exception records will be written. If the file does not exist when the package executes, the file will be created. |
|
FILE TYPE | |
|
7.0 Format |
Specifies to save the exception file in SQL 7.0 format. |
|
Error Text |
Specifies that any errors encountered during the task execution be recorded. Information such as the package name, execution start and completion times, and other data are entered in the exception log. |
|
Source Error Rows |
Specifies that a separate exception file be created to contain all the rows from the source data that did not get written to the destination. The filename is the same the one specified in the Name field but with the extension “Source” appended to the filename. |
|
Destination Error Rows |
Specifies that a separate exception file be created to contain records rejected from the destination file. The filename is the same as the one specified in the Name field but with the extension Dest appended to the filename. |
|
FILE FORMAT | |
|
Row Delimiter |
Specifies the delimiter used to separate rows of data in the exception files. A carriage return/line feed |
|
Column Delimiter |
Specifies the delimiter used to separate the columns of data in the exception files. A vertical bar is used by default. |
|
Text Qualifier |
Specifies the character used to qualify text in the exception files. The choices are |
Table 4.7 lists the options that provide some control of how data is read and handled.
Table 4.7. Data Movement Options
|
Option |
Description |
|---|---|
|
Max Error Count |
Sets a limit for the number of errors allowed before processing for the task is terminated. When the SQL Server fast-load option is selected, each error corresponds either to a row-level failure detected by the Transform Data Task, or to a batch failure. The value of Max Error Count includes the number of row-level errors detected by the Transform Data Task plus batch failures. When the Max Error Count value is exceeded, task execution is terminated. The default is zero, which means that the task will terminate upon the first error. |
|
Fetch Buffer Size |
Sets the number of rows of data being fetched at the source during data movement. Generally, you should not need to adjust this value unless it is necessary to optimize the characteristics of the data provider. |
|
First Row |
Specifies the first row of data to be moved. This option is useful if the first row consists of column headings or if the first part of a data source has been copied. You can set this value to the row number where processing stopped in an earlier data-pump operation. |
|
Last Row |
Specifies the last row of data to move. |
Table 4.8 lists the options that affect SQL Server processing.
Table 4.8. SQL Server Options
|
Option |
Description | ||||||||||
|---|---|---|---|---|---|---|---|---|---|---|---|
|
Use Fast Load |
Specifies that you want to use high-speed, bulk-copy processing. You can use the fast-load option only when the destination connection is the Microsoft OLE DB Provider for SQL Server. When you enable this option, the data pump can accept batches of transformed data. Batch sizes are controlled by the Insert Batch Size option. | ||||||||||
|
THE FOLLOWING OPTIONS ARE AVAILABLE ONLY IF YOU ENABLE THE USE FAST LOAD OPTION. | |||||||||||
|
Enable Identity Insert |
Allows explicit values to be inserted into the identity column of a table (SQL Server only). This option is available only if an identity column is detected. | ||||||||||
|
Keep NULLValues |
Specifies that you want to keep the NULL value in the destination column even if the destination table was created with a default value designated for the column. | ||||||||||
|
THE FOLLOWING OPTIONS ARE AVAILABLE ONLY IF YOU ENABLE THE USE FAST LOAD OPTION. | |||||||||||
|
Check Constraints |
Specifies whether constraints on the destination table are checked during the load. By default, constraints are ignored. This setting improves the performance, but it also allows data that violates existing constraints to be inserted into the table. | ||||||||||
|
Table Lock |
Specifies to lock the whole table when the task executes. Otherwise, row-level locking is used, which reduces performance. | ||||||||||
|
Always Commit Final Batch |
Specifies to commit all rows in the final batch that were processed successfully before an error occurs. This property applies when a transformation or insert error occurs during processing of the final batch, so that all rows in the batch prior to the error do not have to be processed again. The setting is useful for large batch sizes. | ||||||||||
|
Insert Batch Size |
Specifies the number of rows in a batch.
| ||||||||||
The Data Driven Query Task derives its name from the fact that it relies on parameterized queries to perform the actual modifications of the data. Like the Transform Data Task, it is based on the DTS data-pump engine but is far more flexible. In addition to INSERT, the task supports other Transact SQL statements (including UPDATE, DELETE, and SELECT) as well as most other SQL statements.
This flexibility comes at a price because this task is significantly slower than the Transform Data Task (described earlier in this chapter) and the Bulk Insert Task (discussed in the “Using the Bulk Insert Task” section later in this chapter).
Using Higher-Performance Tasks
If you can accomplish the same thing using Transform Data Task or Bulk Insert Task, use those instead.
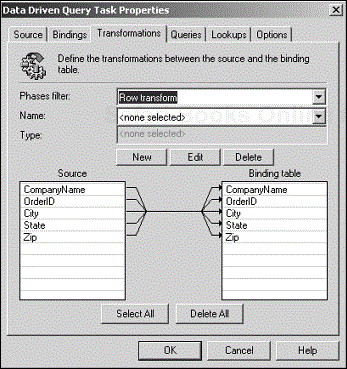
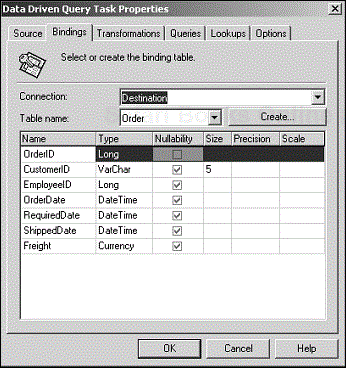
When you open the Data Driven Query Task Properties dialog box, the first thing you will notice is that the Bindings tab sits next to the Source tab instead of the Destination tab (see Figure 4.20). This change is a very important but subtle one from the setup in the Transform Data Task. It is worthwhile to take the time to understand the significance of this change if you want to use this task efficiently.
To understand the role of the Bindings tab and how it differs from the Destination tab, follow the flow of data in a Data Driven Query Task as it executes:
Using the definition in the Source tab, DTS retrieves a row from the source data connection.
By default, DTS defines ActiveX Script transformations in the Transformations tab that copy each column in the source row to a matching or appropriate column in the rowset specified by the binding table.
Optionally, you can transform a column by using lookup queries and ActiveX script calculations. Even though data has moved from the source table to the binding table, at this point no modifications to data have occurred (except for the transformations in memory). More important, no changes have been written to any destination.
By default, the ActiveX Script transformation generated by DTS returns the status code,
DTSTransformstat_InsertQuery.This status code tells DTS that the query to be executed is the Insert query defined in the Queries tab.
Knowing which query to execute, DTS now maps appropriate values in the binding table to the parameters of the selected query.
Note that a set of parameter mappings is defined for each query that is built in the Queries tab.
Finally, using the values passed in through its parameters from the binding table, the query performs the actual data modifications in the destination table.
As you can see, no direct movement of data from source to destination occurs. The final destination of the data may or may not be the destination specified in the Binding tab. The result depends on how the query is set up.
About the Binding Table
The important thing to remember is that the Binding table may not necessarily be the Destination table. The Binding table provides the data that is mapped into the parameters for the query that is to be executed. The query itself could be targeted to update a completely different table.
In the Data Driven Query Task Properties dialog box, the Source, Transformations, and Lookups tabs are similar to those in the Transform Data Task Properties dialog box, and you use them in exactly the same way. When you use ActiveX scripting in the Transformations tab, however, return values have an added significant meaning because of the way it affects the behavior of the task through queries. In the next section, you will be shown how to build the data-driven queries, and you will see how to use the transform status return values to specify which query is executed.
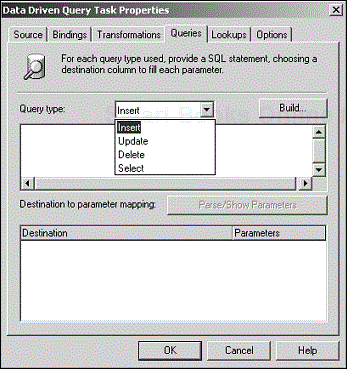
You build the queries for a Data Driven Query Task by using the Queries tab (see Figure 4.21). The Query Type drop-down menu gives you four choices: Insert, Update, Delete, and Select. However, DTS does not enforce these types on the actual query that you build. You can select an Insert type and then build a Delete statement (however, we suggest you keep the two in sync). This means you can create up to four queries of the same type or any combination, depending on what your task needs to accomplish.
You use the query (or queries) by writing some code in an ActiveX Script transformation, just as you did with the lookup query for the Transform Data Task. For example, assuming an appropriate query has been set up for each of the four query types, the following code fragment shows how a query is selected and fired:
Select Case Trim(DTSSource("ChangeCode"))
  Case "New"
   Main = DTSTransformStat_InsertQuery
  Case "Change"
   Main = DTSTransformStat_UpdateQuery
  Case "Delete"
   Main = DTSTransformStat_DeleteQuery
  Case Else
   Main = DTSTransformStat_SkipRow
End Select
Based on the value of the source column "ChangeCode" , the script returns one of four possible DTSTransformStat constants (see Table 4.9, a subset of the transform status codes discussed earlier in this chapter). Returning DTSTransformStat_InsertQuery causes the query associated with the query type Insert to be executed, returning DTSTransformStat_UpdateQuery causes the query associated with the query type Update to be executed, and so on.
Table 4.9. Transform Status Codes
|
Return Value |
Description |
Transform Driven Data Task |
Data Query Task |
|---|---|---|---|
|
|
Executes the query that is marked as Delete in the Queries tab, using values from the currently transformed binding row. |
Y | |
|
|
Executes the query that is marked as Insert in the Queries tab, using values from the currently transformed binding row. |
Y | |
|
|
Executes the query that is marked as Update in the Queries tab, using values from the currently transformed binding row. |
Y | |
|
|
Executes the query that is marked as Select in the Queries tab, using values from the currently transformed binding row. |
Y |
In some instances, you may need to execute more than one of these queries. For example, you may need to delete some rows first and then insert new rows. To do this, you need to return multiple return codes that are combined together using a logical OR, as in the following example:
Main = DTSTransformStat_DeleteQuery OR DTSTransformStat_InsertQuery
When the transformation executes, the two queries indicated in the function’s return value are performed.
The Options tab of the Data Driven Query Task Properties dialog box is very similar to the Options tab of the Transform Data Task Properties dialog box. The main difference is that the Data Driven Query Task Properties dialog box does not have the section on SQL Server options. So, you can’t choose Use Fast Load and its ancillary options (see Figure 4.22). This is all because speed is not the primary focus in this task—functional flexibility is instead.
The options are similar to those of the Transform Data Task because the two tasks rely on the same data-pump engine. Tables 4.4 and 4.5 earlier in this chapter explain these options in greater detail.
As developers, we are always wishing we had more control over our applications. That is certainly true with DTS applications as well. After we discovered how we could use ActiveX Script and status codes in DTS transformations, we soon learned how difficult it was to control the process of looping through the rows. We also learned how it often forced us to use two sometimes three or more tasks to accomplish what could very well be done with one task.
When you add ActiveX script to a transformation, you are actually customizing the behavior of the DTS data pump and taking control of at least part of its processing. More specifically, you are customizing the data pump’s row transform phase. In SQL 7.0, it was all that was available. Now with SQL 2000, more hooks into the data pump have been exposed allowing much more control of its processing.
To gain access to these new hooks, right-click on the Data Transformation Services folder in Enterprise Manager, and click on Properties to open the Package Properties dialog box (see Figure 4.23).
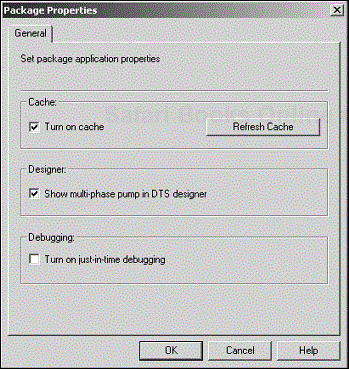
By default, the check box labeled Show Multi-phase Pump in DTS Designer (in the Designer section) is unchecked, thus limiting you to the transformation phase. Check this check box to expose the additional phases.
Now whenever you work with transformations, you will see an additional tab labeled Phases (see Figure 4.24).
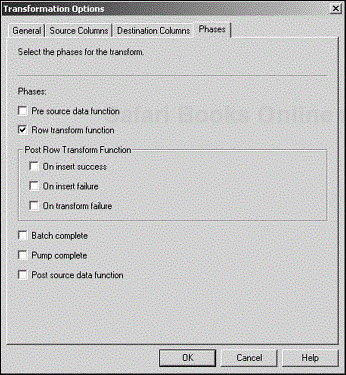
By default, the only option checked in this tab is Row Transform Function, which calls the default Main function just as in SQL 7.0’s ActiveX Script transformations. In spite of being limited then to just that one scripting option, we were able to do a lot with it. It is not so difficult to see how much more powerful SQL 2000 DTS is with seven new entry points to connect into the data pump.
Adding script and hooking it into the data pump is easy. Simply write the function script in the ActiveX Script Transformation Properties dialog box. Then enable the entry point at which you want that script to execute by clicking on the Phases tab. The tab is located in the lower left adjacent to the Language and Browser tabs. Check the appropriate check box, and type the name of the function you just wrote in the associated text box.
When the transformation fires, the DTS data pump uses this information to execute your function(s) in the proper sequence.
As you might expect, each of the seven new entry points corresponds to a particular phase in the data pump’s process flow. Figure 4.25 provides an overview of these phases and shows how the data pump’s processes flow through these phases.
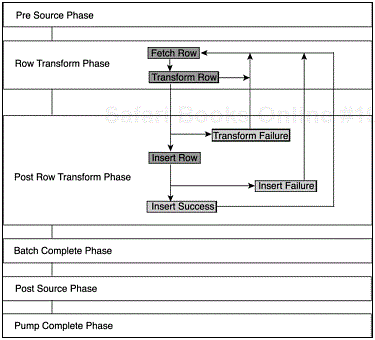
Processing starts by fetching a row from the source data connection. If any transformations have been specified, these are applied to the incoming row. Then the data pump attempts to insert the updated row into the destination rowset. Next, the data pump processes any exceptions that may have occurred, including any special return codes you included in your functions. If a batch size greater than one has been specified, the rowset is saved in a batch buffer, and a new source row is fetched. When the batch size is complete, the batch is written to the destination table, and a new batch is started. The task ends when all batches have been processed.
In Figure 4.25, you can see all the phases and all the entry points for your custom scripts. The pre source phase executes before any source row is fetched. This phase allows you to perform any one-time processing, such as writing header rows or performing initialization that may be necessary. You do not have access to the source row in this phase, but you do have access to the destination row and can write preliminary information to it.
This is the default data pump phase. The Main function stub specified in the ActiveX Script Transformation Properties dialog box provides a starting point for adding custom scripting code for this phase. The row transform phase allows read access to source data and meta data and write access to destination data.
The post row transform phase occurs after the row transform phase and consists of three subphases:
On Transform Failure—. This phase executes whenever an error occurs in the row transform phase; whether it is an implicit error, or your code returns a
DTSTransformStat_ErrororDTSTransformStat_ExceptionRowstatus. This error does not count toward the maximum error specified in the Options tab. When the failure occurs, your script can make the necessary changes. Whatever happens in your code, processing will continue, resulting in either a successful or an unsuccessful insertion of the row into the destination buffer. Note that this is exclusive, it is either successful or it is a failure, which means only one of the following phases can occur next.On Insert Success—. This phase executes when the current row is inserted successfully into the destination rowset. At this point, no data has been written to the database.
On Insert Failure—. This phase occurs when the insertion of the current row into the destination rowset fails. Again, this error does not count toward the maximum errors specified in the Options tab. Because the insertion fails, the row count for the batch is not incremented either.
The on batch complete phase occurs each time the number of rows inserted into the destination buffer equals the batch size specified in the Options tab. It also occurs when all rows have been processed and the destination buffer contains at least one row. When this phase occurs, the rows in the destination buffer are written to the destination table. If an error occurs, it is possible that some or all rows in the buffer are not written out to the table, depending on whether the package is configured to use transactions. You need to remember two important things:
The phase executes on completion of a batch, whether it is written to the table successfully or not.
This phase may not execute (when an insert failure occurs for each row, for example).
The post source data phase occurs after all the batches have been processed. At this point, you still have access to the destination data. So, you can write out any final information required by your application.
The on pump complete phase is the last phase to execute, in spite of the fact that it is not the last phase listed in the Phases tab. You no longer have access to data at this point. However, this is still a full ActiveX Script environment. Therefore, you can still do many things: connect to databases through ADO, work with SQL Server through SQL-DMO, send messages to a pager, and so on.
By working with these phases, you can easily add a great amount of functionality to your DTS package, such as data aggregation, custom error handling, and row-level restartability. One huge benefit of opening all these entry points to the data-pump engine is that it allows you to consolidate more of your script in one place: the DTS package.
The Bulk Insert Task is a specialized task that focuses on loading data from text files into SQL Server tables and doing it really fast (see Figure 4.26). It is not based on the DTS data-pump engine; instead, it is based on the Transact-SQL BULK INSERT statement. Unlike the Transform Data Task, this task requires only one data connection—to a SQL Server destination table. For the source, it specifically asks for a text data file. Because speed is its primary focus, the Bulk Insert Task does not allow you to perform any transformations on your data. Also, you must ensure that your source data columns are mapped properly to the destination columns.
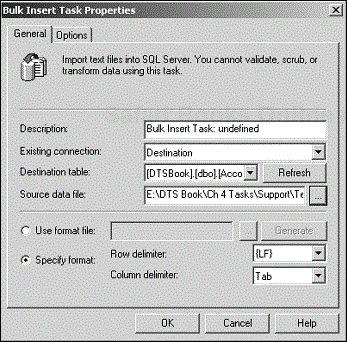
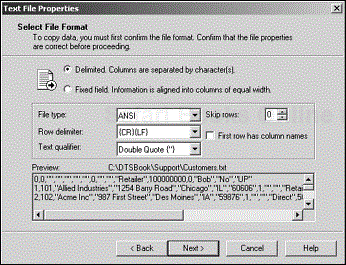
A common mistake is to have column headings in your data file without specifying a format file. If you have column heading information in the first row of your input data files, choose the Use Format File option and generate the format file or browse to it if one already exists. This format file traces its roots to the BCP (Bulk Copy Program) format file in earlier versions of SQL Server. When you generate a format file, a wizard walks you through the various options. One of these options allows you to specify whether the first row consists of column names (see Figure 4.27). You also can specify format specifications other than the default tab-delimited data format.
Setting Bulk Insert Parameters
Because this task encapsulates the Bulk Insert Transact SQL statement, you are setting the parameters of that statement when you set the options in this task. Any parameter not exposed by the task is set to its default value. If you need to set any of the parameters that are not exposed by the task, you can set them through the BulkInsertTask object by using ActiveX script or through the bcp utility by way of the Execute Process Task (see Chapter 5).
The Options tab of the Bulk Insert Task Properties dialog box has several settings that you need to be aware of, because they can dramatically impact the performance of the task you are building (see Figure 4.28).
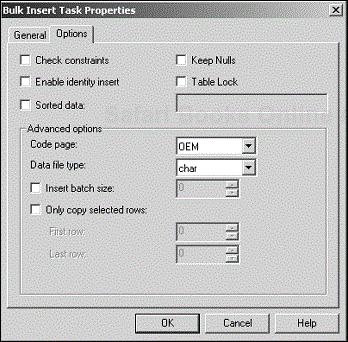
Some of these options, you will recall, showed up earlier in Table 4.8, “ SQL Server Options ” in the section on Transform Data Task. This is because the ultimate processing handler is the SQL Server engine itself.
Table 4.10 lists the basic options for the Bulk Insert Task, including how to handle check constraints, identity inserts, null data, and table locking.
Table 4.10. Bulk Insert Options
|
Option |
Description |
|---|---|
|
Check Constraints |
By default, constraints defined in the destination table are not checked. This means you could end up with some invalid data in your tables. Check this option if you want the constraints to be enforced. |
|
Enable Identity Insert |
If you have an Identity column in your table, SQL Server generates its values automatically, which means that it normally will not allow a row to be inserted if the row has a non-null value in this column. Check this option if you have values in your data file for the Identity column of your table. |
|
Keep Nulls |
If you have default constraints defined for certain columns in your table, those columns will contain the default values if the row being inserted contains nulls. Check this option if you want to override the default values and insert the nulls instead. |
|
Sorted Data |
By default, SQL Server assumes that the data is not sorted. If you have a clustered index defined on your table, and your data file is sorted primarily on the column(s) in the clustered index, check this option to enhance the performance of the Bulk Insert Task’s operations. You must specify the valid column(s) on which the data is sorted. |
|
Table Lock |
By default, SQL Server uses row-level locks when performing bulk inserts. Performance is improved because the locking operation is performed only once and the copy operations do not have to wait for rows locked by other users. Check this check box to improve the performance of the task. |
Table 4.11 lists more advanced options for the Bulk Insert Task. You will recognize most of these options as parameters of bcp. Now you can take advantage of bcp’s advanced options without programming or clunky batch commands.
Table 4.11. Advanced Bulk Insert Options [3]
|
Option |
Description |
|---|---|
|
Code Page |
Specifies the code page of the data in the data file. Code Page is relevant only if the data contains char, varchar, or text columns with character values greater than 127 or less than 32. The possible values for Code Page are:
|
|
Data File Type |
Specifies the type of data in the data file. The Bulk Insert Task adjusts its copy operations accordingly. The possible values for Data File Type are:
|
|
Insert Batch Size |
Specifies the number of rows in a batch. The Bulk Insert Task adjusts its copy operations accordingly. The possible values are:
|
|
Only Copy Selected Rows |
Allows you to specify a contiguous range of rows to be copied, starting at the physical row specified by First Row and ending at the physical row specified by Last Row. |
[3] This table was copied from Microsoft SQL Server 2000 Version 8.00.000 BOL. This information is available on the SQL Server installation CD. | |
This chapter introduced the built-in DTS tasks and showed you how to use them in a DTS package. You got a glimpse of the engine underlying the core data-transformation tasks, called the data-pump engine. The chapter discussed the two DTS tasks that represent the two main implementations of that engine, including the Transform Data Task and the Data Driven Query Task. You learned how to use ActiveX script to customize the behavior of the various phases of the data pump. Finally, the chapter introduced a third data-movement task, the Bulk Insert Task, which is not based on the data pump. Chapter 5 covers the other built-in DTS tasks.