Chapter 5 User Environment Management and Security
All process-based activity on a server is governed by the rights and privileges assigned to the user account under which it is running. The preceding chapter discussed how SLES reserves specific ranges of user IDs (UIDs) and group IDs (GIDs) for system accounts, special accounts, and standard user accounts.
In many operating systems, elevated system access is granted through the assignment of rights by the system administrator. If a specific privilege is not granted deliberately, the user account does not experience an elevation in access rights. In Linux, however, an account can obtain intrinsic rights simply by being placed in a specific UID/GID range. Arguably, mistakes can be made in any operating system environment. Attention to detail and proper auditing of account management would catch such mistakes. In the Linux world, a number in the UID or GID field should be verified for two properties: uniqueness and intrinsic rights.
In this chapter, we investigate user access one level beyond the simple granting of an account. Many of the topics covered here allow you, as the system administrator, to restrict users to allowed patterns of usage. Some users may see this as an obstacle to productivity. In most cases, a corporate IT policy dictates many of the guidelines for each restriction. Implementing these options in a proactive way will enhance your capacity for providing a robust and secure environment.
Account Auditing
The first step in securing a server is to determine what level of presence it must have. A server sitting on a network can be accessed in a variety of ways. Some methods require a username and password, and others do not require any form of authentication.
You can run network services that use a simple query-response scenario that does not require authentication. In this type of environment, a query is sent to a server, the server interprets the information, and when required, it passes information back to the client. Examples include DNS, DHCP, web server traffic, and PING. This type of access is controlled through managing services in the different run levels (see Chapter 3, “Booting and Shutting Down the Server”), the local account the service is run under, and firewall management (see Chapter 11, “Network Security Concepts”).
Most services that are of interest to the end user require authentication. Examples are file sharing, remote logins, and access to secured websites. Numerous methods can be used to authenticate users. In this chapter, we concentrate on the authentication processes available on the local server.
Local access to a system is governed by the use of a username and password typically stored in /etc/passwd. Chapter 4, “User and Group Administration,” introduced the concept of the /etc/passwd file as the repository of all user accounts that have access to a system. Listing 5.1 contains a copy of the /etc/passwd file from the DNS server installed in Chapter 2, “Updating the Server.” If you recall, the DHCP-DNS software components were installed on top of a minimum SLES install. Referring to Listing 5.1, you may observe an interesting fact: A number of accounts created during the install are not required for the proper functioning of DHCP.
LISTING 5.1. /etc/passwd File from the DHCP Server Pollux
root:x:0:0:root:/root:/bin/bash
bin:x:1:1:bin:/bin:/bin/bash
daemon:x:2:2:Daemon:/sbin:/bin/bash
lp:x:4:7:Printing daemon:/var/spool/lpd:/bin/bash
mail:x:8:12:Mailer daemon:/var/spool/clientmqueue:/bin/false
news:x:9:13:News system:/etc/news:/bin/bash
uucp:x:10:14:Unix-to-Unix CoPy system:/etc/uucp:/bin/bash
games:x:12:100:Games account:/var/games:/bin/bash
man:x:13:62:Manual pages viewer:/var/cache/man:/bin/bash
at:x:25:25:Batch jobs daemon:/var/spool/atjobs:/bin/bash
wwwrun:x:30:8:WWW daemon apache:/var/lib/wwwrun:/bin/false
ftp:x:40:49:FTP account:/srv/ftp:/bin/bash
postfix:x:51:51:Postfix Daemon:/var/spool/postfix:/bin/false
sshd:x:71:65:SSH daemon:/var/lib/sshd:/bin/false
nobody:x:65534:65533:nobody:/var/lib/nobody:/bin/bash
hart:x:1000:100:Hart:/home/hart:/bin/bash
named:x:44:44:Name server daemon:/var/lib/named:/bin/false
dhcpd:x:100:65534:DHCP server daemon:/var/lib/dhcp:/bin/false
Echoing the policy that a system should contain only the minimum set of applications for its tasking, a proper account policy should dictate that unused accounts not be permitted on any system. There is no need for accounts such as games on a production server unless they are explicitly required. Such accounts, especially those with a UID in the reserved system space, should be removed. Though unlikely, they could provide access to the system if they are compromised. Because they are “standard” account names, modification to the default setup for these accounts could go undetected, allowing inappropriate access to the system. If the accounts are not present, the opportunity for exploit is not present either.
On a typical system, there are three types of accounts: local accounts with elevated access, local accounts used to run the various services, and unprivileged user accounts. In the remainder of this chapter, we examine how to further refine the access given to accounts.
Configuring the User Environment
An organization typically has two types of servers. One type has relatively static content, such as a DHCP or DNS server. The second type of server contains user files. In both cases, providing a consistent work environment for the end user is a must.
Uniformity of behavior over the server environment permits tool sets and scripts to be used cross-platform. Additionally, users do not have to remember multiple command syntaxes to achieve the same goal. In the following sections, we look at how this can be achieved in SLES first by defining a consistent command interpreter and then by selecting a standard set of variables the user can use.
Default Shell
Previously, we detailed the structure of the /etc/passwd file and identified that the last field on each record identifies the default, or login, shell. A login shell is a fancy name for a command interpreter and its associated environment.
Simply put, a shell is a program. A shell can be run interactively, spawned off as a child process, or run in the background through cron. As with any other program, a shell expects a predetermined syntax for commands and parameters. Within the lifetime of the shell process, the program allows for interaction with the operating system, other processes, and the file system.
Unlike some operating systems, Linux offers a variety of different shells such as ksh, zsh, bash, and others. Each shell supported by SLES incorporates its own syntax and command set. By specifying an initial shell for each user, you can define the type of environment a user experiences when interacting with the system.
A standard should be set for each organization to identify the default shell for all accounts. Each shell type uses a different set of configuration files. To facilitate system management, restricting changes to a single set of configuration files reduces the chances of errors. Choosing a standard shell allows scripting efforts by one individual to be shared with other users.
Selecting which shell to standardize on will invoke various arguments from the different camps as to which is best. For the purpose of this book, we restrict ourselves to describing the bash shell.
BUT I DON’T WANT BASH!
bash is not the only game in town. SLES comes bundled with a variety of other shells. In some cases, required third-party utilities use the scripting capabilities of other shells. In other cases, users with experience on other systems have tool sets of scripts.
In Linux, the first line of a shell script determines the interpreter for the script. If you look around your server at scripts in /etc/init.d, you will find the first line of many scripts showing
#!/usr/bin/sh
Similarly, scripts written in the programming language Perl start with a comment line like
#!/usr/bin/perl
The active shell under which the script is initiated interprets this first line of the script and passes the content of the script off to the identified interpreter. Hence, users who need to run specific shells for their scripts need only point their tools to the appropriate interpreter.
bash is a hybrid shell that is compatible with the original Unix sh shell but contains some features originally present only in the Korn and C shells. The following is a quick summary of what bash makes available:
![]() Standard command set—
Standard command set—bash invokes the standard Linux commands such as ps, df, mount, man, and so on.
![]() Script language—
Script language—bash is actually a fully scriptable language including variable, complex looping structures and if-then constructs.
![]() Command-line completion—You can use the Tab key to trigger
Command-line completion—You can use the Tab key to trigger bash to examine the current command line and expand the provided input to an appropriate value.
AUTOCOMPLETION
Completely typing long names or commands is often unnecessary. bash is aware of what you are typing and can autocomplete filenames for you. As an example, type the following at a command prompt:
Hermes> cat /etc/serv[TAB]
bash autocompletes the filename, and the command line becomes
Hermes> cat /etc/services
You can also traverse complex directory trees by using the Tab key. Each time the Tab key is pressed, the bash shell interprets what it has found and autocompletes the command for the first target matching the current pattern of text. If the shell detects multiple targets, the cursor will not autocomplete. Pressing Tab again lists the available targets. Typing in enough text to allow bash to uniquely identify a path permits the Tab key to continue traversing the various targets.
![]() Command history—Previously used commands can be recalled and edited using the arrow keys.
Command history—Previously used commands can be recalled and edited using the arrow keys.
COMMAND HISTORY
bash allows for command-line recall and command editing using the cursor keys because bash keeps a history of past commands. Pressing the up- or down-arrow keys allows you to scroll through past commands. Pressing the left- or right-arrow keys allows you to edit the command currently present at the prompt.
Commands can also be retrieved through a search function. If you type the first few letters of a command and press Ctrl+S, bash will retrieve the first previously used command that matches the pattern. In some ssh clients, control characters are handled differently and not passed along to the server side. In such instances, the Ctrl+S sequence may not be accessible.
![]() Redirection of input and output—The input for commands can be redirected from a file by using the less-than sign. Also, the output from commands can be redirected to a file by using the greater-than sign.
Redirection of input and output—The input for commands can be redirected from a file by using the less-than sign. Also, the output from commands can be redirected to a file by using the greater-than sign.
REDIRECTION
Redirection at the command-line level allows the user to redefine the source of STDIN, STDOUT, and STDERR. For input redirection, the single less-than symbol followed by a filename tells the command interpreter to read keystrokes from the identified file rather than from the console keyboard.
In the case of output, two channels exist. STDOUT is the default and can be represented by using 1> followed by a filename or, as a short form, by using a single greater-than sign because the numeric 1 is optional. When this is done, all nonerror message output written to the console STDOUT is placed in the identified file. Double greater-than signs cause the output to be appended to the target file.
Error messages, STDERR, are written through the second channel and can be redirected by using 2> followed by a target file for error messages.
You can also combine the standard redirect to a file (for example, > out.txt), with the 2>&1 suffix. This forces STDOUT and STDERR to the same filename. This command would look like this:
Command > alloutput.txt 2>&1
![]() Command-line pipelines—Using the pipe (
Command-line pipelines—Using the pipe (|) symbol, you can pass the STDOUT from one command directly to the STDIN of a second command without having to worry about temporary files to host the content.
![]() Environment variables—
Environment variables—bash maintains a list of predefined variables that can be used at the command line or in scripts. This list includes parameters passed between shells, local host information, the path searched when commands are invoked, as well as the prompt presented during interactive sessions. You can also define your own variables in your scripts.
Using a standard shell across the enterprise is important. It provides consistency of interface and allows for the porting of scripts from server to server. In the following section, we examine another benefit of a consistent default shell: controlling login-generated information.
Login Scripts and Environment Variables
In the preceding section, you saw that a shell is simply an instance of a program or command interpreter. This is true whether it is controlling an interactive session or running a script. A login shell is a special case of such an instance, and it triggers a number of additional events.
A login shell executes a number of additional scripts when it is invoked. These additional scripts are used to tailor the environment the user will experience. You, as the system administrator, can customize these scripts to your advantage. These login scripts can modify search paths pointing to customized resources or set up environment variables specific to third-party software. The names of the logon scripts depend on the flavor of the default login shell. If all the users on a system share the same default login shell, maintenance of login scripts will be greatly simplified.
In the case of the bash shell, the system-wide login script executed at login is stored as /etc/profile. SUSE LINUX suggests that you maintain a customized version of your login script in /etc/profile.local instead. This is done to prevent the overwriting of any customizations at upgrade time. At login, the /etc/profile script will be run followed by /etc/profile.local. One of the benefits of using a managed login script is allowing control over the setting of environment variables that can be used in other scripts or applications. Typical examples would be setting an environment variable ORACLE_HOME to point to the base directory for your Oracle install or a BACKUP_DIR variable to specify a target location for your backups.
Within the /etc/profile script, you will also find numerous calls to other scripts. One such script, /etc/bash.bashrc, creates a number of aliases that can be used as shortcuts for other commands. Listing 5.2 shows a few of the aliases provided. If you want to add a number of system-wide aliases, SLES recommends that you place them in the local version, bash.bashrc.local. This script will be run following bash.bashrc.
LISTING 5.2. Some of the Aliases Generated in /etc/bash.bashrc
alias +=’pushd .’
alias -=’popd’
alias ..=’cd ..’
alias ...=’cd ../..’
alias dir=’ls -l’
alias la=’ls -la’
alias ll=’ls -l’
The default aliases created in bash.bashrc allow users to type plus (+) to save their current working directory and minus (-) to return to that directory without the need for typing pushd and popd. Setting system-wide environment variables and aliases can make the system more comfortable for the users. A case in point would be the dir alias in Listing 5.2 that allows for DOS-type commands to appear to work in Linux.
To allow user-based customizations, bash also interprets scripts in the user’s directory. At login, bash runs the first of the following files it finds in the user’s directory: .bash_profile, .bash_login, or .profile. These local scripts can be used to set or override variables to better suit the end user’s requirements. A typical snippet of a .bash_profile would look like Listing 5.3. In this snippet, you can see that two environment variables, BACKUP_DIR and WEB, are created, as well as an alias. The alias st, short for status, yields information on the current logged-on process, disk quota usage, as well as a summary of disk space in the user’s home directory. When the user is logged in, the variables have the username of the current session in the proper locations, as shown in Listing 5.4. It is important to note that an alias is not evaluated at login; it is evaluated when invoked.
LISTING 5.3. Content of a Typical ./bash_profile
BACKUP_DIR=/backup/$USER ; export BACKUP_DIR
WEB="/home/$USER/public_html" ; export WEB
alias st=’finger $USER ; quota $USER ; du --si -s $HOME’
LISTING 5.4. Verification of Environment Variables After Login
When the $USER symbol is placed in the definitions in Listings 5.3 and 5.4, the .bash_profile script is more portable from machine to machine and user to user. A user with a privileged account on one machine, such as WEBMASTER, should have a regular account, such as eric on other servers. By using standard variables provided by bash, the login script becomes user-independent.
Upon logout, the bash shell calls one final script: .bash_logout. If this file exists at logout time, it will be executed. Users can set up routines to back up files or force a cleanup of temporary files. Here is the content of a sample .bash_logout:
eric@Athena:~> cat ./.bash_logout
mv Documents.tar.gz old_Documents.tar.gz
tar -zcvf Documents.tar.gz ./Documents
eric@Athena:~>
This script makes a copy of the current archive and then creates a backup of the content of the Documents subfolder in the account’s root directory. If required during an interactive session, this routine can be invoked as ./.bash_logout.
A number of automated script processes take place on login and logout. By defining environment variables and aliases, the system administrator can provide the user with a more consistent environment from server to server.
User Resource Management
In the preceding section, we saw how to define a default shell for local user processes. In doing so, we also introduced scripts that will be executed automatically upon login and logout. These scripts can be used to customize the user environment, provide for common environment variables, and allow for a common system-wide configuration. In the following sections, we examine how to further refine a client’s access to system resources.
Authentication Using PAM
Historically, application developers were burdened with developing their own methods for user authentication. This application-by-application approach has led to a multitude of disparate authentication schemes, resulting in individual users having multiple accounts and multiple passwords.
SUSE LINUX uses a system called the Pluggable Authentication Module, or PAM, to standardize the authentication process. With PAM, a programmer can rely on a series of predefined routines to properly identify users. This places the burden of authentication outside the program, resulting in a more portable and flexible architecture for the application.
In SLES, PAM is involved with all aspects of authentication. The main application-specific configuration files for PAM are located in /etc/pam.d. Each one of these files contains the rule sets used by PAM to establish the validity of a user for a specific application.
PAM rules are defined by combining four different module types or families:
![]()
authentication—Uses challenge-response to verify the user.
![]()
account—Determines whether the account is valid or expired.
![]()
password—Verifies passwords and the strength of passwords.
![]()
session—Processes session setup or teardown.
Each module family can contain multiple member modules. Each member module can be used to validate a specific characteristic required by the application being invoked. As an example, a collection of modules could check the group membership of an account, which terminal the account is being used from, as well as time of day. If all conditions are met, control is passed to the next family of modules. If not, the user session can be terminated.
In the simplest of cases, a family of rules can be satisfied by a single check. In most cases, however, applications require the validation of multiple aspects of an authentication request before a user is granted access.
Each module can be further tweaked by passing parameters that modify its behavior. These passed values override preset default characteristics. The configuration files that store the default behaviors are stored in /etc/security. We examine them more closely in the next section.
For each member of each family, it is possible to define a “level of compliance” the rule must satisfy. This metric is called a control flag within PAM. Four different levels of control flags are currently recognized:
![]() Required—Individual veto for the module family. Unless this test returns a valid result, the family will refuse access.
Required—Individual veto for the module family. Unless this test returns a valid result, the family will refuse access.
![]() Requisite—Immediate veto of access. If this test fails, the authentication request will be immediately denied.
Requisite—Immediate veto of access. If this test fails, the authentication request will be immediately denied.
![]() Sufficient—If this test passes, no other steps need take place. Failure of this rule does not terminate the authentication process. Rule evaluation resumes with the next member or family.
Sufficient—If this test passes, no other steps need take place. Failure of this rule does not terminate the authentication process. Rule evaluation resumes with the next member or family.
![]() Optional—This rule is used to trigger events that do not directly affect the authentication process. It is usually used to provide the client with additional status information.
Optional—This rule is used to trigger events that do not directly affect the authentication process. It is usually used to provide the client with additional status information.
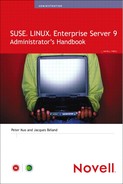
The permutations and combinations of the modules types (family), the control flags (compliance), and the individual modules available make PAM a granular method of authentication. The variations available also make understanding PAM configurations somewhat daunting. To get a better understanding of a typical PAM configuration, let’s examine an out-of-the-box configuration. Located in the /etc/pam.d directory is a PAM configuration file for the login process. Listing 5.5 shows the content of this file.
This first family of modules is the group of authentication modules. Within this family, no fewer than five separate tests are done to validate authentication. The auth family calls the following modules:
![]()
pam_unix2.so verifies that this is a valid username in the /etc/passwd and /etc/shadow files.
![]()
pam_securetty.so verifies that the user root is allowed to access the system from the current terminal.
![]()
pam_nologin.so verifies the existence of /etc/nologin. If it is present, the content of the file is displayed to the user, and the authentication is refused.
![]()
pam_homecheck.so checks to see whether there are dangerous world-writable files/directories in the user’s default login tree and issues a warning. (This option is commented out in the example.)
![]()
pam_env.so sets or forces particular environment variables to specific values.
![]()
pam_mail.so provides a “New Mail” notification to the user.
The second family of modules is of the account type. In this example, only one rule exists, and it references a module used previously in the auth type. In this instance, the pam_unix2.so rule checks the account to verify that the account is valid: not locked, has not expired.
The third rule type used pertains to the password family. The rules are applied as follows:
![]()
pam_pwcheck.so prompts for the user password and verifies it. In the case of an expired password, this rule prompts for a new one and checks it against a series of rules to ensure it is appropriately complex. In the example, NULL passwords are acceptable.
![]()
pam_unix2.so updates the session authentication token using the password provided from the previous rule.
The final set of rules that are checked during a login are the rules governing the session. They are mostly used for the setup and teardown routines that are invoked at process creation and removal. In the example, we have these two rules:
![]()
pam_unix2.so is responsible for preparing the session environment for the client.
![]()
pam_limits.so verifies resource consumption by the account in question against predetermined limits.
The preceding example illustrates how something as simple as a login can look quite complex. It is important to remember, however, that this complexity has been removed from the application level. The benefits of this approach allow for a common and flexible authentication rule set to be applied across multiple applications. In this way, you can ensure that applications such as login, rlogin, and ssh all follow the same methodology when authenticating access. This removes the opportunity for one application, such as POP3, to accidentally present a weaker authentication mechanism to an attacker.
PAM Module Configuration
In the example in Listing 5.5, a number of the modules are passed parameters that affect how they behave. It is possible to preconfigure certain modules to dictate their behavior should a parameter not be passed. These configuration files are stored in /etc/security.
The pam_unix2.so module used in the example has a corresponding pam_unix2.conf file. This file contains default values, and hence specific behavior, for each of the rule families that call it. In the current configuration, because MD5 hashes are used for the account passwords, the password family has a default parameter value of MD5 in pam_unix2.conf. Similarly, the pam_pwcheck.so module’s configuration file defines that it should use the cracklib tool and md5 to verify passwords.
If parameters are passed to the module from within the PAM configuration file, the passed values will supersede those in the configuration.
Resource Management
An additional benefit to the PAM approach is that a number of additional layers of system management can be directly tied into process creation. In the previous example, the final required module reference in the session group refers to a module called pam_limits.so.
The limits module allows the system administrator to limit the resources an account can consume on a system. On individual workstations, resource contention affects only the currently logged-on user. On larger servers, individuals can have an impact on performance if they are allowed to consume any and all available resources.
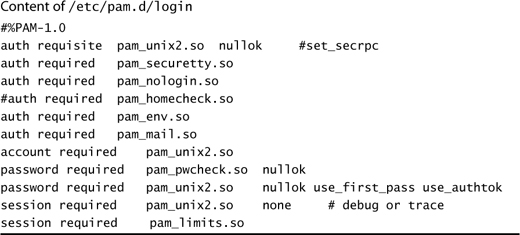
The pam_limits.so module holds its configuration in /etc/security/ limits.conf. An example of this file is shown in Listing 5.6.
In this example, limits have been placed on Eric’s account. Though there are many other possibilities for limiting an account, maxlogins and nproc will most certainly be used the most often. With the current configuration, the account eric is limited to two concurrent login sessions. Because each session can spawn a number of child sessions, a process limit has been set significantly higher. Keep in mind that a command that contains a number of pipes creates numerous concurrent children to process the information. The nproc value must therefore be large enough to satisfy the process nesting that will occur.
What happens when the resource has been exhausted depends on how the limit was reached. In the case of a Telnet session to the host, the account eric will receive a simple permission denied message, as shown here:
Athena login: eric
Password:
Permission denied
Connection to host lost.
The nproc limit is experienced quite differently. As you can see in the following example, if the number of login sessions is less than the limit, the user is able to log in. If, during the login process, the number of processes exceeds the allowed hard limit, the system is unable to create a session for the user, and the connection is dropped.
Athena login: eric
Password:
Last login: Tue Feb 15 07:03:56 from console
Connection to host lost.
We have seen in this section that we are able to control the resources consumed by an end user. Application of such measures is required only in cases of abuse, but it is good to know that this can indeed be achieved. Keep in mind that these limits are on a per-account basis and are not restricted to simple logins. Other applications that use PAM can also make use of the pam_limits.so module.
Access Time Management
In many mission-critical applications, it is important to restrict application and content changes to specific well-controlled change windows. A method for enforcing such an environment is to use the pam_time.so module. This module allows you to control the access to specific services based on where the access is being requested from, the account requesting the access, as well as the time the request is being made.
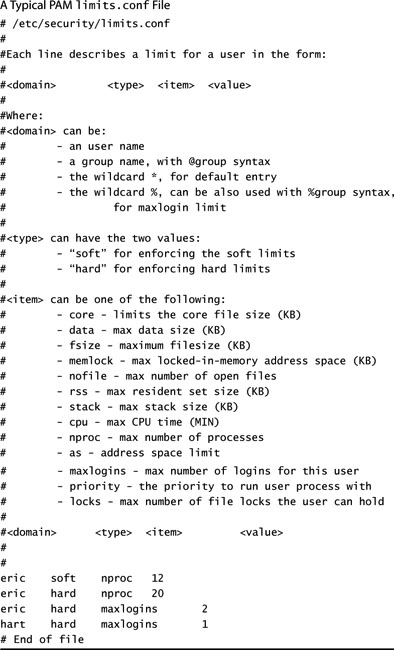
Because you are now introducing time restrictions into the login process, you must inform PAM that this additional step is required. To do this, you must add a line to the PAM login configuration file /etc/pam.d/login. The new version of this file should now look like Listing 5.7.
LISTING 5.7. A Typical PAM pam_time.so Module Configuration File
#%PAM-1.0
auth requisite pam_unix2.so nullok #set_secrpc
auth required pam_securetty.so
auth required pam_nologin.so
#auth required pam_homecheck.so
auth required pam_env.so
auth required pam_mail.so
account required pam_time.so
account required pam_unix2.so
password required pam_pwcheck.so nullok
password required pam_unix2.so nullok use_first_pass use_authtok
session required pam_unix2.so none
session required pam_limits.so
Listing 5.8 shows a snippet of a configuration file for the time module /etc/security/time.conf. In this example, the login application is denied to users eric and hart during the evenings.
LISTING 5.8. Login Time Restriction Example for time.conf
#service;ttys;users;times
login;*;eric | hart ;!Wk1800-0700
Connecting using Telnet to Athena yields the following:
Athena:~> telnet 192.168.1.242
Trying 192.168.1.242...
Connected to 192.168.1.242.
Escape character is ’^]’.
Welcome to SUSE LINUX Enterprise Server 9 (i586) - Kernel 2.6.5-7.97-smp (2).
Athena login: eric
Password:
Permission denied
Connection closed by foreign host.
This result is what you would expect. The twist, however, is that it leaves the following back door available during the time window:
Athena:~> ssh -l eric 192.168.1.242
Password:
Last login: Tue Feb 15 18:04:35 2005 from 192.168.1.247
eric@Athena:~> date
Tue Feb 15 18:06:48 EST 2005
eric@Athena:~>
eric@Athena:~>
It is important to remember that Telnet uses the login process to gain access to the machine while ssh uses the sshd program. Both use different modules for PAM, and both have their own separate configuration modules. If you want to restrict access using sshd as well, the /etc/security/time.conf file must include
sshd;*;eric | hart ;!Wk1800-0700
As well, the /etc/pam.d/sshd PAM module configuration file must include an account verification step for time as well. It would now become
This now closes the sshd access method, as shown in the following. As with login and ssh, a user could use a number of other methods to access the system: ftp, xdmcp, and so on. All of them will have to have their own pam.d configuration checked for time restrictions as well.
Athena:~ # ssh -l eric 192.168.1.242
Password:
Password:
Password:
Permission denied (publickey,keyboard-interactive).
Athena:~ #
We have seen in this section that it is possible to define limits for resource consumption on a system. As a first control, the PAM time module allows you to selectively restrict the times at which certain applications are available to select users or groups. Also, using the PAM limits module, you can control the resources certain users can consume. The application of these limiting tools must be taken into consideration for each and every application that uses PAM. Failure to do so could allow access to the system through alternate means.
Quota Management
Previously, we introduced the concept of managing volatile system resources such as RAM and CPU utilization consumed by end-user processes. By limiting the number of interactive sessions and the number of child processes, you are able to control the resource impact of each user. In this section, we address the other consumable that is often abused by individual users: disk space.
Storage subsystems have become larger and larger. With this increase has come an insatiable appetite for storage from the user community. In a server environment, it is imperative to keep resource consumption down to the level of what is appropriate for the tasking of the machine. This is done to ensure that maintenance tasks such as backups are completed in a timely fashion and that resources are available for new initiatives. Invariably, however, servers are subject to “scope creep” and sometimes abuse. It is not uncommon for a user to store a backup of his or her local system on the corporate file server just because it is a safe place.
SLES is capable of monitoring and limiting disk space. This functionality is not active by default on a server, however. A certain amount of overhead is involved, and in most cases, quotas are not necessary. In this section, we walk you through the necessary steps to invoke quotas on a server.
Quotas are administered on a per mount point basis. On a typical server, user content directories are segregated from the system partition by placing them on separate disk partitions. Dynamic environments such as /home and /srv are typically mount points for such partitions. These locations are prime candidates for quotas.
NOTE
Quota support is a kernel-level function. By default, the SUSE kernel supports disk quotas. If you recompile your kernel to include or remove functionality, you will have to ensure that quota support is included if required.
CAUTION
Before you modify any disk or partition information, it is imperative to ensure that you have a valid recent backup of your system.
The disk configuration for Athena is shown in Figure 5.1. You can reach this YaST screen by starting YaST, selecting the System program group, and then selecting the partitioner icon. Here, you can see that the servers have three main disk areas: /, /swap, and /home. To enable quotas on the /home partition, select the partition and click the Edit button.
Figure 5.1. The YaST Partitioner main menu.
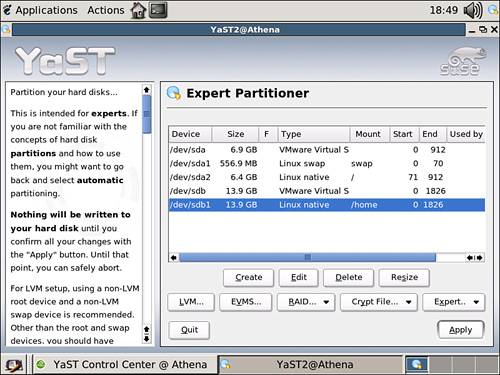
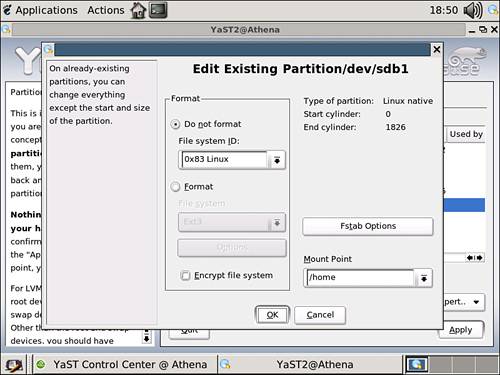
After you click Edit, the edit screen shows up for the /home partition (see Figure 5.2). You engage the quota system by placing an additional option on the partition information within fstab. Select the Fstab Options button to assign the quota parameter.
Figure 5.2. Editing the /home partition fstab options.
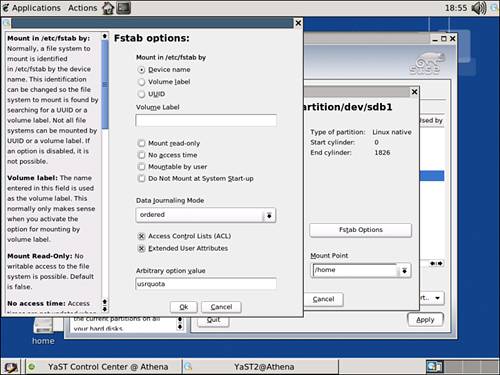
Selecting the Fstab Options button activates a window similar to the one in Figure 5.3. At the bottom of the window is a text box labeled Arbitrary Option Value. In this field, type usrquota. This tells the kernel that this partition needs to keep track of disk usage whenever files are written or removed from the disk. You can activate the change by clicking OK and then Apply to return to the main partitioner window.
Figure 5.3. Adding the usrquota option to the /home partition.
NOTE
You also can enable quotas on a partition by manually editing /etc/fstab. It is prudent to make a backup copy of fstab just in case you make a mistake. Editing the file directly is quite safe and will yield the same result. Simply add the usrquota qualifier to the mount options for the partition in question. Of course, changing these options will require the partition in question to be remounted to acquire the new characteristics.
You can now create the initial files for the quota system by invoking the quotacheck command. This command looks at all partitions mounted on the system and creates, or verifies the consistency of, the files required for keeping track of disk usage and limits:
Athena:~ # quotacheck -auvg
quotacheck: Scanning /dev/sdb1 [/home] quotacheck:
Cannot stat old user quota file: No such file or directory
quotacheck: Old group file not found. Usage will not be subtracted. done
quotacheck: Checked 92 directories and 220 files
quotacheck: Old file not found.
Athena:~ #
In this case, quotacheck recognized that on this system only the /home mount point had quotas turned on. It also noticed that there were no previous copies of the quota files and hence created new versions.
The next step is to activate the quota monitoring service. It is important to ensure that this service starts when the system itself restarts. Using the YaST Runlevel Editor, select the quotad service to run on reboot.
At this point, it is prudent to reboot the system. Doing this remounts all the partitions with the appropriate parameters. When the system comes back up, you are ready to enable and set quotas.
You are now ready to assign quotas to individuals. The amount of disk space allowed for an individual will be left up to a corporate policy, a service-level agreement, or simply good judgment. The total amount of quota allocated to the users should not exceed the disk capacity. Doing so allows the disk to be filled even though a number of users are below quota. It also makes monitoring the quota more difficult. Disk space allocation in SUSE is done in 1KB blocks. Quota limits can therefore be directly related to the amount of disk space, in kilobytes. Similarly, there is a one-to-one relationship between inodes and files. Specifying an inode limit fixes the number of files a user can have independently of how large they become.
The command used to set a quota for a user is called setquota. This command takes the following syntax:
Setquota -u user #blocks_soft #blocks_hard #inodes_soft #inodes_hard mount_point
In this command, the soft limits generate over-quota warnings, and the hard limits cause the system to prevent the consumption of additional resources. A policy should exist that users on a device receive a fixed quota. Stating the policy up front permits the users to police themselves and not lose important information when their quota is exhausted.
Current disk usage for a user can be determined using the du command:
In this example, you can see that the user hart has consumed only 116 blocks and eric has consumed 548. When this file system was created, each block was associated with a size of 1KB. The other parameter you need to understand is the inode value you want to use. An inode is a structure that keeps track of file information. In addition to size and access time stamps, an inode points to the string of blocks that make up the content of the file. The inode itself does not contain the data portion of the file. There is a one-to-one relationship between the number of inodes allocated and the number of files a user can generate. To find out how many inodes are available on the partition with quota, use the df command:
Athena:~ # df -i /home
Filesystem Inodes IUsed IFree IUse% Mounted on
/dev/sdb1 1835008 322 1834686 1% /home
You have now collected enough information for setting quotas. Allow your users to consume 10 megabytes of disk space, which is the equivalent of 10,000 1KB blocks, and create 20,000 files. Because you don’t want users to hit the wall without any warning, place the soft limits at their target quotas and the fixed limits slightly above. First, check to see what quotas are in force for each user:
Athena:~ # quota eric
Disk quotas for user eric (uid 1001): none
Athena:~ # quota hart
Disk quotas for user hart (uid 1002): none
Now set limits:
Athena:~ # setquota -u eric 10000 11000 20000 21000 /home
Athena:~ # quota eric
Disk quotas for user eric (uid 1001):
Filesystem blocks quota limit grace files quota limit grace
/dev/sdb1 548 10000 11000 130 20000 21000
Athena:~ # setquota -u hart 10000 11000 20000 21000 /home
Athena:~ # quota hart
Disk quotas for user hart (uid 1002):
Filesystem blocks quota limit grace files quota limit grace
/dev/sdb1 116 10000 11000 23 20000 21000
Athena:~ #
The final step is to configure the system to send out warning messages when users are approaching their limits. The quota subsystem contains a procedure called warnquota. This routine checks all user quotas and dispatches messages to those who are over their quota. The configuration file containing the warnquota message is called /etc/warnquota.conf. A stripped-down version of this file is shown in Listing 5.9.
LISTING 5.9. Disk Quota Warning Configuration File
/etc/warnquota.conf
# this is an example warnquota.conf
#
MAIL_CMD = "/usr/bin/mail -t"
FROM = "quota_cop@localhost"
# but they don’t have to be:
SUBJECT = Hey, user, clean up your account!
CC_TO = "root@localhost"
SUPPORT = "[email protected]"
PHONE = "Ext. HELP or (4357)"
# Text in the beginning of the mail # This way text can be split to more lines
# Line breaks are done by ’|’ character
MESSAGE = Hello, I’ve noticed you use too much space
on my disk|Delete your files on following filesystems:|
# Text in the end of the mail # is created)
SIGNATURE = See you!| Your admin|
It is important to modify this file for your system configuration. By default, the MAIL_CMD variable does not point to a valid entry.
As an example, user hart has been busy collecting files in his directory. Checking his quota reveals the following:
Athena:/home/hart # quota hart
Disk quotas for user hart (uid 1002):
Filesystem blocks quota limit grace files quota limit grace
/dev/sdb1 10828* 10000 11000 6days 99 20000 21000
Running warnquota generates an email similar to the following:
From [email protected] Wed Feb 16 04:36:14 2005
Date: Wed, 16 Feb 2005 04:36:13 -0500
To: [email protected]
Cc: [email protected]
Subject: Hey, user, clean up your account!
From: [email protected] (root)
Hello, I’ve noticed you use too much space on my disk
Delete your files on following filesystems:
/dev/sdb1
Block limits File limits
Filesystem used soft hard grace used soft hard grace
/dev/sdb1 +- 10828 10000 11000 6days 99 20000 21000
See you!
Your admin
As a system administrator, you have to decide how often to check quotas. Once the policy has been set, you can include the warnquota command in a cron entry so that it is run on a consistent schedule.
User hart can then choose to reduce his consumption, ask for more disk space, or ignore the warning. If he chooses the latter, eventually the grace period will expire, and the user will not be able to create additional files. A sample login session 10 days later will yield this result:
hart@Athena:~>
hart@Athena:~>
hart@Athena:~> date
Sat Feb 26 08:45:48 EST 2005
hart@Athena:~>
hart@Athena:~> quota
Disk quotas for user hart (uid 1002):
Filesystem blocks quota limit grace files quota limit grace
/dev/sdb1 10828* 10000 11000 none 100 20000 21000
hart@Athena:~>
hart@Athena:~>
hart@Athena:~> ls -la > files.txt
/bin/ls: write error: Disk quota exceeded
hart@Athena:~>
In this section, we have seen that it is possible under SLES to limit the amount of disk space consumed by a user. Though quota management is not a module within YaST at this time, it is fairly simple to configure and police. The warnquota utility should be placed in a cron job to run nightly just before or after the backup procedures. This gives the users ample warning of their noncompliance. Limiting the amount of disk space available to users ensures that resources are available across the board. Monitoring resource consumption allows you to better forecast the need for system upgrades.
su or sudo
In Unix, there are two types of users: root and the rest. The root account, also known as the super user, is required for performing system maintenance tasks. If a user requires an account on a machine, the machine needs to be shut down for maintenance, or an application requires direct access to the Ethernet interface, the root account must be used. This constant demand on the holder of the root account can lead to inefficiencies in the management of the system.
There are two solutions to this problem:
![]() Share the root password.
Share the root password.
![]() Grant privileged access to others.
Grant privileged access to others.
The first option is unacceptable. From an audit standpoint, generic accounts are typically frowned upon. It is essentially impossible to track which distinct individual accessed a generic account and performed a particular task. Though it may be possible to correlate who was in the office and had access to a particular terminal, the exercise is often futile. If the account in question has complete access to all the files on the system, sharing the password to that account places all the information on the system at risk.
A sound security policy always includes that access is granted on a need-to-have basis. When a system is production ready, most of the requirements for the root account have already been satisfied. In the case in which additional access is required, alternative solutions should be employed. This brings us back to the second option: granting additional privileges.
The su, substitute user, command allows an individual to start a shell under the account context of another user. This allows complete access to the target account, including files, mail, and applications available. The transition can be made for a simple command or an entire session depending on the command-line parameters. Here are a couple of variations on the su command and the resulting environment:
hart@Athena:~>
hart@Athena:~> pwd
/home/hart
hart@Athena:~> ls
bin login.txt photos su
Documents ls public_html t2.html
exit make_teams.good pwd test.html
key.txt Monoalphabetic Crypto.txt sheila.pdf t.t
hart@Athena:~>
hart@Athena:~> su -l eric
Password:
eric@Athena:~> pwd
/home/eric
eric@Athena:~> ls
bin Desktop Documents exit ls public_html pwd su
eric@Athena:~> exit
logout
hart@Athena:~> pwd
/home/hart
hart@Athena:~>
In this example, a shell is created running under the eric account exactly as it would be if a Telnet or ssh session had been invoked.
In this second example, the ls -l command is executed in the context of the eric account, and control is passed back to the original shell belonging to hart:
hart@Athena:~> su -l eric -c ’ls -l ; pwd’
Password:
total 16
drwxr-xr-x 2 eric users 4096 2005-02-15 06:48 bin
drwx------ 3 eric users 4096 2005-02-15 07:04 Desktop
drwxr-xr-x 2 eric users 4096 2005-02-15 06:48 Documents
-rw-r--r-- 1 eric users 12 2005-02-26 09:55 exit
-rw-r--r-- 1 eric users 192 2005-02-26 09:55 ls
drwxr-xr-x 2 eric users 4096 2005-02-15 06:48 public_html
-rw-r--r-- 1 eric users 16 2005-02-26 09:55 pwd
-rw-r--r-- 1 eric users 517 2005-02-26 09:55 su
/home/eric
hart@Athena:~> pwd
/home/hart
hart@Athena:~>
The su command provides the ability for users to access information and resources through other accounts. It does, however, require that individuals share passwords. When this happens, they are invariably written down or shared beyond the originally intended recipient. In the case of the root account, all the functionality of the root account would be available to whoever acquires the password. All the activities of the su command are logged in /var/log/messages as expected, providing a measure of auditing. In many environments, however, the sharing of passwords is against corporate IT policies. Luckily, another utility resolves many of the issues encountered with the su command: sudo.
The sudo utility provides the equivalent functionality of su but with an extra level of granularity. The configuration file for sudo, /etc/sudoers, can be used to limit which users can use sudo and which accounts they are allowed to target. In addition, sudo can be used to limit the verbs available to the new shell.
Listing 5.10 shows a possible configuration for the /etc/sudoers file. In this listing, you can see sample definitions for the various alias types available. A User_Alias can be used to group like users. The current example defines POWERUSER and command aliases to define groups of commands.
The final portion of the sudoers file contains the granting of rights to users and user aliases. In the current example, eric and hart are able to perform most functions commonly associated with an operator type position. In addition, eric has been granted the right to manage disk quotas. Because of the defaults configured in the sudoers file, eric and hart must know the root password to obtain the necessary privileges.
In contrast to this, the user belandja can have direct access to the shutdown command without the need to know the root password. This capability is often convenient when a user, such as an Oracle DBA, needs to reboot the machine during an install. Because such users do not need the root password for day-to-day tasks, this allows them the freedom to restart the server without requiring additional support staff.

With this configuration in effect, members of the POWERUSER group can perform all the tasks they are required to perform, but no more than that. For the user hart, it is possible for him to manage groups but not affect system services even though he can sudo to root. This can be seen in the following excerpt from an online session:
hart@Athena:~>
hart@Athena:~> sudo /usr/sbin/groupadd websales
Password:
hart@Athena:~> grep -e websales /etc/group
websales:!:1000:
hart@Athena:~>
hart@Athena:~> sudo /etc/init.d/xinetd stop
Sorry, user hart is not allowed to execute ’/etc/init.d/xinetd stop’ as root on Athena.
hart@Athena:~>
After all the rules are sorted out and access is given to those who need it, the su utility can be retired. The easiest way to do this is to change the permission on /bin/su not to allow Other to have execute access to the program. Replacing the su command with sudo—in conjunction with restricting sensitive accounts to known workstations using PAM—greatly reduces the risk exposure of a server. Locking down root to the console further protects the account from external access.
Summary
In this chapter, you saw that numerous things can be done to make the server environment more secure. In harmony with the concept of running only services that are necessary, accounts must be audited and maintained even on freshly installed servers.
On the user environment side, the chapter examined the Pluggable Authentication Module (PAM) and discussed how it can be used to control system access. PAM is a powerful tool that can be used to control system access, resource consumption, as well as standard approaches to authentication. In terms of consumable resources, this chapter touched on the disk quota system and examined how it can be used to prevent running out of disk space.
To further protect the environment, you saw that it is possible to reduce the number of users who have access to elevated privileges. At the same time, you saw that, for those individuals who do need powerful commands, you can grant them a command set tailored to their needs.