
Hour 5. Responsive Apps: Running in the Background
What You’ll Learn in This Hour:
![]() Using
Using IntentServices and BroadcastReceivers
In Hour 4, “Activities and Fragments,” you learned about Activities and the Activity lifecycle. In this hour, you learn more about the UI thread of an Activity and how to create responsive apps by using background processes. In a responsive app, the user can still interact with an Activity while other tasks are occurring. Topics include the use of the AsyncTasks, IntentServices, and BroadcastReceivers.
Working in the Background
Multiple things are always occurring in an app. Something is displayed, the user taps the screen, or data is retrieved from the Internet and displayed. Some processes work best when they run in the background. Tasks that run in the background do work without interrupting user interaction.
The UI Thread
When an app starts and an Activity is launched, the display of widgets on the screen and the interaction with those widgets is handled by the Android operating system. A single thread is used to handle all interactions with the user interface. That means that any action running on that thread will block other user interface interactions. For example, if the user clicks a button for a task that requires 5 seconds to run, the user cannot interact with the user interface during that time. That will lead to a dreaded ANR error: App not responding! If that occurs, the user is given the option to wait or stop the app. Because this single thread handles all the interaction with the Android UI Toolkit, it is known as the UI thread.
You should not perform long-running tasks on the UI thread. Building responsive apps means not blocking the UI thread.
As you will see, it is possible to run background tasks, but a consequence of having a single UI thread is that the user interface widgets and views cannot be updated directly from those background processes. There are several mechanisms for running a background process and then updating the user interface on the UI thread.
You start learning about the UI thread by creating a nonresponsive app. Don’t worry. One goal of this chapter is to learn about turning nonresponsive apps into responsive apps.
To put a delay in your app, use the SystemClock.sleep() method. This simulates a time-consuming task. Using sleep puts the focus on methods to address responsiveness. A more typical scenario that would unintentionally create a nonresponsive app would be downloading data or a large image from a network.
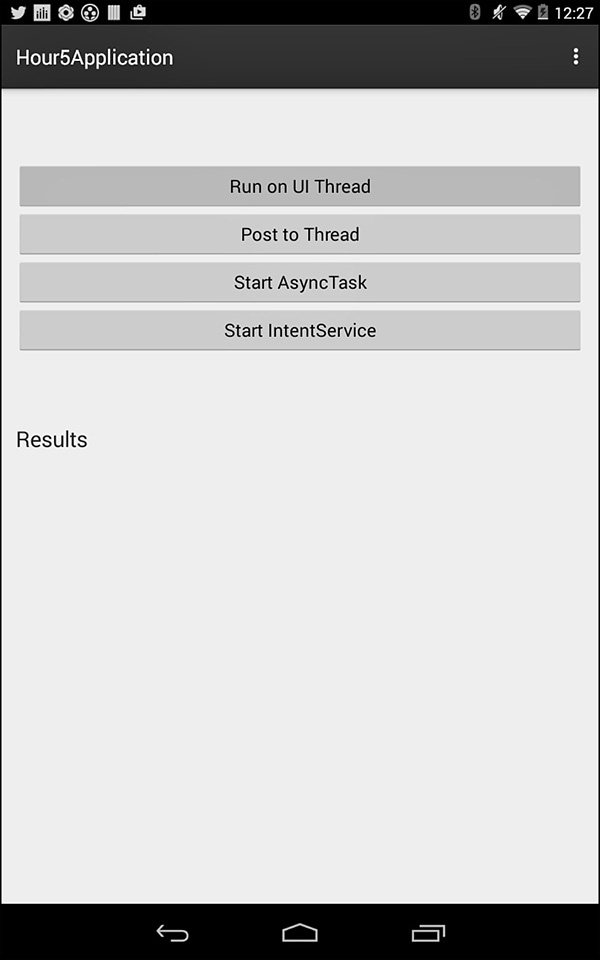
You are going to create an app that contains a single activity called MainActivity.java. The user interface will include four Buttons and a TextView. When the user clicks each Button, a 5-second delay will occur, and the TextView will be updated. The first Button, called uiThreadButton, performs the delay on the UI thread. Notice that the user interface is frozen for 5 seconds. Three methods to fix this delay will be implemented.
Listing 5.1 shows the code for the uiThreadButton setOnClickListener() method. On line 10, a 5-second delay occurs. On line 11, the TextView resultsTextView is updated with the message “Updated on UI Thread.”
LISTING 5.1 Running on UI Thread
1. @Override
2. protected void onCreate(Bundle savedInstanceState) {
3. super.onCreate(savedInstanceState);
4. setContentView(R.layout.activity_main);
5. resultsTextView = (TextView) findViewById(R.id.textView);
6. uiThreadButton = (Button) findViewById(R.id.uiThreadButton);
7. uiThreadButton.setOnClickListener(new View.OnClickListener() {
8. @Override
9. public void onClick(View v) {
10. SystemClock.sleep(5000);
11. resultsTextView.setText("Updated on UI Thread");
12. }
13. }); ...
When the user clicks the uiThreadButton and this code executes, the app appears to be frozen for 5 seconds before the message is displayed in the TextView. When a user clicks a button, the button is highlighted to indicate the pressed state. In this case, the uiThreadButton remains in that state as the delay occurs (see Figure 5.1).
Using a Thread and View.post()
The first approach to fixing this is to move the processing for the 5-second delay to another thread. Threads other than the UI thread are known as worker threads.
You can create a worker thread to ensure that any delay will occur in the background (although that will present a new issue because it is not possible to update the user interface from a worker thread). There needs to be a mechanism to initiate an update to the user interface. The post() method is the most direct way to initiate an update from a worker thread. The post() method is available to any View(android.view.View). Each widget, such as a button or TextView, is a View. Listing 5.2 prevents the app from freezing by creating a worker thread for the delay.
In line 5 of Listing 5.2, a new Thread(java.lang.Thread) is defined. That thread contains a Runnable(java.lang.Runnable). On line 7, the 5-second delay occurs within the run() method of the Runnable. That delay is occurring on the worker thread. On line 8, the post() method is called for the TextView resultTextView. By calling post(), you are executing code that will run on the UI thread. On line 10, the setText() method is called, and the user interface is updated.
The effect of this is that when the user clicks the postButton, the app is not frozen.
1. postButton = (Button) findViewById(R.id.postButton);
2. postButton.setOnClickListener(new View.OnClickListener() {
3. @Override
4. public void onClick(View v) {
5. new Thread(new Runnable() {
6. public void run() {
7. SystemClock.sleep(5000);
8. resultsTextView.post(new Runnable() {
9. public void run() {
10. resultsTextView.setText("Updated using post ");
11. }
12. });
13. }
14. }).start();
15. }
16. });
Using post() is direct, but can become complicated. There are several other techniques to create responsive apps and to run intense processes in the background. You’ll continue to use this simple example of a 5-second delay as you learn these techniques.
Using an AsyncTask
The AsyncTask class is used to manage background operations that will eventually post back to the UI thread.
To use an AsyncTask, you must create a subclass of the AsyncTask class and implement the appropriate callback methods:
![]() onPreExecute(): This method runs on the UI thread before background processing begins.
onPreExecute(): This method runs on the UI thread before background processing begins.
![]() doInBackground(): This method runs in the background and is where all the real work is done.
doInBackground(): This method runs in the background and is where all the real work is done.
![]() publishProgress(): This method, called from the
publishProgress(): This method, called from the doInBackground() method, periodically informs the UI thread about the background process progress. This method sends information to the UI process. Use this opportunity to send updated progress for a progress bar that the user can see.
![]() onProgressUpdate(): This method runs on the UI thread whenever the
onProgressUpdate(): This method runs on the UI thread whenever the doInBackground() method calls publishProgress(). This method receives information from the background process. Use this opportunity to update a ProgressBar control that the user can see.
![]() onPostExecute(): This method runs on the UI thread once the background processing is completed.
onPostExecute(): This method runs on the UI thread once the background processing is completed.
When launched with the execute() method, the AsyncTask class handles processing in a background thread without blocking the UI thread.
Three generic types are used with an AsyncTask. These represent the parameters passed to the task, the progress values used, and the final return value of the task. The class is defined with these generic types, as follows:
android.os.AsyncTask<Params, Progress, Result>
It is not required to use all types. Void indicates that the generic type is not used. The following defines MyTask with no parameters, progress types, or return values:
class MyTask extends AsyncTask<Void, Void, Void> { ... }
In the simple case of updating a TextView from an AsyncTask, you will use the preExecute(), postExecute(), and doInBackground() methods. In preExecute(), the resultsTextView will be updated to indicate that the AsyncTask has started. The 5-second delay will occur in the doInBackground() method. In the postExecute() method, the user interface will be updated. That occurs after the 5-second delay.
In this case, the AsyncTask can be defined completely within the MainActivity.java class.
Listing 5.3 shows the code for an AsyncTask called DelayTask.
LISTING 5.3 Update the User Interface from an AsyncTask
1: class DelayTask extends AsyncTask<Integer, Integer, Integer> {
2: @Override
3: protected void onPreExecute() {
4: resultsTextView.setText("Starting AsyncTask");
5: }
6: @Override
7: protected void onPostExecute(Integer result) {
8: if (result==0){
9: resultsTextView.setText("Updated via AsyncTask");
10: }
11: }
12: @Override
13: protected Integer doInBackground(Integer... params) {
14: SystemClock.sleep(5000);
15: return 0;
16: }
17: }
In the onPreExecute() method on line 4, the TextView resultsTextView is updated to display "Starting AsyncTask". The methods onPreExecute() and onPostExecute() both run on the UI thread and have access to the views defined in the activity.
The delay that has been implemented occurs in the doInBackground() method on line 14. In this case, the doInBackground() method always returns 0. The result returned on line 15 is passed as a parameter to the onPostExecute() method on line 7. If your code app requires different results to display based on what occurs in the background, you could use the result from doInBackground() to determine different actions in onPostExecute().
In Listing 5.3, the onPostExecute() method updates the resultTextView.
In other apps, you might use the onPreExecute() method to show a ProgressBar to indicate that some work is being performed. That ProgressBar would be hidden in the onPostExecute() method.
The publishProgress() and onProgressUpdate() methods work in tandem to send updates from the doInBackground() method and to publish show updates on the UI thread. When the publishProgress() method is called from doInBackground(), onProgressUpdate() runs on the UI thread.
The AsyncTask class is ideal for short operations that interact with the user interface.
Service and IntentService
An Android Service is a background process that runs independently of an Activity. Services are very powerful. A Service object is created by extending the Service(android.app.Service). Like an Activity, the Service must be defined in the AndroidManifest.xml file. A Service has a lifecycle that includes an onCreate() method. Other methods such as onStartCommand(), onBind(), and onDestroy() are part of the Service class.
An IntentService is a simplified version of a service.
You will create an IntentService using the same 5-second delay method used for other examples in this chapter. Typically, an IntentService is used for more complex tasks.
Using an IntentService
An IntentService(android.app.IntentService) provides a simplified way to implement a Service. An IntentService requires the implementation of a method called onHandleIntent().
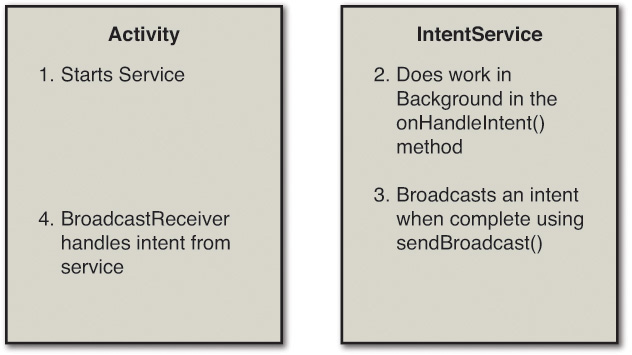
By using an IntentService, you can initiate a background process that handles some work and that can occur while the user in still interacting with the application. An IntentService is completely independent of an Activity. An IntentService will continue to run as the user interacts with various activities within the app. The IntentService you create will broadcast a message after a 5-second delay. You will use a BroadcastReceiver to handle the message from the IntentService.
Figure 5.2 shows a basic interaction between an Activity and an IntentService.
Defining an IntentService
To develop an IntentService, you must implement the onHandleIntent() method. An IntentService also requires an empty constructor.
Listing 5.4 shows the entire code for the IntentService DelayService.java code for this project.
The empty constructor is included in lines 11–13. The onHandleIntent() method is in lines 15–21. The “work” done in this service is to call SystemClock.sleep() on line 16 to have the service sleep for 5 seconds.
Lines 17–20 of Listing 5.4 creates an Intent that includes an extra that specifies the message to be broadcast. The Intent is sent when the work is complete. The Intent created in this IntentService is handled when you define your BroadcastReceiver.
LISTING 5.4 DelayService.java: An IntentService Class
1: package com.talkingandroid.hour5application;
2: import android.app.IntentService;
3: import android.content.Intent ;
4: import android.content.Context;
5: import android.os.SystemClock;
6: public class DelayIntentService extends IntentService {
7: public static final String ACTION_DELAY =
8: "com.talkingandroid.hour5application.action.DELAY";
9: public static final String EXTRA_MESSAGE =
10: "com.talkingandroid.hour5application.extra.MESSAGE";
11: public DelayIntentService() {
12: super("DelayIntentService");
13: }
14: @Override
15: protected void onHandleIntent (Intent intent) {
16: SystemClock.sleep(5000);
17: Intent broadcastIntent = new Intent ();
18: broadcastIntent .setAction(ACTION_DELAY);
19: broadcastIntent .putExtra(EXTRA_MESSAGE, "UPDATE: USING INTENT
SERVICE");
20: sendBroadcast(broadcastIntent );
21: }
22: }
Updating the Manifest for an IntentService
An IntentService must be defined in the AndroidManifest.xml file. The definition for a service is like that of an Activity. In this case, our service is the DelayService class, and the AndroidManifest.xml includes the following:
<service
android:name="com.talkingandroid.hour5application.DelayService">
</service>
Starting the IntentService from an Activity
In MainActivity.java, you will define an Intent for the DelayService class and then call startService() to start the service. This is the similar to creating an Intent for an Activity and then starting that Activity. You can implement this code within a Button’s onClick() method.
Listing 5.5 shows the button definition and the implementation for calling the DelayService. The delayIntent is defined on lines 5 and 6, and the startService() method is called on line 9.
LISTING 5.5 Starting an IntentService
1: intentServiceButton = (Button) findViewById(R.id.intentServiceButton);
2: intentServiceButton.setOnClickListener(new View.OnClickListener() {
3: @Override
4: public void onClick(View v) {
5: Intent delayIntent = new Intent (getApplicationContext(),
6: DelayIntentService.class);
7: startService(delayIntent );
8: }
9: });
That’s it. You’ve created the DelayService and launched it from your Activity. You have one more step to complete the implementation. The goal is to have a 5-second delay and to update the user interface. This code starts the DelayService. The onHandleIntent() code will run, and the 5-second delay will occur. To update the user interface when the DelayService completes, you must implement a BroadcastReceiver. Typically, you want something to happen when an IntentService completes. The IntentService can send a broadcast, and the required work will be done in the BroadcastReceiver.
Referring to Figure 5.2, you have implemented the code for steps 1, 2, and 3. The code for step 4 must be done.
Adding a BroadcastReceiver
When the DelayService onHandleIntent() method finishes, we want to relay that information to the MainActivity. To do that, the service will broadcast an Intent using the sendBroadcast() method, and MainActivity will handle the Intent with a BroadcastReceiver.
In Listing 5.5, you saw how to start an IntentService in MainActivity.java.
Listing 5.4 is the complete DelayService code, and it includes creating an Intent and the call to the sendBroadcast() method. On line 18 of Listing 5.4, the setAction() method is called on the Intent with the parameter ACTION_DELAY that was defined as "com.talkingandroid.hour5application.action.DELAY" on lines 7 and 8. That action identifies the Intent. The extra data is added to the Intent with the putExtra() method:
Intent broadcastIntent = new Intent ();
broadcastIntent .setAction(ACTION_DELAY);
broadcastIntent .putExtra(EXTRA_MESSAGE, "UPDATE: USING INTENT SERVICE");
sendBroadcast(broadcastIntent );
The remaining step is to implement a BroadcastReceiver in MainActivity.java.
You will create a BroadcastReceiver class called DelayReceiver within MainActivity.java. The DelayReceiver will be passed the Intent that was created in the service. That Intent includes a message as extra data. You can then display that data in the resultTextView.
After you create a DelayReceiver, it must be registered in the Activity onResume() method and unregistered in the Activity onPause() method.
Listing 5.6 shows the DelayReceiver class.
LISTING 5.6 BroadcastReceiver Implementation (MainActivity.java)
1: public class DelayReceiver extends BroadcastReceiver {
2: @Override
3: public void onReceive(Context context, Intent intent) {
4: if (intent.getAction().equals(DelayIntentService.ACTION_DELAY)){
5: String message = intent.getExtras().
6: getString(DelayIntentService.EXTRA_MESSAGE);
7: resultsTextView.setText( message);
8: }
9: }
10: }
The DelayReceiver class extends BroadcastReceiver and implements the onReceive() method. The onReceive() method is passed an Intent. You need to verify that Intent passed as a parameter is one that you should act on. On line 4 of Listing 5.6, a comparison is made between the action for the parameter intent and DelayIntentService.ACTION_DELAY. If these actions match, the code to display the message is run. On lines 5 and 6, the message string is populated by reading the Intent extra data. (See line 19 of Listing 5.4 to see how this extra was added to the intent.)
On line 7 of Listing 5.6, the String message from the intent is displayed in the resultsTextView.
A BroadcastReceiver must be registered and unregistered. The registerReceiver() and unregisterReceiver() methods are used for this. When the registerReceiver() method is called, it specifies which BroadcastReceiver should run based on an Intent filter.
The registerReceiver() method is called in the Activity onResume() method. The field delayReceiver is of type DelayReceiver. The Intent Filter parameter passed to the registerReceiver() method filters based on the action associated with the intent.
The BroadcastReceiver is unregistered in the Activity onPause() method.
The onResume() and onPause() methods are shown:
@Override
protected void onResume (){
super.onResume();
registerReceiver(delayReceiver, new Intent Filter(DelayIntentService.
ACTION_DELAY));
}
protected void onPause (){
super.onPause();
unregisterReceiver(delayReceiver);
}
Using an IntentService and a BroadcastReceiver in tandem is a powerful way to invoke a background task and have a notification sent when that task is complete. As you have seen, there are a number of steps to creating an IntentService and BroadcastReceiver. The 5-second delay was used only as an example to show the implementation steps. IntentServices and BroadcastReceivers can be powerful tools that you can use to create sophisticated applications.
Note: IntentServices and BroadcastReceivers
In the example in this hour, an IntentService and a BroadcastReceiver were implemented in the same Activity. That does not need to be the case. A Service runs in the background and is completely independent of an Activity.
Listing 5.7 is the full code listing for MainActivity.java. It includes all the examples from this chapter. The associated layout file has four Buttons and a TextView. Listing 5.4 includes the full code for DelayService.java, so the full Java listings referred to in this chapter are included in their entirety.
LISTING 5.7 Full Listing of MainActivity.java
1: package com.talkingandroid.hour5application;
2: import android.content.BroadcastReceiver;
3: import android.content.Context;
4: import android.content.Intent ;
5: import android.content.Intent Filter;
6: import android.os.AsyncTask;
7: import android.os.SystemClock;
8: import android.support.v7.app.ActionBarActivity ;
9: import android.os.Bundle;
10: import android.view.View;
11: import android.widget.Button;
12: import android.widget.TextView;
13:
14: public class MainActivity extends ActionBarActivity {
15:
16: Button uiThreadButton;
17: Button postButton;
18: Button asyncTaskButton;
19: Button intentServiceButton;
11: TextView resultsTextView;
12: DelayReceiver delayReceiver = new DelayReceiver();
13:
14: @Override
15: protected void onCreate(Bundle savedInstanceState) {
16: super.onCreate(savedInstanceState);
17: setContentView(R.layout.activity_main);
18: resultsTextView = (TextView) findViewById(R.id.textView);
19: uiThreadButton = (Button) findViewById(R.id.uiThreadButton);
20: uiThreadButton.setOnClickListener(new View.OnClickListener() {
21: @Override
22: public void onClick(View v) {
23: SystemClock.sleep(5000);
24: resultsTextView.setText("Updated on UI Thread");
25: }
26: });
27:
28: postButton = (Button) findViewById(R.id.postButton);
29: postButton.setOnClickListener(new View.OnClickListener() {
30: @Override
31: public void onClick(View v) {
32: new Thread(new Runnable() {
33: public void run() {
34: SystemClock.sleep(5000);
35: resultsTextView.post(new Runnable() {
36: public void run() {
37: resultsTextView.setText("Updated using post ");
38: }
39: });
40: }
41: }).start();
42:
43: }
44: });
45:
46: asyncTaskButton = (Button) findViewById(R.id.asyncTaskButton);
47: asyncTaskButton.setOnClickListener(new View.OnClickListener() {
48: @Override
49: public void onClick(View v) {
50: new DelayTask().execute();
51: }
52: });
53:
54: intentServiceButton = (Button) findViewById(R.id.intentServiceButton);
55: intentServiceButton.setOnClickListener(new View.OnClickListener() {
56: @Override
57: public void onClick(View v) {
58: Intent delayIntent = new Intent (getApplicationContext(),
59: DelayIntentService.class);
60: startService(delayIntent );
61: }
62: });
63: }
64:
65: @Override
66: protected void onResume (){
67: super.onResume();
68: registerReceiver(delayReceiver,
69: new Intent Filter(DelayIntentService.ACTION_DELAY));
70: }
71:
72: protected void onPause (){
73: super.onPause();
74: unregisterReceiver(delayReceiver);
75: }
76:
77: class DelayTask extends AsyncTask<Integer, Integer, Integer> {
78:
79: @Override
80: protected void onPreExecute() {
81: resultsTextView.setText("Starting AsyncTask");
82: }
83:
84: @Override
85: protected void onPostExecute(Integer result) {
86: if (result==0){
87: resultsTextView.setText("Updated via AsyncTask");
88: }
89: }
90:
91: @Override
92: protected Integer doInBackground(Integer... params) {
93: SystemClock.sleep(5000);
94: return 0;
95: }
96: }
97:
98: public class DelayReceiver extends BroadcastReceiver {
99: @Override
100: public void onReceive(Context context, Intent intent) {
101: if (intent.getAction().equals(DelayIntentService.ACTION_DELAY)){
102: String message = intent.getExtras().
103: getString(DelayIntentService.EXTRA_MESSAGE);
104: resultsTextView.setText( message);
105: }
106: }
107: }
108: }
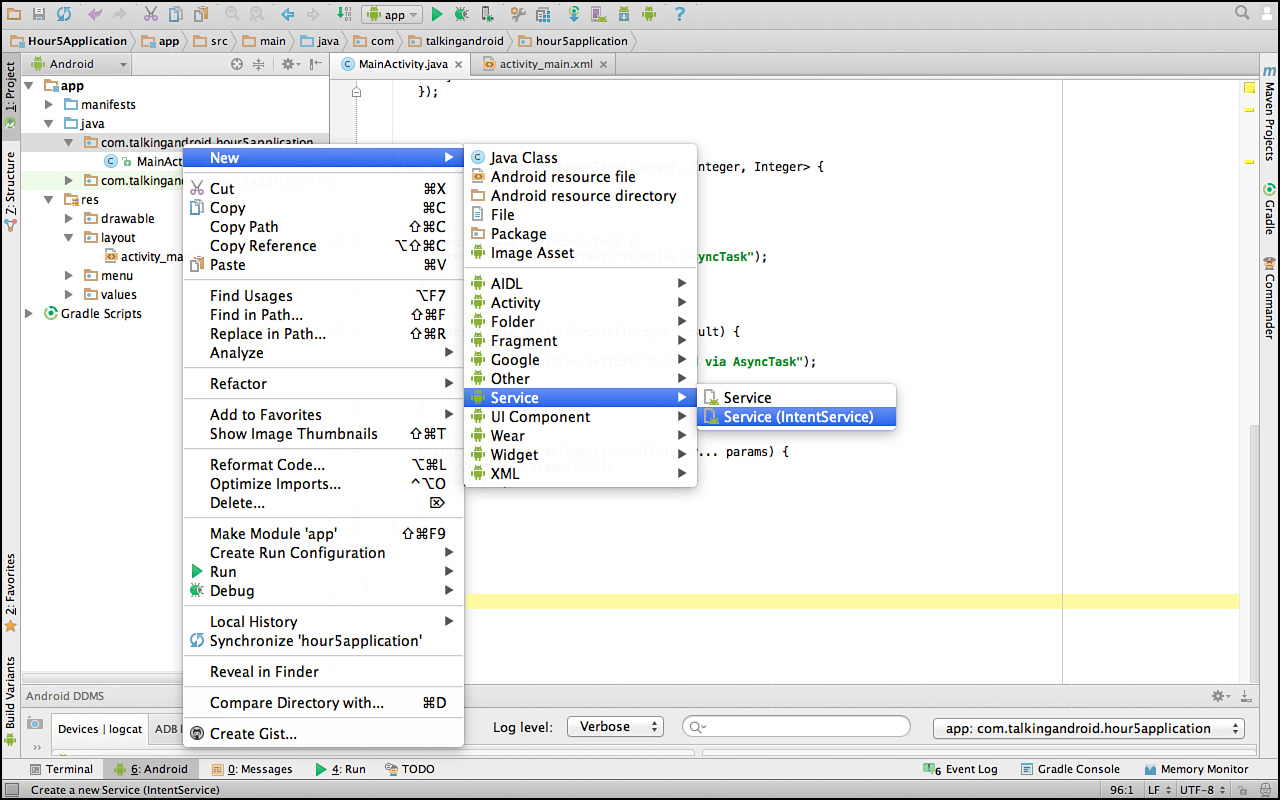
Using Android Studio for IntentServices
Android Studio provides a wizard to generate both IntentService and BroadcastReceiver code. The process is similar to using Android Studio to create a new Activity. One advantage of using Android Studio is that the AndroidManifest.xml file is updated automatically. The code generated for both an IntentService and BroadcastReceiver is more complicated than the code that was implemented in this hour, but the concepts of starting the service, broadcasting an Intent, and having the BroadcastReceiver handle the Intent are the same.
Figure 5.3 shows the menu options to add a new IntentService in Android Studio.
Summary
This hour highlighted the importance of running code in the background in order to create responsive apps. Three methods for running processes in the background were demonstrated: to use View.post(), to use an AsyncTask, and to use an IntentService. The interaction between an IntentService and a BroadcastReceiver was demonstrated.
Q&A
Q. When should I use an AsyncTask or IntentService?
A. An AsyncTask provides background processing and mechanisms to make updates on the UI thread. It is ideal for short-lived tasks in an Activity that are used to update the user interface. An IntentService can be used for tasks that run longer and are not necessarily tied to one Activity.
Q. Is a BroadcastReceiver required when I use an IntentService?
A. No, sending an Intent and using a BroadcastReceiver is a way to indicate that the IntentService has completed and an action should occur. That fit the example and goal of this chapter. You could use an IntentService for any background task. For example, you might retrieve data and store data in the background using an IntentServices. Your app would show those updates the next time the local data is accessed.
Workshop
Quiz
1. What methods in an AsyncTask can make updates on the UI thread?
2. What method must be implemented in an IntentService?
Answers
1. In the example, you implemented onPreExecute() and onPostExecute() to update the user interface on the UI thread. In addition, you can use onProgressUpdate().
2. To use an IntentService, you must implement onHandleIntent().
Exercise
Starting with the AsyncTask code in this hour, implement an AsyncTask that uses publishProgress() and onProgressUpdate() to make periodic updates to the user interface. For a basic approach example, update the user interface when the AsyncTask starts, update the user interface after 2 seconds using publishProgress, and then update the user interface when another 3 seconds pass and the background task completes.