
Hour 21. Using Notifications
What You’ll Learn in This Hour:
![]() Creating and managing notifications
Creating and managing notifications
Your Android device has many capabilities and many apps running on it. Your app is vying for the user’s attention, but your app should be helpful and not annoying to the user. When a new email comes in, a notification occurs. When you have a meeting on your calendar, a notification occurs. A notification can occur based on your proximity to a location. Some notifications are present while an app is running. Consider apps that play music. The notification typically shows what music is playing and provides buttons such as pause and play to control the media. In this hour, you learn how to implement several different kinds of notification. When working with notifications, you can create, update, and cancel existing notifications.
Introducing Notifications
Notifications are indicated on your device by a small icon in the status bar. Figure 21.1 shows this.

Components of a Notification
A notification consists of the small icon on the status bar, an icon that is displayed in the notification itself, a title, and a content message.
Those things comprise what is displayed in a typical notification, but a notification can do more. Typically, a notification has an action associated with it. When you click a notification, you expect to navigate somewhere in the app.
A notification can include a sound or vibration of the device.
Some notifications can be updated. They may be standard notifications with updated messages or can include a progress bar.
There is also the option for a notification to have a custom view.
You can set options for a notification and manage the notification. There are options for updating the notification and for handling what happens when the notification is selected.
Classes Used for a Notification
There is a Notification class that is the notification itself. These are the other Android classes that you typically use when defining and managing a notification:
![]() Notification (android.app.Notification): A notification.
Notification (android.app.Notification): A notification.
![]() Notificaton.Builder (android.app.Notification.Builder): A class for building notifications.
Notificaton.Builder (android.app.Notification.Builder): A class for building notifications.
![]() NotificatonManager (android.app.NotificationManager): A class to create, update, and manage notifications.
NotificatonManager (android.app.NotificationManager): A class to create, update, and manage notifications.
![]() PendingIntent (android.app.Notification.PendingIntent): A pending or future intent that is used as the action tied to a notification. You can create a pending intent to start an activity and associate it with a notification.
PendingIntent (android.app.Notification.PendingIntent): A pending or future intent that is used as the action tied to a notification. You can create a pending intent to start an activity and associate it with a notification.
Creating and Managing Notifications
It is easy to create notifications using the Notification.Builder class. This section presents several examples with different options. In each of these scenarios, consider the following:
![]() What is being displayed?
What is being displayed?
![]() What is the action, if any?
What is the action, if any?
![]() How is the notification managed after it is created?
How is the notification managed after it is created?
When is it dismissed?
Can it be updated?
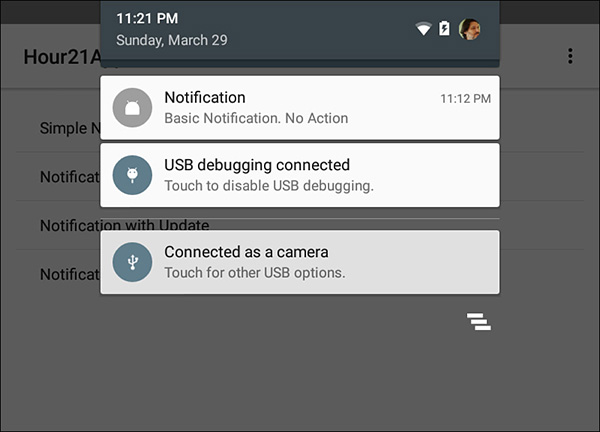
Building a Basic Notification
You can create a basic notification that includes an icon, title, and message. An action is not required. You can set the notification to be cancelled automatically. That way it will not linger. If you are not including an action, you should make it as easy as possible to clear the notification from the status bar.
These code snippets have the following fields defined:
int notificationId;
NotificationManager notificationManager;
Notification.Builder builder;
To create a basic notification, you create a new Notification.Builder and add the options that you want to display. A new Notication.Builder called builder is declared on line 2 of Listing 21.1.
Lines 3–6 of Listing 21.1 set the options for the notification being built. On line 4, the setAutoCancel() value is set to true. That means this notification is cancelled after it is dismissed. Some notifications remain on the status bar until they are cancelled by the app that created them.
Figure 21.2 shows the resulting notification.
LISTING 21.1 Building a Basic Notification
1: builder =
2: new Notification.Builder(MainActivity.this)
3: .setSmallIcon(R.mipmap.ic_launcher)
4: .setAutoCancel(true)
5: .setContentTitle("Notification")
6: .setContentText("Basic Notification. No Action");
7: notificationManager = NotificationManager)
8: getSystemService(Context.NOTIFICATION_SERVICE);
9: notificationManager.notify(notificationId, builder.build());
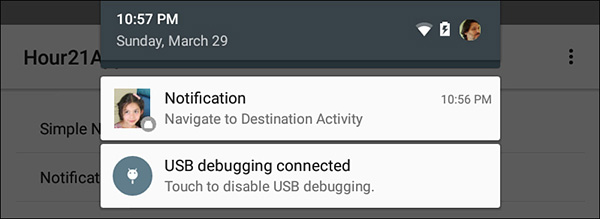
Adding a Destination
Typically, notifications have an associated action. In most cases, the action is that the app starts a new activity. When the user clicks the notification, the user navigates to a specific part of the app.
In this example, you add these new things:
![]() The notification navigates to a new activity.
The notification navigates to a new activity.
![]() The notification is cancelled from the new activity.
The notification is cancelled from the new activity.
![]() A bitmap image is displayed in the notification.
A bitmap image is displayed in the notification.
To manage a notification, you must know the id of the notification. You use an integer as the notification id when you create the notification. In this case, the ID is set in the MainActivity and passed to the DestinationActivity. The notification is dismissed from the DestinationActivity.
Listing 21.2 shows the code in MainActivity for this notification.
LISTING 21.2 Building a Notification with an Action
1: notificationId = 1;
2: intent = new Intent(MainActivity.this, DestinationActivity.class);
3: intent.putExtra(DestinationActivity.ID, 1);
4: intent.putExtra(DestinationActivity.MESSAGE, "Received Notification 1");
5: pendingIntent=PendingIntent.getActivity(MainActivity.this, notificationId,
6: intent,PendingIntent.FLAG_UPDATE_CURRENT);
7: Bitmap bigIcon = BitmapFactory.decodeResource(getResources(),
8: R.drawable.nat);
9: builder =new Notification.Builder(MainActivity.this)
10: .setSmallIcon(R.mipmap.ic_launcher)
11: .setLargeIcon(bigIcon)
12: .setContentTitle("Notification")
13: .setContentText("Navigate to Destination Activity")
14: .setContentIntent(pendingIntent);
15: notificationManager = NotificationManager) getSystem
16: Service(Context.NOTIFICATION_SERVICE);
17: notificationManager.notify(notificationId, builder.build());
In Listing 21.2, a new notification is built that includes a PendingIntent. On line 14, the Notication.Builder method setContentIntent() is called with pendingIntent as a parameter. The PendingIntent is defined on lines 5–6. The notification is passed with an Intent, context, and flag. The Intent that fires when a user chooses this notification is defined on lines 1–4. The intent starts an activity called DestinationActivity with several added extras. One extra is the notification id, and the other is a message to display.
At a high level, this code ties an action to the notification. The action is the launch of DestinationActivity.
There is another new feature in this notification. Lines 7–9 define a new bitmap. That bitmap is used in Notfication.Builder in the setLargeIcon() method on line 11.
Figure 21.3 shows the result.
Clicking this notification results in the DestinationActivity being displayed. In lines 3 and 4 of Listing 21.1, extras were added to the intent. One of those extras was an integer that contained the notification ID.
Because the DestinationActivity has the ID of the notification, that activity can now cancel or update the notification.
In this case, with the notification set to 1, the code in the DestinationActivity ultimately creates a NotificationManager and cancels the notification:
NotificationManager notificationManager = (NotificationManager)
getSystemService (Context.NOTIFICATION_SERVICE);
notificationManager.cancel(notificationId);
Once the user reaches DestinationActivity, the notification is removed from the status bar.
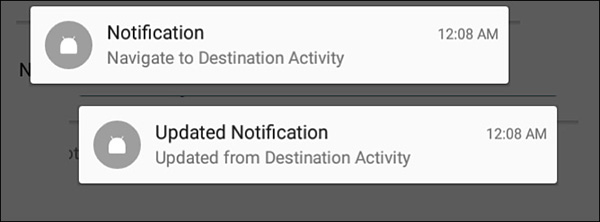
Updating a Notification
Updating a notification is based on the idea that when a notification from your app uses the same notification ID, that notification should be considered an update. As previously shown, the notification id can be passed as an extra in the intent you create. For DestinationActivity to update the notification, the code reads the notification ID and uses it to create a new notification. Because the same ID number is used, this appears to be an update of the original notification.
Figure 21.4 shows the original and updated notification. The updated notification replaces the original notification.
More Notification Options
You can set additional options for your notifications to vibrate the device, make a sound, or start a timer.
A few additional straightforward methods in Notification.Builder include the following:
![]() setUsesChronometer(Boolean b): Add a timer that shows elapsed time to the notification.
setUsesChronometer(Boolean b): Add a timer that shows elapsed time to the notification.
![]() setVibrate(long[] pattern, int repeat): When passed an array of longs, the first value indicates the time to delay before the vibration should start, and the second value indicates how long the vibration should last. The pattern will continue for the values passed. The second parameter indicates how many times the pattern should repeat. To not repeat at all, set this value to -1.
setVibrate(long[] pattern, int repeat): When passed an array of longs, the first value indicates the time to delay before the vibration should start, and the second value indicates how long the vibration should last. The pattern will continue for the values passed. The second parameter indicates how many times the pattern should repeat. To not repeat at all, set this value to -1.
![]() setSubText (CharSequence text): The third line of text that can be displayed.
setSubText (CharSequence text): The third line of text that can be displayed.
![]() setProgress (int max, int progress, boolean indeterminate): Set a progress bar for this notification.
setProgress (int max, int progress, boolean indeterminate): Set a progress bar for this notification.
Figure 21.5 shows a notification with an indeterminate progress bar. It was created adding the setProgess() method to the builder:
.setProgress(0,0,true)

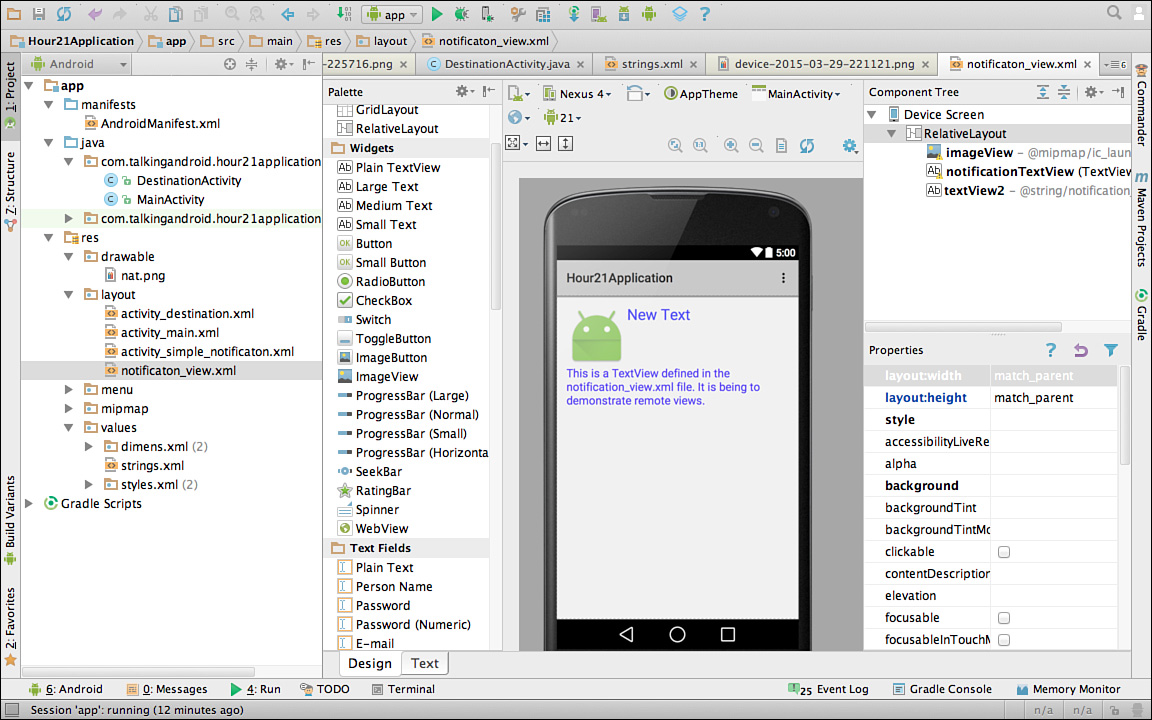
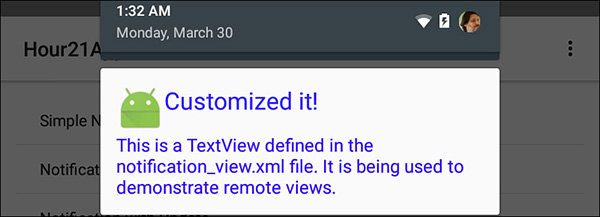
Customizing Notifications
You can create and use custom layouts for your notifications by using the RemoteViews class. To do so, follow these steps:
1. Create the layout.
2. Use the layout in RemoteViews.
3. Add the RemoteViews to the notification.
You create the layout as you normally would using the design mode of Android Studio. See Figure 21.6 for the layout in this example.
Defining the remote depends on using the layout you created and setting values for any widgets that you want to use. You use a package name and the resource id of the layout you want to use for the remote view. Then, you can access and update the individual views in the layout like TextViews and ImageViews.
RemoteViews has methods like setTextViewText() that let you set the text value for a TextView that is contained in the RemoteViews. Similarly, you would set an image from a resource with the method setImageViewResource():
RemoteViews notificationView = new RemoteViews(MainActivity.this.getPackageName(),
R.layout.notificaton_view);
notificationView.setTextViewText(R.id.notificationTextView, "Customized it!");
String longText = getResources().getString(R.string.notification_text);
notificationView.setTextViewText(R.id.textView2,longText);
notificationView.setImageViewResource(R.id.imageView, R.mipmap.ic_launcher);
Once the RemoteViews is defined, you must tie it to the notification. This is the Notification.Builder code. The method setContent() is passed the RemoteViews object notificationView. In this case, a Notification is built and assigned to notification with the call to builder.build(). The Notification can be accessed directly, and the value for bigContentView is directly set to the new RemoteViews notificationView:
builder =new Notification.Builder(MainActivity.this)
.setSmallIcon(R.mipmap.ic_launcher)
.setContentTitle("Notification")
.setContentText("Navigate to Destination Activity")
.setContentIntent(pendingIntent)
.setContent(notificationView);
Notification notification = builder.build();
notification.bigContentView = notificationView;
notificationManager =NotificationManager)
getSystemService(Context.NOTIFICATION_SERVICE);
notificationManager.notify(notificationId, notification);
Figure 21.7 shows the result.
Summary
In this hour, you learned about how to use Notification.Builder to create different kinds of notifications. Notifications use PendingIntents to launch intents when selected. A notification is controlled using a NotificationManager. You can use a NotificationManager to create a new Notification or update an existing one. Using RemoteViews enables you to customize the view for a notification.
A. There are additional options for a notification. You can set the category and priority. Using the addPerson() method, you can add multiple people to a notification. In Android 5.0 (Lollipop), you can use the Notification.MediaStyle option to set up media controls in your notification.
Q. When you start an activity from a notification, how should navigation be handled when the user clicks the Back button?
A. When you launch an intent that takes you into the navigational hierarchy of your app, the goals is to provide consistent navigation. It should be as though the user navigated there directly. To do that, use the TaskStackBuilder to re-create a back stack.
Workshop
Quiz
1. What value must be known to update a notification?
2. True or false: A notification must always have an associated action.
3. What does the RemoteViews setTextViewText() method do?
Answers
1. To update a notification, you must know the ID of the notification.
2. False. Notifications typically have associated actions, but they are not required. You created a notification with no action and set the auto cancel value to true using .setAutoCancel(true).
3. The RemoteViews setTextViewText() method updates the text on a TextView that exists in the RemoteViews object.
Exercise
Create your own layout and apply it to a notification. If your layout includes buttons, how will you know when a user clicked on the buttons? You can use the RemoteViews.setOnClickPendingIntent() method to specify a resource for a view and a PendingIntent to start if that resource is selected. See http://developer.android.com/reference/android/widget/RemoteViews.html#setOnClickPendingIntent(int,android.app.PendingIntent).