
Hour 24. Publishing Your Apps
What You’ll Learn in This Hour:
![]() Publishing to Google Play and other markets
Publishing to Google Play and other markets
![]() Making money with your app
Making money with your app
After you have created an app, you need a way to get it to your users. In almost all cases, that means making the app available in an app marketplace. Google Play is the Google app marketplace, but it is not the only place to make apps available. Amazon and others can be appropriate options. Selling in an app marketplace requires having your AndroidManifest.xml file set up properly and your app signed. This hour covers that topic and some ways to make money with your app.
Preparing for Release
Hour 23, “More Features to Explore,” covered some methods for making a great app. For an app to be successful, it must be functionally complete, well tested, and as polished as possible. Whether an app is functionally complete is your decision. In general, focusing on key features and doing them well is a good idea. Spend time on the part of the app that users will use all the time.
Releasing an app that you have tested only in an emulator is possible, but except for the simplest of apps, it is not advised! Your app should be tested on a real device and if possible multiple devices. Test on different-sized devices and on different versions of the Android operating system. If you have internationalized your app, make sure to test in the target locales.
After your app is functionally complete and tested, look for opportunities to add finishing touches. Do you have a great icon? Does the text in the app convey what it should? A silly game might have a different tone from a financial app. Are you able to remove text and use images or animation to convey meaning? Check the Android design principles for inspiration.
Preparing the Android Manifest File for Release
Before release, you need to make a number of changes to the application configuration settings of the Android manifest file. Although some of these items seem obvious, the idea is to have them in a checklist to verify the release. Other items are important for showing how the app is made available in an app marketplace like Google Play. Use this list to double-check your Android manifest file.
Android Manifest Checklist
Review the Android manifest file as follows:
![]() Verify that the application icon is set appropriately. Check the various drawable resource directories to ensure that it is set for all densities.
Verify that the application icon is set appropriately. Check the various drawable resource directories to ensure that it is set for all densities.
![]() Verify that the application label is set appropriately. This represents the application name as users see it.
Verify that the application label is set appropriately. This represents the application name as users see it.
![]() Verify the application package name. The app marketplace uses the package name to identify the app. If you do not like your package name, this is the time to change it.
Verify the application package name. The app marketplace uses the package name to identify the app. If you do not like your package name, this is the time to change it.
![]() Verify that the application version name is set appropriately. The version name is a friendly version label that developers (and marketplaces) use.
Verify that the application version name is set appropriately. The version name is a friendly version label that developers (and marketplaces) use.
![]() Verify that the application version code is set appropriately. The version code is a number that the Android platform uses to manage application upgrades.
Verify that the application version code is set appropriately. The version code is a number that the Android platform uses to manage application upgrades.
![]() Confirm that the application
Confirm that the application uses-sdk setting is set correctly. You can set the minimum, target, and maximum Android software development kit (SDK) versions supported with this build.
![]() Confirm that the
Confirm that the uses-screens setting is set properly. This property is not required.
![]() If you had set it, disable the
If you had set it, disable the debuggable option.
![]() Confirm that all application permissions are appropriate. Request only the permissions the application needs with
Confirm that all application permissions are appropriate. Request only the permissions the application needs with uses-permission.
What will your manifest file look like as you go through this checklist? This snippet shows the package name and some version information:
package="com.yourcomapny.yourpackagename"
android:versionCode="1"
android:versionName="1.0" >
<uses-sdk
android:minSdkVersion="8"
android:targetSdkVersion="16" />
<uses-permission android:name="android.permission.INTERNET" />
The package name is com.yourcompany.yourpackagename. You can see the versionCode and versionName. The versionName is what is displayed to the user. You can use a scheme that includes text and numbers as part of your naming scheme. The versionCode is a number. It is for your internal use and to indicate the latest version to Google Play or other markets. The versionCode and versionName can differ. You can have versionName 1.07a and a version code of 9. The target and minimum SDK version make sense, and so does using only the Internet permission. There is no uses-screens option, and that is acceptable.
The icon set is ic_launcher.
The app name is included in the application element as follows:
android:label="@string/app_name"
Using <uses-feature> Wisely
The uses-feature tag indicates whether a particular hardware feature is used in the app. For an app that uses the camera app, this is added to the Android manifest:
<uses-feature android:name="android.hardware.camera" />
Google Play filters apps based on this setting.
You can indicate that an app uses the camera, but does not require it, as follows:
<uses-feature android:name="android.hardware.camera"
android:required="false" />
If your app is intended for the TV market, you must specify that touch is not required, as follows:
<uses-feature android:name="android.hardware.touchscreen"
android:required="false" />
Signing Your Apps
Android application packages must be digitally signed for the Android package manager to install them. Throughout the development process, Android Studio has used a debug key to manage this process. However, for release, you need to use a real digital signature—one that is unique to you and your company. To do this, you must generate a private key.
You use the private key to digitally sign the release package files of your Android application, as well as any upgrades. This ensures that the application is coming from you, the developer, and not someone pretending to be you.
Self-signing of signatures is standard for Android applications. Code signing allows the Android system to ensure app updates come from the same source as the original app. Because the signature is self-signed, it cannot confirm the identity of the developer, only that the original app and the update come from the same source. You should ensure your private key is kept safe.
Application updates must be signed with the same private key. For security reasons, the Android package manager does not install the update over the existing application if the key is different. This means you need to keep the key corresponding with the application in a secure, easy-to-find location for future use.
Warning: Keeping Your Key Safe!
Your key is critically important. Keep it safe! Ideally, only the person in charge of building the release version should have access to the key. Your key should be backed up (preferably with at least one copy kept offsite).
Exporting and Signing the Package File Using Android Studio
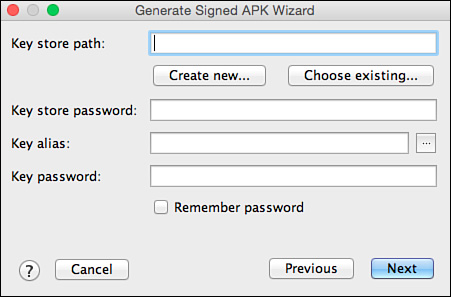
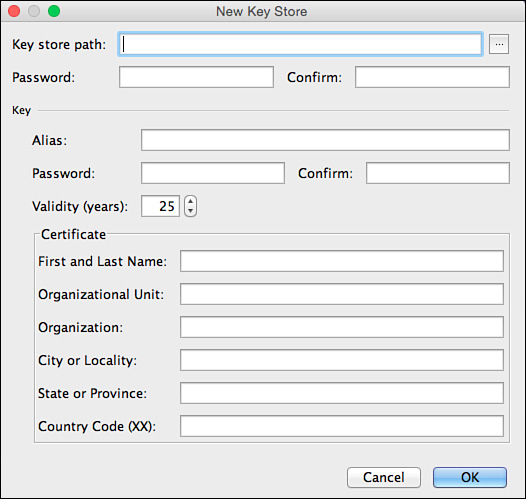
Android Studio makes exporting and signing your app an easy process. You choose Build from the menu. You will pick Build, Generate Signed APK, and then follow the steps. You will decide the module to build. That is usually app. You will be asked to create a new key or use an existing one, as in Figure 24.1. If you choose to create a new one, as you would for a new app, you will be asked for the information shown in Figure 24.2.
Signing Apps Using Command-Line Tools
Knowing something about the command-line tools that are available for creating key stores and signing packages can also be useful.
The command-line tools keytool and jarsigner are part of the Java Development Kit (JDK). You can use keytool to create a key store and jarsigner to sign the Android package file.
To get help, you can enter the tool name at a command line. If the tools are not available at the command line, you need to check the path to your JDK. You can find information on keytool and jarsigner at http://docs.oracle.com/javase/6/docs/technotes/tools/#security.
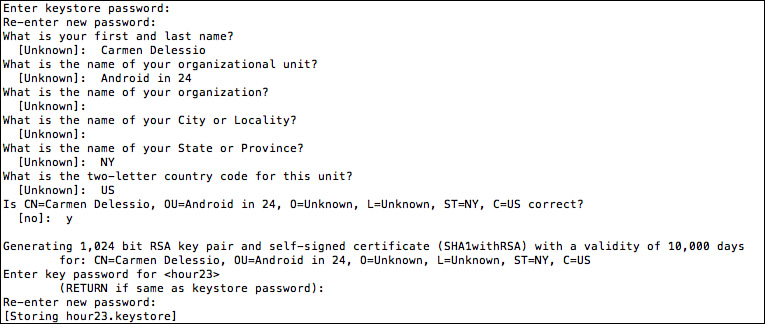
Creating a key with keytool is easiest understood by example:
keytool -genkey -v -keystore hour23.keystore -alias hour23 -keyalg RSA -validity
10000
This command creates a key store in the file hour23.keystore. It is valid for 10,000 days and has an alias of hour23. Figure 24.3 shows the session that occurs after entering this command.
After you create the key store, you can use it to sign an APK file using jarsigner. The following assumes that you have an unsigned APK called hour23opensource.apk:
jarsigner -verbose -sigalg SHA1withRSA -digestalg SHA1 -keystore hour23.keystore
hour23opensource.apk hour23
The -sigalg and -digestalg parameters use the Android recommended values. The keystore parameter is specified by the file that you created: hour23.keystore. The hour23opensource.apk file is listed, and the last parameter is the alias name.
This results in a signed Android package. You should run jarsigner – verify hour23opensource.apk to verify the results.
You can do an optimization process for the final APK file by using the Android command-line tool zipalign. The command is as follows:
zipalign -v 4 hour23opensource.apk hour23opensource-aligned.apk
Exporting the Certificate File
Sometimes you have to export a certificate file (for instance, if you are integrating an SDK from a known third-party provider like Facebook or Amazon). After you have a private key and have signed the APK file, you can generate the proper key hash for Facebook via the keytool command, as follows:
keytool -exportcert -alias hour23 -keystore hour23.keystore | openssl sha1 -binary
| openssl base64
The key store alias and key store file are specified. The result is a hash key that is displayed on the command line. That result is what should be populated into the Facebook developer tool.
Testing the Package
You can test the signed Android package in several ways. The easiest is to email it to an account on an Android device. When you open the attached APK, you should get an option to load the package. Be sure that in the Android Settings app (under Security), you have specified that it’s okay to load Android apps from outside the Android market. You specify that unknown sources are allowed.
You can copy the APK file to the device and launch it with a File Manager tool. An app such as Astro File Manager works well for this.
You can also use a command-line tool for installing and uninstalling. To install, refer to the APK file:
adb install hour23opensource.apk
To uninstall, refer to the package:
adb uninstall com.bffmedia.hour23opensource
Use the command adb devices to list all devices. To specify a device for installation, use the -s flag:
adb -s 016B756E0E01C005 install hour23opensource.apk
Sharing Your App with the World
With a signed app, you are technically ready to publish your application. This section covers the basics of publishing your app on Google Play and considers some alternative markets. Putting thought and consideration into your presentation and marketing efforts in various app markets is important. The app name, icon, description, and supporting graphics are all important for making a good impression.
Publishing on Google Play
Google Play is Google’s app marketplace for Android. It provides an easy way for a developer to publish apps and is probably the most common way that users acquire apps.
To publish applications through the Android Market, you must register as a developer. Registering as a developer verifies who you are to Google and provides a way for Google to pay you when someone buys your app. There is a $25 one-time fee to sign up as a Google Developer. Signing up is a simple online process; go to https://play.google.com/apps/publish/.
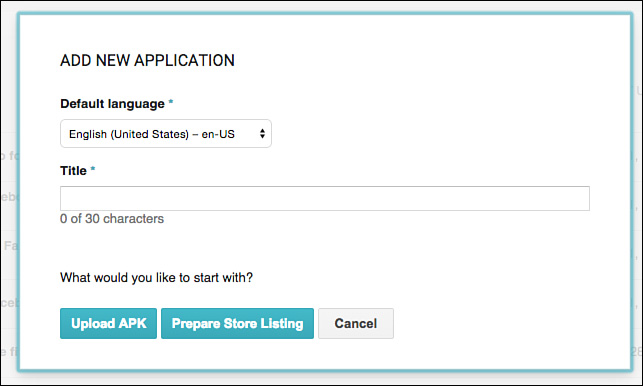
After you have your developer account, you can add a new application. You are given the choice to upload the APK or set up the store listing (see Figure 24.4).
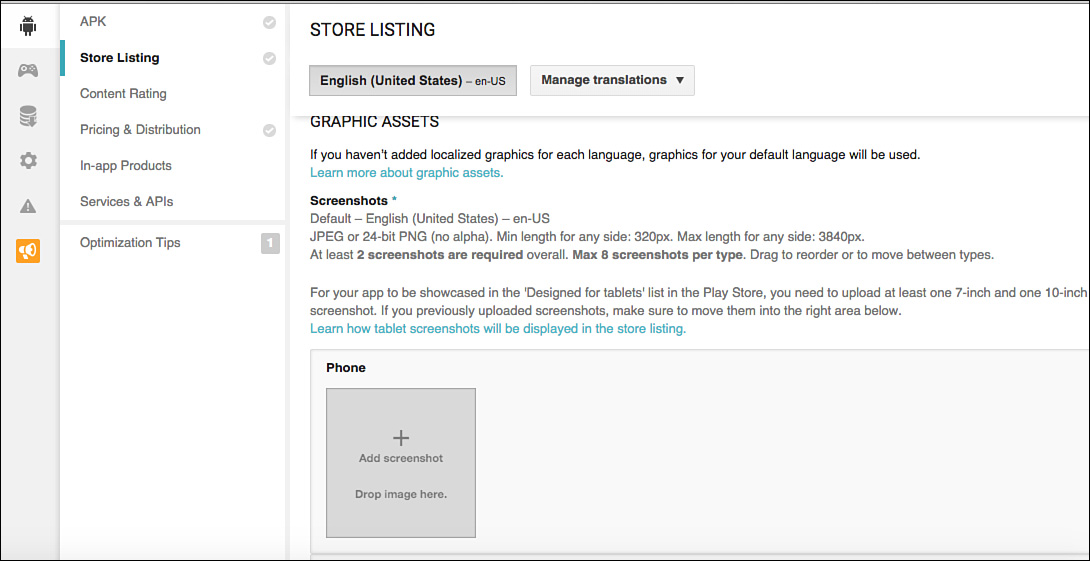
For an app to have a chance to be successful, take advantage of all the available fields on Google Play when you add an app. Add screenshots, descriptive text, promo text, and so on. You can include screenshots for both phone devices and tablets. The screenshots to include should show key elements of your app and ideally how a user interacts with your app.
Store Listing
You will see additional options for your app including Game Center and other services. Google Play is a helpful area to explore and understand the opportunities for making apps available to users in the best way.
Figure 24.5 gives an idea of some of the screenshot options that are available.
Uploading the APK
When you upload an APK to Google Play, Google Play reads the APK file and provides information about the APK, such as the number of supported devices. You can upload for alpha and beta testing. To do so, you specify a Google Group or Google+ community.
Publishing on Amazon
Publishing on Amazon is similar to publishing on Google Play. Choose the Mobile App Distribution option from https://developer.amazon.com/.
You can develop specifically for Kindle Android-based devices or generic Android devices. A Kindle-specific version for the Amazon market might make sense. Kindle Fire is based on Android. If you are developing for the Kindle Fire, getting a device to test on is recommended.
Monetizing Your App
Making apps that people use can be fun and rewarding. Making money with your apps is also fun and rewarding. Many variations exist, but most app monetization schemes fall into one of four models: free, advertising, paid, and in-app billing.
Free Apps
With free apps, you can build a user base and work out the bugs in your app and maybe in your idea or product. Some apps become popular first and then you try to figure out how to make money later. Or some apps build a large user base and are acquired by a larger company. Don’t dismiss free as a good option for many apps.
Ad Supported
Including mobile ads in your apps is easy to do. You can try AdMob, Amazon, or one of many other ad providers. To include ads in your app, you download an ad SDK and incorporate the ad into your app. You might add an ad slot into your layouts, or determine a good spot within your app to show an ad-based activity.
Paid
The paid model is easy to understand. You set a price level in Google Play and other markets, and users pay for your app. Many apps sell for $0.99 in the United States, but you might have a specialty app that can sell for significantly more or a great app that can sell for $4.99. Determine the proper price for your app to maximize revenue.
In-App Payments
Google Play and Amazon have different in-app payment options. The classic model for an in-app payment is a game in which there is a virtual currency. Players can earn the currency by playing the game or they can buy the currency with actual money. In-app purchases can give a user the ability to try an app without any upfront expense.
You can mix and match these options. You might decide your app should have an ad-supported version and a paid version without ads. Creating a business around an app always starts with creating a great app. After that part is done, you can experiment with how to make money.
Summary
This hour covered the process of producing a signed Android application and distributing it on various app marketplaces. The signing process is critical for security and for maintaining apps. Multiple app markets exist, including Amazon, and you can take advantage of new opportunities to distribute Android apps on new and in many markets around the world.
Q&A
Q. Is this everything there is to know about selling apps?
A. No, this hour is a good start. You can look into app licenses and privacy policies. This hour mentions in-app billing and using ad SDKs, but does not cover the details.
Q. How can I limit my application to only specific types of devices?
A. Google Play attempts to filter applications available to those compatible with the specific user’s device. Each application package includes important information in the Android manifest file. Certain manifest file settings can be used to specify what types of devices your application does or does not support. For example, whether an app uses the camera can be determined. After that’s done, the app will be available only for appropriate devices.
Workshop
Quiz
1. Is it possible to make an app that optionally uses the camera?
2. What are some common ways of making money with an app?
3. True or false: All Google Play Services are available in the Amazon Appstore.
Answers
1. Yes, you can indicate in the Android manifest file that the app uses the camera, but does not require it.
2. Free apps might ultimately make money. Other apps are ad supported, paid, or have in-app billing.
3. False. Amazon may have similar or comparable services, but you must implement separate Amazon and Google Play services solutions.