
Hour 22. Android TV and Wear Apps
What You’ll Learn in This Hour:
Android is everywhere. Android was developed as an operating system for devices, not just for phones. There are many sizes of Android phones and tablets. Android is open source, and companies like Amazon have made modified versions of Android for their own devices. Android apps can be developed for cars, TVs, and small devices (for example, watches). In this hour, you learn about approaching Android as a platform and explore developing both wearable apps and TV apps.
Android as a Platform
In Hour 1, “Introducing Android,” you learned about some of the core components of the Android platform: activities, intents, intent services, and broadcast receivers. Since then, you have learned about using resources, designing layout files, storing data, and using content providers. The core components of the Android platform are used whether you are developing a wearable app that will be displayed on a watch or an advanced app for a TV.
You need to be aware of specific constraints or recommendations when developing for a specific target such as Android Wear or Android TV. One factor is the size of the screen, but there are others. For example, the input mechanism changes for these devices. TVs are always in landscape mode.
Android Studio offers options for creating both Android TV and Android Wear projects. There are specific libraries used with these apps.
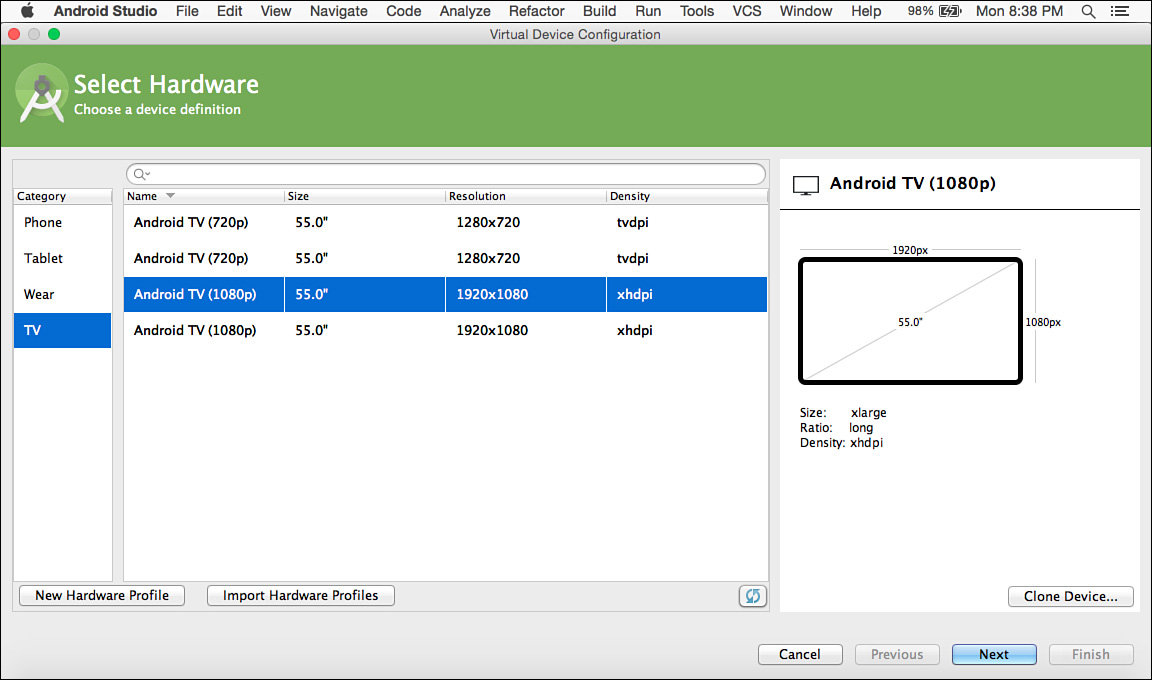
You can create an Android Virtual Device (AVD) for both watches and TVs. In Android Studio, in design mode, you can specify the device and platform that you are targeting.
As you think of Android as a platform, you can use what you’ve learned and have a similar approach to Android app development no matter what device you are targeting.
Developing Android Wear Apps
When developing Wear apps, you want to consider the following:
![]() How are Wear apps different?
How are Wear apps different?
![]() What libraries and development configurations are used?
What libraries and development configurations are used?
![]() How will you test the app?
How will you test the app?
Any Wear app has a limited amount of real estate. The app you create is intended to run on a watch. That watch can be round or square. Wearable apps are often designed to be paired with a second device.
Designing for Android Wear Differences
The UI model for Android Wear was created to take advantage of the strengths of a small and accessible screen. The model focuses on two concepts: suggest and demand.
Suggest implies that the context is important. When you look at your watch, relevant information for where you are and what you are doing should display. Whether that is a meeting reminder or a weather report, it is something meaningful to you at the time.
Wear handles this with a series of card views that display on the device as needed. The user can move through these cards with vertical scrolling.
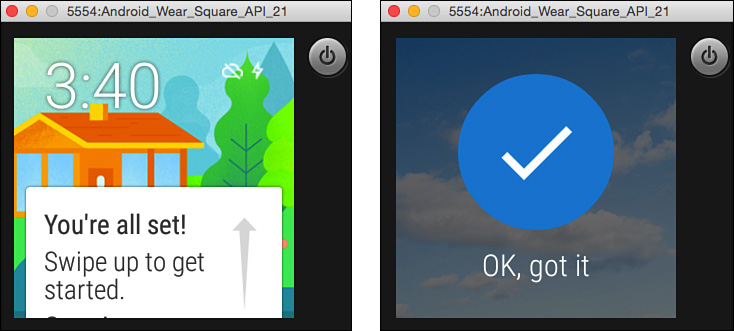
Demand implies that there are times when a user is directed and actively seeking information. Demand is handled through voice commands. It is no surprise that each voice command launches an intent. As a developer, you can create apps that handle these intents and will be shown as options for voice commands. Figure 22.1 shows some sample Wear screens with a square watch face running in the emulator.
Setting Up for Wear Development
Android Studio enables you to create a project for Android Wear that includes a blank Wear activity.
Try It Yourself: Creating an Android Wear Project in Android Studio
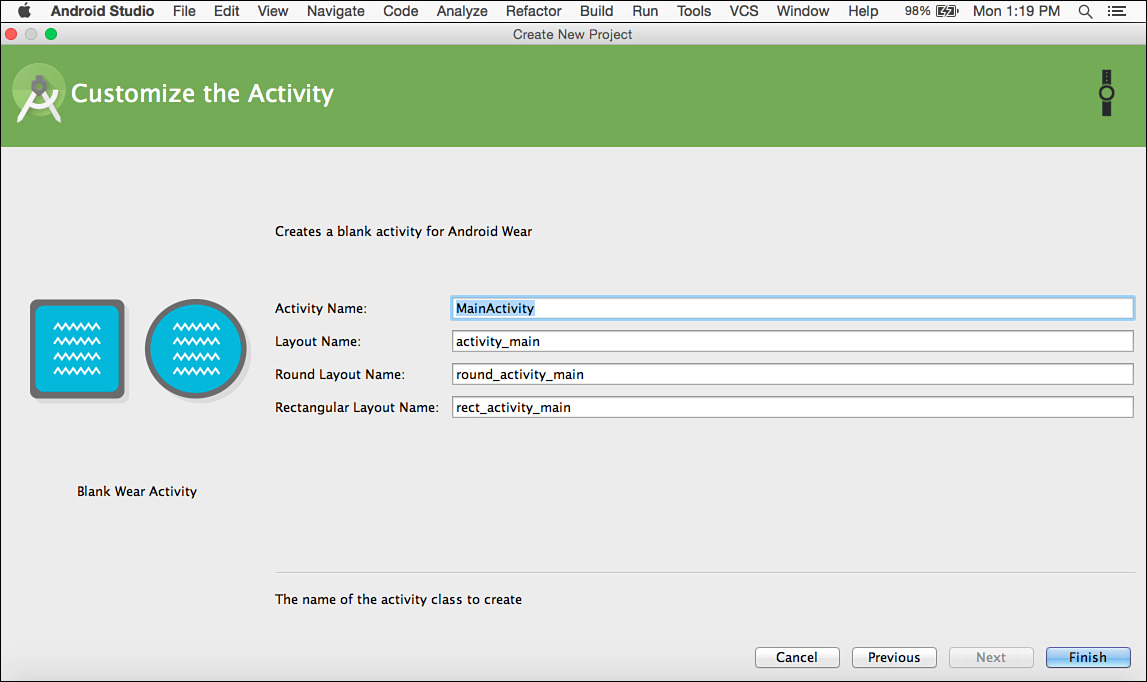
1. Create an Android Wear project in Android Studio. Check only the Android Wear check box.
2. Generate a blank activity for the project (see Figure 22.2).
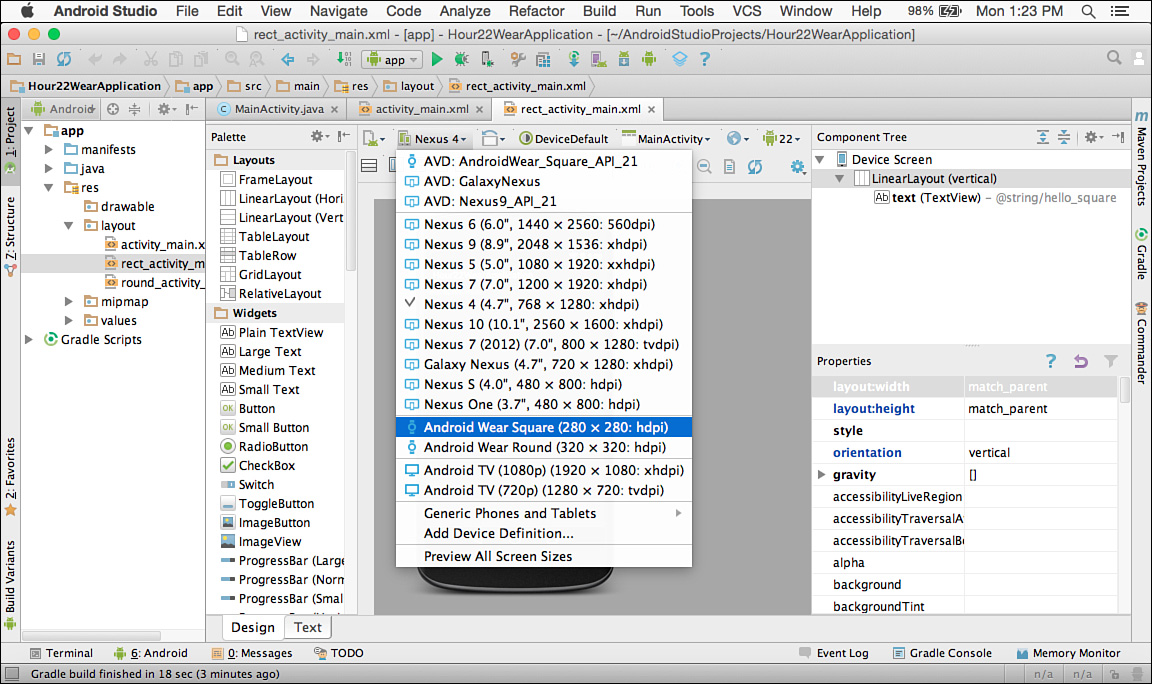
3. Find the rect_activity_main.xml file and open it in design mode.
4. Set the device in design mode to be a square wearable (see Figure 22.3).
Once the project is set up, you want to notice a few things. You can see the list of libraries used in the project by opening the build.gradle file for the app. There are several new dependencies. A wearable project will use the Android wearable support library and the Google Play services wearable library:
dependencies {
compile fileTree(dir: 'libs', include: ['*.jar'])
compile 'com.google.android.support:wearable:1.1.0'
compile 'com.google.android.gms:play-services-wearable:7.0.0'
}
Another difference is in MainActivity.java. The class WatchViewStub(android.support.wearable.view.WatchViewStub) is used. A WatchViewStub extends FrameLayout, so it is a layout class. It is used to display the appropriate view for a square or round watch. The code in MainActivity is as follows:
final WatchViewStub stub = (WatchViewStub) findViewById(R.id.watch_view_stub);
stub.setOnLayoutInflatedListener(new WatchViewStub.OnLayoutInflatedListener() {
@Override
public void onLayoutInflated(WatchViewStub stub) {
mTextView = (TextView) stub.findViewById(R.id.text);
}
});
When you look at the layout files in resources, you will see that there are three. One is for the MainActivity, and it includes only the WatchViewStub layout. It uses the following attribute to indicate that this layout applies to Wear devices:
tools:deviceIds="wear"
The other two layouts, rect_activity_main.xml and round_activity_main.xml, are used for square and round wear devices. They include the appropriate deviceIds. The layout for square devices includes the following:
tools:deviceIds="wear_square"
The round layout uses this:
tools:deviceIds="wear_round"
Testing a Wear App
You need to create an Android Virtual Device (AVD) for your Wear app.
Try It Yourself: Creating an AVD for Android Wear
1. In Android Studio, go to Tools, Android, AVD Manager.
2. In AVD Manager, choose to create a new virtual device.
3. Choose a square or round device (see Figure 22.4).

4. Select Lollipop for development. You may need to upgrade your software development kit (SDK).
5. On the emulator, using the new virtual device, run the app that you previously generated.
After you have the environment in place, you can develop and test your Wear app like any other Android app. You can apply additional configuration options to pair a device with the emulator. You can dive into Wear specifics by examining the wearables support package application programming interfaces (APIs) and related documentation (http://developer.android.com/reference/packages-wearable-support.html).
Adding a Notification
Notifications are important in Android Wear development. Your watch notifies you, and you take an action. Using the code from Hour 21, “Using Notifications,” as a starting point, you create a notification for Android Wear and try it on your emulator. The app creates a notification with a pending intent. That intent starts the WearDestinationActivity that just displays a TextView that says, “You made it!”
In Listing 22.1, the code for WatchViewStub occurs on lines 20–28. The WatchViewStub is defined using the findViewById() method. Then, additional work is done when the view is inflated. In the onLayoutInflated() method on line 25, the TextView that is defined in each separate layout is accessed.
LISTING 22.1 Notification in Android Wear
1: package com.talkingandroid.hour22wearapplication;
2: import android.app.Activity;
3: import android.app.Notification;
4: import android.app.NotificationManager;
5: import android.app.PendingIntent;
6: import android.content.Context;
7: import android.content.Intent;
8: import android.os.Bundle;
9: import android.support.wearable.view.WatchViewStub;
10: import android.widget.TextView;
11:
12: public class MainActivity extends Activity {
13:
14: private TextView mTextView;
15:
16: @Override
17: protected void onCreate(Bundle savedInstanceState) {
18: super.onCreate(savedInstanceState);
19: setContentView(R.layout.activity_main);
20: final WatchViewStub stub = (WatchViewStub)
21: findViewById(R.id.watch_view_stub);
22: stub.setOnLayoutInflatedListener(new
23: WatchViewStub.OnLayoutInflatedListener() {
24: @Override
25: public void onLayoutInflated(WatchViewStub stub) {
26: mTextView = (TextView) stub.findViewById(R.id.text);
27: }
28: });
29:
30: Intent= new Intent(this, WearDestinationActivity.class);
31: PendingIntent pendingIntent =
32: PendingIntent.getActivity(this, 0, intent, 0);
33: int notificationId = 0;
34: Notification.Builder builder =
35: new Notification.Builder(MainActivity.this)
36: .setSmallIcon(R.mipmap.ic_launcher)
37: .setAutoCancel(true)
38: .setContentTitle("Notification")
39: .setContentText("Basic Notification with Action")
40: .addAction(R.mipmap.ic_launcher,
41: "Go for it!", pendingIntent);
42:
43: NotificationManager notificationManager =
44: (NotificationManager)
45: getSystemService(Context.NOTIFICATION_SERVICE);
46: notificationManager.notify(notificationId, builder.build());
47:
48: }
49: }
The notification is defined on lines 30–41. In this case, an action is added to the Notification.Builder on lines 40–41. The action contains an image, message, and pending intent. The notification is created and sent on lines 43–46.
When you run the app in the emulator, the following occurs:
1. The notification is displayed.
2. Slide left to see the action.
3. Click the action for the intent to fire.
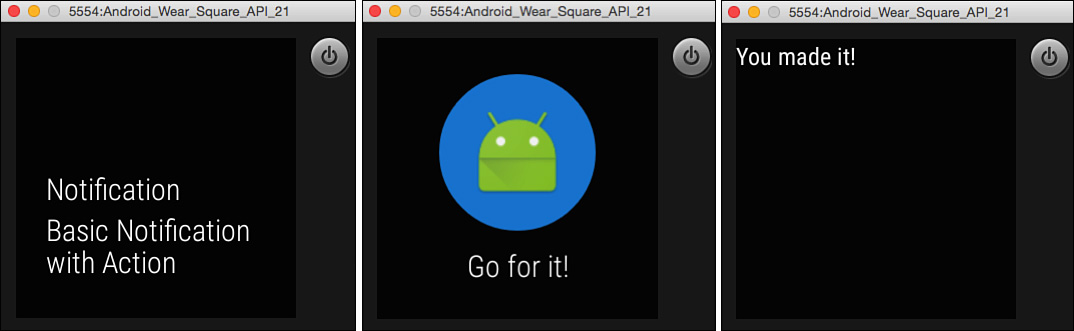
Figure 22.5 shows the states of the app through the steps of the notification.
![]() How are Android TV apps different?
How are Android TV apps different?
![]() What libraries and development configurations are used?
What libraries and development configurations are used?
![]() How will you test the app?
How will you test the app?
An Android TV app will run on a large screen, that screen will always be in layout mode, and a TV app does not have touch input. Navigation will be done with a D-Pad, and there is a certain amount of space on the screen that you may lose to something known as overscan. In Android TV development, there are support libraries and examples that you can use to make successful TV apps.
Designing for Android TV Differences
The size of the screen and how people use a TV in their living room are considerations when creating a TV app. You should consider the nature of your app. Are you delivering content? Do you need to provide a way for people to search a large amount of content? Are you creating a game or educational or interactive app?
The design aspects that are highlighted for a TV app are casual consumption, a cinematic experience, and simplicity. TVs are devices for consuming media. You do not need to be a binge watcher to appreciate that TVs are made for consuming media in a casual atmosphere (usually a living room).
The idea that TV is for content consumption and that TV viewing is a passive experience is called the lean-back experience. Viewers want to lean back and enjoy themselves.
The 10ft environment is used for entertainment and not for work.
The 10ft environment is a social environment rather than a single user environment. When developing apps, whether they are for content consumption, games, or something else, it makes sense to consider the experience for everyone in the room, not just the person holding the remote.
Like mobile apps, TV apps should not be cluttered and should provide clear choices for users. There should be enough space between the elements in a TV app to foster clear navigation. Navigation will be done via the D-Pad’s directional keys.
A TV will often be hooked up to the best speakers in the house. You should consider how sound is used in your app. Related to sound is the concept of audio focus. You can think of that as playing nice with other apps. When your app loses focus, the audio should be turned low or off.
Android TV Development
The process for starting Android TV development is similar to Android Wear development.
You will create an appropriate TV AVD. You will use the AVD Manager, as shown in Figure 22.6.
Android Studio also includes an Android TV project that can be used to start your application. If you choose to create a TV activity with the Android TV project, much of the infrastructure for a fully developed project is included. The advantage of this is that there is a lot of code and infrastructure in place. To create a simple TV app, you can create a TV project but choose to create no activities.
You can learn a lot by creating an Android TV project.
The libraries included in an Android TV project without a generated activity are as follows:
compile 'com.android.support:recyclerview-v7:21.0.3'
compile 'com.android.support:leanback-v17:21.0.3'
If you generate an activity in addition to the leanback and recyclerview modules, you get the following:
compile 'com.android.support:appcompat-v7:21.0.3'
compile 'com.squareup.picasso:picasso:2.3.2'
That is the Picasso library that you are familiar with and the Android support library for backward compatibility. You also use the RecyclerView.
The new library for an Android TV project is the leanback library. The leanback library includes the following:
![]() BrowseFragment:
BrowseFragment: Fragment for browsing media
![]() DetailsFragment:
DetailsFragment: Fragment used to show details
![]() PlaybackOverlayFragment:
PlaybackOverlayFragment: DetailsFragment for playback controls and content
![]() SearchFragment:
SearchFragment: Fragment to handle searches
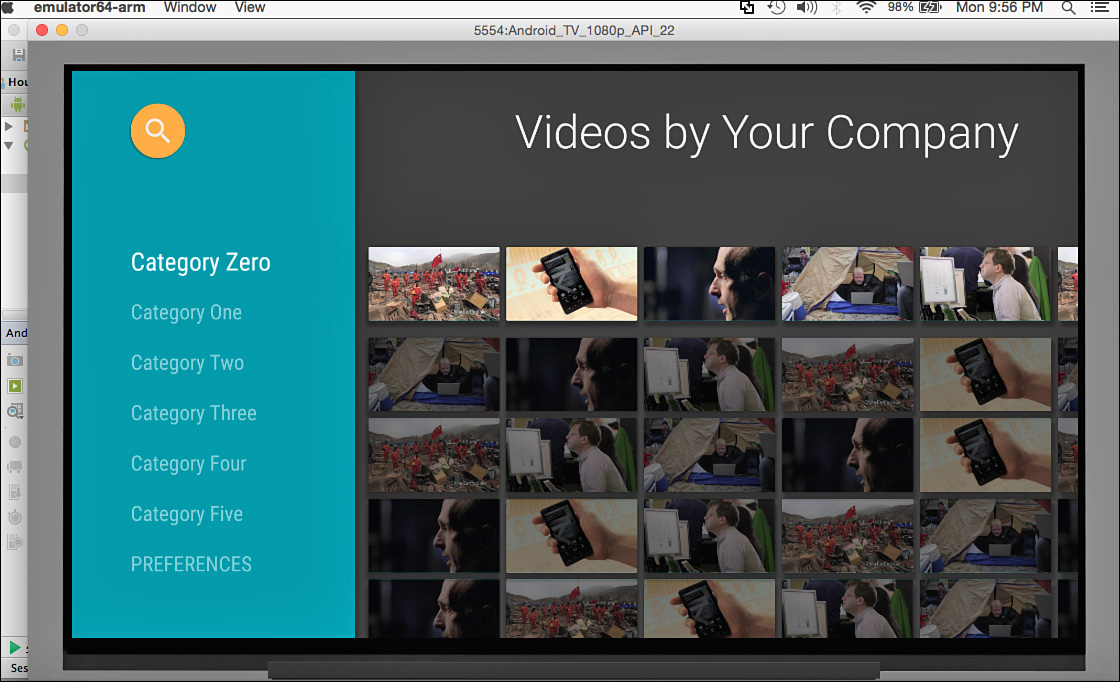
Testing an Android TV App
You will to use the AVD that you created to test your TV app. The sample project that is generated by Android Studio includes the key features from the leanback library. Figure 22.7 shows the app running in the emulator.
Summary
In this hour, you learned about design and development implications for Android Wear and Android TV. In both cases, Android Studio includes a project that you can use as a starting point. There are also AVDs that are specific to testing TV and Android Wear apps. There are support libraries that support each device. The common concepts of Android development carry through when developing Wear and TV apps.
Q&A
Q. How do people get TV and watch apps?
A. Google Play is used for these apps. When apps are published, settings in the Android manifest file are used to determine which devices to offer the app. For example, no app that requires touch will be available on a TV device. You learn more about publishing apps in Hour 24, “Publishing Your Apps.”
Q. Are there differences between developing games and apps for TV?
A. Yes, if your game requires a game controller, you can specify that in your manifest file. You will not have to rely on the D-Pad for navigation. For games, you might consider trying Unity Android development.
Workshop
Quiz
1. How does a WatchStubView indicate that it supports Android Wear devices?
2. True or false: In an Android Wear app, there can be only one activity.
3. Name at least one thing that is always true for an Android TV app.
Answers
1. The WatchStubView has deviceIds set to "wear". The round and square layouts have the deviceIds attribute set to "wear_square" and "wear_round", respectively.
2. False. A Wear app can have more than one activity. You saw this in the notification example when the notification’s action was to navigate to a new activity.
3. Android TV apps are always in landscape mode and never have touch input.