
Adding an MDB to the Agency Case Study
To illustrate the use of MDBs you will extend the Agency case study to utilize a Message-Driven bean to match advertised jobs to new applicants as they register with the system or when an applicant updates his or her skills or location.
As each applicant is created, modified, or deleted, a message is sent to the JMS queue jms/applicantQueue. The message includes the applicant's login and a flag to indicate if this is a new applicant or a change to an existing one. An MDB will receive this message and compare the applicant's details with all advertised jobs. The MDB will add an entry to the Matched table in the database if the applicant's location matches a job location and the applicant has at least one of the skills required by the job. If the applicant has all of the skills required for a job, the row added to the Matched table is tagged with an exact match flag.
Deleting an applicant deletes the rows in the Matched table for that applicant.
The steps required to add this functionality to the case study are as follows:
1. | Write a helper class called MessageSender that creates and sends a message to the jms/applicantQueue containing the applicant's login. |
2. | Amend the Agency and Register Session beans to call this new method when a new applicant is registered or the applicant's location or skills are changed. |
3. | Write an MDB called ApplicantMatch to
|
4. |
Write MessageSender Helper Class
This class contains a constructor for the class and two methods—sendApplicant() and close().
The constructor takes two parameters, which are strings representing the JNDI names of the JMS connection factory and the JMS queue.
The sendApplicant() method is called by the Agency Session bean when a new applicant registers with the system and the Register Session bean when an existing applicant changes his or her location or job skills. It has two parameters—the applicant's login string and a Boolean denoting if this is a new applicant.
The close() method is called before the application is terminated. It sends a message that lets the container know that no more messages will be sent to the queue and frees-up resources.
If you have worked through Day 9, the code for the MessageSender, shown in Listing 10.1, should be familiar to you.
Listing 10.1. MessageSender Helper Class
import javax.naming.*;
import javax.jms.*;
public class MessageSender {
private Connection connection;
private Session session;
private MessageProducer producer;
public MessageSender(String jndiFactory, String jndiQueue) throws JMSException,
|
Update Agency and Register Session Beans
The following changes are required to AgencyBean.java and RegisterBean.java to call the MessageSender.send() method when a new applicant is registered or the applicant's location or skills are changed.
Write The ApplicantMatch MDB
As already stated, all Message-Driven beans must implement the MessageDrivenBean and MessageListener interfaces.
import javax.ejb.*;
import javax.jms.*;
public class ApplicantMatch implements MessageDrivenBean, MessageListener {
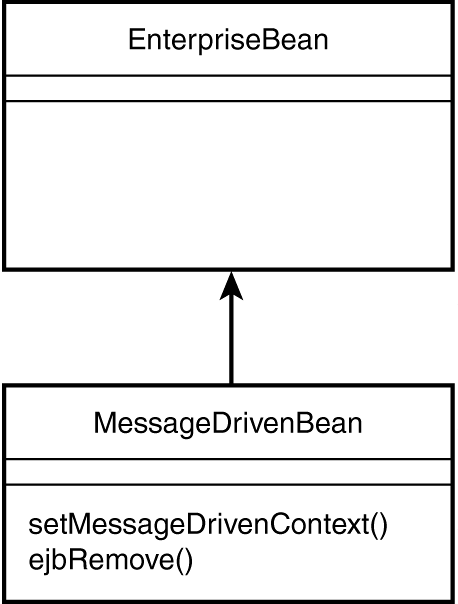
Just like the EntityBean and SessionBean interfaces, the MessageDrivenBean interface extends the javax.ejb.EnterpriseBean interface.
The MessageDrivenBean interface contains only two methods—setMessageDrivenContext() and ejbRemove(); see the class diagram in Figure 10.3.
Figure 10.3. The MessageDrivenBean class diagram.
You also need to supply an ejbCreate() method.
In the ApplicantMatch, MDBs save references to the Applicant, Job and Matched Entity beans in the setMessageDrivenContext() method (see Listing 10.2 later in this chapter).
This update introduces a new Entity bean. The MatchedBean creates rows in the Matched table to store the applicant and job matches. This code may be found in the MatchedBean.java file on the Web site.
The MDB container handles the association of the MDB with the JMS message queue or topic so there is no requirement to create and start a JMS connection. Consequently the ApplicantMatch.ejbCreate() method is blank.
public void ejbCreate(){}
The ApplicantMatch.ejbRemove() cleans up by setting all the references to the Entity beans to null. There are no other resources for you to deallocate—nor should this method stop the JMS connection.
public void ejbRemove(){
    applicantHome = null;
    jobHome = null;
    matchedHome = null;
}
The algorithm that matches an applicant to advertised jobs is in the onMessage() method. First, you need to check that onMessage() has received the expected text message from the Agency or Register Session beans. The message contains the applicant's login, which is the primary key on the Applicants table. This primary key is used to obtain the applicant's location and skills in subsequent finder methods.
if (!(message instanceof TextMessage)) {
    System.out.println("ApplicantMatch: bad message:" + message.getClass());
    return;
}
Next, check whether this applicant is a new one or the registration has been amended. If details about the applicant have changed, you need to delete the existing matches stored in the Matched table.
login = ((TextMessage)message).getText();
if (! message.getBooleanProperty("NewApplicant")) {
    matchedHome.deleteByApplicant(login);
}
Use the login primary key to find the applicant's location using the Applicant Entity bean's finder method.
ApplicantLocal applicant = applicantHome.findByPrimaryKey(login);
String location = applicant.getLocation().getName();
Next, obtain all the skills that the applicant has registered and store them in an array.
Collection skills = applicant.getSkills();
Collection appSkills = new ArrayList();
Iterator appIt = skills.iterator();
while (appIt.hasNext()) {
    SkillLocal as = (SkillLocal)appIt.next();
    appSkills.add(as.getName());
}
Now you have all the information you need about the applicant. The next step is to start matching the jobs. First, find the jobs that match the applicant's location from the Job bean and iterate over this collection finding the skills required for each job.
Collection col = jobHome.findByLocation(location);
Iterator jobsIter = col.iterator();
while (jobsIter.hasNext()) {
    JobLocal job = (JobLocal)jobsIter.next();
    Collection jobSkills = job.getSkills();
Now you have a appSkills array containing the applicant's skills and a jobSkills collection containing the skills required for the job. The next task is to find how many of these skills match. This is done by iterating over the jobSkills, and for each jobSkill, searching the appSkills array for a match. When a match is found, the skillMatch counter is incremented.
int skillMatch = 0;
Iterator jobSkillIter = jobSkills.iterator();
while (jobSkillIter.hasNext()) {
    SkillLocal jobSkill = (SkillLocal)jobSkillIter.next();
    if (appSkills.contains(jobSkill.getName()))
      skillMatch++;
}
Now see if you have a match. If there was a job skill to match (jobSkills.size() > 0) and the applicant did not have any of them (skillMatch == 0), get the next job (continue).
if (jobSkills.size() > 0 && skillMatch == 0)
    continue;
Otherwise, determine if the applicant has all or just some of the skills and update the Matched table.
    boolean exact = skillMatch == jobSkills.size();
    MatchedPK key = new MatchedPK(login,job.getRef(),job.getCustomer());
    try {
        matchedHome.create(key.getApplicant(),key.getJob(),key.getCustomer(), exact);
    }
    catch (CreateException ex) {
        System.out.println("ApplicantMatch: failed to create matched entry: "+key);
    }
}
That is all there is to the bean apart from the exception handling. The full listing of the ApplicantMatch Message-Driven bean is shown in Listing 10.2.
Listing 10.2. Full Listing on ApplicantMatch.java Message-Driven Bean Code
Deploying an MDB Using J2EE RI
Yesterday, you were shown how to create JMS connection factories, queues, topics and destinations using the J2EE RI. Today, you will need to create an additional JMS queue called jms/applicantQueue for sending messages to the ApplicantMatch MDB.
Do this before you start to create the ApplicantMatch MDB by going to the Day10/examples directory provided on the accompanying Web site and running the command
asant create-jms
You are now ready to create the ApplicantMatch MDB as detailed in the following steps. If you do not want to create the MDB but simply look at a completed application, open the EAR file Day10/examples/j2ee-ri/examples.ear and study the results of each step described.
1. | Take a copy of the Day 6 Agency case study (the one with BMP Entity beans), start up deploytool and open the EAR file you created on that day (a suitable starting point is Day06/agency/j2ee-ri/agency.ear). Make sure you pick up your new class files from the Day10/examples/classes directory. | ||||||||||||||||||||||||||||||||||||
2. | Create and add a new BMP Entity bean (using local interfaces) called MatchedBean to represent the Matched database table. Refer to Day 6 for details on creating new BMP Entity beans if you are unsure how to do this. The information you need for the MatchedBean
BMP Entity bean is summarized in Table 10.1.
| ||||||||||||||||||||||||||||||||||||
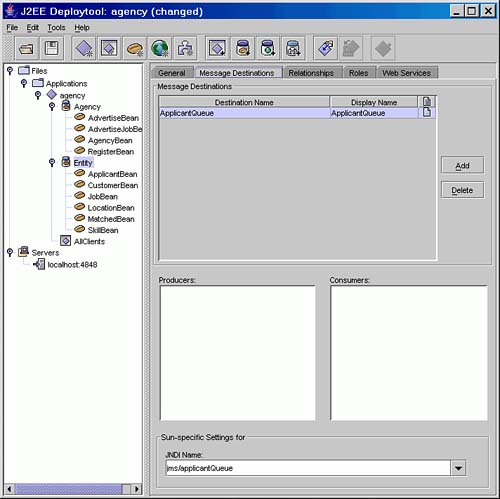
3. | Before you create your new MDB for matching applicants you must define a Message Destination for the MDB. Do this for the Agency case study by selecting the JAR file for the data Entity beans and selecting the Message Destination dialogue page. Add a new message destination and set the Destination Name and Display name to ApplicantQueue and set the Sun-Specific JNDI name to jms/applicantQueue. You should have a screen similar to the one shown in Figure 10.4. | ||||||||||||||||||||||||||||||||||||
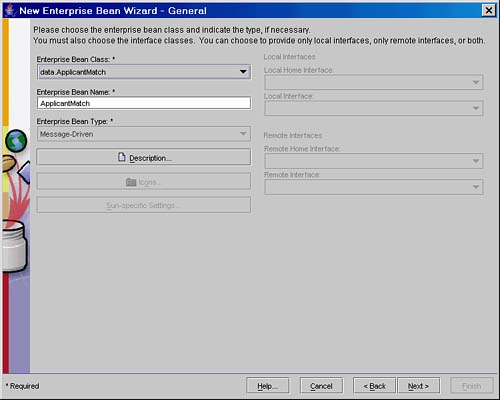
4. | Now you can add the new MDB using the File, New Enterprise Bean… menu option. Skip the introductory page if you have not suppressed display of this page and on the New Enterprise Bean Wizard page add the data.ApplicantMatch class file to the application. | ||||||||||||||||||||||||||||||||||||
5. | On the next page select the data.ApplicantMatch Enterprise Bean class and accept the default name of ApplicantMatch, as shown in Figure 10.5. | ||||||||||||||||||||||||||||||||||||
6. | On the next screen, check the No option so you do not expose the bean as a web service endpoint and move onto the next page to define the MDB settings. | ||||||||||||||||||||||||||||||||||||
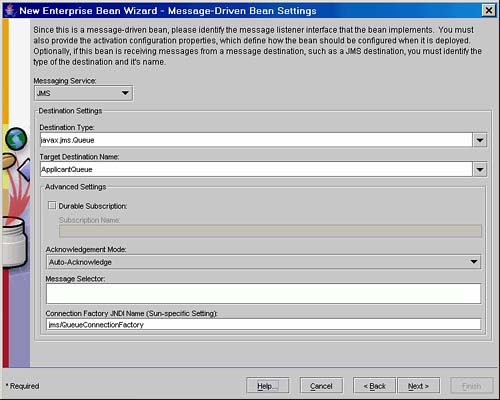
7. | On the MDB settings page, select
| ||||||||||||||||||||||||||||||||||||
8. | Move onto the next page which summarizes your next steps and then click Finish to create the ApplicantMatch
MDB. | ||||||||||||||||||||||||||||||||||||
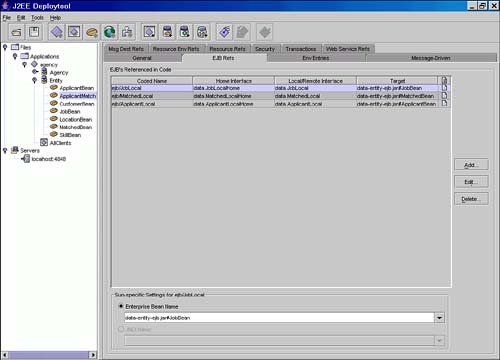
9. | Select the ApplicantMatch
MDB and use the EJB References page to create references to the Applicant, Job and Matched Entity beans as discussed on Day 6 when local EJB references to Entity beans were described. The Coded Names for each of the Entity beans are ejb/ApplicantLocal, ejb/JobLocal and ejb/MatchedLocal, respectively. The required EJB references are shown in Figure 10.7. | ||||||||||||||||||||||||||||||||||||
10. | |||||||||||||||||||||||||||||||||||||
11. | Save your changes to the Enterprise Application and select the Tools, Verify J2EE Compliance to ensure you have created the MatchedBean Entity bean and ApplicantMatch
MDB correctly. |
NOTE
As discussed on Day 6, using deploytool from the November 2003 release of J2EE RI 1.4 reports spurious errors about missing JNDI names for the Entity beans with local interfaces. You can ignore these errors. If you are unsure you can run the command “asant verify-j2ee-ri” from the Day10/examples directory to verify your changes using the command line verifier, which does not report spurious errors. Make sure you save your changes before running the command line verifier.
The EJB DD entry you have created for the ApplicantMatch MDB (with the EJB reference omitted) is
<message-driven>
  <ejb-name>ApplicantMatch</ejb-name>
  <ejb-class>data.ApplicantMatch</ejb-class>
  <messaging-type>javax.jms.MessageListener</messaging-type>
  <transaction-type>Bean</transaction-type>
  <message-destination-type>javax.jms.Queue</message-destination-type>
  <message-destination-link>ApplicantQueue</message-destination-link>
...
</message-driven>
The DD also contains an entry for the Message destination at the end of the assembly-descriptor section:
<assembly-descriptor>
...
  <message-destination>
    <message-destination-name>ApplicantQueue</message-destination-name>
  </message-destination>
...
</assembly-descriptor>
Before you can deploy the updated case study code you must update the Agency and Register session beans to include the jms/ApplicantQueue message destination as discussed in the next section.
Adding JMS Message Destinations with J2EE RI
In order to send messages to an MDB you must define a resource reference for the JMS connection factory and a message destination reference for the JMS queue. For the Agency case study you do this as follows:
1. | Select the Agency JAR file in the case study application, select the General dialogue, click Edit to add the helper class (shown in Listing 10.1). In the popup Edit window add the class file for agency.MessageSender. Close the Edit window. |
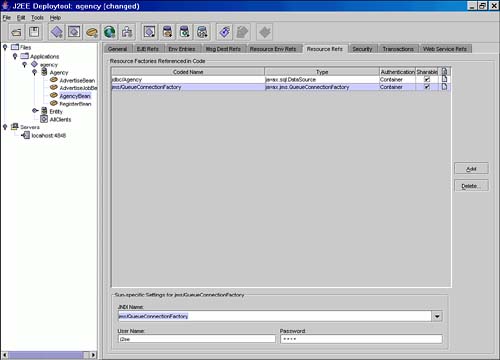
2. | Select the AgencyBean Session bean in the case study application and then select the Resource Refs page. There will already be an entry for the JDBC Resource (jdbc/Agency). Click on Add to add a new resource reference and set the following values
|
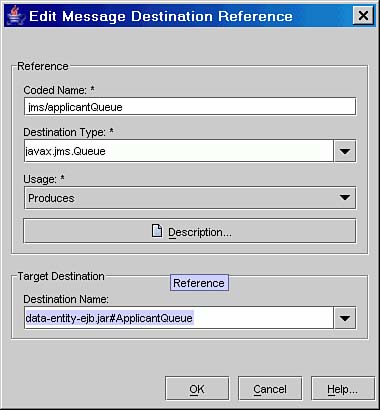
3. | After defining the resource reference for the JMS connection factory select the Msg Dest Refs page and click on Add to add a new message destination reference. In the popup window, enter the following data:
|
4. | Select the RegisterBean Session bean and perform steps 1 and 2 again to add the jms/QueueConnectionFactory resource reference and the ApplicantMatch message destination reference. Save your changes. |
5. | Select the Agency application and run Tools, Verify J2EE Compliance to verify your changes. |
Adding the JMS connection factory resource reference and the message destination adds the following entry to the DD:
<session>
...
 <ejb-name>AgencyBean</ejb-name>
 <resource-ref>
   <res-ref-name>jms/QueueConnectionFactory</res-ref-name>
   <res-type>javax.jms.QueueConnectionFactory</res-type>
   <res-auth>Container</res-auth>
   <res-sharing-scope>Shareable</res-sharing-scope>
 </resource-ref>
   <message-destination-ref>
   <message-destination-ref-name>jms/applicantQueue</message-destination-ref-name>
   <message-destination-type>javax.jms.Queue</message-destination-type>
   <message-destination-usage>Produces</message-destination-usage>
   <message-destination-link>data-entity-ejb.jar#ApplicantQueue</message-destination-link>
 </message-destination-ref>
...
</session>
You can now deploy your updated Agency application. Make sure you obtain the client JAR file for this new application as described on Day 4, “Introduction to Enterprise JavaBeans.” If you are not sure how to obtain the client JAR file, after deploying the updated Agency application (in deploytool), select the localhost:4848 server in the left window. From this list of applications in the right window select agency and click on Client Jar…. Save the returned JAR file to the Day10/examples/j2ee-ri directory. You can now run the example using
asant run-j2ee-ri
If you are working from the asant build files rather than using deploytool, to build and deploy the supplied code, simply enter the command
asant build deploy
The client JAR file is automatically returned to the Day12/examples/build directory. Run this version of the case study using
asant run
You are now ready to test the application.
Testing the ApplicantMatch Bean
Deploy and run the Agency application as described in the previous section. Use the Register screen to add a new applicant whose location is London and skills are Cigar Maker.
Use the Tables screen to view the contents of the Matched table and check that a row has been added for the new applicant with the following details:
Add another applicant whose location is also London and whose skills are Cigar Maker and Critic. Check that this creates a row with the following details in the Matched table:
Change the skills for this second applicant. Remove the Cigar Maker and Critic and add the skill Bodyguard.
Check that the row for this applicant has now been deleted from the Matched table.
If these checks are okay, congratulations! You have successfully deployed the ApplicantMatch MDB. Of course, you can add or amend other applicants to find other job matches in the system.