
Packaging and Deploying the Simple Web Service Using J2EE RI deploytool
This section shows how to deploy the simple Web Service to the J2EE RI. You will get the most out of this if you actually perform these steps (but if you're on a train or plane, just read the text and make do).
As usual, start up the PointBase database server and J2EE RI server before starting deploytool.
Creating the Web Service WAR
You will package up the Web Service in a WAR file, so choose File, New, Web Component to create a new one. Click Next to skip the introduction screen and move onto the WAR file creation screen. You will be creating a New Stand-Alone WAR Module so ensure that this option is selected. Next, under WAR Naming, browse to a location in which you wish to save your WAR file and provide “wsgreeting” as the File Name.
Now you can populate your WAR with the files you saw earlier. Under the Contents section, click the Edit button to display the Edit Contents of wsgreeting screen. Browse to find the class files (Greeting.class and GreetingImplementation.class), the WSDL file (GreetingService.wsdl – created in folder build/generated), and the mapping file (mapping.xml – created in folder build/generated). Add each of these files to the contents as shown in Figure 20.6 and click OK.
Figure 20.6. Populating the Web Service WAR with class and configuration files.

Your WAR file settings should look similar to those in Figure 20.7.

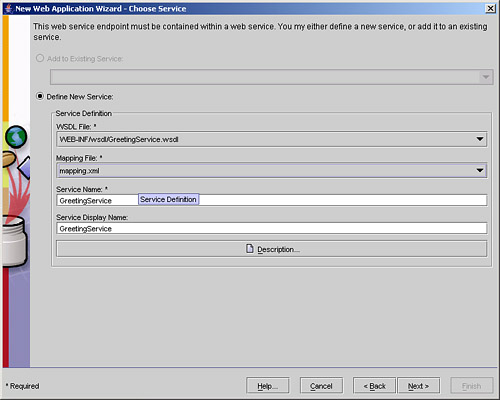
Click Next to move on to the Choose Component Type screen and select Web Services Endpoint. Click Next to move onto the Choose Service screen. Under the Service Definition, the WSDL File drop-down list should offer you the GreetingService.wsdl file and the Mapping File drop-down list should offer you the mapping.xml file. Select these two files so that your screen looks like that in Figure 20.8. You will see that the service name has been picked up from the WSDL file.
Now click Next to move onto the Component General Properties window. Select wsexamples.GreetingImplementation as your Service Endpoint Implementation (this will be offered from the drop-down list). Again, the fields will be populated based on the information in the file.
Click Next to move on to the Web Service Endpoint screen. Select wsexamples.Greeting as your Service Endpoint Interface. In the WSDL Port section, set the Namespace to be urn:J2EE21Examples and ensure that the Local Part becomes GreetingPort as shown in Figure 20.9.

That completes the initial configuration, so click Next followed by Finish. You should be presented with a deploytool screen that looks like Figure 20.10.

Configuring the WAR and Component
There are three final bits of Sun-specific configuration that are needed to complete the Web Service WAR. First, select the General tab of the wsgreeting WAR file (as shown in Figure 20.10). Set the Context Root field to /wsgreeting.
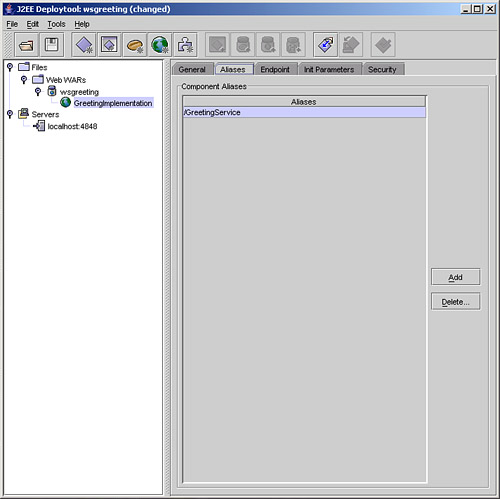
Now select the GreetingImplementation component in the left-hand pane. Select the Aliases tab and Add an alias of /GreetingService as shown in Figure 20.11.
Finally, select the Endpoint tab and change the Endpoint Address at the bottom of the tab to be GreetingService. You should now save your WAR file and you are ready to deploy your service.
During this process, deploytool has generated several new files for you:
The web.xml file— This contains the servlet definition for your Web Service. One part of this defines a servlet and indicates that wsexamples.GreetingImplementation is the servlet class. Obviously, the GreetingImplementation class you saw earlier is not a servlet, but this is indicative of more Web Service scaffolding. As the Web component is marked as a Web Service, the container to which it is deployed will hook it up to a SOAP router servlet during deployment. The other part of the file is the alias you added mapping /GreetingService to the GreetingImplementation servlet:
<servlet>
    <display-name>GreetingImplementation</display-name>
    <servlet-name>GreetingImplementation</servlet-name>
    <servlet-class>wsexamples.GreetingImplementation</servlet-class>
</servlet>
<servlet-mapping>
    <servlet-name>GreetingImplementation</servlet-name>
    <url-pattern>/GreetingService</url-pattern>
</servlet-mapping>
The sun-web.xml file— This contains the sun-specific configuration performed toward the end of the configuration. This includes the setting of the context root and the mapping of the Web Service endpoint information (the names of the service and port) to the servlet used to implement the service:
<sun-web-app>
  <context-root>/wsgreeting</context-root>
  <servlet>
    <servlet-name>GreetingImplementation</servlet-name>
    <webservice-endpoint>
      <port-component-name>Greeting</port-component-name>
      <endpoint-address-uri>GreetingService</endpoint-address-uri>
    </webservice-endpoint>
  </servlet>
</sun-web-app>
The webservices.xml file— This file is described in the JSR109 document as the “Web Services Deployment Descriptor” and is described in the next section.
The Web Services Deployment Descriptor
The Web Services Deployment Descriptor contains a list of the Web Services being deployed and the ports each one of them contains. The root element is webservices, which contains one or more webservice-description elements. Within the webservice-description element there is some information about the overall service, such as the name of the service, the associated WSDL file, and which mapping deployment descriptor should be used for this particular Web Service:
<webservice-description-name>GreetingService</webservice-description-name>
<wsdl-file>WEB-INF/wsdl/GreetingService.wsdl</wsdl-file>
<jaxrpc-mapping-file>mapping.xml</jaxrpc-mapping-file>
Each webservice-description element contains one port-component element for each port in the service. For your simple Greeting service, there is just a single port you can call GreetingPort. This suggested name is intentionally different from the name used in the WSDL document to help you differentiate it:
<port-component>
    <display-name>Greeting</display-name>
    <port-component-name>Greeting</port-component-name>
    ...
</port-component>
The wsdl-port element below the port-component element defines the associated port name from the WSDL you generated earlier—GreetingPort—and the namespace in which it is defined—urn:J2EE21Examples:
<wsdl-port xmlns:wsdl-port_ns__="urn:J2EE21Examples">wsdl-port_ns__:GreetingPort</wsdl-port>
The service-endpoint-interface element within the port-component defines the Java interface associated with this port. In your case, this is the fully qualified name of the interface you are supplying in the WAR file:
<service-endpoint-interface>wsexamples.Greeting</service-endpoint-interface>
The other useful bit of information in the port-component is the link to the implementation. The service-impl-bean in this case defines a link to the GreetingImplementation defined in the web.xml file:
<service-impl-bean>
    <servlet-link>GreetingImplementation</servlet-link>
</service-impl-bean>
Deploying the Service
Now you can deploy the service. Select the wsgreeting WAR in the left-hand pane of deploytool and then select Tools, Deploy from the menus. Provide your administrator user name and password if prompted and ensure that the message “Operation Completed Successfully” is displayed on the Distribute Module screen.
During this deployment, all of the server-side scaffolding, such as the server-side skeletons, will be generated by the container into which you are deploying. Note that there is no need in this case to ask for a client JAR file because you will contact the service over SOAP. The only thing needed to create the artifacts used by the client is the WSDL description (after all, the Greeting Web Service could be implemented in Microsoft .NET if it was developed by someone else).
You can now access the simple Web Service at the URL http://localhost/wsgreeting/GreetingService. Putting this URL directly into a browser will not have much effect as browsers issue HTTP GET commands while Web Services generally use HTTP POST. However, you can test that your service is there by asking it for its WSDL description. To do this, add “?WSDL” onto the end of the URL and type it into your browser:
http://localhost/wsgreeting/GreetingService?WSDL
This will return the deployed WSDL file as shown in Figure 20.12.

The WSDL document is identical to the one in the Web Service WAR, but it now contains the location information for the deployed service (remember that the original WSDL had its location set to REPLACE WITH ACTUAL URL):
...
<service name="GreetingService">
  <port name="GreetingPort" binding="tns:GreetingBinding">
    <soap:address xmlns:wsdl=http://schemas.xmlsoap.org/wsdl/
                  location="http://localhost:8000/wsgreeting/GreetingService"/>
  </port>
</service>
...
In the next section, you will use this WSDL file to generate stubs through which a client application can contact the Web Service.