
Applying Web Security using J2EE RI
If you want to examine the agency case study with Web-based security defined, start up deploytool, open the webagency.war file in the Day15/examples/j2ee-ri directory and select the webagency application.
Alternatively, if you want to work through the steps in today's lesson and add security yourself, copy the webagency.war file you developed on Day 14, “JSP Tag Libraries,” to a working directory and open it with deploytool.
To illustrate the basic features of J2EE Web security, you will need to configure the Web interface to the Agency case study to authenticate users.
Defining Web Application Roles
Using deploytool select the webagency Web Application and the Security tab. On the security tab select Basic from the list of options in the User Authentication Method section on the form. Use the Settings button to configure additional features for the authentication method. The only configurable property for Basic HTTP authentication is the realm in which to authenticate the user. Enter the value file, as shown in figure 15.13. Click on OK to accept the authentication realm.
Figure 15.13. Defining Basic HTTP Web authentication.

Your changes have added a <login-config> security constraint to the Web application deployment descriptor as follows:
<web-app>
  <display-name>webagency</display-name>
  ...
  <login-config>
    <auth-method>BASIC</auth-method>
    <realm-name>file</realm-name>
  </login-config>
  ...
<web-app>
Defining the authentication mechanism does not force any clients to authenticate themselves for pages in the Web application. To force client authentication (login), you will need to add declarative security constraints for the protected Web pages. When the user accesses one of the protected pages, the server will use Basic HTTP authentication to obtain the username and password and validate these credentials against the default security realm
Configuring J2EE RI Declarative Web Security
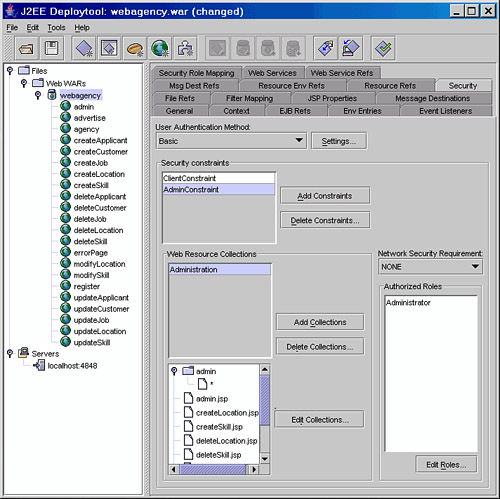
Still on the Web Application Security page in deploytool you can define security constraints for your application. Constraints are based on roles and, to contrast with the example of EJB security that identified applicants and customers as separate roles, the Web application will treat all potential applicants and customers as clients. You will configure two roles for your Web application, as shown in Table 15.5.
| Role | Description |
|---|---|
| Administrator | Administers the skills and locations tables |
| Client | A potential applicant or customer |
Before you can define the roles, you must enable the Edit Roles button on the Security page. This is achieved by clicking on the Add Constraints button to create a constraint. Now click on the Edit Roles button and in the popup Authorized Roles for SecurityConstraint window click on Edit Roles. Now you can click on Add to add the roles shown in Table 15.5. Figure 15.14 shows the cascaded windows that you have open.

Close down the two popup windows to return to the Security page. Your changes have added the following <auth-constraint> elements to the Web Application DD:
<web-app>
  <display-name>webagency</display-name>
  ...
    <auth-constraint>
      <role-name>Administrator</role-name>
      <role-name>Client</role-name>
    </auth-constraint>
  ...
</web-app>
Before applying these security constraints, it is worth briefly looking at the security transport guarantee.
Using Secure Web Authentication Schemes
Previously you were told that basic HTTP authentication is inherently insecure, as the username and password are not passed using a secure form of encryption. To secure the login process, it is usual to switch to using SSL when accessing protected web pages. This is achieved by applying a constraint on the user data transport mechanism.
The Network Security Requirements option on the Security dialog describes the available options
INTEGRAL— The transfer of the data between server and client must guarantee that the data will not be changed.
CONFIDENTIAL— The transfer of the data between server and client must guarantee that the data cannot be observed.
In practice, choosing an option other than none will ensure that the login process and protected Web pages are accessed using SSL. In a real-world application you would typically set the Network Security option to CONFIDENTIAL ensuring the highest level of Web security.
The network requirements are added to the Web application deployment descriptor as defined by the value of the <transport-guarantee> in the <user-data-constraint> tag.
<web-app>
  <display-name>webagency</display-name>
  ...
    <auth-constraint>
      <role-name>Administrator</role-name>
      <role-name>Client</role-name>
    </auth-constraint>
    <user-data-constraint>
      <transport-guarantee>NONE</transport-guarantee>
    </user-data-constraint>
  </security-constraint>
  ...
</web-app>
The basic HTTP authentication mechanism is suitable for development and testing, but commercial applications require more “secure” authentication schemes. Because you will never use J2EE RI as a commercial server, learning how to make it completely secure is not a useful exercise; you have many other features of J2EE to learn in the remaining six days.
If understanding and using HTTPS and SSL is necessary for your understanding of J2EE, this is best done with your commercial Web server. Read the documentation and tutorials with your Web server to determine how to secure your applications. The basic understanding of security you have gained from today's work will stand you in good stead if you are implementing certificate-based security.
Now that you have covered the basic requirements for securing a Web Application, it is time to study security constraints.
Applying Web Application Security Constraints
After the application roles and transport guarantee have been defined, you can add one or more security constraints to you application. A security constraint is applied to a Web Application and defines the following:
A list of roles that are authorized by this constraint
One or more Web resource collections that define the Web pages protected by this constraint
A list of protected Web pages each defined by a URL pattern and the HTTP request methods GET and POST
Before adding any constraints, you must decide which parts of the agency Web application must be protected. The main portal page (agency.jsp) should be accessible to all users because this page is used to create new customer or applicant details. Existing customers also use this page to access their data.
Functionality for customers, jobs, and applicants should be protected so that only authenticated clients can use those pages. The administration page (admin.jsp), for maintaining skill and location lists, should only be accessible to authenticated clients in the Administration role.
To enforce these restrictions, you will need two separate constraints for your Web application:
A constraint to allow clients and administrators to access customer, job, and applicant functionality
A constraint to allow administrators to maintain the skill and location lookup tables
On Day 13, you chose aliases for your Web pages to simplify the definition of the security constraints. All of the customer functionality uses aliases of the form /customer/…; similarly, applicant functionality is /applicant/…. This naming scheme can be used when applying authorization to Web pages.
You have already started to add a security constraint to the agency Web application in order to enable the Edit Roles functionality in deploytool.
The following steps will complete the setup of the first of these constraints:
1. | On the Security dialog select the SecurityConstraint you created earlier and change its name to ClientConstraint. |
2. | In the Authorized Roles section (bottom right of dialog tab), click Edit and add the Client and Administrator roles by using the pop-up window. |
3. | In the Web Resource Collections section, click Add Collections to add a new resource bundle and rename this Customer. |
4. | Select the Customer Web Resource Collection section and click Edit Collections to add the protected URL patterns to your constraint. You will need to protect the individual page names (shown in the next step) and the aliases you defined when deploying the application (shown in step 6). |
5. | |
6. | On the same page, click the Add URL Pattern button and add the pattern /customer/*. |
7. | At the bottom right of this popup window check the GET and POST HTTP method options. Your window should look like the one in Figure 15.15. Figure 15.15. Defining Web Resource Collections.
|
8. | Click OK to save your changes. |

You have had to protect the real Web page filenames as well as the page aliases because authorization is based on URL patterns and not the physical file location.
You may be wondering why you have protected the actual JSP page when the pages themselves always use the page alias. To answer that, you have to remember that the Web is not a secure environment. There are users who will try to break your security by examining HTTP requests and URLs in an attempt to detect logical naming patterns.
Where security is concerned, it is better to err on the side of caution and protect everything rather than leave a loophole for a hacker to exploit.
You must now add a second Resource Collection to the ClientConstraint for protecting access to the applicant registration functionality. Create a new Resource Collection (call it Applicant) and protect the URL Pattern /applicant/* and the following JSP pages for GET and POST HTTP methods:
register.jsp
createApplicant.jsp
deleteApplicant.jsp
updateApplicant.jsp
The last constraint you need is to protect the administrative functionality on the admin.jsp page. Because this requires a different set of roles, you will need to
1. | Create a new Security Constraint and call it AdminConstraint. |
2. | Add Administration to the Authorized Roles for this constraint. |
3. | |
4. | Edit this collection, select the HTTP POST and GET methods and add the URL pattern /admin/* and the following pages to this collection:
|
After you have defined all of these changes, the DD will have the <security-constraint> entries, as follows:
<web-app>
  <display-name>webagency</display-name>
  ...
   <security-constraint>
       <display-name>AdminConstraint</display-name>
       <web-resource-collection>
          <web-resource-name>Administration</web-resource-name>
          <url-pattern>/admin/*</url-pattern>
          <url-pattern>/deleteLocation.jsp</url-pattern>
          <url-pattern>/updateLocation.jsp</url-pattern>
          <url-pattern>/admin.jsp</url-pattern>
          <url-pattern>/createSkill.jsp</url-pattern>
          <url-pattern>/createLocation.jsp</url-pattern>
          <url-pattern>/modifyLocation.jsp</url-pattern>
          <url-pattern>/deleteSkill.jsp</url-pattern>
          <url-pattern>/modifySkill.jsp</url-pattern>
          <url-pattern>/updateSkill.jsp</url-pattern>
          <http-method>POST</http-method>
          <http-method>GET</http-method>
       </web-resource-collection>
       <auth-constraint>
          <role-name>Administrator</role-name>
       </auth-constraint>
       <user-data-constraint>
          <transport-guarantee>NONE</transport-guarantee>
       </user-data-constraint>
    </security-constraint>
    <security-constraint>
       <display-name>ClientConstraint</display-name>
       <web-resource-collection>
          <web-resource-name>Applicant</web-resource-name>
          <url-pattern>/customer/*</url-pattern>
          <url-pattern>/register.jsp</url-pattern>
          <url-pattern>/createApplicant.jsp</url-pattern>
          <url-pattern>/updateApplicant.jsp</url-pattern>
          <url-pattern>/deleteApplicant.jsp</url-pattern>
          <http-method>POST</http-method>
          <http-method>GET</http-method>
       </web-resource-collection>
       <web-resource-collection>
          <web-resource-name>Customer</web-resource-name>
          <url-pattern>/customer/*</url-pattern>
          <url-pattern>/createCustomer.jsp</url-pattern>
          <url-pattern>/createJob.jsp</url-pattern>
          <url-pattern>/advertise.jsp</url-pattern>
          <url-pattern>/updateJob.jsp</url-pattern>
          <url-pattern>/updateCustomer.jsp</url-pattern>
          <url-pattern>/deleteCustomer.jsp</url-pattern>
          <url-pattern>/deleteJob.jsp</url-pattern>
          <http-method>POST</http-method>
          <http-method>GET</http-method>
       </web-resource-collection>
       <auth-constraint>
          <role-name>Client</role-name>
          <role-name>Administrator</role-name>
       </auth-constraint>
       <user-data-constraint>
          <transport-guarantee>NONE</transport-guarantee>
       </user-data-constraint>
    </security-constraint>
   ...
</web-app>
Finally, before you can deploy your application, you will have to map the Web Application roles onto the J2EE RI users and groups.
Mapping Web Application Platform-Specific Roles
Mapping the Sun-specific user and group names to roles is done using deploytool. Select the webagency application in the left pane and the Security Role Mapping tab in the right pane. You will see the same page as shown in Figure 15.8. You need to add the mappings shown in Table 15.6
| Role | User | Group |
|---|---|---|
| Administrator | agency | |
| Client | applicant customer |
Figure 15.17 shows the configured Client role mapped onto the applicant and customer groups.

Mapping the roles onto J2EE RI users and groups shown in Table 15.6 adds the following entry to the Sun-specific Web deployment descriptor sun-web.xml:
<sun-web-app>
  <context-root>/webagency</context-root>
  <security-role-mapping>
    <role-name>Administrator</role-name>
    <principal-name>agency</principal-name>
  </security-role-mapping>
  <security-role-mapping>
    <role-name>Client</role-name>
    <group-name>customer</group-name>
    <group-name>applicant</group-name>
  </security-role-mapping>
...
</sun-web-app>
You can now deploy the secured Web Application using deploytool or the supplied asant build files.
Deploying and Testing the Secured Web Interface
You can deploy the Web application using either the Tools, Deploy menu option, or the asant build files. To deploy from the command line, save your deploytool changes and run the command
asant deploy-j2ee-ri
If you want to deploy the supplied example simply enter the command
asant build deploy
After deploying your application, you can access the main portal page at
http://localhost:8000/webagency
You will not need to authenticate yourself to this page as it isn't included in any of your resource collections. However, if you select a customer name such as winston from the list and access the advertise page, you will be prompted to enter a username and password. This is the basic HTTP security authentication mechanism.
TIP
Typically, once you have logged in to a Web site using your browser, that login will remain valid for that Web site until you close down all browser windows. When testing Web-based security you must make sure you close down all browser windows and not just the current one to reset your login credentials.
Different browser vendors do not share user credentials so you may prefer to use different browsers for different users when developing. You could, for the case study, log in as agency using Internet Explorer, log in as winston using Netscape, and log in as romeo using Mozilla, Opera, or any other browser of your choice.
If, as winston, you access the administration pages you will receive an HTTP 403 error (page access is denied or forbidden). You can always add an error page (as discussed on Day 13, “JavaServer Pages” that will map the 403 HTTP response onto a custom error page rather than rely on the browser's error message.
If, still logged in as winston, you attempt to access the customer details for a customer other than winston you will get the exception thrown by the Advertise EJB due to the programmed authorization that only allows customers to view their own details. You should now redesign the Web interface to take away the ability for a customer to access other customer details by using the remote user's principal name as the key for accessing the customer details. Adding this feature is discussed in the next section on “Applying Programmatic Web Security.” Before moving on to add this extra functionality, there is one last test to do.
Close down all browser windows, restart your browser, and browse to the Agency Web page and this time log in as romeo. If you now attempt to access the customer functionality you will see the exception thrown by the Advertise EJB because you are not in the customer EJB role. Unlike the Web Application the EJB model differentiated between applicants and customers. This example illustrates that it is a bad idea to use different security models for EJBs and client components. In a real application you would either make the Web Application differentiate between applicants and customers to match the EJB security model, or have the EJBs recognize clients rather than applicants and customers.
Applying Programmatic Web Security
The Agency case study does not need any programmatic security additions. The component Session beans (advertise and register) ensure that authenticated clients can only access their own details. However, the user interface can be improved by making use of the principal information from the client authentication.
The Agency case study main page (agency.jsp) presents the user with a list of customers and a small form for creating a new customer. There is no need for the user to be given a list of customers if an authentication mechanism is used. The user's login name can be used to obtain the appropriate customer data. Just the customer section of the form is shown in Listing 15.3.
Listing 15.3. Customer Options in agency.jsp
<H1>${agency.agencyName}</H1>
<H2>Customers</H2>
<H3>Existing Customer</H3>
<FORM action='<c:url value="/customer/advertise" />' >
  <P>Existing customer: <input type="submit" value="Login"></P>
</FORM>
<H3>Create Customer</H3>
<FORM action='<c:url value="/customer/createCustomer" />'>
  <TABLE>
    <TR>
      <TD>Login:</TD>
      <TD><INPUT type="text" name="login"></TD>
    </TR>
    <TR>
      <TD>Name:</TD>
      <TD><INPUT type="text" name="name"></TD>
    </TR>
    <TR>
      <TD>Email:</TD>
      <TD><INPUT type="text" name="email"></TD>
    </TR>
    <TR>
      <TD colspan="2"><INPUT type="submit" value="Create Customer"></TD>
    </TR>
  </TABLE>
</FORM>
|
An existing customer simply clicks the Login button and the Web authentication form is displayed for the user to log in. On successful login, the advertise.jsp page is displayed, and this should obtain the current customer from the remote client principal name. To allow an administrator to log in as any user, the webagency.UseCustomerTag class tests the caller's role and, if the authenticated user is an administrator, obtains the customer name from the page parameter. Listing 15.4 shows the new section of code that obtains the customer name.
Listing 15.4. Customer Name Selection in UseCustomerTag.java
The UseCustomerTag class implements the <useCustomer> custom tag used by the advertise.jsp web page as follows:
<agency:useCustomer login="${param.customer}"/>
The login attribute is saved in the custom tag using the setLogin() method and the doStartTag() method uses this value if the caller is in the admin role, otherwise the user principal name is used.
To support the use of the isUserInRole() method in the custom tag, an entry must be added to the deployment descriptor to map the role reference of admin onto the real role of Administrator. This is done on the Security page of the advertise Web component, as shown in Figure 15.18.
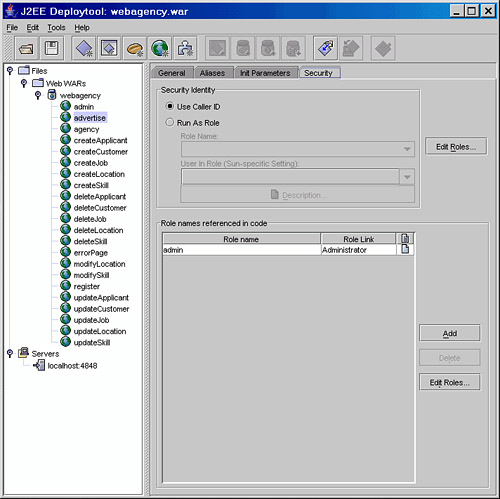
Role references are defined in the <servlet> entry in the web application deployment descriptor as follows:
<servlet>
  <servlet-name>advertise</servlet-name>
  <display-name>advertise</display-name>
  <jsp-file>/advertise.jsp</jsp-file>
  <security-role-ref>
    <role-name>admin</role-name>
    <role-link>Administrator</role-link>
  </security-role-ref>
</servlet>
To complete this example you will also need to define the admin role reference for every JSP that uses the <useCustomer> tag: createJob.jsp, deleteJob.jsp and updateCustomer.jsp.
You can now redeploy the Agency case study and test out the new Web interface.
Deploying and Testing Programmed Web Security
Deploy the revised Web Application and log in and click on the Login button in the customer section of the main agency page. You will now be prompted to log in. Log in as winston and you will automatically see the customer details for this user.
If, as winston, you access the administration pages you will receive an HTTP 403 error (page access is denied or forbidden) as before.
If, as winston, you click on the applicant login button you will see the same stack trace as in the last set of tests you ran. As before, the EJB security is taking precedence over the Web security. You really should rationalize your security models—but that is an exercise for another time.
One more test to do while you are logged on as winston is to enter new customer details; you will have to choose a different login name as duplicate logins are prohibited by the Agency application. When you click on the Create Customer you will once more see a stack trace resulting from the Advertise Session bean rejecting an attempt to access a customer with a login name different to the user principal. If this was a real application you would now refactor the Web interface to remove the ability to register new customers if the user principal has an entry in the Customer table.
At this point you might review the design so that any attempt to access the main agency.jsp page can prompt for the user to log in so that a customized main page is provided based on the user principal details.
A final test requires you to log in as agency (shutdown and restart your browser in order to log in as a different user). As the agency user enter values to create a new customer and click on the Create Customer button. As you are now in the admin role for the EJB you will be able to create and display the customer details without an exception being thrown. To allow an administrator to view any customer details, this functionality has been added to the admin.jsp Web component supplied with today's example on the Web site, but for brevity is not shown here in the book.
That completes the study of EJB and Web security features. Before you attempt today's exercise you will revisit JNDI and study the security implications of using a naming or directory service.