
Passing Parameter Data to a Servlet
Your first servlet, although it shows the principle of servlets, was not actually a very good servlet example. As you have probably realized, it could have been written as a static HTML page and you could have avoided all the complication of having to write and compile a servlet. The next example will show the power of servlets.
How to Access Parameters
Servlets are most useful when the data is dynamic. Dynamic data can come from many sources. It can be obtained from an external resource (such as a file, database, or another Web page) or it can be user input sent from an HTML form to the server in the form of parameters.
Parameters are name-value pairs specified in the GET or POST request. Parameters can be added to a request by using HTML fields defined in a form. For example
<INPUT TYPE="TEXT" NAME="applicant">
places an input text box on the HTML page and any data typed in the input box is associated with a parameter called applicant.
If the form uses a GET method, this parameter will be added to the URL as part of the query string, as in the following:
http://localhost:8000/examples/application?applicant=romeo
If a POST request is used, the value
applicant=romeo
is added to the body of the request.
In the servlet, you use the HttpServletRequest.getParameter() method to gain access to parameters regardless of the request type. For example, the following line will obtain the value stored in the applicant parameter:
String name = req.getParameter("applicant");
Servlet Example with Parameters
You will now code an application that takes information from a simple form and displays it back to the user. There are two parts to the application:
SimpleHTMLForm The static HTML form shown in Listing 12.4.
VerifyData A servlet that simply sends the entered data back to the client (shown in Listing 12.6). This is actually quite a common requirement, where the user is presented with the data just typed into a form, to visually verify it before the application continues processing it.
In the form in Listing 12.4 the ACTION for the target servlet is set to verifydata. The VerifyData servlet must be deployed with an alias of /verifydata for this example to work.
When you click the Submit Query button, the values of the input box and the select list are sent as a query string to the servlet. The query string is appended at the end of the URL that was specified as the ACTION attribute (shown in Listing 12.4) to the form. A sample URL with query string is shown here:
http://localhost:8000/examples/verifydata?name=martin&color=red
The VerifyData servlet (shown in full in Listing 12.6) uses the getParameter() method to access the form parameters.
Listing 12.6. VerifyData.java Servlet with Parameters
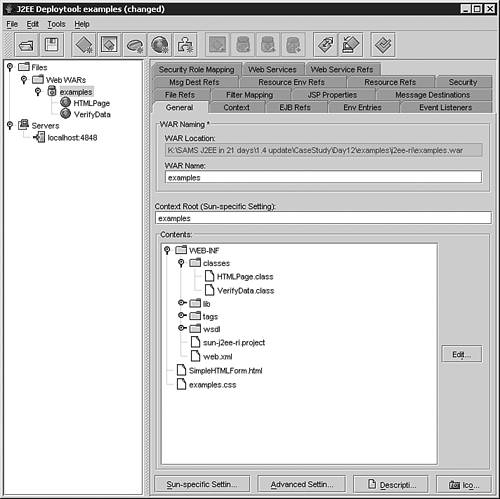
You can add this servlet to your Web Application using deploytool. This time don't create a new WAR file but add your servlet to the examples.war file you created earlier. Remember to give it the alias /verifydata. You will also need to add SimpleHTMLForm.html and examples.css (from the JSP/examples sub-directory) to the list of files in your Web component. Add these files when using the Web Component wizard to create the servlet, or simply add them using the General dialogue page for the Web Application, as shown in Figure 12.11. Simple HTML and CSS files are not Web Components.
Figure 12.11. Adding HTML and CSS files to a Web Application.
Type http://localhost:8000/examples/SimpleHTMLForm.html in your browser to access the HTML form. Figure 12.12 shows an example output from the VerifyData servlet.
Using a POST Request
As already discussed, both the HTTP methods POST and GET can be used to send data to a servlet. Generally, you need the functionality to be the same if either GET or POST is used.
The simplest way for a servlet to handle POST requests is to dispatch the request to the doGet() method. Add the following doPost() method to your servlet:
public void doPost(HttpServletRequest req, HttpServletResponse res)
         throws ServletException, IOException {
  doGet (req, res);
}
Now change your form to use POST instead of GET. To do this, change the <FORM> line of Listing 12.4 to the following:
<FORM METHOD="POST" ACTION="verifydata">
If you updated the class and HTML files in the example WAR file (using the menu option Tools, Update Module Files), then deploy the Web Application, and repeat the example. You will notice that the parameters are not included as part of the URL this time, but the output and the effect is exactly the same as when GET was used.
The Servlet Lifecycle
Figure 12.13 shows the lifecycle of a servlet. When a servlet is instantiated, the server calls the servlet's init() method. This is called once and once only, and should be used to set up servlet resources and initialize servlet instance variables. A servlet can access its context (described in the following section) in the init() method.
Figure 12.13. Lifecycle of a servlet.

The init() method must complete before the servlet can service any requests. The servlet will not be put into service if the init() method throws a ServletException.
The init() method is defined in the superclass. You only need to override this method if you need to do some initialization for the servlet.
The destroy() method is called by the server when the servlet is removed from service. Because a server can destroy a servlet at any time, it should be used not only to free resources but also to save any data or state information that may be required when the servlet is called again.
After a servlet has been initialized, request and response objects are passed as parameters to the appropriate doXXX() method of the servlet interface (as previously described).
The Servlet Context
The javax.servlet.ServletContext interface provides a set of methods that the servlet can use to communicate with the Web server. The ServletContext object is contained within the javax.servlet.ServletConfig object, which is provided to the servlet when it is initialized.
Using the ServletContext object, a servlet can perform the following functions:
Set and store attributes that other servlets in the context can access.
Log events.
Obtain URL references to resources.
Get values assigned to initialization parameters. These are parameters associated with a servlet, not an individual request.
Get the MIME type of files.
Obtain information about the servlet container, such as its name and version.
A servlet context is associated with a Web application and shared by all the servlets within that application.