
Deploying a CMP Entity EJB Using J2EE RI
You should be familiar with deployment by now. The sources for today's examples are in the Day07/examples directory on the accompanying Web site. You can follow the steps for building the EJB example and generate a new EAR file using deploytool, or you can simply build and deploy the completed examples from the command line using the command:
asant build deploy
If you want to follow today's example to learn how to deploy an EJB using deploytool, start deploytool and open the file Day07/examples/j2ee-ri/agency.ear.
Before you can build a CMP Entity bean with J2EE RI you must capture the database schema as discussed in the next section.
NOTE
The J2EE RI is a reduced functionality version of the Sun Java System Application Server (http://wwws.sun.com/software/products/appsrvr/home_appsrvr.html). The deployment process described here is the same as that for the Sun Java System Application Server.
J2EE servers from other vendors will adopt different strategies for defining and deploying CMP Entity beans.
Capturing the Database Schema
In order to map the Entity beans in your application onto a database, the J2EE RI provides a capture-schema utility that will generate an XML file that is used by deploytool for mapping Entity beans onto database tables.
For the Agency case study, you can capture the database schema using the command
asant capture-schema
This runs the following J2EE RI command:
> capture-schema -driver com.pointbase.jdbc.jdbcUniversalDriver -dburl jdbc:pointbase:server://localhost/sun-appserv-samples -username pbPublic -password pbpublic -table
All the capture schema command needs is a database URL, a driver name, and the username and password for accessing the database. You must also supply a list of tables to examine and a file to store the resultant XML schema document. In this example the XML document is saved in the build/agency.dbschema file.
You do not need to be familiar with the details of the schema document; simply treat it as a piece of black box data needed by deploytool to map Entity beans onto tables.
You are now ready to define your CMP Entity beans.
Adding a CMP Entity Bean Using deploytool
With the Day07/examples/j2ee-ri/agency.ear file open in deploytool select the Entity JAR file in the left pane. The EAR file you have opened already contains all the Entity beans for the case study except the Job Entity bean. Figure 7.3 shows the JAR file contents for the Entity beans.

NOTE
This version of the Agency case study includes CMP Entity beans for Skill, Location and Customer but has retained the BMP Entity bean for Applicant. The exercise at the end of today's example is to convert the Applicant bean from BMP to CMP.
In Figure 7.3 it is important to note that the EJB JAR file contents include the agency.dbschema file you generated in the previous section. Without this file you will not be able to map the Entity beans onto the database schema.
You can now add the Job bean using the File, New, Enterprise Bean… menu option. The Job bean class files are included in the Entity JAR file so you can click Next to step through the Wizard screens until you reach the general page where you define the bean classes. Select the following values:
You do not need to set Bean Type to Entity as deploytool will detect that your Enterprise Bean class is an Entity bean.
You must explicitly set the bean name to JobEJB—it is important that you do not simply accept the default name of JobBean, otherwise the table mapping features of deploytool will not work correctly. This is shown in Figure 7.4.

CAUTION
Using the J2EE RI, you must define your CMP Entity bean name with the name of the underlying database table and the suffix EJB. Failure to do this will stop deploytool from correctly mapping your bean onto its underlying table. In this example the database table name is Job, so the bean name must be JobEJB.
Click Next to step forward to the Web Service Endpoint screen, accept the default No option to endpoints and click Next once more.
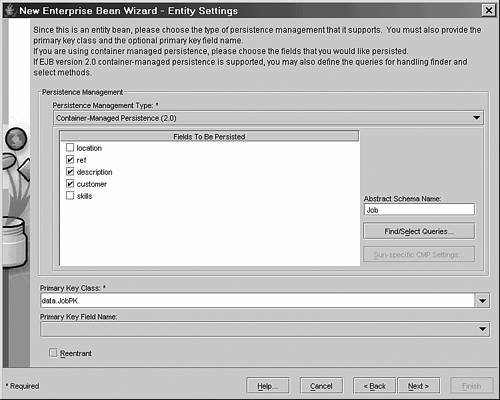
On the subsequent Entity Settings page you should select Container Managed Persistence (2.0) as the Persistence Management type. You will now see a list of managed fields for the bean; deploytool has generated the managed field names from the setter and getter method names in your bean class. Check the ref, description and customer fields, but leave the CMR fields location and skills unchecked.
In the Abstract Schema Name field (on the right of the window) enter the value Job (don't use the supplied JobEJB schema name).
At the bottom of the screen enter data.JobPK for the primary key class and leave the primary key field name blank. You should now have a screen that looks like Figure 7.5.
NOTE
The JobEJB Entity bean uses a custom primary key class and does not have a corresponding bean property as the primary key as is derived from the ref and customer CMR fields. If your Entity bean has a CMR field corresponding to the primary key, this field name should be selected from the list supplied in the deploytool Entity dialog page. When you have completed the wizard for adding the JobEJB bean you can look at the other Entity beans in the EAR file, all of which have a named primary key field.
Click Next and then Finish to complete the bean definition.
Your CMP bean will not need a Resource Reference to the jdbc/Agency database as the container manages database access. Nor does the bean require any EJB References.
However, you need to specify the bean's transaction requirements (discussed in detail tomorrow). Select the JobEJB bean and the Transactions dialog and verify that all the local, local-home and bean methods have Required transaction attributes.
You have just added the following entry to the ejb-jar.xml deployment descriptor:
<ejb-jar>
  <display-name>Entity</display-name>
  <enterprise-beans>
...
    <entity>
      <ejb-name>JobEJB</ejb-name>
      <local-home>data.JobLocalHome</local-home>
      <local>data.JobLocal</local>
      <ejb-class>data.JobBean</ejb-class>
      <persistence-type>Container</persistence-type>
      <prim-key-class>data.JobPK</prim-key-class>
      <reentrant>false</reentrant>
      <cmp-version>2.x</cmp-version>
      <abstract-schema-name>Job</abstract-schema-name>
      <cmp-field>
        <description>no description</description>
        <field-name>ref</field-name>
      </cmp-field>
      <cmp-field>
        <description>no description</description>
        <field-name>description</field-name>
      </cmp-field>
      <cmp-field>
        <description>no description</description>
        <field-name>customer</field-name>
      </cmp-field>
...
    </entity>
...
  </enterprise-beans>
  <assembly-descriptor>
    <container-transaction>
      <method>
        <ejb-name>JobEJB</ejb-name>
        <method-name>*</method-name>
      </method>
      <trans-attribute>Required</trans-attribute>
    </container-transaction>
...
  </assembly-descriptor>
</ejb-jar>
You need also to define the Entity bean JNDI name by selecting the Job Entity bean in the deploytool left pane and the General dialog tab in the right pane. Click on the Sun-specific Settings button and enter ejb/JobLocal in the JNDI Name field in the popup window and click Close to return to the main deploytool window. This is the same process as for BMP Entity beans and has added the following entry to the sun-ejb-jar.xml file:
<sun-ejb-jar>
  <enterprise-beans>
    <name>Entity</name>
    <ejb>
      <ejb-name>JobEJB</ejb-name>
      <jndi-name>ejb/JobLocal</jndi-name>
    </ejb>
...
  </enterprise-beans>
</sun-ejb-jar>
You are now in a position to define the Entity bean finder methods.
Defining Entity Bean Finder Methods
You must provide EJB QL statements for every finder method in your CMP Entity bean. In deploytool select the JobEJB bean and the Entity dialog page and click on the Find/Select Queries button. You will be presented with a popup window listing your finder methods; you will need to select the Finder methods radio button if it is not automatically selected by deploytool. deploytool has generated the list of finder methods from the information in the JobEJB Entity bean's home interface.
You can see that the findByPrimaryKey() method is not included in the deploytool list. The J2EE RI already has sufficient information from the CMP dialog page to be able to generate the EJB QL for this method automatically. However, you will need to supply the EJB QL for the other finder methods.
The findByCustomer() method has the following signature in the home interface:
Collection findByCustomer(String customer) throws FinderException;
The EJB QL query for this is
SELECT OBJECT(j)
FROM Job AS j
WHERE j.customer = ?1
In this query the customer name is passed as a parameter to the finder method and is identified by the ?1 parameter in the WHERE clause. Using deploytool, select findByCustomer() from the list of methods and enter the previous EJB QL statement. This is shown in Figure 7.6.

The other finder method is findByLocation():
Collection findByLocation(LocationLocal location) throws FinderException;
The EJB QL query for this is as follows:
SELECT OBJECT(j)
FROM Job AS j
WHERE j.location.name = ?1
Add the EJB QL for this query to the deploytool settings and click OK.
You have added the following information to the ejb-jar.xml deployment descriptor:
<ejb-jar>
  <display-name>Entity</display-name>
  <enterprise-beans>
...
    <entity>
      <ejb-name>JobEJB</ejb-name>
...
      <query>
        <query-method>
          <method-name>findByCustomer</method-name>
          <method-params>
            <method-param>java.lang.String</method-param>
          </method-params>
        </query-method>
        <ejb-ql>select object(j) from Job j
                where j.customer = ?1</ejb-ql>
      </query>
      <query>
        <query-method>
          <method-name>findByLocation</method-name>
          <method-params>
            <method-param>data.LocationLocal</method-param>
          </method-params>
        </query-method>
        <ejb-ql>select object(j) from Job j
                where j.location = ?1</ejb-ql>
      </query>
    </entity>
...
  </enterprise-beans>
...
</ejb-jar>
Note that there are no J2EE RI platform-specific deployment descriptor entries for finder methods.
You are now in a position to define the Container-Managed Relationships between the JobEJB Entity bean and other Entity beans in the application.
Defining Entity Bean CMR Fields
As previously discussed relationships can only be defined between beans in the same EJB JAR file. To add your Agency case study relationships you must select the Entity JAR in the left pane and the Relationships dialog in the right pane. Currently, there are no relationships defined in the application because you are still adding the Job bean and the Applicant bean is the old BMP version.
In the relationships dialog, click Add and in the popup window enter the following information to define the relationship between the Job bean and the Location bean; this is a many to one relationship (many jobs per single location):
The dialog should look like Figure 7.7.

Click OK. You have now defined the relationship mapping many Job.location fields onto the Location bean. The Location bean does not maintain a list of jobs at that location so this is a uni-directional relationship from Job to Location (hence no job field in the Location bean).
A common mistake made at this point is to confuse the database table and column schema with the EJB object relationships. You are currently defining a relationship so do not be tempted to select the Location.name field for the Bean B values in the deploytool dialog. This would imply that the name field of the Location bean is a list of jobs at that location, which is not the case. Later, in the section “Mapping Entity Beans to a Database Schema,” you will map the underlying database table and columns that represent this relationship.
In deploytool, click OK to save this relationship. You have added the following information to the ejb-jar.xml deployment descriptor:
<ejb-jar>
  <display-name>Entity</display-name>
  <enterprise-beans>
...
  </enterprise-beans>
  </relationships>
    <ejb-relation>
      <ejb-relationship-role>
        <ejb-relationship-role-name>JobEJB</ejb-relationship-role-name>
        <multiplicity>Many</multiplicity>
        <relationship-role-source>
          <ejb-name>JobEJB</ejb-name>
        </relationship-role-source>
        <cmr-field>
          <cmr-field-name>location</cmr-field-name>
        </cmr-field>
      </ejb-relationship-role>
      <ejb-relationship-role>
        <ejb-relationship-role-name>LocationEJB</ejb-relationship-role-name>
        <multiplicity>One</multiplicity>
        <relationship-role-source>
          <ejb-name>LocationEJB</ejb-name>
        </relationship-role-source>
      </ejb-relationship-role>
    </ejb-relation>
  </relationships>
  <assembly-descriptor>
...
  </assembly-descriptor>
</ejb-jar>
In deploytool, click Add to define the many-to-many Job to Skills relationship, as shown in Figure 7.8, using the following information:

This time the Job bean has a field for the many sides of the relationship, and so you must specify whether the relationship is represented by a Java Set or a Collection object. As the JobLocal.getSkills() method returns a Collection object you must select java.util.Collection for the field type.
Like the Job and Location relationship this is a uni-directional relationship and so there is no field in the Skill bean representing the jobs with that skill.
Click OK and you have defined this relationship in the ejb-jar.xml deployment descriptor as follows:
<ejb-jar>
  <display-name>Entity</display-name>
  <enterprise-beans>
...
  </enterprise-beans>
  </relationships>
    <ejb-relation>
      <ejb-relationship-role>
        <ejb-relationship-role-name>JobEJB</ejb-relationship-role-name>
        <multiplicity>One</multiplicity>
        <relationship-role-source>
          <ejb-name>JobEJB</ejb-name>
        </relationship-role-source>
        <cmr-field>
          <cmr-field-name>skills</cmr-field-name>
          <cmr-field-type>java.util.Collection</cmr-field-type>
        </cmr-field>
      </ejb-relationship-role>
      <ejb-relationship-role>
        <ejb-relationship-role-name>SkillEJB</ejb-relationship-role-name>
        <multiplicity>Many</multiplicity>
        <relationship-role-source>
          <ejb-name>SkillEJB</ejb-name>
        </relationship-role-source>
      </ejb-relationship-role>
    </ejb-relation>
...
  </relationships>
  <assembly-descriptor>
...
  </assembly-descriptor>
</ejb-jar>
You have now defined the portable aspects of your Entity bean, so this is a good time to save your changes.
At this point you should verify your application using the deploytool Tools, Verify J2EE Compliance menu option or, after saving your deploytool changes, run the command:
asant verify-j2ee-ri
If you have any verification failures you should fix them now. Common mistakes are to fail to define Transaction Attributes or to select the wrong CMP field settings on the Entity dialog page.
NOTE
The authors found the running the Verifier from within deploytool generated spurious errors about blank JNDI names for the Entity beans. As long as you defined the JobEJB JNDI name as described in the main text you can ignore any errors for blank JNDI names (all of the supplied Entity beans have valid JNDI name settings). This error is not reported by the command-line verifier, which can be run with the command:
asant verify j2ee-ri
When running the verifier you may get the following warning:
INFO: JDO7002: Found unrecognized database generation user policy...
You can safely ignore this warning.
When you have an application that verifies correctly you can proceed to the next stage to map the Entity bean CMP and CMR fields onto the underlying database schema.
Mapping Entity Beans CMP Fields Using J2EE RI
The J2EE RI platform uses the information in the database schema XML document to map the Entity beans to database tables and columns. You will now generate the platform specific mappings for your Entity beans.
NOTE
The mapping of Entity beans to the database schema is very platform specific. The process described here applies to the J2EE RI 1.4 and Sun Java System Application Server. Other platforms will use different techniques.
The J2EE RI capture-schema utility is used to generate a dbschema XML document for the database. Information in this XML document is used to map the Entity bean CMP and CMR fields. In particular, the PRIMARY KEY and FOREIGN KEY constraints for all the tables used by CMP entity beans must be defined, otherwise the automatic field mapping will not work. There are also restrictions on table and column names as described in the text.
Before you generate the Entity bean field mapping information, you must have the J2EE RI and PointBase database servers running. If this is not the case, start them as described on Day 2, “The J2EE Platform and Roles,” before completing this example.
Furthermore, you must be working with a verified application otherwise the next process will fail. Check that you application verifies correctly before proceeding with this example.
CAUTION
The authors found that the J2EE RI 1.4 Nov 2003 version of deploytool consistently locked up and stopped responding to key clicks if the Sun-specific CMP dialog view was shown and the Entity beans had failed to verify correctly. It is imperative that you save your changes to the Agency Application, verify and resolve any errors, before you display the Sun-specific CMP dialog.
In deploytool, select the Entity JAR in the left pane and the General tab in the right pane and click on the Sun-specific Settings… button. You will be presented with a dialog window for generating the Entity bean to database schema settings.
In the Sun-specific settings dialog window, select CMP from the View list in the top left of the dialog and enter the jdbc/Agency CMP Resource JNDI name, as shown in Figure 7.9.

Next, click on the Create Field Mappings… button. If you have followed the previous steps correctly, and verified your application, you will see the dialog screen in Figure 7.10.
Figure 7.10. Mapping the J2EE RI CMP fields using the agency.dbschema XML document.

Select the option to Map Tables in Database schema file and select the agency.dbschema file from the list (as shown in Figure 7.10). There are other options for CMP and CMR mappings but today's example will only use the mapping based on the database schema XML document.
Click OK to generate the mappings and when the warning screen advising you that all current CMP mappings will be lost, click OK once more. The mapping will take a few seconds, but when the main Sun-specific CMP dialog screen is displayed select JobEJB in the Enterprise Bean field and you will see the dialog shown in Figure 7.11.

You can see from Figure 7.11 that deploytool has correctly mapped the Job CMP fields to the database schema as shown in Table 7.2.
| CMP Field | Table and Column |
|---|---|
| customer | JOB.CUSTOMER |
| description | JOB.DESCRIPTION |
| ref | JOB.REF |
deploytool generated these mappings by matching the Entity bean name (JobEJB) to the correct table (JOB) in the database schema file (note the naming convention discussed earlier). Each Entity bean CMP field was matched to a table column with an identical name. You can override the generated mappings for each field by clicking on the ellipsis button (…) between the field name and the column name.
Furthermore, the mapping has identified the Job location and skills fields as CMR fields and tagged them as unmapped relationships (see note).
NOTE
Using the J2EE RI Nov 2003 version of deploytool the authors found that the generated mappings incorrectly identified the location and skills fields as CMP fields rather than CMR fields. This problem is easily resolved.
Close the Sun-specific CMP dialog and select the JobEJB and the Entity page. Check and then uncheck the CMP setting for the location and then the skills fields. Return to the Entity JAR dialog page, click on Sun-specific settings and on the CMP dialog screen select the JobEJB Enterprise bean. Now the mappings will correctly identify location and skills as unmapped CMR fields as shown in Figure 7.11.
The Sun J2EE RI uses a separate deployment descriptor called sun-cmp-mappings.xml to store the Entity bean CMP and CMR mappings. The CMP mappings for the Job bean are represented as
<sun-cmp-mappings>
  <sun-cmp-mapping>
    <schema>agency</schema>
    <entity-mapping>
      <ejb-name>JobEJB</ejb-name>
      <table-name>JOB</table-name>
      <cmp-field-mapping>
        <field-name>customer</field-name>
        <column-name>JOB.CUSTOMER</column-name>
      </cmp-field-mapping>
      <cmp-field-mapping>
        <field-name>description</field-name>
        <column-name>JOB.DESCRIPTION</column-name>
      </cmp-field-mapping>
      <cmp-field-mapping>
        <field-name>ref</field-name>
        <column-name>JOB.REF</column-name>
      </cmp-field-mapping>
    </entity-mapping>
...
  </sun-cmp-mapping>
</sun-cmp-mappings>
You can now finish the Entity bean mappings by defining the two CMR fields in the Job bean as described in the next section.
Mapping Entity Beans CMR Fields Using J2EE RI
If you are not already doing so, view the Sun-specific dialog window in deploytool by selecting the General dialog tab for the Entity JAR of the agency application, and clicking on the Sun-specific settings button.
Select the CMP view and the JobEJB Enterprise bean in the Sun-specific dialog window and you should see the view previously shown in Figure 7.11.
Click on the ellipsis button (…) for the <unmapped relationship> of the location CMR field and you will see the dialog screen in Figure 7.12.

Accept the default Link Mapped Tables option and click Next to get the screen in Figure 7.13.
Figure 7.13. Mapping the J2EE RI Job.location CMR field to the JOB. LOCATION and LOCATION.NAME database columns.

deploytool uses the foreign and primary key information in the database schema XML file to map the CMR columns. The values in Figure 7.13 (JOB.LOCATION and LOCATION.NAME) are correct so click Finish to add the following CMR mapping to the sun-cmp-settings.xml deployment descriptor:
<sun-cmp-mappings>
  <sun-cmp-mapping>
    <schema>agency</schema>
    <entity-mapping>
      <ejb-name>JobEJB</ejb-name>
...
      <cmr-field-mapping>
        <cmr-field-name>location</cmr-field-name>
        <column-pair>
          <column-name>JOB.LOCATION</column-name>
          <column-name>LOCATION.NAME</column-name>
        </column-pair>
        <fetched-with>
          <none/>
        </fetched-with>
      </cmr-field-mapping>
    </entity-mapping>
...
  </sun-cmp-mapping>
</sun-cmp-mappings>
Define the second CMR relationship between Job and Skill by clicking on the ellipsis (…) button for the skills field. In the popup dialog window, select the Linked Map Mapped Tables using a Join Table, as shown in Figure 7.14.

Click Next to map the Job.skills field to the JOBSKILL table, as shown in Figure 7.15.
Figure 7.15. Mapping the J2EE RI Job.skills CMR field to the JOBSKILL.REF and JOBSKILL.CUSTOMER database columns.

Once more, deploytool has used the database schema to generate the correct mapping. The consistent bean and table names, and CMR field and column names together with the primary and foreign key constraints in the database have simplified the process.
Click Next to map the JOBSKILL to SKILL table columns, as shown in Figure 7.16.
Figure 7.16. Mapping the J2EE RI Job.skills CMR field to the SKILL.NAME database columns.

Finally, click Finish to complete the mapping process by adding the following entry to the sun-cmp-settings.xml deployment descriptor:
<sun-cmp-mappings>
  <sun-cmp-mapping>
    <schema>agency</schema>
    <entity-mapping>
      <ejb-name>JobEJB</ejb-name>
...
      <cmr-field-mapping>
        <cmr-field-name>skills</cmr-field-name>
        <column-pair>
          <column-name>JOB.REF</column-name>
          <column-name>JOBSKILL.JOB</column-name>
        </column-pair>
        <column-pair>
          <column-name>JOB.CUSTOMER</column-name>
          <column-name>JOBSKILL.CUSTOMER</column-name>
        </column-pair>
        <column-pair>
          <column-name>JOBSKILL.SKILL</column-name>
          <column-name>SKILL.NAME</column-name>
        </column-pair>
        <fetched-with>
          <none/>
        </fetched-with>
      </cmr-field-mapping>
    </entity-mapping>
...
  </sun-cmp-mapping>
</sun-cmp-mappings>
You will now see the view in Figure 7.17 with all the CMP and CMR fields mapped correctly.

Click Close and save your changes to the agency application. Run the verifier once more to make sure there are no problems (see note).
NOTE
Once more the authors found that the J2EE RI 1.4 Nov 2003 version of the deploytool verifier identifies spurious problems. Apart from incorrectly reporting blank JNDI names, the verifier reported spurious errors about undefined CMP-resource entries for all of the Entity beans. You are advised to save the application and run the command line verifier using
asant verify-j2ee-ri
The command line verifier does not exhibit the problems shown by the deploytool verifier. If you have followed the steps in this example carefully, the command line verifier should report there are no failed tests.
You are now in a position to deploy and test your updated application.
Deploying the Entity Bean Case Study Using J2EE RI
You can deploy from within deploytool by using the Tools, Deploy menu or you can save your changes and use the asant build files and enter the command
asant deploy-j2ee-ri
If you want to build and deploy the supplied agency.ear example instead of the file maintained in deploytool, use the command
asant build deploy
However you deploy the application, you can run the GUI client to test the new version using
asant run
NOTE
A recommended approach to working with CMP Entity beans is to use deploytool to generate the initial ejb-jar.xml, sun-cmp-mappings.xml and sun-j2ee-ri.xml deployment descriptor files and save these descriptors to files for subsequent use with an automated build process using asant build files. This is significantly faster than continually using deploytool for the deployment. The authors used this approach for generating the examples, exercises, and solutions for this chapter, and most of the other chapters, in this book.
You should see no change of functionality as far as the client is concerned. The move from BMP to CMP Entity beans is transparent both to the client and to the Session beans using the Entity beans.
Just before you finish your study of Entity beans, you should be aware of the design implications of using CMP Entity beans.