HOUR 10. Working with SQL Server Views
A view is a saved select statement. A view can retrieve data from one or more tables. After it is created, you can select data from a view just as you can select it from a table. In this hour you’ll learn:
• What views are and why you would want to use them
• How to use the SQL Server Management Studio Query Builder to create a view
• How to use T-SQL to create or modify a view
An Introduction to Views
Views can only select data. They cannot update it (although you can update the data in the result of a view). For example, a T-SQL UPDATE statement in a stored procedure updates data. Although you cannot use a T-SQL UPDATE statement in a view, you can update the results returned from a SELECT statement.
Views have several advantages. They enable you to
• Join data so that users can work with it easily
• Aggregate data so that users can work with it easily
• Customize data to users’ needs
• Hide underlying column names from users
• Limit the columns and rows with which a user works
• Easily secure data
Although a normalized database is easy to work with and maintain from a programmer’s viewpoint, it is not always easy for the user to work with. For example, if users look at the Sales.SalesOrderHeader table, they see only the CustomerID associated with the order. If they wish to see the customer’s name, they must join the Sales.SalesOrderHeaderTable with the Sales.Customer table. This is not a particularly easy task for users to accomplish. Using a view, you can join the Sales.CustomerTable and Sales.SalesOrderHeaderTable and table. You provide the view to the user. The user can build forms, queries, and reports that are based on the view without having to understand how to join the underlying tables.
Just as a view can join data, it can also aggregate data. You can very easily create a view that contains the total order amounts for each customer. The user can use the view as the foundation for forms, queries, and reports that they build. Once again, it is not necessary for the user to understand the syntax required to aggregate the data.
Another advantage of views is their capability to customize data to the users’ needs. For example, a column in a view can combine the first name and last name of a customer, or it can combine the customer’s city, state, and zip code. Users do not need to understand how to combine this information. Instead, they use the view as the foundation for the forms, queries, and reports that they need.
Developers often use column names that are not particularly intuitive for users. This is another situation where views come to the rescue. You can easily build a view that aliases column names. Users will never see the underlying column names. You simply provide them with access to the view and they can easily build the forms, queries, and reports that they need.
The number of fields in a table can be overwhelming to users. Most of the time there are certain fields that users need for the majority of the work that they do. You can create views containing only the critical fields. This simplifies the process when users build forms, queries, and reports based on the table data.
A major advantage of views is the security that they provide. You can grant logins and roles the rights to views without granting them rights to the underlying tables. An example is an employee table. You can create a view that includes the EmployeeID, FirstName, LastName, Extension, and other non-sensitive fields. You can then grant rights to the view. Although the users have no rights to the Employee table, and therefore have no access to fields such as the employee salary, they gain rights to the rows and columns included in the view.
SQL Server Express views are very powerful. Using user-defined functions, you can parameterize views. Using the TOP syntax you can order view results. SQL Server 2005 Express enables you to create INSTEAD OF triggers. Finally, SQL Server 2000 introduced indexed views, also available in SQL Server 2005 Express. All these features make SQL Server 2005 Express views extremely powerful!
Creating a Simple View
A view is actually a SELECT statement with a CREATE VIEW statement that causes SQL Server to save it as a view. You can use a few different methods to create a SQL Server view. The following methods are discussed:
• You can use the Microsoft SQL Server Management Studio Express Query Builder to create a view.
• You can use T-SQL to create a view.
The sections that follow cover each of these options.
Using the Microsoft SQL Server Management Studio Query Builder to Create a View
The Management Studio Query Builder facilitates the process of creating a view. To create a view, follow these steps:
1. Right-click the Views node of the database in which you want the view to appear and select New View. The Add Table dialog appears (see Figure 10.1).
Figure 10.1. The Add Table dialog enables you to add tables, views, functions, and synonyms to your view.

2. Click each table, view, function, and synonym you want to add to the view and click Add. In the example shown in Figure 10.2, the Sales.Customer and Sales.SalesOrderHeader tables are included in the view.
Figure 10.2. The Sales.Customers and Sales.SalesOrderHeader tables appear joined in the view.

3. Click Close when you have finished adding objects to the view. Your screen should appear as in Figure 10.3.
Figure 10.3. A new view that includes the Sales.Customers and Sales.SalesOrderHeader tables.

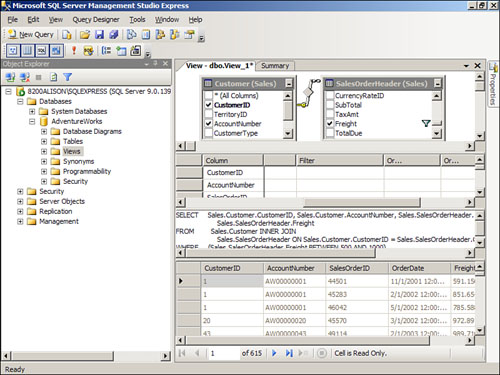
4. Click the check boxes to the left of the field names to select the fields that you want to add to the view. If you prefer, you can drag and drop fields to the column list on the query grid. Figure 10.4 shows a view with the CustomerID, AccountNumber, SalesOrderID, OrderDate, and Freight fields included.
Figure 10.4. A view with selected fields.
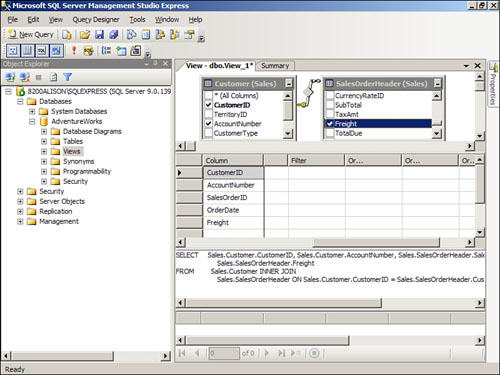
5. Specify any criteria that you want to apply to the view. To add criteria, enter the desired criteria in the Criteria column of the appropriate field on the query grid. Adding criteria limits the records returned when you execute the view. Figure 10.5 shows criteria limiting the selected records to those with freight between 500 and 1000.
Figure 10.5. A view that limits the output to orders with freight between 500 and 1000.
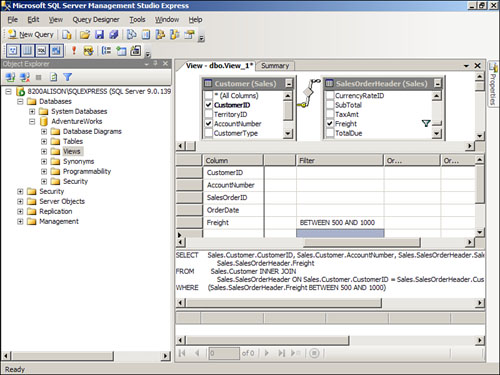
7. Test the view using the Run button. The output should appear as in Figure 10.6.
Figure 10.6. The results of the view appear in the Output pane.
8. Attempt to close the view. SQL Server prompts you to save changes to the view.
9. The view appears in the list of views under the View node. You can treat it much like a table.
By the Way
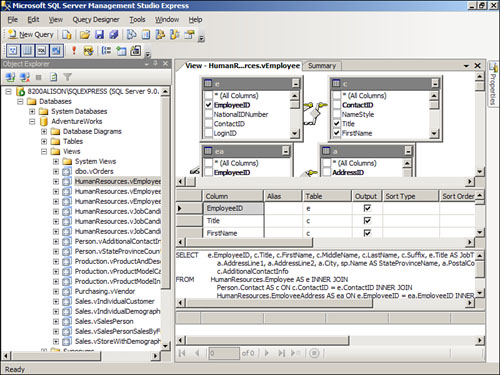
The view builder offers fours panes. These are the diagram pane, the grid pane, the SQL pane, and the results pane. The diagram pane shows you the tables included in the view. The grid pane graphically presents you with the columns, aliases, tables, groupings, and criteria for the data in the view. The SQL pane shows you the actual SQL statement that underlies the view. The results pane provides you with the results of executing the view. You can easily hide and show each of these panes with the Show/Hide Diagram Pane tool, Show/Hide Grid Pane tool, Show/Hide SQL Pane tool, and Show/Hide Results Pane tool, respectively.
To use SQL Server Management Studio to modify a view:
1. Expand the Views node for the database until you can see the view you wish to modify.
2. Right-click the view you want to modify and select modify. The view appears as in Figure 10.7.
Figure 10.7. Modifying a view is very similar to building a new view.
3. Make the desired changes and then close and save the view.
Did you Know?
You can easily drag and drop tables to the diagram pane of the view. Simply resize the View and Console windows so that you can see both windows simultaneously and then drag and drop the tables from the Tables node of the appropriate database to the diagram pane of the view.
Using T-SQL to Create or Modify a View
In addition to using the Management Studio View Builder to build a view, you can use T-SQL to create a view. Rather than building the view graphically, as outlined in the preceding section, you type the entire CREATE VIEW statement from scratch. The syntax for a CREATE VIEW statement is as follows:
CREATE VIEW [DatabaseName] [<owner>] ViewName
[(column [,...n])]
[WITH <ViewAttribute> [,...n]]
AS
SelectStatement
[WITH CHECK OPTION]
<ViewAttribute> :: = [ENTCRYPTION|SCHEMASBINDING|VIEW_METADATA]
An example of a CREATE VIEW statement is the following:
CREATE VIEW vwUSACustomers
AS
SELECT CustomerID, FirstName, City
FROM Sales.vIndividualCustomer
WHERE CountryRegionName = 'USA'
The statement creates a view named vwUSACustomers, which selects the contents of the CustomerID, FirstName, and City fields from the Sales.vIndividualCustomer view for all customers in the USA.
To type and execute the CREATE VIEW statement, follow these steps:
1. Click the New Query button on the toolbar. Your screen appears as in Figure 10.8.
Figure 10.8. The screen after clicking the New Query button on the toolbar.

2. Type the SQL statement into the available pane.
3. Click the Execute button on the toolbar. The results should appear as in Figure 10.9.
Figure 10.9. The results of using the Execute button to create a new view.

If you wish use T-SQL to modify a view, you must use an ALTER VIEW statement rather than a CREATE VIEW statement. An example of an ALTER VIEW statement is
ALTER VIEW vwUSACustomers
AS
SELECT CustomerID, FirstName, LastName, City
FROM Sales.vIndividualCustomer
WHERE CountryRegionName = 'USA'
This example modifies the vwUSACustomers view, adding the LastName field to the view.
Summary
Views are a critical part of any application that you build. It is therefore important that you understand how to create and work with views. In this hour you learned how to create and modify simple views, using both the SQL Server Management Studio and T-SQL.
Q&A
Q. Name some advantages of views.
A. Views enable you to join data, aggregate data, customize data to the user’s needs, hide underlying column names from users, limit the columns and rows that a user works with, and easily secure data.
Q. Explain why you would want to join data so that users can easily work with it.
A. A normalized database is not always easy for the user to work with. For example, only the CustomerID is stored in the Orders table. The Company Name is stored in the Customers table. To see both the Customer and Order information, the user must join the tables. Using a view, you can join the tables for the user, so that the user can work with the view as if it were a single table.
Q. Explain what it means to customize data to a user’s needs.
A. Using a view, you can create a column that combines first, middle, and last name of an employee, or the city, state, and zip code from an address. This makes it much easier for the user to work with this data.
Q. How do views help you to secure data?
A. You can grant rights to logins and roles to the views that you create. It is not necessary to grant rights to the underlying tables. In this way you can give users access to just desired columns and rows. For example, you can give users rights to name and address data for the sales department in the employee table.
Workshop
Quiz
1. Name two ways that you can create a view.
2. What statement do you use to create a view?
3. The result of a view is updatable (true/false).
4. Name the four panes of the view builder.
5. You cannot drag and drop tables onto the diagram pane of the view (true/false).
Quiz Answers
1. Using SQL Server Management Studio, and using T-SQL.
4. Diagram, grid, SQL, and results.
5. False. You can drag and drop from the Tables node of the appropriate databases to the diagram pane of the view.
Activities
Create a view by using the Microsoft SQL Server Management Studio Query Builder. Include the EmployeeID, Title, BirthDate, Gender, HireDate, VacationHours, and SickLeaveHours from the HumanResources.Employee table. Sort the result in Ascending order, and return just the rows where the HireDate is between 1/1/1998 and 12/31/1998. Close and save the view as vw1998Hires. Modify the view and add the LoginID to the view. Create another view by using T-SQL. Include the SalesPersonID, SalesQuota, Bonus, SalesYTD, and SalesLastYear from the Sales.SalesPerson table. Sort in descending order by SalesYTD, and return just the rows where the SalesYTD is greater than 800,000. Close and save the view as vwBigHitters. Modify the view (using T-SQL), and add the CommissionPct field to the view. Change the criteria for the SalesYTD to 1,000,000.