HOUR 11. Creating Complex Views
Now that you’ve learned the basics of creating and working with views, you’re ready to move on to more advanced techniques. These techniques enable you to fully harness the power of views and what they have to offer. In this hour you’ll learn:
• How to create views based on data in multiple tables
• How to work with views and subqueries
• How to add outer joins to a view
• How to utilize functions in the views that you create
• How to use views to secure data
• How to modify data in a view
• How to modify, rename, and delete views
• How to work with indexed views
• How to optimize the views that you build
Creating Views Based on Data in Multiple Tables
Creating a view based on data from multiple tables is quite simple. While in the View Builder you use the Add Table tool on the toolbar to add tables to the view. SQL Server automatically joins the tables based on relationships established in the database. To create a new view, follow these steps:
1. Right-click the Views node within SQL Server Management Studio and select New View. The Add Table dialog appears (see Figure 11.1).
Figure 11.1. The Add Table dialog enables you to add tables to a view.

2. Select all the tables, views, functions, and synonyms that you want to include in the view and click Add.
3. Click Close to close the Add Table dialog. Your view should appear as in Figure 11.2.
Figure 11.2. After you close the Add Table dialog, you are ready to begin the process of building the view.

4. Add the desired fields to the output of the view. Your view should appear as in Figure 11.3.
Figure 11.3. After you add the desired fields to the view, they appear on the query grid.

Views and Subqueries
Just as a T-SQL statement can contain a subquery (see Hour 7, “Building SQL Statements Based on Multiple Tables”), so can a view. The syntax looks like this:
CREATE VIEW vwCustomersWithoutOrders
AS
SELECT CustomerID, AccountNumber
FROM Sales.Customer
WHERE NOT EXISTS
(SELECT CustomerID FROM Sales.SalesOrderHeader WHERE
Sales.Customer.CustomerID = Sales.SalesOrderHeader.CustomerID)
This example selects all customers who do not have orders. You call the view like this:
SELECT * FROM vwCustomersWithoutOrders
An alternative to the subquery would be a LEFT JOIN, which is type of outer join. A LEFT JOIN is almost always more efficient than a subquery. The section that follows covers views and outer joins.
Views and Outer Joins
As discussed in the section on views and subqueries, views, like T-SQL statements, can contain outer joins. Here’s the subquery example, rewritten as follows:
ALTER VIEW vwCustomersWithoutOrders
AS
SELECT Sales.Customer.CustomerID, Sales.Customer.AccountNumber
FROM Sales.Customer LEFT JOIN Sales.SalesOrderHeader
ON Sales.Customer.CustomerID = Sales.SalesOrderHeader.CustomerID
WHERE Sales.SalesOrderHeader.CustomerID Is Null
This example uses a LEFT JOIN from the Sales.Customer table to the Sales.SalesOrderHeader table to accomplish its task. Because only Orders with a Null CustomerID appear in the result, the view returns only customers without orders.
Views and Top Values
The TOP syntax is available for both T-SQL statements and views. The TOP syntax for views works the same way as it does for tables. It looks like this:
SELECT TOP 100 Percent SalesOrderID, OrderDate, Freight
FROM Sales.SalesOrderHeader
This example shows only that the TOP clause is available for views. The following section, “Sorting View Results,” provides practical examples of the TOP clause.
Sorting View Results
The syntax required to sort the results of a view is a little bit different than you might expect. It looks like this:
CREATE VIEW vwHighOrders
AS
SELECT TOP 100 Percent SalesOrderID, OrderDate, Freight
FROM Sales.SalesOrderHeader
ORDER BY Freight DESC
The combination of the TOP clause and the ORDER BY clause enables you to sort the view result. Of course, you can use similar syntax to return only the top values in the result:
ALTER VIEW vwHighOrders
AS
SELECT TOP 5 Percent SalesOrderID,
Sales OrderDate, Freight
FROM Sales.SalesOrderHeader
ORDER BY Freight DESC
Views and Functions
Prior to SQL Server 2000, a major limitation of views in SQL Server was that you could not parameterize them. SQL Server 2000 handled this limitation with the introduction of user-defined functions. User-defined functions enable you to pass parameters to functions as if they were stored procedures, but to work with the results as if they were views.
Two types of functions are available in SQL Server 2005 Express: system (built-in) functions and user-defined functions. The section that follows covers built-in functions. Hour 14, “Stored Procedure Special Topics”, covers user-defined functions in detail.
Views and Built-in Functions
You can use built-in functions within the views that you build. Here’s an example:
CREATE VIEW vwTodaysOrders
AS
SELECT SalesOrderID, OrderDate, Freight
FROM Sales.SalesOrderHeader
WHERE OrderDate = Convert(VarChar(10),GetDate(),101)
In this example, SQL Server returns only orders placed on the current day. The GetDate() function returns the current date and time. The Convert function converts the date to the mm/dd/yyyy format so that the current date and time can be compared to the order date.
Using Views to Secure Data
One major benefit of a view is the security that it provides. Consider the following view:
CREATE VIEW vwEmployeeList
AS
SELECT EmployeeID, FirstName, LastName, EmailAddress
FROM HumanResources.VEmployee
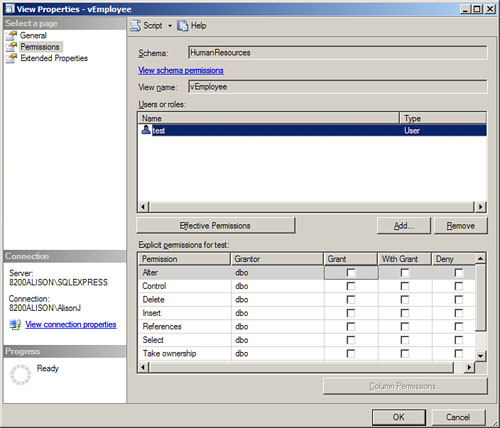
This view selects the EmployeeID, FirstName, LastName, and EmailAddress from the Employees table. In this scenario you would grant no rights to certain users for the Employees table. Instead, you would grant them rights to the view. Figure 11.4 shows the Permissions dialog for a view. Notice that the permissions available for a view are similar to those available for the table. As long as the owner of the table and the owner of the view are the same, the user can interact with the table based on the permissions granted to the view.
Figure 11.4. The permissions available for a view are similar to those available for the table.
Modifying Data in a View
With a few exceptions, the results of views are updateable. Recognize that a view is not a table and does not contain any data. Therefore, when you are modifying the data in a view, you are modifying the underlying table. You cannot violate any rules, check constraints, referential integrity rules, or any other rules that govern the data that can be contained in the tables. The following are limitations to the updateability of a view:
• If a view joins multiple tables, you can insert and update data in only one table in the view.
• The results of a view that aggregates data are not updateable.
• The results of a view that contains a UNION clause are not updateable.
• The results of a view that contains a DISTINCT statement are not updateable.
• Text and image columns cannot be updated via a view.
• Data that you modify is not checked against the view criteria. For example, if the criteria for the view is to show only customers in the USA, and you change the country of a row in the result to Canada, no error occurs and the row remains in the result set until the view is run again.
Modifying Views
The process of modifying a view is similar to that of modifying a table. You simply go into the design of the view and then make the desired changes. Here are the steps involved:
1. Click to expand the Views node for the database.
2. Select the view whose attributes you want to modify.
3. Right-click and select Modify. The design of the existing view appears.
4. Modify the view’s attributes.
5. Close the window and save your changes when you are finished.
Renaming Views
Renaming a view is a relatively simple process. The process is similar to that of a table. To rename a view, follow these steps:
1. Right-click the view that you want to rename and select Rename.
2. Enter a new name for the view.
Watch Out!
No warning appears when you rename a view. Because other objects (such as stored procedures) may depend on the view that you are renaming, the results can be disastrous.
Deleting Views
Deleting a SQL Server view is very simple. In fact, it is so simple, that it is dangerous. To delete a view, taking the following steps:
1. Click to expand the Views node in the Objects list.
2. Right-click the view you want to delete.
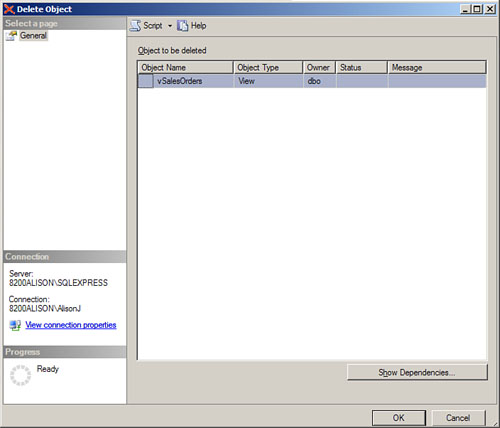
3. Select Delete from the pop-up menu. The Delete Object dialog appears (see Figure 11.5).
Figure 11.5. The Delete Object dialog enables you to drop a view.
4. If you want to look at the view’s dependencies, click Show Dependencies. The Dependencies dialog appears (see Figure 11.6).
Figure 11.6. The Dependencies dialog shows you on what other objects a view depends.

5. Click OK when you are finished viewing dependencies.
6. If you want to drop the view, click OK. SQL Server deletes the view.
Indexed Views
SQL Server 2000 introduced indexed views. They provide you with greatly improved performance by enabling you to create a unique clustered index for a view. Here’s the reason why: SQL Server does not store the result set of a standard view in the database. Each time a query references the view, SQL Server creates the result set dynamically. The overhead of building the result set can be substantial, particularly for complex views. You can greatly improve performance by creating a unique clustered index for the view. When you create a unique clustered index, SQL server stores the data that exists at the time you create the view. SQL Server then reflects all modifications to table data within the stored view. This improves the efficiency of data retrieval. After you create a unique clustered index for the view, you can then create additional non-clustered indexes. The following is an example of the syntax to create an indexed view:
CREATE UNIQUE CLUSTERED INDEX [vwCustomerInfoCustomerID]
ON [dbo].[vwCustomerInfo] ([CustomerID])
This example creates a clustered index for the view called vwCustomerInfo, based on the CustomerID field. The index is called vwCustomerInfoCustomerID and is based on the CustomerID field. Here’s another example:
CREATE INDEX [vwCustomerInfoCountry] ON [dbo].[vwCustomerInfo] ([Country])
It is easy to use the SQL Server Management Studio to create an indexed view. To create an indexed view, follow these steps:
1. Create the view.
2. Within the design of the view, click Properties.
3. Set the Bind to Schema property to Yes (see Figure 11.7).
Figure 11.7. You must first set the Bind to Schema property to Yes.

5. Right-click Indexes under the View node for the view and select New Index. The New Index dialog appears (see Figure 11.8).
Figure 11.8. The New Index dialog enables you to add an index to a view.

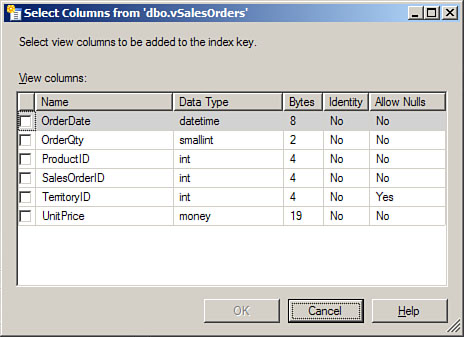
6. Click Add to create a new index. The Select Columns dialog appears (see Figure 11.9).
Figure 11.9. The Select Columns dialog lets you select the fields that will participate in the view.
7. Click to select the columns that will participate in the index and click OK to close the dialog.
8. Enter a name for the index.
9. Specify index options such as whether the index is clustered and whether it is unique. Figure 11.10 shows an index called HumanResources.vEmployee.EmployeeID. It is based on the EmployeeID field and is clustered and unique.
Figure 11.10. You can specify several index options, including whether the index is clustered and whether it is unique.

10. Click OK to create the index. You are returned to Management Studio, where you can create additional indexes, modify existing indexes, or delete unwanted indexes, as well as perform any other database administration tasks.
When to Use Indexed Views
Indexed views are not appropriate in all situations. Although indexed views speed up data retrieval, they slow data updates. You must therefore ascertain that the benefits of data retrieval performance outweigh the performance degradation experienced for data update operations.
Requirements for Indexed Views
Not all views can be indexed. A view must meet all the following requirements for you to index it:
• The view cannot reference other views.
• The tables underlying the view must be in the same database as the view and have the same owner as the view.
• You must set the ANSI_NULLS option to ON when you create the tables referenced by the view.
• You must set the ANSI_NULLS and QUOTED_IDENTIFIER options to ON before creating the view.
• You must create the view, and any functions underlying the view, with the SCHEMABINDING option. This means that you cannot modify or drop tables and other objects underlying the view without dropping the view first.
In addition to the limitations for the view, there are also limitations for the syntax within the view:
• You cannot use * to designate all columns.
• You cannot use the keyword UNION.
• You cannot use the keyword DISTINCT.
• You cannot include the keywords TOP or ORDER BY.
• You cannot use COUNT(*).
• You cannot include AVG, MAX, MIN, STDEV, STDEVP, VAR, or VARP.
• You cannot repeat a column in a view (for example, SELECT CustomerID, CompanyName, ContactName, CompanyName as Client).
• You cannot include derived tables or subqueries.
Optimizing the Views That You Build
The most important thing that you can do to improve the performance of your views is to design your indexes efficiently. The SQL Server query optimizer automatically selects the most efficient index for any query. It can select only from existing indexes. It is therefore necessary that you create all the indexes that your queries need to execute. Follow these guidelines:
• Create indexes for any fields used in the criteria of views.
• Create indexes for any fields that are included in the sorting or grouping of a view.
• Create indexes for all columns used in joins.
• Do not create indexes for columns that have very few unique values.
Displaying the Estimated Execution Plan
When in doubt about what indexes you need, the Express Manager can help you out. Using Express Manager, you can display the estimated execution plan for a view, perform index analysis, display the execution plan when the query executes, show a server trace, and show client statistics. Here’s how:
1. Open Express Manager.
2. Click New Query on the toolbar.
3. Enter the SQL statement underlying the view (you can copy it from SQL View of the view).
2. Select Query, Display Estimated Execution Plan. The Query Analyzer appears as in Figure 11.11.
Figure 11.11. The Query Analyzer enables you to display the Estimated Execution Plan.
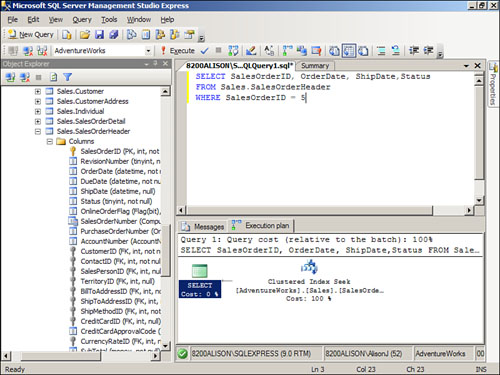
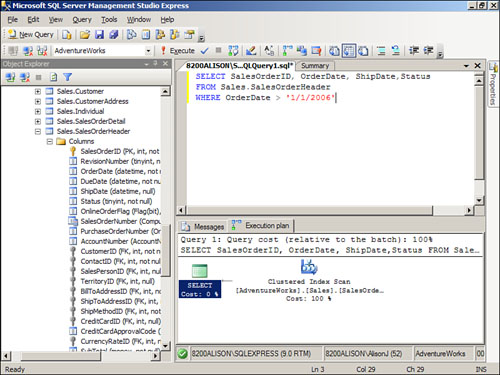
3. Hover your mouse pointer over each icon to show the statistics for that particular statement. In Figure 11.12 you can see that the search for the OrderDate uses an index seek because an OrderDate index exists for the Orders table. Contrast this to Figure 11.13 where SQL Server must perform an index scan because no index exists for the ShipCountry field.
Figure 11.12. Because the necessary index is available, the search for the OrderDate uses an index seek.
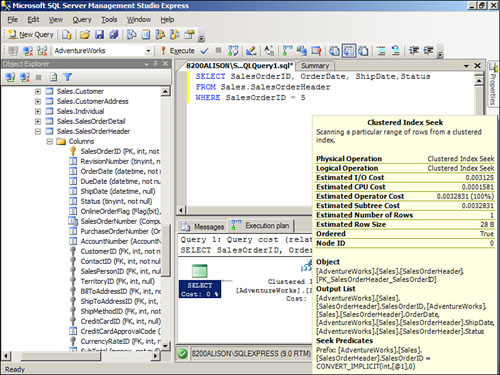
Figure 11.13. Because the necessary index is not available, the search for the ShipCountry uses an index scan.
Summary
Views are a very powerful aspect of SQL Server. In this hour you learned advanced techniques that you can use to ensure that you are taking full advantage of what views have to offer. For example, you learned how you can use views to secure the data in your database.
Q&A
Explain what an indexed view is and why it is beneficial.
With indexed views, you provide a unique, clustered index for a view. This means that SQL server stores the data in the designated order at the time that you save the view. It updates the index as you add, update, and delete data. Therefore, there is no need for SQL Server to create a result set dynamically each time the view is referenced.
Describe the benefits of user-defined functions when working with views.
User-defined functions enable you to pass parameters to functions as if they were stored procedures, but to work with the results as if they were views.
Explain how you can use a view to secure data.
You first create a view containing the appropriate columns. You then give the users rights to the view. Although they have no rights to the underlying tables, they are able to work with the data displayed in the view.
Workshop
Quiz
1. What type of join can you use to ensure that you display only customers who do not have orders?
2. What type of join can you use to ensure that you display only customers with orders?
3. What two clauses enable you to sort the results of a view?
4. What is the problem when renaming a view?
5. What dialog is beneficial when deleting a view?
6. Express Manager enables you to display the estimated execution plan for a query (true/false).
Quiz Answers
4. Other objects may be dependent on the view and will no longer run after you rename the view.
5. The Dependencies dialog shows you what objects are dependent on the view.
Activities
Attach to the AdventureWorks database if you have not already done so (for more information, see Hour 3, “Getting to Know the SQL Server Object Explorer”). Create a new view in the AdventureWorks database. Add the Sales.Customer, Sales.SalesOrderheader, and Sales.SalesOrderDetail tables to the view. Add the CustomerID and AccountNumber fields from the Customer table to the view. Add the OrderDate, DueDate, and ShipDate from the SalesOrderHeader table. Finally, add the OrderQty, UnitPrice, and LineTotal to the view. Save the view as vOrders. Create a second view that finds all the customers who do not have orders. Note the number of rows returned. Modify the view to display all customers, whether they have orders or not. Note the number of rows returned. Finally, modify the view to display only the customers who have orders. Note the number of rows returned. The number of customers returned who have orders plus the number of customers returned without orders should equal the total number of rows returned (whether they have orders or not).