Hour 7. Declaring a Class in an Interface File
What You’ll Learn in This Hour
![]() Developing classes
Developing classes
![]() Introducing protocols
Introducing protocols
![]() Looking at class declarations
Looking at class declarations
Letting Xcode Do the Work
In Hour 6, “Exploring Messaging and a Testbed App,” you saw how you use messages to tell the object that receives the message what to do. The message itself consists of the name of a method along with zero or more arguments. At runtime, information about the receiver is used to determine what method to invoke to implement the message.
That is the how of Objective-C. This hour begins an in-depth look at the what of Objective-C—the classes that are instantiated at runtime into instances or into class objects themselves. Within classes, you find the methods that are performed as a result of messages.
Designing Classes
In Hour 6, you saw the use of a simple method that is part of the Cocoa (and Cocoa Touch) framework: It sets the color of text in an NSTextField or UITextField, which is the class that handles text fields in the interface. In many ways, a class such as NSTextField or UITextField can be misleading because you can see the representation of the class (the text field itself), and you can work with it. Many classes are not based on physical objects—they represent abstractions or concepts. As such, those classes might help you understand the basics of working with classes in Objective-C because you are not distracted by the physical object.
For that reason, this hour works with a class that is an abstraction; it is a class that manages currency conversion. You can use it as a model for any computational class—not just for other types of conversions such as length or weight, but also for classes that might, for example, find the factors of a non-prime number.
In reality, many people wind up working with classes that are a combination of representations of the physical world in code and those that are abstractions of processes.
Note: The History of the Objective-C Currency Converter
A currency converter is a good process to implement in a class because it is fairly easily understood. For that reason, it has long been used as an example of Objective-C and the Cocoa framework (historically known as the Rhapsody framework from Apple, the OpenStep framework, and the NeXTSTEP framework before that from NeXT). The example used here focuses on the Objective-C code; the Currency Converter example was used to demonstrate the code as well as the frameworks and their support for the user interface. It was published by NeXT Software, Inc., and Apple several times during the period 1993–1997.
Most of the time, each class is written using two files: a header file (.h) with the interface and a .m file containing the implementation. You can put the interface and implementation in the same file, and you can put several classes together. Combining classes in a single file is usually done only for very short utility classes or for private classes that should not be available for use by other classes.
Getting Ready to Create the Class
Before you start to create the class, make certain that you know what it is that you want the class to represent and what you want it to do. A critical part of the design of an object-oriented system is defining the classes. Often, a second, third, or even hundredth pass is needed to refine the class structure. However, at any given moment, you should make certain you know what it is you want to build.
Note
As a matter of good design, you also should keep an eye out for other classes in your design that are related to the one you are thinking about. It might be the case that you want to create a class/superclass structure—possibly with an abstract superclass that is never instantiated. The goal is to have the simplest structure with as little repetition and overlap as possible.
After you have decided on what the class is that you want to create, you should name it. Apple’s current guidance on naming conventions is that class names should start with a two- or three-letter prefix in capital letters. This typically identifies the framework of which the class is a part. If it is not part of a framework, it might identify the project.
Using a prefix is not required, but it can prevent you from winding up with a collection of unrelated classes with the same or similar names.
Because prefixes are used to help you organize your code, make certain that you do not use Apple’s own prefixes such as UI (in Cocoa Touch) and NS (in both Cocoa and Cocoa Touch). Many Apple prefixes are two letters long, so you might want to use three letters for your own prefixes. Also remember that prefixes help you organize your code, but they do not enforce rules: You are free to ignore them and destroy your carefully thought-out organizational scheme.
A class name starts with a capital letter; if it consists of several words, they are separated by internal capital letters rather than underscores or other delimiters. (This technique is often called CamelCase.) Thus, a currency converter class might be called CurrencyConverter. If you are writing it as part of a project called Basic Objective-C Programming, you might prefix it to create BOPCurrencyConverter.
Tip
Because the classes in this book typically are designed for reuse, in most cases they do not have prefixes.
Try it Yourself: Create a Class with Xcode
1. If you are using a testbed as described in Hour 6, open it and create a new branch. You might call it Classes.
Alternatively, create a new app from a template. It really doesn’t matter what the project is for the purpose of this hour.
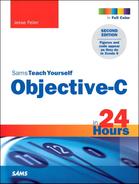
2. Show the project navigator at the left of the workspace window, as shown in Figure 7.1.
3. Select a group in the navigator. You can easily rearrange files and groups later so this is not a life-or-death choice. The overall project group—Testbed iOS, in this case—is a good starting point.
Note
Remember: Groups look like file folders, but are not folders or directories on disk.
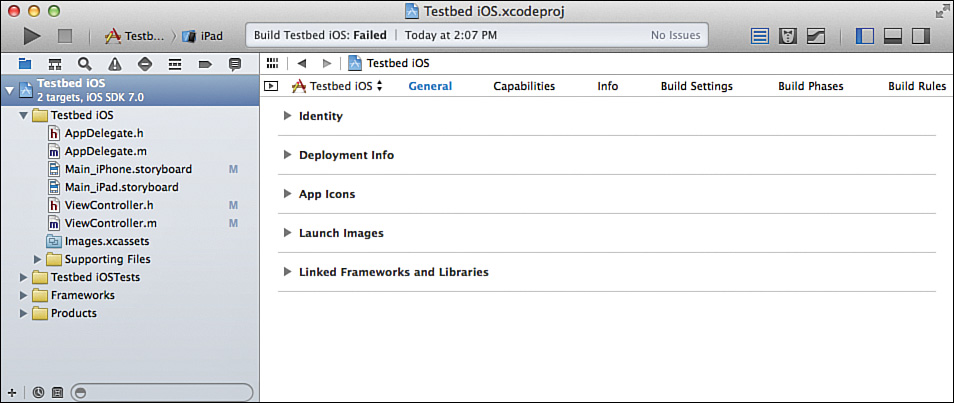
4. Choose File, New, File, or hold down Control and click the group to bring up the shortcut menu and select New File (see Figure 7.2).
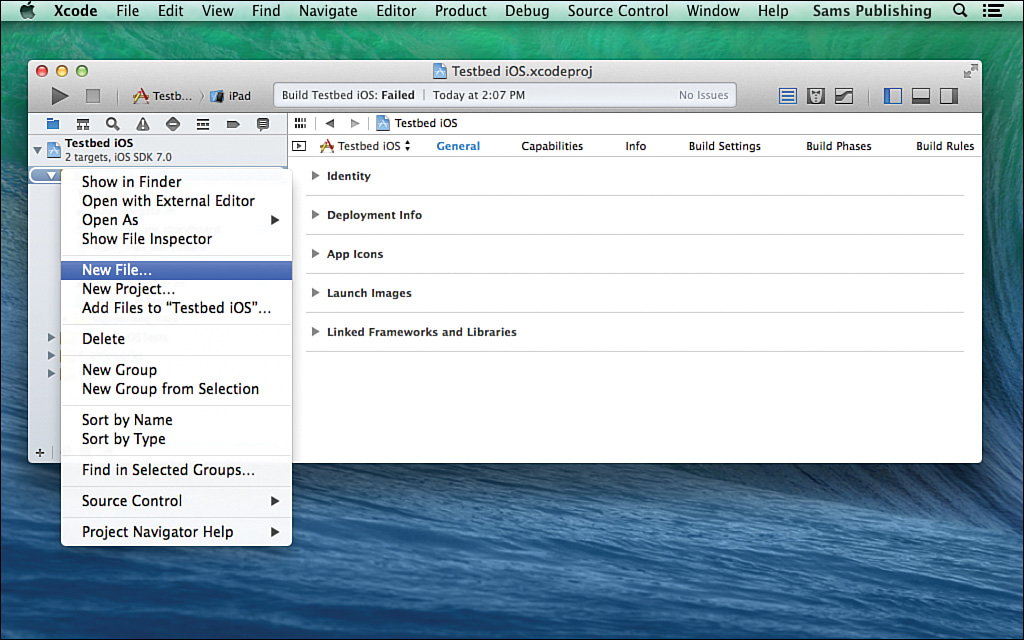
5. From the file templates in either Cocoa or Cocoa Touch, choose Objective-C class, as shown in Figure 7.3. Make certain that you are in the right OS.
6. Name the class and choose its parent class, as shown in Figure 7.4. Remember to start the class name with a capital letter and do not include spaces or special characters. It should be a subclass of NSObject.
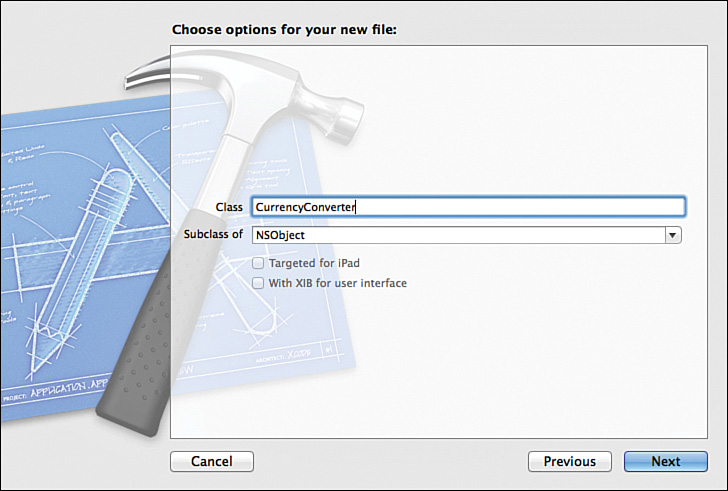
If you look at your choices, you can see that none of them is appropriate, so the more general base class is the proper one.
7. Click Next and then save the file, as shown in Figure 7.5. Note that you have a chance here to change the group the file is in.

8. As you see in Figure 7.6, two files have been added to your project: CurrrencyConverter.h and CurrencyConverter.m. (Note the A badges next to the names as opposed to the M—modified—badges next to other files.) You might want to commit the project now; the A badges will disappear as the files are added to the repository.
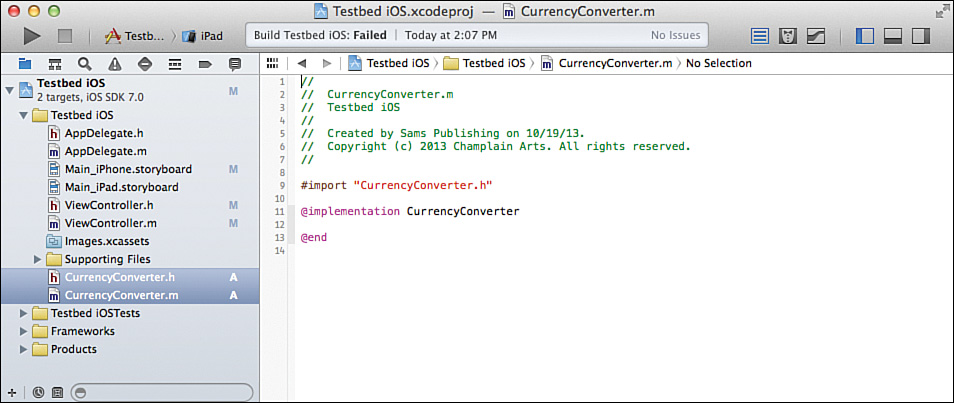
The files use the same basic structure as the files you have seen in previous hours. These are bare-bones files that are ready for you to implement your class.
The interface file is shown in Listing 7.1.
LISTING 7.1 CurrencyConverter.h
//
// CurrencyConverter.h
// Testbed
//
// Created by Jesse Feiler on 11/19/13
// Copyright (c) 2013 Champlain Arts Corp. All rights reserved.
//
#import <Foundation/Foundation.h>
@interface CurrencyConverter : NSObject
@end
The implementation code is shown in Listing 7.2; the comment at the top has been removed to save space.
LISTING 7.2 CurrencyConverter.m
#import "CurrencyConverter.h"
@implementation CurrencyConverter
@end
Exploring Class Hierarchies
Except for NSObject, which is the root class in Cocoa, every class has a superclass. You can follow up the hierarchy until you get to NSObject.
Calling Superclass Methods
The methods of each superclass are available to a child class, but only one at a time. For example, consider the imaginary hierarchy shown here:
NSObject
UIView
draw
MyAbstractView
draw
MyView
draw
MySpecificView
The draw method is implemented in UIView, MyAbstractView, and MyView. If you instantiate MyView, the draw method in MyView is performed when you send a message to the instance of MyView. If you instantiate an instance of UIView, the UIView draw method is performed when you send a draw message to that instance. In terms of the architecture, each of the classes’ methods is separate.
However, you can write code that does move up the inheritance chain. To call a method of a superclass, you send a message to super as in
[super description];
description is a part of the NSObject protocol, so it can be called on any object. It returns an NSString description of the object. This is very useful for debugging. As with any method, you can override it to provide more or different information if you want.
You can invoke any method of a superclass subject to some constraints that are set when you declare the method. There are two patterns here. The first is the very specific case of moving up the inheritance structure by calling the superclass method with the same name. In other words, in this example, it would mean writing
[super draw];
in both MyAbstractView and MyView. If you are using this structure, the call to super is almost always either the first or last line of your method. This means that you can write some setup code in MyAbstractView and call it first before you call customized code in draw in MyView. Using the call to super as the last line of a method is done when you want to do your customized code before the general code. In the case of drawing, you typically want the generalized drawing routines to function before you draw your data. In cases such as saving data or disposing of objects, you often want to do your own saving before you let the object save or even dispose of itself.
When you call a method of a superclass with a different name from your own method, that code can be anywhere in your project.
In the case of an instance of a class that does not have a method defined, the message is sent up the class hierarchy until it finds the first class in the hierarchy that defines that method. In the hierarchy shown here, a message draw sent to an instance of MySpecificView would be passed up the hierarchy because that method is not declared in MySpecificView. It would next go to MyView, which does implement the method, and that is the code that would be performed. The message would not be passed further up the chain unless draw in MyView invokes
[super draw];
It is very common in most object-oriented programming languages to implement abstract classes. These are classes that are not meant to be instantiated. They are designed to be subclassed, and it is those subclasses that are instantiated. The methods in an abstract class are called by subclasses using a call to super. These methods do not always have the same name as the subclass method. Thus, you could find a subclass method draw calling a superclass’s prepareForDraw method. Abstract classes let you provide an architecture for yourself and others to use in providing detailed concrete subclasses. UIDocument is a good example of an abstract class: if you use it, you override it.
Introducing Protocols
Abstract classes are not specific to Objective-C because you can use them in most object-oriented programming languages. However, Objective-C also uses another concept that is somewhat similar to abstract classes and that you will probably use frequently.
Protocols are groups of methods that are not part of a specific class. You define the protocol in some of the same ways that you define a class, but instead of getting to those methods by instantiating a class, you get to those methods when a class adopts a protocol. Adopting a protocol means announcing that your class will implement some of the methods defined for the protocol.
Tip
You can specify which methods are required and which are optional when you declare the protocol.
GO TO ![]() Hour 17, “Extending a Class with Protocols and Delegates,” p. 231, for more information on protocols.
Hour 17, “Extending a Class with Protocols and Delegates,” p. 231, for more information on protocols.
When a class adopts a protocol, the methods of that protocol are available to instances of the class. This means that when you invoke a method in an instance of a class, you have access to all of its declared methods and all of the methods in superclasses. The superclass methods are directly available if they are not overridden in the instance in question because you just call a method that is implemented only in a superclass and get right to it. For methods that are overridden, you do have to use super to get to them.
In addition to your instance methods and the methods available through superclasses, the methods of adopted protocols are also available. This gives you two paths to finding methods to use. You can go up the standard inheritance structure through superclasses, but you can also jump over to whatever protocols your class might have adopted. This structure was designed in part to handle the issue of multiple inheritance in object-oriented programming in which you sometimes want to inherit parts of various objects. Protocols implement that type of functionality.
Declaring Classes
Class declarations can become complex if they have many methods or instance variables, but the structure is always the same.
Writing a Basic Class Declaration
The class declaration shown previously in Listing 7.1 is the most basic type of declaration possible. It imports the file or framework in which the superclass is declared and then it declares the class and specifies its superclass after a colon:
#import <Foundation/Foundation.h>
@interface CurrencyConverter : NSObject
The declaration can go on to declare instance variables, properties, methods, and actions. The declaration ends with
@end
Actions are special types of methods. They are mostly used in conjunction with Interface Builder.
GO TO For more information on declaring instance variables, properties, methods, and actions, refer to the following hours:
![]() Hour 8, “Declaring Instance Variables in an Interface File,” p. 111
Hour 8, “Declaring Instance Variables in an Interface File,” p. 111
![]() Hour 9, “Declaring Properties in an Interface File,” p. 127
Hour 9, “Declaring Properties in an Interface File,” p. 127
![]() Hour 10, “Declaring Methods in an Interface File,” p. 141
Hour 10, “Declaring Methods in an Interface File,” p. 141
![]() Hour 11, “Declaring Actions in an Interface File,” p. 149
Hour 11, “Declaring Actions in an Interface File,” p. 149
If you have instance variables to declare, they are placed within brackets. Declared properties, methods, and actions follow the bracketed instance variables. Thus, a declaration might look like this:
#import <Foundation/Foundation.h>
@interface CurrencyConverter : NSObject {
float height; //primitive C instance variable -- not Objective-C object
}
@property (assign) UIView *viewForCurrencyRate; //declared property
– (void)alphabetizeCurrencyNamesInPlace:(NSArray *)names; //method
– (IBAction)done:(id)sender; //action
@end
After any instance variables, declared properties, methods, and actions, the declaration finishes with @end.
Using Forward References
In addition to importing the framework or superclass file, you might need to make reference to other classes or protocols in your declaration. For example, if you want to declare an instance variable that contains an instance of one of your own classes, you need to write this:
MyClass * anInstance; // instance of MyClass
That produces an error because MyClass is not declared. You can get rid of the error by importing the file in which MyClass is declared (it is likely called MyClass.h).
Although that gets rid of the error, it is not the most elegant way of solving the problem of the forward reference to something not yet declared. You can use the @class directive to make it possible to use the class in your declaration without an error. If you do this, your declaration will look like this:
#import <Foundation/Foundation.h>
@class MyClass;
@interface CurrencyConverter : NSObject {
float height; //instance variable
MyClass * anInstance; // instance of MyClass
}
@property (assign) UIView *viewForCurrencyRate; //declared property
– (void)alphabetizeNamesInPlace:(NSArray *)names; //method
– (IBAction)done:(id)sender; //action
@end
You often need to refer to not-yet-declared protocols, and there is a comparable syntax for that purpose:
@protocol MyProtocol;
Note: Be Careful Where You Place #import, @class, and @protocol
Note that the #import, @class, and @protocol directives are placed outside the @interface section.
Your forward references as well as imported header files are sufficient for your declaration, but you are going to have to import the corresponding .m files when you get around to writing your own implementation that contains the definition of your class file. For this reason, until you add the definitions, do not try to build your project yet.
GO TO ![]() Hour 14, “Defining a Class in an Implementation File,” p. 189, for more information.
Hour 14, “Defining a Class in an Implementation File,” p. 189, for more information.
Summary
This hour showed you the basics of a class declaration. It consists of the class name, its superclass, and space to declare its instance variables, declared properties, methods, and actions. You have seen the ways in which you can access methods that are outside your class declaration by using the class hierarchy as well as protocols.
Q&A
Q. What does the protocol architecture accomplish?
A. It provides a way of specifying related methods that are not part of the inheritance structure.
Q. Why would you use @class or @protocol?
A. These are forward references that let you compile your declaration without importing the header files. You need to import the implementation files into your own implementation. The forward reference is a much simpler way of being able to use the undeclared class or protocol than importing the header code.
Workshop
Quiz
1. What is a class prefix?
2. What are the rules for naming classes?
Quiz Answers
1. A class prefix consists of two or three capital letters at the beginning of a class name that identifies the framework or project to which it belongs. A class prefix is optional.
2. Start with a capital letter and run together the descriptive words. Do not use special characters to separate the words; instead use interior capitals as in NSPredicateEditorRowTemplate. After the prefix, class names usually are nouns.
Activities
Create a new Xcode project (or use a branch of a testbed) and experiment with creating new classes. Watch the errors and warnings that Xcode gives you as you type. If you are using source control, discard your changes when you are done.
Browse the sample code on developer.apple.com. You can download each project, but you can also browse them online. Do not worry about the functionality, but just explore the interface files to see how classes are declared. After you have looked at several of the samples, you should start to see the patterns of class declaration.