
Introducing Add-ins
Yesterday, when you created your first macro, you learned how to interact with the IDE using the objects in the EnvDTE namespace. All the code you wrote was in Visual Basic .NET, and the overall access you had to objects in the Visual Studio .NET IDE through the automation objects was limited. For example, using the macro recorder, you couldn't automate adding a task to the Task List. You could, however, add a task directory by accessing the TaskItems object. Using add-ins, you can write code in C# or Visual Basic .NET, and you have complete control over all objects in the Visual Studio .NET automation namespaces.
Add-ins are applications in their own right. The only difference between an add-in and a standalone application is that an add-in is hooked into the Visual Studio .NET IDE. By creating an add-in, you literally have complete programmatic control over whatever you want to do inside the Visual Studio .NET IDE. Compiled as COM applications, add-ins use the IDTExtensibilty2 interface, which is part of the EnvDTE namespace. The automation model gives you programmatic access to the following groups of items:
All items available in the Add New Item dialog in Visual Studio .NET
All windows in Visual Studio .NET that are accessible from the View, Other Windows menu items, including the Output window, all debugging windows, and all Find and Search windows
All events that take place in Visual Studio .NET, such as closing and opening of forms, classes, and designers
That means the sky's the limit when creating an add-in. As with macros, the idea is to use add-ins to extend the IDE in ways that help you become more productive.
To use an add-in, it must be registered with the component object model (COM). That means an add-in must be installed on the computers that are to use it. You can't XCopy deploy an add-in. If you did, you'd have to manually register the add-in with the Windows Registry. A cool feature in Visual Studio .NET is that the Add-ins Project Wizard creates a Windows Installer file for you when you create an add-in project, so you can create your installation package simply by building the add-in.
When an add-in is installed, it can be accessed from the Tools, Add-in Manager menu item. When you select the Add-in Manager menu item, the Add-in Manager dialog pops up, as Figure 17.1 demonstrates.
Figure 17.1. The Add-In Manager in Visual Studio .NET.
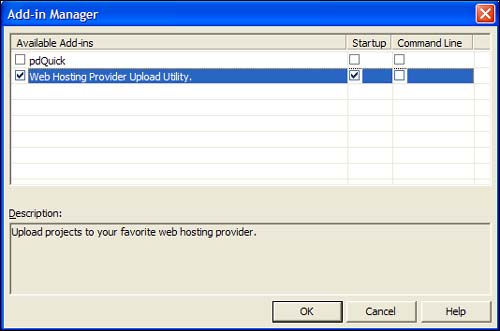
You can see in Figure 17.1, the Web Hosting Provider Upload Utility is selected and is set to load when Visual Studio .NET starts. The Web Hosting Provider Upload Utility is an add-in that's installed with Visual Studio .NET and extends the IDE by helping you upload ASP.NET applications to your Web hosting service. The other add-in in the list is called pdQuick—I downloaded it from the Web. I thought it was really cool because it added a Try/Catch block to my code. After I realized how easy it is to do that with a macro, I decided to write my own. Based on what you learned yesterday, you can do the same thing on your own, too! After an add-in is installed, you can uninstall it through Add/Remove Programs in the Control Panel.
To get an understanding of what you can do with add-ins, you're going to create a simple add-in that interacts with the IDE. When that's done, you'll create an add-in that expands on the code snippet macro that you wrote yesterday.