
Creating Your First Add-in
To create your first add-in, open Visual Studio .NET and click the New Project button on the Start Page. In the Project Types dialog, expand the Other Projects node and then select the Extensibility Projects node. In the Templates pane, you'll see the Visual Studio .NET Add-in and the Shared Add-in templates. Select the Visual Studio .NET Add-in template and change its name to FirstAddin_vb or FirstAddin_cs, depending on the language you're writing in, as shown in Figure 17.2.
Figure 17.2. The Extensibility Projects node in the New Project dialog.
After you click the OK button, the Add-in Project Wizard dialog pops up. This wizard guides you through setting the default properties for your new add-in. Figure 17.3 shows the Welcome screen for the Add-in Project Wizard.
Figure 17.3. The Add-in Project Wizard welcome screen.
Click Next to get to step 1 of 6 in the wizard. In this step, you decide on the language in which you want to write the add-in. You can choose Visual Basic .NET, C#, or C++, as Figure 17.4 demonstrates. Select the language you're most comfortable with and click Next.
Figure 17.4. Choosing the language the add-in will be written in.

In step 2, shown in Figure 17.5, you select the host environment for the add-in: You can choose either the Macros IDE or Visual Studio .NET. Because this add-in won't be needed in the Macros IDE, make sure that Visual Studio .NET is the only option selected.
Figure 17.5. Selecting the add-in's host application.
After you click Next to get to step 3 of 6 in the wizard, you're prompted for the name and description of your add-in. Figure 17.6 shows the information I added for my first add-in.
Figure 17.6. Entering a name and description for the add-in.
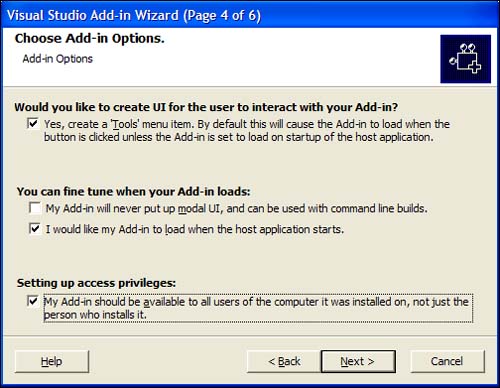
Click Next to get to step 4 of 6 in the wizard. This step has several options that determine how your add-in will be used. If you check the first option, a Tools menu item is automatically created for you when the add-in is installed and running. Make sure that this option is checked. The second group of options dictates how the add-in is used. If the add-in pops up a modal window during a build process, you must uncheck the My Add-in Will Never Put up a Modal IU option. To make your add-in start automatically when Visual Studio .NET starts, you can check the second option. For the purpose of the add-in you're writing here, check this box.
The final option sets the Windows Installer options regarding how the add-in is to be installed. If the add-in is meant for all users of a computer, check this box. For the add-in you're writing today, you can leave this option checked. This option doesn't impact the code you're writing for the add-in. Your add-in options should look like Figure 17.7.
Figure 17.7. Setting the add-in options.
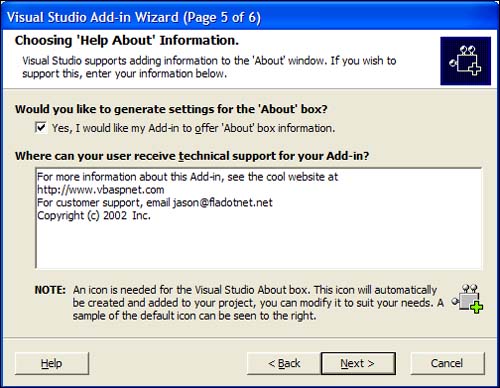
After you click Next, you're taken to the Help About information page for the add-in. Check the Yes box, and modify the template information for the Help About dialog that will be generated for your add-in. I changed my information to look like Figure 17.8.
Figure 17.8. Adding Help About dialog box information.
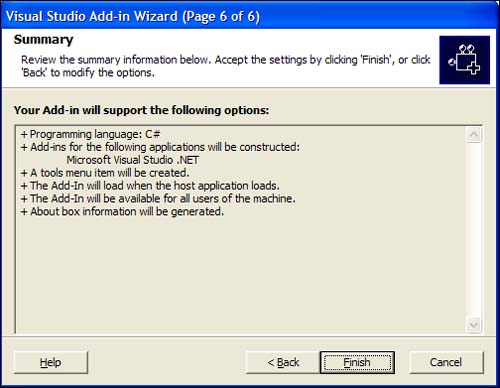
Click Next to get to the Summary page of the wizard. This screen, shown in Figure 17.9, gives you a summary of the options you selected while creating the add-in. If there's something you want to change, you can click Back at this point and modify your settings.
Figure 17.9. Summary page for the Add-in Project Wizard.
When you click the Finish button, the FirstAddin solution is created. Figure 17.10 shows the FirstAddin solution after the Add-in and Windows Installer Deployment projects have been created.
Figure 17.10. The FirstAddin solution after running the Add-in Project Wizard.
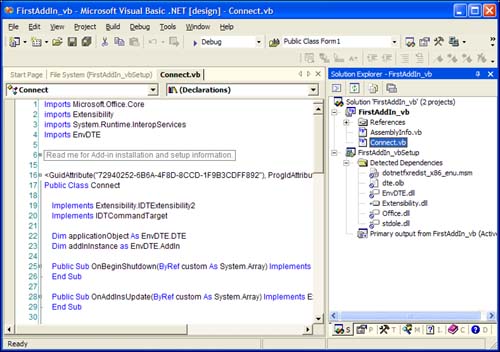
The wizard process creates the plumbing code that's needed to make your add-in function. This includes hooking into the IDE and creating dummy entries for the different events that can occur in the lifetime of the add-in. Let's go through the code that was generated to better understand the capabilities of the add-in.