
Deploying ASP.NET Applications with Windows Installer
The most robust way to deploy any application is to use the Windows Installer technology that's built into Visual Studio .NET. When you learned how to deploy Windows Forms applications, you got a good idea of their power and flexibility when creating MSI packages using Visual Studio .NET. You're now going to extend what you learned two days ago and create an MSI package that can deploy an entire Web site.
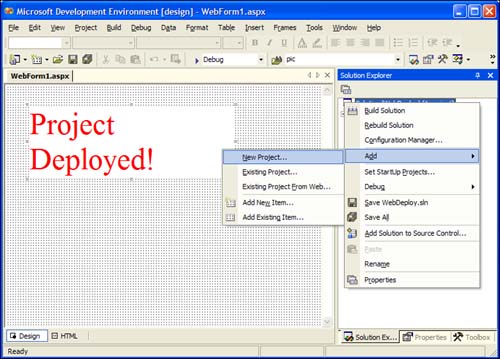
To start, you need to add a new deployment project to your WebDeploy solution.
To do so, right-click on the solution name in the Solution Explorer and select Add, New Project as shown in Figure 6.20.
Figure 6.20. The New Project contextual menu.
When the New Project dialog pops up, drill into the Setup and Deployment node in the Project Types pane. On the Templates pane, select the Web Setup Project template. Change the name to MSIWebDeploy as Figure 6.21 demonstrates.
Figure 6.21. Creating a new Web Setup project.
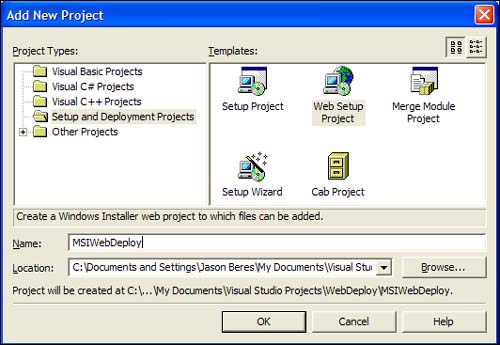
Exactly like creating a Windows Setup project, the new Web Setup project is added as another project in your Solution Explorer.
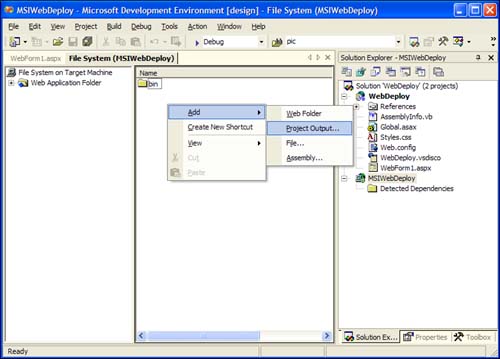
The next step is to add the project output to the project. To add the WebDeploy project's output to the MSIWebDeploy project, right-click the MSIWebDeploy project name and select Add, Project Output, as Figure 6.22 shows.
Figure 6.22. Adding project output to the Web deployment project.
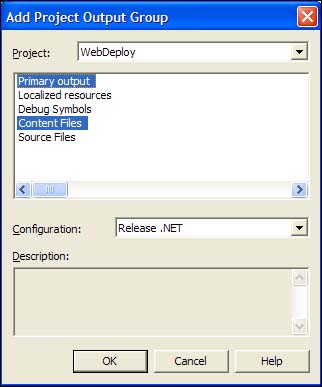
When the Add Project Output dialog pops up, Crtl+click with the mouse and select both Primary Output and Content Files from the list box. This ensures that the assembly in the Bin directory is included along with the ASPX files, the Web.Config file, and the remaining files that make up the WebDeploy ASP.NET project. From the Configuration drop-down list, change the configuration from Active to Release. You change the configuration of the WebDeploy project in a later step.
Figure 6.23 shows you what the Add Project Output dialog should look like.
Figure 6.23. The Add Project Output dialog box.
After you click the OK button, you're taken back to the File System Editor. If you select the Web Application folder in the left pane of the File System Editor and then press F4 to view its properties, you'll notice the various properties you can modify for the target folder when it's deployed.
Like the settings of the New Virtual Directory Wizard you used earlier, you can set the different access modes, execute permissions, the port the site works on, and the default document.
Change the DefaultDocument property from default.aspx to WebForm1.aspx, as Figure 6.24 demonstrates.
Figure 6.24. Setting the Web site's default document.
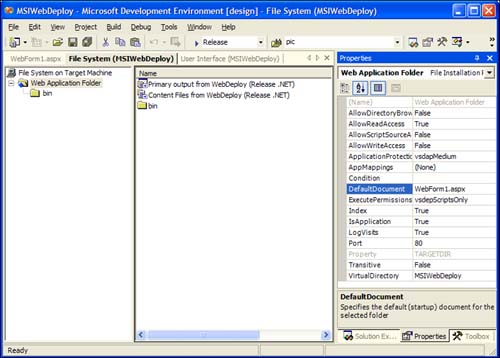
The DefaultDocument property updates the settings for the virtual directory as to what page should come up in the browser when a person browses to the site for the first time. Normally, this is Default.htm, Default.aspx, Index.htm, or Default.asp, but you can specify other pages that should come up first. When you set the DefaultDocument property to WebForm1.aspx, the end user can browse to the site and not have to specify the full filename.
Next you want to update the build configuration for this project. To do so, select Configuration Manager from the Build main menu.
When the Configuration Manager dialog pops up, notice that the configuration for the projects are set to Debug. That means when the project is compiled, debug information is created and the output is sent to a Debug folder in the solution. When you're ready to deploy applications, you should change the configuration setting to Release.
In the Configuration Manager dialog, make sure that the MSIWebDeploy and WebDeploy projects are both set to Release. Also make sure that the Build check box is checked for both projects.
At this point, you're ready to build the solution and test the deployment. That's all there is to creating a basic deployment package for an ASP.NET application.
To see how cool this tool is, you're going to extend the functionality of this deployment project and add a custom action that creates a database on the Web server during installation.
Creating a Custom Action
When creating a deployment project, you learned two days ago that you could set conditions on the installation. The conditions might include a file dependency, a specific version of a product, or the existence of the .NET Framework on the deployment target.
You can also extend an installation by adding a custom action. A custom action can be nearly anything you can dream of. Today, you're going to add a console application that creates a database on the target machine. You'll then add the resulting EXE file as a custom action for the deployment project.
To do this, right-click on the solution name in the Solution Explorer and select Add, New Project from the contextual menu. When the Add New Project dialog pops up, select Console Application from the Visual Basic Projects folder (see Figure 6.25).
Figure 6.25. Adding a new console application to the solution.
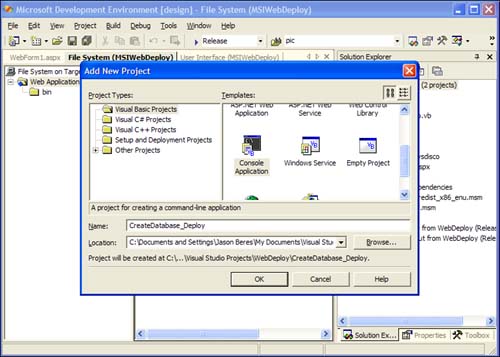
Change the name of the project to CreateDatabase_Deploy, and click the OK button to add the new project to your solution.
After the project is added to your solution, you'll be looking at the Sub Main method for the Module1 module. A console application is a linear, command-window application that has a Main method that controls the lifetime of the application. You can accept command-line parameters, add class files, and do pretty much whatever you want with a console application. In this case, you're just going to modify the Main method to create a database and a table when it executes.
Add the code in Listing 6.1 to the Module1 in the console application.
Listing 6.1. Adding the Create Database Code to Module1.vb
The code in Listing 6.1 is basic ADO.NET code that you'll learn about next week. The idea is that as this application executes, it creates the database, creates a table in the database, and then ends. A console application is perfect for a custom action because it has a visual screen to which you can write out messages, and it ends all by itself.
If you right-click the CreateDatabase_Deploy project name in the Solution Explorer, the EXE will be built for this Console application.
Next, return to the File System Editor by either selecting the correct tab in the IDE or double-clicking any of the files in the MSIWebDeploy project in the Solution Explorer.
From the File System Editor, select Editor, Custom Actions from the View main menu. This takes you to the Custom Actions Editor.
Right-click on the Install node and select Add Custom Action from the contextual menu. You should now see the Select Item in Project dialog as you see in Figure 6.26.
Figure 6.26. Select Item in Project to add a custom action.
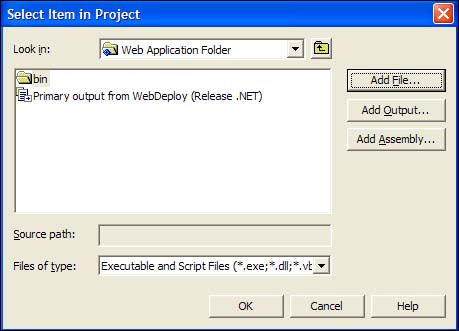
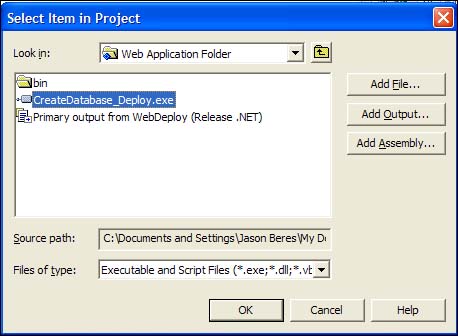
If you click the Add File button, you can browse to the CreateDatabase_Deploy folder to select the CreateDatabase_Deploy.exe file from the Bin directory. After you've added the file, your dialog box should look like Figure 6.27. The application is now added as a custom action for this project.
You can now select Build Solution from the Build menu. When you build the solution, the ASP.NET application is built, then the console application is built, and finally the MSI package is built.
If you remember the Project Build Order dialog box from yesterday, you can specify the order in which the projects are built. You can access the build order by right-clicking on the solution name in the Solution Explorer and selecting Project Build Order from the contextual menu.
You've now successfully created the MSI package. To test the installation, you can right-click on the MSIDeploy project name in the Solution Explorer and select Install. This starts the MSI package and guides you through the installation.
Notice that a command window pops up during the installation. This is the console application you wrote; it's creating the database and the table in SQL Server.
By adding custom actions, the sky's the limit in what you can do when creating a custom setup.