
I have an existential map. It has “You are here” written all over it. | ||
| --Steven Wright | ||
Unlike Steven Wright’s existential map, Google Maps is an online mapping tool that is without a doubt one of the coolest online resources I’ve ever used. Online map services aren’t really new but Google Maps is so unique in its map interface that it is truly a groundbreaking application. Google Maps provides both a traditional vector map view along with a satellite photography view and even a hybrid view that overlays vector street information onto the photographic satellite map. One of the features that makes Google Maps so interesting is the fact that it is customizable via a programming interface that Google has made available to web developers. And as you might be guessing, XML factors heavily into Google Maps and how you go about customizing it. This hour introduces you to the inner workings of Google Maps and guides you through a complete XML-based map customization example.
In this hour, you’ll learn
What Google Maps is and why it is so interesting
The basics of the Google Maps API and how to obtain an API key to access it
How to convert a physical address into geocoordinates for mapping purposes
How to create a complete XML-based custom Google Maps application
If you’ve never heard of it, Google Maps is a free online mapping service made available by Google that is truly revolutionary in nature. What makes Google Maps so interesting is how it allows you to drag and zoom maps in real time, along with a seamless merger of vector map graphics and real satellite imagery. While all of these features are certainly impressive, the killer feature of Google Maps that has impressed most hardcore web users is its speed. If you’ve done much web development, you’ll likely be amazed at how responsive Google Maps is to user input such as dragging and zooming maps. I know I was the first time I ever used it. The newness has admittedly worn off of Google Maps by now but the fun has really only just begun. In June of 2005, Google made available to the public an API (Application Programming Interface) for Google Maps that allows web developers to build custom mapping applications. Later in this hour you will build a custom mapping application. Before you get into that, however, it’s important to get familiar with Google Maps and what all it has to offer.
You can visit Google Maps online at http://maps.google.com/. If you’ve never used Google Maps, I encourage you to follow that link now and start exploring the service.
When Google Maps first starts up, there is nothing particularly surprising about it since all you see is a map of the United States. But keep in mind that this is Google we’re talking about, the masters of the search engine. Try entering a search in Google Maps to watch it come to life. For example, enter “pizza near Nashville” in the main search box and click the Search button (feel free to insert your hometown here). Figure 15.1 shows the resulting map after searching for pizza restaurants near Nashville, TN.
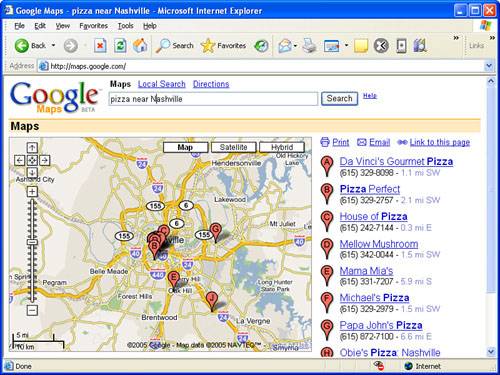
Figure 15.1. The search feature in Google Maps is surprisingly effective at finding places of interest.
Ah, now you’re starting to see some of the power of Google Maps. Take things a step further by clicking one of the markers on the screen that represents the location of a pizza joint. Figure 15.2 shows how an information window appears that identifies the name of the location along with its address and a link to the restaurant on CitySearch.com.
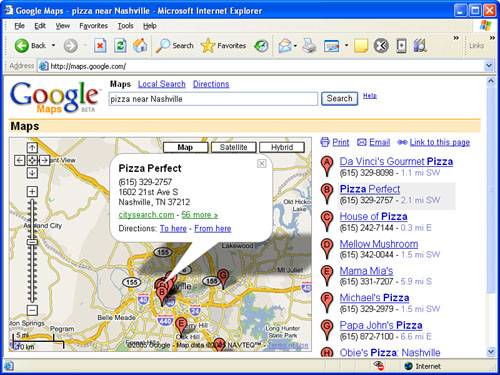
Figure 15.2. Clicking a marker in Google Maps brings up an information window with details about the location.
Keep in mind that at any point while using Google Maps you can click and drag the map or click on the zoom control in the upper-left corner of the map. Or maybe you want to see an actual satellite photo image of the map instead of vector map graphics. Just click the Satellite button in the upper-right corner of the map. More than likely you’ll find the Hybrid view to be more useful than the Satellite view. The Hybrid view displays a satellite image with streets and street names overlaid, which makes most maps much easier to discern.
By the Way
You can use the plus (+) and minus (-) keys on your keyboard as a shortcut for zooming in and out of a map, respectively.
Local search is another very handy feature of Google Maps that you won’t want to overlook. While viewing any map on the screen, you can click Local Search and then perform a search on any piece of information. As an example, let’s say you’re planning on visiting Franklin, TN on business and you’re interested in doing a little cycling on the Natchez Trace Parkway while you’re in town. You’ve already been exploring the area in Google Maps but you don’t know anything about area bicycle shops. Just enter “bicycle rental” as a local search and let Google Maps do the rest.
Figure 15.3 shows how a local search turns up numerous bicycle shops within a reasonable proximity to the original map location.

Figure 15.3. Performing a local search on Google Maps allows you to search for locations within the current map area in view.
Another interesting application Google has in the works is RideFinder, which is a real-time GPS-based system for tracking taxicabs using Google Maps. Using RideFinder, you can check for the nearest cab to your location and find yourself a ride home. RideFinder uses GPS transmitters that are placed in cabs to determine the locations of the cabs as they make their rounds. RideFinder is currently available for several major cities in the U.S. and is expected to continue expanding into new cities. To learn more about RideFinder, visit it on the Web at http://labs.google.com/ridefinder.
There are lots of other interesting features that Google Maps has to offer but at some point I have to bring my Google Maps love fest to a halt and get to the point of this lesson, which is how to use XML to customize Google Maps. However, I’d like to leave you with a few Google Maps–related links to explore as you learn more about the service and what all it can do:
Google Moon— The Moon as viewed through Google Maps; make sure you zoom all the way in (http://moon.google.com/)
GeoBloggers— Photographs that rely on Google Maps to show you where they were taken (http://www.geobloggers.com/)
Chicago Crime— Locations of crimes committed in the Chicago metropolitan area (http://www.chicagocrime.org/)
Cheap Gas— Locations of gas stations selling the cheapest gas (http://www.ahding.com/cheapgas/)
New York City Subway— Locations of New York City subway stations (http://monkeyhomes.com/map/nycsubway.php)
GeoWorldNews— World news with the location of each story marked (http://www.parsec.it/geoworldnews/)
Recent Earthquakes— Locations of recent earthquakes (http://chimi.org/quake/index.html)
Urinal Dot Net— Locations of public urinals around the United States (http://urinal.net/google_map.html)
Google Maps Directory— Directory of Google Maps applications (http://www.gmdir.com/)
By the Way
In addition to some of the interesting Google applications that have been created, there are also some interesting finds that people have made while using Google Maps. For example, one astute Google Maps user spotted a building suspiciously shaped like a swastika (http://maps.google.com/maps?q = san + diego&ll = 32.676505, -117.157559&spn = 0.004739, 0.009917&t = k&hl = en) and therefore deemed it a potential hideout for Adolf Hitler. Another person spotted a pattern on a Peruvian sand dune that some say resembles the face of Jesus. . . or Charles Manson (http://maps.google.com/maps?ll = -16.337013, -71.959763&spn = 0.110893, 0.158186&t = k&hl = en). I’m not making this stuff up!
In this list, I’ve provided plenty of interesting sites to keep you busy for the remainder of this hour but if you can tear yourself away from Google Maps for just a moment, it’s time to dig into the details of what it takes to customize Google Maps to create your own mapping application.
Customizing Google Maps to create your own mapping application is fairly straightforward but it does require a couple of preliminary steps before you can even start thinking about XML code or web pages. First off, although Google exposes the Google Maps API for anyone to use, they do require you to obtain a special API key in order to use the API in your own web pages. Secondly, you need to understand some basics about the Google Maps API and how it is used to create and customize maps via JavaScript code. And finally, locations in Google Maps are specified via geocoordinates, which you probably don’t have readily available for the locations you’re interested in mapping. For this reason, you need to learn how to obtain the latitude and longitude of a location based upon its physical (mailing) address. The next few sections explore each of these topics in more detail.
The easiest part of the map creation process is obtaining your own Google Maps API key. This virtual key is literally your key to being able to view, test, and share your map creations with others. A Google Maps API key is completely free of charge, and is presumably required so that Google can keep close tabs on how its technology is being used. Keep in mind that Google Maps is technically still a beta product, which means that it is still under development. So in many ways you are playing the role of tester when using Google Maps.
Anyway, getting back to the API key, you can sign up and obtain your key by visiting http://www.google.com/apis/maps/signup.html. This page requires you to enter the URL of the web site to which you plan on publishing your maps. A single API key gives you the ability to publish maps to one folder on one web server. As an example, if I register an API key for http://www.michaelmorrison.com/maps, I can only publish maps to the maps folder on my web server and nowhere else. Well, technically I can publish them wherever I want on my web server but they’ll only work if I place them in the maps folder. Make sure you actually publish your maps to the URL you specify when obtaining your API key.
The API key is provided to you as a long text code that you will cut and paste into your mapping code later. For now, copy and paste the code into a text file and save it for later.
The Google Maps API consists of a set of JavaScript functions that you call in order to create and manipulate a map within an HTML web page. Every map must have a standard <script> tag in the head of the HTML document that references the Google Maps API and specifies your API key. Following is an example of how this <script> tag is coded:
<script src="http://maps.google.com/maps?file=api&v=1&key=
ABQIAAAASyb3gcwJHvHRgYeL6xQGZRScAy-
eqpGBgb_U5UIf4tD_qtSUMBQD201ZWuwo7NWFLUKzESpdimx61w"
type="text/javascript"></script>
The API key is too long to fit on one line of printed text in this book, which is why you see it broken across multiple lines. In your HTML code, don’t add any spaces or line breaks in the API key or it won’t work. After placing the <script> tag in the head of a web page, you can begin calling API functions to create the map itself.
The GMap() function is called to create a new map. This function expects as its only argument the element on the page that is to contain the map:
var map = new GMap(document.getElementById("map"));The map container element is typically a div element, as in the following sample code:
<div id="map" style="width:700px; height:450px"></div>
Notice that the ID of the div element is map, which corresponds to the ID of the element passed into the GMap() function. This is how the map gets connected to a container element on the web page.
By the Way
If all this talk of functions and arguments is flying right over your head, don’t worry. It really isn’t critical that you understand the JavaScript code in this example in order to use XML to customize it. However, in case you do have some JavaScript knowledge, I want to at least lay down the basics of how the Google Maps API works. If you’d like to learn more about JavaScript, I recommend Teach Yourself JavaScript in 21 Days and JavaScript Bible.
The Google Maps API offers several different user interface controls that you can use. The standard control that consists of full-sized pan/zoom buttons is represented by the GLargeMapControl object. There is also a smaller control called GSmallMapControl, as well as a control with no pan features at all called GSmallZoomControl. To set the control for a map, you call the addControl() method on the newly created map, like this:
map.addControl(new GLargeMapControl());
There is also a control that determines whether or not you can switch between the different map views (Map, Satellite, and Hybrid). To enable this control, add the GMapTypeControl object to the map with the following piece of code:
map.addControl(new GMapTypeControl());
With the map and controls in place, you’re ready to set the default area for the map, which is based upon a geocoordinate as well as a zoom level. You learn how to find a geocoordinate for a location in the next section. For now, just understand that it consists of two numbers that represent the latitude and longitude of a location. Furthermore, the zoom level of the map is set to an integer number that you will likely need to experiment with in order to find a zoom level that suits your specific map. Following is the code that centers and zooms a map at a specific geocoordinate and zoom level:
var point = new GPoint(-86.853171, 36.071689);
map.centerAndZoom(point, 6);
The last step in creating a custom map is creating the markers on the map, which can also involve using custom icon images if you so choose. Custom icons in Google Maps actually consist of two images: the icon image and a shadow for the icon. You learn more about these images a bit later in the hour. For now, take a look at the following code, which shows how to create a marker with a custom icon, as well as how to set a listener function that opens an information window when the marker is clicked.
var icon = new GIcon();
icon.iconSize = new GSize(48, 40);
icon.shadowSize = new GSize(75, 32);
icon.iconAnchor = new GPoint(24, 38);
icon.infoWindowAnchor = new GPoint(24, 20);
icon.image = "mapicon.png";
icon.shadow = "mapicon_sh.png";
var marker = new GMarker(point, icon);
GEvent.addListener(marker, "click", function() { marker.openInfoWindowXslt(
  description, "styles.xsl"); });
The main things to note in this code are how the various icon sizes are specified, including the relative offset of the icon anchor and the information window anchor. These offsets determine how the marker icon image is positioned relative to the location on the map, as well as the offset of the information window with respect to the marker. The last two lines of code look messier than they truly are—all they do is open an information window and display an XML element in it, while making sure that the element is coded using the styles.xsl stylesheet. The job of this stylesheet is to transform the XML description of a location on the map into HTML code that can be displayed in a browser.
I realize I hit you pretty fast with the Google Maps API and code that puts it to work. Not to worry because you see all of this code again in the context of a real custom Google Maps web page. For now, I just wanted to lay the groundwork and start getting you comfortable with the script code required to get a custom map up and running.
Although Google Maps is typically queried based upon the mailing address of a location, when you deal directly with the Google Maps API you are required to deal with more accurate location data. More specifically, you must specify the latitude and longitude of a location, also known as its geocoordinates, when specifying its position to the Google Maps API. Because you probably haven’t committed to memory the latitude and longitude of your favorite hangouts, you’ll likely need to use a tool to find out the coordinates of any address that you want to include on a map. Fortunately, exactly such a tool exists in the form of the geocoder.us web site, located at http://geocoder.us/.
This web site allows you to enter an address much as you would enter it in Google Maps. Assuming the address is successfully found, geocoder displays the latitude and longitude of the address, which you can then use in Google Maps to specify the exact position of the location. Figure 15.4 shows the geocoder online tool displaying the latitude and longitude of a well-known address.
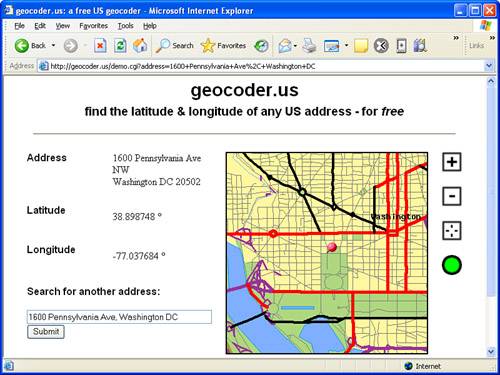
Figure 15.4. The geocoder.us web site is extremely handy for converting physical addresses to geocoordinates (latitude and longitude).
By the Way
If you happen to have a GPS receiver, you can also determine the latitude and longitude of any location using the receiver. Of course, you’ll have to physically travel to the location so that its latitude and longitude are registered on your GPS device.
The figure reveals the geocoordinates for the White House, which is located at 1600 Pennsylvania Avenue in Washington, DC. You can use the geocoder.us web site to look up any address that you want, keeping in mind that you can always cheat and use a nearby address if for some reason the address you’re looking for isn’t found. Later in this hour you’ll use the latitude and longitude values displayed on the geocoder.us web site to fill in details regarding the locations of real estate projects in XML code.
There are all kinds of interesting prospects out there when it comes to dreaming up your own custom Google Maps application. The sample application that you work through in the remainder of this lesson is based upon an application that I desperately needed to develop for a real-world project. I was hired to revamp the web site of a local construction company that wanted an interactive map of its projects, among other things. Although I could’ve certainly used image maps, JavaScript, and other traditional web trickery to put together somewhat of an interactive project map, it occurred to me that Google Maps might make an ideal environment for this task. So I ended up developing a custom Google Maps application that displays the builder’s projects around town. I even took things a step further by using custom markers to provide visual cues as to whether a project is active (still has properties for sale) or completed (sold out).
In this example, the custom mapping application involved several facets:
Developing an XML language for coding real estate properties
Interacting with the Google Maps API to open and display a map centered on a certain location
Using the Google Maps API to create custom markers for each property
Using XSLT to present a unique information window for each property when it is clicked in Google Maps
The remainder of this hour focuses on a slightly pared down version of this application. However, before you get into the design and development of the application, you may want to try out the real thing online. Visit http://www.haurysmith.com/condomap.htm to see the real-world example application that I developed for the construction company. This web page is shown in Figure 15.5.
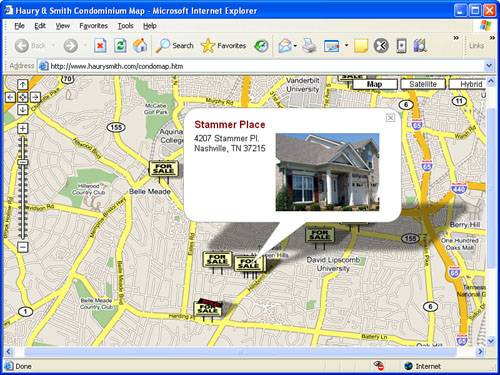
Figure 15.5. The Haury & Smith sample mapping application demonstrates how Google Maps can be used in a practical commercial context.
Again, you spend the rest of this lesson developing a Google Maps application very similar to the one shown in the figure. With this knowledge, you’ll be ready to develop your own mapping applications with relatively little effort.
By the Way
Real estate isn’t the only custom Google Maps application I’ve tackled. I’m in the process of developing the world’s first interactive skatepark map where you’ll eventually be able to find the location of every skateboard (extreme sports) park in the world using Google Maps. Check out http://www.skateparkmap.com/ to find out more.
Developing a custom Google Maps application first involves deciding on a format for the data that you plan on feeding into Google Maps. This is where XML enters the picture in regard to Google Maps. Because the sample application you’re working through in this lesson involves real estate developments, it’s worth considering what pieces of information you might want to code in an XML document in order to map a piece of real estate property:
Property name
Physical address (mailing address)
Thumbnail image for a Google Maps information window
Geocoordinates (latitude and longitude)
Status (active or completed)
By the Way
In the actual Haury & Smith custom mapping application that I developed, a URL is also specified for each real estate property to link from the map back to an information page on the main web site. Because there is no web site associated with the example in this lesson, I left out the URL.
These pieces of information are sufficient to describe any real estate property for the purposes of displaying information about the property in Google Maps. The trick is then determining the best way to effectively represent this information in the context of an XML document. Listing 15.1 contains the partial code for a document that solves this problem with ease.
Example 15.1. The condos.xml Document Containing Condominium Map Data
 1: <?xml version="1.0"?>
 2:
 3: <projects>
 4:   <proj status="active">
 5:     <location lat="36.122238" long="-86.845028" />
 6:     <description>
 7:       <name>Woodmont Close</name>
 8:       <address>131 Woodmont Blvd.</address>
 9:       <address2>Nashville, TN 37205</address2>
10:       <img>condowc.jpg</img>
11:     </description>
12:   </proj>
13:   <proj status="active">
14:     <location lat="36.101232" long="-86.820759" />
15:     <description>
16:       <name>Village Hall</name>
17:       <address>2140 Hobbs Rd.</address>
18:       <address2>Nashville, TN 37215</address2>
19:       <img>condovh.jpg</img>
20:     </description>
21:   </proj>
22:   ...
23:   <proj status="completed">
24:     <location lat="36.091559" long="-86.832686" />
25:     <description>
26:       <name>Harding Hall</name>
27:       <address>2120 Harding Pl.</address>
28:       <address2>Nashville, TN 37215</address2>
29:       <img>condohh.jpg</img>
30:     </description>
31:   </proj>
32: </projects>
The listing contains the complete code for the condos.xml sample document that houses XML data for the real estate sample mapping application. As its name implies, the real estate properties coded in the document are condominium developments. However, all Google Maps will ultimately care about is the data stored in the <location> tag for each piece of property. The <location> tag is where the latitude and longitude for each condominium development is specified. More specifically, this information is provided via the lat and long attributes (lines 5, 14, and 24). Everything else in the document is just supplementary data to provide additional information when the user clicks one of the markers on the map. Even so, this information plays an important role in overall application.
The document is laid out as a series of <proj> tags that each represents an individual real estate project. These tags appear within the root <projects> tag (line 3). Each <proj> tag includes a status attribute that can be set to either active or completed based upon the status of the real estate project (whether it still has units available or it is sold out). The value of the status attribute determines what kind of visual marker is displayed on the map for a given project. Inside of the <proj> tag is a <description> tag that describes more details about a real estate project. The <name>, <address>, <address2>, and <img> tags all combine to provide information that will appear in the information window in Google Maps when the user clicks on a marker.
By the Way
It’s important to point out that the project images in this sample document are specified without any path information, which means that they are expected to reside in the same folder as the XML document.
You now have a solid enough grasp on the underlying data for the mapping application example to push on further and learn how to assemble the code and stylesheet that actually make it work.
Developing a customized map for Google Maps is really a three-step process. The first step is putting together a suitable XML document to house your map data. The second step is creating an HTML web page that creates the map and handles the majority of the work in running the application. And the third step is creating an XSLT stylesheet that is responsible for formatting content to be displayed in an information window when a marker is clicked on the map. You’ve already completed the first step, and now it’s time to knock out the second two.
Earlier in the lesson I let you in on the fact that interacting with the Google Maps API requires a decent understanding of the JavaScript programming language. Knowing this, it shouldn’t come as too much of a surprise that the HTML document that actually displays a custom Google Map contains a fair amount of JavaScript code. Fortunately, even if you don’t know much about JavaScript I’ve already primed you with the how and why that a typical mapping application uses the Google Maps API. With that in mind, take a look at Listing 15.2, which contains the complete code for the condomap.html web page.
Example 15.2. The HTML Document that Houses the Customized Google Map
 1: <!DOCTYPE html PUBLIC "-//W3C//DTD XHTML 1.0 Strict//EN"
 2:   "http://www.w3.org/TR/xhtml1/DTD/xhtml1-strict.dtd">
 3: <html xmlns="http://www.w3.org/1999/xhtml">
 4:   <head>
 5:       <title>Condominium Map</title>
 6:       <script src="http://maps.google.com/maps?file=api&v=1&key=
 7:       ABQIAAAASyb3gcwJHvHRgYeL6xQGZRScAy-eqpGBgb_U5UIf4tD_
 8:       qtSUMBQD201ZWuwo7NWFLUKzESpdimx61w" type="text/javascript"></script>
 9:   </head>
10:   <body style="text-align:center">
11:     <p style="font:bold 14pt arial; color:maroon">Condominium Map</p>
12:     <div id="map" style="width:700px; height:450px"></div>
13:     <script type="text/javascript">
14:     //<![CDATA[
15:     // Initialize the map and icon variables
16:     var map = new GMap(document.getElementById("map"));
17:     map.addControl(new GLargeMapControl());
18:     map.addControl(new GMapTypeControl());
19:     var point = new GPoint(-86.853171, 36.071689);
20:     map.centerAndZoom(point, 6);
21:     var baseIcon = new GIcon();
22:     baseIcon.iconSize = new GSize(48, 40);
23:     baseIcon.shadowSize = new GSize(75, 32);
24:     baseIcon.iconAnchor = new GPoint(24, 38);
25:     baseIcon.infoWindowAnchor = new GPoint(24, 20);
26:
27:     function createMarker(proj, point, description) {
28:       // Create the custom icon
29:       var icon = new GIcon(baseIcon);
30:       if (proj.getAttribute("status") == "active") {
31:         icon.image = "mapicon_forsale.png";
32:         icon.shadow = "mapicon_forsale_sh.png";
33:       }
34:       else {
35:         icon.image = "mapicon_sold.png";
36:         icon.shadow = "mapicon_sold_sh.png";
37:       }
38:
39:       // Create the marker and register the info window listener function
40:       var marker = new GMarker(point, icon);
41:       GEvent.addListener(marker, "click", function() {
42:         marker.openInfoWindowXslt(description, "projects.xsl"); });
43:       return marker;
44:     }
45:
46:     // Open and process the condo XML document
47:     var request = GXmlHttp.create();
48:     request.open("GET", "condos.xml", true);
49:     request.onreadystatechange = function() {
50:       if (request.readyState == 4) {
51:         // Get the nodes
52:         var xmlDoc = request.responseXML;
53:         var projs = xmlDoc.documentElement.getElementsByTagName("proj");
54:         var locations = xmlDoc.documentElement.getElementsByTagName(
55:           "location");
56:         var descriptions = xmlDoc.documentElement.getElementsByTagName(
57:           "description");
58:
59:         // Iterate through the nodes, creating a marker for each
60:         for (var i = 0; i < projs.length; i++) {
61:           var point = new GPoint(parseFloat(locations[i].getAttribute(
62:              "long")), parseFloat(locations[i].getAttribute("lat")));
63:           var marker = createMarker(projs[i], point, descriptions[i]);
64:           map.addOverlay(marker);
65:         }
66:       }
67:     }
68:     request.send(null);
69:     //]]>
70:     </script>
71:   </body>
72: </html>
Roughly the first part of this web page should be somewhat familiar to you thanks to the earlier primer on the Google Maps API. Most of this code follows the general template you saw earlier regarding how a map is created (line 16), controls are added (lines 17 and 18), a default view is established (lines 19 and 20), and so on. Even the code that creates a custom icon is somewhat similar to the icon code you saw earlier in the hour except in this case the status attribute (of the <proj> tag) in the XML document is checked to determine which icon to use (lines 30 through 37). This is the code that results in a different marker being displayed on the map based upon the status (active or completed) of each real estate project. You’ll notice that two marker images are set for each status condition: one for the marker icon and one for its shadow. Figure 15.6 shows the four marker icons used in this sample application.
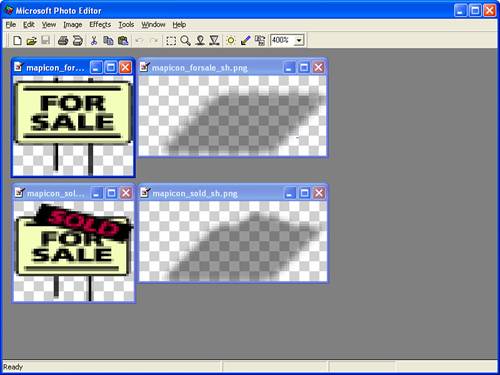
Figure 15.6. The condominium map sample mapping application relies on four custom marker icon images.
The figure shows how a marker that appears on a Google Maps map actually consists of two icons: the marker image and a shadow image with transparency. When combined, these two icons provide a clever visual trick that makes the markers appear to rise off of the map in 3D.
Getting back to the code for the mapping HTML document, each custom icon is used to create a custom marker in the createMarker() function that also establishes the information window and links it to the projects.xsl stylesheet (lines 40 to 43). This code is a little tricky in that a special listener function is created to automatically display an information window in response to the user clicking a marker. It isn’t terribly important for you to understand every nuance in this code—the main thing to note is that this is where the projects.xsl stylesheet is getting connected to the information window.
The last big chunk of code in the HTML document is where the XML document is opened, read, and processed. The XML file is opened on line 48, and then its relevant nodes (proj, location, and description) are grabbed on lines 53 through 57. A loop is then entered that cycles through the projects, creating a marker on the map for each one via calls to the previously mentioned createMarker() function (lines 60 through 65).
The HTML document has now created the custom map in Google Maps, complete with unique markers and information windows ready to spring into action when the markers are clicked. The last thing to address is the XSLT stylesheet that makes the information windows worth looking at.
The XSLT stylesheet for the condominium map application has only one responsibility: format the name and address of the real estate project and display it next to the thumbnail image of the project. Considering the power of XSLT, this is a fairly simple responsibility because it only requires performing some basic transforming of XML content into styled HTML content. Listing 15.3 contains the code for the projects.xsl stylesheet.
Example 15.3. The projects.xsl XSLT Stylesheet that Transforms a Project Description into HTML Code
 1: <?xml version="1.0"?>
 2:
 3: <xsl:stylesheet version="1.0" xmlns:xsl="http://www.w3.org/1999/XSL/
 4: Transform">
 5:   <xsl:template match="/">
 6:     <xsl:apply-templates select="description" />
 7:   </xsl:template>
 8:
 9:   <xsl:template match="description">
10:     <table style="width:320px; height:140px; text-align:left">
11:       <tr>
12:         <td colspan="2" style="font-family:arial; font-weight:bold;
13:         color:maroon">
14:           <xsl:value-of select="name" />
15:         </td>
16:       </tr>
17:       <tr style="vertical-align:top">
18:         <td style="font-family:arial">
19:           <div style="font-size:10pt">
20:             <xsl:value-of select="address" /><br />
21:             <xsl:value-of select="address2" />
22:           </div>
23:         </td>
24:         <td>
25:         <div>
26:           <xsl:apply-templates select="img" />
27:         </div>
28:         </td>
29:       </tr>
30:     </table>
31:   </xsl:template>
32:
33:   <xsl:template match="img">
34:     <img>
35:       <xsl:attribute name="width">166px</xsl:attribute>
36:       <xsl:attribute name="height">125px</xsl:attribute>
37:       <xsl:attribute name="src"><xsl:value-of select="." /></xsl:attribute>
38:     </img>
39:   </xsl:template>
40: </xsl:stylesheet>
The stylesheet begins by immediately matching up the <description> tag and applying the description template (lines 5 to 7). The <description> tag serves as the container for the more specific project description tags (<name>, <address>, <address2>, and <img>), so it makes sense to start out by processing it first. Within the description template, the project name is first transformed into HTML so that it appears as a row in a table in a bold maroon font (lines 11 through 16). The table cell for the name is given a column span (colspan) of 2 to indicate that it spans both of the cells in the next row. This is necessary so that the name remains aligned to the left edge of the information window.
The second row in the table consists of two cells; the first cell contains the address of the project while the second cell contains the thumbnail image. The address of the project is transformed so that it appears aligned to the top of the cell (lines 18 to 23). The thumbnail image is placed in the next cell with no special formatting (lines 24 to 28), although the <img> tag does use its own template to get the job done (lines 33 through 39). The main point of this template is to specify the width and height of the image, which is consistent for all of the project thumbnails, along with specifying the actual source file for the image.
This wraps up the XSLT stylesheet for the condominium map example. You’re finally ready to try out everything in a web browser and see how the finished product works.
This sample application represents one of the most complete examples you see in this book. It’s admittedly somewhat of a challenge to merge several different technologies into a single example without it getting overly complex but this example remained reasonably manageable while combining XML, JavaScript, and XSLT in a single application. Hopefully you’ll find the end result to be worth the effort. Figure 15.7 shows the condominium map example upon first being loaded as viewed in Internet Explorer.
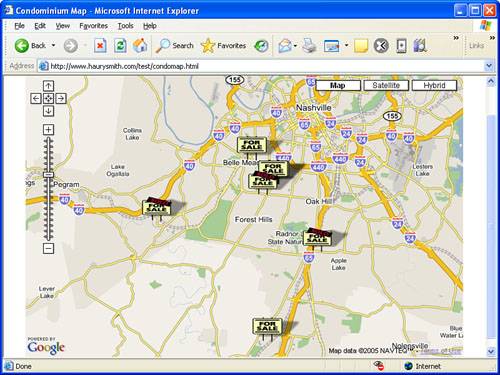
Figure 15.7. The condominium map sample application starts out with all of the project markers in view.
Not surprisingly, the application starts out with all the project markers in view on the map. This is no accident, by the way—I carefully selected the initial viewing area and zoom level of the map (line 20 in Listing 15.2) so that you could see all of the projects. Don’t forget that what makes your custom Google Maps application so cool is that you can still use all of the familiar navigational features built into Google Maps. You can drag the map around to view other areas, as well as zoom in and out on the projects and their surroundings. You can also switch back and forth between Map, Satellite, and Hybrid views. Perhaps most importantly, you can click any of the project markers to get information about each specific project. Figure 15.8 shows the condominium map zoomed in very tight with one of the project information windows open.
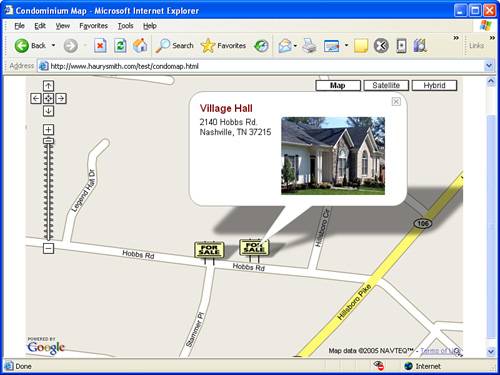
Figure 15.8. Clicking on a marker in the example opens up an information window containing the project name, address, and thumbnail image.
This map reveals how close two of the projects are located to each other. Hopefully it also reveals how valuable this tool could be to potential customers who are searching for real estate in a certain neighborhood or area of a city. It’s important to keep in mind the practical implications of a custom mapping application, and what value it brings to other people who might end up using it.
This hour took you on a journey through one of the most interesting and compelling tools in the online world, Google Maps. I realize at times I probably sounded like a cheerleader for Google Maps but the reality is that I’ve personally found it to be incredibly handy for all kinds of different things. Yes, I’ve used it for common mapping tasks such as helping with driving directions and finding landmarks when traveling, but I’ve also used it to gain a unique perspective on the world around me. Who would’ve thought a few years ago that the Web would make it possible to view up-to-date crime statistics on a map of where they occurred? Or what about tracking taxicabs live as they drive through major cities? These are the tip of the iceberg in terms of how an application such as Google Maps can improve our interactions with the world. And thanks to Google opening up its API to developers, you can be a part of it all.
This hour not only taught you how Google Maps works from a programming perspective but it also showed you how to take advantage of Google Maps to construct your own unique mapping applications. Granted, creating a Google Maps application requires a mixture of several web development disciplines such as JavaScript and XSLT. Even so, you found out how a solid understanding of XML can go a long way toward helping you roll out your own custom maps.
I tried to open the example condomap.html web page and it won’t work. What’s the problem? | |
Google has strict rules about how you use Google Maps, and one of these rules has to do with only hosting maps on servers for which you’ve obtained an API key. This means that a page can only be hosted from a server associated with the API key in the document. Because the API key in the sample document is one that I obtained to use on a server that I use, it won’t work when opened from anywhere else, including from your local hard drive. You’ll need to obtain your own API key from Google at http://www.google.com/apis/maps/signup.html, and then host the example map on your own server. I know that’s a pain but it’s the way Google has it set up. | |
Can I use another online mapping service such as MapQuest to create custom maps? | |
Yes, but MapQuest appears to only make its programming interface available to businesses that are interested in partnering with MapQuest. At least for now, Google Maps is much friendlier to the hobbyist and small-time web developer who want to experiment with creating custom mapping applications. For this reason alone Google Maps is a better option than MapQuest for creating XML-based mapping applications. That Google Maps is a more interesting technology outside of custom maps is just icing on the cake. | |
Can I use Google Maps to beat a speeding ticket in court? | |
Absolutely! I recently read a story about a guy who was pulled over for running a red light. In court, the policeman explained how the driver ran the red light while turning onto a one-way street. The driver countered by explaining that the only reason he ran the light was because of a rapidly approaching oncoming vehicle that he had to wait on before continuing through the intersection. The judge challenged the driver’s assertion that the street was a two-way street. Thanks to a notebook computer and a sketchy Wi-Fi connection, the driver quickly launched Google Maps in the courtroom and zoomed in on the intersection in question. Indeed, Google Maps revealed a two-way street, confirming the driver’s assertion. Google Maps 1, Police 0. | |
Is the moon really made of cheese? | |
Visit http://moon.google.com/ and find out for yourself—make sure you zoom in on the map. |
The Workshop is designed to help you anticipate possible questions, review what you’ve learned, and begin learning how to put your knowledge into practice.