HTML is dead. Web developers have to accept this and move on to XHTML. | ||
| --Uttam Narsu | ||
Those are strong words. Actually, I think they are intended more as a directive than a statement but the general idea is to push web developers toward XHTML. An important variant of XHTML is called XHTML Mobile, and its focus is on mobile devices that don’t require the full XHTML feature set. You’ve probably experienced the challenge of trying to “browse” the web on a mobile phone. If so, you probably understand how constrained the mobile phone environment can be in terms of limited screen space, processing power, memory, and so on. Some mobile devices exist that are more flexible in this regard, but the fact remains that mobile devices have unique needs when it comes to accessing online information.
You may have heard of WML (Wireless Markup Language), which is a markup language used to code scaled down web pages for mobile devices. WML strips a transmission down to its bare essentials by providing what is basically a pared down HTML for the wireless world. Paradoxically, it offers a remarkable amount of interactivity through its action elements, navigation controls, and scripting capabilities. WML and XHTML Mobile are technically two different technologies but efforts are underway to combine them into a single technology that solidifies an XML future for mobile web browsing. This hour explores WML, XHTML Mobile, and the imminent convergence of the two.
In this hour, we’ll cover
How WML and XHTML Mobile fit into the state of the wireless web
Decks and cards—the anatomy of a WML document
Formatting tags for WML text
How to provide for user entry in WML
Blending WML with XHTML Mobile
The wireless web has undergone a lot of changes, some of which affect XML’s role in developing mobile content. For this reason, it’s important to understand how the wireless web has evolved to where it is today, and what ramifications this evolution has for mobile XML content developers.
Back in Hour 21, “Adding Structure to the Web with XHTML,” you learned how XHTML was created as a new and improved HTML that adheres to the more rigorous syntax of XML. In version 1.1 of XHTML, the features were modularized so that features could be selectively added and removed to accommodate different applications. XHTML Basic is one of these modularized versions of XHTML, and its focus is on supporting a limited set of features that are uniquely suited to mobile devices. For example, frames are not supported in XHTML Basic. XHTML Basic doesn’t solve all of the mobile issues, however, so a profile was built on top of XHTML Basic called XHTML Mobile. Its job was to fill in some of the gaps in XHTML Basic. As an example, XHTML Mobile adds support for some presentation elements not found in XHTML Basic, as well as stylesheet support. XHTML Mobile is the standard markup language for WAP (Wireless Application Protocol) 2.0, which is the latest mobile industry standard for the wireless web. But let’s back up for just a moment.
By the Way
Mobile devices include any handheld or easily portable technology—cell phones, pagers, connected organizers, handheld PCs, and potentially others.
Before XHTML Mobile came along there were two primary mobile web services, WAP and iMode. iMode was created by NTTDoCoMo, and is popular in Japan and parts of Europe. WAP was created by a group of mobile industry leaders, and is the predominant standard for serving up mobile content worldwide. This version of WAP is known as WAP 1.0, and has taken a fair amount of criticism despite its success. WAP 1.0 and iMode rely on their own markup languages for coding pages served on each. More specifically, WAP 1.0 is based on WML (Wireless Markup Language) and iMode is based on cHTML (Compact HTML). These languages have both worked as basic markup languages for mobile web pages but they are lacking in many ways as we move to a more powerful XML-based wireless web.
Many of the core features in WML and cHTML converged in XHTML Mobile. A few of the WML-specific features, such as its card/deck user interface metaphor (more in this in a moment), were added to XHTML Mobile to form yet another language called WML2. WML2 represents the most complete XML-based mobile markup language for the wireless web but it isn’t widely supported yet. Most current mobile browsers do support XHTML Mobile and regular WML (WML1). For this reason, a combination of WML1 and XHTML Mobile is the best bet for mobile web development.
Let’s summarize the XML-related languages that enter the picture with the wireless web:
WML1—Widely supported, based on WAP 1.0
cHTML—Widely supported internationally, based on iMode
XHTML Mobile—Rapidly gaining support, based on WAP 2.0
WML2—Very little support, considered an extension to WAP 2.0
Because I’ve tipped my hand that WML and XHTML Mobile represent the current approach for mobile web development, it’s worth taking a closer look at those two technologies individually. As a mobile alternative to HTML, WML addresses the issues of limited bandwidth and limited screen real estate, which are common limitations of wireless devices. Wireless connections are typically slow, and the display space accommodates a relatively small number of text characters—depending on the device—and sometimes 1-bit (straight black-and-white) monochrome graphics. WML documents are extremely simple, created with a small selection of tags. WML’s deck-and-card metaphor subdivides a WML document—envisioned as a “deck”—into components—“cards.” This allows the document to be transmitted all at once (if desired, and space allowing), without the need for the browser to display it all at once. However, it’s ultimately up to the specific browser as to how a WML document is downloaded.
Although XHTML Mobile doesn’t support many of the presentation features of WML, such as the card/deck user interface, it does support the use of CSS. Technically, WAP 2.0 represents the combination of XHTML Mobile and CSS. As you’ve seen several times throughout the book, CSS provides a great deal of control over the formatting and display of XML content. When I refer to CSS as it applies to XHTML Mobile, I’m actually referring to a subset of CSS known as WCSS (Wireless CSS), which is somewhat of a scaled down CSS. In other words, WCSS is to XHTML Mobile what CSS is to XHTML.
The good news in regard to XHTML Mobile and WAP is that you can build pages in either language and know that they will be supported on most mobile web browsers. If backward compatibility is a huge issue, you might lean toward WML. If you want a language that more cleanly separates content from presentation, XHTML Mobile is the answer. And finally, you may find that mixing the languages across different pages provides you with the most flexibility.
By the Way
When I refer to mixing WAP and XHTML Mobile, I don’t mean mixing them within the same document. I mean that you can create a WAP document and link it to an XHTML Mobile document.
The remainder of the hour focuses on the WML and XHTML Mobile languages, and how to use them to build wireless web pages.
WAP 1.0 and its components, like WML, are stewarded by the WAP Forum, an industry consortium of mobile device manufacturers and service providers. The WAP Forum is important because it serves as a single source of information on WAP-related technologies. The WAP Forum is also responsible for creating and maintaining formal specifications that result in industry standards, such as the WML language.
By the Way
When I refer to WML throughout the remainder of this hour, I’m talking about any and all versions of WML1, which you may also see referred to as WML 1.x.
Before jumping into WML code, it’s worth going over a few fundamental issues that surround any XML-based markup language. More specifically, you need to know about the WML specification, which is the last word on WML, as well as the WML DTD and MIME types associated with WML. Following is the information you need to get started with WML:
The WML specification can be found at http://www.wapforum.org/what/technical.htm
The WML DTD is
"-//WAPFORUM//DTD WML 1.3//EN", and can be found at http://www.wapforum.org/DTD/wml13.dtd
As any legitimate XML-based language must, WML defines a root element for conforming documents—wml. As such, the wml root element serves as the container for all other elements in WML documents. To help facilitate display and navigation in limited screen space, a WML document is conceived as a deck of cards, one of which is visible at any given time. Although the document is typically transmitted as a single unit, it is navigated piece-by-piece, or card-by-card.
The wml element is the parent of the card element, which in turn contains all other elements in the document. You can have an unlimited number of cards in each document (deck). A card is intended to, but doesn’t necessarily, convey approximately one screen of information. (To scroll beyond the screen’s boundaries, the user can navigate with the arrow keys.)
Because so little text fits on the screen of a mobile device, efficient navigation is critical in a WML document. WML provides numerous ways of getting around, from the anchor element, which is adopted from HTML, to the monitoring of user events. One of WML’s solutions to the screen real estate crunch is its capability of mapping actions to the mobile device’s softkeys, which are the mysterious blank buttons just below the screen. The labels (names) that appear on the screen just above them may vary from one device to another, but their intention is usually clear. For the most part, they appear only when WML code instructs them to do so.
The softkeys provide navigation controls beyond what you can fit on the screen in the content of a document. For instance, a Menu or Options key displays the equivalent of an HTML navigation bar, whereas a Reset key takes the user back to the first card in the deck. The Link button, as shown in the examples in this hour, appears when the text contains hyperlinks.
Besides anchors, WML provides a selection list tool that lets you display a series of choices as a numbered list. Thus, the user can select an option with a number key on the keypad, in addition to using the Link button.
WML offers a number of action elements (go, prev, refresh, and so on) that move the user from one card to another under specified contexts, such as the use of go href="url" in the anchor element (a href, and so forth, is a shorthand version of this). These elements are flexible in their implementation and can be associated with a number of parent elements in order to provide a considerable amount of mobility.
Events in WML are comparable to events in any scripting or programming language; you set up the document to wait for a specified event to happen, and when it does the program automatically carries out a designated task. Some events you can code for are onenterforward, onenterbackward, and ontimer, which indicate entering a card in the forward direction, entering a card backward, and the elapsed time of a timer that is associated with a card, respectively.
Given the nature of mobile devices, screen space is severely limited and bandwidth is precious. Thus, we can’t afford to clog the airwaves with fancy formatting or layout directives, which is why WML offers only the simplest of formatting tags. WML does support tables, but they are very primitive, nothing like the sophisticated layout capabilities afforded by tables in HTML. The few text-formatting tags that do exist in WML have been adapted straight from HTML, making for a flat learning curve for traditional web developers.
Graphics support in WML is restricted to the WBMP (Wireless BitMap Picture) format, a 1-bit bitmap format whose files end in a .wbmp extension. One bit means on-or-off, black-or-white, which is just two colors. Besides the color depth restriction, the size is limited as well; WML images can’t measure more than 64 3 64 pixels. Because you probably aren’t accustomed to storing images in the WBMP format, you’ll need to use a graphics converter of some sort to convert other graphics formats to WBMP. You’ll find sources for such software listed in the “Inserting WBMP Images” section later in this hour.
This section discusses the basics of setting up a WML document and describes several of the most common tasks involved in authoring a document for the wireless web. You’ll work through an example of a mobile web site called FilmTime, which uses geographic coordinates to present a list of movies currently playing within 10 miles of the user’s current position. Menus navigate the user through a series of choices about theatres, show times, and film synopses.
For the sake of simplicity, you won’t worry about where FilmTime gets the user’s coordinates, how it maps coordinates to a ZIP code, or how it processes database queries. You also won’t worry about how the components you’re authoring fit into the larger scheme of things, as the main objective is to introduce you to the elements rather than coaching you in designing a full-fledged application. In other words, this example focuses on the wireless aspects of such a web site, not on the technical details that don’t directly involve WML.
By the Way
For information and inspiration about the advanced aspects of WML (and of course, WAP), you can really take the bull by the horns and visit the formal WAP specification at http://www.wapforum.org/what/technical.htm. Or, you can go someplace more conversational, but no less exhaustive, such as http://www.wirelessdevnet.com/.
Though this hour does not introduce you to the full range of WML elements and their attributes, you will learn how to carry out the following tasks in WML:
Create a deck (WML container document) and a number of cards, or sections of the document
Enter and format text
Navigate around other cards in the deck
Associate events with a card element
Set up a field for user entry
Insert an image
The next few sections get you going with the creation of your first WML document and guide you through the fundamental tasks required to develop complete WML documents.
As with just about any kind of software development, tools can ultimately determine how likely you are to succeed in completing a project. WML is no different, although its tool requirements are fairly straightforward. You will need the following items to build a wireless web site with WML:
A text editor, such as the no-frills Windows Notepad or Simple Text, or a dedicated WML editor
A mobile phone simulator—software that runs on your PC or online and displays content as the user sees and experiences it (on a “microbrowser”), complete with clickable buttons
Debugging capabilities, optionally, which typically accompany the simulator
The most important tool in any WML developer’s arsenal is the mobile phone simulator because it is what allows you to test WML documents in the context of a wireless device. A mobile phone simulator acts as a microbrowser, which is a small-scale web browser that is designed specifically for wireless devices. The wireless tool used throughout this hour is the Nokia Mobile Browser Simulator, which is available for free download from Nokia (http://www.forum.nokia.com/main/0,,034-13,00.html). The Nokia Mobile Browser Simulator is handy because it isn’t very forgiving with your WML and XHTML Mobile code. It will quickly let you know if a tag or attribute is used improperly, and won’t display a page until the problem is fixed.
By the Way
If you visit the Nokia site to download the Nokia Mobile Browser Simulator, make sure you download the simulator, not the Nokia Mobile Internet Toolkit. The toolkit is an excellent set of tools but it is geared toward editing mobile content, not simulating it.
Another good alternative to the Nokia Mobile Browser Simulator is WinWAP, which actually looks more like a traditional HTML-based web browser than a WML microbrowser. WinWAP is a good test browser for WML documents because it is so simple to use. You can download a trial version of WinWAP at http://www.winwap.org/. For a more full-featured microbrowser and WML development environment, you might consider the Openwave SDK, which provides a highly useful microbrowser that resembles a virtual mobile phone. You can download the Openwave SDK for free at http://www.openwave.com/products/developer_products/.
By the Way
You might also want to consider an online mobile phone simulator such as Wapaka. Wapaka is a Java-based microbrowser that allows you to test WML web pages on a simulated mobile phone directly in a normal web browser. Wapaka is neat in that it allows you to change devices to experiment with different screen sizes. To check out Wapaka, visit http://www.digitalairways.com/wapaka/.
In order to transmit WML documents, you need a WML gateway and a web server in place. The cell phone transmits the user’s information to a WAP gateway, which sends it on to the web server, which stores it as session information in the user profile.
Your web server needs to know how to process the MIME types of the WML documents, as mentioned in the section “Nuts and Bolts” earlier in the hour. You’ll need to take a look at your web server’s documentation to learn how to do that. Essentially, you need to introduce each MIME type to the server in a statement of its own. Following are the MIME types associated with WML:
To view the sample WML documents, you’ll need a mobile phone simulator such as the Nokia Mobile Browser Simulator, WinWAP, the Openwave SDK, or some other suitable WML tool that includes a microbrowser. Most of the major mobile phone manufacturers offer simulators that you can download and install and use to test WML pages in a microbrowser. With a microbrowser in hand, you’re ready to begin creating your first WML document.
To begin creating a WML document, you must first enter the familiar XML declaration, and then reference the WML DTD. The WML root element, wml, is then added as a paired tag. Following is code for a skeletal WML document, which accomplishes these basic tasks:
<?xml version="1.0"?>
<!DOCTYPE wml PUBLIC "-//WAPFORUM//DTD WML 1.3//EN"
  "http://www.wapforum.org/DTD/wml13.dtd">

<wml>
</wml>
After entering this code into a text editor, you should save it with a .wml extension, which is standard for WML documents. Granted, some microbrowsers don’t care about the file extension and will display documents okay regardless of the extension, but it’s good programming practice to get it right and use the correct file extension.
The card element is the basic unit of content in WML and the parent of all lower-level elements in the document; that is to say, it is the only child of the wml element. So, one card and a small snippet of text is all it takes to get you to the tiny silver screen. Of course, most practical WML documents consist of multiple cards.
The p, or paragraph, element is a direct import from HTML and is a child of the card element. However, unlike its HTML counterpart, it has a number of children, discussed later in the hour. You can use it to present straight text, as shown in Listing 23.1.
Example 23.1. A Simple WML Document with a Single Card (hello.wml)
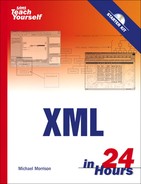
1: <?xml version="1.0"?>
2: <!DOCTYPE wml PUBLIC "-//WAPFORUM//DTD WML 1.3//EN"
3:   "http://www.wapforum.org/DTD/wml13.dtd">
4:
5: <wml>
6:   <card>
7:     <p>Hello, Movie Lovers!</p>
8:   </card>
9: </wml>
Figure 23.1 shows the resulting document as viewed in a microbrowser.
As you can see, it isn’t too difficult to place a greeting into a WML document and make it available to the world of wireless devices.
Even though wireless device screens are typically somewhat limited in terms of their graphical capabilities, it is possible to format text in WML documents to a certain extent. The good news is that if you’ve ever formatted text in HTML, you’ll find the WML approach to be very familiar. Following are the text formatting elements used in WML:
b— Bolds textbig— Enlarges text relative to the browser’s default text sizeem— Emphasizes text in a browser-defined fashioni— Italicizes textsmall— Reduces text relative to the browser’s default text sizestrong— Renders text “strong,” whatever that means to the given browser
Listing 23.2 shows how to put these formatting elements to use in formatting text.
Example 23.2. A WML Document That Shows How to Format Text (formattext.wml)
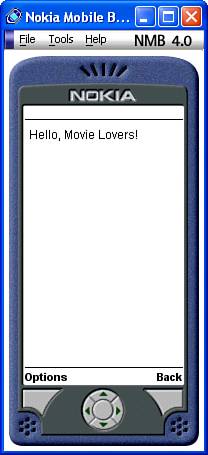
 1: <?xml version="1.0"?>
 2: <!DOCTYPE wml PUBLIC "-//WAPFORUM//DTD WML 1.3//EN"
 3:   "http://www.wapforum.org/DTD/wml13.dtd">
 4:
 5: <wml>
 6:   <card>
 7:     <p><b>FilmTime!</b></p>
 8:     <p><big>FilmTime!</big></p>
 9:     <p><em>FilmTime!</em></p>
10:     <p><i>FilmTime!</i></p>
11:     <p><small>FilmTime!</small></p>
12:     <p><strong>FilmTime!</strong></p>
13:   </card>
14: </wml>
The results of the code in Listing 23.2 are shown in Figure 23.2.
As you can see in the figure, WML doesn’t go crazy in its support for text formatting, but it does cover the basics: bold, italic, and so on. Keep in mind that it is up to the microbrowser to determine exactly how to draw formatted text, so you may well get different results with other browsers.
A popular text layout feature of HTML is tables, which allow you to arrange text and other content in a grid-like array. Tables are supported in WML, but their role is modest as compared to tables in HTML. Think of WML tables as more like a typewriter’s tabs, useful for alignment but not much else.
There are many ways to structure and navigate around a document in WML, all of which have their pros and cons. Four of the more common approaches follow:
Anchors
The
select>optionconstructA series of links using the OK softkey
A separate card using other softkeys, such as the Menu key
Which navigation approach you choose may be a matter of weighing the advantages and disadvantages of the particular document you’re creating, or it may be part of the style guide of the company you work for. There isn’t really a right or wrong way to navigate WML documents, but generally speaking, simpler is better.
Anchors, which form the basis of hyperlinks in HTML, have the hands-down advantage in terms of WML navigation approaches due to the familiarity from HTML. The syntax follows the HTML anchor syntax exactly:
<a href="url">content</a>
This is actually the short form of the longer anchor element. In other words, though HTML relies on the somewhat cryptic a element, WML allows you to spell it out with the anchor element, like this:
<anchor href="url">content</anchor>
The best way to get acquainted with the anchor element is to see it in the context of a sample document. The hypothetical FilmTime wireless web site presents a list of movie titles that serve as links. The user navigates the list with the up or down arrow keys and makes a selection by clicking the Link button. Alternatively, they can use the Send button (the physical one) to jump to a link. Listing 23.3 contains the code for a WML document that uses anchors to allow the user to select from a listing of movies.
Example 23.3. A WML Document That Presents a Movie Listing (movielist.wml)
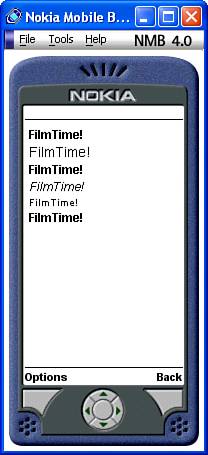
1: <?xml version="1.0"?> 2: <!DOCTYPE wml PUBLIC "-//WAPFORUM//DTD WML 1.3//EN" 3: "http://www.wapforum.org/DTD/wml13.dtd"> 4: 5: <wml> 6: <card id="films"> 7: <p align="center"><b>***FILMTIME!***</b></p> 8: <p><b>FILMS NEAR YOU</b></p> 9: <p><a href="#allkingsmen">All the King's Men</a></p> 10: <p><a href="#theproducers">The Producers</a></p> 11: <p><a href="#kingkong">King Kong</a></p> 12: </card> 13: 14: <card id="allkingsmen"> 15: <p><b>All the King's Men</b></p> 16: <p>Remake of the classic novel, which charts the spectacular rise 17: and fall of a charismatic Southern politician, "Boss" 18: Willie Stark.</p> 19: </card> 20: 21: <card id="theproducers"> 22: <p><b>The Producers</b></p> 23: <p>Remake of a Broadway hit about two producers who set out to 24: make the worst movie ever but unwittingly turn out a smash hit, 25: much to their dismay.</p> 26: </card> 27: 28: <card id="kingkong"> 29: <p><b>King Kong</b></p> 30: <p>Remake of the 1933 classic, in which a giant ape is found on a 31: mysterious island and brought back to New York City.</p> 32: </card> 33: </wml>
As you can see, multiple card elements are used here to represent different screens of information, one for each movie. Each movie card in the document is assigned a unique ID via the id attribute (lines 14, 21, and 28). Lines 9–11 use the a element with the href attribute to link to the movie cards in the deck. The value of the href attribute is the id attribute of the card to which you’re linking. The result of this code is shown in Figure 23.3. In this browser, each link is underlined, much as it would be in a traditional HTML web browser. Other browsers may render them differently, such as using square brackets around the links.
The previous example showed how to allow the user to select from a list of options using anchors. You can get almost the same effect by using the select element with its child, the option element. This results in a set of radio buttons for each selection option. As with the anchor approach, the user can hit the physical Options or Send key to jump to a link.
The select element itself is a child of the p (paragraph) element, which is in turn a child of the card element. In other words, you need to place the select element within a paragraph. Listing 23.4 illustrates the select>option construction in an example that allows you to select movie theatres from a list.
Example 23.4. Using WML to Select a Movie Theatre (theatrelist.wml)
 1: <?xml version="1.0"?>
 2: <!DOCTYPE wml PUBLIC "-//WAPFORUM//DTD WML 1.3//EN"
 3:   "http://www.wapforum.org/DTD/wml13.dtd">
 4:
 5: <wml>
 6:   <card>
 7:     <p align="center"><b>***FILMTIME!***</b></p>
 8:     <p><b>KING KONG NOW PLAYING AT...</b>
 9:     <select>
10:       <option onpick="#rio">Rio</option>
11:       <option onpick="#apollo">Apollo</option>
12:       <option onpick="#crown">Crown</option>
13:     </select>
14:     </p>
15:   </card>
16:
17:   <card id="rio">
18:     <p><b>Rio Theatre</b></p>
19:     <p>455 River Street, Anytown</p>
20:     <p>111.222.3333</p>
21:     <p>3:30, 5:30, 7:30</p>
22:   </card>
23:
24:   <card id="apollo">
25:     <p><b>Apollo Theatre</b></p>
26:     <p>779 Pax Romana Drive, Chesterton</p>
27:     <p>111.222.4444</p>
28:     <p>3:45, 5:50, 7:40</p>
29:   </card>
30:
31:   <card id="crown">
32:     <p><b>Crown Theatre</b></p>
33:     <p>83 Imperial Avenue, Kingston</p>
34:     <p>111.234.5566</p>
35:     <p>2:00, 4:30, 6:45</p>
36:   </card>
37: </wml>
In this example, a select element is used (line 9) to establish a list of theatres from which the user can select. Each theatre option is represented by an option element accompanied by an onpick attribute (lines 10–12), which determines the destination of the option link. The link destinations correspond to card IDs that appear later in the document (lines 17, 24, and 31). The rest of the listing is similar to the anchor example in structure, and the result is shown in Figure 23.4.
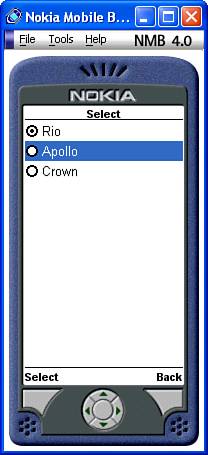
Unlike the a href construction, select>option's output is a set of radio buttons, which allows the user to make the selection by navigating through the buttons.
Another approach to navigating through the cards in a WML document is to set up the choices as a sequence of cards through which the user navigates by hitting the OK softkey (accessible via Options in the Nokia microbrowser) until reaching the end of the deck. This feature is useful for presenting large chunks of narrative material. See the following section on assigning to other softkeys for a complete list of available actions.
By the Way
If you’re looking to create a document that has a presentation feel to it, you might consider combining the navigation with a timer (see “Associating an Event with a Task,” next section) so that the presentation advances from one screen to the next automatically.
Listing 23.5 contains sample code for a WML document that uses the OK mapping for each card as the plot for the movie King Kong, laid out screen by screen.
Example 23.5. Describing a Movie Plot with WML (moviedesc_kingkong.wml)
 1: <?xml version="1.0"?>
 2: <!DOCTYPE wml PUBLIC "-//WAPFORUM//DTD WML 1.3//EN"
 3:   "http://www.wapforum.org/DTD/wml13.dtd">
 4:
 5: <wml>
 6:   <card id="one">
 7:     <do type="accept">
 8:       <go href="#two"/>
 9:     </do>
10:     <p align="center"><b>***FILMTIME!***</b></p>
11:     <p><i>King Kong</i> This remake of the 1933 classic follows an
12:       expedition to the mysterious Skull Island, where a legend of
13:       a giant gorilla draws explorers and filmmakers.</p>
14:   </card>
15:
16:   <card id="two">
17:     <do type="accept">
18:       <go href="#three"/>
19:     </do>
20:     <p align="center">-2-</p>
21:     <p>The legend, however, is both real and dangerous, living in a
22:       massive jungle that has protected him and other prehistoric
23:       creatures for decades.</p>
24:   </card>
25:
26:   <card id="three">
27:     <do type="accept">
28:       <go href="#four"/>
29:     </do>
30:     <p align="center">-3-</p>
31:     <p>Kong finds solace in a beautiful woman (Naomi Watts), and is
32:       subdued enough to be captured and brought back to New York.</p>
33:   </card>
34:
35:   <card id="four">
36:     <do type="reset">
37:       <go href="#one"/>
38:     </do>
39:     <p align="center">-4-</p>
40:     <p>However, as the captors and the public will learn, it takes a
41:       lot more shackles to hold back an animal of such monstrous
42:       size.</p>
43:   </card>
44: </wml>
In lines 7, 17, and 27, the accept value of the do element’s type attribute assigns the enclosed go action to the OK softkey. I’ll admit that I’m jumping ahead here a bit, but suffice it to say that the do element, which you learn more about in a moment, is how you assign an action to the OK softkey. More specifically, the value accept for the type attribute indicates that the action applies to the OK softkey. Other possible actions are prev and noop, the last of which is designed to eliminate any default behavior in the microbrowser that might result in an unintended jump (for instance). The last card in the document, beginning on line 36, sets the Reset button.
Tasks, such as moving from one card to the next, can be set so that they are triggered by actions, such as timer events. For example, you could re-create the movie plot example so that it presents the same text in the same order but uses a timer that automatically flips the display to the next card. This is accomplished with an event called ontimer. Events are specified using the onevent element, which is a child of the card element. Following is the syntax of the onevent element:
<card>
  <onevent type=type>
    action
  </onevent>
</card>
To create a timer, you must set the type attribute of the onevent element to ontimer and then provide a separate timer element that specifies the duration of the timer. The unit of measurement of the timer’s value is a 10th of a second, which means that a value of 20 represents two seconds. Following is a code snippet that demonstrates how to set a two-second timer that flips to the second card in the movie plot document:
<card id="one">
  <onevent type="ontimer">
    <go href="#two"/>
  </onevent>
  <timer value="20"/>
  <p align="center"><b>***FILMTIME!***</b></p>
  <p><i>King Kong</i> This remake of the 1933 classic follows an
    expedition to the mysterious Skull Island, where a legend of
    a giant gorilla draws explorers and filmmakers.</p>
</card>
Better yet, there’s a shortcut that allows you to include the ontimer attribute directly in the card element, eliminating the need for the onevent element and its contents:
<card id="two" ontimer="#three">
  <timer value="50"/>
  <p align="center">-2-</p>
  <p>The legend, however, is both real and dangerous, living in a
    massive jungle that has protected him and other prehistoric
    creatures for decades.</p>
</card>WML allows you to map cards to the Menu (or Options) and other softkeys. This is accomplished with the do element, which has an attribute named type that is set to indicate which softkeys are targeted by the mapping. The type attribute of the do element can be any of the following actions that correspond to the microbrowser’s softkeys:
accept— OK buttondelete— Delete buttonhelp— Help buttonoptions— Options or Menu buttonprev— Prev button, return to previous cardreset— Return to first card of the deck, and/or reset variables
Listing 23.6 contains sample code for a WML document that demonstrates how to use the do element to map movie options to the Options softkey; pressing the Options/Menu key displays a list of links to other cards. Those cards, in turn, link to cards in other WML documents.
Example 23.6. An Example of How to Select a Movie in WML (movieselect.html)
 1: <?xml version="1.0"?>
 2: <!DOCTYPE wml PUBLIC "-//WAPFORUM//DTD WML 1.3//EN"
 3:   "http://www.wapforum.org/DTD/wml13.dtd">
 4:
 5: <wml>
 6:   <card id="top">
 7:     <p>Press the Menu button for more choices:</p>
 8:     <do type="options" name="movies" label="Movies">
 9:       <go href="#movies"/>
10:     </do>
11:     <do type="options" name="synopses" label="Synopses">
12:       <go href="#synopses"/>
13:     </do>
14:     <do type="options" name="theatres" label="Theatres">
15:       <go href="#theatres"/>
16:     </do>
17:   </card>
18:
19:   <card id="movies">
20:     <p align="center"><b>***FILMTIME!***</b></p>
21:     <p><b>FILMS NEAR YOU</b></p>
22:     <p><a href="moviedesc_allkingsmen.wml">All the King's Men</a></p>
23:     <p><a href="moviedesc_theproducers.wml">The Producers</a></p>
24:     <p><a href="moviedesc_kingkong.wml">King Kong</a></p>
25:   </card>
26:
27:   <card id="synopses">
28:     <p><b>SYNOPSES</b>
29:     <select>
30:       <option onpick="movielist.wml#allkingsmen">All the King's Men</option>
31:       <option onpick="movielist.wml#theproducers">The Producers</option>
32:       <option onpick="movielist.wml#kingkong">King Kong</option>
33:     </select>
34:     </p>
35:
36:   </card>
37:
38:   <card id="theatres">
39:     <p><b>THEATRES NEAR YOU</b>
40:     <select>
41:       <option onpick="theatrelist.wml#rio">Rio</option>
42:       <option onpick="theatrelist.wml#apollo">Apollo</option>
43:       <option onpick="theatrelist.wml#crown">Crown</option>
44:     </select>
45:     </p>
46:   </card>
47: </wml>
This example uses several do elements to link to parts of the document within the Options softkey. For example, the first do element (line 8) links to the “movies” card because of the nested go element (line 10); the href attribute of the go element is set to #movies. This approach is also used with the two other cards (“synopses” and “theatres”). Notice that the original anchor approach to linking cards is used in the “movies” card (lines 22–24), whereas the option element is used to allow selection within the “synopses” and “theatres” cards (lines 30–32 and 41–43). Figure 23.5 shows the resulting options for this document as viewed in the Nokia Mobile Browser Simulator; keep in mind that the mapping of these options will differ when viewed on an actual wireless device because of the softkeys.
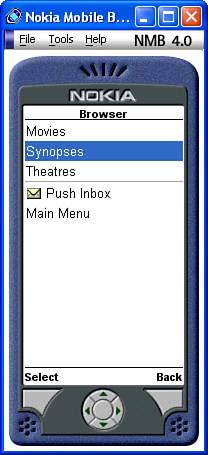
In this relatively simple example, not a whole lot is accomplished by putting the choices in a separate options menu rather than directly on the screen. But on a larger commercial web site with a great number of cards, it could be a very efficient design element. As an example, consider other types of corporate sites where users have become accustomed to the Menu or Options button linking to a global set of choices, such as “Company,” “About,” “Careers at . . .,” and so on. The point is that as a site becomes deeper in terms of content, the options approach starts to pay off versus normal anchors.
As you learned earlier in the hour, it is possible to display images in WML documents. WML supports only one graphics format, WBMP, which stands for Wireless BitMap Picture. The WBMP format is a 1-bit monochrome format and, currently, the only graphics format supported by WML. Because most traditional paint applications don’t support WBMP just yet, you’ll have to find a converter application to convert traditional images, such as GIFs or BMPs, into the WBMP format. One such converter application is offered for free by the Waptiger WAP search engine. There is even an online version of Waptiger’s WBMP Converter at http://www.waptiger.com/bmp2wbmp/ that allows you to convert 1-bit BMP bitmaps to WBMP images. This online converter allows you to browse for an image on your local computer, after which it is converted to a WBMP image that is saved on your local computer—very handy indeed!
By the Way
WBMP images are typically limited to 150 3 150 in size, although some tools restrict them even further. For example, Waptiger’s WBMP Converter only converts images that are 127 3 127 or smaller.
To display an image in WML, you must use the img element, which, like so many other WML elements, is a child of the p element. The src, alt, height, and width attributes of the img element come directly from HTML. Unlike traditional HTML images, however, WML limits the size of WBMP images to 64 3 64. Listing 23.7 contains the code for an example that demonstrates how to use the img element.
Example 23.7. Displaying an Image in a WML Document (image.wml)
 1: <?xml version="1.0"?>
 2: <!DOCTYPE wml PUBLIC "-//WAPFORUM//DTD WML 1.3//EN"
 3:   "http://www.wapforum.org/DTD/wml13.dtd">
 4:
 5: <wml>
 6:   <card>
 7:     <p><img src="ftlogo.wbmp" alt="FilmTime Logo"
 8:       width="64" height="39"/>
 9:     </p>
10:   </card>
11: </wml>
This code uses the img element to embed the image named ftlogo.wbmp in the WML document (line 7). Notice that alternative text is specified for the image (line 7), as well as the width and height of the image (line 8). Figure 23.6 shows the results of viewing this document in the Nokia Mobile Browser Simulator.
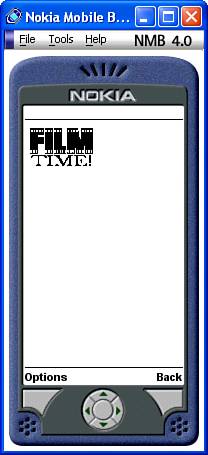
Figure 23.6. Displaying a simple WBMP image in a WML document isn’t too difficult thanks to the img element.
The image shown in the figure is a logo for the hypothetical wireless web site FilmTime.
Although the keyboard of a mobile device is hardly ideal for text input—sometimes the user has to press the same key three times to enter a single character—it is easy enough to support in WML documents. Keyboard support is carried out via the input element, which is a child of the p element. The user types in the current value (input can also be initialized to a default value) and WML assigns it, for instance, the name email, as in the first occurrence of the input element in Listing 23.8.
Example 23.8. Retrieving Information from the User (input.wml)
 1: <?xml version="1.0"?>
 2: <!DOCTYPE wml PUBLIC "-//WAPFORUM//DTD WML 1.3//EN"
 3:   "http://www.wapforum.org/DTD/wml13.dtd">
 4:
 5: <wml>
 6:   <card id="subscribe">
 7:     <p align="center"><b>***FILMTIME!***</b></p>
 8:     <p>To subscribe to FILMTIME!, please enter your e-mail address:</p>
 9:     <p><input name="email"/></p>
10:     <do type="accept">
11:       <go href="#email-ok"/>
12:     </do>
13:   </card>
14:
15:   <card id="email-ok">
16:     <p>You entered <i>$email</i>. If this is correct, click OK.</p>
17:     <do type="accept">
18:       <go href="#username"/>
19:     </do>
20:   </card>
21:
22:   <card id="username">
23:     <p>Please enter your name.</p>
24:     <p><input name="username"/></p>
25:     <do type="accept">
26:       <go href="#thanks"/>
27:     </do>
28:   </card>
29:
30:   <card id="thanks">
31:     <p>Thanks, <b>$username</b>!</p>
32:     <p>Goodbye!</p>
33:   </card>
34: </wml>
In this example, the user is allowed to input his email address (line 9). The email address is given the name email, which is the name used to store the information for any further processing. When the user progresses to the next card, the email address is displayed to him by preceding its name with a dollar sign (line 16): $email. A similar approach is used to ask the user for his name (line 24), and then display it when telling him goodbye (lines 31 and 32).
You now have a very good idea of how WML works and what is has to offer. So how does WML fit into XHTML Mobile? You learned earlier that WML is a good option if you want your mobile pages to be backwardly compatible with older phones or if you really like the “stack of cards” metaphor used to build WML pages. On the other hand, XHTML Mobile is a bit more advanced in that it allows you to use CSS styles to improve the appearance of mobile pages. You can create mobile web pages using either language but you can’t use the two languages within a single document. As a hybrid solution, you might consider mixing pages that selectively use WML and XHTML Mobile whenever one makes more sense than the other. Microbrowsers that support XHTML Mobile are required to support WML, so this option should always be available to you.
By the Way
If you recall from earlier in the lesson, XHTML Mobile actually relies on WCSS for stylesheet support. Because WCSS is simply a subset of CSS, in this lesson I refer to styles generally as CSS styles. Just know that I’m technically talking about WCSS and not full-blown CSS.
The great thing about XHTML Mobile is that it is no different than using XHTML, except that it is more limited. So, if you know XHTML you already know XHTML Mobile. At worst, you’ll just have to unlearn a few things because XHTML Mobile is a bit more limited than XHTML. Generally speaking, you’ll find that XHTML Mobile can do just about anything markup-wise that you will want to do on a mobile web page.
As an example of how XHTML Mobile can be used in the context of a wireless application, I’ve reworked the King Kong movie description document as an XHTML Mobile document. Listing 23.9 contains the code for the moviedesc_kingkong.xhtml document.
Example 23.9. The XHTML Mobile Version of the King Kong Movie Description Page (moviedesc_kingkong.xhtml)
 1: <?xml version="1.0"?>
 2: <?xml-stylesheet type="text/css" media="handheld" href="moviedesc.css"?>
 3: <!DOCTYPE html PUBLIC "-//WAPFORUM//DTD XHTML Mobile 1.0//EN"
 4:   "http://www.wapforum.org/DTD/xhtml-mobile10.dtd">
 5:
 6: <html>
 7:   <head>
 8:   </head>
 9:
10:   <body>
11:     <h1 align="center">***FILMTIME!***</h1>
12:     <p><i>King Kong</i> This remake of the 1933 classic follows an
13:       expedition to the mysterious Skull Island, where a legend of
14:       a giant gorilla draws explorers and filmmakers. The legend,
15:       however, is both real and dangerous, living in a massive
16:       jungle that has protected him and other prehistoric creatures
17:       for decades. Kong finds solace in a beautiful woman (Naomi
18:       Watts), and is subdued enough to be captured and brought back
19:       to New York. However, as the captors and the public will
20:       learn, it takes a lot more shackles to hold back an animal of
21:       such monstrous size.</p>
22:   </body>
23: </html>
There really aren’t any surprises in the content part of this document as it consists of run-of-the-mill XHTML code with familiar h1, p, and i tags. The most interesting code that is unique to XHTML Mobile is the document type declaration and the stylesheet reference. The document type declaration references the XHTML Mobile 1.0 DTD (lines 3 and 4), which is publicly available at http://www.wapforum.org/DTD/xhtml-mobile10.dtd. The page imports the moviedesc.css stylesheet (line 2), which specifies colors and more exacting fonts for the King Kong movie content. Notice that there is an additional media attribute for the xml-stylesheet directive, and that it is set to handheld. This attribute allows you to establish the type of media that the page is targeting, which in this case consists of handheld devices.
By the Way
Examples of other settings for the media attribute include all (the default), print, and tv. This attribute provides you with a mechanism for altering the specific formatting of content based upon how it is going to be viewed. In this case, you are formatting the content specifically for mobile handheld devices.
Listing 23.10 contains the code for the moviedesc.css stylesheet that is used to format the King Kong movie description XHTML Mobile document.
Example 23.10. The WCSS Stylesheet for the XHTML Mobile King Kong Movie Description Page (moviedesc.css)
 1: body {
 2:   background: #FFFFFF;
 3: }
 4:
 5: h1 {
 6:   font-size: x-large;
 7:   color: #660000;
 8:   text-align: center;
 9:   text-decoration: underline;
10: }
11:
12: p {
13:   display: block;
14:   border: 1px #330000 solid;
15:   background: #660000;
16:   color: #FFFFFF;
17:   text-align: left;
18:   font-size: medium;
19:   padding: 4px;
20: }
Figure 23.7 shows the results of viewing the King Kong XHTML Mobile page in the Nokia Mobile Browser Simulator.
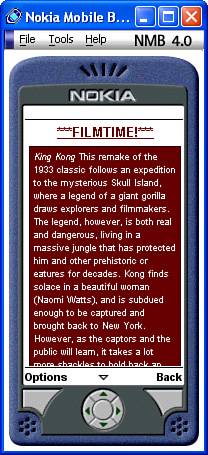
Figure 23.7. XHTML Mobile allows you to create mobile web pages with more interesting styles applied to them than pure WML pages.
As the figure reveals, the stylesheet dramatically affects the look of the page as compared to the earlier version that was coded in WML (refer to Figure 23.5). Although you can’t quite make out the colors in this printed figure, you can easily open the page for yourself in a WAP microbrowser and get the full effect.
This hour covered everything it takes to get a complete, navigable, illustrated document onto the wireless web via WML or XHTML Mobile. You started out by learning some general information about the wireless web and the evolution of markup languages for creating wireless web pages. You then delved into the mechanics of creating a WML document, starting with the basics of working with a microbrowser simulator on your PC. You found out how to set up the deck and its component cards, design navigation routes, map tasks to the microbrowser’s softkeys, and insert an image into a document. Moving up a little on the ladder, you then explored setting up the document for user input—useful for simple name or password entries. And finally, the lesson concluded by taking what you learned about WML and scaling it over to XHTML Mobile.
The Workshop is designed to help you anticipate possible questions, review what you’ve learned, and begin learning how to put your knowledge into practice.