Google is to “the semantic web” as CompuServe was to “the web”. | ||
| --Joshua Allen | ||
If you don’t remember CompuServe, it was one of the earliest online communities and data service providers that offered discussion forums, news, and primitive versions of what we commonly associate with modern web portals such as Yahoo!. Although CompuServe certainly paled in comparison to the modern Web experience, it nonetheless provided a fairly interesting online community back before AOL or Yahoo! even existed. I should know—I was a CompuServe local for several years! The quote above is being a bit critical of Google by comparing its ability to perform semantic searches to CompuServe’s primitive online service. Although this may be a valid argument, CompuServe was initially ahead of its time, and so is Google. Google has set the standard for searching the Web, and has numerous projects underway to help add context to Web searches and provide a more accurate means of mining the world’s electronic information.
This hour explores a feature of Google’s search engine called Google Sitemaps, which allows Web developers to automatically notify Google of changes in web page content so that Google can know that the pages exist, as well as indexing the pages more frequently. Of course, Google Sitemaps uses XML or I wouldn’t be bothering to tell you about it. It represents a clever and efficient use of XML that serves as an important tool in any Web developer’s toolkit.
In this hour, you’ll learn
The basics of web crawling and why it’s important
What Google Sitemaps is and how it can help your web site
About the XML-based Google Sitemaps protocol, as well as how to develop Sitemap documents for your own web pages
How to validate, submit, and automatically generate Google Sitemaps
You’ve probably heard the term web crawler before, and you may already have a pretty good idea as to what it means. Because web crawling is such an important part of this lesson, I want to give you a quick background on it before moving on to Google Sitemaps and how XML fits into it.
A web crawler is an automated program that browses pages on the Web according to a certain algorithm. The simplest algorithm is to simply open and follow every link on a page, and then open and follow every link on subsequent pages, and on and on. Web crawlers are typically used by search engines to index web pages for faster and more accurate searching. You can think of a web crawler as a little worker bee that is constantly out there buzzing from link to link on every web page reporting information back to a database that is part of a search engine. Pretty much all major search engines use web crawlers of one form or another.
The specific algorithms employed by web crawlers are often shrouded in secrecy, as search engine developers attempt to one-up each other in regard to accuracy and efficiency. So far Google appears to be out in front, at least when you consider how far-reaching their search results go as compared to other search engines. Even so, this is an ongoing battle that will likely be waged for a long time, so the main players could certainly change over time. In fact, Microsoft recently entered the fray with its own MSN Search service.
Getting back to web crawlers, they are important to web developers because you actually want public sites to be crawled as frequently as possible to ensure that search engines factor in your most recent web content. Up to this point, you pretty much had to cross your fingers and hope for the best when it came to a search engine’s web crawler eventually getting around to crawling your site again and updating its indexes accordingly. Keep in mind that I’m not talking about your site’s search ranking per se—I’m talking more about how a search engine goes about crawling your site. Of course, the content within your web pages certainly affects the site’s rankings but having your site crawled more regularly doesn’t necessarily have anything to do with a ranking improvement.
To understand the relationship between a web crawler and a page’s ranking, consider a blog page where you discuss the inner workings of a diesel engine in detail. When this page is crawled by a search engine, it may move up the rankings for searches related to engines. Now let’s say a week later your topic of choice is movies by Steven Spielberg. If the page is crawled again, the content will dictate that it isn’t such a good match for engine searches, and will instead be realigned to match up with Steven Spielberg movie searches. Of course, it’s also possible that both blog entries are still on the page, in which case you may dramatically move up the rankings for searches involving Steven Spielberg’s first film, Duel, which featured a renegade 18-wheeler powered by a diesel engine.
This example is admittedly simplified, but hopefully you get the idea regarding web crawling and search engine results. The main point to be taken: increased web crawling of your web pages results in more accurate web searches but not necessarily any improvement in search rankings. Incidentally, if I had a magic XML bullet for improving search rankings, you’d be watching me on an infomercial instead of reading this book!
XML enters the picture in regard to web crawling thanks to a relatively new service offered by Google called Sitemaps. Google Sitemaps is a beta technology that makes it possible to feed the Google search engine information about your web pages to assist Google’s web crawlers. In some ways Sitemaps works similarly to RSS (Really Simple Syndication), which you learn about in Hour 24, “Syndicating the Web with RSS News Feeds.” RSS is used to notify visitors to your web site about changes to the site’s content. Sitemaps works in much the same way except the recipient of a Sitemap “feed” is Google, as opposed to visitors to your web site.
By the Way
Google Sitemaps is a beta technology, which means that it is still under development. This also means that the service is subject to undergoing significant changes as its designers continue to develop and refine it. So know as you’re using the service that it is subject to change.
A Google Sitemap is an XML document or documents that contain a list of URLs of pages within your web site that you want to be crawled. For the utmost in accurate crawling, you should list the URL of every page on your site, which can potentially be quite a few pages. It’s not uncommon for even relatively small web sites to have hundreds of pages, while larger sites can reach into the thousands or even tens of thousands of pages. Many sites also have dynamic content that is generated by specifying attributes through a URL. Examples of such pages include Microsoft Active Server (ASP) pages and PHP pages, both of which result in unique pages solely by passing in attributes to the same document via the URL of the page. You’ll want to try and include every combination of attributes for these pages in order to have your site thoroughly crawled.
In addition to the URL of a page, a Sitemap also allows you to provide some cues to the crawler in regard to how frequently the page is updated. More specifically, you can include the last modification date of a page, along with how frequently the page’s content changes. Google doesn’t hold you to this update frequency, by the way, it’s just a general estimate to help determine how frequently the page should be crawled ideally.
The last piece of information that you associate with a Sitemap is the priority ranking of the page, which is relative to other pages on your site, not other pages on the Web in general. Your inclination might be to flag all of your pages as having the highest of priority but all you would be accomplishing is giving them equal priority with respect to each other. The idea behind the page priority is to provide a mechanism for giving more important pages a higher potential for getting crawled. As an example, you might want your home page to have a higher priority than say, your “about” page. Or maybe on a storefront site you want the product catalog pages to all have a higher priority than the company history page.
Google Sitemaps is valuable beyond just causing your web pages to be crawled more regularly. You may have some pages that are effectively on islands that would otherwise never be crawled. For example, maybe you have some pages in a knowledgebase that are only accessed via search queries. Because no permanent links exist for the pages, a normal web crawler would never find them. By placing the pages in a Sitemap, you ensure that the knowledgebase is indexed and included in Google search results.
When submitting a Sitemap to Google, you’re notifying Google of the specific URLs that encompass your site, basically helping it along in its job of crawling your site thoroughly and accurately. When you add a new page to your site, you should update the Sitemap and resubmit it to Google so that the page is immediately targeted for crawling. It’s a way to assist Google so that your web site content is always as synchronized as possible with search engine results.
By the Way
Google wasn’t the first search engine to experiment with the concept of a submitted sitemap for the purpose of assisting its crawler. Yahoo! has a Content Acquisition Program that works roughly similar to Google Sitemaps except that you have to pay to use it. I would expect Microsoft to offer a service similar to Google Sitemaps at some point in the future seeing as how Microsoft is clearly making a run at Google with MSN Search.
After you’ve created a Sitemap document, you must publish it to your web site and then notify Google of its location. From there, everything else is automatic. The next section explains how to go about coding a Sitemap using XML, as well as how to submit it to Google.
Enough background information, let’s look at some XML code! The language behind Google Sitemaps is an XML-based language called the Sitemap protocol. The Sitemap protocol is very simple, and only consists of six different tags. Following is a list of these tags and their meaning in the context of a Sitemap document:
<urlset>— The root element of a Sitemap document, which serves as a container for individual<url>elements<url>— The storage unit for an individual URL within a Sitemap; serves as a container for the<loc>,<lastmod>,<changefreq>, and<priority>elements<loc>— The URL of a discrete page within a Sitemap; this tag is required<lastmod>— The date/time of the last change to this web page; this tag is optional<changefreq>— An estimate of how frequently the content in the web page changes; this tag is optional<priority>— The priority of the web page with respect to other pages on this site; this tag is optional
The previous section covered the information associated with a Sitemap, which these tags match up with very closely. In other words, these shouldn’t come as too terribly much of a surprise given that you already knew a Sitemap is described by a URL, last modification date, change frequency, and priority ranking. However, it helps to see the tags in context to get a better feel for how a Sitemap is structured. Following is the code for a minimal Sitemap with one URL entry:
<?xml version="1.0" encoding="UTF-8"?>
<urlset xmlns="http://www.google.com/schemas/sitemap/0.84"
  xmlns:xsi="http://www.w3.org/2001/XMLSchema-instance"
  xsi:schemaLocation="http://www.google.com/schemas/sitemap/0.84
  http://www.google.com/schemas/sitemap/0.84/sitemap.xsd">
  <url>
    <loc>http://www.michaelmorrison.com/</loc>
    <lastmod>2005-08-23</lastmod>
    <changefreq>daily</changefreq>
    <priority>1.0</priority>
  </url>
</urlset>
The messiest part of this code is the <urlset> tag, which includes several namespace declarations, as well as a reference to a schema for the document; more on Sitemap schemas later in the section titled, “Validating Your Sitemap.” As you can see, the <urlset> tag serves as the root of the document, and therefore contains all of the other tags in the document. The Sitemap namespace is first declared in the <urlset> tag, followed by the XMLSchema namespace and then the Sitemaps schema itself. All of this namespace/schema stuff is boilerplate code that will appear in every Sitemap document. Of course, if you don’t feel the need to validate your Sitemap, you can leave out the schema code.
Within the <urlset> tag, the real work starts to take place. In this example there is only one URL, as indicated by the solitary <url> tag. The <url> tag is used to house the child tags that describe each URL in your web site. These child tags are <loc>, <lastmod>, <changefreq>, and <priority>, and together they describe a single URL for a Sitemap. Let’s take a quick look at the details of each tag and how they are used.
The <loc> tag represents the location of a web page in the form of a URL. This URL must be a full URL complete with http:// at the start, or https:// in the case of secure pages. If your web server requires a trailing slash on domain paths, make sure to include it here, as in http://www.michaelmorrison.com/. Also keep in mind that the contents of the <loc> tag can’t be longer than 2,048 characters. That would be a ridiculously lengthy URL, so I doubt you will encounter a problem with this upper limit on URL length. The only other thing to note about the <loc> tag is that it is the only required child tag of <url>, which means you can feasibly create a Sitemap with nothing more than the <urlset>, <url>, and <loc> tags. But why would you want to do that when you can use the other optional tags to give Google even more assistance in crawling your pages?
By the Way
Each Sitemap is limited to 50,000 URLs and a 10MB compressed file size. Google Sitemaps supports compressed Sitemap files that are compressed with the gzip tool, which is freely available at http://www.gzip.org/.
The <lastmod> tag is used to identify the last time a page was modified, which can let the web crawler know if it needs to reindex the page based upon the modification date of the last indexed version of the page. The content in the <lastmod> tag must be formatted as an ISO 8601 date/time value. In practical terms, this means you can code it simply as a date with the following format: YYYY-MM-DD. In other words, you can omit the time if you want. If you do elect to include the time, the entire date/representation is typically expressed as YYYY-MM-DDThh:mm:ss. The letter T in the middle of the date/time is just a separator. Of course, you may already be asking yourself how the time zone factors into this format. You add the time zone onto the end of the time as a +/- offset relative to UTC (Coordinated Universal Time) in the form hh or hh:mm if you’re dealing with a half-hour time zone. Following is an example of a complete date/time in the central time zone (CST), which is GMT minus five hours:
2005-10-31T15:43:22-05:00
In this example, the date is October 31, 2005, and the time is 3:43:22 p.m. CST. Notice that 24-hour time is specified in order to make the distinction between a.m. and p.m.
By the Way
ISO 8061 is an international date/time standard for representing a date and time as plain text. ISO 8061 supports a wider range of date/time formats than what I’ve explained here. Feel free to learn more about ISO 8061 online if you feel the urge to know more: http://www.w3.org/TR/NOTE-datetime.
The <changefreq> tag is used to specify how often the content on a web page changes. The change frequency of a page is obviously something that can’t always be predicted and in many cases varies considerably. For this reason, you should think of the <changefreq> tag as providing a web crawler with a rough estimate of how often a page changes. Google makes no promises regarding how often it will crawl a page even if you set the change frequency to a very high value, so your best bet is to try and be realistic when determining the change frequency of your pages. Possible values for this tag include: always, hourly, daily, weekly, monthly, yearly, and never. The always value should only be used on pages that literally change every time they are viewed, while never is reserved for pages that are completely and permanently static (typically archived pages). The remaining values provide plenty of options for specifying how frequently a page changes.
The <priority> tag allows you to assign relative priorities to the pages on your web site. Although I mentioned it earlier, it’s worth hammering home once more that this tag has nothing to do with a page’s priority level as compared to other web sites, so please don’t think of it as a way to boost your site as a whole. The significance of a priority ranking in this case is to help identify URLs on your web site that are more important than other URLs on your web site. In theory, this may help a web crawler isolate the most important pages on your site when targeting search results. Values for the <priority> tag range from 0.0 to 1.0, which 1.0 being the highest priority and 0.0 being the lowest. Generally speaking, you should rank average pages as 0.5, the most important pages as 1.0, and the least important pages as 0.0; this tag defaults to 0.5 if you don’t specify it. Feel free to use values in between those I just suggested if you think you can assess the relative importance of pages on your site to that degree.
By the Way
It will do you no good to set a high priority for all of your pages, as the end result will provide Google with no basis for determine which of your pages you think are more important than others.
The restrictions on sitemap files are modest. URLs must not include embedded newlines; you must fully specify URLs because Google tries to crawl the URLs exactly as you provide them. Your sitemap files must use UTF-8 encoding. And, each sitemap file is limited to 50,000 URLs and 10MB when uncompressed.
You’ve already seen the nuts and bolts of the Sitemap protocol language, along with the basic template for a Sitemap XML document. It’s time to take the next step and create your very own Sitemap document, or in reality, my very own Sitemap document because you’re going to use URLs on my web site as examples. Let’s get started!
Listing 20.1 contains the code for a complete Sitemap document for my web site. By complete, I mean that it meets all of the requirements of a Sitemap document, although it doesn’t actually include URLs for all of the pages on my site.
Example 20.1. A Complete Sitemap Document for My Web Site
1: <?xml version="1.0" encoding="UTF-8"?>
2: <urlset xmlns="http://www.google.com/schemas/sitemap/0.84"
3: xmlns:xsi="http://www.w3.org/2001/XMLSchema-instance"
4: xsi:schemaLocation="http://www.google.com/schemas/sitemap/0.84
5: http://www.google.com/schemas/sitemap/0.84/sitemap.xsd">
6: <url>
7: <loc>http://www.michaelmorrison.com/</loc>
8: <lastmod>2005-08-23</lastmod>
9: <changefreq>daily</changefreq>
10: <priority>1.0</priority>
11: </url>
12: <url>
13: <loc>http://www.michaelmorrison.com/mambo/index.php?
14: option=com_content&task=category&sectionid=2&id=11&
Itemid=35</loc>
15: <lastmod>2005-08-20</lastmod>
16: <changefreq>weekly</changefreq>
17: <priority>0.8</priority>
18: </url>
19: <url>
20: <loc>http://www.michaelmorrison.com/mambo/index.php?
21: option=com_content&task=blogcategory&id=16&Itemid=37</loc>
22: <lastmod>2005-08-23</lastmod>
23: <changefreq>daily</changefreq>
24: <priority>0.8</priority>
25: </url>
26: <url>
27: <loc>http://www.michaelmorrison.com/mambo/index.php?
28: option=com_simpleboard&Itemid=48&func=showcat&catid=37</loc>
29: <lastmod>2005-08-18</lastmod>
30: <changefreq>daily</changefreq>
31: <priority>0.6</priority>
32: </url>
33: <url>
34: <loc>http://www.michaelmorrison.com/mambo/index.php?
35: option=com_simpleboard&Itemid=48&func=showcat&catid=36</loc>
36: <lastmod>2005-08-21</lastmod>
37: <changefreq>daily</changefreq>
38: <priority>0.6</priority>
39: </url>
40: </urlset>This code is very similar to the Sitemap code you saw earlier in the chapter, except in this case multiple URLs are specified. Notice that I opted to use all of the optional tags in every URL—there’s no good reason not to unless you just don’t want to take the time to be so detailed. One thing I did skimp on a little is the <lastmod> tag for each URL, which I specified only as a date. However, because none of these pages are listed as having a change frequency higher than daily, it really isn’t necessary to get more exacting with the modification date.
By the Way
Google requires all Sitemap documents to use UTF-8 encoding (see line 1 in the example), as well as escaped entities for the following symbols: &, ', ", >, and <.
One other thing worth pointing out in this sample Sitemap is how I opted to use 0.6, 0.8, and 1.0 as the priority levels of the pages. Presumably, a more complete sample page would continue on down the range, finishing up at 0.0 for the least important pages.
By the Way
A Sitemap document can only reference URLs in the same folder or a child folder of the location of the Sitemap file. In the sample in Listing 20.1, the file would need to be placed at the same level as http://www.michaelmorrison.com/ because that URL is hierarchically the highest URL in the Sitemap.
If you’re responsible for a really monstrous site with loads of pages, you may need to consider breaking up your Sitemap into multiple Sitemap documents, in which case you’ll also need a Sitemap index document to pull them all together. A Sitemap index document is very similar to a normal Sitemap except that it uses the following tags:
<sitemapindex>— The root element of a Sitemap index document, which serves as a container for individual<sitemap>elements<sitemap>— The storage unit for an individual Sitemap within a Sitemap index; serves as a container for the<loc>and<lastmod>elements<loc>— The URL of a Sitemap document; this tag is required<lastmod>— The date/time of the last change to the Sitemap document; this tag is optional
The first two tags work very similarly to the <urlset> and <url> tags in an individual Sitemap. However, instead of organizing URLs they organize other Sitemap documents. The remaining two tags, <loc> and <lastmod>, also work similarly to their individual Sitemap counterparts, except in this case they determine the location and last modification date of a Sitemap document, not a web page. Following is some code that demonstrates how a Sitemap index is assembled out of these tags:
<?xml version="1.0" encoding="UTF-8"?>
<sitemapindex xmlns="http://www.google.com/schemas/sitemap/0.84">
<sitemap>
  <loc>http://www.michaelmorrison.com/sitemap1.xml.gz</loc>
  <lastmod>2005-11-05T08:34:11-05:00</lastmod>
</sitemap>
<sitemap>
  <loc>http://www.michaelmorrison.com/sitemap2.xml.gz</loc>
  <lastmod>2005-11-19T14:18:47-05:00</lastmod>
</sitemap>
</sitemapindex>
This sample code shows how to include two Sitemap documents in a Sitemap index. If you pay close attention, the two Sitemap documents in this example have been compressed using the gzip tool, which explains why their file extension is .xml.gz. Also notice that the date and time of each Sitemap is different, which means that an intelligent web crawler could focus on reindexing only the URLs in the newer Sitemap.
By the Way
A Sitemap index document can only reference Sitemaps that are stored on the same site as the index file.
In the Sitemap index example I didn’t include schema information for validating the Sitemap index. However, there is an XSD schema available from Google that you can use to validate Sitemap indexes just as you saw earlier how an XSD schema can be referenced in an individual Sitemap. The schema for individual Sitemaps is http://www.google.com/schemas/sitemap/0.84/sitemap.xsd, while the schema for Sitemap indexes is http://www.google.com/schemas/sitemap/0.84/siteindex.xsd.
Before you submit a Sitemap to Google for processing, it’s a good idea to validate it using a validation tool such as the W3C Validator for XML Schema, which is located at http://www.w3.org/2001/03/webdata/xsv. This online tool allows you to either validate a Sitemap document that you’ve already posted to the Web or browse for a Sitemap file stored locally on your hard drive. Either way, the Sitemap should be validated against the Google Sitemap XSD Schema, which is located at http://www.google.com/schemas/sitemap/0.84/sitemap.xsd. Refer back to lines 3 and 4 in Listing 20.1 for details on how to reference the XSD schema for a Sitemap in a Sitemap document.
By the Way
If you’re interested in validating a Sitemap index document, make sure you use the appropriate XSD schema: http://www.google.com/schemas/sitemap/0.84/siteindex.xsd.
The W3C Validator for XML Schema allows you to choose between several different output options for the validator but in all likelihood the default option will work fine for you. All you really have to do to use the tool is specify a Sitemap file. In this case, I opted to publish my Sitemap file on the Web at the location http://www.michaelmorrison.com/sitemap.xml. After entering the URL of the file and clicking the Get Results button to initiate the validation process, Figure 20.1 shows the result of a successful validation.
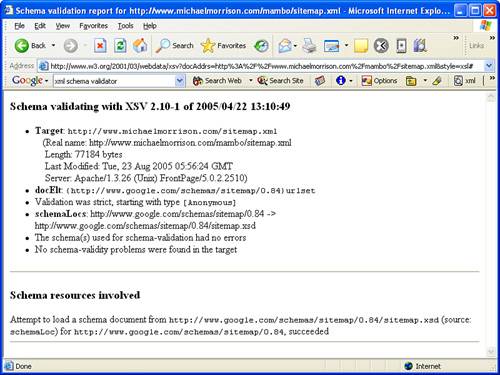
If all goes well with the Sitemap validation, you’ll see a figure similar to Figure 20.1. If not, the validator will provide you with detailed information about the kinds of errors found and where they are located. You should be able to find the errors in the document and correct them without too much trouble. Make sure you eventually arrive at a file that validates successfully before you move on to submitting the Sitemap to Google.
Validation is an important part of the Sitemap submission process because you’ll only be wasting your time if you submit the Sitemap and Google can’t process it. Because Google doesn’t immediately process Sitemaps, you may not know that the Sitemap failed to process for several hours after submitting it. So, try and make sure to validate your Sitemap documents, especially upon first creating them.
Submitting a Sitemap to Google for processing is a very simple process. First off, you need a Google account. You may have already created a Google account back in Hour 15, “Using XML to Hack Google Maps,” when you found out how to create custom interactive maps for Google Maps. If so, just log in to your existing account as you did in Hour 15 via the following link: https://www.google.com/accounts/Login. After logging in, go to the main Sitemaps web page, which is located at https://www.google.com/webmasters/sitemaps/stats. This page initially doesn’t show any Sitemaps for you because you’ve yet to submit any, as you can see in Figure 20.2.
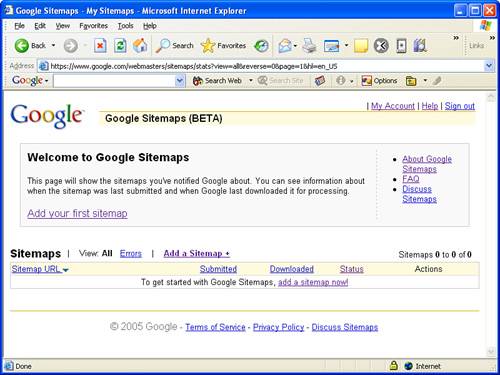
Figure 20.2. The Google Sitemaps web site initially shows on Sitemaps because you haven’t submitted any yet.
Click the Add a Sitemap button to add a Sitemap to Google. You’ll be prompted to enter the URL of the Sitemap file. At this point you should make sure that you’ve uploaded the Sitemap to the appropriate location on your web server. This location is typically where the home page for the site is located. Enter the complete URL for the Sitemap file into the Google Sitemaps submission page, and click the Submit URL button. Google Sitemaps will queue up the Sitemap for processing, and then provide you with information about the status of the Sitemap (see Figure 20.3).
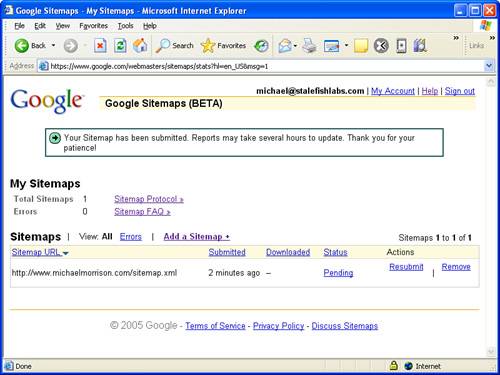
It’s important to understand that when you submit a Sitemap to Google it isn’t immediately processed and crawled. In fact, it typically takes several hours for a Sitemap to be processed. You can check back to the Google Sitemaps web site to view the status of Sitemaps that you’ve submitted. The status of a newly submitted Sitemap will start out as Pending, and once it has been processed the status will change to OK.
That’s really all it takes to make your web site more readily available to Google’s web crawler. Of course, you’ll want to resubmit a Sitemap whenever you add new pages to your site but otherwise the Sitemap will do the job of helping Google to crawl your pages more frequently and more accurately.
Although the Sitemap protocol is a fairly simple XML language to use, you’re probably thinking that there has to be a better way to create Sitemaps than sitting there typing in all those URLs by hand. And in fact there is. There are actually several options available to you when it comes to automatically generating a Sitemap from your web pages. One such tool is Google’s own Sitemap Generator, which is very powerful but somewhat difficult to use unless you already happen to have experience with Python and you have access to run command-line scripts on your web server. If not, you’ll want to investigate other options. If you’re already a Python guru and you have server access, feel free to look into the Sitemap Generator at http://www.google.com/webmasters/sitemaps/docs/en/sitemap-generator.html.
By the Way
Python is an interpreted programming language that is similar in some ways to Perl, which is another popular web development language. Google uses Python throughout many of its tools and services.
Short of using Python, I recommend you consider using an online Sitemap generation tool to automatically generate your Sitemaps. There are many such online tools out there but one that I’ve found particularly useful is the XML Sitemap Generator, which is located at http://www.xml-sitemaps.com/. This online tool is very easy to use; it basically just requests a starting URL from you and then churns out a Sitemap XML document in return. What’s neat is that online Sitemap generation tools such as the XML Sitemap Generator will automatically crawl your entire site figuring out the URLs of all your pages.
By the Way
To find out about other Sitemap generation tools, visit Google’s list of third-party sitemap resources at http://code.google.com/sm_thirdparty.html.
As an example, I fed the home page of my web site into the XML Sitemap Generator, and after it churned for a few minutes crawling through the pages on my site, it created a Sitemap XML file that I could download and post on my site. What I found particularly interesting is that it counted 299 pages on my site. Because my site is set up through a content management system that generates pages dynamically from a database, I never really had a good feel for how many pages were on it. The XML Sitemap Generator not only answered that question for me but it also created for me a Sitemap document ready to feed into Google to ensure that all of my pages get crawled efficiently.
Figure 20.4 shows the XML Sitemap Generator web page as it busily works away crawling my web site and figuring out URLs for the pages within.
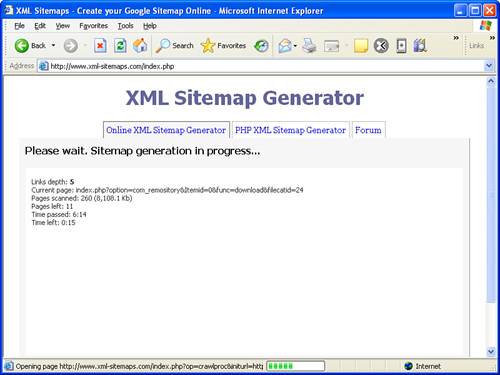
Figure 20.4. It’s pretty interesting just watching a Sitemap generation tool crawl your site and count the number of pages, along with their sizes.
After the XML Sitemap Generator finishes, it will provide you with links to both uncompressed and compressed versions of the resulting Sitemap. Although you can submit either version to Google, you might as well go with the compressed version to speed up the transfer time unless you just want to open the uncompressed version to study the code. In that case, why not download both? Figure 20.5 shows the results of the XML Sitemap Generator tool, including the links to the newly created Sitemap files.
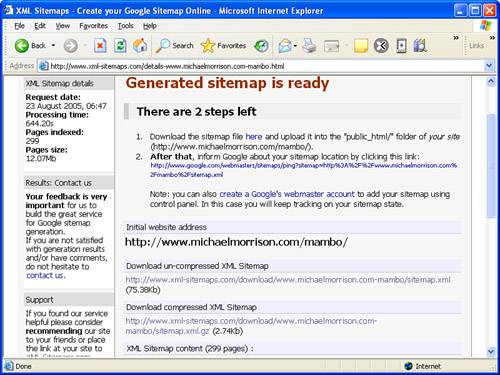
Figure 20.5. When the XML Sitemap Generator tool finishes, it provides you with links to download the new Sitemap in either uncompressed or compressed form.
You now have a Sitemap document that contains a thorough representation of the pages that compose your web site. You can then turn around and feed this Sitemap document into Google Sitemaps to improve the crawling of all the pages.
By the Way
You may be wondering if it’s possible to automate the process of resubmitting a Sitemap based upon web site changes. The answer is yes, but you’ll have to use a special utility on your web server that is capable of running in the background at regular intervals. For example, a UNIX utility called cron is perfectly suited for this task. The cron utility is typically run using the crontab command. Please refer to your specific web server documentation to find out more about setting up recurring commands and/or scripts.
This lesson started out this part of the book with somewhat of an unlikely topic, the optimization of web sites with respect to search engine web crawlers. Of course, XML factored heavily into the discussion as it forms the basis of Google’s Sitemaps service that allows you to seed Google’s web crawler with information about the pages on your web site. You not only learned how Google Sitemaps works and how it can help you, but you also learned how the XML-based Sitemap protocol language is structured. From there, you created a Sitemap by hand and then learned how to validate it and submit it to Google for processing. After you learned how to create a Sitemap the hard way, I shared with you a much easier technique that involves generating Sitemap documents automatically using online tools. Hopefully you’ve left this hour with a practical web trick up your sleeve to try out on your own web sites.
The Workshop is designed to help you anticipate possible questions, review what you’ve learned, and begin learning how to put your knowledge into practice.
What XML encoding scheme is required of all Sitemap documents? | |
What is the purpose of the priority ranking of a URL in a Sitemap? | |
If I store a Sitemap file at the URL http://www.michaelmorrison.com/books/, can I include a URL in the sitemap for http://www.michaelmorrison.com/index.html? |
All Sitemap documents require UTF-8 character encoding. | |
The priority ranking of a URL in a Sitemap is used to establish the relative importance of the page with respect to other pages on your web site; it has no bearing on your pages as compared to pages on other web sites. Changing all of your pages to a high priority will only have the effect of neutralizing the effectiveness of the priority ranking. | |
No. A Sitemap cannot contain URLs that are higher in the folder hierarchy than where the Sitemap file is stored. In this example, all of the Sitemap URLs would need to start at http://www.michaelmorrison.com/books/. |
1. | Modify the Sitemap document example in this lesson to map the pages of your own web site. If your web site has a table of contents or an existing site map feature, you may be able to use it to help get a listing of URLs for the Sitemap document. Don’t forget to post the Sitemap file to your web site and then submit the file to Google through your Google Sitemap account. |
2. | If you have a fairly large web site or a site that uses dynamically generated pages (ASP, PHP, and so on), try using Google’s own Sitemap Generator tool or a third-party Sitemap tool. Google maintains a list of such tools at http://code.google.com/sm_thirdparty.html. |