I don’t have any solution but I certainly admire the problem. | ||
| --Ashleigh Brilliant | ||
When it comes to transforming XML, it’s safe to admire both the problem and the solution, which just so happens to be XSLT. But you already knew that because in the previous hour you learned the basics of XSLT and were quickly introduced to the XSLT language and the way to use it to create basic XSLT style sheets. This hour picks up where the previous one left off by examining the XSLT language in more detail and showing you some interesting ways in which XSLT can be used to transform XML content. More specifically, you learn how to sort and process nodes, as well as how to perform conditional tests and computational operations with expressions. This hour arms you with the XSLT knowledge necessary to create practical XSLT style sheets that you can use in your own XML projects.
In this hour, you’ll learn
More details about the XSLT style sheet language
How to process and sort nodes in an XSLT style sheet
How to use patterns and expressions in XSLT
How to apply XSLT style sheets to more challenging document transformation tasks
As you know, XSLT is an XML-based markup language that includes its own set of elements and attributes that are used to create XSLT style sheets. These style sheets are used with XML documents to transform XML content in some manner. This transformation can be something as simple as sorting the content according to a certain piece of information, such as sorting products by price, or it can be as powerful as transforming content into a completely different XML language. Regardless of how you use XSLT style sheets, it’s important to have a solid understanding of the XSLT language and what it has to offer.
An XSLT style sheet is broken down into two types of information: instructions and literals. Instructions are the XSLT elements and attributes that describe exactly how XML content is to be transformed. Literals, on the other hand, are static pieces of information that are placed directly in the resulting document and therefore aren’t processed in any way. You can think of the relationship between instructions and literals as the relationship between text and blanks in a traditional paper form that you might fill out, such as an IRS tax form. (I apologize for the scary IRS reference but when people think of forms, many of them think of taxes.) Anyway, the comparison to paper forms has to do with the fact that text on a form is static and doesn’t change, whereas the blanks are subject to being filled in by whomever is using the form. In the case of XSLT, the blanks are “filled in” by XSLT instructions that determine the XML content to be placed in the blanks. The resulting output document is the combination of transformed XML content and the literals located throughout a style sheet.
By the Way
Literals play a significant role in XSLT whenever you transform an XML document into an XHTML document for display in a web browser. In order to successfully generate an XHTML document using XSLT, you must place XHTML code throughout the style sheet as literals. XSL instructions are then used to transform XML content and place it within the XHTML code.
XML content is merged with literals in a style sheet by way of the xsl:value-of element, which inserts the value of an element or attribute in the output document. To get a better understanding of how this works, consider the following example:
<p>Hello, my name is <xsl:value-of select="name"/></p>
By the Way
This code shows how the xsl:value-of element is used to insert the value of a name element into an XHTML paragraph. In this example, the xsl:value-of element is the instruction, and the remaining XHTML code is the literal. Now that you understand the difference between instructions and literals, let’s move on to more important business.
You learned in the previous hour that templates are used in XSLT style sheets to transform a particular portion of an XML document for output to a result tree. Templates are created using the xsl:template element, which requires an attribute named match that determines which nodes of the source document tree are processed by the template. The value assigned to the match attribute is a pattern or expression that resolves to a set of nodes. An example of a commonly used value for the match attribute is a forward slash (/), which identifies the root node of a document:
<xsl:template match="/">
...
</xsl:template>
This root template is significant because it serves as the first template applied to a document. Technically, it isn’t necessary to include a root template in your style sheets because the XSL processor will automatically start applying other templates with the root element if no root template exists. However, if you want to control the manner in which other templates are applied, you’ll want to create a root template. Keep in mind that you can also refer to a root element directly by name, as the following example shows:
<xsl:template match="news">
...
</xsl:template>
Because the news value assigned to the match attribute in this example is the root element of the News document from Hour 10, “Styling XML Content with CSS,” it has the same effect as using the forward slash to identify the root element. Although the root element gets things started in an XSLT style sheet, most of the action takes place in other templates. Templates in an XSLT style sheet are used to transform specific portions of an XML document, which are identified using the match attribute, as the following example demonstrates:
<xsl:template match="headline">
...
</xsl:template>
In this example, the headline element is matched by the template, which means the template is used to transform all content in the News document that is contained within a headline element. This template is usually applied from the parent template of the headline element, which in this case is the news element. In other words, the headline template would be applied from within the news template. Following is a portion of XML code for a news document to which this template could be applied:
<header>
  <headline>
  Local Author Creates Free Online Music Game
  </headline>
  <byline>
  By Brent Andrews
  </byline>
  <dateline>
    <location>Nashville, Tennessee</location>
    <date>Monday October 17 2005 12:08 CST</date>
  </dateline>
</header>
By the Way
There are trickier approaches to specifying nodes using the match attribute. These approaches require knowledge of XPath, which you learn about in Hour 22, “Addressing and Linking XML Documents.”
In this code, the headline element matches up with the previous example template. It then becomes important to apply the template and somehow transform the headline element. What do I mean by “applying” a template? Applying a template means that you are invoking the template so that it actually carries out the transformation logic defined in it. It isn’t always necessary to explicitly apply every template that you create because the XSL processor will automatically attempt to figure out which templates to apply to certain parts of a document using the match attributes of the templates. However, you will usually apply at least one template to get the ball rolling; templates are applied using the xsl:apply-templates element. The xsl:apply-templates element supports an attribute named select that identifies the nodes to which the template is applied. If you don’t specify a value for the select attribute, the template will be applied to all of the child nodes of the current node. So, the select attribute serves to limit the nodes to which a template is applied.
By the Way
Similar to the match attribute of the xsl:template element, the select attribute of the xsl:apply-templates element allows you to use XPath to carry out more advanced node selections. You learn a little more about how this is accomplished later in this hour in the section titled “Pattern Essentials.” You get the whole scoop on XPath in Hour 22.
If you want to apply the root template to a document, you can simply place an empty xsl:apply-templates element directly in the root template:
<xsl:template match="/">
  <xsl:apply-templates/>
</xsl:template>
In this example, the default template is automatically applied to the root node of the document, after which the xsl:apply-templates element makes sure the remaining templates are applied to children of the root element. This may sound a little confusing, so let’s take a second to understand exactly what is happening. This code defines a template that handles the default node of the document, as indicated by the forward slash (/) value of the match attribute. When the XSL processor encounters the root node of the document, it automatically matches it up with this template and invokes the template to process the node. The xsl:apply-templates element within the template doesn’t include a select attribute, which means that templates matching any children of the root node should be applied (illustrated in Figure 12.1).
If you wanted to target a specific set of nodes, you could identify it using the select attribute of the xsl:apply-templates element:
<xsl:template match="/">
  <xsl:apply-templates select="//headline"/>
</xsl:template>
In this example, the headline child node is identified in the select attribute, which means only templates matching headline nodes are applied. This demonstrates how the select attribute limits the set of nodes to which templates are applied. Incidentally, the two forward slashes (//) before the headline element name indicate that the selected headline elements are children of the current node (news).
There are several elements defined in XSLT that are used to process nodes. These node-processing elements perform a range of operations and ultimately provide you with somewhat of a programming approach to creating templates. The first of these elements is xsl:for-each, which allows you to process a set of nodes individually according to a certain transformation. The xsl:for-each element is particularly useful for database transformations where you have a set of data that must be formatted into a list or table. The xsl:for-each element accepts a select attribute that works similarly to the select attribute in the xsl:apply-templates element. Following is an excerpt of code from the contacts.xsl style sheet that you saw in the previous hour, which demonstrates the usefulness of the xsl:for-each element:
<xsl:for-each select="contacts/contact">
  <div style="width:450px; padding:5px; margin-bottom:10px; border:5px double black;
    color:black; background-color:white; text-align:left">
    <xsl:apply-templates select="name"/>
    <xsl:apply-templates select="address"/>
    <xsl:apply-templates select="city"/>
    <xsl:apply-templates select="state"/>
    <xsl:apply-templates select="zip"/>
    <hr />
    <xsl:apply-templates select="phone/voice"/>
    <xsl:apply-templates select="phone/mobile"/>
    <hr />
    <xsl:apply-templates select="email"/>
  </div>
</xsl:for-each>
In this example, the xsl:for-each element is used to loop through the contact elements in a document. For each contact element in the document, the transformation code within the loop is applied. More specifically, an XHTML div element is created with the appropriate styles, and several templates are applied for every child contact element. This usage of the xsl:for-each element allows you to effectively display a formatted list of contacts.
Another interesting XSLT node-processing element is the xsl:if element, which allows you to include conditional processing within a template. Transformation code within an xsl:if element is conditionally carried out based upon the result of the conditional expression for the element. This expression is specified in the test attribute of the xsl:if element. You learn a great deal more about expressions in Hour 22, but a quick example might help to reveal how easy they are to use with the xsl:if element:
<xsl:template match="name">
  <div style="font-family:Times, serif; font-size:15pt; font-weight:bold">
    <xsl:value-of select="."/>
    <xsl:if test=". = 'Michael Morrison'">
      <span> (that's me!)</span>
    </xsl:if>
  </div>
</xsl:template>
This code shows how you can conditionally add a literal to the output document based upon the value of the name element. The test attribute of the xsl:if element checks to see if the content of the name element is equal to 'Michael Morrison'. If the conditional expression is true, the literal text (that's me!) is inserted into the output document just after the value of the name element. If not, the value of the name element is inserted like normal.
If you find that you need to conditionally choose between more than one possible value, you can use the xsl:choose element in conjunction with the xsl:when and xsl:otherwise elements. The xsl:choose element works a lot like the xsl:if element except that it supports multiple conditional sections, which are identified by xsl:when elements. Following is the general form of the xsl:choose element:
<xsl:choose>
<xsl:when test="">
</xsl:when>

<xsl:when test="">
</xsl:when>
<xsl:otherwise>
</xsl:otherwise>
</xsl:choose>
This code shows two different conditional sections of transformation code, which is evident by the two xsl:when elements. The final xsl:otherwise element identifies transformation code that is carried out if none of the previous xsl:when conditionals apply. Following is an example that should help show how to use these elements to create multiple conditionals:
<xsl:template match="name">
  <div style="font-family:Times, serif; font-size:15pt; font-weight:bold">
    <xsl:value-of select="."/>
    <xsl:choose>
      <xsl:when test=". = 'Michael Morrison'">
        <span> (that's me!)</span>
      </xsl:when>

      <xsl:when test=". = 'Steve Morrison'">
        <span> (brother)</span>
      </xsl:when>

      <xsl:when test=". = 'Milton James'">
        <span> (friend)</span>
      </xsl:when>

      <xsl:otherwise">
        <span> (don't know this guy!)</span>
      </xsl:otherwise>
    </xsl:choose>
  </div>
</xsl:template>
This example uses an xsl:choose element and three xsl:when elements to provide three conditional transformations that add unique text next to name elements whose content matches the conditionals. An xsl:choose element is also specified to handle any name elements that don’t match the conditionals.
I’ve mentioned several times that one of the enormous benefits of using XSLT to transform XML documents is that you can carefully organize document content before formatting it for display with CSS or XSL-FO. One of the most common operations performed on databases is sorting, in which items are organized according to the value of a particular type of information such as date, quantity, or price. XSLT supports sorting through the xsl:sort element. This element allows you to sort the nodes in a node set according to specified criteria. The criteria for an XSLT sort operation are determined by the select, order, and data-type attributes of the xsl:sort element.
A set of nodes is sorted based upon a key, which is a pattern or expression that identifies a piece of information in the set. For example, if you wanted to sort a set of nodes on an attribute named price, the sorting key would be set to @price. This value is assigned to the select attribute of the xsl:sort element. Another important attribute in the xsl:sort element is order, which is set to either ascending (the default) or descending. The final attribute of interest with the xsl:sort element is data-type, which allows you to specify the type of data being sorted; this attribute is important because it impacts the manner in which the sorting is carried out. The data-type attribute can be set to one of the following values: text or number. Following is an example of an xsl:sort element that is used to sort a list of names alphabetically in descending order:
<xsl:sort select="name" order="descending" data-type="text"/>
This example uses the name element as the key and then sorts nodes within the node set in descending order. The data type is set to text to indicate that the sorting routine is text-based. Following is an example of how you might use this code in the context of a real style sheet:
<xsl:for-each select="contacts/contact">
  <xsl:sort select="name" order="descending"/>
  <div style="width:450px; padding:5px; margin-bottom:10px; border:5px double black;
    color:black; background-color:white; text-align:left">
    <xsl:apply-templates select="name"/>
    <xsl:apply-templates select="address"/>
    <xsl:apply-templates select="city"/>
    <xsl:apply-templates select="state"/>
    <xsl:apply-templates select="zip"/>
    <hr />
    <xsl:apply-templates select="phone/voice"/>
    <xsl:apply-templates select="phone/mobile"/>
    <hr />
    <xsl:apply-templates select="email"/>
  </div>
</xsl:for-each>
You probably recognize this XSLT code from the familiar contacts.xsl style sheet. In this example the xsl:sort element is used to sort the contacts prior to displaying each of them.
Patterns have crept into the XSLT discussion several times throughout this hour and the previous hour. I’d like to mention one more time that you explore patterns more thoroughly in Hour 22. However, XSLT uses patterns enough that I think it would be helpful to cheat a little and give you a quick primer on how to use them. This section isn’t intended to make you a pattern expert, but it will hopefully give you some insight into how patterns fit into XSLT.
As you know by now, patterns are used to address parts of XML documents much as paths in file systems are used to address folders and files. Patterns can be used to isolate specific nodes or groups of nodes and can be specified as absolute or relative. An absolute pattern spells out the exact location of a node or node set, whereas a relative pattern identifies a node or node set relative to a certain context. In the previous contacts.xsl example, the pattern contacts/contact is an absolute pattern, whereas the pattern name is a relative pattern. The name pattern is relative because it makes an assumption about the current context.
Patterns are used in several situations throughout XSLT, but the majority of the time you’ll use them to set the select and match attributes of standard XSLT elements. The simplest pattern is the pattern that references the current node, which is a simple period (.). Following is an example of how to use this pattern:
<xsl:value-of select="."/>
The current node pattern is obviously highly dependent upon the context of the document. A pattern that isn’t dependent upon context is the root pattern, which is identified with a single forward slash (/). The root pattern identifies the location of a document’s root element no matter where it appears. To create an absolute pattern, you must begin with the root element and specify the exact hierarchy of nodes leading to a node or node set.
Other patterns are used to reference nodes that are above or below the current node. For example, a child node pattern is created by simply specifying the name of the node. A parent node, on the other hand, is created using two periods (..). Following is an example of using a pattern to access a parent node:
<xsl:value-of select=".."/>
You can put patterns together to get more interesting results. For example, to address a sibling node, you must first go to the parent and then reference the sibling as a child. In other words, you use the parent pattern (..) followed by a forward slash (/) followed by the sibling node name, as in the following example:
<xsl:value-of select="../brother"/>
If you want to select all of the child nodes of a given node, you can use the double slash (//) pattern, as in the following example:
<xsl:value-of select="//"/>
Lest you think patterns are limited to elements, you can easily address attributes by specifying the attribute name preceded by an at symbol (@), as in the following example:
<xsl:value-of select="info/@ssnum"/>
This code assumes that the current node contains a child element named info that has an attribute named ssnum.
Similar to patterns, expressions play an important role in determining how XSLT style sheets transform XML content. However, expressions differ from patterns in that expressions are capable of carrying out programmatic operations such as comparisons and calculations. Expressions are created using patterns and additional XSLT constructs such as comparison operators and functions. The next couple of sections explain how to use these constructs to create XSLT expressions.
Earlier in the hour you learned how to use the xsl:if and xsl:when elements to add conditional logic to XSLT style sheets. What you didn’t learn, however, was how powerful the actual conditional test of these elements can be. Both of these elements rely on an attribute named test to specify a conditional expression that essentially results in a value of true or false; if the resulting value is true, the associated XSLT code is carried out. The specific expression used by the test attribute is quite flexible and can involve several different comparison operators. Following are some of the most commonly used comparison operators that can appear within the test attribute:
<— Checks to see if one piece of data is less than another<=— Checks to see if one piece of data is less than or equal to another>— Checks to see if one piece of data is greater than another>=— Checks to see if one piece of data is greater than or equal to anotherand— Checks to see if two conditional expressions are both trueor— Checks to see if at least one of two conditional expressions is true
By the Way
Although the less-than and greater-than operators look strange at first, upon closer inspection you can see that they are actually just entities. If you recall, an entity is identified by sandwiching its name between an ampersand (&) and a semicolon (;). So, the greater-than-or-equal-to operator, which is specified as >=, is ultimately resolved into >=.
To use these operators, you simply combine them with patterns and literal values to create expressions. For example, the following code shows how to create an xsl:if element that invokes a section of code only if the content of the child element named countdown is less than or equal to zero:
<xsl:if test="countdown <= 0"> Lift off! </xsl:if>
The and and or operators carry out a logical comparison between two other expressions that must evaluate to a true or false value. As an example, if you wanted to expand the countdown example so that you could count in either direction, the following code would do the trick:
<xsl:if test="countdown <= 0 or countdown > 10"> Lift off! </xsl:if>
The or operator used in this example causes “lift-off” to occur if the value of countdown is either less than or equal to zero, or greater than 10. This example demonstrates how multiple comparison operators can be used together to create more powerful conditional expressions.
In addition to comparison operators, there are also a few familiar math operators that you may find useful:
These operators can be used in expressions to perform math operations on XML data. Following is an example of how you might multiply the contents of two child elements (quantity and unitprice) in order to calculate a shopping cart total that is displayed in an XHTML document:
<div>
  Total price = <xsl:value-of select="quantity * unitprice"/>
</div>
This code reveals the flexibility of the select attribute and how a math operator can be used within it to carry out simple calculations. The values stored in the quantity and unitprice child elements are multiplied using the multiplication operator (*).
The result of the multiplication is inserted into the output document as the content of an XHTML div element.
If you thought operators were neat, you will be really impressed with the standard functions built into XSLT. These functions are much more interesting than operators because they carry out calculations that would otherwise be quite tedious using simple math operators alone. Following are some of the more commonly used standard functions supported in XSLT:
Although these functions are somewhat self-explanatory in terms of what kinds of calculations they carry out, it doesn’t hurt to see a few of them at work in the context of a style sheet. Following is an example of how you might add up the values of a set of nodes to calculate a total with the sum() function:
<div>
  Total amount = $<xsl:value-of select="sum(cart/item/@price)"/>
</div>
This example would work well for a shopping cart XML document that includes a cart element that holds several item elements representing each item in the shopping cart. Notice that the price attribute of each item element is used as the basis for the sum calculation. Following is an example of the kind of XML code that could be transformed using this XSLT example:
<cart>
  <item price="199.99">
  DVD Player
  </item>
  <item price="699.99">
  32-Inch Television
  </item>
  <item price="249.99">
  Surround-Sound Speaker System
  </item>
</cart>
When applied to this code, the previous XSLT example adds together the prices of the three items to arrive at a total of 1149.97. This shopping cart example could also benefit from knowing how many items are in the shopping cart, which is accomplished with the following code:
<div>
  Number of items = <xsl:value-of select="count(cart/item)"/>
</div>
The count() function is used in this example to count the number of item elements contained within the cart element. As this example demonstrates, the standard functions built into XSLT allow you to perform very useful computations with little effort.
As you’ve seen in the past few hours, I like to reinforce style sheet knowledge with complete example style sheets. At this point I’d like to revisit the News XML document that you saw back in Hour 10. If you recall, this document contained content for a news story complete with XML code to identify the relevant portions of the story such as the headline, byline, and body text. Listing 12.1 shows the code for the News XML document, just in case your memory is a little fuzzy.
Example 12.1. The News Example XML Document
 1: <?xml version="1.0"?>
 2: <?xml-stylesheet type="text/xsl" href="news.xsl"?>
 3:
 4: <news>
 5:   <header>
 6:     <headline>
 7:     Local Author Creates Free Online Music Game
 8:     </headline>
 9:     <byline>
10:     By Brent Andrews
11:     </byline>
12:     <dateline>
13:       <location>Nashville, Tennessee</location>
14:       <date>Monday October 17 2005 12:08 CST</date>
15:     </dateline>
16:   </header>
17:
18:   <story>
19:     <p>Local nerd author Michael Morrison is involved in yet another unusual
20:     project. Following up on the success of his quirky trivia game Tall
21:     Tales, Morrison has gone back to his technical roots with his latest
22:     project, Guess That Groove. Guess That Groove acts as somewhat of an
23:     online version of the popular television game show Name That Tune. What
24:     makes Guess That Groove so unique is how it relies on actual digitized
25:     music recordings to present popular songs from the last seventy years of
26:     music.</p>
27:     <p>Located online at <url>www.guessthatgroove.com</url>, the service is
28:     entirely free. Morrison explained that the business model is based upon
29:     commission fees from linked sites such as Amazon.com and iTunes, which
30:     offer game players an option to purchase CDs and individual music tracks
31:     that they encounter throughout the game. It's too early to tell whether
32:     Morrison has hit on another social phenomonon along the lines of Tall
33:     Tales. Regarding the potential success of the online game, Morrison
34:     replied, <quote>It was a lot of fun to create and I enjoy playing it
35:     myself, so in some ways I already consider it a success</quote>.</p>
36:   </story>
37: </news>
If you’re very observant, you might notice that this News XML code is actually a little different than the code you saw in Hour 10. The only change in this code occurs in line 2 where an XSL style sheet (news.xsl) is referenced, as opposed to a CSS style sheet. Otherwise, the document is identical to the original. In Hour 10 you created a CSS to format the document so that it could be viewed in a web browser. Given your newfound knowledge of XSLT, can you think about how an XSLT style sheet might be structured to transform this document so that it can be viewed in a web browser?
Obviously, XSLT alone won’t be enough to prep the document for display because XSLT isn’t capable of carrying out content formatting directly. The approach you saw in the previous hour involves transforming the XML code into XHTML code that is understood by web browsers, as well as applying CSS styles. You’re going to use the same approach here in the XSLT style sheet for the News document. In order to transform each portion of the document, it is necessary to create a template that matches each major element found in the document. With those templates in place, you simply create a root template that establishes the XHTML document structure and invokes the other templates. Listing 12.2 contains the complete source code for the news.xsl style sheet, which uses this exact strategy to transform the News XML document for display within a web browser.
Example 12.2. The news.xsl Style Sheet Used to Transform and Format the News XML Document
1: <?xml version="1.0"?>
2: <xsl:stylesheet version="1.0" xmlns:xsl="http://www.w3.org/1999/XSL/Transform">
3: <xsl:template match="/">
4: <html><head><title>Contact List</title></head>
5: <body style="text-align: center; background-image: url(newspaper.jpg);
background-repeat: repeat">
6: <xsl:apply-templates/>
7: </body>
8: </html>
9: </xsl:template>
10:
11: <xsl:template match="headline">
12: <div style="width:450px; border-bottom:5px double black; text-align:left;
13: color:black; font-family:Verdana, Arial; font-size:26pt">
14: <xsl:value-of select="."/>
15: </div>
16: </xsl:template>
17:
18: <xsl:template match="byline">
19: <span style="width:200px; text-align:left; color:black; font-family:Verdana,
20: Arial; font-size:12pt">
21: <xsl:value-of select="."/>
22: </span>
23: </xsl:template>
24:
25: <xsl:template match="dateline">
26: <span style="width:250px; text-align:right; color:gray; font-family:Verdana,
27: Arial; font-size:10pt; font-style:italic">
28: <xsl:value-of select="."/>
29: </span>
30: </xsl:template>
31:
32: <xsl:template match="p">
33: <div style="width:450px; text-align: left; margin-bottom:8px; color:black;
34: font-family:Verdana, Arial; font-size:10pt">
35: <xsl:apply-templates/>
36: </div>
37: </xsl:template>
38:
39: <xsl:template match="url">
40: <span style="font-weight:bold">
41: <xsl:value-of select="."/>
42: </span>
43: </xsl:template>
44:
45: <xsl:template match="quote">
46: <span style="font-style:italic">
47: <xsl:value-of select="."/>
48: </span>
49: </xsl:template>
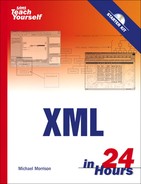
50: </xsl:stylesheet>The general structure of this style sheet should be somewhat familiar to you from the Contacts example in the previous hour. Similar to the contacts.xsl style sheet, this style sheet uses an empty apply-templates element within its root template to indirectly invoke all of the other templates in the style sheet (line 6). Notice that the root template includes XHTML code that establishes the resulting web page (lines 4–8). From there, the headline template formats the headline of the News document using a div element and CSS styles (lines 11–16). The remaining templates continue with a similar process of placing XML content into the framework of an XHTML document and carefully applying CSS styles to get the desired formatting. Figure 12.2 shows the resulting XHTML document as viewed in Internet Explorer.
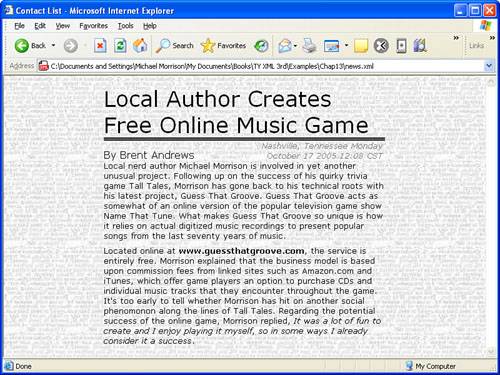
Figure 12.2. The News example document is displayed in Internet Explorer using the news.xsl style sheet.
This figure shows how an XSLT style sheet is used to transform XML content so that it appears highly formatted in a web browser. Of course, the formatting aspect of the style sheet is actually carried out with CSS, but XSLT is still at the heart of the transformation. Other than the new tiled background image, the resulting styled page looks very much like the News page styled with CSS back in Hour 10.
I’m a little concerned about the fact that you’ve only seen how to create an XSLT style sheet that mimics the functionality of an existing CSS style sheet. The reason for the concern is because you might be wondering why you wouldn’t just create the style sheet in CSS since the CSS version is obviously simpler to code. The answer is that you probably would be smarter to use CSS for the example style sheets that you’ve seen thus far because they really do nothing more than format XML content for display. The real power of XSLT is revealed when you must go a step further and actually manipulate and extract information from XML content. In this section you create an XSLT style sheet that conditionally displays content according to its value and that also performs an interesting calculation on information in a document.
The example document for this style sheet is a document that stores a list of vehicles for sale. If you’ve ever shopped for cars on the Internet, you are probably familiar with the process of searching through lists of cars according to certain criteria. In this example you learn how to use an XSLT style sheet to format vehicle information intelligently. The Vehicles example document is coded in a custom XML language that would be suitable for an online car shopping web site. Listing 12.3 contains the code for the vehicles.xml document.
Example 12.3. The Vehicles Example XML Document
 1: <?xml version="1.0"?>
 2: <?xml-stylesheet type="text/xsl" href="vehicles.xsl"?>
 3:
 4: <vehicles>
 5:   <vehicle year="2004" make="Acura" model="3.2TL">
 6:     <mileage>13495</mileage>
 7:     <color>green</color>
 8:     <price>33900</price>
 9:     <carfax buyback="no" />
10:   </vehicle>
11:
12:   <vehicle year="2005" make="Acura" model="3.2TL">
13:     <mileage>07541</mileage>
14:     <color>white</color>
15:     <price>33900</price>
16:     <carfax buyback="yes" />
17:   </vehicle>
18:
19:   <vehicle year="2004" make="Acura" model="3.2TL">
20:     <mileage>18753</mileage>
21:     <color>white</color>
22:     <price>32900</price>
23:     <carfax buyback="yes" />
24:   </vehicle>
25:
26:   <vehicle year="2004" make="Acura" model="3.2TL">
27:     <mileage>28434</mileage>
28:     <color>black</color>
29:     <price>31995</price>
30:     <carfax buyback="yes" />
31:   </vehicle>
32:
33:   <vehicle year="2004" make="Acura" model="3.2TL">
34:     <mileage>22422</mileage>
35:     <color>silver</color>
36:     <price>31995</price>
37:     <carfax buyback="no" />
38:   </vehicle>
39:
40:   <vehicle year="2004" make="Acura" model="3.2TL">
41:     <mileage>18350</mileage>
42:     <color>silver</color>
43:     <price>32995</price>
44:     <carfax buyback="no" />
45:   </vehicle>
46:
47:   <vehicle year="2004" make="Acura" model="3.2TL">
48:     <mileage>12163</mileage>
49:     <color>gold</color>
50:     <price>31995</price>
51:     <carfax buyback="yes" />
52:   </vehicle>
53:
54:   <vehicle year="2004" make="Acura" model="3.2TL">
55:     <mileage>23182</mileage>
56:     <color>silver</color>
57:     <price>31995</price>
58:     <carfax buyback="no" />
59:   </vehicle>
60:
61:   <vehicle year="2003" make="Acura" model="3.2TL">
62:     <mileage>37775</mileage>
63:     <color>grey</color>
64:     <price>22995</price>
65:     <carfax buyback="yes" />
66:   </vehicle>
67:
68:   <vehicle year="2003" make="Acura" model="3.2TL">
69:     <mileage>34503</mileage>
70:     <color>black</color>
71:     <price>22995</price>
72:     <carfax buyback="yes" />
73:   </vehicle>
74:   <vehicle year="2003" make="Acura" model="3.2TL">
75:     <mileage>42670</mileage>
76:     <color>black</color>
77:     <price>23995</price>
78:     <carfax buyback="no" />
79:   </vehicle>
80:
81:   <vehicle year="2003" make="Acura" model="3.2TL">
82:     <mileage>48405</mileage>
83:     <color>gold</color>
84:     <price>22995</price>
85:     <carfax buyback="yes" />
86:   </vehicle>
87: </vehicles>
This example document represents XML data that you might receive as part of a search result for a specific type of car, in this case an Acura TL. The XML code shows how the Vehicles document relies on a relatively simple markup language consisting of only a few elements: vehicles, vehicle, mileage, color, price, and carfax. Each vehicle in the document is coded as a vehicle element within the parent vehicles element. In addition to the mileage, color, and price of each vehicle, which are coded as child elements, the year, make, and model of each vehicle are coded as attributes of the vehicle element. There is an additional child element called carfax that is used to code whether or not a vehicle is covered under the CARFAX Buyback Guarantee. This element includes an attribute named buyback that can be set to either yes or no.
By the Way
The online automotive service CARFAX offers a search that you can perform to find out the history of vehicles. The CARFAX Buyback Guarantee helps to ensure that the information about a vehicle on CARFAX is accurate. If not, CARFAX will buy the car back from you. To learn more about CARFAX, visit them online at http://www.carfax.com.
So what exactly should an XSLT style sheet do with this document? For the purposes of this example, I’d first like to see the style sheet sort the vehicles according to a certain criterion, such as price. Following is a template that carries out this kind of sorting process using the xsl:sort element and its order attribute:
<xsl:template match="vehicles">
  <xsl:apply-templates select="vehicle">
    <xsl:sort select="@price" order="ascending"/>
  </xsl:apply-templates>
</xsl:template>
This template sorts vehicles according to price and in ascending order (cheapest to most expensive). Although price is certainly an important factor, not all buyers are driven solely by price. In fact, you may be determined to buy a car with low miles, and it could very well be that the CARFAX guarantee is important to you. Knowing this, I thought it might be interesting to highlight vehicles that are under a certain mileage (20k miles) and that have the CARFAX guarantee. This task can be carried out using xsl:when and xsl:otherwise elements, which allow you to conditionally transform XML content, in addition to sorting vehicles by price.
One final piece of information that would be interesting to know is the average price of the vehicles in the document; lucky for us, XSLT is quite capable of performing this calculation without much work. Following is an example of how this calculation could be carried out in a template:
<xsl:value-of select="round(sum(vehicles/vehicle/price) div
  count(vehicles/vehicle))"/>
This code makes use of the round(), sum(), and count() functions to carry out the average price calculation.
The complete XSLT style sheet for the Vehicles document is similar to the other XSLT style sheets you’ve seen—it must transform the XML content into XHTML so that it can be viewed in a web browser. Unlike those style sheets, however, this one must be structured a little differently. First off, the root template has much more responsibility because there is a fair amount of formatting involved in listing the vehicles, because they need to be listed in a tabular format. Additionally, the template for the main vehicles element is kind of interesting because it must sort its child vehicle elements according to the price of each vehicle.
I think you know enough about the required functionality of the Vehicles style sheet to take a look at the complete code for it, which is shown in Listing 12.4.
Example 12.4. The vehicles.xsl Style Sheet Used to Transform and Format the Vehicles XML Document
1: <?xml version="1.0"?> 2: <xsl:stylesheet version="1.0" xmlns:xsl="http://www.w3.org/1999/XSL/Transform"> 3: <xsl:template match="/"> 4: <html> 5: <head> 6: <title>Used Vehicles</title> 7: </head> 8: 9: <body background="money.jpg"> 10: <h1 style="background-color:#446600; 11: color:#FFFFFF; font-size:20pt; text-align:center; 12: letter-spacing: 12pt">Used Vehicles</h1> 13: <table align="center" border="2px"> 14: <tr> 15: <th>Year</th> 16: <th>Make</th> 17: <th>Model</th> 18: <th>Mileage</th> 19: <th>Color</th> 20: <th>Price</th> 21: <th>CARFAX</th> 22: </tr> 23: <xsl:apply-templates/> 24: <tr style="font-weight:bold"> 25: <td colspan="3"></td> 26: <td colspan="2">Average price:</td> 27: <td> 28: $<xsl:value-of select="round(sum(vehicles/vehicle/price) div 29: count(vehicles/vehicle))"/> 30: </td> 31: </tr> 32: </table> 33: </body> 34: </html> 35: </xsl:template> 36: 37: <xsl:template match="vehicles"> 38: <xsl:apply-templates select="vehicle"> 39: <xsl:sort select="price" order="ascending"/> 40: </xsl:apply-templates> 41: </xsl:template> 42: 43: <xsl:template match="vehicle"> 44: <xsl:choose> 45: <xsl:when test="mileage < 20000 and carfax/@buyback = 'yes'"> 46: <tr style="color:#446600; font-weight:bold"> 47: <td><xsl:value-of select="@year"/></td> 48: <td><xsl:value-of select="@make"/></td> 49: <td><xsl:value-of select="@model"/></td> 50: <td><xsl:value-of select="mileage"/></td> 51: <xsl:apply-templates select="color" /> 52: <td>$<xsl:value-of select="price"/></td> 53: <xsl:apply-templates select="carfax" /> 54: </tr> 55: </xsl:when> 56: <xsl:otherwise> 57: <tr> 58: <td><xsl:value-of select="@year"/></td> 59: <td><xsl:value-of select="@make"/></td> 60: <td><xsl:value-of select="@model"/></td> 61: <td><xsl:value-of select="mileage"/></td> 62: <xsl:apply-templates select="color" /> 63: <td>$<xsl:value-of select="price"/></td> 64: <xsl:apply-templates select="carfax" /> 65: </tr> 66: </xsl:otherwise> 67: </xsl:choose> 68: </xsl:template> 69: 70: <xsl:template match="color"> 71: <xsl:choose> 72: <xsl:when test=". = 'black'"> 73: <td style="background: #000000"></td> 74: </xsl:when> 75: <xsl:when test=". = 'red'"> 76: <td style="background: #880000"></td> 77: </xsl:when> 78: <xsl:when test=". = 'green'"> 79: <td style="background: #008800"></td> 80: </xsl:when> 81: <xsl:when test=". = 'blue'"> 82: <td style="background: #000088"></td> 83: </xsl:when> 84: <xsl:when test=". = 'silver'"> 85: <td style="background: #CCCCCC"></td> 86: </xsl:when> 87: <xsl:when test=". = 'gray' or . = 'grey'"> 88: <td style="background: #666666"></td> 89: </xsl:when> 90: <xsl:when test=". = 'gold'"> 91: <td style="background: #CC9933"></td> 92: </xsl:when> 93: <xsl:otherwise> 94: <td style="background: #FFFFFF"></td> 95: </xsl:otherwise> 96: </xsl:choose> 97: </xsl:template> 98: 99: <xsl:template match="carfax"> 100: <xsl:choose> 101: <xsl:when test="@buyback = 'yes'"> 102: <td style="text-align: center"><img src="checkmark.gif" 103: alt="CARFAX Buyback Guarantee" /></td> 104: </xsl:when> 105: <xsl:otherwise> 106: <td></td> 107: </xsl:otherwise> 108: </xsl:choose> 109: </xsl:template> 110: </xsl:stylesheet>
Although the code is a little long compared to the other style sheets you’ve seen, it does some pretty neat things with the vehicle data. First of all, the XHTML web page is set up and a table is created with a caption for the vehicle list; this all takes place in the first part of the root template (lines 4–22). On line 23 the xsl:apply-templates element is used to invoke the other templates in the style sheet, which results in the vehicle data getting transformed and formatted into XHTML table data. The root template then continues by calculating and displaying the average price of the vehicles on the last row of the table (lines 24–31). Notice that the round(), sum(), and count() functions are all used in this calculation, along with the div operator.
There are four other templates defined in this style sheet: vehicles, vehicle, color, and carfax. The vehicles template invokes the vehicle template and also sorts the vehicle elements using the xsl:sort element (line 39). The sort is an ascending sort according to the price attribute of the vehicle elements.
The vehicle template is intriguing in that it uses the xsl:choose, xsl:when, and xsl:otherwise elements to set up two branches of code that are conditionally carried out based upon the values of the mileage element and the buyback attribute of the carfax element within each vehicle element. More specifically, vehicles with mileage less than 20,000 miles that have the CARFAX guarantee are highlighted (line 45). Notice on this line (45) that a fairly interesting expression is used to check for vehicles matching the mileage and CARFAX requirements. If there is a match with this expression, the details of the vehicle are displayed in a green, bold font (lines 46–54); if there is no match, the vehicle details are displayed in a normal font, as indicated in the xsl:otherwise element (lines 57–65).
The last two templates focus on the color and CARFAX information for each vehicle. Instead of just displaying the name of the color as text, a colored rectangle is drawn on the screen to help provide a better visual interface to the data. In other words, you see the actual color of the vehicle instead of the name of the color. The color template (lines 70–97) is what makes this functionality possible.
The carfax template appears last, and is responsible for displaying an image of a checkmark that identifies whether a vehicle is covered by the CARFAX BuyBack Guarantee. The value of the buyback attribute is used in the conditional, and if its value is set to yes the image checkmark.gif is displayed.
You now have a pretty good idea regarding what the resulting web page should look like given the code in the vehicles.xsl style sheet. Figure 12.3 shows the vehicles.xml document as viewed in Internet Explorer using this style sheet.
Figure 12.3. The Vehicles example document is displayed in Internet Explorer using the vehicles. xsl style sheet.
The figure reveals how the XSLT style sheet manipulates the Vehicles XML document in several ways. First off, the vehicles are sorted according to increasing price, which allows you to quickly determine their different price points. Secondly, all the vehicles with less than 20,000 miles that have a CARFAX BuyBack Guarantee are highlighted with a bold font in a different color to make them stand out. Finally, the average price of the vehicles is calculated and displayed as the last item in the table, which would be useful information for a buyer trying to gauge how much vehicles cost.
Although XSLT style sheets can be used in conjunction with CSS to perform basic XML document formatting, the real power of XSLT is revealed when you actually manipulate the content of a document in order to facilitate a more meaningful presentation. Fortunately, XSLT includes rich features for carrying out a variety of different transformation tasks. Some of the XSLT features that make it so flexible are patterns and expressions, along with the ability to use them to process and sort nodes. Of course, at the core of every XSLT style sheet is a set of templates that are used to transform different parts of XML documents.
This hour taught you a great deal about templates and how they are created and applied in XSLT style sheets. You also learned how to process and sort nodes, not to mention how to use patterns and expressions. The hour culminated in a couple of complete XSLT example style sheets, which hopefully gave you some practical knowledge that can help you get started on your own XSLT projects.
Are there any limitations regarding the use of literals in an XSLT style sheet? | |
Yes. Because XSLT style sheets are coded in XML, everything in them must adhere to the syntax rules of XML. This applies to literals as well, which means that tags must be nested properly, start tags must have end tags, and so on. | |
What happens to nodes in an XML document that aren’t matched by a template in an XSLT style sheet? | |
If nodes in a document aren’t matched by a template in an XSLT style sheet, those nodes aren’t processed or transformed. Keep in mind that it isn’t necessary for a style sheet to address every single piece of information in an XML document; it’s perfectly acceptable to pick out highly specific information from a document if so desired. The degree to which document content is processed is entirely dependent on each specific application of XSLT. | |
Are there any other functions I can use with XSLT beyond the standard functions mentioned in this hour? | |
Yes. There are several other standard XSLT functions that weren’t covered in this hour; you can learn more about them by visiting the XSLT page at the W3C web site, which is located at http://www.w3.org/TR/xslt. Additionally, XSLT supports the inclusion of extended functions in different implementations of XSLT. For example, a web browser vendor could add browser-specific functions to their implementation of XSLT. You’ll have to check with the specific browser you are targeting to see if extended XSLT functions are supported. | |
In regard to an XSLT style sheet, what happens if a document doesn’t validate against a DTD/XSD schema? | |
If a document doesn’t validate against a provided schema, a web browser will still apply the style sheet and display the document. However, if the document isn’t well formed, the style sheet is never processed and the document isn’t displayed. |
The Workshop is designed to help you anticipate possible questions, review what you’ve learned, and begin learning how to put your knowledge into practice.