
MISSION 8
Door Sensor to Tell When Your Room Is Under Attack
Little brothers, big sisters, none of them belong in your room—unless, of course, you share it with them. If you want to keep your home safe and siblings out your room, then I’d recommend the cookie jar lock for your belongings. This door alarm can work on any door, so you could add it to a closet or wardrobe instead.
The door sensor works on electrical signals. When two wires are touching, they let electricity flow from one to the other. If that connection is broken, then we can sense that electrically.
Back in Mission 1, you created a touch sensor to test whether a family member is a zombie. This worked because humans conduct electricity. Now we can’t stay in our room all day waiting for a sibling to attack. So we’re going to leave a conductive circuit behind.
One item that conducts electricity and that you can find in your home is tinfoil.
Let’s look at the algorithm first and then get building.
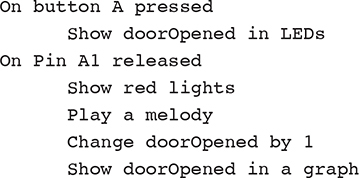
Algorithm
![]()
Build
The build for this mission is the same until you connect your individual device.
Let’s add a small speaker using crocodile clips. You will need:
![]() A speaker with a headphone jack and its own power source
A speaker with a headphone jack and its own power source
![]() Four crocodile clips
Four crocodile clips
![]() Tinfoil
Tinfoil
![]() Tape
Tape
Add the Speaker
Mission 4 talks about how to use crocodile clips.
1. Add a crocodile clip to the tip of the headphone jack (yellow crocodile clip).
2. Clip the other end of this crocodile clip onto the GND pin.
3. Add a crocodile clip to the base of the headphone jack (green crocodile clip).
4. Clip the other end of this crocodile clip onto
a. Pin 0 on the micro:bit.
b. Pin A0 on the Circuit Playground Express.
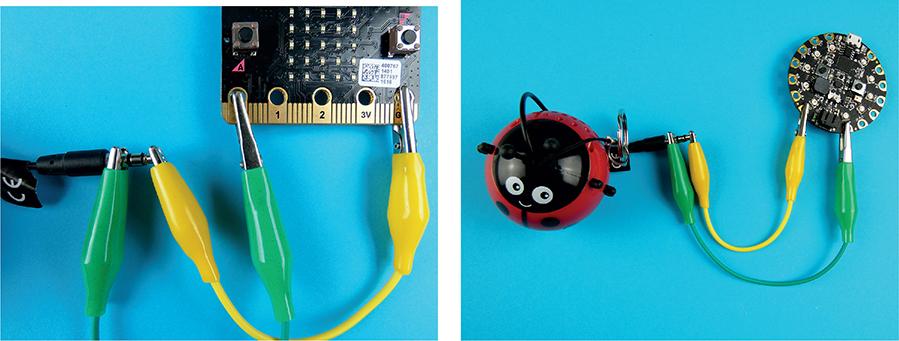
Figure 8.1 Adding a speaker to a project.
This will work connected the other way around as well. Use this test code to check that it works:
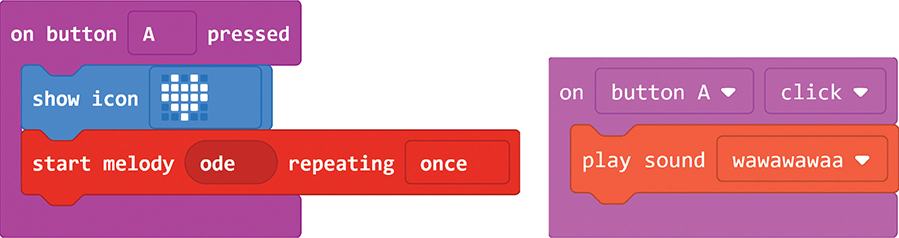
Figure 8.2 Testing the speaker on the micro:bit (left) and the Circuit Playground Express (right).
Add the Door Pads to the Door
1. Cut out two pieces of tinfoil. I started with two pieces each 6 × 8 inches.
2. Fold the pieces into thin rectangular strips. My final pieces were 4 × 2 inches. I wouldn’t add them to the door frame until you’ve coded them first! It’s much easier to test this project on your desk rather than on the floor.
3. Add one piece to the door frame using the tape.
4. Add the second piece to the door. Make sure that when you close the door, the two pieces touch.
Add the Door Pads to the Device
1. Add a crocodile clip to the tinfoil on the door frame. Attach the other end of the crocodile clip to pin 1 of the micro:bit or pin A1 of the Circuit Playground Express.
2. Add a crocodile clip to the other piece of tinfoil on the door. Attach the other end to GND of the micro:bit or the Circuit Playground Express. It doesn’t matter which piece of tinfoil goes to GND or pin 1/A1, the door or the frame.
Here are all the crocodile clips and battery attached:
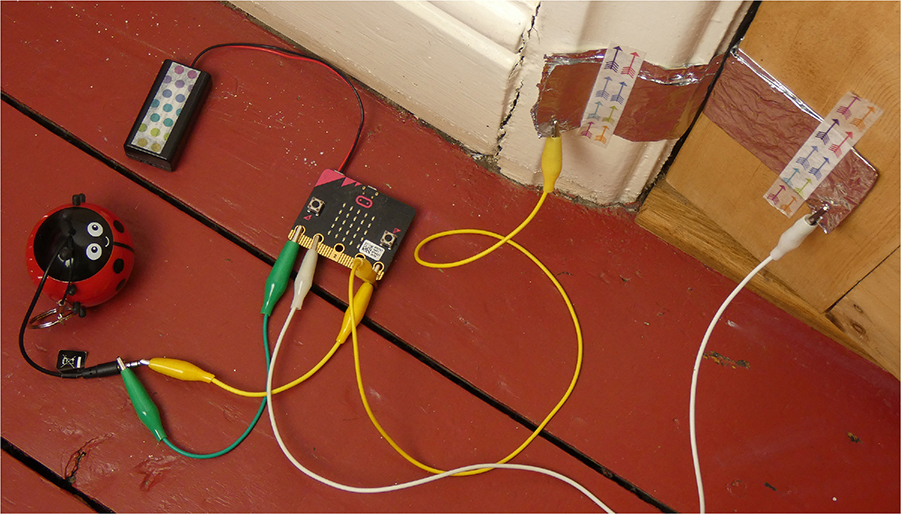
Figure 8.3 All the wires!
micro:bit
Code
Instead of pressing the pin, like we did in Mission 1 to test for zombies, we’re looking for a block that detects the pin being released.
1. Under the Input menu, click on the submenu More… for the block on pin P0 released.
2. We’re going to change P0 to P1 because we want to play music out of P0.
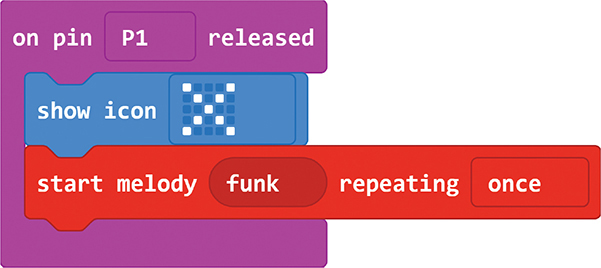
Figure 8.4 I like funk melody. What will you choose?
When testing the code, the micro:bit’s pins work better when it’s plugged into a battery pack instead of the USB on your computer.
This melody repeats just once—how many times do you want it to play? How long will it take you to get from the other side of the house to your room? I counted six melodies. Let’s put it in a repeat loop instead.
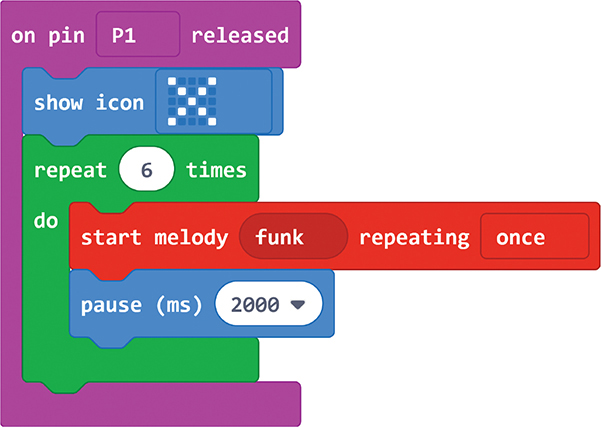
Figure 8.5 This creates a long alarm.
REPEAT LOOP
A repeat loop is a nice, simple loop. It just repeats the number of times you want it to.
When I first tested this, the melody sounded like it played only once. The loop was repeating the melody, but it was happening so fast that it sounded like one melody. I want one melody played six times, one after the other.
I put a pause after the melody to let it stop before it plays it again. The pause is 2,000 milliseconds, or 2 seconds, long. It lets the first melody finish before the next one begins.
Play around with your melody and pauses in the simulator to get the best alarm for your room.
Debug
They’ve broken into your room, you’ve dealt with them swiftly, but we’ve found a bug: the screen still shows an X on it. Let’s reset the screen.
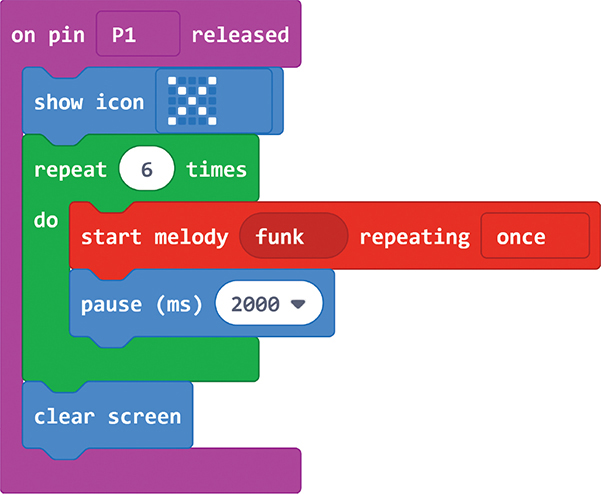
Figure 8.6 Reset.
When you debug this mission, it will mostly be debugging the build. Getting two pieces of tinfoil to touch is harder than it sounds. Putting them in the right place and making sure that the croc clips don’t fall off—this is a delicate operation!
To help me debug, I kept the tune on button A pressed.

Figure 8.7 Debugging the speaker.
That way, I could test whether the speakers are set up correctly, separate from the door setup.
Expert Level
I have crafty brothers. I know they’ll find a way around my alarm. Maybe they’ll unplug the speaker. Check out Mission 12 on how to add a remote speaker. Also, why not use a variable to record every time the door is open. Take a look at the following algorithm. Can you code it?
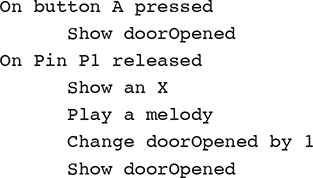
This way, every time you open your door, the micro:bit shows you the number of times the door has been opened. If it was more than the last time you opened the door, crafty siblings are at work!
When we have a mission like this that could stay set up for days, you’ll find that your batteries will need replacing. I found this item from Monk Makes really helpful for long-term projects:

Figure 8.8 Power for micro:bit.
It lets you plug the micro:bit into a wall socket. You won’t need batteries. Find out more information at https://www.monkmakes.com/mb_power/.
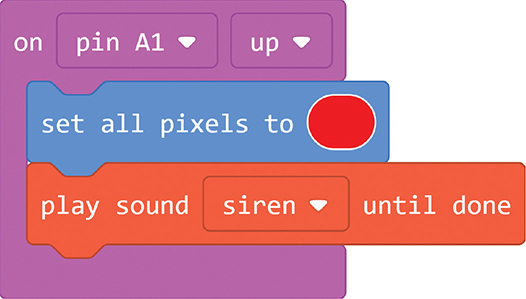
Figure 8.9 The siren is a great alarm sound.
Circuit Playground Express
Code
Instead of pressing the pin down, like we did in Mission 1 to test for zombies, we’re looking for a block that detects the pin going up. This is the same block; you just change down to up!
We also need to pull the pin up when the Circuit Playground Express starts.
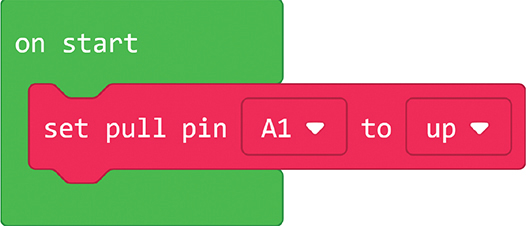
Figure 8.10 Set up the pin.
The siren repeats just once. How many times do you want it to play? How long will it take you to get from one side of your house to your room? I counted four sirens. Let’s put the play sound siren until done block inside a repeat block.
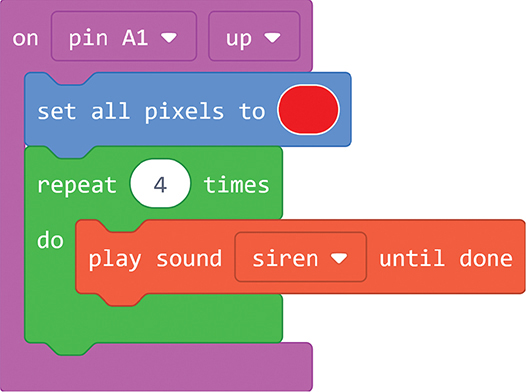
Figure 8.11 This creates a long alarm.
Debug
When I caught someone in my room and dealt with that person, I noticed that the Circuit Playground Express was still showing red. Let’s clear the screen, ready for the next intruder.
Other problems with this mission are to do with the build. Getting two pieces of tinfoil to touch when the door closes is harder than it sounds. It’s quite a tricky setup to get right. To help me debug, I kept the tune on a button click. That way, I can test whether the speakers are set up correctly, separate from the door setup.
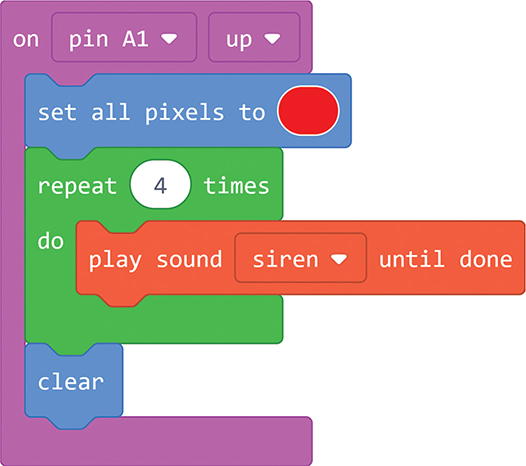
Figure 8.12 Reset.
To set up this mission, I found that if you open the door, press Reset on the Circuit Playground Express, and then close the door, this arms it, and it will recognize the door being opened. If the door is already closed when you start up the Circuit Playground Express, it won’t recognize that the pin has gone up, because it didn’t spot the pin going down.
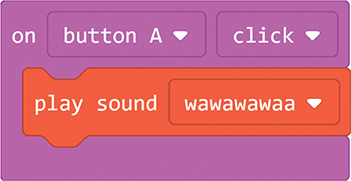
Figure 8.13 Debugging the speaker.
Expert Level
There are crafty intruders out there, and they’ll find a way around my alarm. Mission 12 shows you how to add a remote speaker so that the intruders can’t remove your speaker and get in. Also, why not use a variable to record every time the door is opened. Take a look at the following algorithm. Can you code it?
This way, every time you open your door, it shows you the number of times it has been opened. If it was more than the last time you opened it, there was an intruder!
Raspberry Pi
Build
The Raspberry Pi can play sound through the HDMI cable attached to the monitor or through a speaker you plug into it. For this mission, I’m going to attach a speaker and run the Raspberry Pi without a monitor.
You will need:
![]() Two male-to-female jumper wires
Two male-to-female jumper wires
![]() Two crocodile clips
Two crocodile clips
![]() Tinfoil
Tinfoil
![]() A cool speaker
A cool speaker
Use Figure 8.14 to guide you.
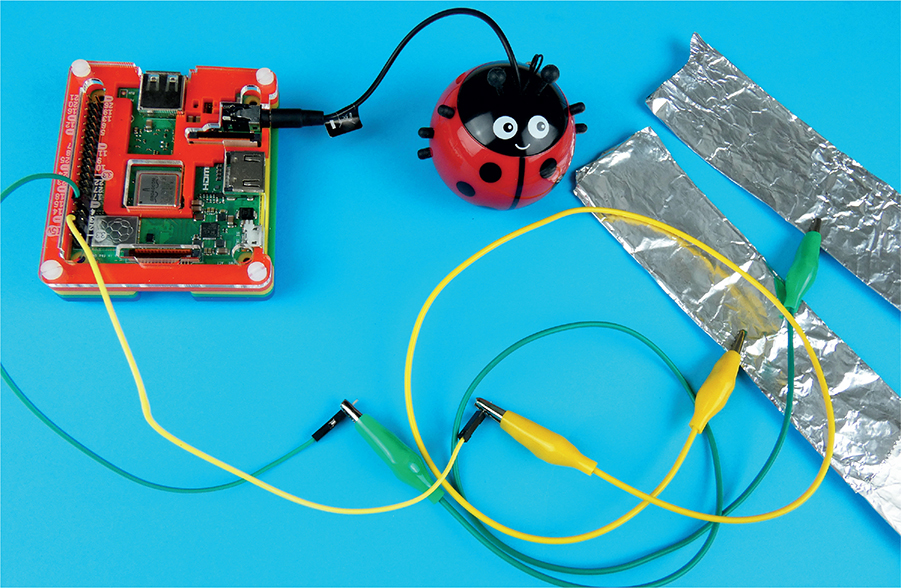
Figure 8.14 Door sensor with funky speaker.
Connect a Ground Pin on the Raspberry Pi to a Piece of Tinfoil
1. Attach the female end of one jumper wire to a ground pin on the Raspberry Pi.
2. Attach a crocodile clip to the other (male) end of the jumper wire.
3. Attach the other end of the crocodile clip to a piece of tinfoil.
Do the Same for Another Piece of Tinfoil and GPIO2
1. Attach the female end of a jumper wire to GPIO2 on the Raspberry Pi.
2. Attach a crocodile clip to the other (male) end of the GPIO2 jumper wire.
3. Connect the other end of the crocodile clip to a piece of tinfoil.
Keep everything on your desk so that you can test it as you code it.
Code
Let’s set up the code using a monitor first.
Set Up the Speaker
Download a siren noise to use as the alarm.
1. On the Raspberry Pi, open up the terminal (remember what the terminal is from Mission 1).
2. Type wget 'http://soundbible.com/grab.php?id=1577&type=wav'-O siren.wav. This should download a siren audio file called siren.wav to your Raspberry Pi. It should! But you might type it wrong, which I do all the time. This code is downloading a wav file from a website. If you find it easier, you could:
a. Open up a browser on the Raspberry Pi.
b. Type this URL: http://soundbible.com/?grab.php?id=1577&type=wav, or go to http://soundbible.com.
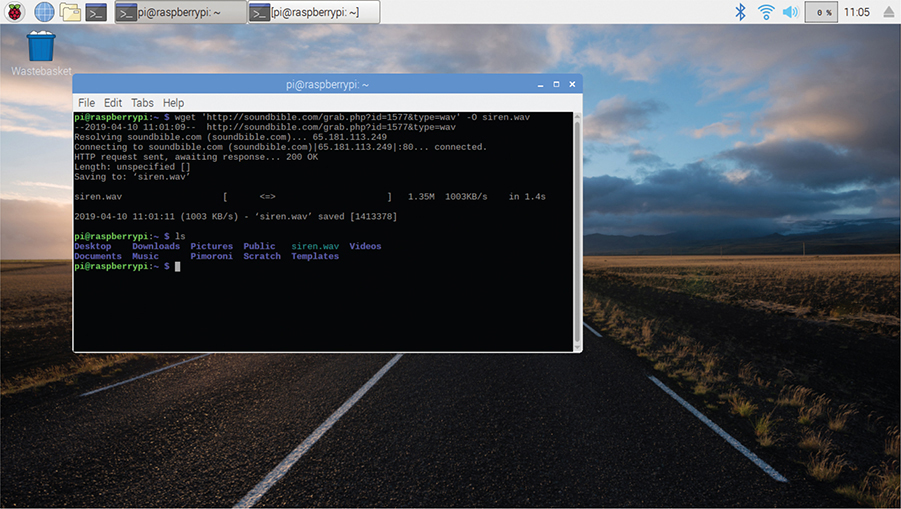
Figure 8.15 What sound will you use?
c. Find the siren file by using the search box on the website.
d. Open the siren file by clicking on its name.
e. Click on the wav icon to download the file.
3. You can check that the file downloaded properly by typing ls in the terminal.
4. Once it’s finished, type aplay siren.wav into the terminal. You should hear a siren!
BOX SOUND NOT WORKING
My computer monitor doesn’t have a speaker on it, so when I typed aplay siren.wav, nothing happened. I plugged a speaker into the Raspberry Pi, and nothing happened again. Sometimes we need to set where the sound is coming from. Use this command in the terminal
amixer cset numid=3 2
to set the speaker to the HDMI (monitor) cable. Use
amixer cset numid=3 1
to set the speaker to the audio jack.
FIND YOUR OWN SOUND
1. Find a sound you like.
2. Look at the number in the address of the sound. My siren was here: http://soundbible.com/1577-Siren-Noise.html.
3. Enter that number, in this case 1577, into the wget command: wget ‘http://soundbible.com/ grab.php?id=1577&type=wav’ -O siren.wav.
Set Up the Door Sensor
1. Open up Python from the main menu: Programming > Python 3 (IDLE).
2. Here’s the code to run the siren in Python 3. Let’s put it in a function and call that function to test whether it works.
3. Run the code to check whether it works.
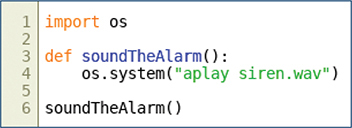
Figure 8.16 Code.

Figure 8.17 Code.
4. Set up the door as a button using the gpiozero library.
5. When the door button is released, the alarm sounds!
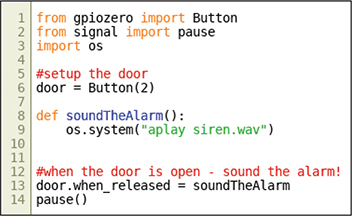
Figure 8.18 Code.
We don’t want to drag a TV into our bedroom to get this code running. Let’s set up the Raspberry Pi to run this file when it starts, without a screen.
CRON
Cron is a tool that lets us set up commands to happen when we want. We can set up Python files to run every hour, every minute, at 12 noon every day, or, in this case, when the Raspberry Pi starts. Find out more about Cron on the Raspberry Pi website (https://www.raspberrypi.org/documentation/linux/usage/cron.md).
1. Open the terminal, and type crontab –e.
2. The first time it might ask you to choose an editor. I like nano, so I pressed 2 and enter.
3. Press the down key to scroll DOWN to the bottom of the file.
4. On the last line, type your command: @reboot python3 /home/pi/doorSensor.py.
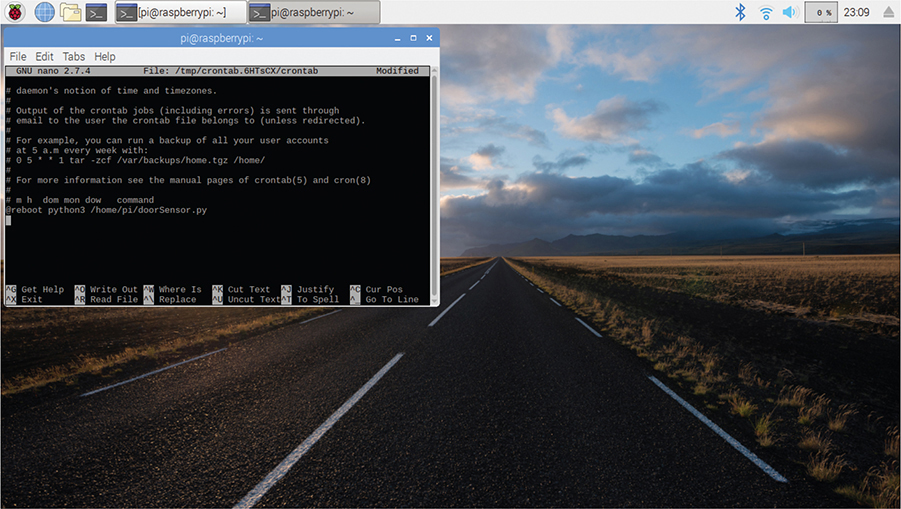
Figure 8.19 Setting up crontab in the terminal.
5. doorSensor.py is what I called my program, which we coded earlier. Make sure that you enter your filename correctly here.
6. Restart the Raspberry Pi, and see whether it works!
a. To test, put the tinfoil pieces together and then take them apart.
b. The siren should play once the pieces of tinfoil are not touching.
Debug
The only debugging I can see for this project is the build. Getting the cables to stay on the tinfoil while I taped it to a door was tricky. Also, my doors have weird gaps in them. No wonder my house is so cold! I had to make extra-thick tinfoil to make sure that the pieces would touch when the door was closed. What are your doors like?
Expert Level
Check out Mission 12, which sends an email every time your door is opened!