
MISSION 6
Reaction Game to Test for Zombies

Figure 6.1 I mean, how will we ever know who the zombie is?? They’re identical twins!
Everyone knows that zombies are really slow and can’t react as quickly as humans. So a good test to know if someone is a zombie or not is to challenge him or her to a reaction game.
The game is simple: there are two buttons. The device counts down, and when it gets to 0, the first person to press his or her button wins, is human, and won’t be hunted down. The following program uses the built-in buttons on the micro:bit and the Circuit Playground Express and the keyboard for the Raspberry Pi. The “Expert Level” adds cool arcade buttons that you can slam with your fist.
The game is simple, but the code is not! Let’s write down the problem in a logical way.
Algorithm

But this algorithm won’t work, because if button A is pressed then button B is pressed, button B will declare the winner.
We need the game to continue until someone presses a button. Whoever presses the button is the winner. Once a button is pressed, a winner is declared and the game ends. This is where a while loop comes in handy.
WHILE LOOP
A while loop is a loop that will continue until a certain event happens. We don’t know how many times a while loop will loop; we just want it to stop when something happens—in this case, when a button, any button, is pressed.
When the button is pressed, we have our winner.
Full Algorithm

Let’s get coding!
micro:bit
Build
For this mission, make sure that the suspected zombies can reach their buttons and see the screen.

Figure 6.2 Testing Dad.
Code
Let’s do the countdown first. Put all these blocks under a forever loop, and test it in the simulator. It should be counting down from 3 to 1 and then go back to 3.
Let’s play until someone presses a button. Now let’s grab our while true loop from the Loops menu and place it under clear screen.
1. From the Logic menu, pull out the block and, and place it on the true of the while block.
2. From the Logic menu, pull out the block not, and place it on the first diamond of the and block.
3. Do the same on the second diamond so that it looks like Figure 6.6.
4. From the Input menu, scroll down and select button A is pressed, drop it on the first not block’s diamond. This can be tricky. Make sure that it’s going on the diamond. Sometimes I accidentally replace the whole not block.

Figure 6.3 Countdown.
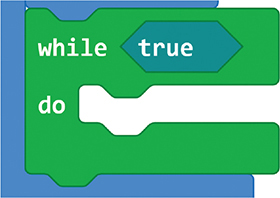
Figure 6.4 While.

Figure 6.5 While and.

Figure 6.6 While and not.
5. From the Input menu, scroll down and select button A is pressed, drop it on the second not block’s diamond. Change A to B.

Figure 6.7 While and not buttons.
6. So we’re going to just wait until someone presses a button. Let’s put a really short pause in here. We don’t want to do anything while we’re waiting, but MakeCode needs a block inside this loop. A really short pause won’t affect the program.

Figure 6.8 While pause.
Who Won?
The next block after this while loop only gets run when a button is pressed. So let’s check which button was pressed.
1. From the Logic menu, drag out if true then.

Figure 6.9 If.
2. From the Input menu, drag out button A is pressed, and drop it on top of true.

Figure 6.10 If A.
3. From the Basic menu, drag out show string “Hello!”, and place it inside this if statement.
4. Click on Hello, and change it to A.
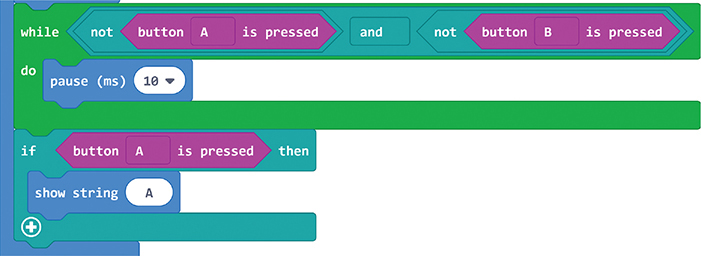
Figure 6.11 If winner.
5. Do the same for the B button, replacing Hello with B.
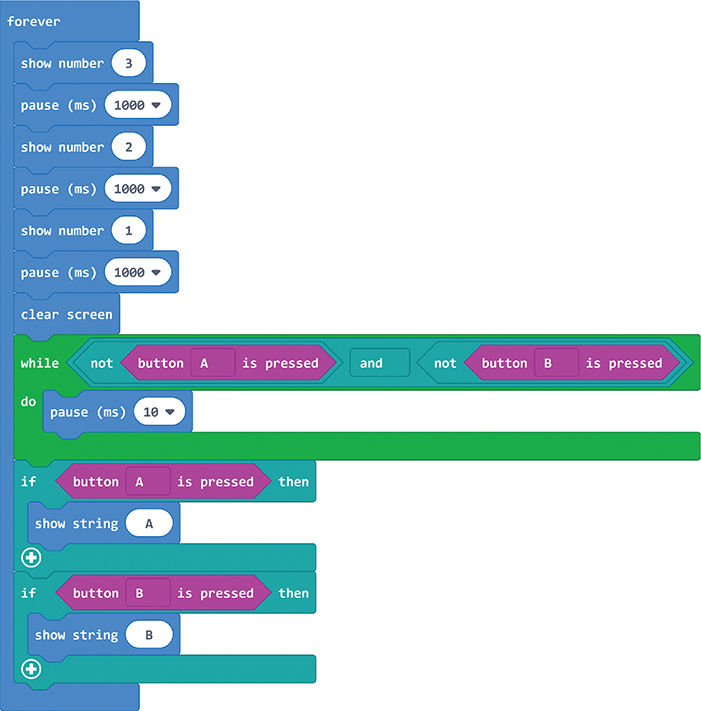
Figure 6.12 If winners.
That’s it! Try out the game on the simulator before you download it to the micro:bit.
Before you download, give your project a good name at the bottom of the screen. If you do the “Expert Level,” you’ll need to find this code again.
Debug
Something’s not quite right—when I win, I want to cheer! But this game goes too fast. I could almost miss who won! How could you fix this?
Put a pause block after you display A and B. My pause is 3,000 milliseconds, which is 3 seconds. How long do you need to cheer?
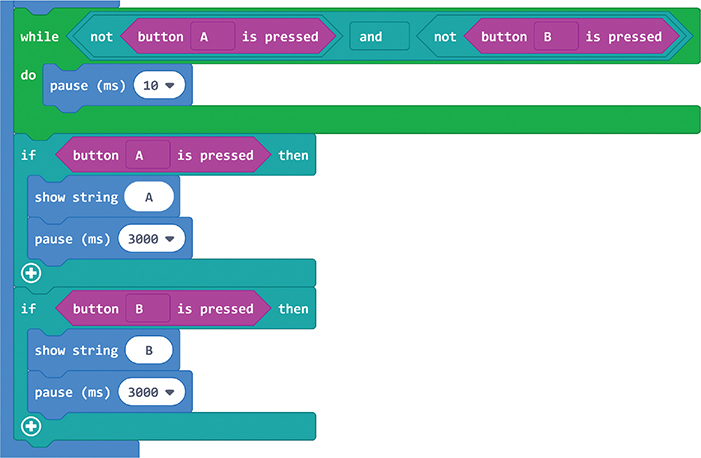
Figure 6.13 Pause.
Expert Level
Here’s a cool build and code extension. Add some arcade buttons so that your human subjects can really smash the button! Find the full build and code steps for this on the website (savetheworld.mcunderwood.org).
Circuit Playground Express
Build
For this mission, make sure the suspected zombies can reach their buttons and see the lights. Staring down your opponent can also help you win.
Code
Use the lights around the Circuit Playground Express to indicate who has won and as a countdown clock. The countdown clock will be in red, player A will be green, and player B will be blue. I think you can follow the steps in the micro:bit section to create this code. Everything is under the same menu in Circuit Playground Express. Here’s your final piece of code:

Figure 6.14 Testing Dad.

Figure 6.15 Final code.
Expert Level
To create a really cool reaction game, add some arcade buttons. Find the full build and code steps on the website (savetheworld.mcunderwood.org).
Raspberry Pi
We can use the keyboard for the reaction test. Let’s use keys A and L on the opposite sides of the keyboard.
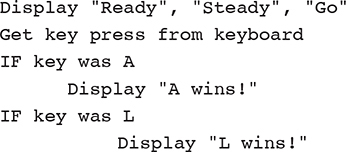
Algorithm
With some extra room, we’re going to change the algorithm a bit for the Raspberry Pi.
Build
Set up the Raspberry Pi with a screen, keyboard, and mouse attached. Make sure that the suspected zombies can reach their buttons and see the screen.
Code
Let’s start!
1. Select Programming > Python 3.
2. Select File > New.
3. Start with a countdown (you’ll need the time library. Learn what a library is from Mission 1, page 33.
4. Get the entry from the keyboard using the input function. I’m storing it in the variable userEntry.
5. Now let’s check who has won.
The players will have to press ENTER on the keyboard after they’ve tried to type a letter. That’s it! Or is it?
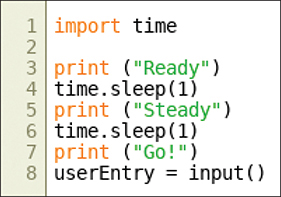
Figure 6.16 Countdown.

Figure 6.17 Who won?
Debug
If the users both enter a letter, it will look like AL or LA, depending on who was the fastest. But the code is only looking for A or L. Nothing will happen if you enter AL or LA.
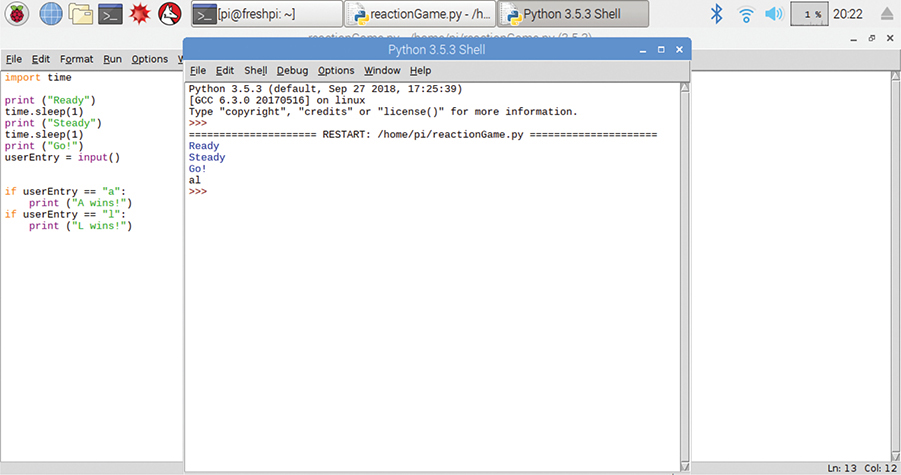
Figure 6.18 No one wins.
What we need the code to do is to look at the first letter of what was entered. We can use square brackets to do that. On my keyboard they’re next to P. userEntry[0] gets the first letter of the variable userEntry.
When we run this code, a winner will be declared.

Figure 6.19 Check the first letter.
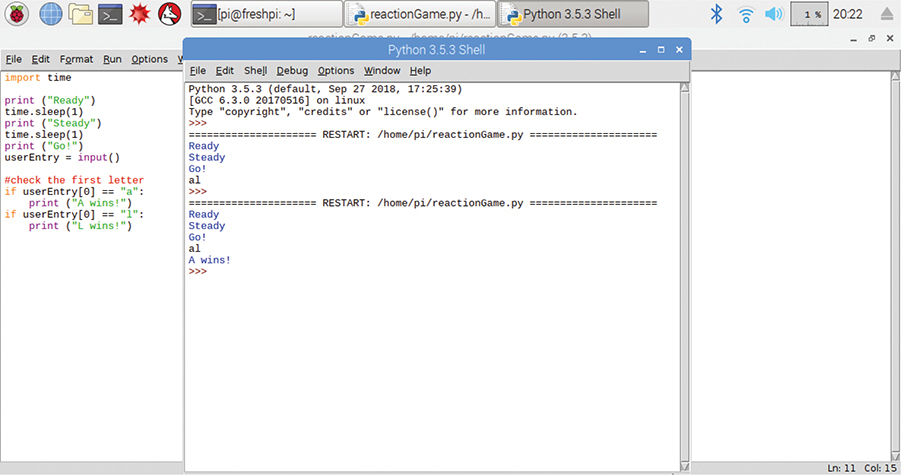
Figure 6.20 Who wins?
Also, let’s put it all in a while loop so that we can keep playing forever! Remember to indent everything after while True:.

Figure 6.21 Code.

Figure 6.22 Program running.
Expert Level
You can easily add buttons to the Raspberry Pi. Check out the website for instructions on how to create an arcade-style reaction game (savetheworld.mcunderwood.org).

Figure 6.23 My suspects got really nervous.