
INTRODUCTION
Getting Started
With this book, you can code missions to help save the world using the BBC micro:bit, the Circuit Playground Express, and/or the Raspberry Pi. At the end of this Introduction, you will find a list of missions by device, difficulty, and whether you need extra equipment.
NOTE TO PARENTS/GUARDIANS
The Raspberry Pi is more suitable for older children or those with a lot of help from an adult, especially when setting it up. Many children will not have experienced Linux before, and the environment will not be familiar to them. The MakeCode platform for the BBC micro:bit and Circuit Playground Express is really easy to use. It is very similar to Scratch, which many children will have used before.
Start this Introduction by choosing your tool and learning your skills and how to get mission ready. Then move on to choosing a mission. Most missions can be completed individually; some missions are connected to previous missions. Some missions may refer to definitions or code from earlier missions. Jump right in and get started on saving the world!
Choose Your Tool: BBC micro:bit, Circuit Playground Express, or Raspberry Pi
BBC micro:bit
The BBC micro:bit is a small device packed with many features. You need a computer to code it, so it’s not a full computer, but it is a microcomputer. It was created by the British Broadcasting Company (BBC) and many other partners in the United Kingdom in 2015. In 2016, one million micro:bits were delivered for free to schools in the United Kingdom to inspire a generation of children to code. The micro:bit is now available to buy around the world, and many other countries have followed the United Kingdom’s example of giving them out for free in schools to support the teaching of coding.
Some of the features available on the micro:bit that we’re going to use in this book include:

Figure I.1 The BBC micro:bit.
![]() Twenty-five light-emitting diodes (LEDs) on the front in a 5 × 5 grid [A]
Twenty-five light-emitting diodes (LEDs) on the front in a 5 × 5 grid [A]
![]() Two buttons [B]
Two buttons [B]
![]() Touch and physical pins [C]
Touch and physical pins [C]
![]() Light sensor
Light sensor
![]() Temperature sensor
Temperature sensor
![]() Accelerometer
Accelerometer
![]() Compass
Compass
![]() Radio
Radio
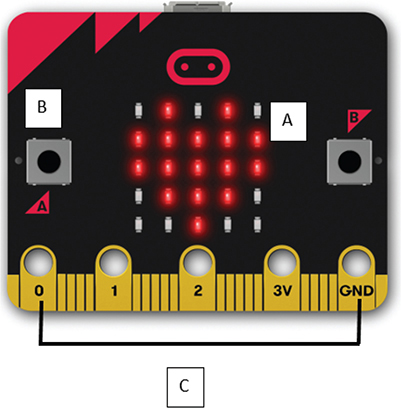
Figure I.2 BBC micro:bit up close.
You can code LEDs to display text, numbers, and smiley faces! Besides displaying light, these LEDs can actually sense light too [A].
You can press button A, you can press button B, and you can press A and B together [B].
The holes are called pins. You can add extra accessories to the micro:bit using these pins. They are touch sensitive [C].
Find out more about each feature on the micro:bit website: https://microbit.org/guide/features/.
The micro:bit is powered with a 2 × AAA battery pack or a USB socket plugged into a laptop. It’s not recommended that you plug the micro:bit into a USB power bank or charger.
We’re going to code the micro:bit using blocks called MakeCode, which was developed and is maintained by Microsoft. You can also code the micro:bit using microPython. Find out more about microPython at this website: http://docs.micropython.org/en/latest/.
Circuit Playground Express
The Circuit Playground Express was created by Adafruit as a successor to its popular Circuit Playground Classic. The Express has more sensors and is easier to program than the Classic. The Circuit Playground Express is a bit bigger than the BBC micro:bit. Some of the features on the Circuit Playground Express that we’re going to use in this book include:
![]() Two buttons [A]
Two buttons [A]
![]() Ten colored lights around the edge [B]
Ten colored lights around the edge [B]
![]() Touch and physical pins [C]
Touch and physical pins [C]
![]() Light sensor
Light sensor
![]() Temperature sensor
Temperature sensor
![]() Microphone sensor
Microphone sensor
![]() Accelerometer
Accelerometer
![]() Speaker
Speaker

Figure I.3 The Circuit Playground Express.
You can press button A, you can press button B, and you can press A and B together [A].
You can code these lights to show different colors. You can code all of them or just specific ones [B].
The holes are called pins. You can add extra accessories to the Circuit Playground Express using these pins. They are touch sensitive [C].
I power the Circuit Playground Express with the same battery pack as I use for the micro:bit: a 2 × AAA battery pack, but you can use a 3 × AAA battery pack and other types of batteries.
Find out more about each feature of the Circuit Playground Express on the Adafruit website: https://learn.adafruit.com/adafruit-circuit-playground-express.

Figure I.4 Circuit Playground Express up close.
We are going to code the Circuit Playground Express using Microsoft MakeCode as well.
Raspberry Pi
Unlike the BBC micro:bit and the Circuit Playground Express, the Raspberry Pi is a computer. Once you plug in a monitor, keyboard, and mouse, it’s a fully working computer! But it has this huge difference over most computers: you can see its insides. You can add hardware to its inside and create and code a bigger and better computer. The Raspberry Pi doesn’t have any built-in sensors like the BBC micro:bit or the Circuit Playground Express, but we’re still going to build some very cool projects with it.

Figure I.5 Raspberry Pi.
There are many different types of Raspberry Pi units. In this book, we’re going to be using the Raspberry Pi 3 Model A+, but all these missions will work on any other Raspberry Pi.
To get started with setting up your Raspberry Pi, follow this guide from the Raspberry Pi Foundation: https://www.raspberrypi.org/help/noobs-setup/2/.
Learn Your Skills: MakeCode or Python
Each device has multiple ways of being coded. We’re going to code the micro:bit and Circuit Playground Express using MakeCode and a computer. And we’re going to code the Raspberry Pi using Python, plugging the Raspberry Pi into a monitor with a keyboard and mouse attached.
For each mission, we’ll look at MakeCode for micro:bit and then Circuit Playground Express. Then we’ll move on to the Raspberry Pi.
Coding with MakeCode
MakeCode is a website that you can access via this address using a browser such as Google Chrome or Microsoft Internet Explorer: http://makecode.com.
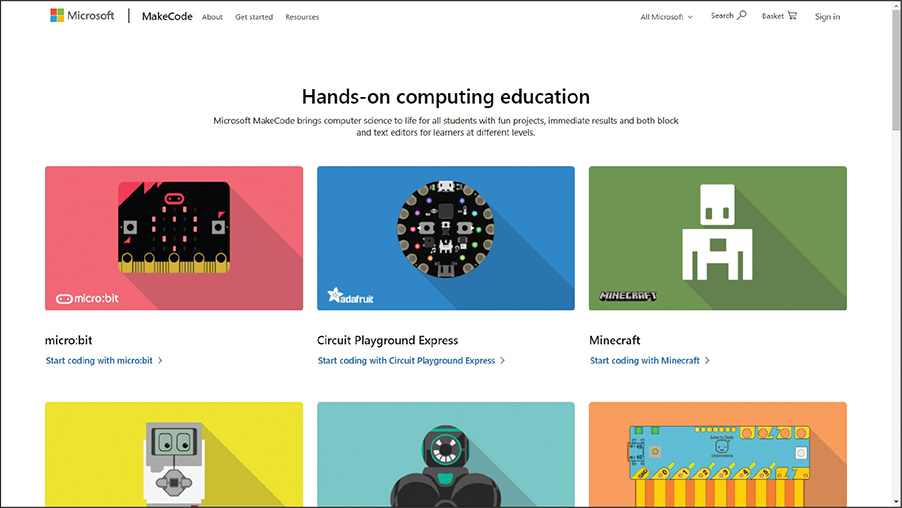
Figure I.6 MakeCode landing page.
From the MakeCode page you can select your device, the BBC micro:bit or the Circuit Playground Express. Next time you could go straight to the website for your device: https://makecode.microbit.org/ or https://makecode.adafruit.com/. The websites look slightly different from each other, but they act in pretty much the same way.
Projects

Figure I.7 My projects on the MakeCode micro:bit website.
Once you start creating multiple projects, they will appear on the MakeCode website. They are saved via your browser onto your computer. You won’t be able to find them if you use a different computer. To start a new project, select New Project.

Figure I.8 New Project button.
MakeCode Platform
Let’s have a look at the MakeCode website, on which we’re going to code.

Figure I.9 MakeCode micro:bit coding screen.
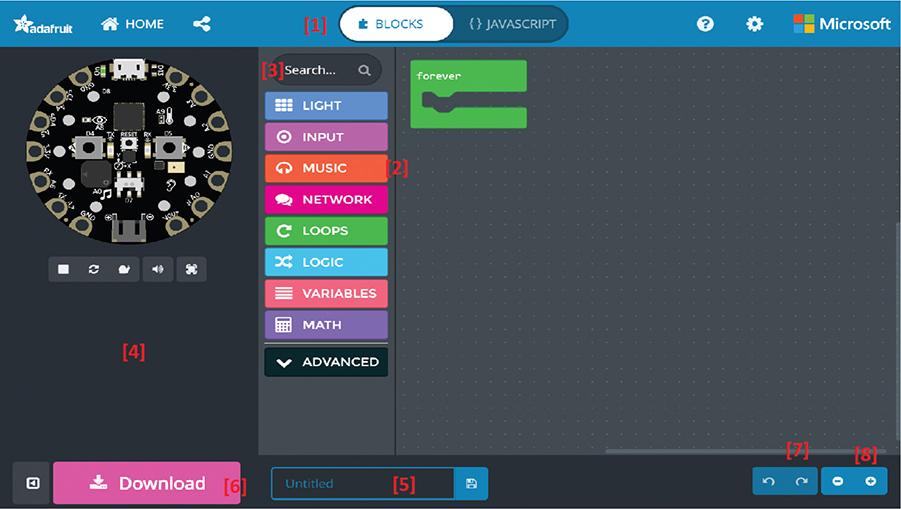
Figure I.10 MakeCode Circuit Playground Express coding screen.
You will see the following buttons:
![]() Blocks/JavaScript [1]. We’re going to code in blocks. If you want to see what the code looks like in JavaScript, press this button to switch between the two.
Blocks/JavaScript [1]. We’re going to code in blocks. If you want to see what the code looks like in JavaScript, press this button to switch between the two.
![]() Menu [2]. These are the menus. When you click on one, you will find the blocks that make up your code
Menu [2]. These are the menus. When you click on one, you will find the blocks that make up your code
![]() Search [3]. If you can’t remember the menu with the block inside, you can always use the Search field to type in the name of the block. I love this feature. I use it all the time!
Search [3]. If you can’t remember the menu with the block inside, you can always use the Search field to type in the name of the block. I love this feature. I use it all the time!
![]() Simulator [4]. This is the simulator. This is super useful for testing your programs before you download them.
Simulator [4]. This is the simulator. This is super useful for testing your programs before you download them.
![]() Project Name [5]. Here you can name your projects. This is a really good idea so that you can keep track of which project is which.
Project Name [5]. Here you can name your projects. This is a really good idea so that you can keep track of which project is which.
![]() Download [6]. Guess what this button does?
Download [6]. Guess what this button does?
![]() Undo and Redo [7]. The super-important Undo and Redo buttons.
Undo and Redo [7]. The super-important Undo and Redo buttons.
![]() Zoom [8]. Zoom in and out.
Zoom [8]. Zoom in and out.
Your First Program Using MakeCode
Using MakeCode is really good fun. You find the blocks you want, drag them onto your coding screen, and click them together. We’re going to create a simple program to say “Hello World” when you start up the micro:bit and the Circuit Playground Express.
The start block should be on your screen when you first start, but if it’s not:
1. In the micro:bit MakeCode, click on the Basic menu, and drag it out onto the screen.
2. In the Circuit Playground Express MakeCode, click on the Loops menu, and drag it out onto the screen.

Figure I.11 On start block.
Then:
1. micro:bit. From Basic, drag out the block show string “Hello!”.
a. Click on the word hello and type Hello World.
b. Circuit Playground Express. From the Light menu, drag out the block show ring.
c. Select your favorite color from the triangles in the middle of show ring.
d. Select the circles around the edge of the circle to change them to your favorite color. Mine is green!
2. Place the block show ring inside the on start block. If your computer has sound, you should hear a satisfying click noise. Now when you move the on start block, the show string/show ring block should move with it like one large block made of two pieces.
Your program should now look like this:
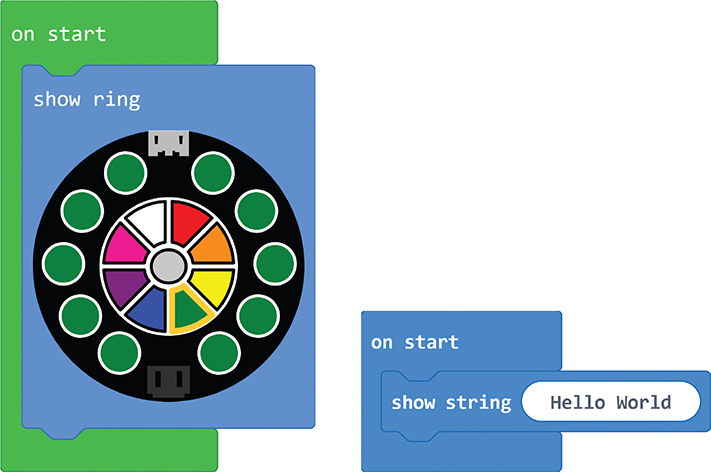
Figure I.12 Hello World.
You can add more blocks inside the on start block like so.
Delete Blocks
Try to keep your code nice and tidy. Don’t let blocks overlap. Make sure that you can read it all clearly. Get rid of blocks that aren’t doing anything.

Figure I.13 Hello World and a heart.
Let’s delete the forever block from our micro:bit code. It works the same way in Circuit Playground Express. Click and drag the block onto the menu like so:

Figure I.14 Deleting a block.
Be careful that you’re only deleting one block. If blocks are attached to each other, they will all get deleted. Play around with the blocks in MakeCode to get used to them. Add some, delete some. Zoom in, zoom out. Undo, redo. Play!
Debug Code
Once you’ve finished with your code, you need to download the code to your device. It’s a good idea to test it first. This can save you time when debugging. The simulator in MakeCode is really good for this. It lets you test your code on a virtual device.
This is what my micro:bit simulator looks like when it stops running. It scrolled the phrase Hello World; then it stopped on the love heart. What does yours show?
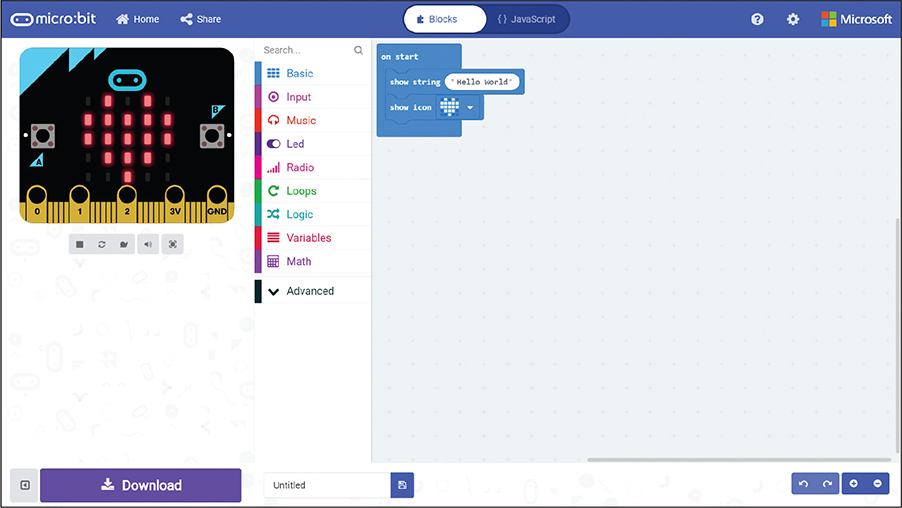
Figure I.15 micro:bit MakeCode simulator.
On the Circuit Playground Express, I can see that all the lights have changed to green.
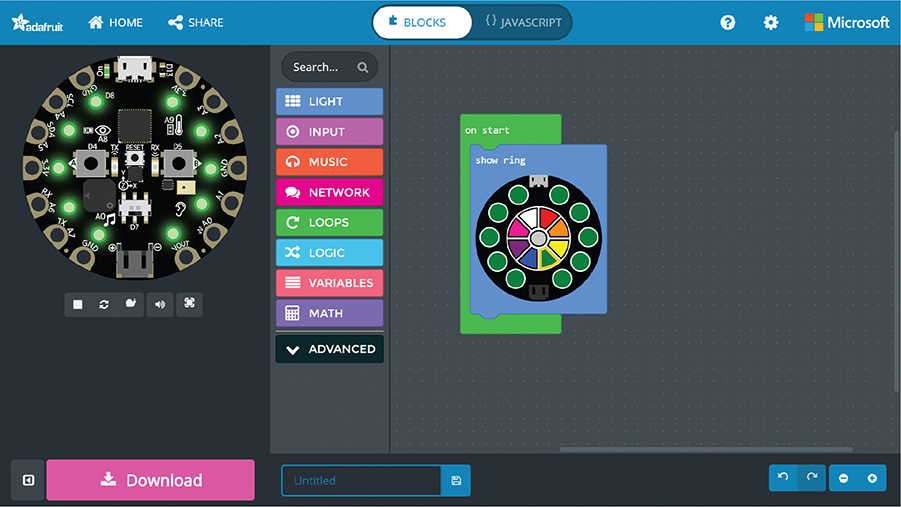
Figure I.16 Circuit Playground Express MakeCode simulator.
If your simulator didn’t work the way you expected, then the real device isn’t going to work either. Make sure that the code works fully on the simulator before downloading it.
Download Code
1. When you’re ready, give your project a name that describes it and enter it in the bottom bar, next to the Download button.
![]()
Figure I.17 Name your project.
2. Press the Download button next to the project name. In Internet Explorer, a bar will pop up along the bottom of the screen and ask if you want to Open or Save the file.

Figure I.18 Internet Explorer pop-up.
a. Select Save to save the file to your Downloads folder.
b. Select Open to find the file.

Figure I.19 Chrome download bar.
In Chrome, the file will automatically download to your Downloads folder.
a. Select the small arrow next to the filename.
b. Select Show in Folder to find the file.
3. Both sets of steps should bring you to your Downloads folder. This is what it looks like on a Windows 10 machine.
a. The micro:bit file will be called microbit-Hello-World.hex.
b. The Circuit Playground Express file will be called circuitplayground-Hello-World.uf2.
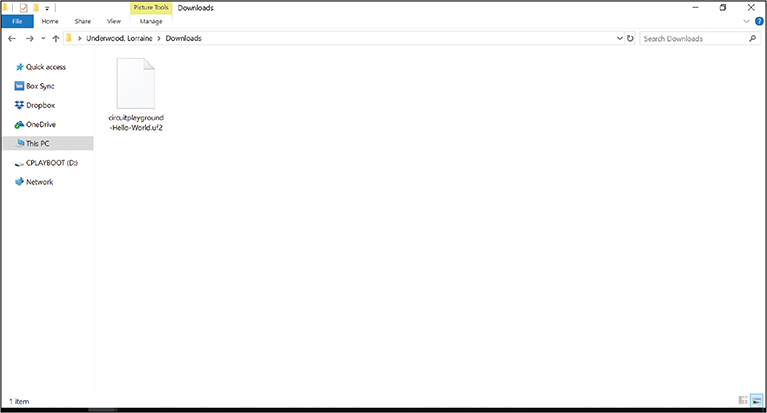
Figure I.20 Downloads folder.
4. Plug the BBC micro:bit or Circuit Playground Express into your computer or laptop using a USB data cable. Some USB cables are for charging only. Make sure that your cable is a data cable.
5. Press the Reset button on the Circuit Playground Express.
6. Your device should appear on the left in the Downloads folder, called MICROBIT or CPLAYBOOT. You can see it in my Downloads folder (Figure 1.20).
7. Drag your file from the Downloads folder onto your device.
8. It should take just a few seconds for the file to transfer and then run. Adafruit has a guide and a video on how to do this for the Circuit Playground Express: https://learn.adafruit.com/adafruit-circuit-playground-express/downloading-and-flashing. A graphic showing how to do this for the BBC micro:bit is available on the micro:bit website. It also includes how to download the code using a Mac: https://microbit.org/guide/quick/.
Coding the Raspberry Pi with Python
The Raspberry Pi is a full computer. You plug in a monitor, keyboard, and mouse, and you’re good to go! You also need an SD card with the operating system on it. All the missions in this book were created using Raspbian Stretch, which was downloaded in November 2018. The missions were tested again in April 2019 with the latest version.
With your Raspberry Pi plugged into a screen, keyboard, and mouse, select the Raspberry Pi logo in the top left-hand corner. This is your start menu. Select Programming and then Python 3 (IDLE).

Figure I.21 Raspberry Pi start.
Python Shell
This opens a shell, a Python development environment. You can type code directly in here and see the results immediately. For example, type “Hello World” (including the quotes), and press enter on your keyboard.

Figure I.22 Shell “Hello World.”
Python Files
Our code isn’t saved anywhere. When we close the shell, the code will go away. To create code that we can run again another day, select File and then New File from the shell window. A new window will open, and this is a Python file. The code won’t run here. We’ll need to type it here, save it, and then run it.
Let’s try that now:
1. In the new empty file, type:
print ("Hello World")
2. Save the file by selecting File and then Save from the top menu. Call the file hello, and save it in the current folder, /home/pi.

Figure I.23 Save shell.
3. Now select Run Module from the top menu of hello.py and Run Module F5. Here we see the shell and the Python file opened together, just before I press Run Module.

Figure I.24 Before Run Module.
4. When you press Run Module, the code will run in the shell. Your shell might be hidden behind your Python file. Drag the windows around to see them side by side.

Figure I.25 After Run.
Unlike the blocks we use in MakeCode, Python is a text-based language. Every part of the sentence
print ("Hello world")
is important. print has to start with a small p. In Python 3, you have to have the parentheses around what you want to print. Your string started with quotation marks, and it has to end with them too. There are a lot of ways to fail in text-based languages. Yeh! But I will show you the way, young Padawan.
Terminal
Another way to run the code is to use the terminal. This will come into use later when we’re downloading tools.
1. In the Python file, create a second file (select File and then New), and type this into the new file:
print ("Goodbye world")
2. Save it, and call it goodbye. Here are the two files hello.py and goodbye.py and the shell open together.
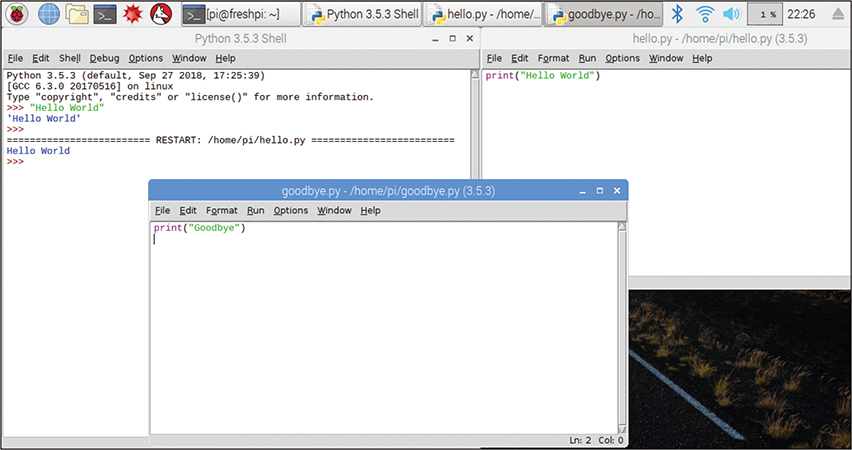
Figure I.26 Hello goodbye.
3. Open a new terminal window by selecting the terminal icon in the top toolbar.

Figure I.27 Launch the terminal.
4. Type python3 hello.py, and press enter.
5. Type python3 goodbye.py, and press enter.

Figure I.28 Terminal.
The benefit of using the terminal is that you don’t have to open the Python files to run them. You can actually create and edit Python files from the terminal, but it can be tricky to edit them.
To find out more about Python on the Raspberry Pi, check out the Raspberry Pi website: https://www.raspberrypi.org/documentation/usage/python/. You can write Python code in any way that suits you best. My missions will include the full Python code.
Choose Your Mission: How to Use This Book
You have your tools, and you know your skills. To create the missions in this book, we’re going to run through five tasks for each mission. Let’s use the “Hello World” example above. It’s as easy as ABC . . . D and E!
Algorithm
Every mission will start with an algorithm. An algorithm is a plan, a set of step-by-step instructions to solve a problem. There can be several parts to an algorithm:
![]() Sequence. The order that steps need to be in.
Sequence. The order that steps need to be in.
![]() Selection. When a decision needs to be made.
Selection. When a decision needs to be made.
![]() Repetition. When some steps need to be repeated.
Repetition. When some steps need to be repeated.
Look at this algorithm for brushing your teeth:
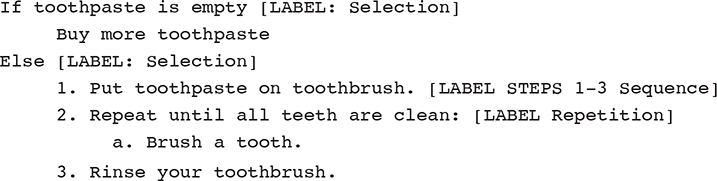
Every part of the algorithm is important. If the selection is wrong, you might be brushing your teeth with no toothpaste. If the sequence is out of order, you might end up putting toothpaste on the toothbrush for every tooth! If the repetition sentence is wrong, you might never stop brushing!
Algorithms are really important when it comes to coding. You should never start coding straightaway. You need a plan: an algorithm written in plain English is a good start.
Here’s our algorithm for our first program:
![]()
The next few steps are specific to the devices. If you only have a Circuit Playground Express, you will be able to skip the micro:bit build, code, debug, and expert level steps and go straight to the Circuit Playground Express section. And the same goes for micro:bit and Raspberry Pi.
Build
Some of the missions in this book require extra build steps, such as adding extra accessories or placing the device in a certain location. I’ll describe these using detailed (and hilarious) photographs.
Some missions won’t have any build steps, such as the Zombie Tester in Mission 1 for micro:bit and Circuit Playground Express. You just need to run the code, so the build section will just be a photograph.
The next sections will be repeated for each device for that mission. To find the missions for your device, see page 21 of Your Missions.

Figure I.29 Build photograph.

Figure I.30 Debugging.
Code
The code will be broken down step by step until the final code is shown. Sometimes I’ll add a bug for fun. But we’ll fix it together. Here’s the code for the micro:bit.
WHAT’S A BUG?
A bug is a mistake in your code. It’s something you didn’t mean to happen. It’s called a bug because American computer scientist Grace Hopper found a real bug, a moth, inside a computer in 1945 that caused the computer to malfunction.
Debug
After we’ve created our code using the algorithm, we might find a bug that we’ll need to debug. The bug might be in the code, or it could be that our algorithm was wrong in the first place, and we need to add more code.
“Hello World” Debug
“Hello World” is displaying over and over again because it’s a forever loop. We only wanted it to display once. Oops! Here’s the correct code for the micro:bit.

Figure I.31 “Hello World.”
Expert Level
After we’ve coded and debugged the mission, I will challenge you to reach the expert level by asking you to add an extra feature to the mission. I won’t give you the answer straightaway. All expert level answers are on the website accompanying this book (savetheworld.mcunderwood.org). Try the challenge first before looking for the answer. Push yourself with your new skills.
“Hello World” Challenge
Display your name when the user presses the A button on the BBC micro:bit. Make all the lights go blue when the user presses the B button on the Circuit Playground Express. Please see the website for the answer to this challenge (savetheworld.mcunderwood.org).
Kill Bugs in Your Code: How to Debug
Let’s get this over with right now. You are going to have bugs in your code. Something will not work because you coded it wrong. It’s okay! It happens. It happens to all of us.
In some of the missions, I’m even going to set you up by deliberately creating bugs. Fixing bugs will make you a really good coder. And spotting bugs is half the battle. So I’ll be deliberately putting bugs in your code. See if you can spot them! I’ll tell you, eventually. And there will be full bug-free code for all the missions in this book.
How to debug is all about how not to create bugs in the first place. Here are some tips to help you along the way:
1. Keep it neat. Don’t overlap your blocks. Spread your blocks across the screen, and try to arrange them in an order that makes sense to you. Space out your Python code. While the code won’t work in Python if it’s in the wrong order, put all your libraries at the very top and then your variables. Order your functions in a way that makes sense.
2. Get a buddy. This is Duck; he is my duck. There are many like him, but he is mine.
Explaining your code to someone else can really help you when debugging. There’s even a method called Rubber Ducking where you explain your code to a rubber duck. Just talking through your code out loud can help you figure it out.
3. Break it down. If your code is quite long and complicated, break it down into smaller chunks. Try to test one piece at a time. Even remove code so that you can test smaller chunks. This seems like a bad idea, but sometimes it’s hard to see a small bug in a lot of code.

Figure I.32 Duck.
Common Mistakes/Troubleshooting Your Build
Even the best programmers make mistakes. Here are some common mistakes I’ve made when using MakeCode and Python:
1. Not connecting the blocks. In MakeCode, the blocks need to be attached to work. If they are not attached, they won’t be their normal color. The blocks will be gray. Check that all your code is attached and colorful.
2. Not downloading your code. Your code isn’t doing what you want it to do. It’s running the old code. In MakeCode, did you download the new code to your device? In Python, did you save your changes? This is really common. Every time you make a change to your code, you have to download or save the code to the device again.
3. Using the wrong cable. You need a data cable to transfer the program from your computer to your device. There are some evil USB cables out there that are charge only. Try another cable to see if that’s the problem.
4. Low batteries. If the micro:bit or Circuit Playground lights are looking a bit weak, you need to change the batteries.
5. Loose cables. Crocodile clips are always sliding off stuff on me. Wiggle the croc clips around to see if they’re actually attached.
6. Dodgy connections. Never connect power to ground. Never ever, ever! If you do this, you risk draining your battery in one second flat or, worse, causing damage to your device. Make sure that the ground is connected to ground and power is connected to power.
7. Too much power. Make sure that you’re using the right batteries for your device. Don’t ever put a battery in that’s more powerful than what’s required, for example, three AAs instead of two AAs.
Next is a list of missions in the book by device and difficulty. Some missions need extra equipment, which is detailed next.