
Thus far, we’ve covered different architectural patterns and pain points that can cause you to want to scale your application. It is now time to start going through different scaling techniques.
This chapter will cover differences between scaling vertically and horizontally, as well as other techniques, such as using microservices, clustering, and even load balancers to handle increased traffic.
Without further ado, let’s get cracking.
Scaling Techniques
It is important to note that the following techniques don’t require a specific architectural pattern to be used; what I covered in the previous chapter can be considered an independent topic (in most cases) from this one. In practice, especially for big platforms with complex components, different patterns might apply depending on the needs of each one.
Vertical or Horizontal Scaling?
When it’s time to start scaling, the most basic things you can do are either improving the hardware your code is running on, or simply adding more computers to distribute the load among them.
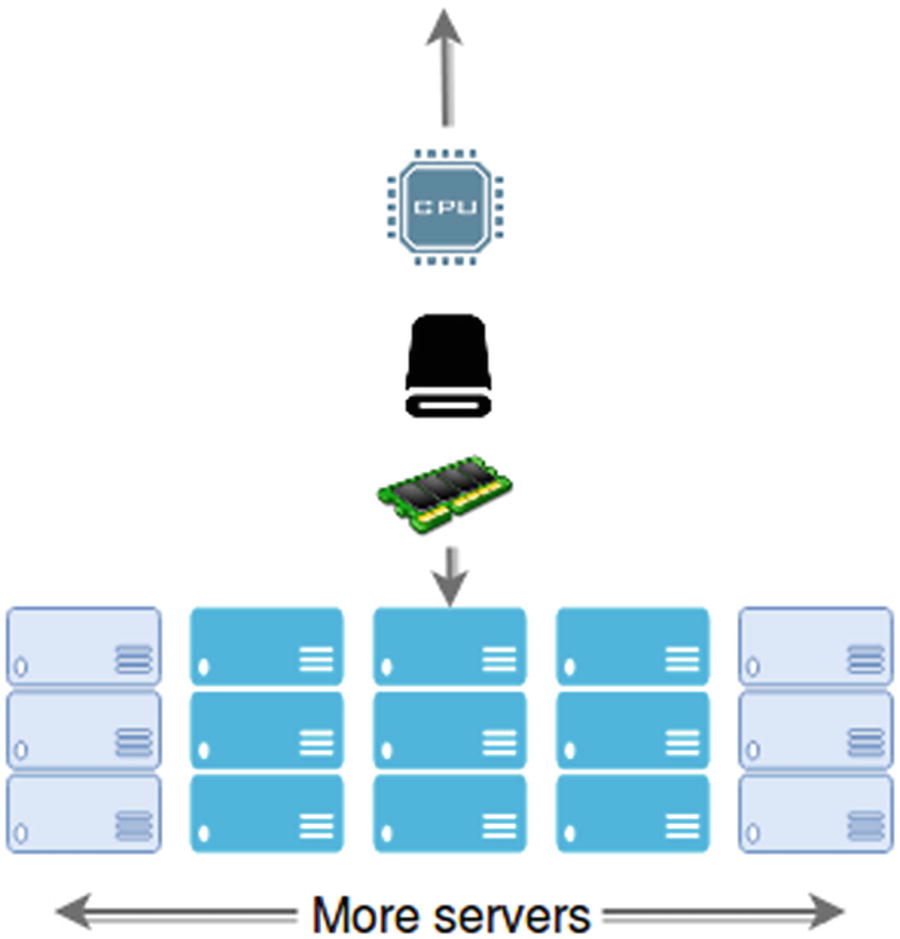
Simple reminder diagram to understand what vertical and horizontal scaling means
This approach normally requires some downtime because of the physical changes that need to take place. Whatever benefits you might get from doing this are limited by the resources you must add to the hardware. There is, of course, a sort of improved vertical scaling option, which is available if you’re in a cloud-based environment. In these situations, your cloud provider will allow you to switch your application from one type of hardware to another. This can be done with a few clicks. Options are limited, but at least you’re not constrained by your original hardware’s specs. For example, Amazon will let you switch your t2.nano instance that only has half a Gigabyte worth of RAM for a t2.2xlarge one, which actually has 32 GB of RAM and 8 virtual CPUs. If memory or CPU power was your bottleneck, this would solve it).
The main problem with vertical scaling, though, is that sooner or later you’re going to hit the cap for your scaling capacity. No matter what service you’re paying for, eventually you’ll run out of specs to improve.
And here is where horizontal scaling enters. Instead of improving a single server, you’re now working with a pool of them, and adding to that pool is as simple as connecting the new server to it (or removing one from it). You can design your application to withstand such changes and avoid any real downtime when scaling. With that you gain “elasticity” in your capacity, and control over how much money you want to spend, during both normal operation and peak hours.
Service oriented architectures : These are the easiest to horizontally scale. If yours is not designed around services, it might be a good idea to evaluate whether that pattern is a fit for your use case. As long as you have small, interconnected services, you can focus on scaling the ones that are suffering and leave the rest alone, avoiding a great deal of headaches.
Stateless microservices: If your architecture is based on them, adding new copies of the services being overworked will not be a problem. I will cover this in the next chapter, but having stateful microservices keeping session information while trying to scale is not a trivial task. You will need to have extra considerations before deciding to boot-up a new copy of the affected service.
Tier separation : A good idea for structuring your services is to give them a separation between their presentation, their processing, and their storage access code. This will let you focus on the main pain points. Tier separation is closely related to the previous point. You could take it one step further even, and analyze your individual services. You could try to split them into individual components following the three-tier approach. This will give you more control over what to scale, instead of blindly scaling your entire module, because one specific part of it is affected (for example, data access inside your module might be suffering from a high workload, while the rest of it might not be as badly affected).
Taking Advantage of the Cloud
Ability to handle highly predictable spikes of traffic with predefined growth and shrink scripts: If you happen to have studied your traffic and have predictable patterns (that is, if you have high peaks during specific hours of the day), you can schedule your infrastructure changes. (For example, you might increase the number of processing nodes during high traffic and remove the extra ones after the peak passes.) This is a service that Azure and AWS provide, but GCP (Google Cloud Platform) doesn’t, because it claims to have good enough reaction time to avoid the need for such a service.
Capacity to handle changes in traffic automatically with near-realtime speed: (Note that it usually takes time to spin up new instances and scale platforms, but doing so is fast enough to be useful.) Cloud providers usually allow you to monitor different resources from your instances, such as disk space, memory, and processor utilization. You can also usually monitor custom metrics, and you can even generate them from your application to provide more accurate and precise scaling behavior.
Cost management : This is another added benefit that derives from the previous points. With all cloud providers, you’re always paying for what you use. So by accurately estimating the required size for your infrastructure, you gain more control over your expenses.
Improving the overall health of your cluster by replacing nodes that are not working correctly: You can monitor specific indicators and decide when to terminate an unhealthy instance and replace it with a new one.
Better availability: By deploying into multiple zones, you gain the ability to remain operational even when big network outages occur.
Note
In case you’re not aware of the terminology, a “zone” in this scenario refers to a specific geographic location (usually a datacenter). So multi-zone deployments refer to having your code deployed in different parts of the world.
The Power of a Multi-Zone Deployment
Although it is not strictly related to scaling your architecture, taking advantage of a multi-zone deployment on the cloud is a must if you have the chance. This is usually something that most of the major cloud providers already allow, so you should consider, when planning your architecture, deploying and even scaling into multiple zones.
By doing this, you gain tolerance for big network outages that tend to affect an entire geographical zone. These types of network problems aren’t very common, but when they happen, big sections of the internet are isolated from the world, and this is something you want to avoid.
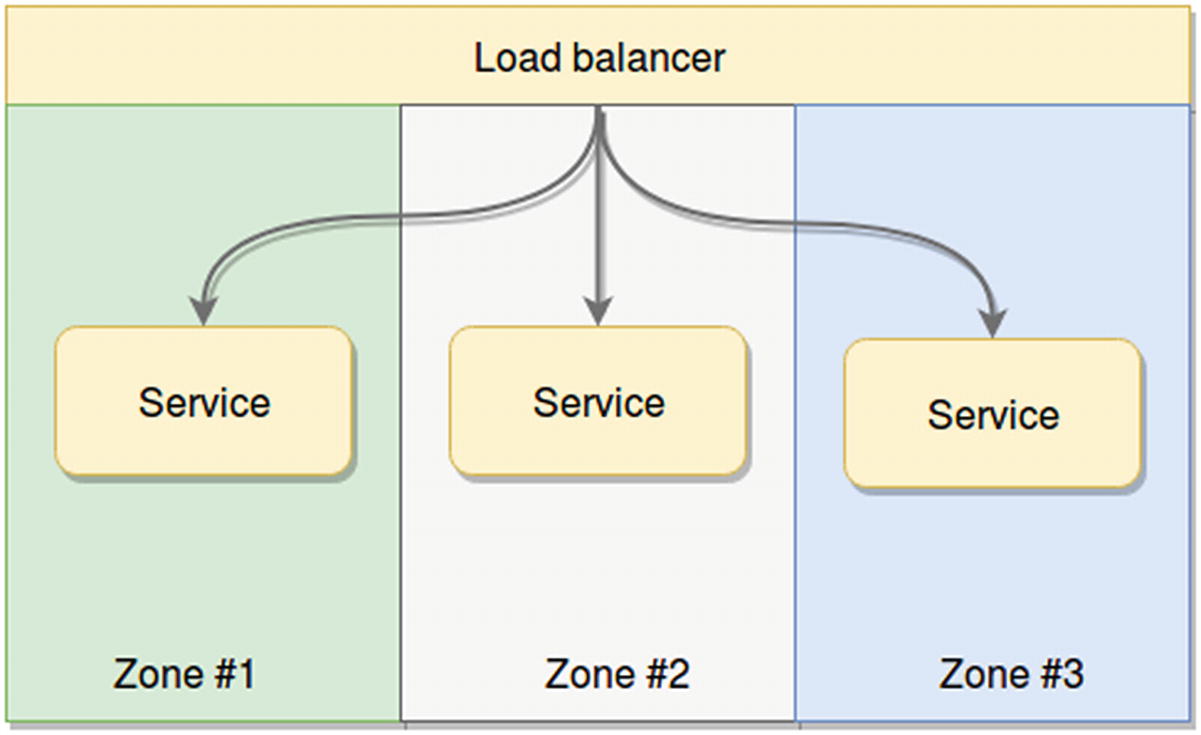
Multi-zone service deployment

Multi-zone replica schema
Clustering Your Application
The term cluster implies a group of things acting together with a common goal; and when applied to software architecture, it usually implies a group of nodes (servers) acting together to fulfill a request.
But here I’m going to discuss clustering from a Node.js perspective and how this concept can actually help you scale your Node apps.
As you may know, Node.js runs in a single-threaded environment; and even though there may be some multi-threading involved (at the lowest levels) to help deal with asynchronous calls, that is definitely outside the normal user’s realm. To all intents and purposes, Node.js is a single-threaded language, and because of that, any normal deployments will not take full advantage of your multi-core systems, unless told otherwise.
Note
Version 10.5.0 Node.js introduced experimental support for actual threads, but because this feature is still very new and not yet stable, I will not cover it here. If you want to know more, please visit Node’s documentation.1
But although Node.js is single threaded, you still have a way to overcome this limitation and make the most out of your servers—you just need to remember to cluster your application!
The cluster module should be your first step toward scaling your applications, regardless of the scaling technique you might consider next. This module allows you to fork your process multiple times, having the forks work in parallel using as many cores as your processor might have.
The nice thing about this module is that if you already have an existing application that needs to be clustered, you don’t really have to change it to make it work; you simply need to add a few lines of code and suddenly you’re forking processes and having them act as a single app. Let me show you a basic example in Listing 3-1.
Tip
You don’t need to download the cluster module from anywhere; it’s included as part of the native modules in Node.
Basic clustering example code
The code from this example doesn’t do much, but it is more than enough to show you how to start working with this module. And just to make sure we’re all on the same page, the code in Listing 3-1 takes care of creating as many forks as there are logical cores in your CPU and inside each fork, it will print a message and then exit.
Tip
In Listing 3-1, the numCPUs variable contains the number of logical cores in your CPU. This means the number of physical cores times the number of threads they can handle at once. So a four-core CPU with a hyperthreading factor of 2 will have eight logical cores.
Example of a clusterized index.js file for a generic API
Note
that the code in Listing 3-2 is an example from an existing project, and if you try to run it directly, without the rest of the code around it, you’ll run into problems. Try to understand this code by reading it instead of by executing it.
In the example, the content for the start function is what you would normally add in your API’s main file. This would start the server, set the access control headers, and configure a couple of plugins, all with the help of restify. You could very well use that code, and your entire project would work correctly. It would only take advantage of one of your CPU cores, but it would still work. But if you add the extra bits of code shown in Listing 3-2, you’re now ready to start increasing your processing capacity proportionally to the number of cores in your processor. It’s that easy!
The way this module works is by spawning copies of the process (by forking them) and sharing the port between them. The main worker will listen to the port you specify, and it will share the connections with the rest of the worker processes in round-robin order.
Just as when dealing with microservices and scale problems caused by in-memory session data, Node’s cluster module does not provide any kind of routing logic. This means that you should not rely too much on in-memory information, since subsequent requests from the same client are not ensured to land on the same server process.
Example of IPC used to share data through processes
This example creates one child process per core in your CPU, and each process will count from 0 to 10 at one-second intervals. On each run, a process will send its notification text to the main process through a new message broadcast using the send method of the process object.
Printing out a process ID to show how subsequent requests might yield unwanted results

Output showing how requests are handled by different processes
Command line required to test the previous example
Clustering with PM2
The cluster module is great, because it allows you to make the most of your CPU with minimum effort; but that’s about all it can do for you. If you want more control over how it’s done, or need to know a bit more about what exactly is happening with your cluster, there is very little you can do out of the box.
Command line to install PM2 after you’ve installed Node.js
Starting your app with pm2

Output from pm2 start command
Command to show the last few lines of the log files

Output from the pm2 logs command
In Conclusion
Clustering is and should be your first step toward scaling whatever Node.js application you might be working on. Depending on your needs, you might want to go with the cluster module. You don’t need anything extra; simply add a few lines of code and you’re done. On the other hand, if you’re looking to avoid changing your code, and you need extra support for your production environment, then PM2 or similar solutions should definitely be your choice.
Microservices to the Rescue
I’ve already touched on this subject during the previous chapter, and I’ll probably return to it in future ones. Splitting your application into a set of services, each one small enough to be easy to maintain and focused on one or just a few functionalities, simplifies the task of scaling by replication.
In many cases horizontally scaling your application should be enough to solve whatever performance issues you might be having; but if your application is not ready for it, the cost of such a solution might end-up being too high.

Differences between scaling a monolithic and a microservices-based architecture
The diagram in Figure 3-7 provides two versions of scalation by duplication. The first approach can’t focus on the most affected areas, since a monolithic solution can only be considered as a unified block. Duplicating these applications is easy, because there is no inter-service communication to deal with, but the main drawback with this approach lies in the fact that if only one of your layers is affected and it’s the source of your scalation needs, you still need to duplicate the entire codebase.
Decouple your code: This is a basic one, but if you can’t follow this step, your scaling efforts are doomed. This practice will not only allow you to split your code into individual services, but it will also provide you with added benefits, such as easier-to-maintain codebase, simpler logic (which in turn usually yield fewer bugs), and added extensibility by adding new (future) services to the existing ecosystem.
Understand what it means to inter-communicate services: Whether you want to accept it or not, your architecture will end-up with a (possibly) big number of services, and you need an easy way to orchestrate them and let them communicate with each other whenever necessary. I will cover this subject in the next chapter, so I’m not going to go into much detail now. That being said, you might want to think about why this subject is such a major one in scaling microservice-based architectures.
Automate as much as possible: This is another item you can get away without if you’re dealing with a monolithic architecture, because deploying (and other similar tasks) can be done simply by copying a set of files from one place to the other. But if you expect your platform to be easily replicated and horizontally scaled, thinking about automating deployments, having a well-defined set of coding rules and standards, and a documented control flow (such as gitflow), among other things, will definitely pay off. This is usually the case because in these type of projects several development teams need to work together, sometimes even in different code bases but creating systems that need to act as one. Once you start factoring in the human aspect of development, having a well-defined set of standards and rules definitely helps keep the chaos in check.
In Conclusion
Microservices is a topic that you’ll read about throughout this book because it is a very helpful pattern for scaling Node.js platforms (since Node is usually used to create APIs).
That being said, and as I’ve already covered in previous chapters, it is not a silver bullet and will not work for you every time. You need to remember when this pattern is helpful and how you need to prepare your code and your team to be able to get the most out of it.
Summary
There is no one way to scale your architecture; in fact, there is even more than one way to cluster your Node.js applications. In this chapter I’ve tried to show you a few ideas about how to tackle this topic; it is up to you to apply them to your own circumstances.
In the next chapter, I’ll cover some common problems that arise when starting to scale your application for the first time and offer some suggestions for tackling them.