
Let’s take a break from discussing architectural patterns and scaling techniques and discuss something equally important for your project: how are you going to test it?
The purpose of this chapter is to give you a little insight into what we normally mean by “testing” in the context of software development. I’ll cover some basic principles such as unit testing, mocking, and so forth, and once you’re ready, we’ll go over some examples of how to implement those concepts in your Node.js project.
So let’s get started.
Testing 101
First things first: if by the end of this chapter you want to know more about unit testing, please feel free to go online and keep reading. There is more than enough material about this subject to fill several books. This chapter’s only aim is to act as an entry way into this world.
The Definition
Pseudocode for a theoretical test case
Several assertions in the same test
This example is still quite simple, but I’ve added a bit more complex internal logic to the function called myFunction by adding the ability to pass in the mathematical function to apply as the first parameter. With this new logic, the function we’re testing is bigger, and it does different things, so if we design our tests as in Listing 6-2, we can run into a problem: what happens if our test fails?
I haven’t really covered what it means to “run” our tests, but it should be pretty obvious by now: your code is executed and the assertions are verified; if they are true, then your test will succeed, but if they fail (your assertion stated that two values were to be equal and in practice, they aren’t), then your entire test fails. You can see the problem if you’re testing several things within the same test. Once you get the results back from the execution, you will have to dig deeper into the execution logs (if there are any) to understand where your problem lies.
The correct way to structure test cases when the function tested is too complex
Now whenever a test fails, you’ll get better details from your test runner, because you’ll know exactly which test failed, and thus, you’ll be able to determine immediately which block of code in your complex function failed.
A unit test is a statement about a unit of code that needs to be proven true in order to pass.
The word unit is the most important one there, because if you go online, you’ll probably find a lot of people defining it as your functions (provided you’re using a procedural programming language) or your methods (if you’re using an OOP language). But as you can see from a simple generic and pseudocode-based example, a unit of code can actually be smaller than that. It’s true that in all these examples I didn’t really show the actual code of the function, and you could argue that for each test case of Listing 6-3, our function is actually calling other, smaller functions, and that is a very good point!
A unit of code is the smallest block of code that makes sense to test and would allow you to cover a whole logical path.
So putting both definitions together, you get a pretty accurate idea of what testing your code means and a good basis for the rest of this chapter.
The Tools
Now that we’ve covered what unit testing is, let’s review the tools provided by this methodology that will allow you to test your code.
These are not software tools; they aren’t libraries or frameworks you can use. We’re not there yet. What I’m trying to give you here are the concepts, the wheels you’ll use to build your car down the road.
Test Cases and Test Suites
Test cases have already been covered, but to reiterate, they define how you call the test. You normally structure them to test a very specific scenario, which is why you usually need several cases before you can be sure you’ve properly covered every logical path in your code.
Test suites are, as their name implies, groups of test cases. Depending on your system and your methodology, you might want to have a single test suite for all your tests or a set of suites, acting as logical groups for your unit tests. The criteria used for the suites are entirely up to you and your team, so feel free to use this tool to organize your code as much as you can.
Assertions
I’ve already used this concept in the previous section without formally defining it, because it’s one of those things you don’t really need to define before people can understand it. That being said, there are still some details I left out, so let me cover them here.
Assertions bring meaning to your test cases; everything else within your test is just preparation for these few lines of code. In other words, you first set everything up (function imports, variables, correct values, and so on), and then state your assumptions about the output of the tested code, and that, that is your assertion.
If you want to get a bit more technical, an assertion is (usually) a function or method that executes your target code with the right parameters and checks its output against your expectations. If they match, then the function makes your test pass; if they don’t, then it returns an error using the information it has about your test (description, function called, expected value, and actual value are some of the most common ones).
You don’t usually need to worry about creating assertions; they are part of every testing framework and library out there. All you need to know is how to use them, and that will depend on each implementation. Usually testing frameworks provide several flavors of assertions to help make the test case code be more readable. So you might find yourself using assertions called isTrue, isEqual, notEqual, throwsException and similar names, instead of using just one as in my previous examples. They are, of course, syntactic sugar, but when it comes to test development, making code readable and easy to understand is considered a very good practice.
Keep your test’s code clean and simple.
Make the code readable.
Simplify debugging when one of the tests fails, because there is only one thing that can fail per test.
Stubs, Mocks, Spies and Dummies
These are all similar tools, so I wanted to cover them as part of the same section since they’re all related in one way or another. It’s important to note that so far the examples provided in this chapter have been quite simple and naïve. Usually production systems aren’t so straightforward, and your methods and functions will normally interact with each other and external services (such as APIs, databases, and even the filesystem), and this set of tools will help you with that interaction.
I shall not test code that’s already been tested by others
Generic save function interacting with your database
Listing 6-4 shows a very basic database interaction. It has several functions that you would probably have already tested individually because of their complexity (validationFunction and createSavePersonQuery), and it also has a function called executeQuery, that in our case is provided by your database library. You didn’t write that function and don’t even have access to its code, so why would you care about testing it? You can’t really do anything about it if it fails.
More so, why would you even consider depending on your database server being up and running? Are you going to be using the production database for your tests? What will you do with the garbage data generated by your tests? What if your database server is up, but your table is not created? Will the test fail? Should it?
These are all normal questions that arise when starting to write tests and hitting the brick wall that is reality. If you’re not starting out just with tests but with software development in general, you might think the right way to go is to have a “test database,” one you can control and you can do whatever you want with. I’ve done it; it’s completely normal, but also wrong.
You see, when you add an external service into your tests, even one you think you can control such as your own database server, you’re implicitly testing that service and the connectivity between both systems within your unit test. You’ve turned a simple and straightforward test into a very complex one that is not even prepared to handle everything that could go wrong. What if your network fails? Should this test fail? What if you forgot to start your database server? Should this test fail, too? And this is just one simple example, one database; I’m not covering logging, other APIs, multiple database queries, and so forth. You definitely need to cut all connections to the outside when unit testing; and that means everything that is not your target unit of code. Fear not, though, because that is where this particular set of tools comes into play.
Tip
When your architecture is complex enough, containing modules that have dependencies with each other, acting as external services, you might want to also consider integration testing, discussed briefly at the end of this chapter, as well as unit testing your source code.
Stubs
Stubs help you deal with external services, by replacing the code that uses them with a simpler version, which instead returns a known and controlled value.
Pseudocode examples of how stubs help your tests
Listing 6-5 shows two examples of why stubs are so useful. The first one shows how you can easily control the outcome of the interaction with an external service. You don’t need complex logic in your stubs; the important part of them is their returned value. The second example is not overwriting an external service, but rather, an external function, in fact, one that you would probably have written. And the reason for that (instead of simply providing an invalid person object as input) is that in the future, your validation code could change—maybe you’ll add or remove valid parameters to or from your person definition, and then your test could fail, not because of the code you’re testing, but an unwanted side effect. So instead of suffering from that, you simply eliminate the dependency on that function, and make sure that no matter what happens to the internal logic of validationFunction, you’ll always handle the FALSE output correctly.
- 1.
Removing dependency from external service
- 2.
Removing dependency from communication infrastructure (related to the previous point)
- 3.
Forcing a logical path within your target test code
- 4.
Ensuring that if there is an error, it will be in your code and not an external service.
Mocks
Mocks are very similar to stubs—so much so that many people use both terms to refer to the same behavior. But that is not correct; even though they’re conceptually similar, they are also different.
Whereas stubs allowed you to replace or redefine a function or a method (or even an entire object), mocks allow you to set expected behaviors on real objects/functions. So you’re not technically replacing the object or function; you’re just telling it what to do in some very specific cases. Other than that, the object remains working as usual.
Example of how a mock can be used in a test case
(Yes, that’s two assertions in the same test case; I haven’t even finished the chapter and I’m already going against my words. Bear with me here; in some cases the expected behavior for mocks is automatically checked by whatever framework you’re using, so this example is just to let you know it’s happening.)
Now, back to the example in Listing 6-6. We could have definitely done this with stubs, too, but we’re conceptually testing something different. Not just the final state of the aisle object, but also the way the aisle object interacts with the inventory, which is a bit harder to do with stubs. During the first part of the test, where we set the expectations, we’re basically telling the mocked object that its getItems method should be called with 100 as a parameter, and that it should return TRUE. We’re also telling it that its removeFromInventory method should be called with 100 as a parameter and to return TRUE when this happens. In the end, we’re just checking to see if that actually happened.
Spies
As cool as this name might sound, we’re still dealing with special objects for your test cases. This type of object is an evolution of the stub, but I’m only now discussing it because spies are the answer to the example in the mock discussion.
Example of a spy being used to determined if a method was called
The example in Listing 6-7 should probably be one of many tests for the FileReader module, but it illustrates when a spy can come in handy.
Note
The spy, unlike the stub, wraps the target method/function, instead of replacing it, so the original code of your target will also be executed.
Dummies
Dummies are simply objects that serve no real purpose other than being there when they’re required. They are never really used, but in some cases, such as strongly typed languages, you might need to create dummy objects for your method calls to be possible.
If you’re creating a stub of a method that receives three parameters, even though you’re not thinking about using them, you might need to create them so they can be eventually passed to the method stub. This is a very simple case of a test utility object, but dummy is a term that also gets mentioned quite a bit, so I thought I’d cover it.
Fixtures
Test fixtures help provide the initial state of your system before your tests are executed. They come in handy when your tested code depends on several outside sources of data.
For instance, think of a configuration checker for your system. You could have fixtures for different versions of your config files, and load one in each test case, depending on the type of output to test.
Fixtures are usually loaded before the tests are run, and they can be unloaded (or reverted if necessary) after everything has been tested. Usually test frameworks provide specific instances of the testing flow for these cases, so you just need to have your fixture-related code in place.
Best Practices
I’ve already covered some of these briefly in the previous section, but it’s a good idea to review the full list of recommended practices when writing tests. Like anything in software development, it’s never a solo effort; even if you’re the only one writing code right now, you have to think about the future.
Consistent: Your test cases need to be consistent, in the sense that no matter how many times you run them, they always need to return the same result if the tested code hasn’t changed.
Atomic: The end result of your tests needs to be either a PASS or a FAIL message. That’s it; there is no middle ground here.
Single responsibility: This one we already discussed: each of your tests should take care of just one logical path so that their output is easy to understand.
Useful assertion messages: Testing frameworks usually provide a way to enter descriptions of your test suites and test cases, so that they can be used when a test fails.
No conditional logic within it: Again, I mentioned this one earlier: you don’t want to add complex logic within the test case; it is only meant to initialize and verify end results. If you see yourself adding this type of code into your test cases, then it’s probably time to split it into two (or more) new cases.
No exception handling (unless that is what you’re looking for): This rule is related the previous one. If you’re writing tests, you shouldn’t really care about any exceptions thrown by your code, because there should already be code in place to catch them (unless, of course, you’re actually testing that your code throws a specific exception).
Testing with Node.js
Now that you’ve got an idea of what unit testing is and the basic concepts behind this practice, we can move forward with a specific implementation. You’ll see that testing your code in js.Node is not hard at all, even without libraries, since the language already comes with a built-in assertion module ready to be used.
Testing without External Modules
Let me first talk about this option, it’s probably not the way to go, since the provided module is pretty basic, but if you’re looking for something that’s quick and dirty, this will do the job.
One of the major things you’ll notice this library is missing is the rest of the framework; with it, you only get the assertion support. The rest will have to come from you or someplace else, but let’s look into it anyway.
As I already mentioned, this module does not require any kind of installation steps, since it’s already provided with Node’s installation. All you have to do to use it is to require the module assert. After you do so, you’ll gain access to a set of assertion methods, which basically help you compare two values (or objects).
This method performs a deep comparison between two objects. That means Node will recursively compare (using the strictly equal operand) properties within the objects, and if that comparison fails it will throw an AssertionError.
Simple example of how deepStrictEqual works
AssertionError exception thrown from the code of Listing 6-8
As expected, because in JavaScript, the number 1 and the string literal ‘1’ aren’t strictly the same, the objects compared in Listing 6-8 aren’t equal.
Note
If instead you were to use the deepEqual method, the comparison from Listing 6-8 would pass correctly.
The other method I wanted to highlight is this one, which will test your block of code for a thrown exception. The only mandatory parameter here, is (as the method signature indicates) the first one, but you can also add pretty interesting behaviors using the second one.
Example using a function as a second parameter
There are many other methods to use, but they’re simply variations on the three we’ve just covered, so I’ll let you browse the documentation. Let’s now look at adding tests in Node using one of the most common libraries, Mocha.
Mocha
When it comes to testing libraries for Node, the list is always growing. You have some that add assertions, others that are full testing frameworks for TDD, others provide the tools you need if you’re practicing BDD, and I could keep going. Here I’ll focus on the one most people in the community seem to be using these days, and see what testing with it looks like.
Mocha2 is a testing framework (not just an assertion library, it actually provides a full set of tools for us) that allows both asynchronous and synchronous testing, so considering that asynchronous functions are quite common in Node.js, this is a great choice already.
Installing and First Steps
Installing Mocha
Sample test case written using Mocha
We’re not directly calling Mocha, or requiring the module at all. It is not needed, because to execute the test, you’ll be using Mocha’s cli tool, which will take care of that.
We’re back to using the assert module from Node, which is one of the features from Mocha: it won’t force an assertion syntax on you, it will let you decide which one to use, based on your preferences.
The describe function can be nested as many times as you need; it’s just a grouping mechanism that can help you when reading the code and when looking at the output from Mocha (more on this subject in a minute).
Finally, the it function contains the actual test case; in its callback you define the test’s logic.
Output from running your Mocha tests
Notice the indentation of the first two lines; that’s related to the use of the describe function.
Testing Asynchronous Code
Before going into the specifics of how to test our project, I’m going to talk about one more feature provided by Mocha, since it will come in handy: asynchronous tests.
In order to test asynchronous functions using Mocha, you simply add a parameter to the callback on the function. This will tell Mocha that the test is asynchronous, so it will know to wait until that parameter is called upon (it’s going to be a function indicating the end of the test). It is worth noting that this function can only be called once per test, so if you try to call it more than once (or do so by accident), your test will fail.
Example of an asynchronous test case in Mocha
Simplified example of an asynchronous test case.
There are many other features for this library that I haven’t covered (and won’t) in this chapter, so I urge you to go to its main website and browse through its documentation. Let’s now look at what it would look like to add some tests to our API project.
Testing: a Practical Example
Let’s now apply everything I’ve discussed so far into a single example. Consider an API project, one that is designed for a bookstore. This is a very straightforward API, so it will have a lot of classic CRUD endpoints. Let’s assume this API is using the classic MVC pattern for its internal architecture.
All resources are grouped into controllers, with each one having its own set of actions to perform.
For the purpose of this exercise and to show how you can add tests yourself, I’m going to show how to create tests for the create method of the BookSales controller . This controller simply takes care of listing and creating new resources (new book sales if you will), nothing else, and these actions are simple interactions with the database; so again, there is nothing too complex, since the focus here is on the test cases to add, not the actual code to test.
Unit tests for the BookSales controller’s create method.
We begin by creating the groups for our tests. As I mentioned before, these groups can be anything we want; in my case I felt that grouping as Controllers ➤ [Controller name] ➤ [Method name] would come in handy.
Make sure it returns the correct type of error message whenever the body for a new book sale is not present.
Make sure it calls the save method on the model being created.
Check that after a successful data save on the database, the controller is actually calling the writeHAL method , to create the correctly formatted response.
All three tests have different mechanics. The first one shows you how to use the done callback optionally available within each test. If you’re dealing with an asynchronous function, that’s how you tell it when to stop waiting for a response.
The second test is actually creating a spy on a method, so we can tell whether it was called. Note that in order to create the spy, we’re using yet another module, called SinonJS; this particular library works together with Mocha (or any other unit testing framework) and provides the same tools we saw earlier in this chapter: mocks, spies and stubs.
Finally, the third test case is creating a stub, because we need to control exactly how the insertion into the database works. (In this case, we end with a returned value of success as if the database was actually there.) This particular test also does not directly create or restore the spy on the writeHAL method for the controller; instead, that happens in the beforeEach and afterEach function callbacks, which are part of the testing flow executed by Mocha. They’re provided to exclude from the test case’s code anything that needs to happen for every single test.
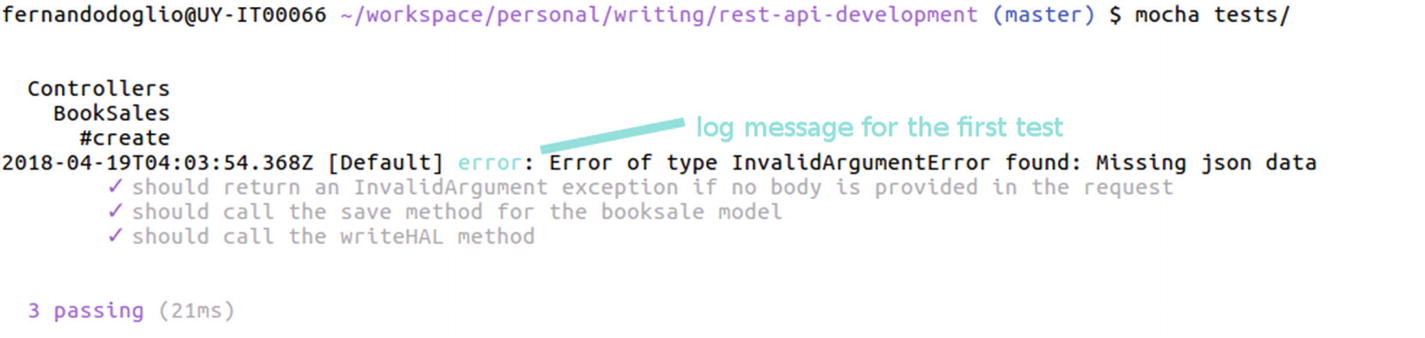
Output of the execution
Here you can see the other point of having the groups; namely that the results are much easier to understand if the tests are properly grouped. Also notice the error message; even though the tests are all green, we’re showing an error message, and that’s completely normal, since the very first test is actually testing for the error type.
Tip
Even if error messages are normal, you still might want to catch them somehow (depending on how you’re printing out the error, possibly using a try-catch block, or redirecting the output based on an environment variable) in order to show only messages related to the output of the test, and avoid any clutter related to actual error messages. This could be useful if you have too much clutter from your own code.
Integration Testing
Unit testing helps you save a lot of time and effort fixing bugs later down the road, but when you’re dealing with a big enough platform, your modules will start having interdependencies, which in turn means you might run into trouble when they start interacting with each other.
You can have different team members working on different modules of your architecture, and individually the modules can be extremely well tested, but once you deploy them together, you realize that your teams never actually coordinated and have been making assumptions about each other’s systems. So once they start sending messages back and forth, your application is no longer working as expected.
This happens more often than you’d think, so having an integration testing strategy from the get-go will save you a lot of headaches in the future.
Testing Approaches
There are different ways to implement integration testing into your system, each with its pros and cons. The most common ones are the big bang, top-down, and bottom-up approaches.
Let’s take a closer look at each one to understand when to use them and when to avoid them.
The Big Bang Approach
This approach consists of testing the entire system integration in one go. Forget about module-to-module communication; this approach goes for the entire platform at once.
This is great for small systems, with not a lot of interaction between components, that way if something goes wrong and there is an issue, you can quickly find the root cause for it. If your platform is complex and consists of multi-step interactions between modules, on the other hand, then this approach is not really recommended.
Because you’re testing everything at once, finding the root cause of a problem becomes a challenge. you can’t simply look at the output of your test and know which module failed; all you’ll know is that something went wrong, AND then it’s dive-into-logfiles time to try to see where the error is.
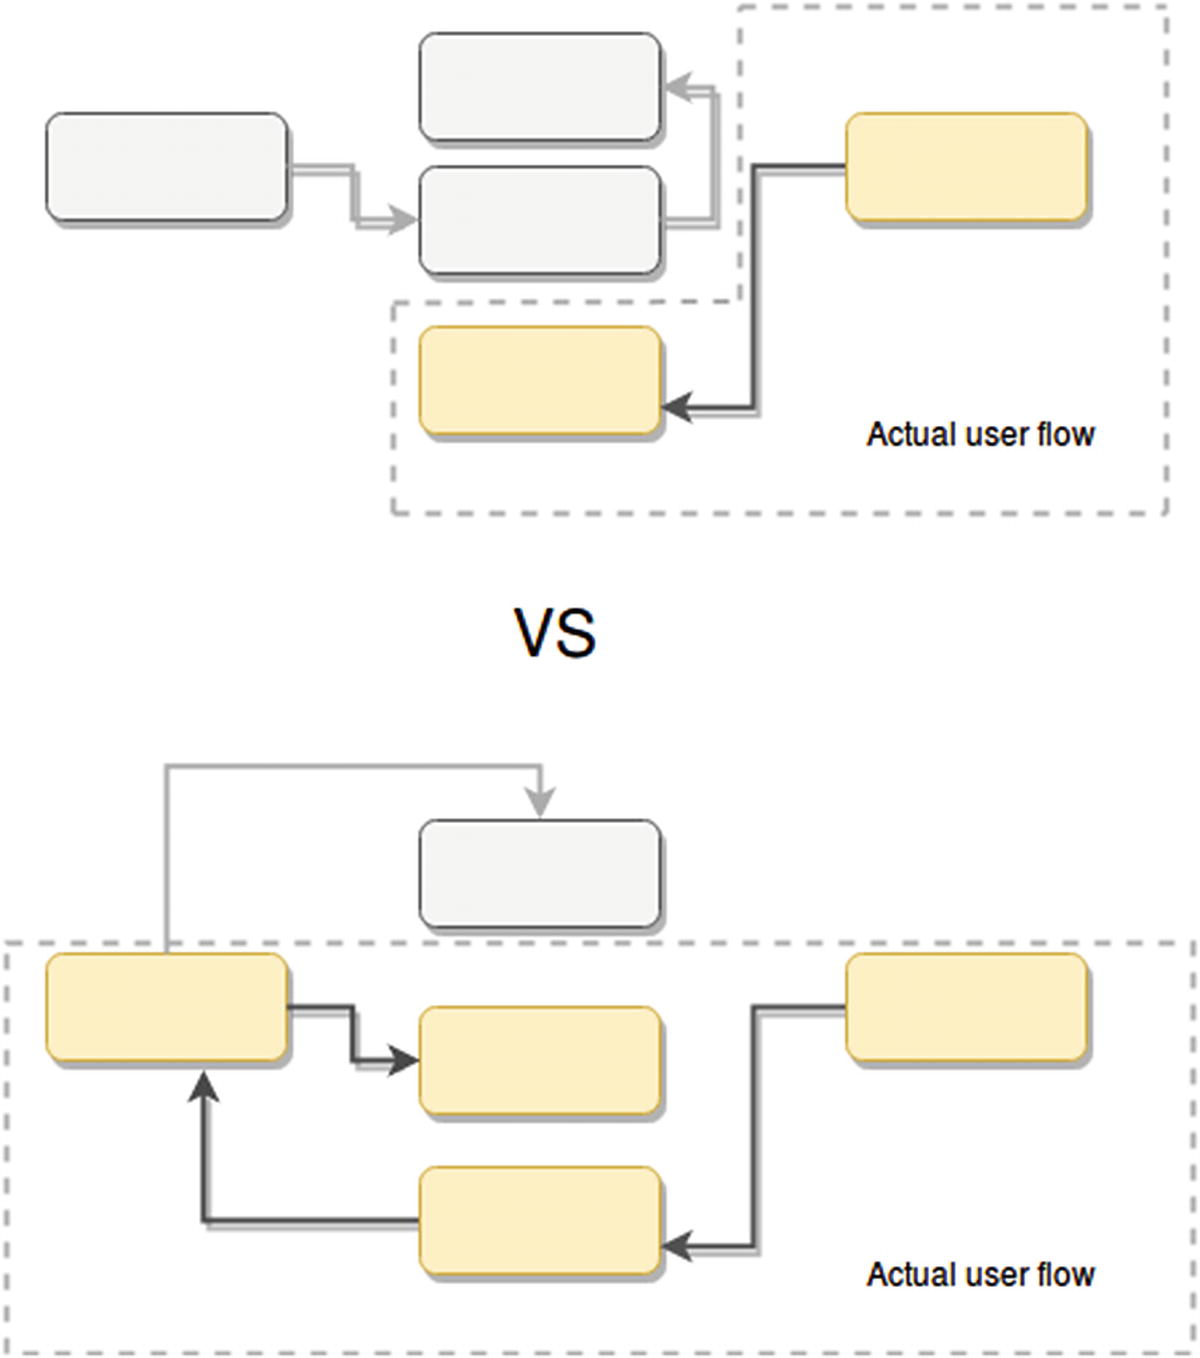
Big bang approach testing entire user flows for simple and complex architectures
With this approach, finding root causes for issues turned up in the second example of Figure 6-2 would require you to go through the logs of four different modules in the hope of finding out what went wrong.
Another big problem with this approach is that it requires the entire system to be present to start applying it. You can’t partially test a user flow if you’re going big bang; you have to test the entire thing, so you need to wait for your team (or teams) to have a working version of all required modules before you can start implementing the integration tests between them.
If you’re dealing with complex systems, there are other ways to go about integration testing that might better suit your needs.
The Gradual Approach
If testing entire user flows at once is not good enough for your integration testing needs, then you have to go through the interactions gradually, one by one, making sure that just two interconnected systems work correctly with each other, without paying attention to the big picture.
Top-down testing, which follows the data flow from module to module, making sure to test the interactions between them in each step. This approach works well if you want to start testing as soon as possible, since all you need are the first two modules of the flow; after that, you can start working in parallel with your devs while they work on the rest of the modules, and you begin adding tests for the existing ones. This approach also works well if you aim to have a quick prototype of your application tested as soon as possible. You don’t need all its modules for that, only the critical ones, and this approach allows you to have them tested by the end of the development effort.
Bottom-up integration testing, on the other hand, starts at the very end of the data flow, testing integration between modules, just like the previous one, but working its way backwards. The main advantage of doing integration testing this way is that problems deep in the integration steps are identified early on. The main problem, though, is that it kills your chances of getting early prototypes out and properly tested if the development flow instead follows a more top-down approach.
In the end, these are all valid approaches, and picking the right one for your particular circumstances requires you to look at your needs, from a development perspective as well as from a quality one.
Summary
This chapter provided a small glimpse into the unit testing world as well as the work required to test big and complex systems. It showed you the basics of unit testing your applications in order to give you a basic idea of what it takes to do that in your own Node.js applications.
In the final chapter, I’ll show you some real-world examples of problems experienced by big companies while trying to scale their platforms and how they managed to solve them.