Understanding the Hardening Process and Mind-set
Software vendors of all types, including operating system vendors, encounter a basic dilemma when deciding on default installation options. One school of thought is to install the most features possible to showcase what the product can do. This approach is the one that vendors generally select because it promotes the richness of their product’s features. The other approach is to only install the bare minimum of features to avoid increasing the product’s vulnerability to attack. Many vendors, however, end up showcasing more features. This raises the risk of making their product more vulnerable. The software a computer runs that is vulnerable to attack is called the attack surface. The primary goal in securing Windows computers is to reduce the attack surface. While you can’t ever reduce the risk of attack to zero, you can employ controls to make your computers more secure.
Strategies to Secure Windows Computers
You have two main strategies to choose from to reduce a computer’s attack surface. First, disable or remove programs that contain vulnerabilities. This strategy is the most secure method. For example, suppose you are concerned about vulnerabilities in the Microsoft Internet Information Services (IIS) web server. This web server is running on your computer and is named WebServ01. You could disable IIS on WebServ01, or remove it entirely. An attacker can’t compromise a program that isn’t present or running on a computer. Unfortunately, WebServ01 is an important service for your organization. It is a web server for your e-commerce application. Since you can’t disable or remove IIS, you’ll have to use another strategy.
The second main strategy to reduce the attack surface is to establish controls on running programs to mitigate any known vulnerabilities. This method is always more difficult and less complete. It is also more time consuming than just disabling unneeded programs or services. Despite this, it is necessary when running a program that contains vulnerabilities.
In this chapter, you’ll learn the steps to reduce the operating system attack surface of your computers. The process of making configuration changes and deploying controls to reduce the attack surface is called hardening.
Hardening Windows computers is not a single activity—it is an ongoing process. When installing Windows, choose the installation options for programs and services you absolutely need. Then, harden each computer as soon as you complete the installation process.
Install Only What You Need
The workstation versions of the Windows operating system installation procedures follow a standard process. You can’t easily change which programs the process installs. If you are installing Windows 7, Windows 8, or Windows 10, you’ll have to complete the install process and then remove any unwanted components. When you install a Windows Server operating system, you have the ability to select which programs to install. The easiest way to customize a server is to define one or more roles for the computer. A role is a predefined set of services, programs, and configuration settings that enables a computer to fulfill specific requirements. The available roles depend on the edition of Windows you are installing. Microsoft offers multiple editions of each of its server operating systems. Each edition can support different types of roles.
Windows Server 2016 and Windows 2019 Editions and Roles
Recall that Microsoft offers the following editions of Windows Server 2008 R2:
Essentials—Cost-effective, entry-level server for small businesses
Standard—Supports more features than Essentials edition for medium-sized businesses
Datacenter—Optimized for large-scale deployment using virtualization on small and large servers
TABLE 11-1 lists the 17 Windows Server 2016 roles and which editions support each role.
TABLE 11-1 Windows Server 2016 Standard Installation Roles and Editions |
|---|

|
Microsoft also provides another installation option making it easier to exclude programs you don’t need. The server core installation option provides a minimal Windows Server environment that includes only programs necessary for the roles you select. A server core installation doesn’t even include a Windows graphical user interface (GUI). You use a command-line interface to interact with the operating system. Since Microsoft limits the programs a server core installation installs, your choice of roles is limited. TABLE 11-2 lists the roles from which you can choose for a server core installation of Windows Server 2016
TABLE 11-2 Windows Server 2016 Core Installation Roles and Editions |
|
|---|---|
| ROLE (CORE INSTALL) | INSTALLED BY DEFAULT? |
| Active Directory Certificate Services | No |
| Active Directory Domain Services | No |
| Active Directory Federation Services | No |
| Active Directory Lightweight Directory Services | No |
| Active Directory Rights Management Services | No |
| Device Health Attestation | No |
| DHCP Server | No |
| DNS Server | No |
| File and Storage Services | Yes |
| Host Guardian Service | No |
| Hyper-V | No |
| Print and Document Services | No |
| Remote Access | No |
| Remote Desktop Services | No |
| Volume Activation Services | No |
| Web Server (IIS) | No |
| Windows Server Essentials Experience | No |
| Windows Server Update Services | No |
© Jones & Bartlett Learning. |
|
Taking the time to select the right role for each Windows Server installation is the first step in hardening your Windows servers.
Windows Server 2019 Editions and Roles
Recall that Microsoft offers the following editions of Windows Server 2019:
Essentials—Cost-effective, entry-level server for small businesses
Standard—Supports more features than Essentials edition for medium-sized businesses
Datacenter—Designed for large-scale deployment on servers that support extensive virtualization
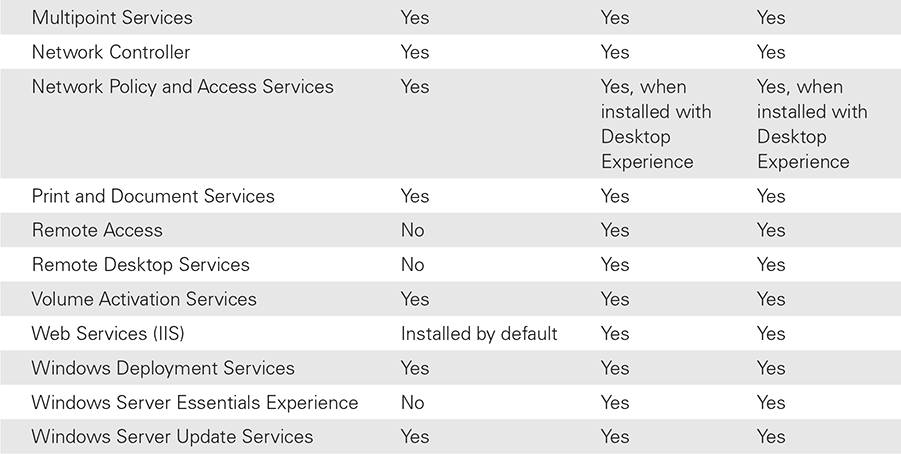
TABLE 11-3 lists the Windows Server 2019 roles and which editions support each role.
TABLE 11-3 Windows Server 2019 Standard Installation Roles and Editions |
|||
|---|---|---|---|

|
|||
© Jones & Bartlett Learning. |
|||
Windows Server 2019 supports server core installations as well. The Windows Server core installation is essentially a Windows Server installation without any GUI components. Due to the lack of GUI, it has a smaller footprint and offers a smaller attack surface. Windows Server core installations work well in datacenters where command-line interaction or remote web-based administration are sufficient. In fact, in every Windows Server release since Windows Server 2012, you can switch between a full server and server core installation without having to reinstall the entire operating system. Windows Server 2019 offers server core installation options for the Standard and Datacenter editions.
Security Compliance Toolkit
Microsoft provides a set of tools to help manage Windows security baselines. According to Microsoft, the Security Compliance Toolkit (SCT) “… allows enterprise security administrators to download, analyze, test, edit, and store Microsoft-recommended security configuration baselines for Windows and other Microsoft products.” The SCT provides guidance to administrators that makes it easier to ensure policies adhere to policy best practices.
SCT is not installed with the operating system, but must be downloaded from Microsoft’s website. You can get the SCT at https://www.microsoft.com/en-us/download/details.aspx?id=55319. Once you navigate to the download website, click the Download button. The action will display a list of files that you can download. You can choose from the following files:
LGPO.zip—The Local Group Policy Object tool
Office-2016-baseline.zip—Baseline recommended policy settings for Office 2016
PolicyAnalyzer.zip—The policy analyzer tool to compare sets of GPOs and analyze their differences.
Windows 10 Version xxxx (multiple available versions) Security Baseline.zip—Separate baseline recommended policy settings for Windows 10 versions 1507, 1511, 1607, 1703, 1709, and 1803
Windows 10 Version 1809 and Windows Server 2019 Security Baseline.zip—Baseline recommended policy settings for Windows 10 Version 1809 and Windows Server 2019
Windows Server 2012 R2 Security Baseline.zip—Baseline recommended policy settings for Windows Server 2012 R2 (and Windows Server 2016)
After you download the files that match the versions for Windows you have installed, extract each of the zip files into a folder of your choice. The baseline zip files contain Microsoft recommended configuration settings for specific versions of Windows. You’ll find documentation, policy examples, and Microsoft Excel spreadsheets that list all of the group policy settings, along with Microsoft’s recommendations.
The supplied baseline information contains so many recommendations. The SCT include two tools to help manage the baseline input, along with managing your own GPOs. The LGPO tool helps to automate managing your local GPOs. The LGPO tool is a command-line utility that you can run from a Windows PowerShell. For example, suppose you want to view the contents of a local computer’s Registry.pol file. This file is a binary file that contains a registry-defined policy. By default, you can find this file at C:WindowsSystem32GroupPolicyMachineRegistry.pol (assuming that Windows is installed in C:Windows). You can’t view this file directly since it is a binary file, but you can use LGPO to see what it contains. The command .lgpo/parse/m C:WindowsSystem32GroupPolicyMachineRegistry.pol will show what the Registry.pol file contains. (This command assumes that the directory where you extracted LGPO.exe is your current directory.)
The other utility available in SCT is the policy analyzer tool. The policy analyzer tool displays GPOs and compares selected GPO values. This makes it easy to compare the Microsoft supplied baseline GPOs with your own. You can even use the policy analyzer to create your own baseline GPOs and use those to quickly see if any computers in your organization have changed their settings to violate your security policy.
After you extract the policy analyzer zip archive you downloaded, change your working directory to the location where you extracted PolicyAnalyzer.exe. Then, you can launch the policy analyzer by running PolicyAnalyzer.exe. The first time you run the policy analyzer, the window is blank. Try loading the Registry.pol file. Click Add, then File -> Add Computer Configuration (registry.pol). Navigate to C:WindowsSystem32GroupPolicyMachine and select Registry.pol. Click Import, then close the Policy File Importer window. Select Local policy (at the top of the window) and the registry entry you just imported, then click View/ Compare. The policy analyzer shows all of the settings in selected GPOs and will highlight any differences. FIGURE 11-1 shows the Policy Analyzer selection window, and FIGURE 11-2 shows the Policy Viewer (the result of the policy comparison.).

FIGURE 11-1
Policy Analyzer selection window.
Courtesy of Microsoft Corporation.

FIGURE 11-2
Windows Security Configuration Wizard—Select Server Roles Policy Analyzer - policy viewer.
Courtesy of Microsoft Corporation.
Manually Disabling and Removing Programs and Services
Before proceeding, back up the Windows Registry. It is a good idea to back up the Windows Registry before making any changes. Some of the changes you make to Windows can cause unexpected results. A Windows Registry backup may help you research problems and restore settings. In addition, make changes on a test computer whenever possible. Making changes on test computers gives you the ability to test the results of those changes before they impact your production environment.
The next step is to evaluate each computer. Identify remaining programs and services that you don’t need. If you carefully select the roles for each server computer, you shouldn’t have to remove or disable many programs. Since workstation versions of Windows do not provide the option to install the operating system based on roles, you’ll likely find several programs and services installed you don’t need. For example, it is a good idea to disable the Remote Registry service. This service allows remote users to modify their Windows Registry. Once you identify any unneeded programs or services, either disable or remove them.
The most permanent and secure option is to remove unneeded programs. Make sure you know what a program is before you remove it. Don’t just remove a program because you don’t know what it is. If you don’t recognize a program, try searching for the program name using an Internet search. You’ll likely find information that will help you decide whether or not to remove the program. You can remove unneeded programs using the Control Panel -> Programs and Features utility. You can also use the Add or Remove Programs app to manage applications. Removing a program makes it impossible for an attacker to use that program to compromise a computer. FIGURE 11-3 shows the Programs and Features utility for Windows 10.

FIGURE 11-3
Uninstalling a program in Windows using the Programs and Features utility.
Courtesy of Microsoft Corporation.
Many programs in the Windows operating system run as services. Services are programs that run in the background and help other programs to run. For example, the DHCP Client service is a program that you don’t see on your display, but it provides the important service of requesting an IP address for your computer. You’ll find many services running on servers as well as workstations. The Windows Services maintenance utility allows you to start, stop, and change the settings for services defined for a computer. An alternative to removing or uninstalling a program that runs as a service is to disable it. When a Windows computer boots, the operating system reads the list of services and starts the services with a Startup type value of Automatic. Windows will also start services with a Startup type value of Automatic (delayed start) as well once all of the Automatic services have started. You can change the Startup type to Disabled for any services you want to prevent Windows from starting. Although it is possible to manually start a service by running the program, disabling a service reduces the probability an attacker can use it to compromise a computer.
FIGURE 11-4 shows the Windows Services Maintenance utility.

FIGURE 11-4
Windows Services Maintenance utility.
Courtesy of Microsoft Corporation.
FIGURE 11-5 shows the Windows Services Properties dialog box.

FIGURE 11-5
Windows Services Properties.
Courtesy of Microsoft Corporation.
After you’ve identified unneeded programs and services and have either removed or disabled them, you can address remaining vulnerabilities. To continue the hardening process, learn about common vulnerabilities in running programs and deploy controls to secure your computers from those vulnerabilities.