Chapter 12: Special Effects with EEVEE – Fire and Smoke
In Chapter 2, Creating Materials Fast with EEVEE, we created an animated material that involved smoke. In this chapter, we're going to spend time creating a physical simulation of fire and then compositing it into our spaceship scene. The fire we make is part of the physics simulation suite that comes built into Blender. Physics simulations can cover anything, from fluid to smoke to dropping objects and having them shatter. The workflow for physics simulations is a little different than other workflows in Blender. First, the simulation is created using the parameters that we input, but we don't get to directly create the fire like we would when modeling. We can add or subtract forces from the simulation, change gravity, and add effects, but ultimately it's the computer that calculates each frame for us and then caches it so that we can play it again. This leads to more experimentation when creating physics simulations. It's prudent to change a value in the simulation and then test the simulation to see if it reached the desired outcome, and then try again and again until you get something that looks good. With more practice, you'll start to get a better feel for how each factor affects the simulation and need to do less testing, but I recommend experimenting with every step that we take in this chapter to really get the fundamentals of fire physics.
We're going to go over how to utilize the Quick Smoke function for faster results, the important aspects of a fire simulation, how to create a better shader using volumetrics, how to clear the cache of the simulation to keep working on the scene, and finally an example of how to use Cycles and EEVEE together.
The main topics we will cover are as follows:
- Creating fire with Quick Smoke
- Tweaking the shader for fire and smoke in EEVEE
- Optimal EEVEE render settings for the smoke and fire
- How to combine renders in Cycles and EEVEE
Technical requirements
As usual, you can download Chapter12-Start.blend from GitHub, or keep working from the file you created in Chapter 11, Kitbashing – Adding Details Fast. In this chapter, we will need some room on our drive for the fire cache, so make sure you save your files somewhere with a little bit of room to store the cache files.
The supporting files for this chapter can be found here: https://github.com/PacktPublishing/Shading-Lighting-and-Rendering-with-Blender-s-EEVEE-/tree/main/Chapter12.
Creating fire with Quick Smoke
Creating fire inside of Blender has never been so easy. While it can be immensely gratifying to create your own simulation from scratch, the Blender developers have done all the work for you with the Quick Effects menu options. With these options, you can really quickly create a smoke or liquid simulation, an explosion, or fur. As our recurring theme is how to do things quickly, we're going to use the Quick Smoke option to create our fire. While on the surface, Quick Smoke doesn't initially seem very logical as a way to create fire. But you know what they say, where there's smoke, there's fire. So let's jump into creating some fire with the Quick Smoke menu options:
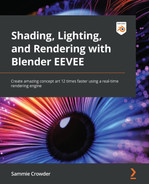
- In Chapter 12-Start.blend, I have hidden our hangar from view so that we can create the fire without Blender having to render the entire scene plus the fire at once. You'll notice the only object visible in the scene is the FireObject. This object is the exact size of one of the thrusters of our spaceship. We're going to use its geometry as the basis for the size of the fire. Select that FireObject by left-clicking on it.
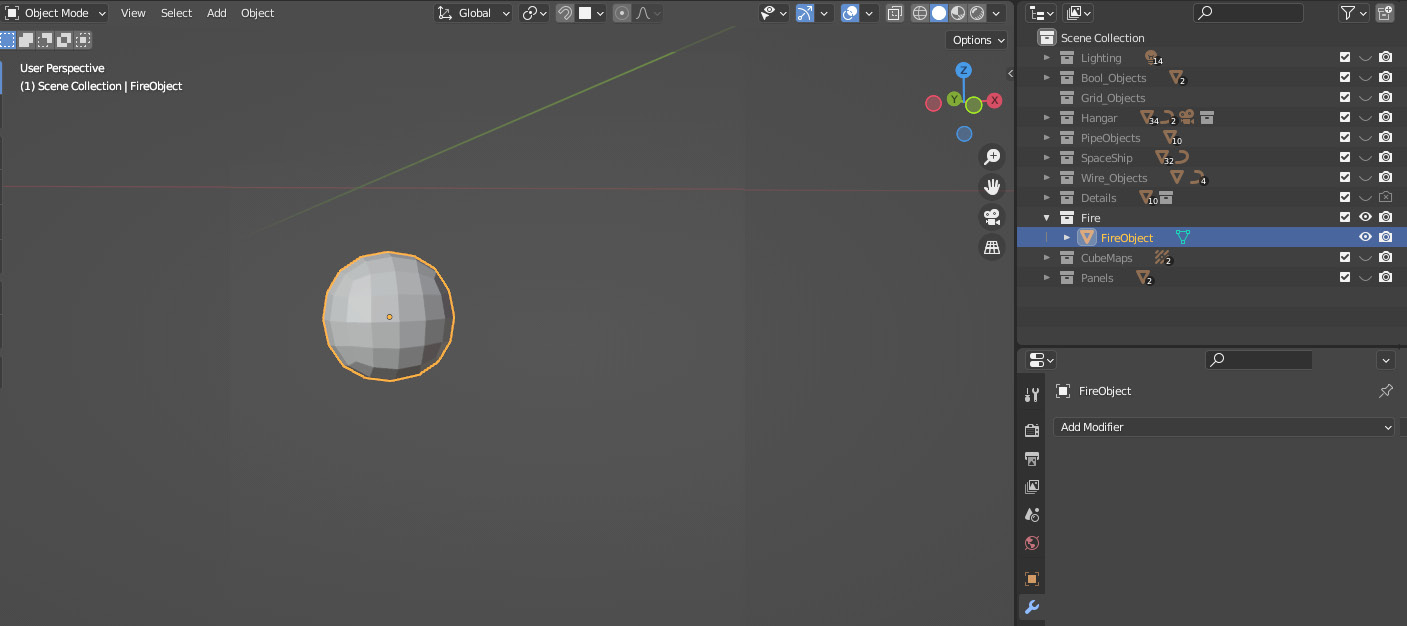
Figure 12.1: The FireObject
- Next, go to the Object menu located in the top left corner (next to the Add menu) and click on it. Find Quick Effects on the list of menu options, then choose Quick Smoke from the Quick Effects menu.
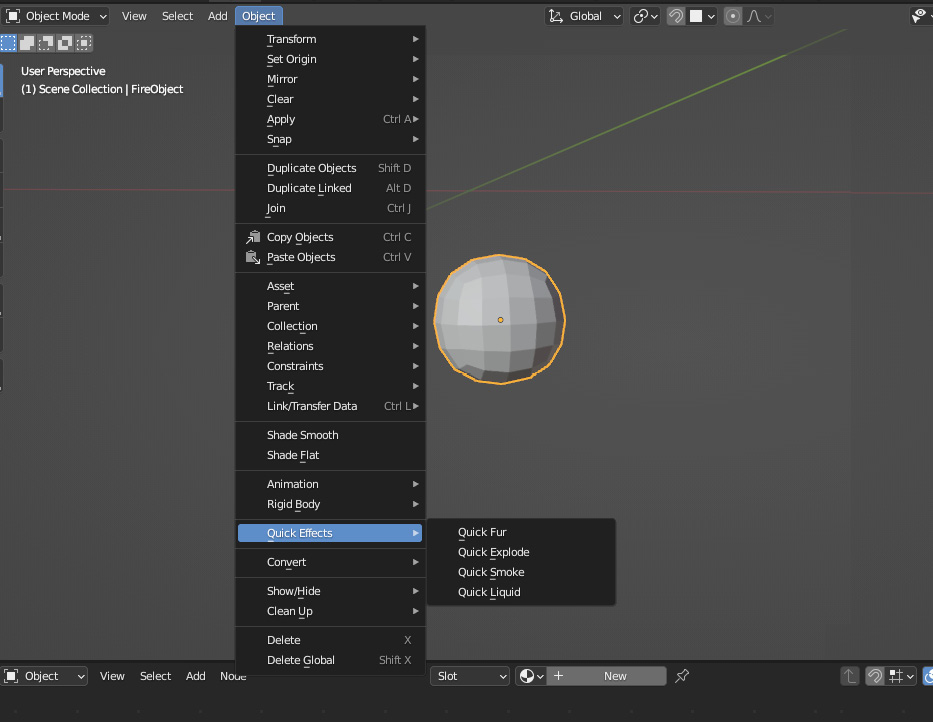
Figure 12.2: The Quick Effects menu
- Blender will automatically add a new object called Smoke Domain.
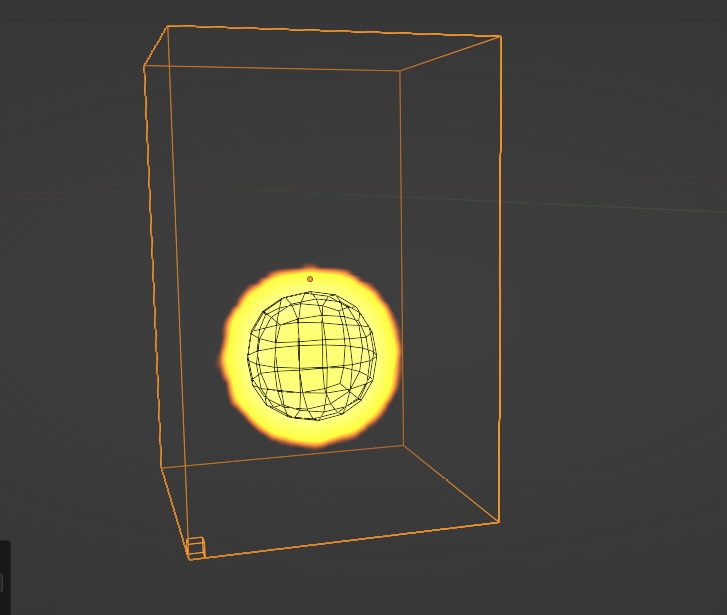
Figure 12.3: Smoke Domain added
- Before clicking on anything else, there should be an Add menu that popped up in the bottom left corner of the screen – this is called the last operator menu. It can be recalled with F9. This menu should have Smoke Style as an option. Click the drop-down menu and change that option to Fire.
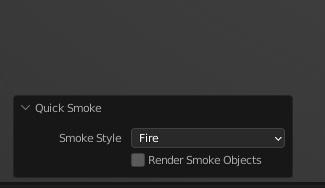
Figure 12.4: Changing from Smoke to Fire
And that's all you need to make fire! Let's prove that the fire is actually working by previewing it in the viewport.
- Go to Render mode, then go to the Timeline (you may need to open your Timeline by using the Editor Type button, or by changing to the Animation workspace). Set your Timeline to the starting frame by dragging the playhead to the first frame of the animation.

Figure 12.5: The Timeline
- Next press the play button or spacebar on the Timeline and see how the fire looks.

Figure 12.6: The default fire simulation
Using the default options, we already have something that looks like fire. Now we'll make some changes to the default and get our fire looking a little more like the controlled flame that we can imagine coming out of the thrusters of the spaceship.
There are two parts to a fire simulation:
- The first part is the Domain. The Domain is the box that Blender added when we opted for Quick Smoke. It describes the area where the fire simulation is taking place. Fire can only be simulated inside of the Domain box, simply so Blender isn't trying to calculate the fire over an infinite area. The bigger the Domain box, the harder the computer will have to work to run the simulation.
- The other part of the fire simulation is the Inflow object. This object is the FireObject that we created and that we had selected when we hit the Quick Smoke button. This Inflow object is where the simulation will flow from. It uses the geometry of the object to decide the size and shape of the simulation.
So, we have two visual representations of how the simulation is being simulated in the viewport. The other place we can change the properties of our simulation is in the physics properties when we have either the Domain or Inflow objects selected. We'll start with the Inflow object:
- Select the FireObject we had originally. Go to the Properties menu and select the Physics (
 ) menu.
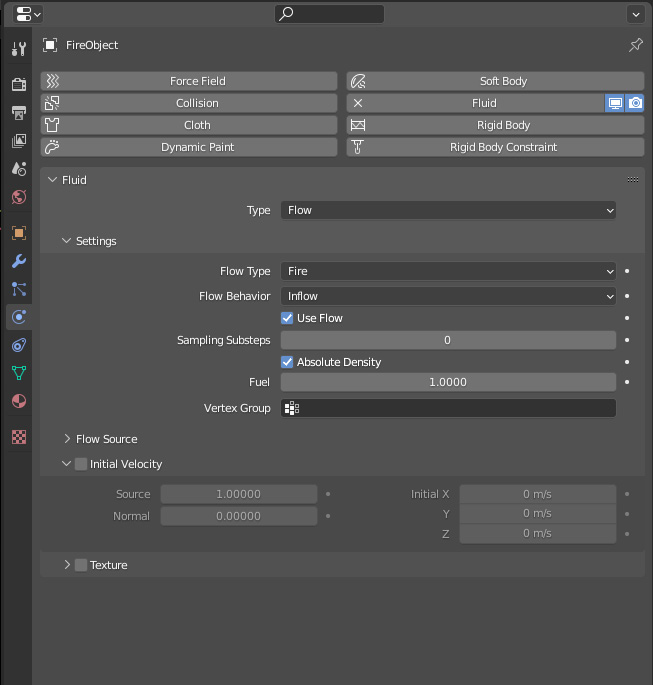
Figure 12.7: The Inflow options
- These values are much less important than the values for the Domain of the simulation, but it still can be useful to tweak these if you need a certain effect. Here you'll find the Flow Type option, where you can change Fire back to Fire + Smoke or to just Smoke by clicking the drop-down menu in Figure 12.7.
- Another interesting aspect to tweak is Fuel. This denotes the amount of computer-generated fuel that is added to the fire, so a higher fuel number will make the fire a lot bigger and more out of control (exactly like adding real-world fuel to a real-world fire). I'm going to leave my Fuel number at 1.000, but you can experiment with different numbers.
Now that we've changed some settings for the Inflow object, let's try some different values in the Domain object. You may have noticed at this point that sometimes when you change values for the fire simulation, nothing actually happens. This happens because of the cache of the simulation. We've come across caching in Chapter 10, Working with Irradiance Volumes and Cubemaps for More Accurate Rendering, where we baked the Irradiance Cube Probes. The baked information is called a cache. This cache is Blender saving the simulation so it plays faster next time you press play on the timeline. Sometimes this caching is really useful, but sometimes it can get in the way of trying out different values in the simulation. Let's delete the cache for the simulation we've created so far so we can tweak some numbers in the Domain to get a different result than what we have:
- Move the play head back to frame 1.
- Select the Smoke Domain object.
- Press the F3 button on your keyboard. This brings up the search menu.
- In the search menu, type free.
- Select fluid.free_all | Free All. This tells Blender to dump all the cache data that we have stored so far. Unless we dump this data, Blender will not re-simulate the fire with our new parameters.
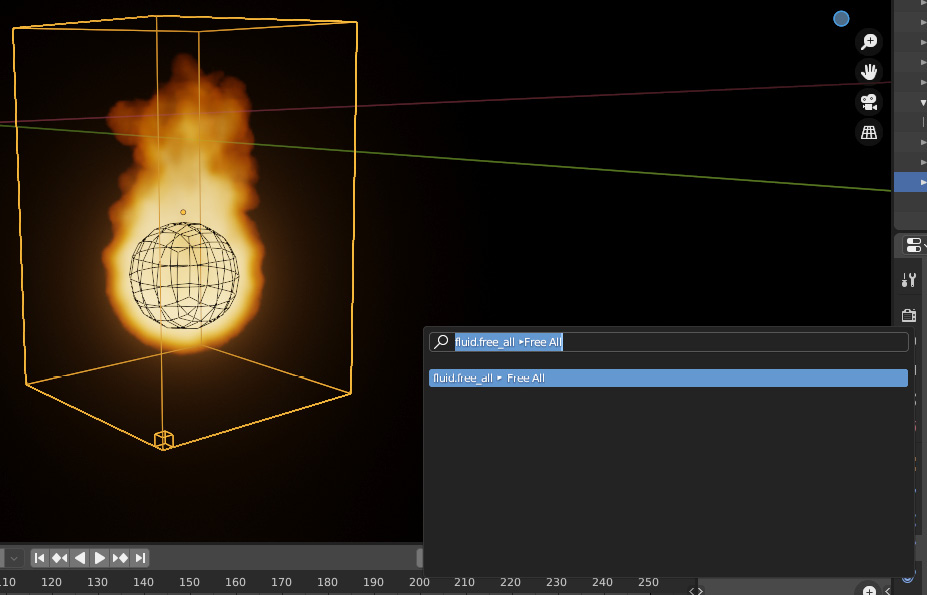
Figure 12.8: Freeing the cache
- Now make a change to the options and see how it affects the fire simulation.
Now that we know how to reset our cache, it should be a lot easier to change our options and then test the fire simulation. Let's move on to changing the values for the Domain object:
- Select the Smoke Domain and then navigate to the Physics menu, inside the Properties menu.
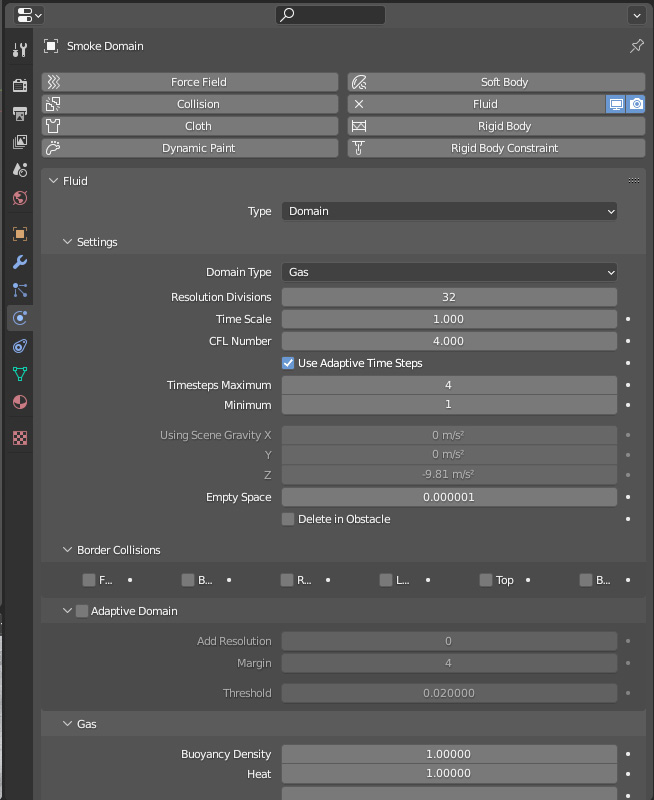
Figure 12.9: Smoke Domain options
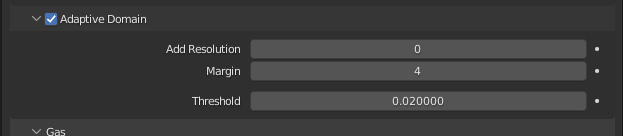
Figure 12.10: Adaptive Domain options
Adaptive Domain means that the Domain will get bigger as the fire simulation grows, so it will start small, and then move with the fire. This makes the simulation easier to render for Blender, as it maximizes the efficiency of the Domain. You can see in Figure 12.11 the way the Domain has shrunk to only cover the area the fire is currently being simulated inside.
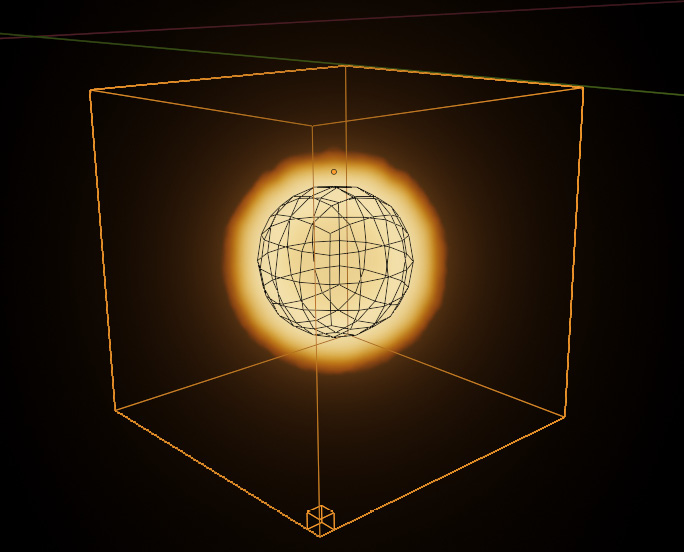
Figure 12.11: The Domain shrinking to only contain the Inflow object
And then as our simulation runs, the Domain grows so the fire is still contained:
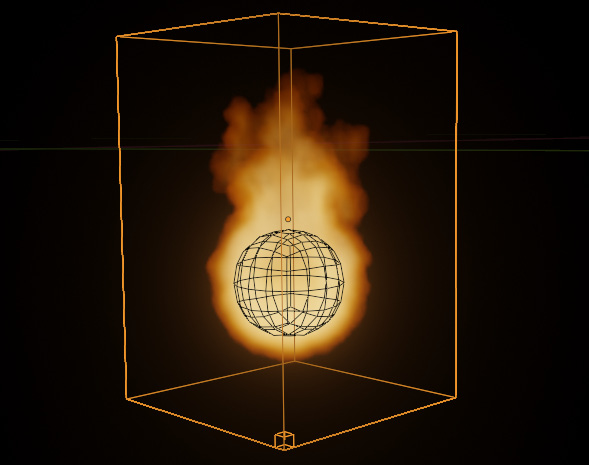
Figure 12.12: Domain size changes as the simulation grows
- Next we need to scroll down to the Fire menu in the Physics Properties for our simulation.

Figure 12.13: The Fire options
The Fire menu is the main factor that controls the fire simulation. The first value to change is Reaction Speed. This dictates the speed of the burning. A larger number will result in a smaller flame. Figure 12.14 shows a simulation with a Reaction Speed value of 0.2.
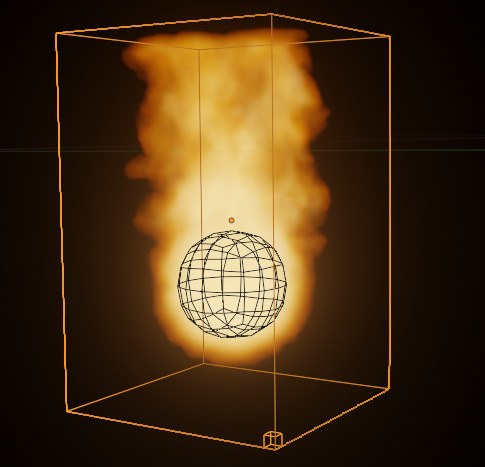
Figure 12.14: Fire simulation with Reaction Speed set to 0.2
Figure 12.15 shows a simulation with Reaction Speed set to 0.9:
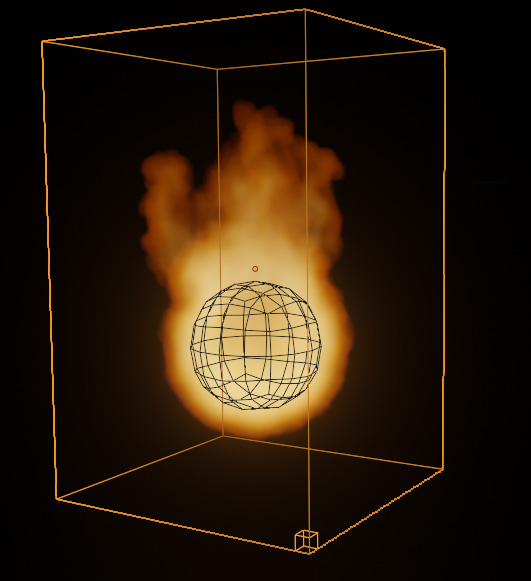
Figure 12.15: Flame simulation with a Reaction Speed value of 0.9
The lower Reaction Speed is so tall that it gets cut off by the Domain. The higher Reaction Speed results in a much shorter flame. Since we're trying to make a small and controlled "thruster" type flame, we probably want a lower Reaction Speed value, but feel free to experiment and make your own mind up.
- We'll change the values for Flame Smoke next. This value determines how much smoke comes off the fire. I'm going to set my Flame Smoke option to 0, as I think my thruster probably doesn't emit any smoke, but again, it's up to your own creative sensibilities to decide what to do.
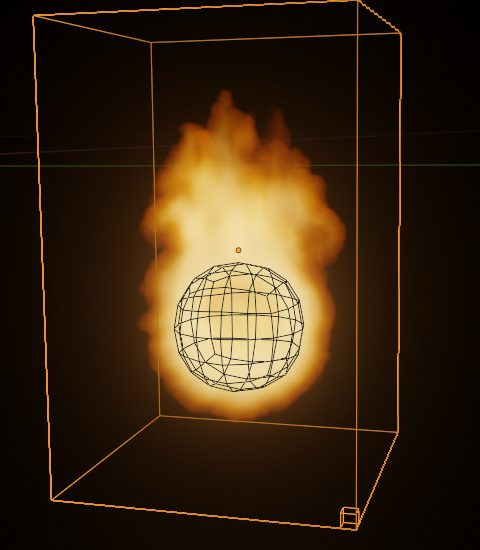
Figure 12.16: The fire with a Flame Smoke value of 0
- There are a few other options in the Fire menu, but I don't often touch those. Vorticity is the rotational force of the flames, so you'll get slightly more flickery, broken-up flames with a higher Vorticity value. The Temperature Maximum and Minimum can help you tweak the animation of the fire, where higher values for both or either will make the flames rise faster, but since we're just going to render a single frame of the fire, we don't need to use those values.
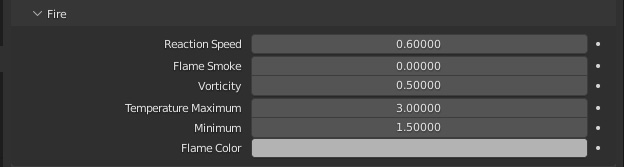
Figure 12.17: My final Fire values
- The last value we want to change is back up in the Settings section of the Domain menu (Figure 12.18). Let's double the overall Resolution of the fire simulation. The higher the Resolution value, the more detailed the final simulation will be. If your computer has trouble simulating a fire at a Resolution value of 64, drop back down to 32 for now, and then we can come back and raise the Resolution setting even higher than 64 right before we render, so we only have to cache that high-resolution simulation once.

Figure 12.18: Domain settings
That will be it for the fire simulation for now. Let's move on to creating a better shader for the fire that will reduce the overall blurriness of the simulation and add more realism to the fire.
Tweaking the shader for fire and smoke in EEVEE
When using the Quick Smoke option, a shader is already created for us, which is why we can already see shades of red, yellow, and orange on our fire. In this section, we are going to create a much more complicated shader that gives a little more life to the fire:
- Open the Shading workspace using the workspace editor that we talked about in Chapter 3, Lights, Camera....
- The shader should look something like that shown in Figure 12.19. This is the default fire shader, but it doesn't give the ability to tweak any of the values or really change the color of the fire.
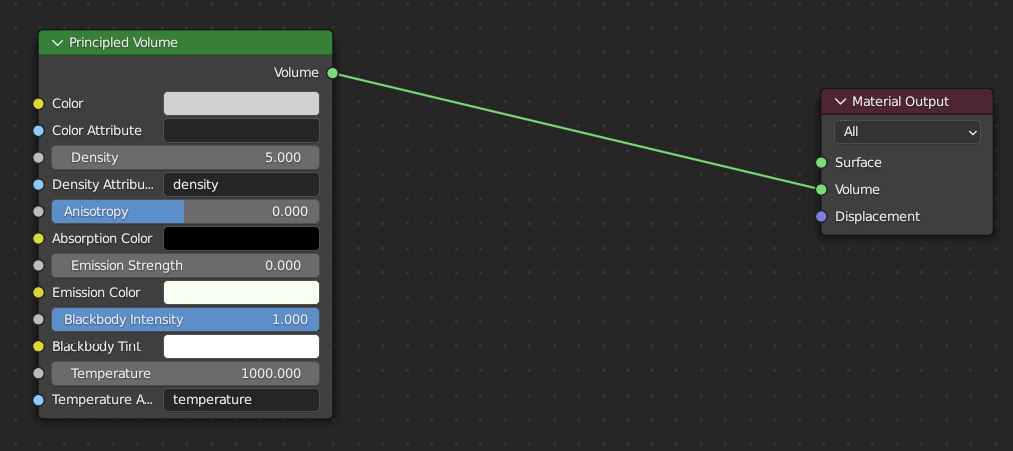
Figure 12.19: Principled Volume shader defaults for the fire simulation
- To give some more variability, we'll add an Attribute node to this shader. We haven't used the Attribute node yet, but it isn't so different than other nodes. It just allows us to input an attribute into the node network. An attribute is a piece of data that Blender calculates for us. They are also used in the Geometry Nodes system. We can already see an attribute that Blender is using automatically in the Temperature Attribute box. You can see that temperature (the attribute we typed in) is driving the Temperature Attribute, which makes the fire different colors depending on the heat of the fire.
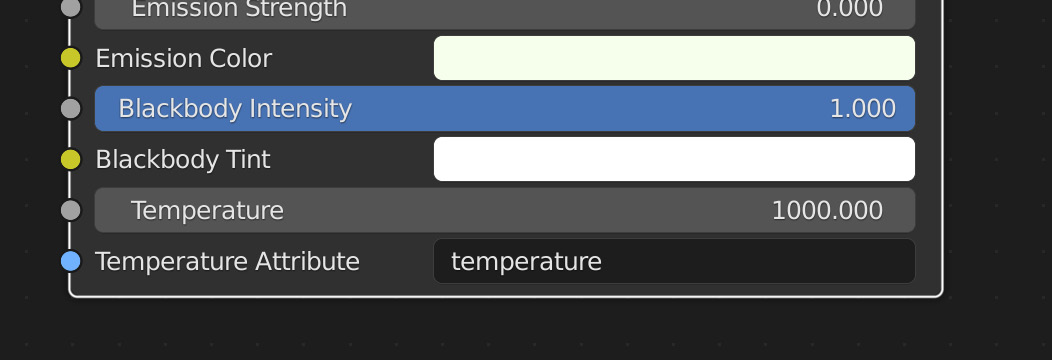
Figure 12.20: The Temperature Attribute
- Let's add the Attribute node to our shader using Shift + A and searching for Attribute.
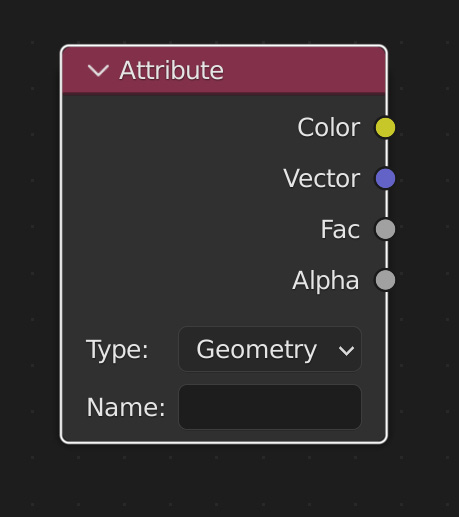
Figure 12.21: Attribute node
- Now, we need to type flame in the Name box. This adds the flame attribute to the shader, and we'll use the flame attribute to drive the colors and emission in our shader.
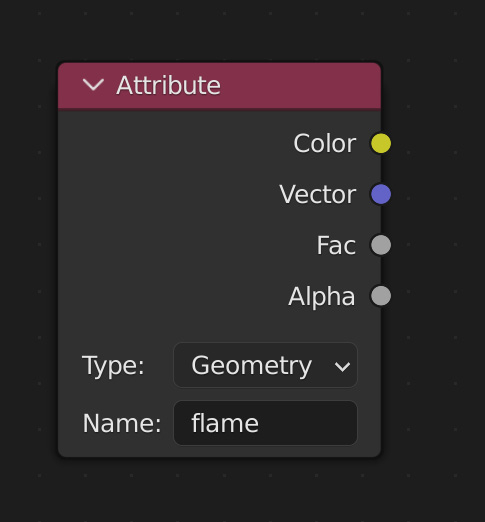
Figure 12.22: Adding the flame attribute
- Next, we'll add a Mix Shader to combine the Principled Volume with an Emission Shader. Take the Mix Shader and drop it on the connection between the Principled Volume and the Material Output nodes. This should automatically add it to the connectors between those two nodes.
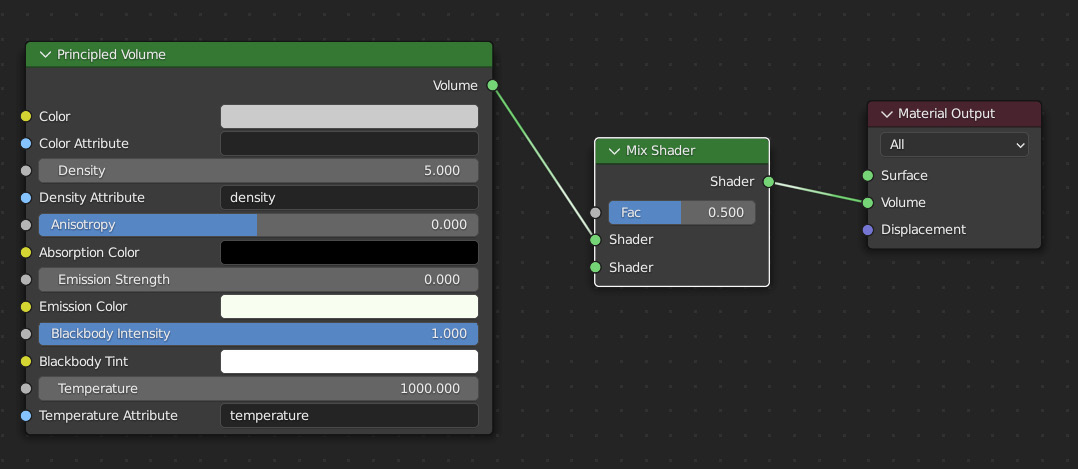
Figure 12.23: Adding the Mix Shader
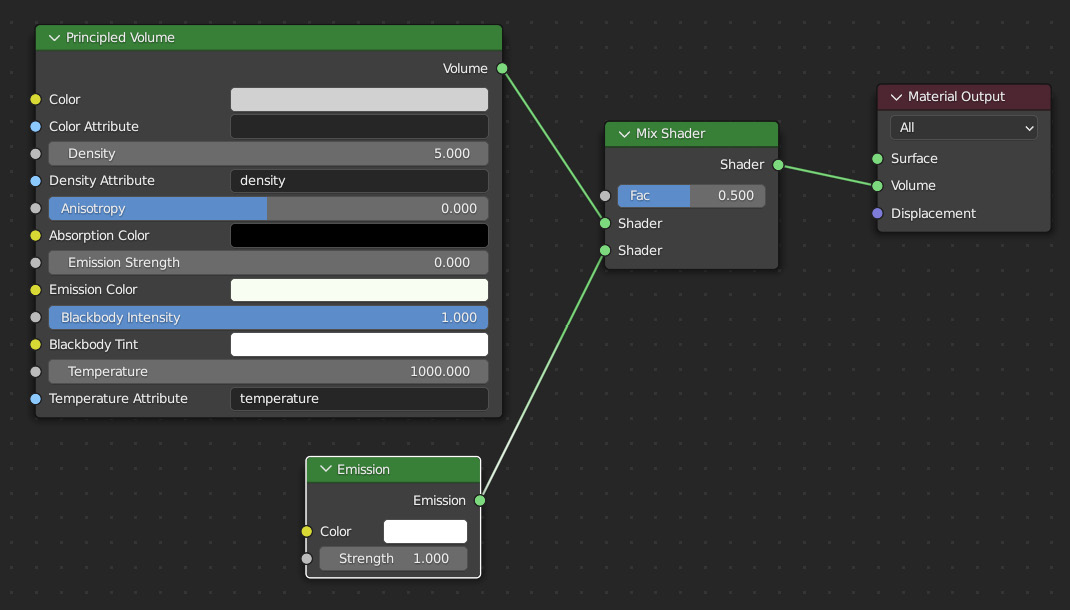
Figure 12.24: Adding the Emission shader to the Mix Shader node
Adding this Emission shader has completely changed how the fire looks in the viewport. And not for the better...but this is where our attribute comes in.
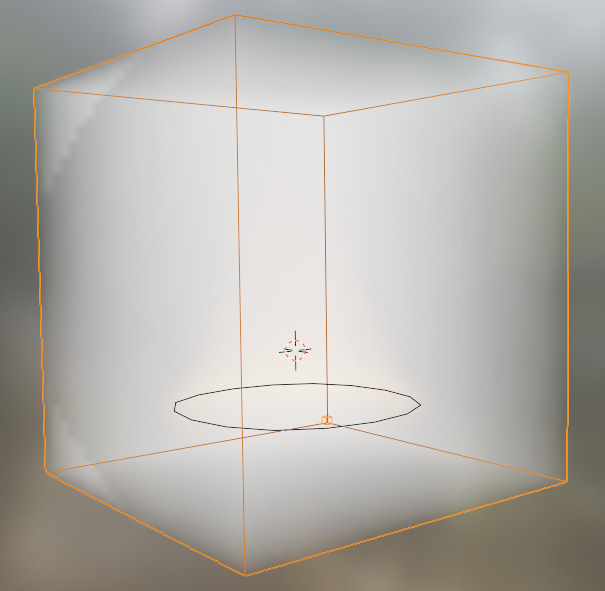
Figure 12.25: Result with Emission shader added
- Take the output of the Color option from the Attribute node and attach it to the Fac input of the Mix Shader node, as follows:
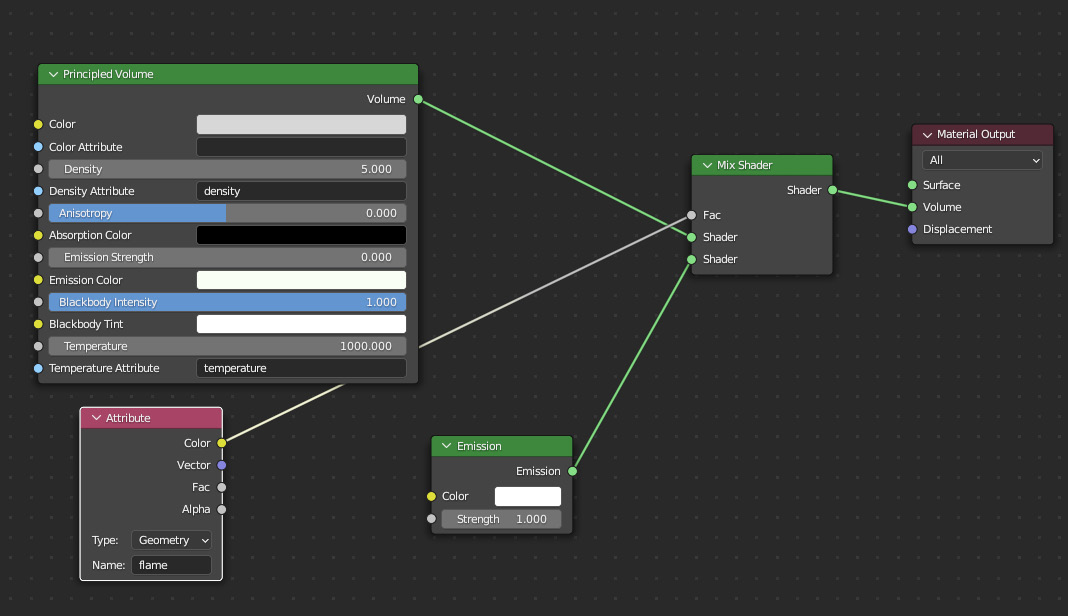
Figure 12.26: Adding the flame Attribute node as the Mix Shader node's factor
The fire is now at least looking like the correct shape again:
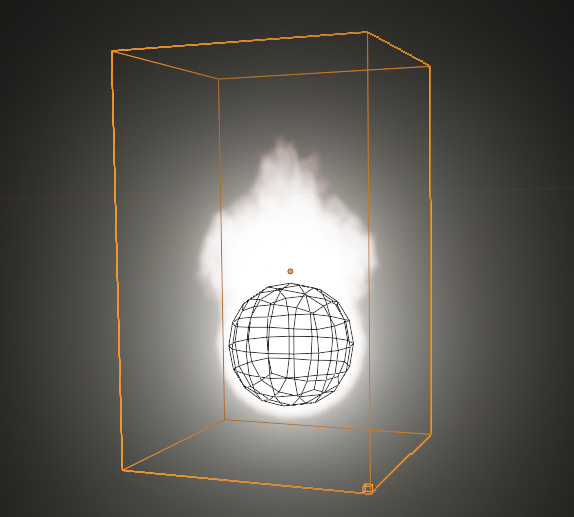
Figure 12.27: Result with the flame attribute added
- Now, we'll add a ColorRamp node between the Attribute and Mix Shader nodes. ColorRamps are very versatile, allowing us to tweak colors, masks, and values, as we're already seen in Chapter 2, Creating Materials Fast with EEVEE. Change the Interpolation type on the ColorRamp node to Ease using the right-hand drop-down menu on the node.
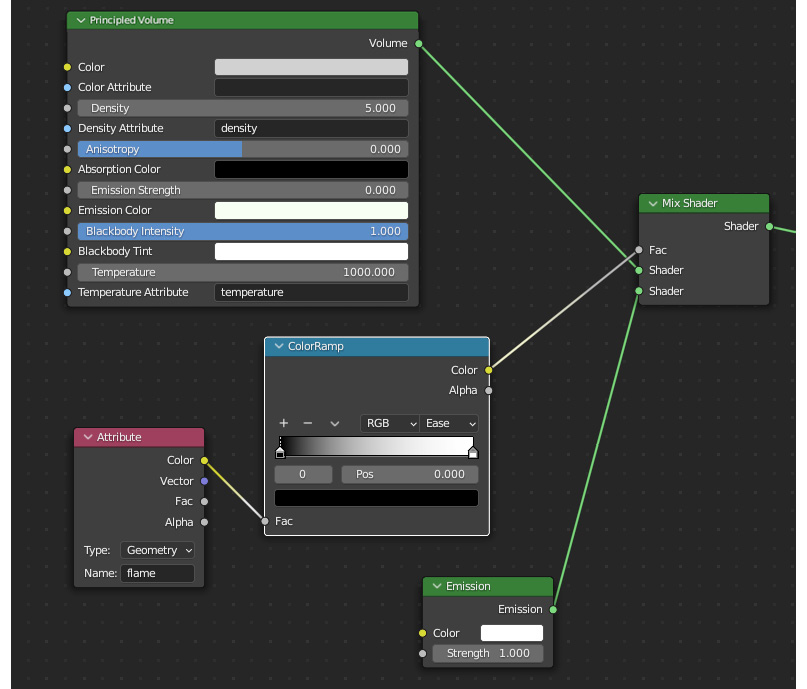
Figure 12.28: Adding a ColorRamp node to control the result
- Copy the ColorRamp node and then hook it up between the Color output on the Attribute node and the Color input on the Emission node. Now we have controls for how we want to mix the nodes together and change the overall color of the fire.
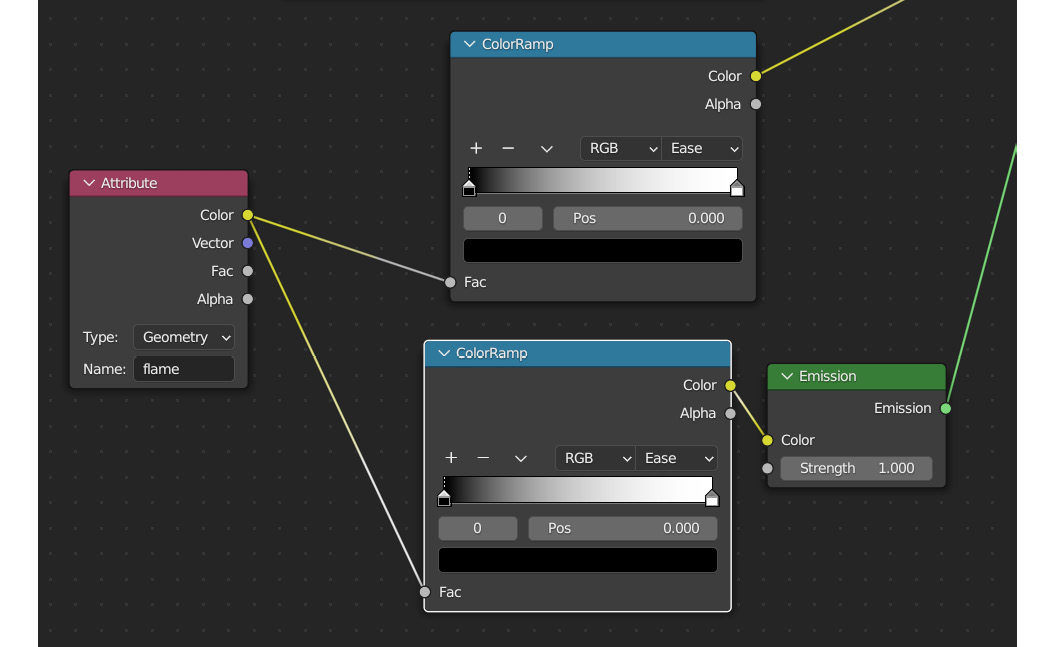
Figure 12.29: Adding another ColorRamp node for the Emission node
- Change the Emission node's Strength value to 10. This should add a lot of light to the scene, and we may want to dial it down later, but for now, this helps us see how the ColorRamps affect the scene:
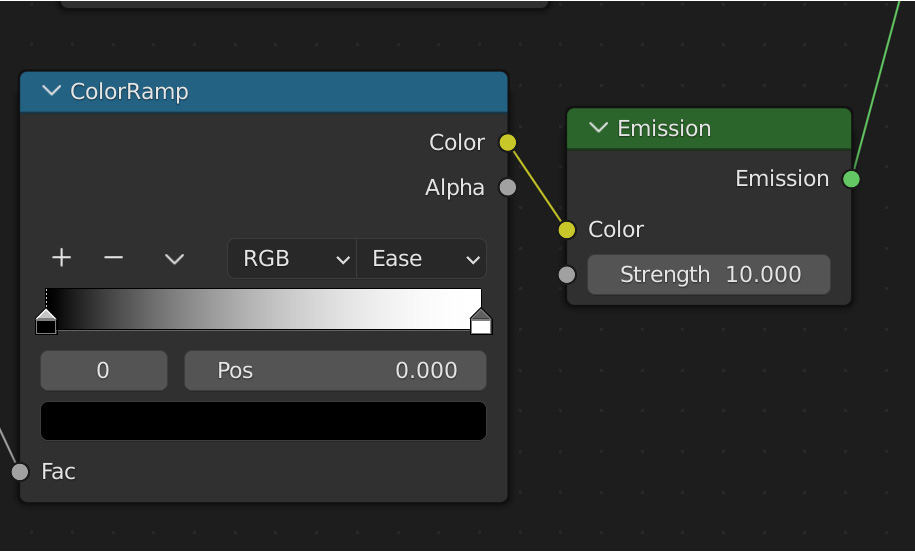
Figure 12.30: Increasing the Emission Strength to 10
- Right now the colors of our new Emission shader are only black and white. Let's add two more colors to the ColorRamp node by clicking the plus button (+) on the left side of the node twice.
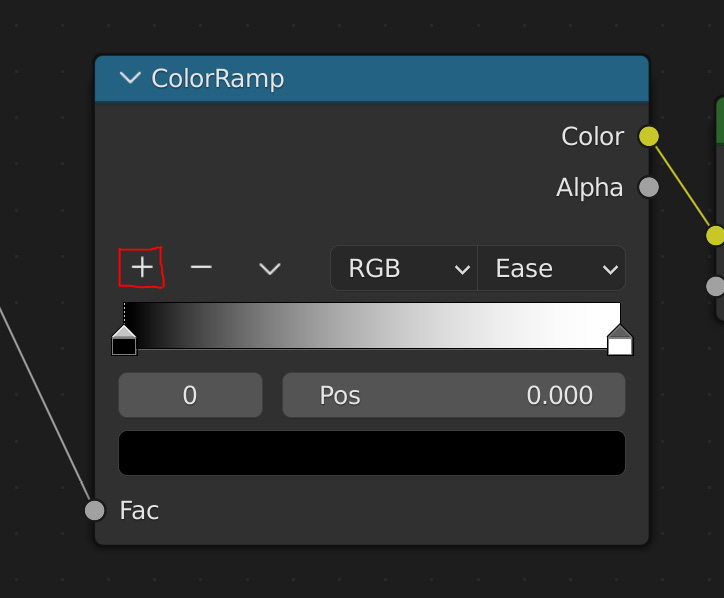
Figure 12.31: Adding Color inputs to the ColorRamp node
- Now, click on each marker on the color gradient in turn, clicking on the bottom solid-color bar to change the color of each marker each time.
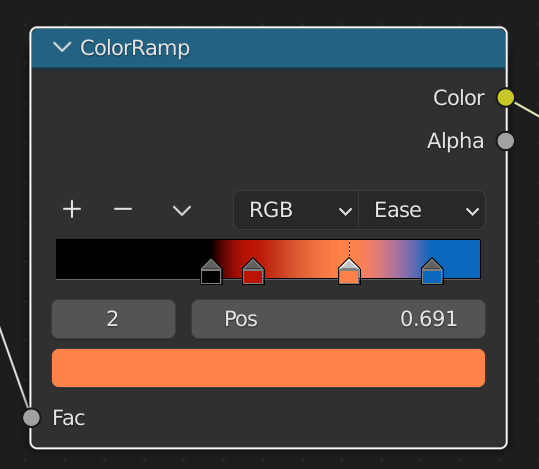
Figure 12.32: Mapping colors onto our fire
- I created something like Figure 12.32, where blue is the middle of the fire, which is burning the hottest, which then turns to red and then orange as it gets closer to the edge of the fire. The blue color happens in really, really hot fires, and I think a thruster on a spaceship would probably have some blue flames at the core of the fire.
- You can also use the ColorRamp node connected to the Mix Shader factor input to change how much of the Volume shader is being used as opposed to the Emission shader.
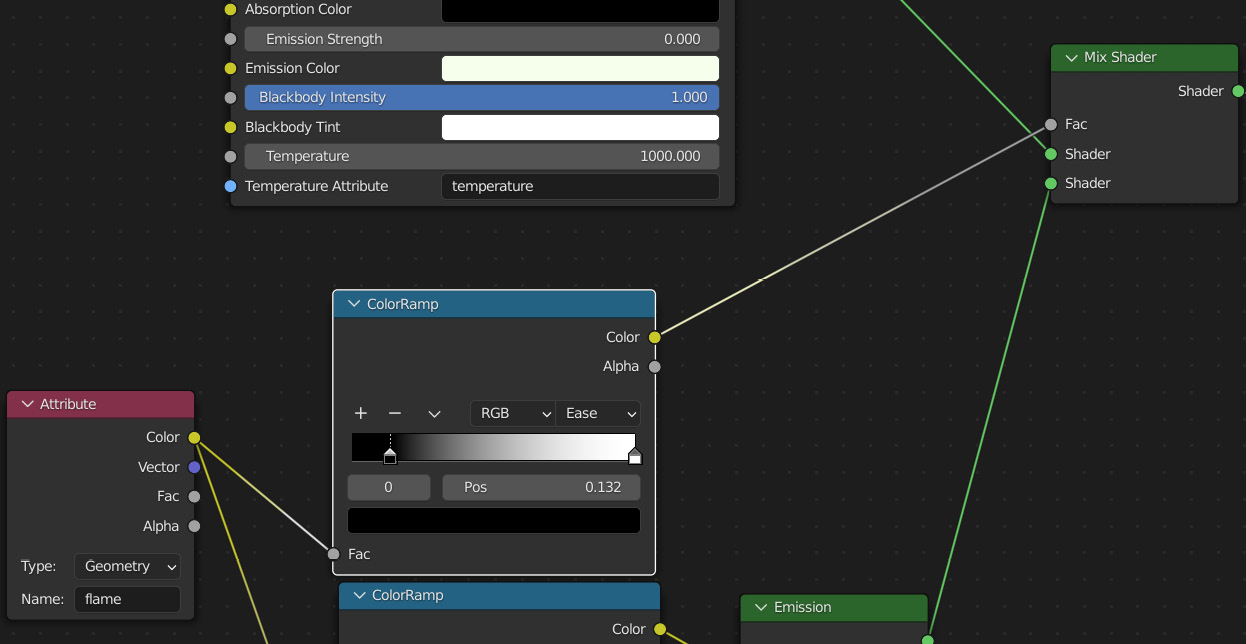
Figure 12.33: Changing the Volume Shader versus Emission Shader mix
After some careful tweaking, my fire shader looks something like this in Render mode:
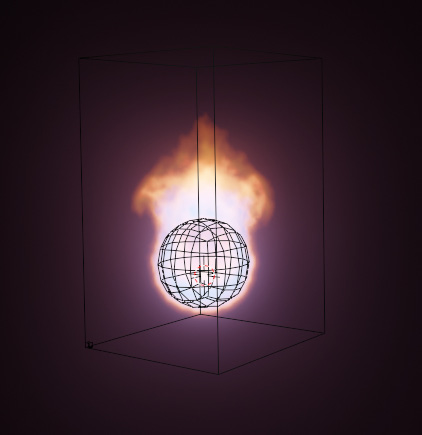
Figure 12.34: The fire shader
We're starting to get some more detail into the flame, but as you can see, it's still kind of blurry and amorphous compared to a real fire. We're going to do some work in the EEVEE rendering options to get a little closer to realism in the next section.
Optimal EEVEE render settings for the smoke and fire
Now that we have the overall settings and the shader done for the fire, we'll move into the EEVEE render settings to add more resolution to the fire. Let's get started:
- The most basic things to do are turn on Bloom and Screen Space Reflections. They should already be turned on in this scene, but it never hurts to make sure. Go to Render Properties to check and turn these on if needed.
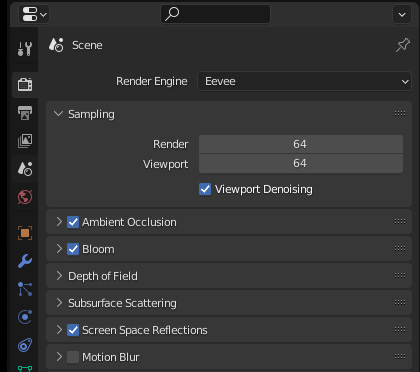
Figure 12.35: Turning on Bloom and Screen Space Reflections
- The most important properties for the fire simulation are the volumetrics. Scroll down the Render Properties settings and you should see Volumetrics as a twirl-down menu.
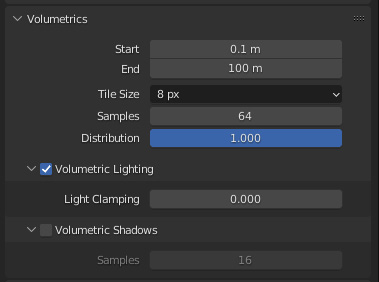
Figure 12.36: Volumetrics defaults
- Let's change Tile Size first. Tile Size denotes how many pixels each tile of the simulation has. Therefore a smaller Tile Size value equals a higher resolution. We should change our Tile Size option to 2 px for best results.
- Check Volumetric Shadows on so that our fire will cast a shadow on itself, which should add to the realism.
- I'm also going to change the Samples to 128, doubling it from 64. This increases the number of times the computer will sample the simulation. The greater the Samples value, the higher the resolution. Increasing the Samples value might cause your fire to disappear from view, but don't worry, we'll fix that in the next few steps.
- It's very important that you do this next step from Camera view. Press 0 on the numpad to toggle Camera view or go to View | Camera | Active Camera. This is important because we're about to change the Start and End point for the volumetrics. This is calculated from the view used, and considering we're going to want to see the fire from the camera, we want to be in Camera view to ensure we set the relevant values correctly.
- Change the Distribution value to 1. This tells Blender we want more samples closer to the camera, and therefore we get better resolution closer to the camera.
- Now, start lowering the End value. Keep lowering it until the flame starts to disappear, then go back up a little to get the whole flame in view with the smallest possible number. I found 24 m was a good value that keeps the flame intact without clipping. This End value dictates the area in which the Volumetrics settings will apply. By decreasing the End value, we're telling Blender to only sample the fire in the area we want, and therefore although we get a smaller range of sampling, the sampling is more compact. More compact means a higher resolution, which increases the quality of the fire render.
- Now change your Start value using the same principles that we applied to the End value. I found 7 m was good for my fire.

Figure 12.37: Final Volumetrics values
Figure 12.38 was what I ended up with. Try different settings depending on the strength of your computer and how you want the fire to look:
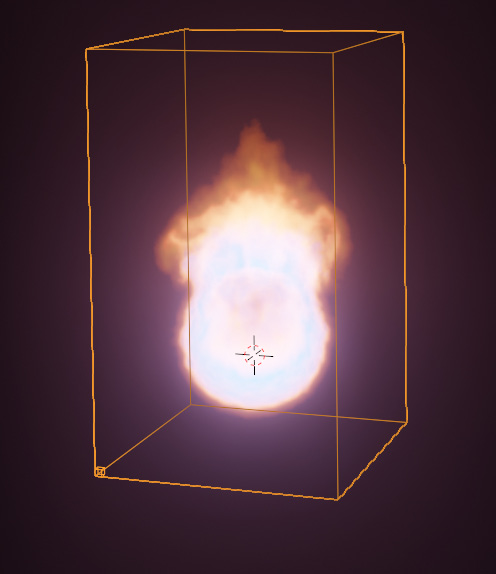
Figure 12.38: The fire
The last thing we're going to do in this section is rotate the fire so it simulates downward, instead of up, due to the fact that our thrusters are facing downwards. To do this, we need to grab the Domain and use F3 to open our menu, then select Free.all to reset our cache. Then, take the Domain and rotate it 180 degrees. This will take the simulation we just created and run it upside down. There are many other ways to make the fire simulate downward, such as using force fields, changing the Initial Velocity, and others. But they all require tweaking and can be difficult to control without a lot of work. So, we're taking a shortcut and just turning our fire simulation upside down, which tricks Blender into making the fire shoot downward instead of up. Feel free to look up other ways of doing this, but we will now move on, as more complicated fire simulations are outside the scope of this book.
As you can see, the fire we created is starting to become clearer with more detail. This fire still probably needs a higher resolution, so if you have the time, set the Domain Resolution to 128 or 256 and let the animation run for a while. It might take 10-15 minutes for the fire to be simulated, but after the simulation is cached, you'll have a much more detailed-looking fire that can be rendered in EEVEE.
Putting everything together, I have something that looks like this. As you can see, while the fire looks very cool, it also doesn't look like it's coming from inside the thruster, but rather is bleeding over the top of the thruster:
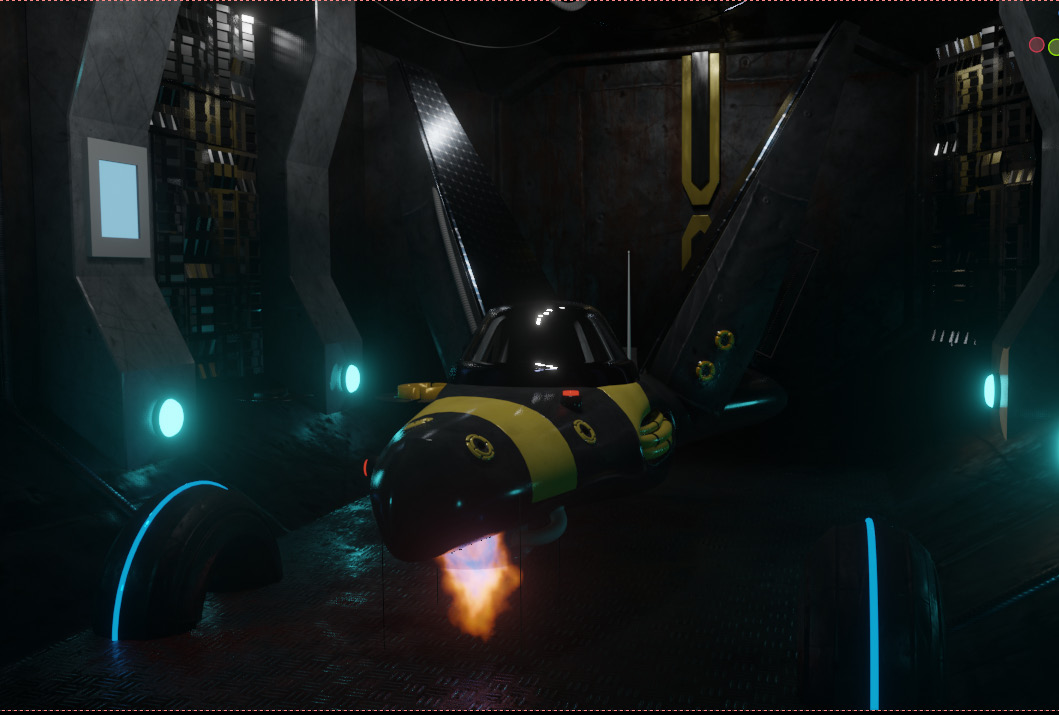
Figure 12.39: The render so far
It's okay, we don't need to spend more time tweaking the fire. Rather, we're going to use some rendering tricks to composite the fire into the scene.
How to combine renders in Cycles and EEVEE
In Chapter 4, Non-Physical Rendering, we went through a workflow to render different layers of a scene and then combine them later, with full creative control. Since we've already gone through that procedure, we're going to do something different here. I spoke a little bit in the introduction about how EEVEE can be used with Cycles, so in this chapter, we're going to render the fire we just created with Cycles, then composite it into a scene with EEVEE. Just know, it is still completely valid to separate the fire, spaceship, and hangar, render each of them in EEVEE, and then composite them together exactly as we did in Chapter 4, Non-Physical Rendering. But it's also worth learning how you can utilize Cycles while still letting EEVEE do all the heavy lifting. Let's start by rendering the fire:
- First, we'll do something we haven't done in this entire book: switch to Cycles. This option is in Render Properties, at the very top of the available options.
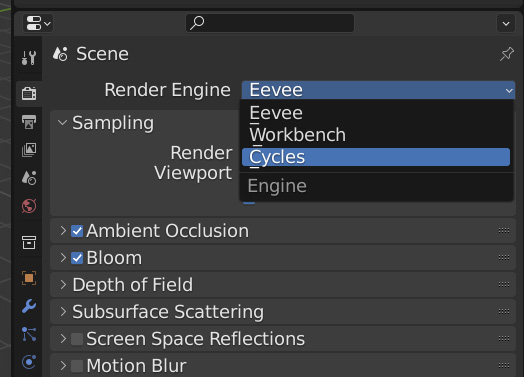
Figure 12.40: Changing to Cycles
Our viewport is immediately different. But, the fire is now contained inside the Thruster object, which is an improvement!
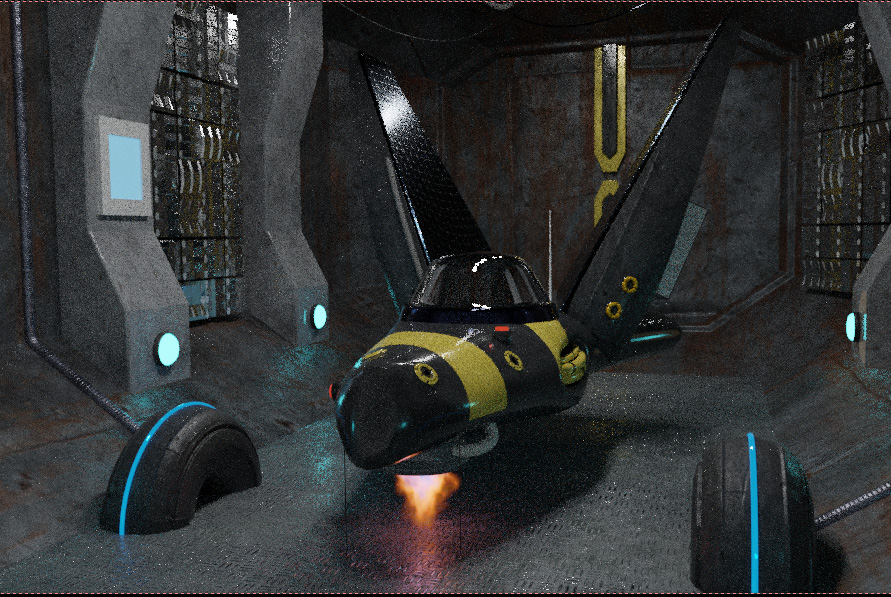
Figure 12.41: The viewport in Cycles
- In the top right of the Blender window are the Scene and View Layer options. I renamed my ViewLayer to Cycles by double-clicking on it to edit.
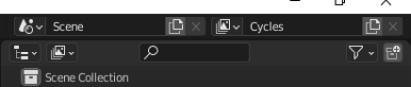
Figure 12.42: The Scene and ViewLayer options
- Now we're going to exclude everything from the ViewLayer except the Fire, SpaceShip, and Lighting collections. We do that by unchecking the checkbox next to each collection:

Figure 12.43: Deactivating the collections we don't need for the render
The viewport should look something like this now:
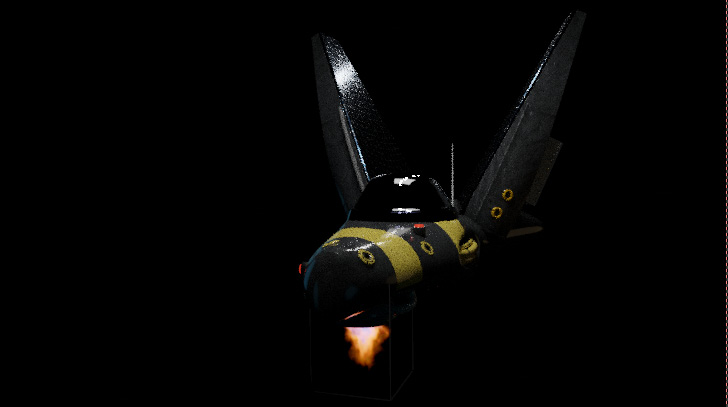
Figure 12.44: The viewport with only three collections activated
- We need to do something special to the spaceship now since if we just unchecked it, we'd be able to see the entirety of the fire, rather than just the part coming out of the thruster as we want. We want to set the spaceship as a holdout, meaning that it still blocks other objects behind it, but these blocked objects will render transparently. If we click the Restriction Toggles filter in the top right of the Outliner, we can activate the ability to set the SpaceShip object as a holdout.
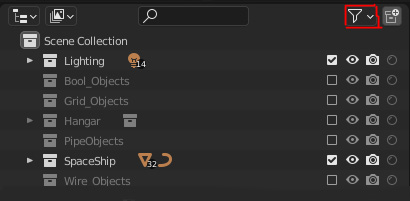
Figure 12.45: The Restriction Toggles filter
- Once we click the Restriction Toggles filter, a menu should open. Click the button that looks like a square with a circle cut out of it, shown in Figure 12.46:
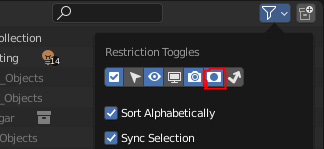
Figure 12.46: The Restriction Toggles menu
- You'll notice that this creates a new column in the options for each collection, a little circle. Click on the bubble that corresponds to the SpaceShip object:
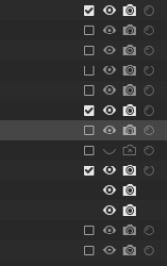
Figure 12.47: The added column for holdout toggles
You'll notice that the spaceship is no longer visible, but is also still blocking out parts of the fire.
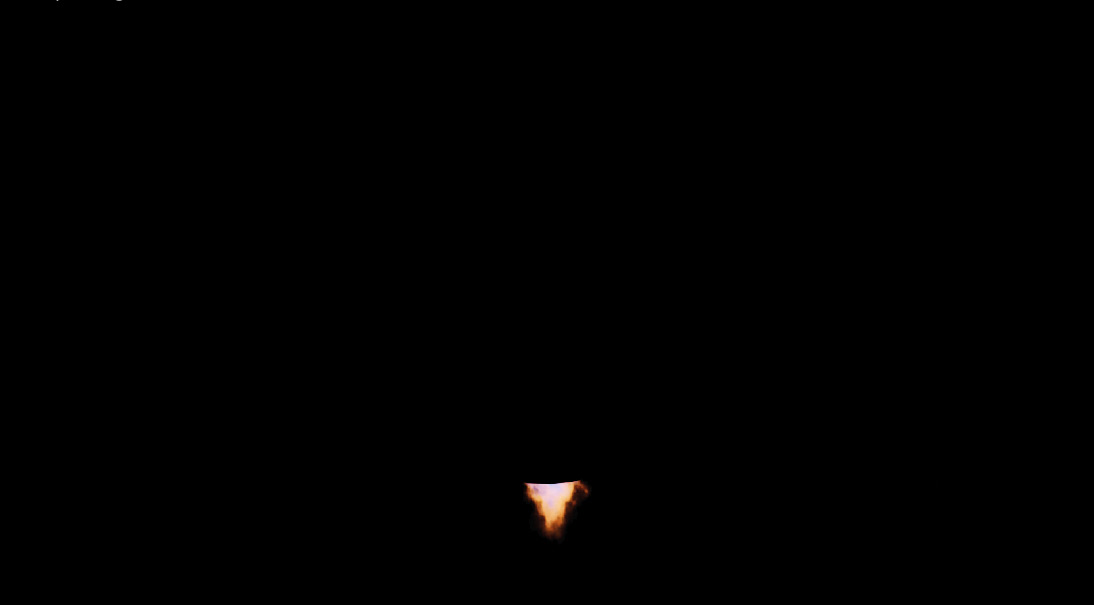
Figure 12.48: The flame is partially obscured by the thruster
- The last thing to do is go back to the Render menu and make the background transparent. This option is under the Film twirl-down menu in the Render Properties. Check the box next to Transparent.
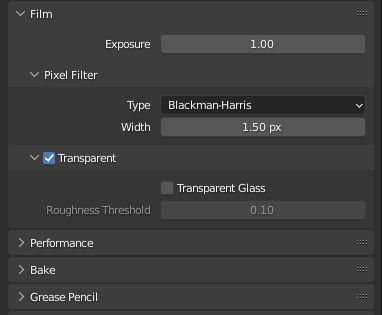
Figure 12.49: Turning transparency on
- Our scene is now ready to render in Cycles, so hit F12 or the Render button in the Render Properties panel. Once the render is done, go to the Image menu in the top left of the Render window and choose Save As.
You can save this image in OpenEXR Multilayer format. This is the best format for most compositing in Blender.
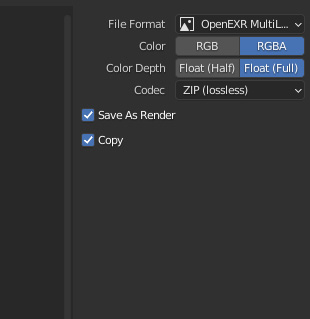
Figure 12.50: Saving the image in OpenEXR MultiLayer format
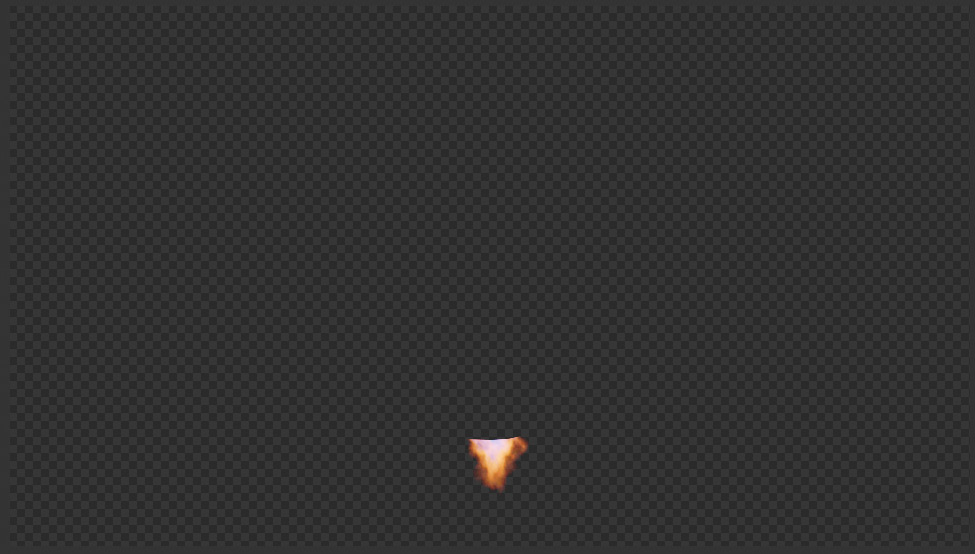
Figure 12.51: Fire render in Cycles
Now that we've successfully rendered the fire in Cycles, let's move back to EEVEE, render our other layer, and then composite it all together. I'll be doing this in a little less detail than I did in Chapter 4, Non-Physical Rendering, so check out that chapter again if you need a more granular explanation of this process. We now have the fire rendered and it's time to switch back to our preferred rendering engine, EEVEE:
- Switch back to EEVEE!
- Re-activate all the layers in the scene that we turned off to isolate the fire.
- I don't really like how little light the fire is casting on the ground, but if we turn up the Emission Strength in the fire shader, we'll just wash out the color of the fire. As a solution, I'm going to add a Point light right under the thruster, change its color to something orangey, and increase its Power to 100 W.
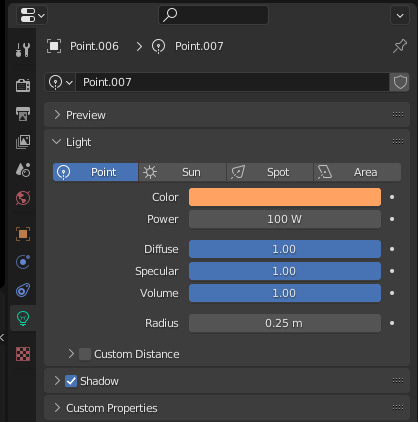
Figure 12.52: Values for the Point light
- Then copy it and put another Point light closer to the back of the spaceship to show that there's another Thruster back there; we just can't see it because of the camera angle. This is a little bit of artistic license on my part, so take it with a pinch of salt.
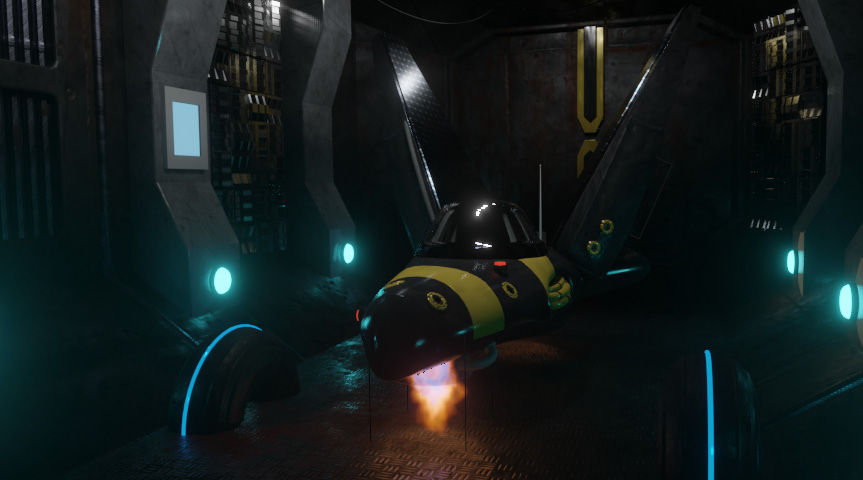
Figure 12.53: The Render in EEVEE with Point lights
- Now let's bake our lighting again in the Render panel, as we learned in Chapter 10, Working with Irradiance Volumes and Cubemaps for More Accurate Rendering, to make sure our lighting is up to date.
- Deactivate the Fire collection in the ViewLayer.
- Render again, this time with EEVEE.
- Once the render is done, switch to the Compositing workspace.
- Activate the Use Nodes checkbox in the menu bar.

Figure 12.54: The Use Nodes checkbox
- Also make sure to check the Backdrop checkbox in the Node menu. If you can't see the Node menu, open it using the N keyboard shortcut, and it's in the View submenu section.
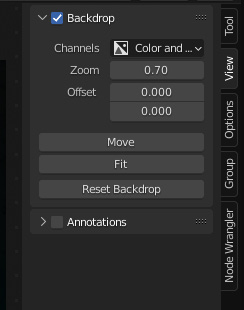
Figure 12.55: Backdrop checkbox
Our node tree is simple at the moment, and luckily we just need to add two nodes to incorporate the fire render from Cycles.
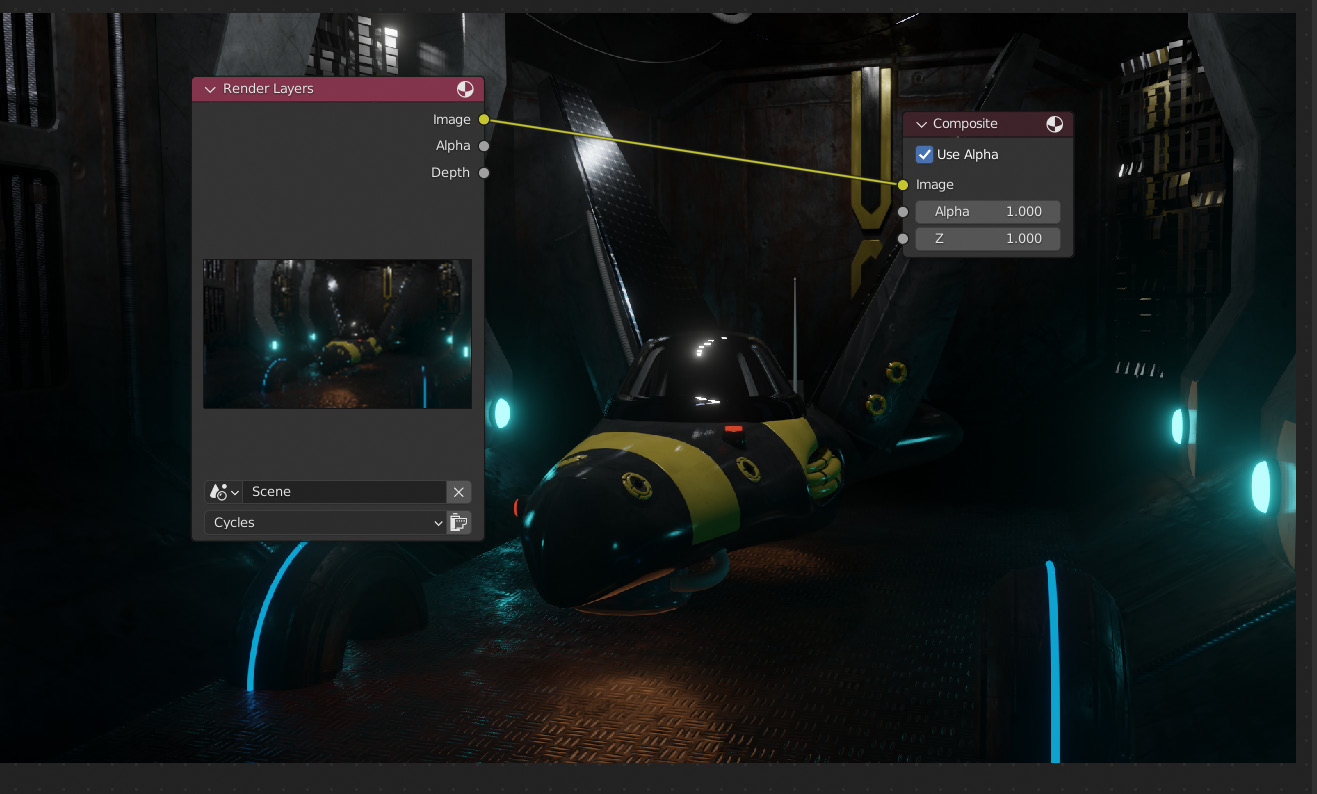
Figure 12.56: Compositing the backdrop
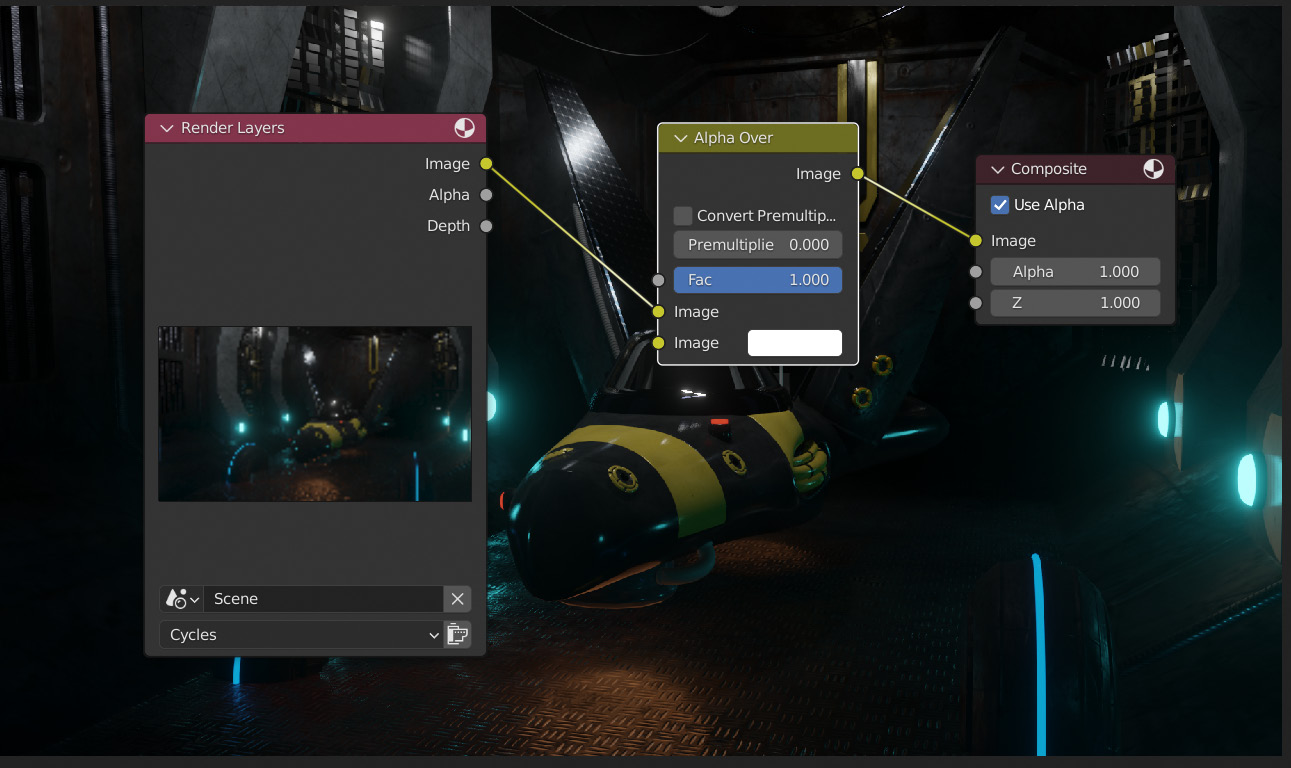
Figure 12.57: Alpha Over node added
- And then import the Fire.exr we made in Cycles. You can just drag and drop the image from a folder into the Blender window. Take the Combined output and hook it up to the bottom Alpha Over input.
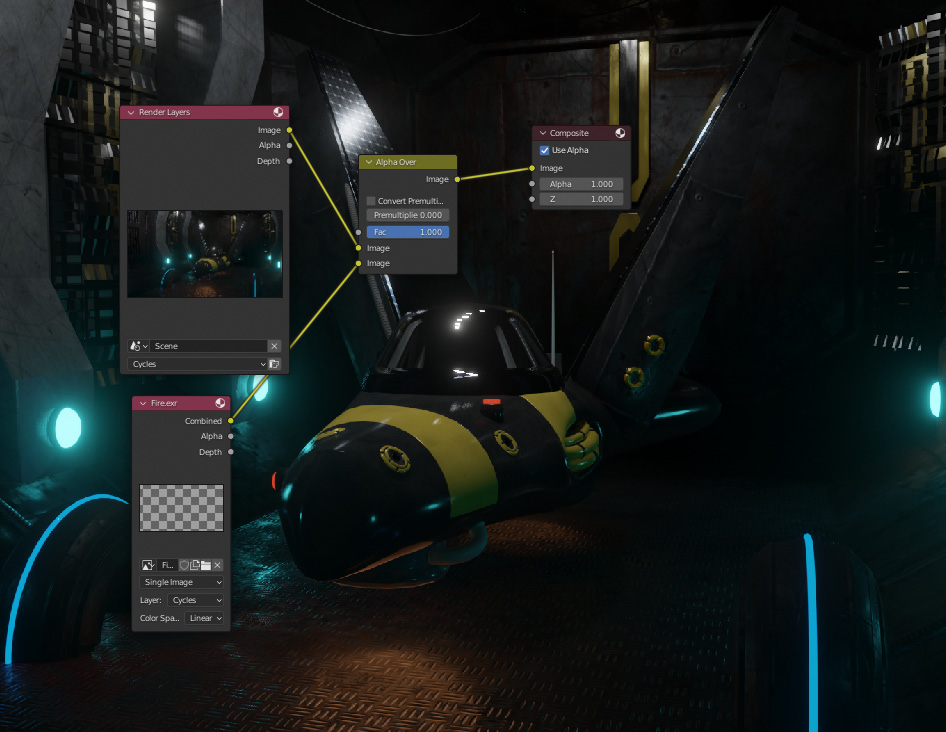
Figure 12.58: Adding the Fire render from Cycles
- Hold down Control + Shift and click on the Alpha Over node. A Viewer node is now enabled and we can see how the final product looks.
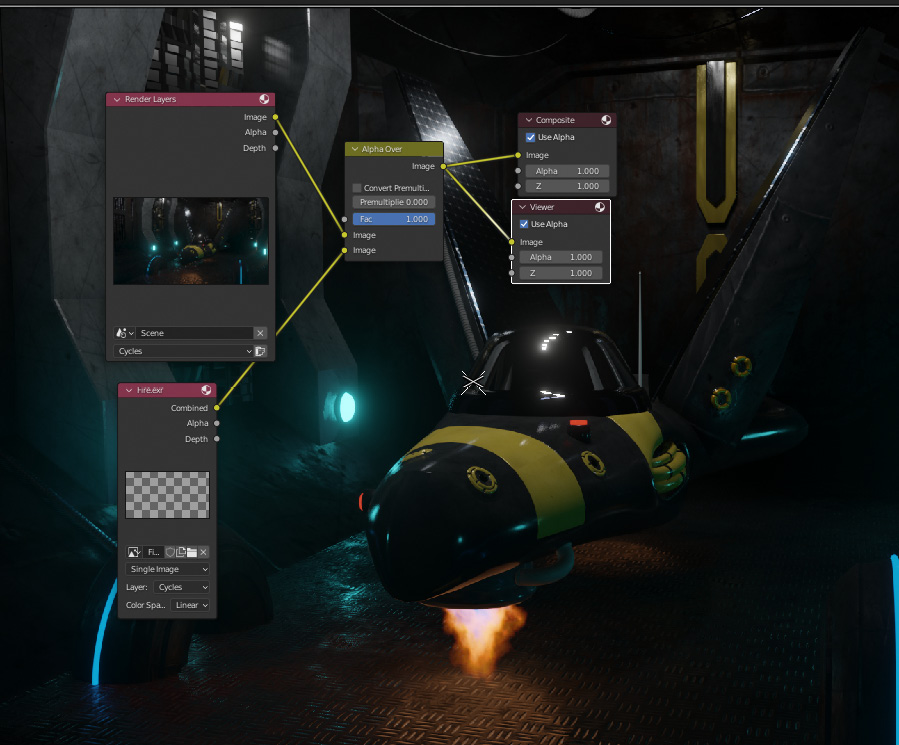
Figure 12.59: The viewport with added flame
- Now we just render again using F12 and we have a final product we can save in our preferred file format.
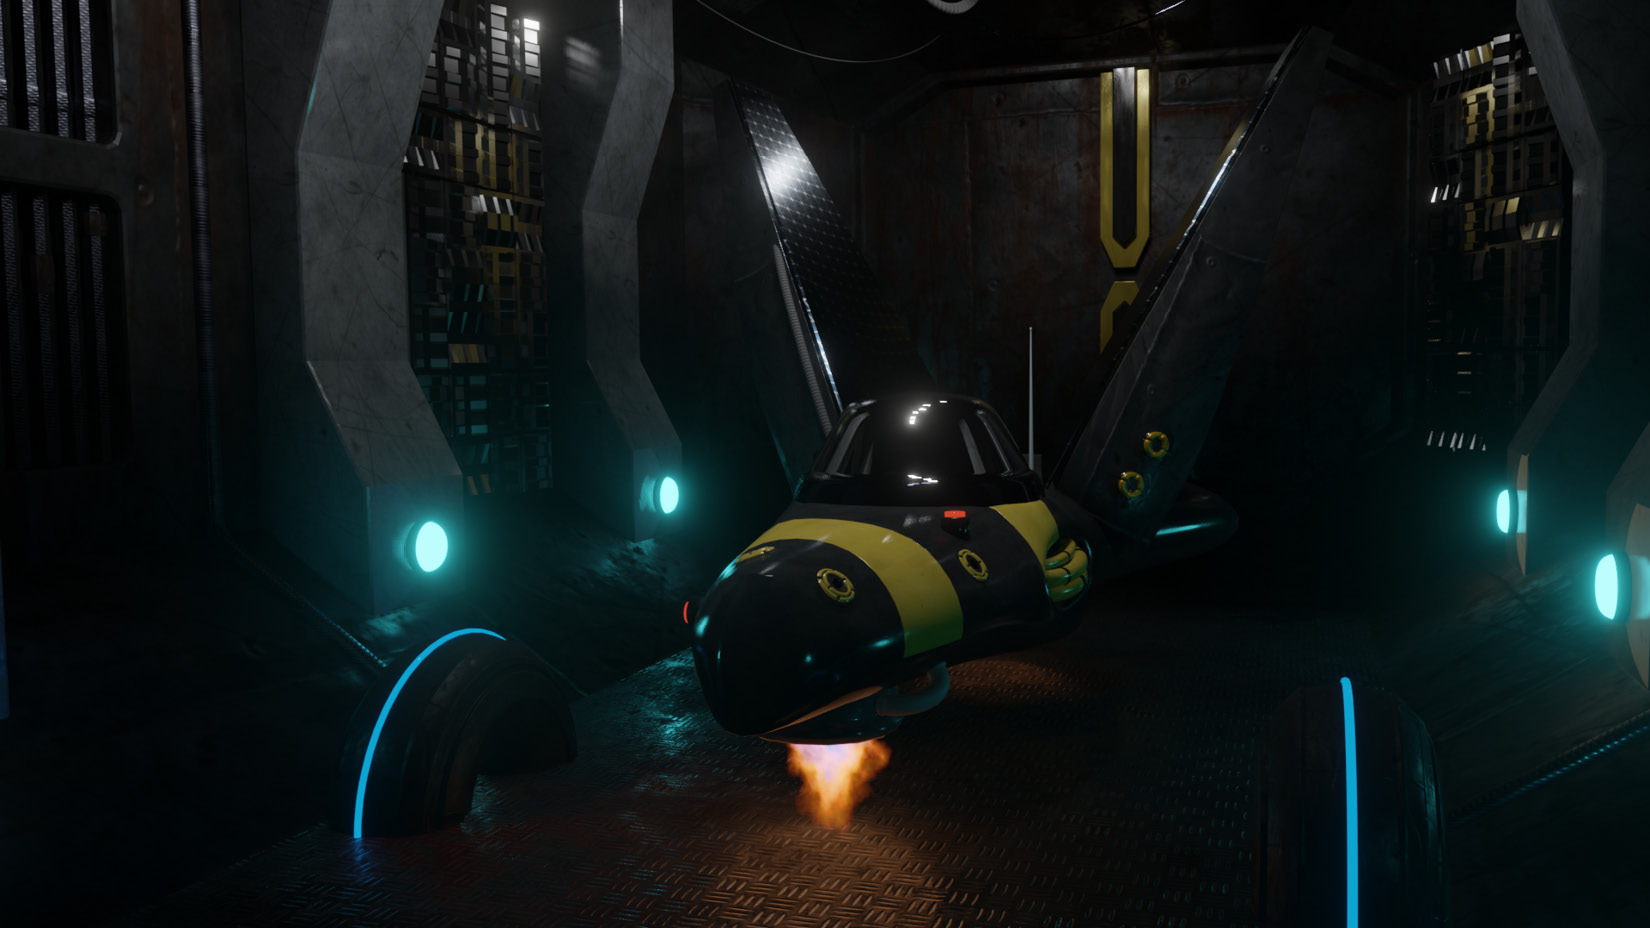
Figure 12.60: Final product
Hopefully you have enjoyed incorporating Cycles into our workflow – I really like the versatility that using both render engines together can bring. There are a myriad of ways you could use Cycles and EEVEE together, not just when rendering special effects, so go out and try a few.
That is the end of this mini-project. I hope that you got a chance to exercise your creativity in this sci-fi scene and made it your own.
Summary
We have officially come to the end of this last mini-project! Thanks for sticking with it to the end, I think it's worth it with the outcome we have. In this chapter, we talked about how to create a fairly realistic fire simulation inside EEVEE, and then how to incorporate Cycles into our EEVEE workflow. It is really important to remain flexible when creating your scenes, so don't discount using both Cycles and EEVEE when the need arises. I hope you really enjoyed all three of the projects we worked on and I hope you feel more confident about your Blender abilities and now have the skills to create the things you can imagine. The next chapter is a conclusion of sorts, where I'll talk about the next steps you could take in your Blender career. I'll cover learning materials, other software you should learn, and further projects that you can work on.