Chapter 10: Working with Irradiance Volumes and Cubemaps for More Accurate Rendering
Now that we've started a scene and we have the lighting set up, you may have noticed some lighting-related irregularities in the scene. Or you may not have. Honestly, EEVEE straight out of the box does a great job with approximating the lighting we're using and should already give us a great result. But sometimes it makes sense to push the boundaries of realism and we need something to look just that much more real. We have already seen this in action when we used the reflection probe in Chapter 6, Screen Space Reflections – Adding Reflection to the Water. We used a Light probe to tell EEVEE that we wanted to spend more time and energy processing the reflection on our lake because it was important to the scene. In the scene we will work on this chapter, we don't have a lake that we want to be rendered with greater accuracy, but we do have an interior scene. An interior scene, in a traditional render engine, will have the light that is bouncing off the objects, interior walls, and other obstacles, which can create more noise in a ray-tracing render engine like Cycles. In a real-time rendering engine like EEVEE, we have to add back some of the subtle bounced lighting that would happen in an interior scene with an Irradiance Volume probe.
An Irradiance Volume is a tool that we can use to integrate indirect lighting into a scene and therefore create a more realistic render, sacrificing some of the speed that EEVEE affords us. In this chapter, we will use an Irradiance Volume probe to calculate some of the bounced (indirect) lighting for the spaceship hangar and then go through some of the overall functionality and tweaking that can be done to get a better result. The other light probe that we will talk about in this chapter, but to a lesser degree, is the Reflection Cubemap. The Reflection Cubemap will result in a similar output as Screen Space Reflections, but it will only be localized to the area that the Reflection Cubemap is placed. This can be used if you want reflectivity in an area, but not in the entire scene. The processing gain (how easily the computer can calculate our scene) on using a Reflection Cubemap over using Screen Space Reflections is negligible, so there's not a lot of reasons to use the Cubemap over screen space functionality for most situations. But I'm sure at least once in your career you'll find a reason to use the Reflection Cubemap, so therefore we should go over it for that point in the future when you need it.
In this chapter, we will look at the following topics:
- Implementing an Irradiance Volume
- Implementing a Reflection Cubemap
Technical requirements
Download Chapter 10-Start.blend to start working on this chapter, or carry on from your own file we worked on in Chapter 9, Lighting an Interior Scene. This chapter will only use features native to Blender, so doesn't require any outside files or add ons.
Download the Chapter 10-Start.blend file from here: https://github.com/PacktPublishing/Shading-Lighting-and-Rendering-with-Blender-s-EEVEE-/tree/main/Chapter10.
Implementing an Irradiance Volume
In this section, we're going to implement an Irradiance Volume probe, which allows us to more accurately calculate the bounced lighting within our hangar. When EEVEE rasterizes lighting, it approximates the overall lighting. When we use an Irradiance Volume probe, we're telling EEVEE to calculate the light that bounces from different surfaces and create more accurate occlusion. This gets us a better result. As you can imagine, an Irradiance Volume probe is better utilized in an indoor situation where light is more likely to be bounced between objects and kept inside of a room. Let's get started and add an Irradiance Volume probe to the scene and then tune our results:
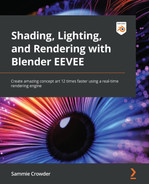
- To add an Irradiance Volume probe to the Scene, use Shift + A to navigate to the Light Probe section and select Irradiance Volume.
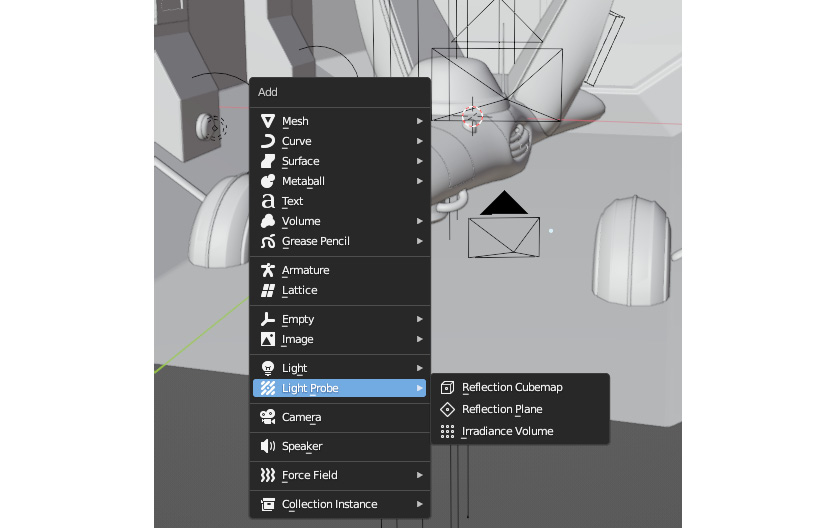
Figure 10.1: Adding an Irradiance Volume probe

Figure 10.2: Sizing up the Irradiance Volume
- With the Irradiance Volume probe still selected, navigate to the Probe setting in the right-hand side Properties menu:
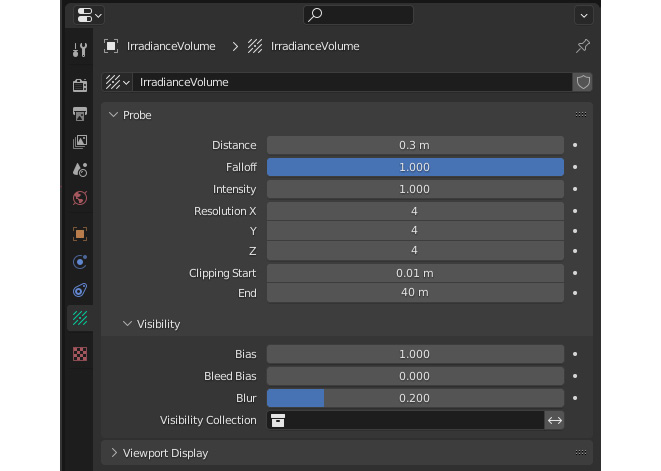
Figure 10.3: Irradiance Volume Probe options
- The most important property is Resolution. The Resolution number is the number of probes that are added to the volume. More probes mean more accurate lighting, but a slower bake time. Resolution is shown visually as the number of points. Try changing Resolution to 5 and see how it adds more points to the volume. Each represents one probe point from the Irradiance Volume probe.

Figure 10.4: Resolution parameters
- Distance is the influence distance of the probe. The outer box (the larger box in Figure 10.5) is the end of the decay distance of the effect. The inner box (the smaller box in Figure 10.5) is the start of the decay zone. Anything inside of the inner box (where the probe points are) is 100% affected by the probe. The area outside the inner box, but inside the outer box lessens in effect in accordance with the Falloff value, reaching zero at the lower limits of the outer box.

Figure 10.5: Difference between the inner and outer box
- Changing the Falloff value changes how fast the effect decays from 100% to 0. This is visualized by the distance between the inner box and the outer box.

Figure 10.6: Distance and Falloff values
- The Clipping values can be used to change the distance at which the effect of the volume is clipped. You can use these to limit the lights that are being calculated in the Irradiance Volume probe, say if you had a light you wanted to exclude from the volume.

Figure 10.7: Clipping parameters
Feel free to try different things and learn what each value affects for yourself. The values in Figure 10.3 are the ones I've used. Once we've tweaked all the settings for the Irradiance Volume, we need to go to the Render properties.
- The first thing we're going to do in the Render properties is to make sure the Ambient Occlusion option in the scene is turned on, and that Bent Normals is activated. This makes sure that the lighting is sampled from the direction that has the fewest obstacles, ensuring that the lighting will appear more realistic.

Figure 10.8: Activating Ambient Occlusion
- Then scroll down to the Indirect Lighting section. Make sure you have saved recently, as there is a chance of Blender crashing, and then click the Bake Indirect Lighting button. This should take a couple of minutes, depending on how good your computer is. While baking it might seem like Blender is not responding, but give it some time to work through the bake.

Figure 10.9: Render properties Indirect Lighting section
If you find your results less than satisfying, troubleshooting Indirect Lighting is fairly straightforward:
- Firstly, probe points should be put in areas with geometry present. Try not to put the probe resolution points in empty areas, as you are then using processing power for spaces that don't need processing.
- Use multiple Irradiance Volume probes. Small probes will always be calculated first, so if you have problem areas, or areas that have many models and lights, try putting a smaller, high-resolution cube in the problem area for better-baked lighting.
- Another option to try is changing Cubemap Size in the Indirect Lighting section. Changing it to 1024 or 2048 should increase the resolution of the baked lighting. Also, remember this will increase the baking time.
- It can also help to increase Diffuse Bounces to 5 or 6 to get more accurate light bouncing.
Baking the indirect lighting means that we're calculating the light only once – when we choose to bake. Every time we move in the viewport, EEVEE usually has to recalculate the lighting. Baking means that we decide when to calculate indirect lighting and we only have to wait for it to compute once. Then the lighting is cached and EEVEE doesn't need to spend resources on recalculating it. If we do happen to make changes to the lighting or layout of the scene, we will need to re-bake the lighting, so it is advisable to only bake the lighting when you're close to completing the scene. Look at the scene before adding the Irradiance Volume:
Figure 10.10: Before the Irradiance Volume
And this is the scene after adding the Irradiance Volume probe:

Figure 10.11: After the Irradiance Volume
You'll notice the differences are subtle, but very obvious if you look closely. The area under the spaceship is now more illuminated as light is bouncing from the underside of the ship to the floor. We can now see the thruster and pipe underneath. It's subtle but could make all the difference in adding realism to the render.

Figure 10.12: Close up of the Irradiance Volume before and after
As you can see, the underside of the ship is much more visible in the after (right-side) photo.

Figure 10.13: Close up of the Irradiance Volume before and after
Figure 10.12 and Figure 10.13 both illustrate the differences before and after the Irradiance Volume has been baked.
Now that we have the indirect lighting baked using an Irradiance Volume, we can move on to the third type of light probe, which we haven't used yet – the Reflection Cubemap.
Implementing a Reflection Cubemap
We've talked through the two most important light probes that are included with EEVEE. The third is the Reflection Cubemap probe. Reflection Cubemap probes create general reflectivity in the area that the Reflection Cubemap occupies. This Reflection Cubemap probe cannot be used by itself; it can only be used in conjunction with Screen Space Reflections (in the EEVEE Render properties panel). It also functions similarly to the Irradiance Volume probe, in that the reflections must be baked in order to take effect. This means that reflections need to be calculated once, and then they are cached and don't need to be baked again unless the scene changes. A Reflection Cubemap is different from a Reflection Plane, in that a Reflection Plane only provides reflections for a flat surface or localized plane, with reflections only being created on one axis. The Reflection Cubemap can provide reflections for an entire area. You might be asking though, why should I use a Reflection Cubemap probe instead of just Screen Space Reflections? There is one situation where you might use a Reflection Cubemap instead of just Screen Space Reflections. Screen Space Reflections only provide reflections that are oriented to the camera. So if a reflection is reflecting something that is not in view of the camera but still would be reflected on something that is not oriented to the camera, we can get reflections from the orientation of the Reflection Cubemap probe, as well as the orientation of the camera. The following figure illustrates this concept. Notice how we can't see most of the interior red walls of the green cube until the reflection map is baked, even though Screen Space Reflections is enabled:
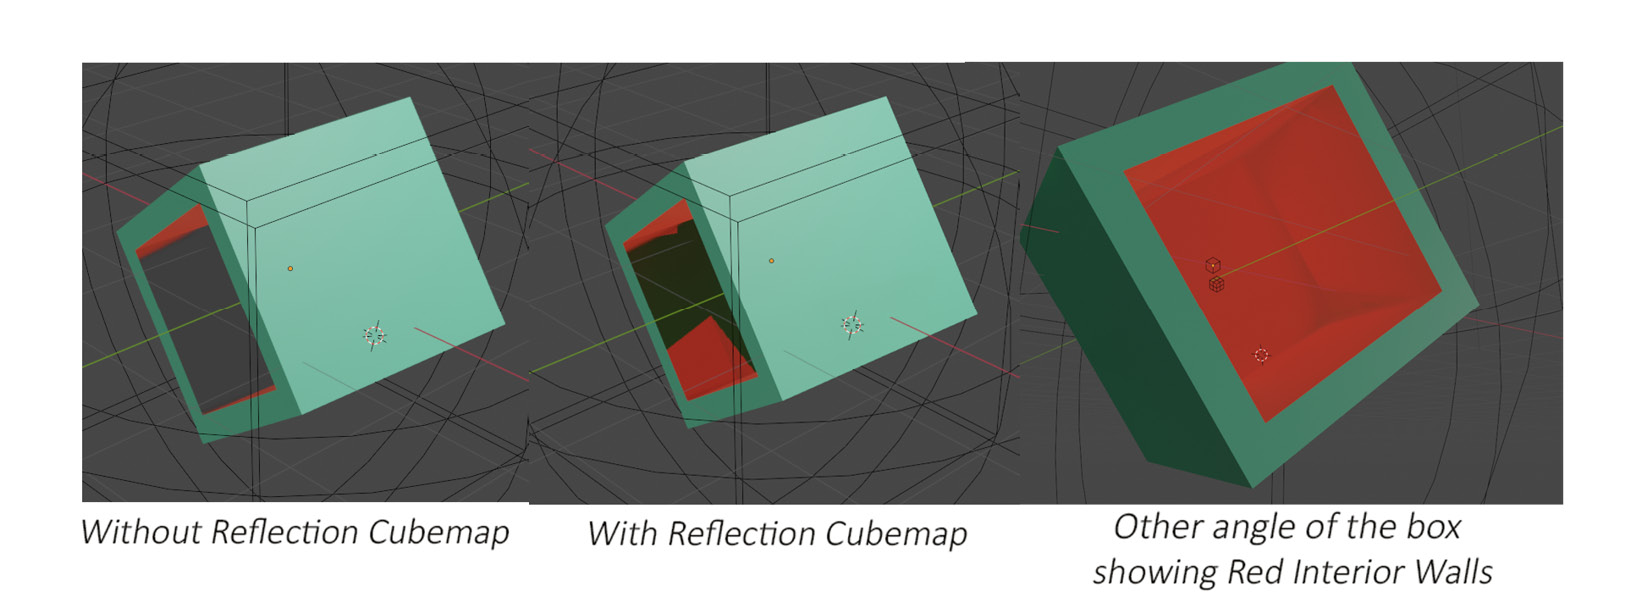
Figure 10.14: Reflection Cubemap demonstration
Now that we've explored why we might use a Reflection Cubemap, let's add one to our scene. Reflection Cubemaps are designed to be used with Irradiance Volumes, so let's add the Reflection Cubemap to the area that the Irradiance Volume covers. We'll also add it to an area that might need more reflective fidelity. Let's get started with the Reflection Cubemap:
- Add a Reflection Cubemap to the scene using Shift + A and then navigate to Light Probe and select the Reflection Cubemap option.

Figure 10.15: Adding a Reflection Cubemap
- Use the G shortcut to move the Reflection Cubemap around the spaceship, so we'll get reflections from that area.

Figure 10.16: Sizing up the Reflection Cubemap
- If we make sure the Reflection Cubemap is still selected and then open the Light Probe properties in the right-side menu, we can change some of the parameters of the Reflection Cubemap:

Figure 10.17: Reflection Cubemap parameters
- Radius dictates the size of the affected area. The larger the size, the more reflections will be baked, but the longer the bake is going to take.
- Falloff here is the same as Falloff for the Irradiance Volume. It indicates the size of the area that the effect decays from 100% to 0.
- Clipping can be used to limit what objects are being reflected by the probe.
- Visibility Collection can also be used to limit what objects are being reflected by the probe.
- It's really important to try different settings on each subject we go through, to see how different aspects change the result. I used the values in Figure 10.14.
- Once we've tweaked the settings we need to tweak, we can then go to the Render settings. Go to the Indirect Lighting section. Since we've already baked our Irradiance Volume, we can select the Bake Cubemap Only option. If you had not already baked the Irradiance Volume, you could bake both light probes at the same time by selecting the Bake Indirect Lighting option.

Figure 10.18: Indirection Lighting parameters after baking
And we'll take a look at the results!
We have the before Reflection Cubemap scene:
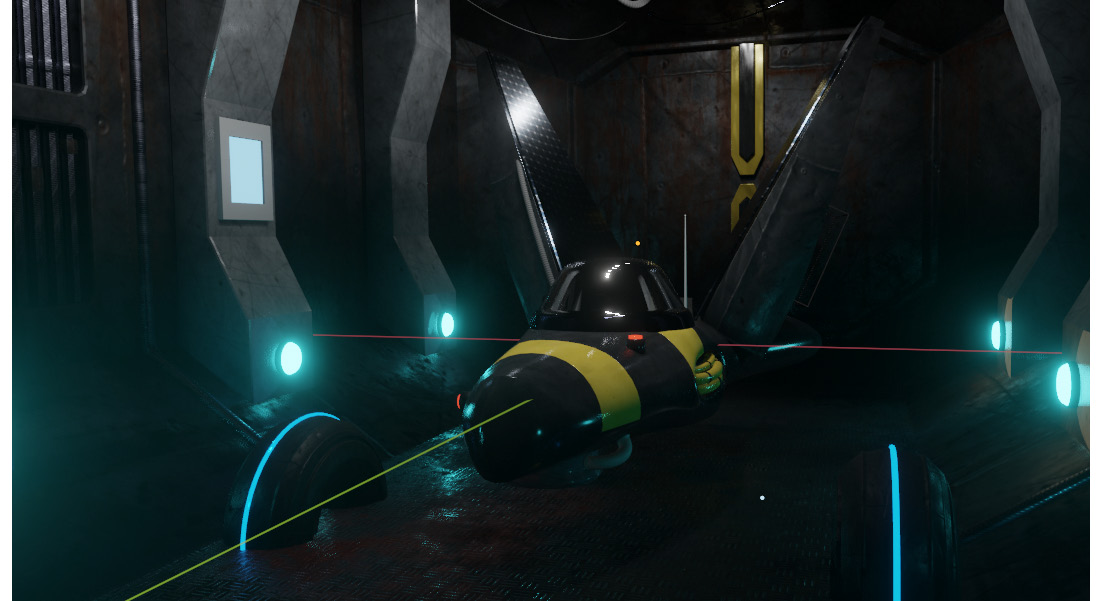
Figure 10.19: Before baking the Cubemap
And then the after scene (see Figure 10.19):

Figure 10.20: After baking the Reflection Cubemap
If we zoom in even further on the spaceship reflections, notice how in Figure 10.21, the before (left) picture's reflections on the nose and thruster are not even visible, whereas in the after (right) picture, the reflections of the blue lights on the spaceship are very sleek and realistic.
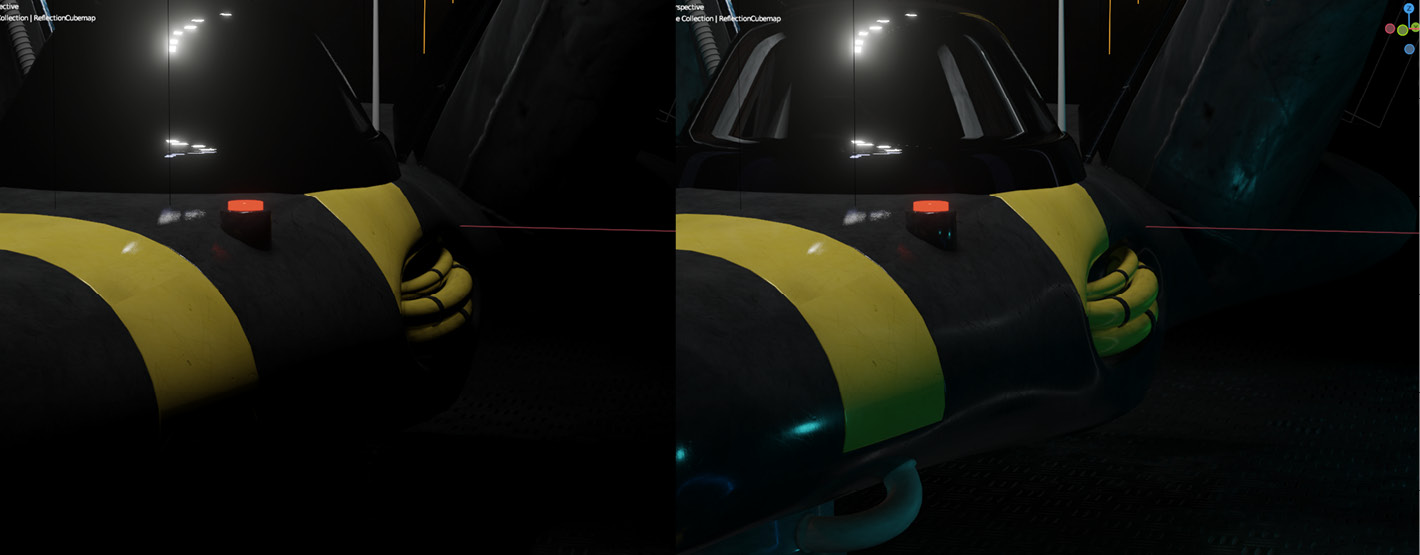
Figure 10.21: After baking the Reflection Cubemap
Once the Reflection Cubemap is baked, you could also select the Delete Lighting Cache option to get rid of the previous bake and start again. You can also view the size of the cache in MiBs. If your reflection results are less than satisfactory, try increasing the Cubemap size in the Indirect Lighting section of the Render panel, or increasing Diffuse Bounces. The gains will be subtle but may be very useful as you progress in your Blender career.

Figure 10.22: Indirect Lighting options
Now that we know how to use all the different types of probes, you should have a good grasp of how lighting works in EEVEE and how we can use different techniques to fake different types of ray tracing effects. Have fun trying different combinations of these effects to hone your ability to diagnose and fix problems with lighting in EEVEE.
Summary
In this chapter, we worked through using two different types of probes. First, we talked about Irradiance Volumes to increase the accuracy of the bounced light in the scene. Then, we discovered how Reflection Cubemaps can be used to reflect aspects of a scene that can be overlooked by Screen Space Reflections.
The number one problem that I see with a lot of renders in EEVEE is problems with lighting and reflectivity. It can be really hard to dial those in to make people think they're looking at a real image. Light probes are there to help you create something fast and flexible without sacrificing style and realism. It is important to use light probes sparingly, as they can increase the computing time and increase the size of the file. Knowing when to use a light probe is something that will come with practice and experience, but being able to implement them can be the difference between a mediocre render and a great render. I would recommend that any scene with reflections or that relies on indirect lighting should use an Irradiance Volume or a Reflection Plane, as long as you need realistic lighting. It can be completely impossible to capture realism without one of the three kinds of light probes to facilitate the right light bounces.
After this chapter and Chapter 6, Screen Space Reflections – Adding Reflection to the Water, hopefully you feel comfortable using light probes in a number of situations, and know when to use a probe and when they're not applicable. I would recommend trying out the three different types of probes in a new .blend file, trying different configurations, and then baking each to see how different lighting or parameters affect the end result.
At this point, we have a really well-lit scene with baked lighting and reflectivity that has been meticulously planned and executed. Now, you could call the scene done, but I want to take it up a notch. We're going to spend the next chapter adding more detail to the hangar and spaceship. You may realize that I tend to emphasize details a lot. Details are a really important part of creating something that seems real. Having multiple methods of adding detail quickly and flexibly is just one aspect of creating concepts that really resonate with the viewer.
In this next chapter, we're going to cover a technique called Kitbashing, which we will use with Geometry Nodes to add more detail to our scene. Don't worry if you've never heard of Kitbashing before – by the end of the next chapter, you'll be a professional.