Chapter 3: Lights, Camera...
From the last chapter, you should understand some of the very specific EEVEE material techniques that you can employ in your art and design. Practicing the creation of materials will only make your art better. But there's another topic that contributes to the look of your concept as much as, if not more than, materials, and that topic is lighting. Lights influence how we see things and how we understand their interaction with other objects; our materials aren't going to even be visible if we don't add lights to our scene.
In this chapter, we're going to walk through lighting an outdoor scene with EEVEE. Cycles has multiple additions to its rendering engine that make rendering things outside a lot easier, including Global Illumination and the Nishita Sky shader. But lighting a scene in EEVEE is possible too, especially if we use the render panel to add some effects and are smart about how we use the tools that we do have.
In this chapter, we will cover the following:
- Adding lighting to our mini-project
- Creating and configuring cameras
- Learning about the Line Art modifier
Technical requirements
In the last chapter, we left off at creating two materials, but we didn't delve into creating materials for every single piece of the mini-project. If we were to do that, this book would be thousands of pages long, and you wouldn't want to read it. So, from this point, there are two options: you can download Mini-Project-Chapter 3 from GitHub and start with a file that has materials I've created for you, so you can jump straight into lighting.
The other option is to take the file from the last chapter that you worked on and use it to practice creating materials using the methods we went over so that when you get to this point, you won't need to download the aforementioned file. Do whatever you're most comfortable with. Regardless of your choice, make sure to download the resources for this chapter as well, so you have access to the HDRI I'll be using: https://github.com/PacktPublishing/Shading-Lighting-and-Rendering-with-Blenders-EEVEE/tree/main/Chapter03.
Material Creation Resources
Obviously, there are hundreds of approaches to creating materials, and YouTube is a great resource to get tutorials from. One channel that I would recommend is CG Cookie; their small videos are great bite-sized pieces of really useful information. Do a YouTube search for topics that you may want to know more about to get more information about the truly expansive topic of material creation. For more information on material creation, check out: Top 6 Blender Nodes To Make Any Material in Blender https://www.youtube.com/watch?v=yffWd4kI51Q.
Adding lighting to our mini-project
Lighting is the cornerstone of any good render, and in this chapter, we're going to work through the process of adding lights, tuning them to suit our overall environment, and then making sure they work properly inside of EEVEE. I'll cover both the artistic and technical aspects of what we're doing. We'll add a world lighting system and a few simple lights and then consider some of the ways EEVEE can be used for better lighting, especially in the compositing stage.
World lighting system
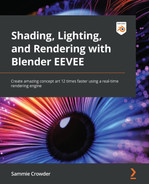
If you've been following along (or downloaded Mini-Project 1-Chapter 3), you should have something resembling what I have here, a scene with a lot of materials but not a lot of lighting:
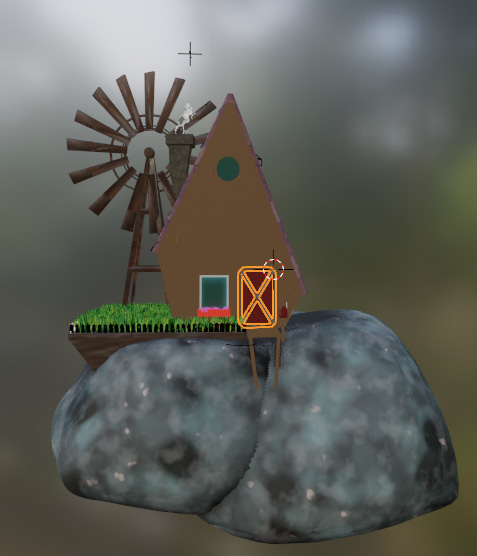
Figure 3.1: Scene with minimal lighting
Let's start to fix up our lighting by adding a world lighting system and tweaking it so we still get some good shadows inside the scene:
- The first step is to disable the previous changes we made to the viewport shading. Now that we are working on lighting, we want to be able to see that lighting in the viewport so that we can make changes in real time.
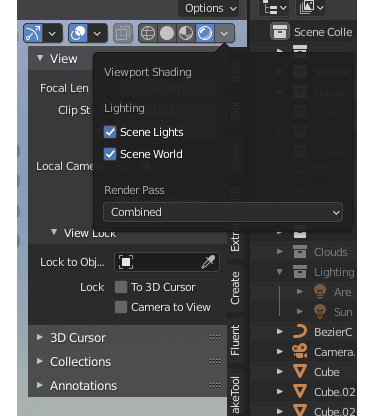
Figure 3.2: The Viewport Shading menu
- Now, we can create a world lighting system. Do that by navigating to the World tab on the right-hand toolbar.
Figure 3.3: The World tab in the properties menu
- Click the yellow dot to the right of the Color option. You should get a fly-out menu that will let you change the Color node directly in the toolbar.
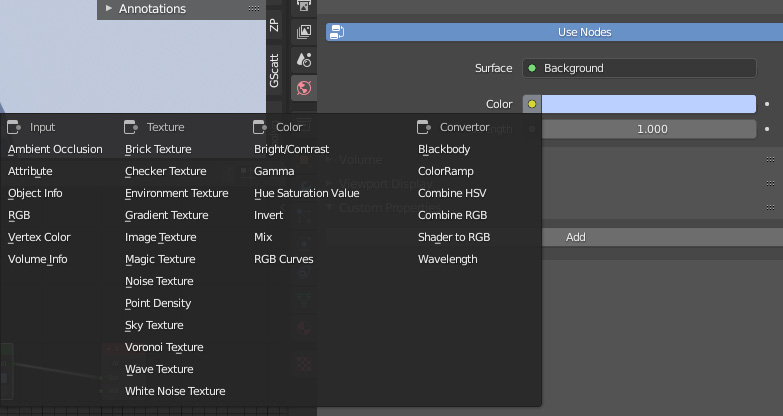
Figure 3.4: Adding an environment texture
- Select Environment Texture in the Texture column. Now the toolbar should give you the option to open an environment texture from your hard drive.
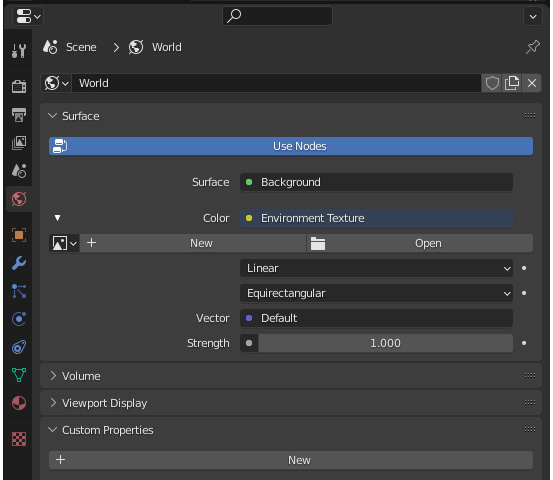
Figure 3.5: Adding an HDRI file
- Select the Open button and open where you've stored the HDRI; you could have downloaded it from GitHub, or use any other HDRI you like instead.
You should now be able to see the world lighting system we just added in the viewport.
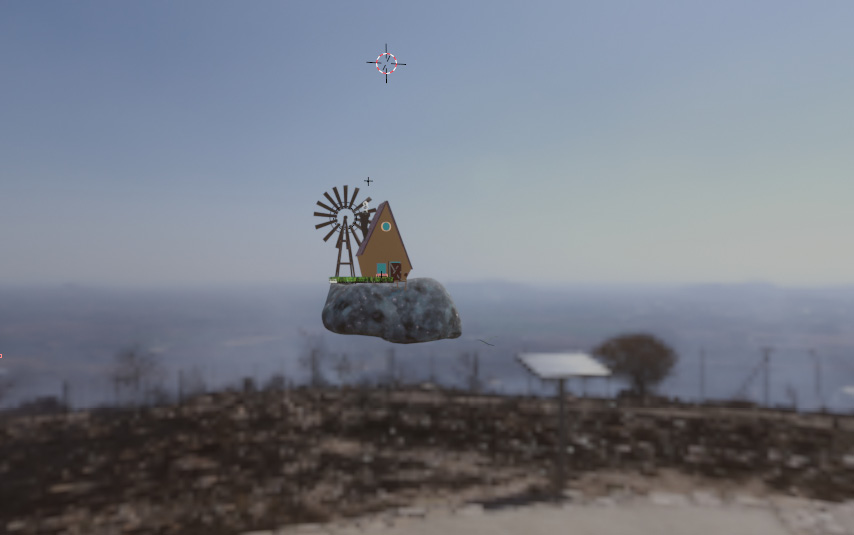
Figure 3.6: The viewport after adding the environment texture
Cool! But if you look at the render viewport, you might notice something is wrong with the lighting we just added... There aren't any shadows! In the next section, we'll figure out how to manipulate our HDRI so it gives us a background but allows us to substitute other aspects for the shadow-casting light.
Changing to the world shader editor
In order to better manipulate our environment texture, let's flip over to the world shader material space:
- Go to the Shader Editor pane we set up for editing materials. Or, select the change editor button at the top left of any individual pane and select Shader Editor.
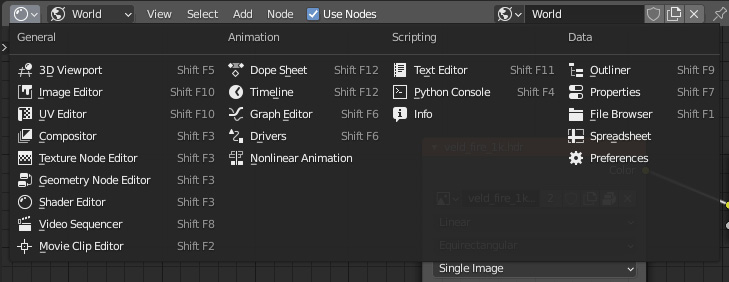
Figure 3.7: Opening the Shader Editor pane
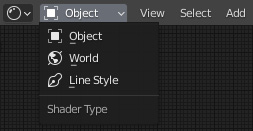
Figure 3.8: Shader Type selection options
- We can see the HDRI we just added as a node graph.
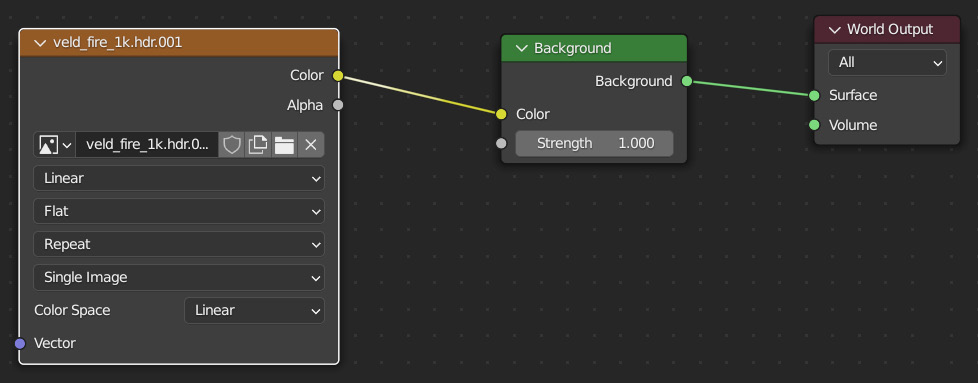
Figure 3.9: The HDRI in the node editor
Changing the HDRI to fit our scene
Now that we have the node graph open, we can start to change what is happening in the scene:
- Select the environment texture and use the node wrangler shortcut we previously went over, Ctrl + T, to add a Texture Coordinate and Mapping node. Tweaking the Z rotation value will spin the HDRI so you can decide what is going to be in the background of your scene.
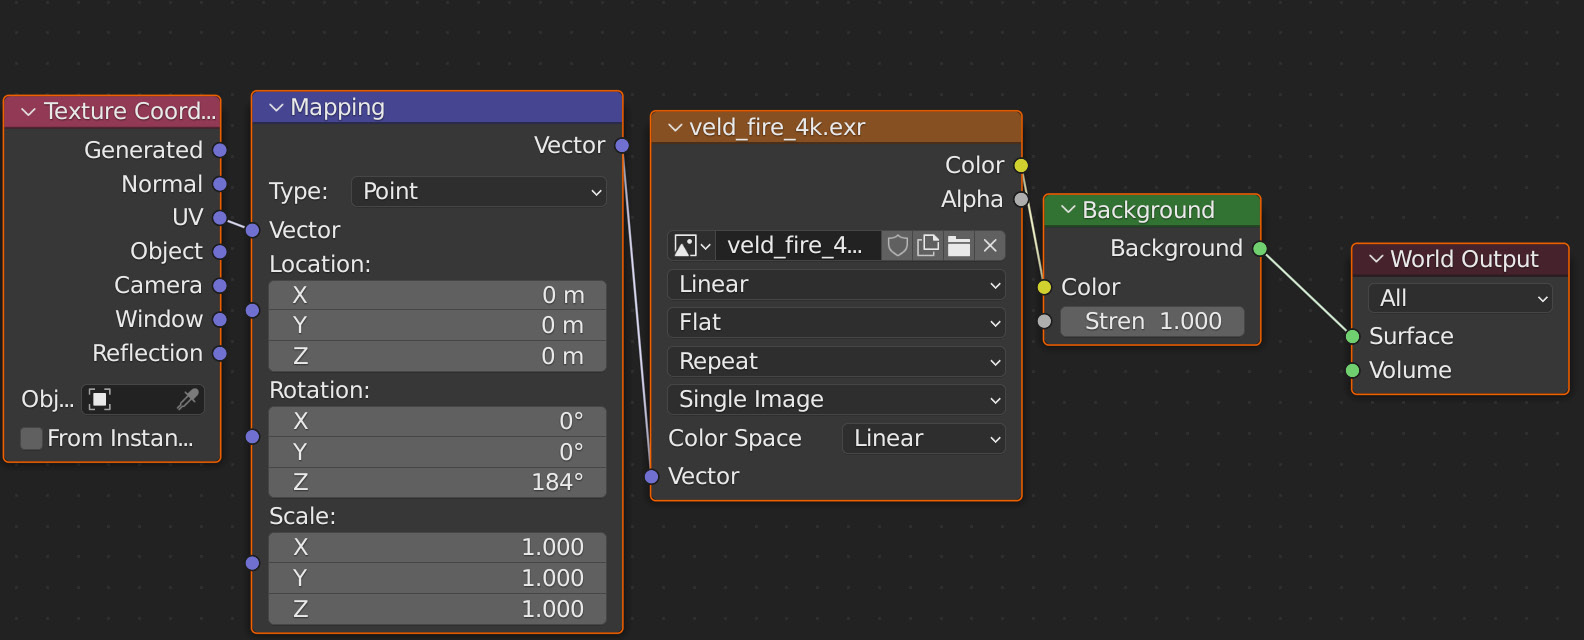
Figure 3.10: Mapping the HDRI texture
- Now, let's limit the lighting so it only lights the background, not our objects. We're using this technique because EEVEE does not accurately calculate shadows using an HDRI light. So, we want the HDRI as a background for our lighting, but we want to use a sun light to add shadowing to the house. Add a Light Path node to the shader editor and attach the Is Camera Ray output to the Strength input on the Background node. Is Camera Ray tells the Background node to have 0 strength for areas that don't have camera rays and 1 for areas that do.
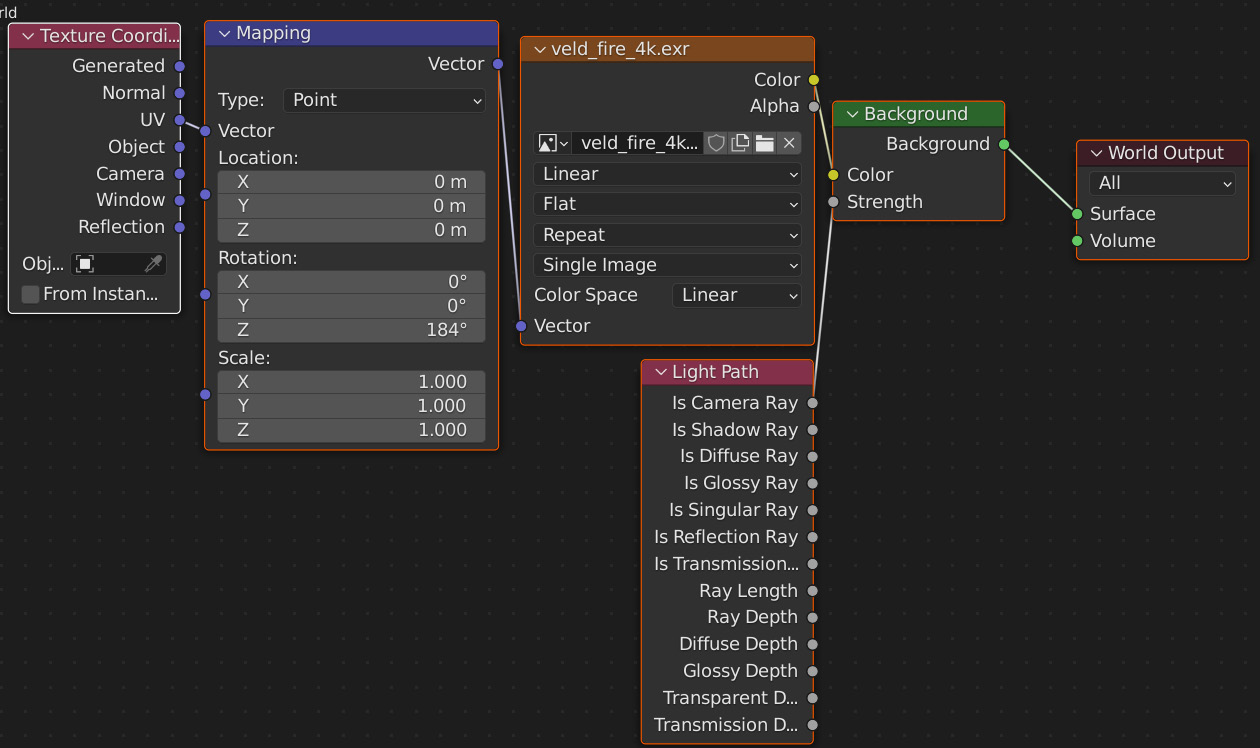
Figure 3.11: The Light Path node and Is Camera Ray set up
- The final touch to make is adding an RGB Curves node between the HDRI output and the Background input and tweaking the background to your lighting. I decided I wanted the sky to be much bluer, so I increased the blue channel and the overall Color channel.
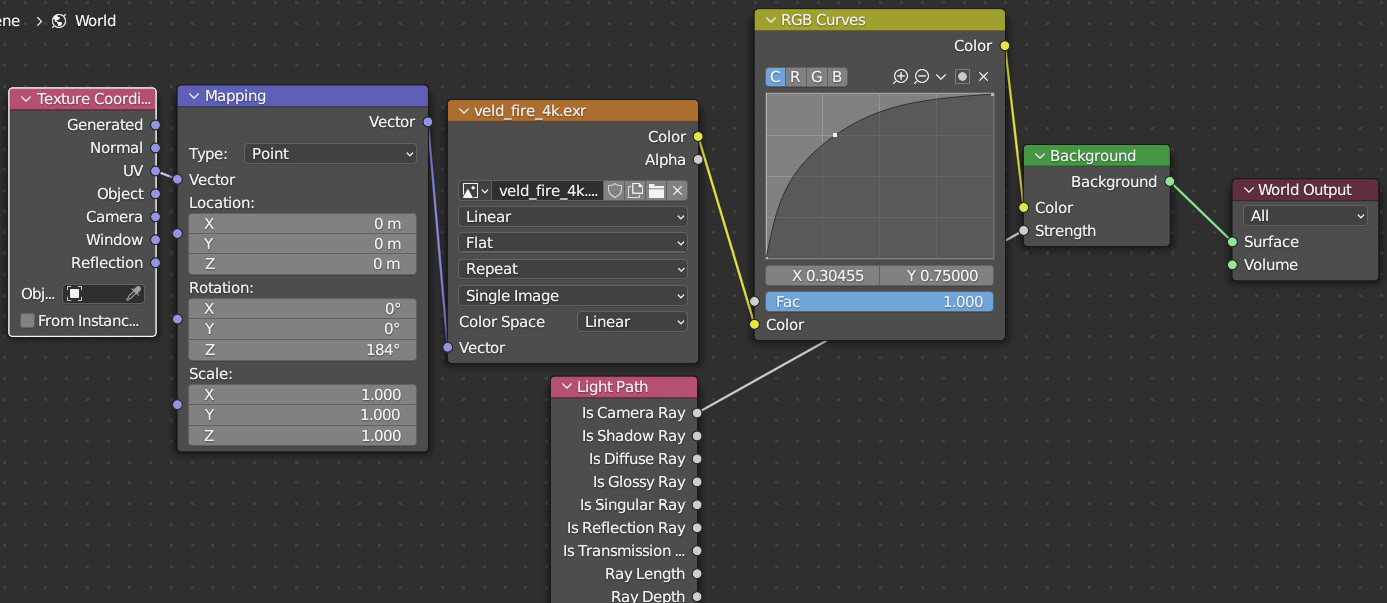
Figure 3.12: The RGB Curves node
- The final look that we just created should show the HDRI in the background of the scene, but we should see minimal light hitting our mesh objects. This allows us to add a sun light in the next section to light the mesh objects with shadows and variations in lights.
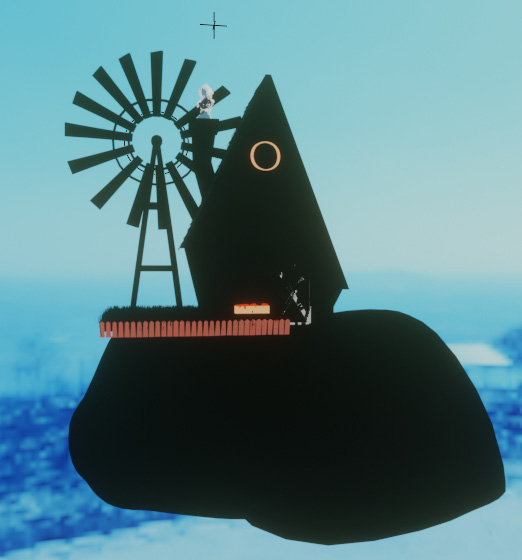
Figure 3.13: The HDRI lighting
Why are we using an HDRI just as our background without using the light from the HDIR? Well, as we discussed before, EEVEE doesn't have Global Illumination (yet), so the HDRI light won't actually bounce around our scene and produce shadows. As you can imagine, having no shadows makes everything look very strange and completely unnatural, which is not the look we're going for here. So, we limit the HDRI to the background of the scene and now we can work on creating shadows and highlights with the tools given to us in EEVEE, building on the basis of the HDRI. In the next section, we'll add some light objects and configure them to work with what we just created.
HDRI Resources
HDRIs are amazing resources, but for your average 3D artist, it can be hard to make your own. Luckily, there are a couple of sites that provide free HDRIs for a variety of environments. HDRLabs is one that I personally use for most of my projects. Poly Haven also has a great collection:
http://www.hdrlabs.com/sibl/archive.html
Adding lights to our scene
Now the HDRI is set up with EEVEE, we have an idea of how to light the scene, based on what our HDRI already has. We have an HDRI that has a lot of ambient blue light and a sun ray that comes from the right to the left on our screen. So, let's create some lights to mimic that setup, but since these lights are objects, EEVEE will be able to calculate their shadows. The first light we'll create is the area light.
Adding an area light
Area lights can be added through the standard Add menu, which can be accessed by hitting Shift + A and then navigating to Lights and clicking on the Area option. You should now be able to see the Light options menu in the right toolbar by clicking on the Light options button while the area light is the active object in your scene:
- Let's change the color of the light to a light blue, which we can actually color pick using the eyedropper tool from the HDRI.
- Increase the power of the light to 20000 (or more – decide what looks good to you!).
- Then, increase the size to 50 m.
- Make sure the Shadow option is checked under the next subheading.
- Raise the area light so it's about 50 m on the positive z axis.
My area light properties look something like this:
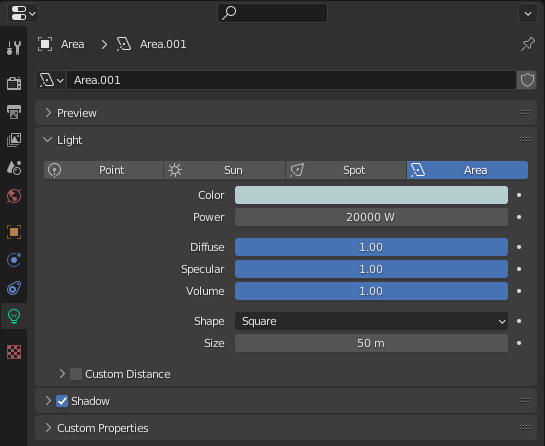
Figure 3.14: Configuring the area light
At this point in time, the light we have probably won't be all that impressive. The area light is only meant to simulate an ambient light that is diffusely reflected from the sky, so our house should be illuminated a little bit, but not much. Let's add a sun light, which does exactly as advertised... simulates the sun!
Adding a sun light
Sun lights can be found in the same menu as the area light, so go ahead and add one and navigate to the Light Options tab for our sun light object:
- Change the color of the sun light to a very light yellow/orange.
- Increase the strength to 10.
- Change the angle to 0.525. The angle of the sun represents the size of the sun and therefore the overall hardness of the shadows. I also selected the sun and rotated it with the R key, so it was angled roughly from where the sun was in the HDRI we used.
- Make sure Shadow is checked.
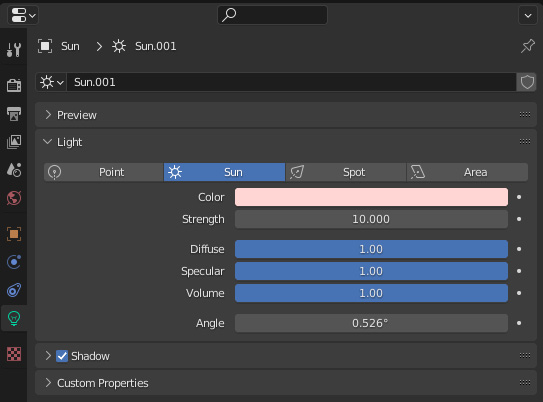
Figure 3.15: Configuring the sun light
Right now, the light in our scene should be pretty close to what we would have achieved with the HDRI, but with shadows. The materials we created in the last chapter react to the lighting that we have in the scene, so now is the time to look over them again and tweak them if necessary.
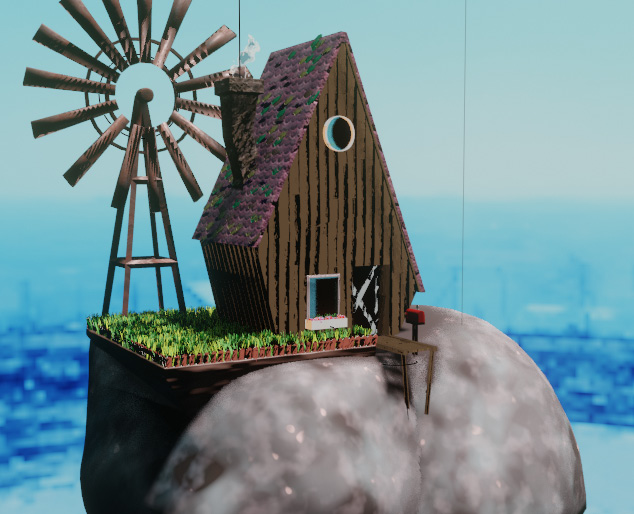
Figure 3.16: My lighting result
EEVEE can sometimes pose problems to a normal workflow, such as shadows not working with an HDRI, but with some quick and clever thinking, it's pretty easy to overcome the setback. In later chapters, we'll learn more about complex lights that need to be baked for EEVEE, but for now, let's leave this simple outdoor lighting setup as is.
In this subsection, we've worked on adding a lighting system that works with EEVEE and you understand a little more of the eccentricities of working with a real-time renderer. In the next section, we'll work on adding a camera and setting up the composition.
Creating and configuring cameras
The camera is maybe one of the most important parts of creating a 3D scene, because if you don't have a camera, you won't be able to render the scene and save it. But it's often very difficult for Blender users to use the camera intuitively and frame a shot with a composition that makes sense. In this section, we'll create a camera and go over some useful ways of using that camera, for both a general workflow and an EEVEE workflow.
Adding a camera
Let's add a simple camera to our scene. We'll use the typical workflow of Shift + A and then select the camera. This adds a camera to wherever our cursor is in the scene. Working with the camera like you would any other object, by selecting it, using the transform, and moving it, is very difficult. You can't see what the camera is seeing and it's hard to narrow in on a shot. So, we'll use two very cool tools here to position our camera the way we want:
- Inside the 3D viewport, use your mouse to position your view to what you generally would want to camera view to look like. I decided I wanted to look down on the house from an acute angle.
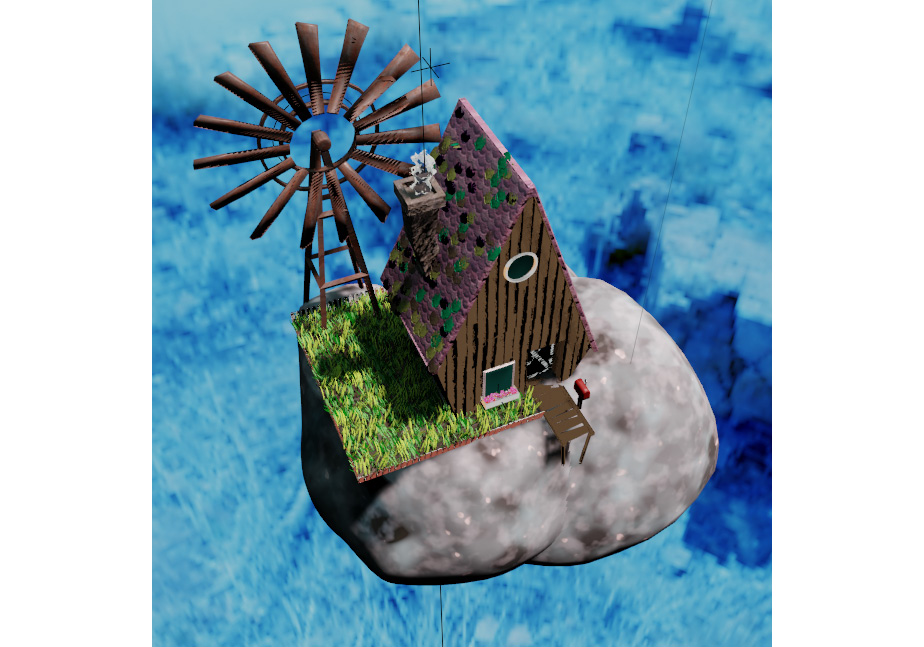
Figure 3.17: My view in the viewport
- Once you have the view you want, press Ctrl + Shift + 0 on the Numpad.
- The camera view should now match your viewport view. You can test this by pressing 0 on the Numpad to toggle your camera view on and off.
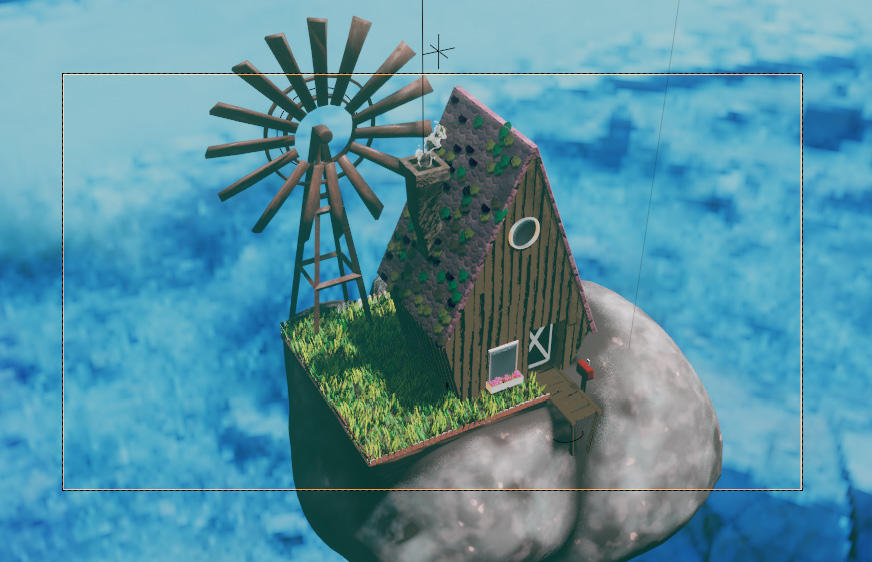
Figure 3.18: My camera view after pressing Ctrl + Shift + Numpad 0
- We can now tweak our view directly in the viewport. Make sure you're already in Camera View mode. Press N while in the 3D viewport to open the right-hand side menu, if you don't already have it open. Select the View tab and check the box next to Camera To View, which is underneath the To 3D Cursor box. You can now use your mouse to move your viewport as usual, but now the camera will be locked to your viewport.
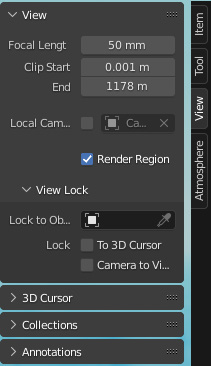
Figure 3.19: Checking the Lock Camera to View box
We've successfully added a camera and used two distinct methods to edit the camera view, therefore providing us with a better way to compose our render. Next up, we'll explore some camera properties that can help you create a better render.
Camera properties
You might be aware that in Cycles, there's a way to create a render border, so you don't render anything that's outside of the camera view in preview. This functionality doesn't exist in the same way inside of EEVEE; we have to use the camera properties to mimic this function:
- Select the camera in the outliner.
- Using the right-side properties menu, navigate to the
 tab.
tab. - Scroll down to Viewport Display and select the Viewport Display area drop-down to see more options.
- Check the box next to Passepartout and turn the value up to 1.000.
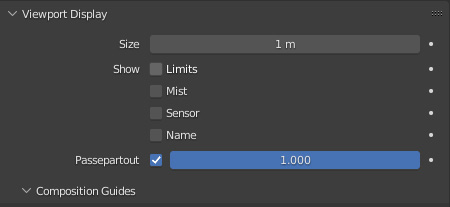
Figure 3.20: Selecting the Passepartout option
- You should now only see what the camera will render, with the rest blacked out. I find this really helps me to fine-tune the image that I want without being distracted by things that won't ever appear in the final render.

Figure 3.21: The viewport with Passepartout
Another really interesting setting is a submenu of the Viewport Display menu, the Composition Guides. These guides provide different overlays to assist with composition. I like to use the Thirds option (which can be activated by checking the box) to line up the features of interest on where the lines intersect. This is called the rule of thirds and is a very traditional way of composing an image.
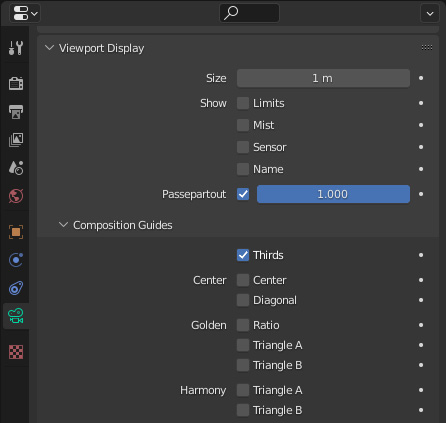
Figure 3.22: Checking the Thirds option
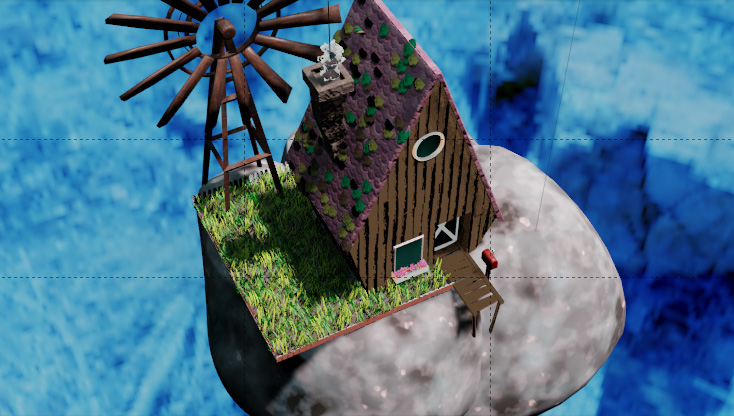
Figure 3.23: Thirds superimposed over the viewport for help in composition
Learning More about Composition
Composition and design are infinite topics that you could spend a lifetime studying and still not know everything about. I would suggest learning some basic photography concepts as you advance in your career in Blender. Online resources are very useful to get an overview of composing and also understand more about lighting and design in general. Check out this site if you want to start learning about the Rule of Thirds and other Composition concepts: https://digital-photography-school.com/rule-of-thirds/.
Now that we've learned about composition and some materials, we'll briefly discuss a new aspect of Blender 3.0 that streamlines the process of creating cartoon-style line art.
Learning about the Line Art modifier
A quick, cool effect to add further interest to the house in the sky we're building is the Line Art modifier. This is a brand-new modifier that was added with the past release of 2.93. Previously, there was a postprocessing ability to add lines to the geometry of your objects, but now we can actually see that in the viewport; so, let's give it a try and see whether we can push this house we're working on to be a little more stylized. The Line Art modifier only works if you already have a camera in the scene, so that's why we're adding the Line Art modifier now.
The Line Art modifier only works with a Grease Pencil object, so let's add a Collection Line Art object to the scene.
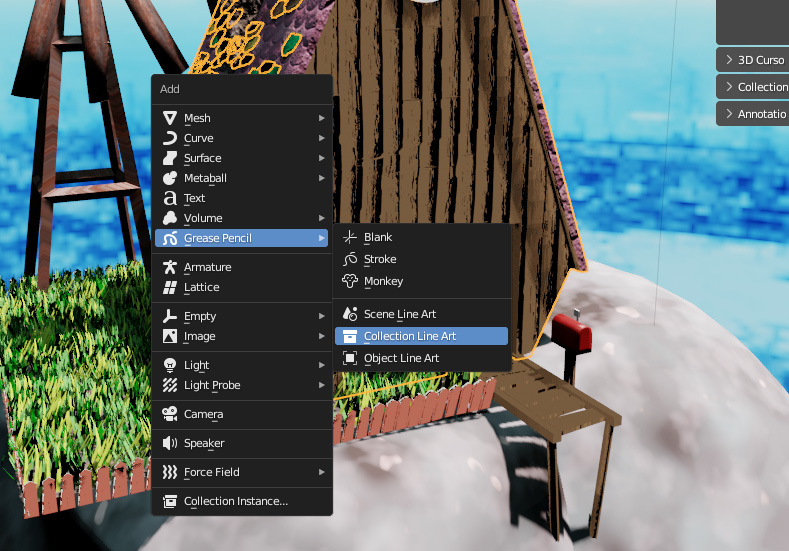
Figure 3.24: Collection Line Art modifier
Side Note
Shift + A is the shortcut for the Add menu, something that I recommend you use instead of the more laborious Add button on the menu bar.
Change Source Collection to House and Target Layer to Lines.
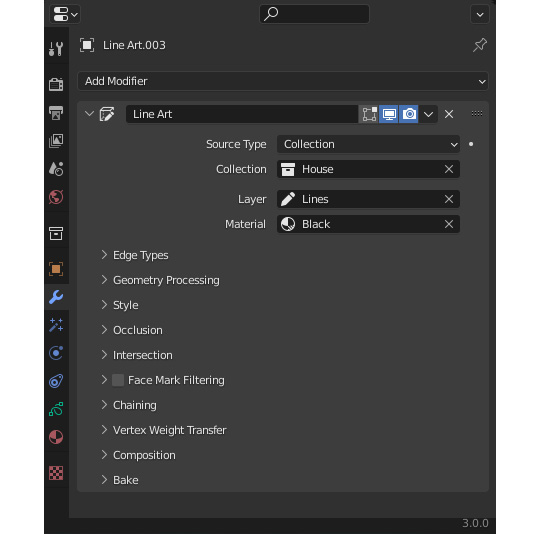
Figure 3.25: Line Art modifier options
Target Material only takes Grease Pencil materials. I have mine set to just a simple black color, but you can go into the Grease Pencil material toolbar and add any number of line colors to try out. Materials in Grease Pencil work similarly to other materials, but in this menu, you have the option to fill or just render a stroke. Try out some of these options and see whether you can come up with something you like.
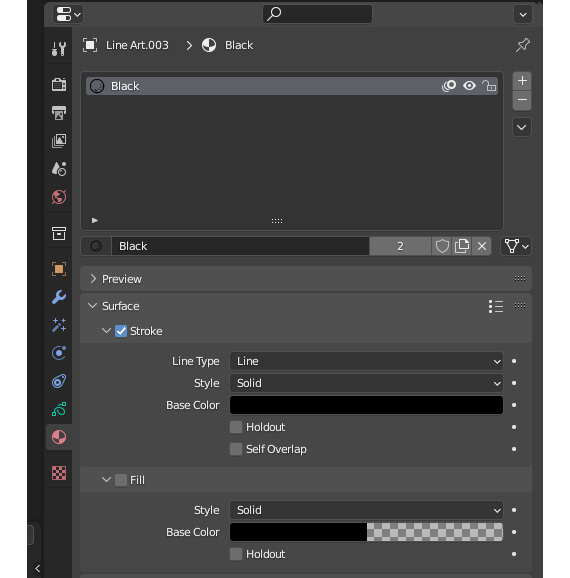
Figure 3.26: Grease Pencil material
My final Line Art modifier renders lines onto my object inside of the 3D viewport. It's also an awesome feature if you just want to render lines for a "blueprint" effect.
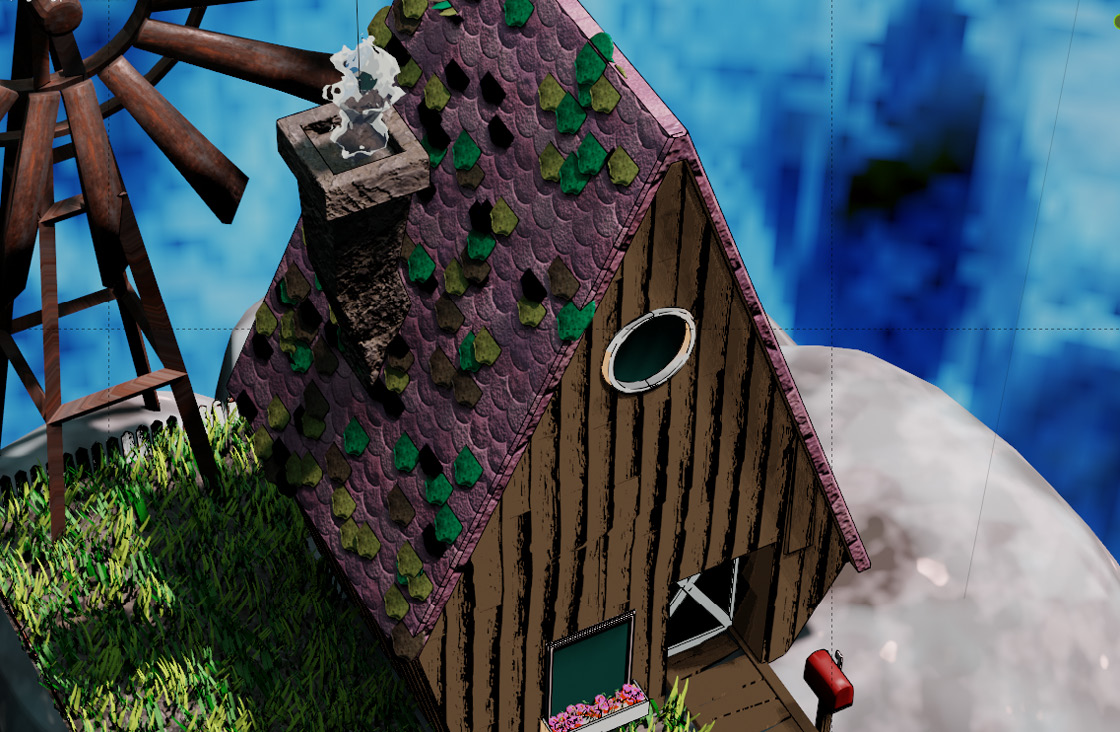
Figure 3.27: Line art applied to the house
Side Note
You may notice a slowdown in your processing ability with the Line Art modifier when you try to go into edit mode. I recommend adding the Line Art modifier when you're done with a piece of the scene and are ready to render, or hide it from the viewport while you work on other things to save yourself some lag and possible crashes. It's still a feature very much in development, so bear that in mind when using it.
The Line Art modifier is a work in progress I hope you can now see the power of such a feature and the ways to use it in your future art.
Summary
In this chapter, we looked at lighting cameras and the Line Art modifier, covering some of the peculiarities of working inside of EEVEE. We're already seeing that EEVEE can sometimes provide roadblocks that can be annoying to navigate around, but overall, being able to see our render in real time far outweighs those pain points. The Line Art modifier in particular is something to keep an eye on, as more features for this tool are added in future versions of Blender. This is just the beginning of this powerful feature.
I hope that you are starting to grasp the awesome power of EEVEE and are ready to take the work we've done, add some simple volumetrics, and then render it out as a full scene in the next chapter.