In this chapter, I’m going to dive deeper into building applications with more functionality. In reality, that means I’ll be writing some code to make these sample apps do more when it comes to filtering and displaying data. While Visual Studio LightSwitch supports both C# and Visual Basic, I’ll be using Visual Basic for all the code examples.
I’ll also introduce you to LightSwitch extensions and using Silverlight to spruce things up a bit. Extensions make it possible to add features to Visual Studio LightSwitch to enhance the out-of-the-box capabilities. Examples I’ll be using include the LightSwitch Filter control extension for filtering query results. In Chapter 5, I’ll use the Excel export extension for two separate examples. Both of these free extensions are available on the Microsoft Visual Studio Gallery website under the LightSwitch section (http://visualstudiogallery.msdn.microsoft.com/).
On the same site, you’ll find an entire third-party ecosystem built around extensions for mainstream Visual Studio. Many of those same vendors are adapting their products for use with LightSwitch. I’ll use one of those in Chapter 5 to connect to a Google data source. Microsoft provided a cookbook for developing Visual Studio LightSwitch extensions during the beta period of the product and now offers a number of tutorials and samples to help you write your own.
One of the things we will need in most of the applications in this chapter is the ability to authenticate users to SharePoint. To do this, we’ll be using basic Windows authentication to get access to the current logged-in user. To set this for any LightSwitch application, you simply select the “Use Windows authentication” radio button on the Access Control tab of the solution properties page, as shown in Figure 4-1.

If you choose “Allow only users specified in the Users screen of your application,” you’ll have to maintain a list of users in the application. LightSwitch supports both entity- and screen-level permissions. In code, you will use a permission object, which must be defined in the Application Designer. Individual permissions are set by the application administrator. You can enable the administrator functionality temporarily by enabling the Granted for Debug checkbox for the Security Administration username. With that box checked, you’ll see a new menu item when you run the application for administering Users and Roles (see Figure 4-2). This method does give you lots of flexibility but could get unwieldy with lots of users.

The other side of the permissions coin concerns the SharePoint site. You must connect to the site as a user with Create permissions, or you won’t be able to make any changes. With that in mind, we’re going to create a sample app that will make it easy to browse the current SharePoint user database and make any necessary changes. We’ll start with a connection to the demo SharePoint site and the UserInformationList. Next, we’ll create a screen using the Editable Grid template. We’ll add a simple filter query to show just ContentType of Person. You should see something like Figure 4-3 at this point.

All columns in a LightSwitch grid are sortable if you click on the column header. This might not be obvious just looking at the grid, so you would want to document this for your users. The stock search box will search any string field across the entire dataset. If you need to search for some other field type like a phone number or a date, you’ll either have to add some additional code or use something like a parameterized query to make it work.
If you’ve ever had to administer a SharePoint site before, you’ve probably been presented with the “ownership change” problem. It’s not uncommon in organizations of all sizes to have an employee leave. The problem is what to do with things like SharePoint lists or tasks assigned to them. An obvious solution is to write a program to make the changes for you.
We’ll use the task application from the previous chapter as a starting point and add some functionality to implement a search-and-replace capability. The basic approach is to build a search screen to find all items assigned to a specific user and then add code behind a button to change the owner to a different user. Figure 4-4 shows what the basic app looks like.
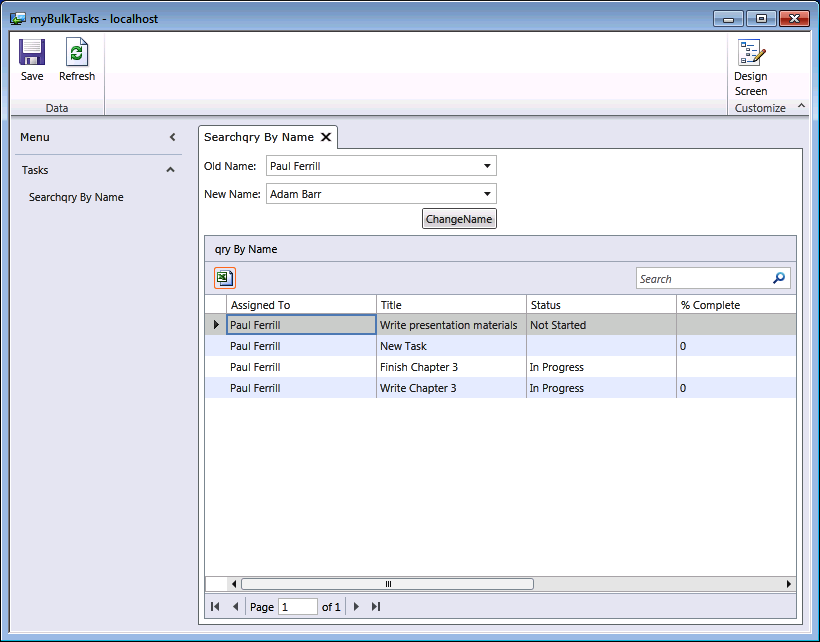
There are a few steps required to make this app work. The app uses an external connection to the demo SharePoint site with the Tasks and UserInformationList lists selected. With these two data sources available, we’ll need to add a parameterized query to search for all tasks assigned to a specific person.
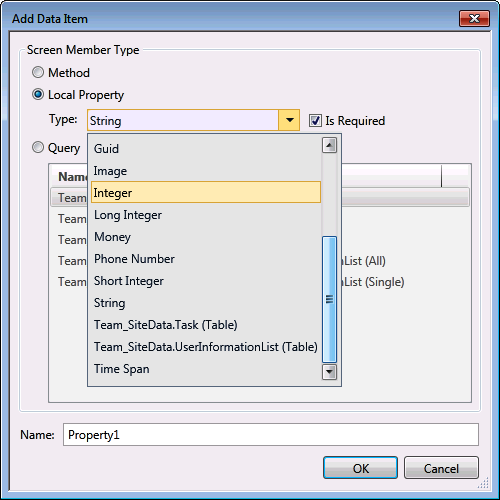
First of all, we need to add the two list boxes at the top of the screen labeled Old Name and New Name. This is done by clicking the Add Data Item button, as shown in Figure 4-5.

This will bring up a dialog box like the one in Figure 4-6. In order to add a new list box element to the screen, we must choose Local Property and then select Team_SiteData.UserInformationList.
Now that we have the data elements defined, we need to work on the screen layout. Visual Studio LightSwitch will set all screen elements to autosize by default. While this works just fine in most cases, it will cause some elements like list or text boxes to be larger than needed. The best way to make these changes is to first run the application and then modify the screen using the Design Screen option (see Figure 3-6 in Chapter 3).
Once we have the data element defined, it needs to be connected to the query parameter so that selecting a name from the drop-down list changes the displayed task items appropriately. Visual Studio LightSwitch adds a data item with the name of the parameter when you initially define the query. We will be using the new data item for this purpose, so you can just delete the account item. To add the data item to the screen, simply click and drag it from the lefthand pane onto the screen tree-view just below the command bar.
The last step is to set the Parameter Binding property of the
account query parameter to OldName.Account, as shown
in Figure 4-7. This will connect
the UserInformationList-based list of user names to the drop-down list
box on our screen.

You will need to click the Design Screen button in order to change the way specific elements display on the screen. We’ll use this method to change the size of the two list boxes so they don’t take up the entire screen. Figure 4-8 shows the design screen with Old Name selected in the element tree on the lefthand side of the screen. To set the width to a fixed value, you must choose either Pixels or Characters and then enter an appropriate value.
