Chapter 11. Custom Libraries
We’ve already seen how to include the headers of useful libraries that come with the Arduino IDE as well as how to add third-party libraries for some of the more interesting peripherals and sensors. But as you build up your catalog of microcontroller projects, you’re likely to create some code that you reuse. I regularly employ the maxim that there are only three numbers in the universe: 0, 1, and many. If you find a chunk of code you use a second time, you’re in that “many” category and it is probably time to consider making your own library.
That statement may seem dramatic. It certainly sounds grandiose. Happily, it is a fairly straightforward process and really does make reuse a snap down the road.
I do want to admit that the project in this chapter is bigger than our past projects in every sense. If remote-control robotic cars don’t spike your interest, feel free to skip the bulk of this chapter. I would still recommend reading “Multifile Projects” and “Creating the Library” to get a sense of the steps involved in writing a library for your own use within the Arduino IDE. You can safely skip this chapter in favor of exploring an IoT project in Chapter 12.
Creating Your Own Library
To get started on a custom library, you’ll need some code to reuse. The best way to find reusable code is to create some usable code first. We can kick off a normal project and then extract the parts that seem likely to work well in other projects.
For this project, we’ll create a motorized car that can be driven with simple forward, backward, left, and right buttons. Once that is all working, we can break out the various “drive” functions into a separate file to highlight how the Arduino IDE works with multiple files. And finally, with a little multifile experience in your back pocket, we’ll make the leap to radio control and see how to encapsulate that communication in a library that can be shared between our car and a separate navigation project.
Figure 11-1 shows the setup we’re going to use. I bought these parts from Adafruit, but you can assemble a similar car from other parts just as easily. (See Appendix B for the exact part numbers I used.) The physical car is reasonably simple, but definitely requires some assembly. I had to make a trip to my local hardware store for a few of the small machine screws, but the prefabricated chassis from Adafruit sure made things simpler. The chassis has perfect holes and sockets to guide the attachment of both the rear motors and the loose caster on the front. I just rested a breadboard and battery on top, but there are ample spots to mount these with clips, screws, or zip ties.
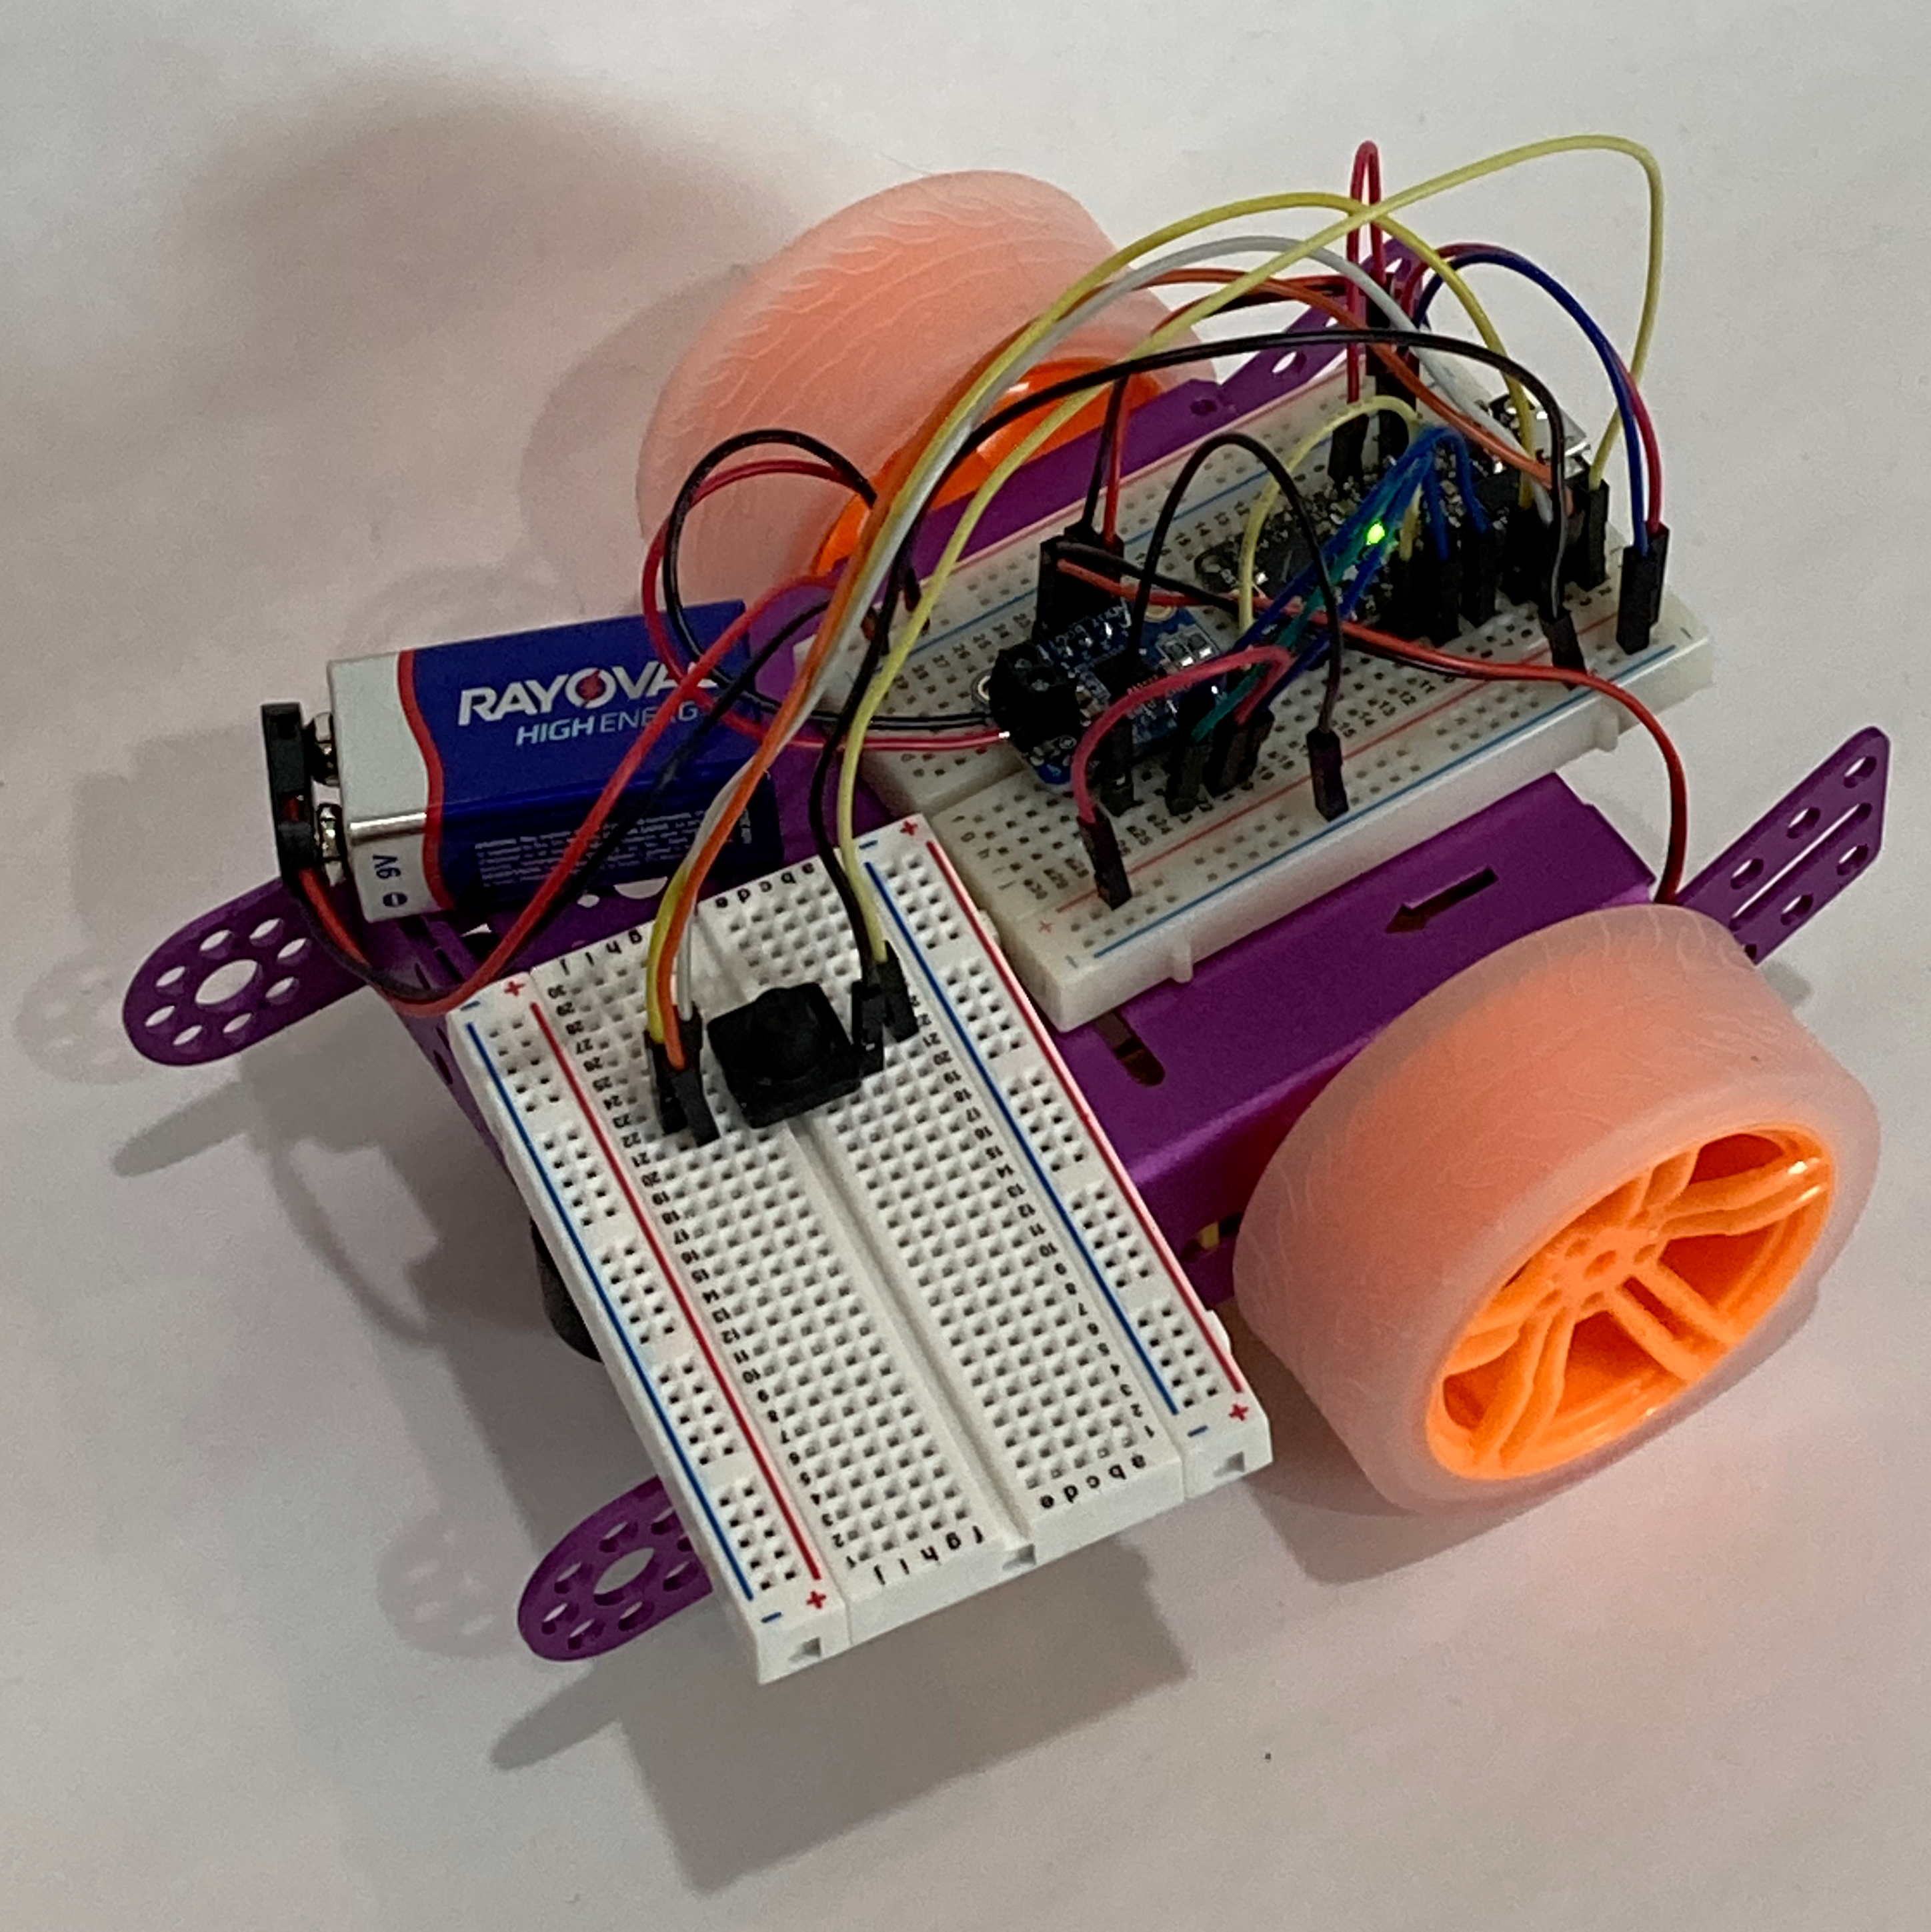
Figure 11-1. Our robot car
Figure 11-2 shows the wiring of our microcontroller, navigation joystick, and the DRV8833 motor driver breakout board. There are a lot more connections on this project, but hopefully not so many that you are overwhelmed.
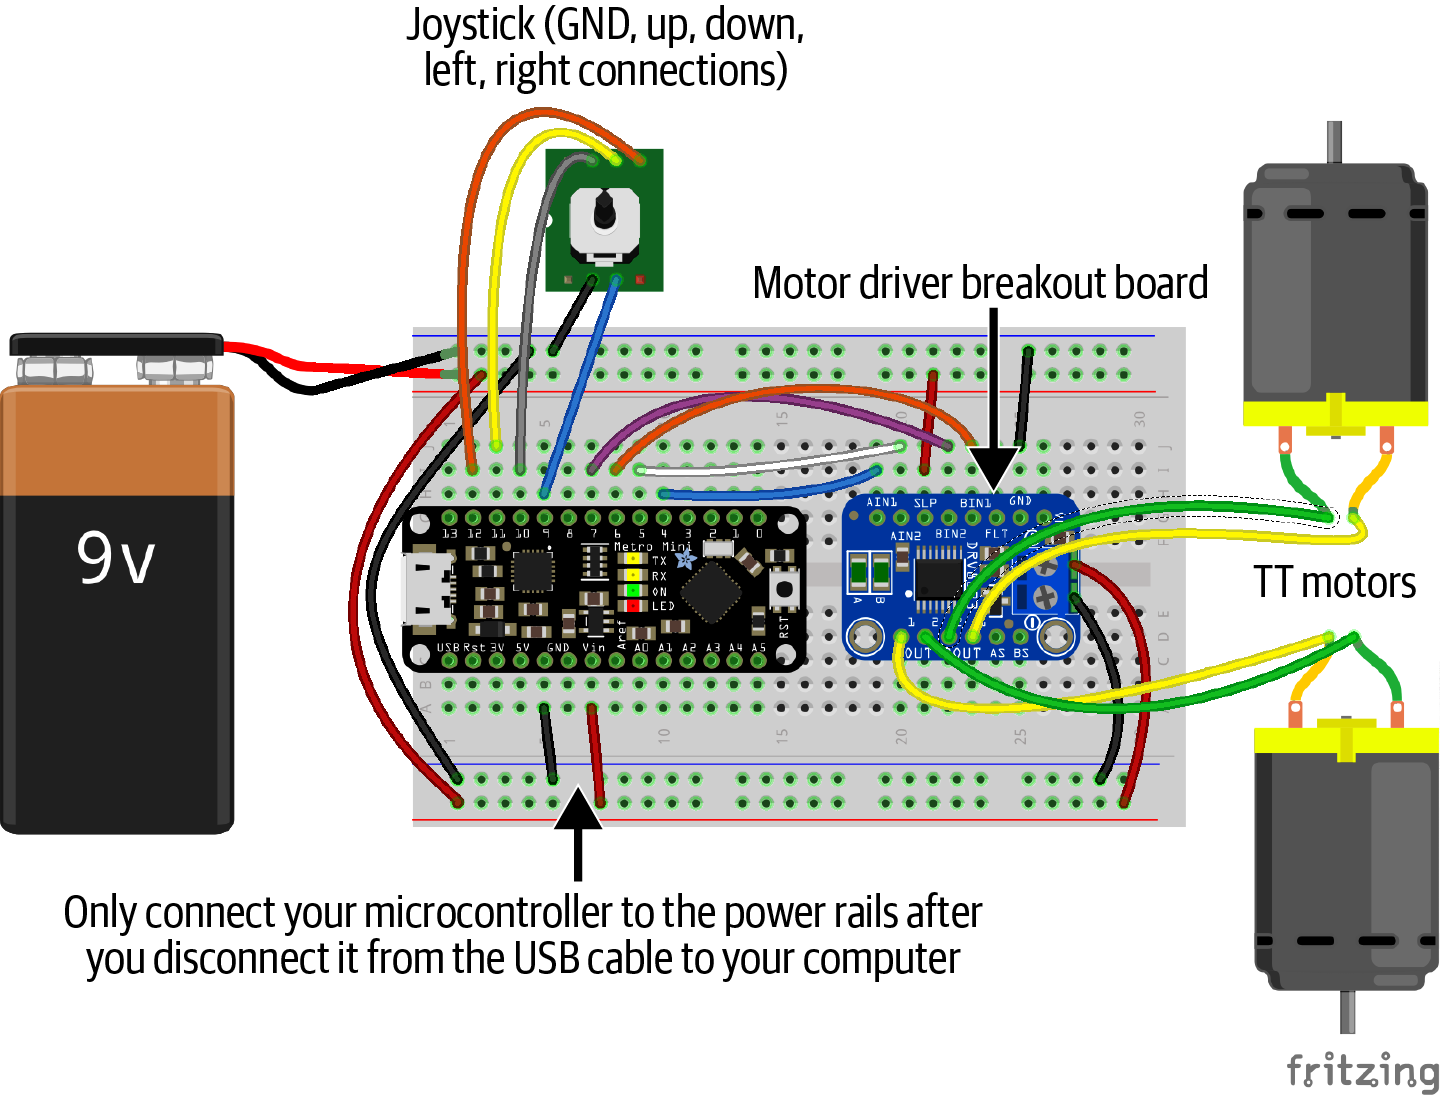
Figure 11-2. Wiring for the robot car
Robotics in general is a big interest of mine, but the mechanical elements are (way) out of my field of expertise. The extra learning required to pull off this project my first time around was challenging but fun—at least more fun than frustrating. I’ve never worked with motors before, so getting them mounted, powered, and properly connected so I could control them through software certainly required a little trial and error and no small amount of exasperated utterances. But if this particular project does not hold much interest for you, feel free to just follow along with the deconstruction of our code and see how to pull those parts back together in a library. But I will say that the first time you make a wheel spin by pressing a button, you feel like you can conquer the world. :)
Tip
If looking at the diagram in Figure 11-2 gives you the heebie-jeebies, you can look for robotic car kits that come with all the necessary parts as well as detailed assembly instructions. The kits usually have their own coding instructions, too. Feel free to get the kit running “as is” and get comfortable with the electronics first. Then come back here to work through my code examples and apply them (probably with a few modifications that will reinforce the work we’re doing here) to your fully functioning car.
Preprocessor Directives
We’ve seen a couple of preprocessor directives already: #include and #define
are both handled by the preprocessor. And the name “preprocessor” probably
gives you a hint about its role in compiling your code. These directives are processed
before your code is compiled.
The #include directive is used to bring in code defined in a separate file. After
inclusion, it looks to the compiler as if you had typed in that external file as part
of your own code.
The #define directive, as we’ve been using it, puts a human-friendly name on
some literal. We can then use the name in our code rather than remembering the correct
literal every time. And if we ever need to change that value, say, move an LED connection
to a different pin on our controller, we only need to change it once. As with #include,
the preprocessor replaces each instance of a #define name with its literal as though
you had typed the literal directly.
For our car, let’s use #define for the pins on our navigation joystick as
we have with other connected peripherals:
#define LEFT_BTN 12#define RIGHT_BTN 9#define FWD_BTN 10#define BKWD_BTN 11
I should point out that you can use #define with values other than numbers. Perhaps
you have a standard error message or text response. Those can be defined, too:
#define GOOD_STATUS "OK"#define BAD_STATUS "ERROR"#define NO_STATUS "UNKNOWN"
Knowing how #define works with the preprocessor also explains why we don’t put
a semicolon at the end. We don’t want the semicolon showing up in our code, after
all.
Preprocessor Macros
You can take #define a step further as well. Not only does it handle strings, it can
handle small pieces of logic, almost like a function. These snippets are often referred
to as macros to distinguish them from actual functions. A macro (or macroinstruction) transforms some bit of input to a corresponding bit of output, typically via substitutions.
Macros are not function calls. Macros are not pushed onto or popped off of the stack.
Macros are great when you have a repeated bit of code that just doesn’t rise to the level of needing a function. They are also great when you want your snippet to remain data-type agnostic. For example, consider a simple macro to determine the minimum of two values. Here’s the definition and an example of how to use it:
#define MIN (x,y) x < y ? x : yintmain(){intsmaller1=MIN(9,5);floatsmaller2=MIN(1.414,3.1415);// ...}
To create the macro, we use #define and a name, like before, but then we supply
a variable (or variables) in parentheses. Whatever arguments you pass to the macro
replace the variables in the macro’s snippet. That snippet, in turn, replaces
the spot where it was called. It’s as if you had typed the following:
intmain(){intsmaller1=9<5?9:5;floatsmaller2=1.414<3.1415?1.414:3.1415;}
That simple replacement process can be powerful. But do be careful. Because the replacement is so simple, you can create problems if you pass complex expressions to your macro. If, say, your expression uses an operator of lower precedence than one used in your macro, the intended outcome can be wrong or even uncompilable. You can avoid some of these problems with judicious use of parentheses, like this:
#define MIN (x,y) (x) < (y) ? (x) : (y)Even then you can create some odd code by passing just the right (er, wrong) expressions. The GNU documentation on C and the C preprocessor even has an entire section devoted to macro pitfalls.
We don’t need any macros just yet, but they’re common enough that I want you to recognize them if you find them in the wild. The C preprocessor is actually quite an interesting entity in its own right. It’s a great target for some independent research after you finish this book!
Custom Type Definitions
Beyond constants and macros, libraries often make use of another feature of C: the
typedef operator. You can use typedef to assign an alias to some other type.
That might sound unnecessary, and it technically is, but there are several cases where
it is very convenient and leads to more readable, maintainable code.
We saw the use of some of these typedef aliases in Chapter 10. The byte,
uint8_t, and uint32_t specifiers were all created with typedef. If the Arduino
environment didn’t provide those for you, you could create them yourself like
so:
typedefunsignedcharbyte;typedefunsignedcharuint8_t;typedefunsignedlongintuint32_t;
Note
The “_t” suffix is popular for these aliases. It’s an easy way to
highlight the fact that the name is an alias built with typedef.
You can also use typedef with the struct keyword to make more palatable names for
your custom, rich data types. For example, we could have used typedef in “Defining Structures”
and defined our transaction like this:
typedefstructtransaction{doubleamount;intday,month,year;}transaction_t;// Transaction variables can now be declared like this:transaction_tbill;transaction_tdeposit;
This feature is not something strictly necessary for our simple library, but many libraries do
use typedef to provide names for types that make more sense in the context of the library
or that are simply easier to work with. Let’s go ahead and define a type for any variables
that might store one of our direction constants:
typedefsignedchardirection_t;
We’ll stick with the signed version of char since we might find uses for negative
values down the road. Negative numbers make great error codes if you are otherwise only
expecting positive numbers, for example. Now let’s use our new type to create some
typed constants:
constdirection_tSTOP=0;constdirection_tLEFT=1;constdirection_tRIGHT=2;constdirection_tFORWARD=3;constdirection_tBACKWARD=4;
Recall the discussion of const versus #define in “Constants: const versus #define”.
This is one of those spots where we aren’t really doing anything that demands one approach
or the other, but the const approach does add some inherent documentation to our
code that could be useful to other readers. And I should say that 90% of the time the
first “other reader” that sees your code is you, but you after a few weeks
or months away from the project. Hints about your intentions like the direction_t type
can be very useful in jogging your own memory.
Our Car Project
Let’s get going! This will be our “version one” project with some extra
abstraction that should help as we break up this project into reusable pieces.
(You can take a look at
version 0 if you want to start
with a simple proof of functionality.) As you work with your own project, you may not have
the motors wired up exactly as I do. Your navigation input (buttons or a joystick)
might be connected a little differently. Test out your setup and don’t be afraid of
changing which pins get set HIGH or LOW in the various driving functions. Happily, that can all be tweaked here in software. The end goal is simply to get your car to roll forward when you push the joystick up.
Here’s version 1 of our car build. As always, you can type this up yourself or just open ch11/car1/car1.ino:
// Define the pins we're using for the joystick and the motor#define LEFT_BTN 12#define RIGHT_BTN 9#define FWD_BTN 10#define BKWD_BTN 11#define AIN1 4#define AIN2 5#define BIN1 6#define BIN2 7// Define our direction typetypedefchardirection_t;// Define our direction constantsconstdirection_tSTOP=0;constdirection_tLEFT=1;constdirection_tRIGHT=2;constdirection_tFORWARD=3;constdirection_tBACKWARD=4;voidsetup(){// Tell our board we want to write to the built-in LEDpinMode(LED_BUILTIN,OUTPUT);// Accept input from the joystick pinspinMode(LEFT_BTN,INPUT_PULLUP);pinMode(RIGHT_BTN,INPUT_PULLUP);pinMode(FWD_BTN,INPUT_PULLUP);pinMode(BKWD_BTN,INPUT_PULLUP);// Send output to the motor pinspinMode(AIN1,OUTPUT);pinMode(AIN2,OUTPUT);pinMode(BIN1,OUTPUT);pinMode(BIN2,OUTPUT);// And make sure our LED is offdigitalWrite(LED_BUILTIN,LOW);}voidallstop(){digitalWrite(AIN1,LOW);digitalWrite(AIN2,LOW);digitalWrite(BIN1,LOW);digitalWrite(BIN2,LOW);}voidforward(){digitalWrite(AIN1,LOW);digitalWrite(AIN2,HIGH);digitalWrite(BIN1,HIGH);digitalWrite(BIN2,LOW);}voidbackward(){digitalWrite(AIN1,HIGH);digitalWrite(AIN2,LOW);digitalWrite(BIN1,LOW);digitalWrite(BIN2,HIGH);}voidleft(){digitalWrite(AIN1,HIGH);digitalWrite(AIN2,LOW);digitalWrite(BIN1,LOW);digitalWrite(BIN2,LOW);}voidright(){digitalWrite(AIN1,LOW);digitalWrite(AIN2,LOW);digitalWrite(BIN1,LOW);digitalWrite(BIN2,HIGH);}direction_treadDirection(){if(digitalRead(FWD_BTN)==LOW){returnFORWARD;}if(digitalRead(BKWD_BTN)==LOW){returnBACKWARD;}if(digitalRead(LEFT_BTN)==LOW){returnLEFT;}if(digitalRead(RIGHT_BTN)==LOW){returnRIGHT;}// No buttons were pressed, so return STOPreturnSTOP;}voidloop(){direction_tdir=readDirection();if(dir>0){// Driving!digitalWrite(LED_BUILTIN,HIGH);switch(dir){caseFORWARD:forward();break;caseBACKWARD:backward();break;caseLEFT:left();break;caseRIGHT:right();break;}}else{// Stopping, or eventually we could handle errors, toodigitalWrite(LED_BUILTIN,LOW);allstop();}}
Feel free to take a break from the book at this point and just have some fun. :) Can you drive both forward and backward? When you move the joystick left or right, does the car turn the way you want? Can you parallel park between two stuffed animal obstacles? It might feel a little awkward following your car around with the tethered joystick, but we’ll fix that shortly.
Multifile Projects
Welcome back! Hope you managed to safely parallel park your new roadster. With a working program as our baseline, let’s break it up into some reusable parts.
C, as a language, does not really worry about where your code lives. As long as gcc can find all of the source files, header files, and libraries you mention in your code, it will produce usable output. Creating multifile projects for the Arduino IDE is a little different, however. The IDE manages some integration steps that would normally be left to you on the desktop. Since we’re concentrating on microcontrollers at this point, we’ll stick to what needs to be done in the Arduino IDE. If you are curious about building larger projects outside of Arduino, I’ll again recommend Prinz and Crawford’s C in a Nutshell.
We’ll start by converting our current project into a multifile project with no change in functionality. Then we’ll extend our robot car to support remote radio control and see how powerful shared code can be.
In our small car example, we have several functions devoted to making the car move. Those related functions are perfect for separating into their own file. They all serve a similiar purpose. Their related purpose is not necessary for creating separate files, but it’s a popular means of organizing the pieces of a larger project. A small number of files, each with a small number of functions, can be easier to maintain and debug than a huge file with lots of functions. But if you break up functions randomly, it will be difficult to remember which files contain which functions.
The Arduino IDE gives us a few options for breaking up our projects: we can add new .ino files, we can include custom header files, or we can create and then import a custom library. The rest of this chapter looks at all three of these mechanisms.
Code (.ino) Files
To start, let’s save this project under a new name so that we have a backup in case something goes awry and we want to refer back to a working project. From the “File” menu in the Arduino IDE, select the “Save As…” option. I chose the highly creative and original name car2. You are free to be as creative or even more so if the muse strikes.
Now let’s take all five of our driving functions and move them to their own file. To add a new file, use the downward pointing triangle button on the right-hand side near the top. That button opens a small menu, as shown in Figure 11-3. Select “New Tab” from that menu.
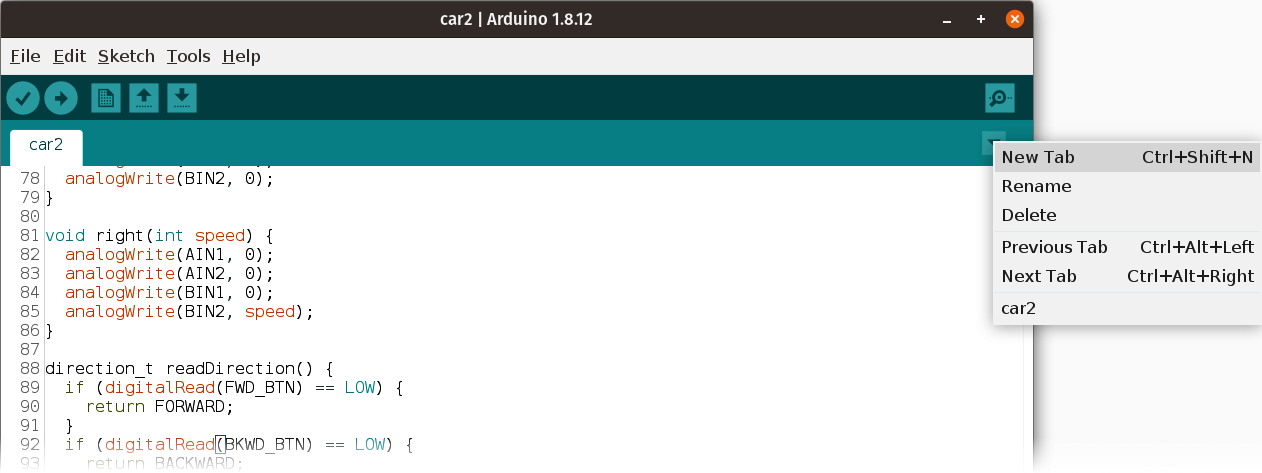
Figure 11-3. Creating a new tab in the Arduino IDE
Next, you’ll be prompted to name the tab, as shown in
Figure 11-4. Enter
the name drive.ino in the field and then click the OK button.

Figure 11-4. Naming our new file
You should now have a new tab named “drive” (with no suffix showing). Go
ahead and cut the five driving functions (including allstop()) from the “car2”
tab and then paste them into our new “drive” tab. That tab will end up with
the following code
(ch11/car2/drive.ino):
voidallstop(){digitalWrite(AIN1,LOW);digitalWrite(AIN2,LOW);digitalWrite(BIN1,LOW);digitalWrite(BIN2,LOW);}voidforward(){digitalWrite(AIN1,LOW);digitalWrite(AIN2,HIGH);digitalWrite(BIN1,HIGH);digitalWrite(BIN2,LOW);}voidbackward(){digitalWrite(AIN1,HIGH);digitalWrite(AIN2,LOW);digitalWrite(BIN1,LOW);digitalWrite(BIN2,HIGH);}voidleft(){digitalWrite(AIN1,LOW);digitalWrite(AIN2,HIGH);digitalWrite(BIN1,LOW);digitalWrite(BIN2,LOW);}voidright(){digitalWrite(AIN1,LOW);digitalWrite(AIN2,LOW);digitalWrite(BIN1,HIGH);digitalWrite(BIN2,LOW);}
That’s actually all the work required to separate these pieces of code! You now have your first multifile Arduino project. Click the Verify (checkmark) button to make sure your project still compiles in its new, two-file configuration. Everything should still work. You can even upload this to your controller and still drive your car.
If the project does not verify or upload, check to make sure you didn’t drop a curly brace or perhaps grab an extra line from the original file. You should also make sure the name you picked for your newly separated file ends with that .ino extension.
The Arduino IDE performs a little magic for us with .ino files. Our main project file
(car2.ino in the car2 folder, in this case) is prepared first. Any other .ino files
will then be included in alphabetical order. You may have noticed that our drive.ino file
has no #include statements. And yet, we clearly use the pin constants defined in our main
file. As far as the compiler is concerned, there is
only one large .ino file to compile, so successive .ino files see all of the functions,
#defines, and global variables from the files that came before. At this time, there is no
way to change the order of the separate .ino files; they are always incorporated
alphabetically.
Header Files
So how can all these separate files work together so seamlessly? The IDE adds one more piece of magic before loading these separate files. It creates a header file with forward declarations of all of the functions and global variables in your .ino file. Forward declarations are brief descriptions of what your function is named, what parameters it has, and what type of value it will return. They allow separate files to use a function without needing to have its full implementation. Each header, in turn, is automatically included in your main project file.
You can see the effect of this in our simple two-tab project. The drive.ino file does
not need to include any extra information to make use of our #define pin entries. And
the code in our main car2.ino file can call the functions defined in drive.ino without
worrying about the ordering or specific location of the functions. In the end, both files
fit together perfectly to complete our project.
You can also create your own header files. This can be nice for housekeeping. For
example, if you have many #define statements, you could place them in their own header.
Or if you want a low-tech means of sharing some directives between projects, you can make
a copy of a header and put it in another project. It is largely up to you what makes the
most sense for your own projects. Many successful makers out there have dozens or hundreds
of projects each with one single .ino file. I just want to make sure you know how to
split things into more manageable pieces if that one big file starts to overwhelm you.
In service of that goal, let’s break up our main project just a little more. Let’s
try the trick of putting some of our #define directives in their own header file. We’ll
move the eight pin constants. Create a new tab as before, and name it pins.h when
prompted. The new tab should show the full name of the file, pins.h, to help
distinguish it from .ino files that hide the extension.
Cut the eight #define lines and the relevant comments from car2 and paste them into pins.h.
The result should look like
ch11/car2/pins.h:
// Define the pins we're using for the joystick and the motor#ifndef PINS_H#define PINS_H#define LEFT_BTN 12#define RIGHT_BTN 9#define FWD_BTN 10#define BKWD_BTN 11#define AIN1 4#define AIN2 5#define BIN1 6#define BIN2 7#endif/* PINS_H */
Now we just need to add an include statement to our car2 tab at the top of our file:
#include "pins.h"You can check your work against my version 2. Your project should still verify (and upload) just as before. Feel free to give it a try and make sure you can still drive your car.
Warning
Pay close attention to the double quotes around our pins.h header name.
Previous #include statements used angle brackets (<>: less than,
greater than). The distinction is intentional. The angle brackets tell the
compiler to look for the header in the standard include path. Typically,
that means you are bringing in a header from a known library.
The quotes tell the compiler the file to be included is in the same folder as the file doing the including. Typically, that means you are bringing in a header file you wrote specifically for this project.
Again, divvying up a project is not a requirement or something you always do with large files, but it can be helpful. It allows you to concentrate on one part of your code without accidentally changing another part. If you collaborate with other programmers, working on separate files can also make it easier to combine your efforts at the end. In the end, though, it really is up to you and what you feel comfortable with.
Importing Custom Libraries
Beyond multiple .ino and .h files, though, you can also build your own Arduino IDE library. If you have code that you want to use in multiple projects or perhaps share with others via public code sites like GitHub, a library is a great choice.
Happily, creating a custom library doesn’t require too much effort. You need at least one .cpp file and a matching header (.h) file. You can have more files, if needed, as well as a few niceties we’ll discuss in the next section.
Facilitating Communication
Our robot car is spiffy, but following it around with a tethered joystick is clunky. A radio-controlled robot car would be even spiffier! We can do that, and using a library to manage that radio communication is a great way to guarantee we don’t cross any signals—literally. We can use a library to make sure multiple parties have access to common definitions (say, the value for driving “forward”). We can also put the rules of a protocol into a library’s functions. It’s a bit like making sure everyone is speaking the same language.
Libraries can supply more than the vocabulary of this hypothetical language. They can also enforce the rules of conversation. Who speaks first? Who speaks next? Is a response required? Can there be more than one listener? You answer questions like these with the functions you write in your library. As long as two (or more) projects use the same library, the details you encoded in the library’s functions will make sure everyone plays nicely together.
Let’s create a library to send and receive radio signals. We’ll create two separate projects that both use this library. We’ll start by replacing the joystick that is currently wired to our car with a radio component. Then we’ll create a controller project that pairs our newly liberated joystick with a similar radio. This does mean we need two microcontrollers, by the way. I’ll use another Metro Mini, but they don’t have to be identical. If you have some other controller lying around that is compatible with our radio and can use our library, any combination of controllers should work.
Retrofitting Our Car
Let’s swap out the joystick for a radio transceiver. I’m using the nicely packaged RFM69HCW high-power breakout from Adafruit. It’s about $10 and is reasonably straightforward to connect. Plus, it comes with some nice features like encrypted transmissions that can only be decrypted by a similar chip with the same encryption key (that you provide in code). Figure 11-5 shows the wiring diagram for our microcontroller, the motor driver, and our radio. I had to relocate several of the DRV8833 connections as the RFM69HCW requires the use of specific pins on our Metro Mini microcontroller (more on that in “Our radio-control library header”).
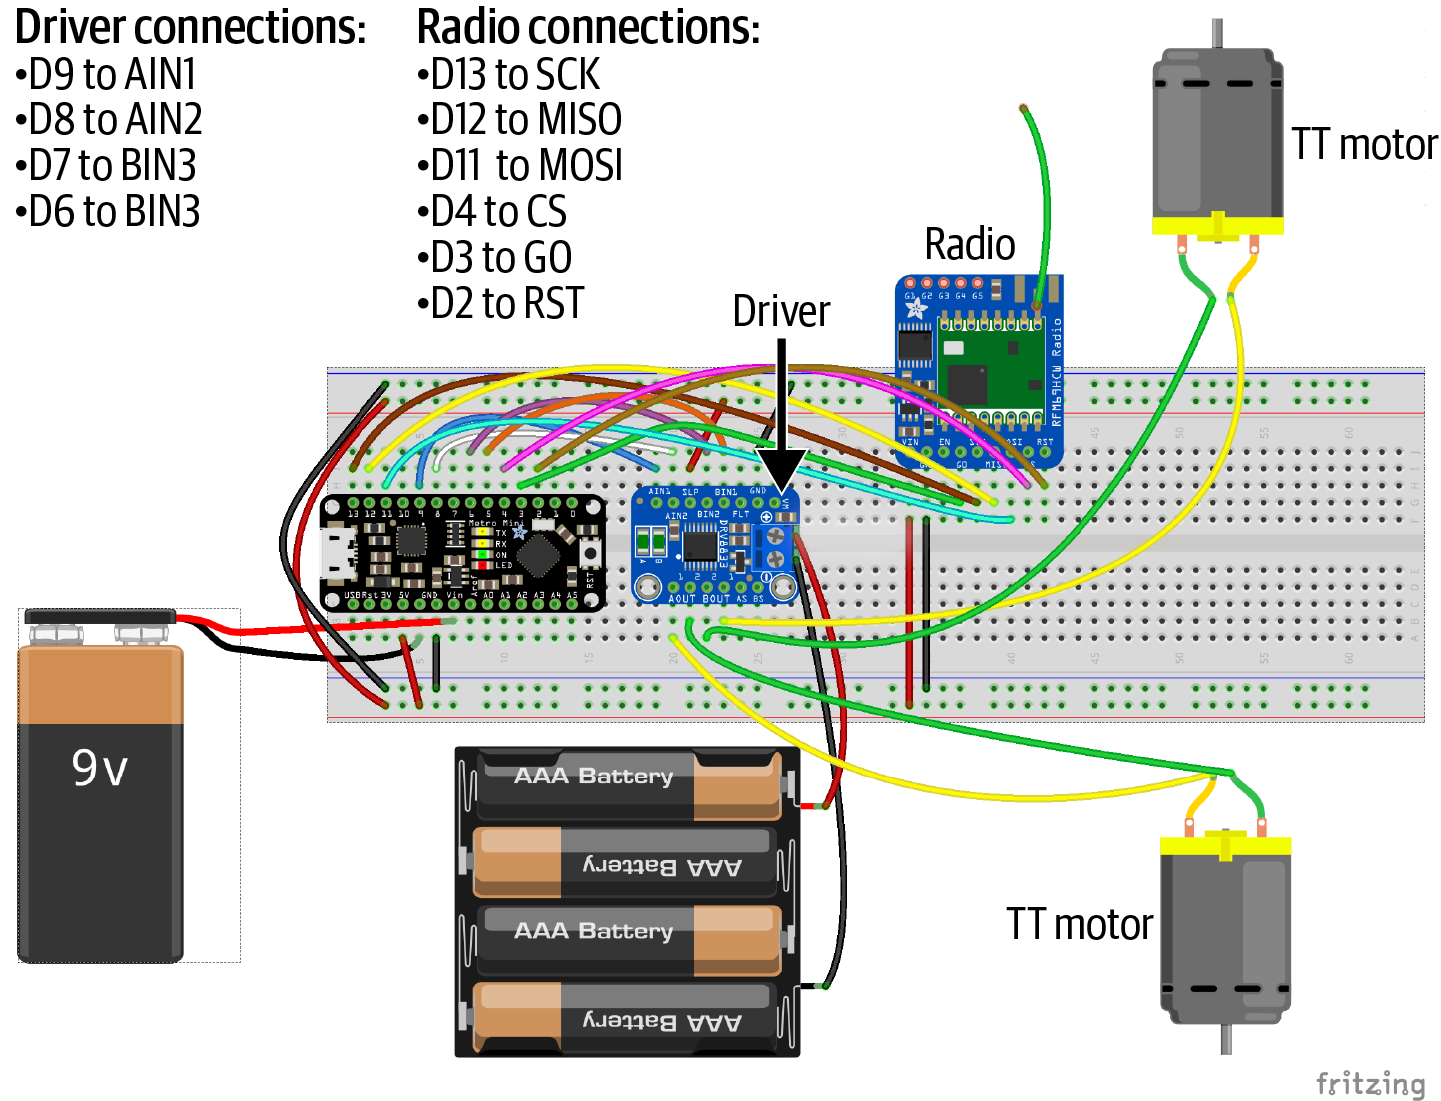
Figure 11-5. Wiring for the robot car with radio transceiver
Of course the power and ground pins should be connected as well. I used a 9V for the microcontroller (which in turn supplies power to the radio) and a separate power supply for the DRV8833. The lonely green wire attached to the top of the RFM69HCW is just a three-inch piece of wire serving as the simplest possible antenna.1
Figure 11-6 shows the assembled components, all ready to roll with no wires attached!
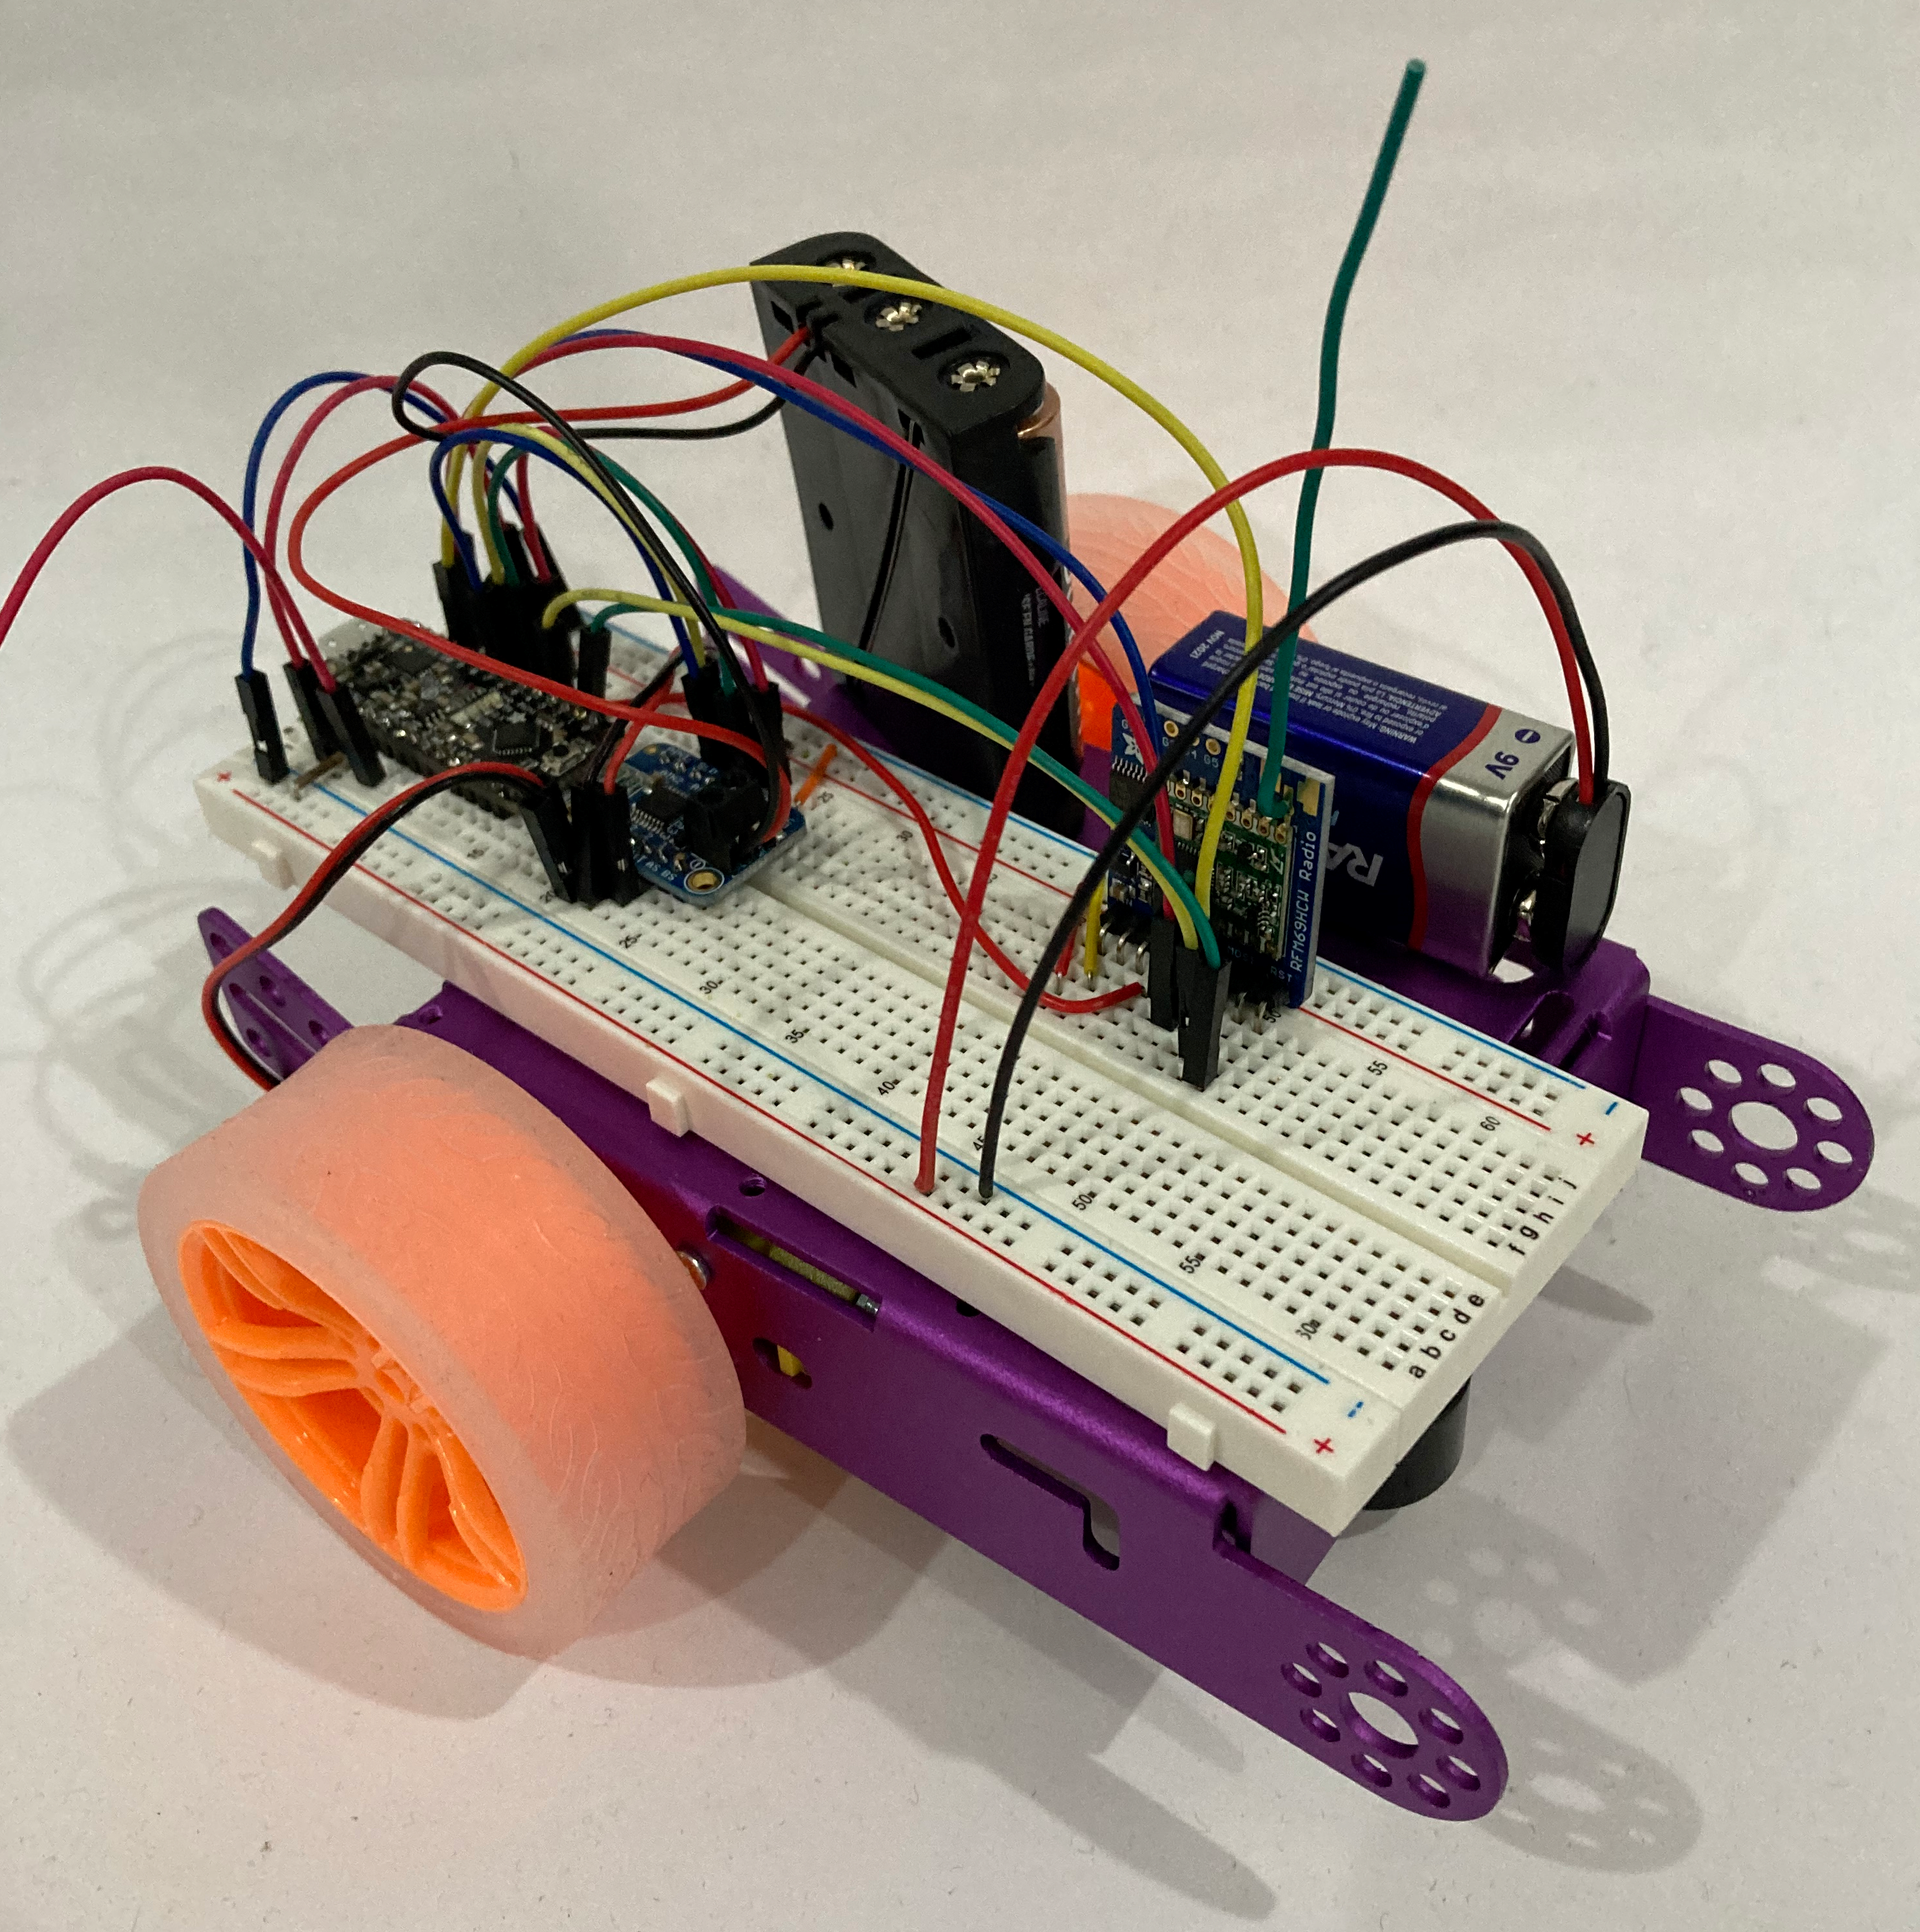
Figure 11-6. Our wire-free robot car
Well, no wires to a joystick, that is. The breadboard is rather lousy with wires. This is a bigger project than we’ve tackled so far. If a radio-controlled car isn’t up your alley, feel free to skip to the next chapter. But before you go, check out “Creating the Library” on creating the library code and its header file.
I’m using two separate power supplies to keep the motors separate from the microcontroller and the radio. If you have more experience powering Arduino projects and want to use a different configuration, go right ahead! The important part is that we have our radio ready to receive driving instructions.
Creating a Controller
We also need a new project to take input from our joystick and send that information out over the radio. Figure 11-7 shows the wiring. Only one battery is required for the controller; the radio can be safely powered from the 5V pin of our microcontroller.

Figure 11-7. Wiring for the radio controller
I powered the controller with a USB power pack plugged into the Metro Mini. Figure 11-8 shows the final result.
Figure 11-8. Our wire-free controller
Not the most glamorous of gadgets, but it does send radio signals! At least, it will once we add a little code.
Creating the Library
The code for both our car and our controller will require our radio library, so let’s start there. We’ll be creating one header file and one .cpp file to accommodate the C++-centric nature of the Arduino IDE. The actual code will still be (mostly) vanilla C, it just needs to live in a file with that .cpp extension.
How you go about writing this code is really up to you. You can write everything in one file and then separate out the parts that go into the header (much like we did earlier in this chapter). You can also use the header as a sort of outline or plan. Fill out the header with your constants and names of your functions, then go create the .cpp file to implement those functions. Regardless of which path sounds better to you, we need to put the files in a specific place before the IDE will recognize them.
The libraries folder
We place all of the files for our library inside one folder that goes in the libraries folder wherever your Arduino sketches live. On my Linux box, that’s the Arduino folder in my home directory. If you’re not sure where that folder is on your system, you can check the preferences in the Arduino IDE. From the File menu, select the Preferences option. You should see a dialog similar to Figure 11-9. Notice the “Sketchbook location” toward the top. That’s where the libraries folder needs to go. If there isn’t one there already, go ahead and create that now.

Figure 11-9. The Sketchbook location preference setting
It’s actually useful that we’re looking at this folder now, since we need to
manually install the library for our radio breakout. It will go in this same folder.
I’m using the
radio library written by the folks at
Adafruit.2 Download the ZIP archive from the green “Code” drop-down
button. Unzip that file and rename the resulting folder RadioHead. Place this RadioHead
folder in the libraries folder, and that’s it.
Well, that’s it for the radio library. We still need to make a folder for our own, yet to be written, library. Inside the libraries folder, create a new folder and pick a name for your custom library. Since this is a radio control library for a robot car, and the title of this book ends in those two letters, I chose to name mine SmalleRC. You are under no pressure to use such delightful, nerdy puns for your library names, by the way. This is where the “custom” adjective comes in. Customize your library however you like!
Our radio-control library header
Inside your new library folder, then, let’s create our files. I’ll use the second approach and start with the header file, SmalleRC.h.
We’ll load the headers we need for our radio work as well as the Arduino.h header in case we rely on any Arduino-specific functions in our library code. We’ll define several constants and then provide some function prototypes:
#ifndef SMALLERC_H#define SMALLERC_H#include "Arduino.h"#include <SPI.h>#include <RH_RF69.h>#define RF69_FREQ 915.0#define RFM69_CS 4#define RFM69_INT 3#define RFM69_RST 2#define LED 13#define rc_INIT_SUCCESS 1#define rc_INIT_FAILED -1#define rc_FREQ_FAILED -2// Define our direction typetypedefsignedchardirection_t;// Define our directionsconstdirection_trc_STOP=0;constdirection_trc_LEFT=1;constdirection_trc_RIGHT=2;constdirection_trc_FORWARD=3;constdirection_trc_BACKWARD=4;charrc_start();voidrc_send(intd);intrc_receive();#endif/* SMALLERC_H */

We’ll use a header guard like we did with pins.h.

Our library code may need some of the Arduino-specific types or functions, so we include this header. It is automatically included in our main project by the IDE, which is why we haven’t seen this
#includebefore.
The SPI (Serial Peripheral Interface) header allows us to perform complex communication (i.e., something other than
HIGHandLOWor single values) with a peripheral using only a few wires. We’ll use this type of connection with our radio breakout board. Our microcontroller has very specific pins for SPI, so we don’t have to specify which ones to use. Figure 11-7 shows the correct connections to make.
We’ll need the RH_RF69 library we just installed to talk to the radio.

While SPI takes care of most communication needs, these
defineentries fill in some details needed by the RH_RF69 library to operate our radio, including the frequency to use (RF69_FREQ; use 433 MHz in Europe and 868 or 915 MHz in the Americas) and which pins handle the interrupts and resets.
We’ll define a few of our own constants to help coordinate the initialization of our radio. We’ll distinguish failures in a way that can help us debug any issues.

We can put our
typedefhere so that everyone importing this library has access to thedirection_ttype alias. We’ll also include our directions.
These are the forward declarations (also called function prototypes) for our library. We’ll need to write the complete functions in our .cpp file, and those functions will have the same names and parameters as the ones declared here.
That’s quite a lot of detail in one header file! But that’s what header files are for. In the absence of any other documentation, reading a header file should tell you just about everything you need to know to use a library.
Warning
I’m cheating a bit with this header. For an Arduino library that you intend to share with others, you wouldn’t normally dictate the pins to use in connecting peripherals. We have the ability to make this header match up with our physical project, but other users might not have the same controller or the same free pins. See “Sharing online” for some tips on digging deeper into shareable library creation. For libraries meant solely for your own projects, though, you’re allowed a shortcut or two.
Our radio-control library code
To complete our library, then, we need to write some code and implement the functions that were prototyped in our header file. This code is not very complex, but it does have several novel parts related to enabling and communicating with our radio. You can type it in yourself or pull up SmalleRC.cpp in your editor:
#include "SmalleRC.h"RH_RF69rf69(RFM69_CS,RFM69_INT);charrc_start(){pinMode(LED,OUTPUT);pinMode(RFM69_RST,OUTPUT);digitalWrite(RFM69_RST,LOW);// manual resetdigitalWrite(RFM69_RST,HIGH);delay(10);digitalWrite(RFM69_RST,LOW);delay(10);if(!rf69.init()){returnrc_INIT_FAILED;}if(!rf69.setFrequency(RF69_FREQ)){returnrc_FREQ_FAILED;}// range from 14-20 for power// 2nd arg must be true for 69HCWrf69.setTxPower(17,true);// The encryption key is up to you, but must be// the same for both the car and the controlleruint8_tkey[]={0x01,0x02,0x03,0x04,0x05,0x06,0x07,0x08,0x01,0x02,0x03,0x04,0x05,0x06,0x07,0x08};rf69.setEncryptionKey(key);pinMode(LED,OUTPUT);returnrc_INIT_SUCCESS;}voidrc_send(direction_td){uint8_tpacket[1]={d};rf69.send(packet,1);rf69.waitPacketSent();}direction_trc_receive(){uint8_tbuf[RH_RF69_MAX_MESSAGE_LEN];uint8_tlen=sizeof(buf);if(rf69.recv(buf,&len)){if(len==0){return-1;}buf[len]=0;return(direction_t)buf[0];}returnSTOP;}
Include our recently built header file with all the pins, directions, and radio configuration information.
Create a radio control object similar to the NeoPixel objects in previous projects.
Initialize the radio. This code is based on the examples included with the library we installed. See “Sharing online” for a few more details on examples and other library documentation.
Part of the radio initialization is setting an encryption key that will make sure only other radios using the same key can communicate with us. These values are exactly those from the example. Feel free to change them, just make sure the key is 16 bytes.
A simple function to broadcast a direction. The radio library expects a packet of
uint8_tvalues, so we create a one-element array to match. The library can send longer messages, of course, but we only need to send this single value.The receiving function to read any directions coming from the controller. Again, the radio library can handle longer messages, but we only need the first byte, which should contain our direction. If there’s no message at all, return
-1to let the caller know nothing was ready. Otherwise, return the direction we received orSTOPas a default.
With our custom library in place, we can look at writing the actual projects for the car and the controller. But we sure whizzed through this code! If you’re curious about radio communication, I encourage you to play with the examples from the radio library to get a better feel for what possibilities and limits exist.
Updating the Car Project
Now we need to write the code for the car. (Feel free to review the physical setup of the car and breakouts in “Retrofitting Our Car”.) Essentially, we are going to replace the logic for polling the joystick with a call to check for data from the radio. We’ll pause for a few milliseconds to avoid starting and stopping the motors too quickly. Otherwise, we’ll run a pretty tight loop so that the car feels responsive to our remote controller.
I based this version (car3) on the car2 project, which had the separate pins.h and drive.ino files. We no longer need the pins for the joystick in this project, so the header file is a bit shorter:
#ifndef PINS_H#define PINS_H#define AIN1 9#define AIN2 8#define BIN1 6#define BIN2 7#endif/* PINS_H */
The driving functions are completely unchanged so I’ll leave those out, but you can review the code (“Code (.ino) Files”) if you want. The code for the main car3.ino file should feel familiar, but obviously we need to include the header file of our new radio library:
#include "pins.h"#include "SmalleRC.h"voidsetup(){Serial.begin(115200);// Send output to the motor pinspinMode(AIN1,OUTPUT);pinMode(AIN2,OUTPUT);pinMode(BIN1,OUTPUT);pinMode(BIN2,OUTPUT);if(rc_start()!=rc_INIT_SUCCESS){Serial.println("Failed to initialize radio.");}}voidloop(){direction_tdir=rc_receive();if(dir>0){// Driving!switch(dir){caserc_FORWARD:forward();break;caserc_BACKWARD:backward();break;caserc_LEFT:left();break;caserc_RIGHT:right();break;}delay(20);}else{// Stopping, or eventually we could handle errors, tooallstop();}}
Notice that I’m using the new navigation constants (like rc_LEFT)
defined in the SmalleRC.h file. But that’s really all the code
we need now to drive our car! This is one of the
many benefits from separating out chunks of common code. By building on that
shared code, you can more quickly create some very interesting projects.
There’s no good way to test this new car3 project just yet, but go ahead
and upload it to your microcontroller. If nothing else, you can use the Serial Monitor
tool to ensure that there were no errors in starting up the radio to receive. I went
with the “no news is good news” approach to errors in the setup()
function, but feel free to alter that a bit to produce a success message if you like.
Tip
Now that the Arduino IDE knows about our SmalleRC library, you can actually edit
the source files of that library in place and then reverify or reupload the project.
If you do have some trouble starting the radio, for example, add some debugging
calls to Serial.println() in SmalleRC.cpp. Once you have the problem isolated
and solved, you can remove the debugging statements and upload once more.
Getting It Under Control
Next up is getting the controller programmed. (Again, look back at “Creating a Controller” if you still need to build the physical remote control.) Here we take the joystick polling and instead of sending the results to the motors, we broadcast any directional information over our radio. This is a pretty small project thanks to the library, so I left it in a single ch11/controller/controller.ino file:
#include "SmalleRC.h"#define LEFT_BTN 9#define RIGHT_BTN 7#define FWD_BTN 8#define BKWD_BTN 6voidsetup(){Serial.begin(115200);// Accept input from the joystick pinspinMode(LEFT_BTN,INPUT_PULLUP);pinMode(RIGHT_BTN,INPUT_PULLUP);pinMode(FWD_BTN,INPUT_PULLUP);pinMode(BKWD_BTN,INPUT_PULLUP);if(rc_start()!=rc_INIT_SUCCESS){Serial.println("Failed to initialize radio.");}}direction_treadDirection(){if(digitalRead(FWD_BTN)==LOW){returnrc_FORWARD;}if(digitalRead(BKWD_BTN)==LOW){returnrc_BACKWARD;}if(digitalRead(LEFT_BTN)==LOW){returnrc_LEFT;}if(digitalRead(RIGHT_BTN)==LOW){returnrc_RIGHT;}// No buttons were pressed, so return STOPreturnrc_STOP;}voidloop(){direction_tdir=readDirection();rc_send(dir);delay(10);}
We could have put the logic of the readDirection() function right inside our
loop() function, but I like how concise loop() is with this small abstraction.
Try verifying this new project and if you hit any snags, add a few more
Serial.println() statements. And remember, you can also add those to your library code if needed.
Tip
For projects like this, where so much work is done in libraries
(not just our custom one, but also libraries like RF_RH69)
println() calls may not help with every problem. Bugs in downloaded libraries
do happen, but they’re pretty rare.
I find many problems are caused by me getting some of the wiring wrong.
So if things still aren’t working, try double-checking your connections
between the microcontroller and the various peripherals.
Go Driving!
No code. No diagrams. No instructions. Just another point in this chapter where I wholly encourage you to go play. :) Try powering up both projects and see what happens when you move the joystick. There are definitely things that could go wrong! If the wiring isn’t quite right, for example, the car might move, but not in the direction you meant. (I accidentally swapped the right-side motor input pins when moving the project to a full-size breadboard, for example. The right wheel turned, but in the wrong direction.) Or if we have the wrong pins connected to the joystick, we might not send any signal at all.
If the car doesn’t budge, it’s time yet again to break out your debugging skills.
You can have both projects connected to your computer at the same time, by the way. They will
simply be on different serial ports. (Remember, you can set which port you use for your
microcontroller through the Tools menu in the Arduino IDE.)
You can use Serial.println() statements to
make sure your inputs, sends, receives, and drives are all doing what you
expect them to do. Just watch out for success! When you do get things working, it’s
surprisingly easy to drive your car right off the desk and leave a string of
electronics dangling from your USB cable. Or, you know, so I’m told.
Documentation and Distribution
Once your library is working and you’ve had enough fun zipping around your room, it’s time to think about adding a little documentation to your project. Documentation is great. Not just for other programmers who might use your library, either. If you step away from a project even just for a few days, any documentation you wrote can be surprisingly useful for helping you get your own mind back up to speed.
Keywords
One very simple piece of documentation that you can add for use with the Arduino IDE is a single text file called keywords.txt. For a custom library, it should contain two columns, separated by a tab. The first column contains functions, constants, and data types defined in your library. The second column should contain one entry from Table 11-1 indicating the category of the name in the first column.
| Category Name | Purpose | Appearance |
|---|---|---|
KEYWORD1 |
data types |
orange, bold |
KEYWORD2 |
functions |
orange, plain |
LITERAL1 |
constants |
blue, plain |
While limited, these few categories can still help programmers who rely on the IDE cues for things like whether or not they spelled a function name correctly.
For our library, then, we could create the following entries (again, separated by a tab) in our own keywords.txt file:
rc_INIT_SUCCESS LITERAL1
rc_INIT_FAILED  LITERAL1
rc_FREQ_FAILED  LITERAL1

direction_t KEYWORD1

rc_STOP LITERAL1
rc_LEFT LITERAL1
rc_RIGHT    LITERAL1
rc_FORWARD  LITERAL1
rc_BACKWARD LITERAL1

rc_start    KEYWORD2
rc_send KEYWORD2
rc_receive  KEYWORD2
Basically, that list is everything we defined in our SmalleRC.h file minus the few constants that were used only by the radio library. If you restart your IDE at this point, the functions and other names listed in the file will share the same syntax highlighting that the core language uses! Very cool.
Warning
Be sure to use real tab characters to separate the columns in keywords.txt. Spaces will not work. Many editors (like VS Code, for example) have a reasonable setting that turns all tabs into the appropriate number of spaces when the file is saved. There are many reasons that quiet change can be useful in source files, but we don’t want it here.
If you can’t temporarily disable this feature in your editor of choice, keywords.txt really is just a text file. You can create or edit it using any text editor, including very simple ones like Notepad in Windows 10 or TextEdit in macOS.
Including examples
Including a few example projects with your library is another great addition that doesn’t require too much effort. You simply create an examples folder in the folder with your library code and keywords.txt file. Inside examples, then, you can place a few project folders. (Use the entire folder, not just the .ino file inside.)
Example projects should be short and sweet. Don’t include unnecessary features that don’t make use of the library if at all possible. You want a new user to see the important parts of your library and how they fit within a sketch. If your library is fairly rich, don’t be afraid of providing several smaller examples that each focus on a particular aspect of the library.
Of course, you will find the other end of that “smaller, focused” spectrum in the wild. Sometimes a single example contains a demonstration of every single feature in a library. While these expansive examples do highlight the use of a library, they can make it more difficult for an outsider to extract details. If you’re only trying to learn about one or two of the functions in a library, big examples can be overwhelming.
But any example is better than no examples! If you only have the energy for the single, comprehensive approach, include it. If you host it somewhere public like GitHub, you might even invite other users to contribute some focused examples from their own projects.
Sharing online
If you do get serious about sharing your code, you’ll want to check out the official Library Guide online, as well as the excellent Library Specification document. There are a few more things you can add to your library folder if you want it to feel polished. You can even get your library to work with the Library Manager in the IDE. A quick heads-up, though: these docs (reasonably) use C++. C++ has many more facilities for sharing the appropriate parts of your code while hiding the implementation details. There are definitely bits of syntax that will be new to you, but hopefully nothing too overwhelming.
As a first step toward publishing your library, check out the FAQ direct from the Arduino team.
Next Steps
Even if you never publish a library, we have seen how to manage larger projects with several tricks including preprocessor macros, type aliasing, and using multiple tabs in the Arduino IDE. We also covered creating simple libraries that you can manually install on your system to share between your own projects.
It’s useful to remember that the tab and library stuff is peculiar to the Arduino IDE. Other IDEs or environments may have their own quirks, but you can almost always find a way to use multiple files when needed. The main goal is to keep you productive with whatever tools you choose.
I mentioned that you might want to know a little C++ if you publish any libraries. C++ in general is an excellent topic to explore after this book. In the next chapter, we’ll look at a more advanced project as a stepping-stone out into the wider world. I’ll also suggest a few other topics worth considering as you continue to expand your C and Arduino skills.
1 There are certainly fancier options available if you are so inclined or want to communicate over longer distances.
2 Forked would be a better verb than written. The Adafruit library is based on the AirSpayce RadioHead library written by Mike McCauley.