Chapter 12. Next Next Steps
First off, congratulations for making it this far! We have toured a pretty impressive breadth of the C programming language and the Arduino microcontroller ecosystem. Remember that first “Hello, World” program or that first blinking LED? You know a lot more about both worlds now, and I hope you’re eager to continue expanding your skills.
In this final chapter, we’ll look at one last project that connects your Arduino skills to the Internet of Things. The world of IoT is growing daily and will provide plenty of opportunities to try out new things, but we’ll also cover a few other topics you might look into next.
Intermediate and Advanced Topics
There are so many paths you can take from here. The array of sensors and displays available these days is truly astonishing. Go exploring! You’ll find your own inspirations and projects to tackle, which will lead to more exploring and more inspiration. My most enjoyable adventures have come from specific project ideas. I wanted an animated LED hourglass for part of a Halloween costume, so I found a capable, wearable microcontroller and some dense LED strips.1 I had such fun with the LEDs on that project that I decided to create some weatherproof lighting for my backyard. With WiFi available to makers like us on small budgets, I could even let guests pick the colors and other effects. The success of the WiFi feature in turn propelled me to create a miniature weather station to feed my inner meteorologist.
The key to success for all those projects was picking a fairly focused goal. For example, in the next section we’ll dip our toes into the world of IoT with a simple project that takes a temperature reading from the TMP36 components we’ve used already and reports it to a cloud service over WiFi. If you really want to cement the new knowledge and skills you’ve gained through the projects and examples in this book, pick your own mini project and make it a reality!
IoT and Arduino
It wouldn’t do to have a chapter with no code, so let’s look at one last project that introduces some really fun avenues you can explore on the way to creating your own gadgets. The Internet of Things is exploding, and Arduino is perfectly suited for playing in that space. Let’s look at a simplified version of my weather station project. We’ll use a WiFi-capable microcontroller to report sensor data to a cloud API.
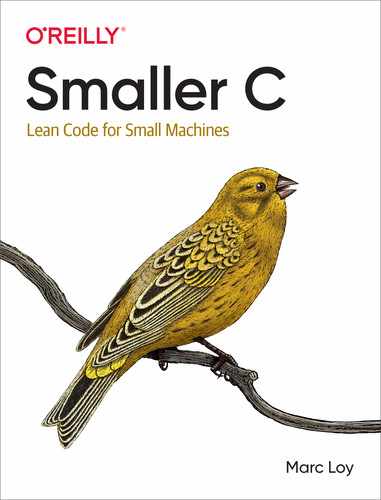
The circuit for this project is fairly simple. We need a WiFi-capable microcontroller or a WiFi breakout that you can connect to your controller like we did with the RF breakout in “Importing Custom Libraries”. I chose the HUZZAH32 Feather from Adafruit. It has some impressive specs like more than 500KB of SRAM and 4MB of flash in addition to the integrated WiFi support. The sensor is the same TMP36 we used in “Sensors and Analog Input”. I also added an OLED display so I could watch the output without being tied to a computer to access the Serial Monitor, but this display is definitely optional. Figure 12-1 shows the wiring diagram and my actual “station” up and running on a breadboard.
Figure 12-1. Connecting the HUZZAH32, TMP36, and OLED
The OLED uses a library provided by Adafruit that you can import through the Manage Libraries
dialog of the IDE. Enter SSD1306 in the search field and look for the “Adafruit
SSD1306” library. It should be close to the top.
We also need to pick a cloud service provider and find a library for communicating with them. I use Adafruit.io for these types of projects, but any IoT cloud service will likely work. AWS, Google, and Azure all have IoT solutions, for example.
For Adafruit.io, we can use the Library Manager to find our communication library. Search for “adafruit io arduino” and then scroll down a bit to find the actual library called “Adafruit IO Arduino.” Installing this library requires quite a few dependencies, such as the HTTP and message queue libraries, but the Library Manager will handle that for you automatically and prompt you to install those dependencies. You might have some of the listed dependencies like the NeoPixel library already, but the Library Manager isn’t quite smart enough to show only the missing ones. When you do install the dependencies, though, only those that are missing will be added.
I won’t go through the details of signing up, but once you have an account with your chosen provider, you’ll almost certainly need a few credentials to configure the library. Adafruit.io, for example, requires a unique username and access key. Let’s put this cloud service information in a separate config.h file where we can also include our WiFi details:
#include "AdafruitIO_WiFi.h"#define IO_USERNAME "userNameGoesHere"#define IO_KEY "ioKeyGoesHere"#define WIFI_SSID "HomeWifi"#define WIFI_PASS "password"
Happily, that library also contains a more generic WiFi library as a dependency.
That double duty is nice for us—we don’t have to go through separate
steps to configure both the WiFi and our access to the cloud. But we do still have to
do a little bit of setup work to make sure we can communicate with the cloud. We’ll
add that code in with the stuff necessary to use our nifty OLED display in the setup()
function. As always, feel free to type this in yourself, or grab
ch12/temp_web/temp_web.ino:
#include <SPI.h>#include <Wire.h>#include <Adafruit_GFX.h>#include <Adafruit_SSD1306.h>// Use credentials from config.h to set up our feed#include "config.h"AdafruitIO_WiFiio(IO_USERNAME,IO_KEY,WIFI_SSID,WIFI_PASS);AdafruitIO_Feed*smallerc=io.feed("smallerc");// Set up our OLED#define SCREEN_WIDTH 128// OLED width, in pixels#define SCREEN_HEIGHT 32// OLED height, in pixels#define OLED_RESET 4// Reset pin ##define SCREEN_ADDRESS 0x3C// 128x32 screenAdafruit_SSD1306display(SCREEN_WIDTH,SCREEN_HEIGHT,&Wire,OLED_RESET);charstatusline[22]="Starting...";// A few things for keeping an average temperature reading#define ADJUST 3.33/* my office reads about 3 degrees C cold */floattotal=0.0;intcount=0;voidsetup(){Serial.begin(115200);// SSD1306_SWITCHCAPVCC = generate voltage from 3.3V internallyif(!display.begin(SSD1306_SWITCHCAPVCC,SCREEN_ADDRESS)){Serial.println(F("SSD1306 allocation failed"));for(;;);// Don't proceed, loop forever}// Show Adafruit splash screen initialized by the display librarydisplay.display();// Now set up the connection to adafruit.ioSerial.("Connecting to Adafruit IO");io.connect();// wait for a connectionwhile(io.status()<AIO_CONNECTED){Serial.(".");delay(500);}// we are connectedSerial.println();Serial.println(io.statusText());// Set up our display for simple (if small) textdisplay.clearDisplay();display.setTextSize(1);// Normal 1:1 pixel scaledisplay.setTextColor(SSD1306_WHITE);// Draw white textdisplay.setCursor(0,0);// Start at top-left cornerdisplay.cp437(true);// Use 'Code Page 437' fontdisplay.println(statusline);// Show our starting statusdisplay.display();// Update the actual display}voidloop(){// put your main code here, to run repeatedly:intreading=analogRead(A2);floatvoltage=reading/1024.0;if(count==0){total=voltage;}else{total+=voltage;}count++;floatavg=total/count;floattempC=(avg-0.5)*100;floattempF=tempC*1.8+32;if(count%100==0){// Update our display every 10 secondsdisplay.clearDisplay();display.setCursor(0,0);display.println(statusline);display.(reading);display.("");display.println(voltage);display.(tempC);display.println("370C");display.(tempF);display.println("370F");display.display();strcpy(statusline,"Reading...");}if(count%600==0){// Update our IoT feed every minutesmallerc->save(tempF);strcpy(statusline,"Feed updated");}delay(100);}

Include the various header files needed to communicate with the libraries that draw on our OLED.

With the credentials from config.h, create an I/O object (
io) and establish a connection to the Adafruit IO service, then specify which feed we will update.
Instantiate our
displayobject using constants and referencing theWirelibrary.
Attempt to connect to the display. If that fails, print an error message and do not continue. If you do get stuck here, it’s likely a problem in your wiring. Double-check the connections and make sure your display also has power.

Make sure we can use the feed from
. Wait (potentially forever) until it’s ready.
If you can’t connect, you might try using your credentials in a browser to verify the combination of user and
key works. You can also test out your WiFi connection with a separate project. Under the File menu in the IDE,
look for the Examples submenu, find your board, and pick something simple like HTTPClient.
Read the current analog value from our TMP36 sensor and update the average, running temperature.

Update our display with some nice text on the temperature and the current cloud status. The API for this display is similar to the functions we use with
Serial.
Once a minute, report the simple temperature in Fahrenheit to our feed. The next time through
loop(), we’ll note the update in our status line on the OLED.
You can certainly turn controllers like the HUZZAH32 into their own web servers and just get readings directly in your browser, but services like Adafuit.io make it easy to get fancier reports, such as the small graph of temperatures over a few minutes shown in Figure 12-2. These services typically support connecting to yet more services as well. For example, If This Then That (IFTTT) allows you to use events reported to Adafruit.io to trigger actions like sending an email or turning on smart home devices.
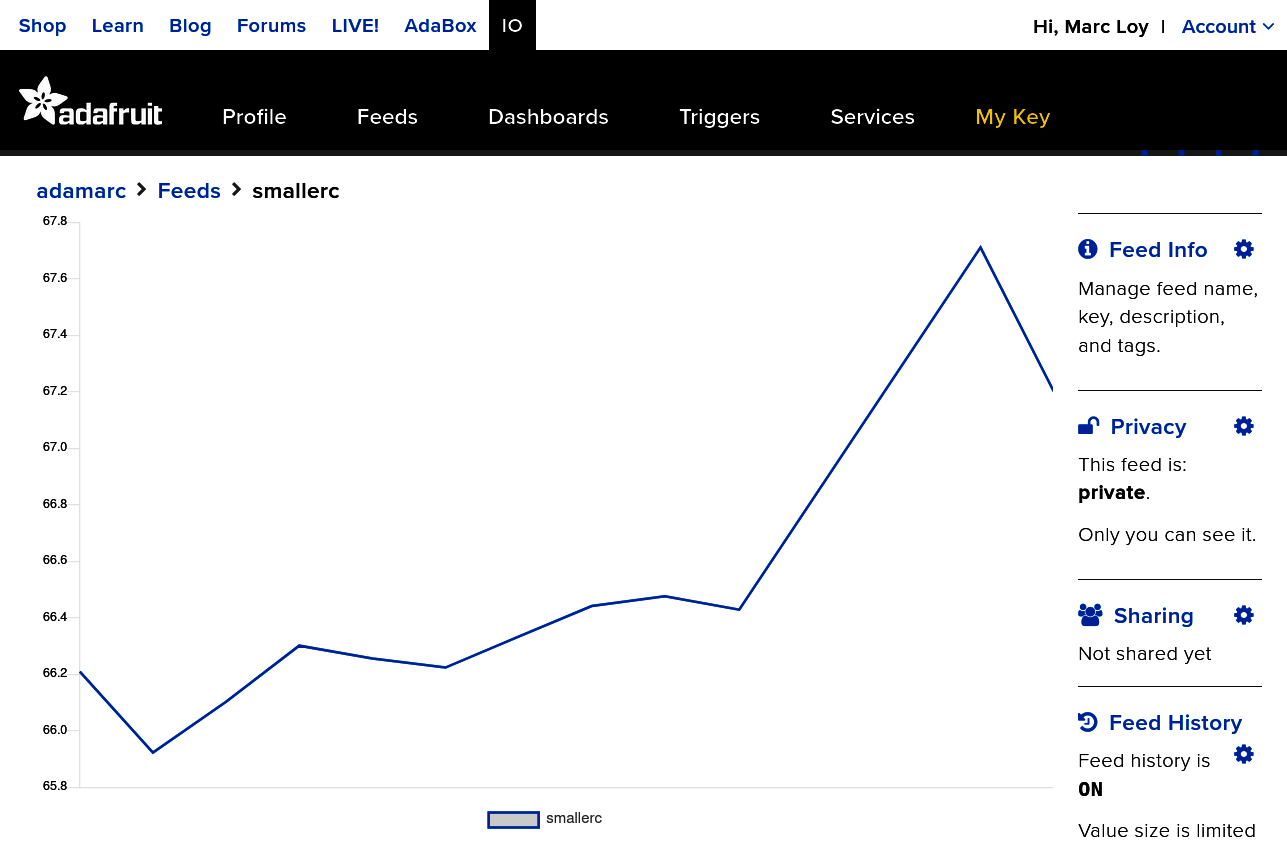
Figure 12-2. Graph of our reported temperatures
This little project is just the briefest of introductions to the Internet of Things. Heck, just the fun combinations possible through IFTTT could fill their own book. IoT books and blog posts abound, covering everything from user interface design for small devices to enterprise mesh configurations. This is a fun, dynamic area, and you certainly have the skills to dive in if you’re curious to learn more.
Arduino Source Code
There are so many neat Arduino projects out there and so many of their authors are doing it for the joy of creating. They put their hardware specs and source code online and actively participate in the Arduino forums. I heartily encourage you to read some of that source code. You have the skills to understand the code in those projects now, and seeing how other programmers tackle problems can help you learn new tricks.
You can also access the source code behind the many boards supported out of the gate by the Arduino IDE. The various ArduinoCore packages cover the C and C++ content that goes into the Arduino “language” we discussed in “The Arduino Environment”. It’ll be dense reading, to be sure, but you might be surprised how much of the basics you can pick up.
Other Microcontrollers
Of course, Arduino isn’t the only microcontroller game in town. Mitchel Davis has a really enjoyable series on YouTube documenting his journey from programming on Arduino to more limited controllers like the STM8. His examples are often in C, and you can see some of the more arcane topics we covered like bit-wise operators on full display.
Going the other direction toward more powerful controllers, the Raspberry Pi platform deserves a mention as well. These tiny computers are full-fledged desktop systems capable of running a complete Linux distribution—including running all of the developer tools like gcc. What’s more, Pis come with the same kinds of GPIO (general purpose I/O) connections as the microcontrollers we’ve worked with in this book. You can use the same types of sensors and outputs and write C programs to drive them. And you get to compile those programs right on the hardware where the peripherals are attached! You can take some of the really clever projects, such as the MagicMirror, and add motion detectors so the mirror lights up only when someone is nearby to make use of it, making it even more magical.
If nothing else, I hope this book has given you the confidence to try tackling these types of projects. It’s a gratifying world that lends itself to mastery. Unlike enterprise engineering projects that literally span the globe, you can concentrate on really learning the details of something like the Metro Mini controller from so many of our examples. You don’t need eight different toolchains to get that LED blinking. You don’t need a dozen programmers to debug a photoresistor night-light. As one of the reviewers for this book, Alex Faber, put it, there’s no cruft to get in the way of the craft. I couldn’t agree more.
Industry C/C++
You also aren’t limited to tinkering with C at home. Arthur C. Clarke’s many futures (2001: A Space Odyssey, 2010: Odyssey Two) are now our past, but computers and artificial intelligence figure quite prominently in our present. If you are interested in pursuing C programming as a career, search any tech job site and you will find hundreds of jobs for C programmers from entry level positions to senior architects. You can intern with a Linux kernel group or help program embedded controllers. You can get a job working on tiny toy drones or program sensors that keep the world’s largest factories running.
Legacy code maintenance still requires good C programmers and pays well enough for said programmers to build a nice financial legacy for their progeny. Gaming systems need really, really fast code for both the game engines and the consoles they run on.
Supercomputers and microcontrollers both make use of C in a variety of environments. While it might be more obvious that microcontrollers need efficient code, massive supercomputers want every possible cycle of CPU (or, these days, GPU) time to go toward completing their calculations. C excels at providing that level of control, and companies know they need programmers who excel at making their expensive machines go fast. Just about any field you can think of these days is computerized, and anywhere they are pushing the limits of hardware (the tiniest, the deepest, the coldest, the fastest, etc.), you can find C programmers helping push those boundaries.
Back to the Future
Many languages have cropped up since C was first developed in the 1970s. Many more languages will undoubtedly appear in the years and decades to come. C remains so relevant precisely because of that extra control and speed it provides. Many more “advanced” languages like Java retain the ability to load native libraries written in C with the same kinds of header files we wrote for Arduino. Go can also call C functions. Working on embedded systems with Rust, but that one component only has C support? Rust can pull in C as well.
Just about everywhere you go in the computer programming world these days, you will find C. From its ubiquitous control statements to integration via native libraries, knowing C connects you to so much more of this world than you probably imagined. All I can say in closing is that I hope you keep imagining. Imagine new projects. Imagine new libraries. And then get that imagination running on hardware. C is a great tool for reifying those digital dreams. After working through this book, I hope you feel confident using it.
1 Again from Adafruit, I used the Gemma M0 and carved up one of their 144 LED/meter RGBW strips to sew the hourglass onto a shirt. I powered the whole thing with a USB battery pack and barely dented the charge after more than four hours of continuous operation.