
Chapter 7: Android App Navigation Structure
Navigation structure is a critical aspect of an app’s usability. Get the navigation wrong, and the app is useless. Getting the navigation structure right requires careful planning and a good understanding of the platform. I have seen examples whereby developers ported an app designed for another platform over to Android, unchanged. Results are mostly disastrous in these cases. Navigation must work consistently in all apps on Android platforms. Users learn to use Android apps a certain way and expect the same behavior.
Navigation structure is all about presenting your content in a meaningful and intuitive way. Users must be able to determine where to find the content they are looking for and how to navigate the app without getting lost. It is important to let the users feel like they are in control all the time. Making users feel lost in your app is a sure way to get your app uninstalled.
Navigation is not just about your app’s internal structure. On Android your app is part of the platform. You must plan how your app integrates with other apps and understand the different ways your users can enter and leave your app.
This chapter explains what you need to take into account and know to be able to design and implement good Android app navigation.
Components of Android navigation, Activities, and Intents
To understand how Android navigation works, you need a good understanding of what’s going on under the hood, so to speak. This section explains some of the most important technical navigation concepts.
The two main components of Android navigation are intents and activities. An activity is the core component of the Android app user interface. An activity very often corresponds one-to-one to a screen. Although this is not always true and there are many situations where this isn’t true, you can think about activities this way for now. The way activities are called and closed form the bulk of the navigation structure of an app.
As explained in the previous chapter, activities are started by triggering intents. By default, each intent creates a new activity, which is then activated. If another activity is already active it is moved to a structure called the back stack.
Users can then navigate backward by closing the active activity, for example by pressing the Back button. Whenever the active activity is closed, the topmost activity from the back stack is brought to the front and activated. If no activities are found from the back stack, the user is brought back to the home screen.
Modifying back stack behavior with intent flags
In most cases the default behavior of back stack is enough, but sometimes using the default behavior would lead to situations where the back stack structure doesn’t make sense. It is possible to tell the operating system to handle the activity stack differently by adding control flags to the triggered intent.
There are more than 20 intent flags that can be used to launch activities. Most of them are useful only in very rare cases. Three of the intent flags are important and used very often, and are listed here:
• FLAG_ACTIVITY_NEW_TASK—An activity started with this flag will start a new task. Later in this chapter, you’ll see an example of this flag in practice.
• FLAG_ACTIVITY_CLEAR_TOP—If an instance of the new activity is already running in the back stack, the instance is brought to the front and all the activities on top of it are cleared. This intent flag is especially useful with notifications. You’ll find an example of this later in the chapter.
• FLAG_ACTIVITY_SINGLE_TOP—If the topmost activity in the back stack is an instance of the activity that is being launched, that activity is brought to the front and no new activities are launched. This intent flag is very useful for preventing the same activity from getting started over and over again when it is not needed.
 Scan the QR code with your Android phone to open the companion app and try a functional example. Of course, make sure you have the Smashing Android UI companion app installed on your phone first. See the Introduction for more information.
Tasks
Whenever an app is launched from the home screen it has its own back stack and does not interfere with other apps’ back stacks. Two apps that are launched from the home screen can, therefore, be thought of as separate tasks. Tasks are collections of activities in the back stack. You can manually start a new task inside your app by using intent flags. This feature is not needed that often when navigating within one app, but sometimes you can make better use of the other intent flags if you use tasks to group activities in your app. Tasks are an important concept when you are launching other apps from your app.
Android Navigation controls
Android provides a set of standard navigation controls to the users. The Back and Home buttons have become identifying hardware features of all Android phones. On top of these two navigation keys is the Up button, which is sometimes used to help users navigate in the screen hierarchy. Users can also directly switch between apps by using a dedicated multi-tasking button on newer phones or holding down the Home key on older phones. All of these controls have dedicated roles and all app designers must understand them.
The Home button
All Android phones have a Home button. Older ones have a physical one and newer ones often have a software-rendered one. The Home button serves a critical purpose, and the Android platform prevents you from overriding its functionality. Pressing the Home button will always trigger an intent that opens the user’s home screen. Any running app moves to the background. The current activity doesn’t end, so the user can return to the app using Android’s multi-tasking controls. Always keep in mind that the user might choose to press the Home key at any time.
The Back Button
Users navigate backward in the navigation hierarchy by pressing the Android Back button. In older devices the Back button is a physical button, and in newer generation devices it often is a software key rendered by the operating system. Developers can trust that the Back key is always available.
Tip: By default, pressing the Back button will end the active activity and return users to the previous activity. In the vast majority of cases, this is exactly what should happen and what users expect. As a rule of thumb, do not override the Back button’s functionality unless you have a very good reason for doing so!
For developers, having the Back button terminate the current activity makes sense. It is easy to understand and logical. For users, Back button functionality can be more confusing. They don’t understand or care what activities are, what their lifecycle is, and what happens under the hood. If you use more complex activity structures, always make sure that the Back button functionality looks correct to the users regardless of the underlying implementation.
Although the Back button typically exits the active activity, its functionality has been overridden in many places. All of the following examples might look different to phone users, although to a technical person they all make sense. More importantly, the behavior under the hood is consistent.
• Go back to the previous screen (activity).
• Exit the running app when on the last activity.
• Return to the previous app when on the last activity and when the app was launched through an intent from another app.
• Dismiss a pop-up.
• Terminate a long-running process.
• Close the on-screen keyboard.
• Go to the previous page on a browser.
You must keep in mind that the Back button is probably the most popular user control on the Android platform. Users use it without thinking. It should always be clear to the users what is going to happen when they press it. If users have to think about what is going to happen even a bit, it will make the app feel cumbersome and difficult to use.
The Up button
With the release of Android 3.0 Honeycomb, Google introduced a new navigation concept, the Up button. The Up button is derived from a concept that is very common on the web. On many web pages, the top-left corner contains the website logo. Users can click the logo to go to the front page of the website. Before the 3.0 Android release, an emerging pattern on Android apps was to place the app logo in the top-left corner, which always took users to the app front page.
Unfortunately, Google decided to change this concept and replaced the functionality of the top-left button. The top-left button, which is part of the Action Bar pattern (more about the Action Bar in Chapter 18), is now the Up button. Although developers don’t have to use this feature in their apps, it is encouraged as it has become a pervasive feature and users are starting to expect it.
Visually, the Up button is the application icon with a left caret when it is active. Figure 7-1 shows an example of the Up button from the TED talks app.

Figure 7-1: The Up button is a left-pointing caret.
Source: TED CONFERENCES, LLC
In theory, at least, the purpose of the Up button is simple. Whereas the Back button takes the users back to the previous screen, the Up button takes the users to the screen that is one step higher in the hierarchy. Figure 7-2 shows a simple example demonstrating the difference between the Up and Back buttons. In the example, screen A, a list screen, is higher in navigation structure than screens B and C, which are item details screens. The user first navigates from the list screen to the first item details screen B, and then to another item details screen C. If she is on the item details screen C, pressing the Back button would take her back to the previous item details screen B, whereas pressing the Up button would take her to list screen A.
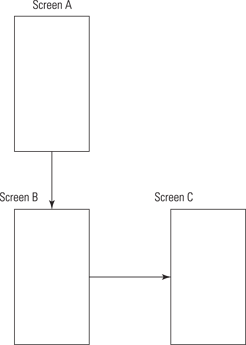
Figure 7-2: Navigation diagram demonstrating the difference between the Up and Back buttons.
User Confusion
The Up button can easily confuse users. For technical people it is easy to understand and once the difference between the Back button and the Up button is explained, it’s usually clear. Unfortunately, nobody is going to be explaining the difference to most users. Users historically have a hard time understanding the difference between Up and Back. Google’s unfortunate choice to use the left-pointing caret as the Up symbol doesn’t help. The Back button icon also points left.
The iOS Back button is often placed very similarly as the Android Up button. This is guaranteed to cause even more confusion for people using both platforms.
Due to the possible confusion it is very important to follow the guidelines carefully. Consistent functionality in all Android apps is the only way to combat user confusion.
Up Button Rules of Thumb
Clearly, the functionality of the Up button versus the Back button can cause some confusion for users as well as developers. Here are some rules of thumb you should follow when using the Up button (unless you have a very good reason to break them).
♦ The Up button should never lead the user to the home screen.
♦ The Up button should never lead the user to another app.
♦ Disable the Up button when there are no more levels for the user to go up. The left caret must not be visible when the Up button is disabled.
♦ The Up button should always lead to the same screen from one screen regardless of how the user navigated to the screen (in-app navigation, from notification, and so on). A screen can exist only in one place in the screen hierarchy.
You should familiarize yourself with the latest navigation guidelines in the Android Design guidelines online at http://developer.android.com/design/patterns/navigation.html.
Navigation Improvements in Android 4.1
In the Android 4.1 Jelly Bean, Google has added many features that help developers build the back stack and Up button functionality more easily. Probably the biggest improvement is the addition of the android:parentActivityName attribute for the activity tag in the Android app manifest file. You can now define the parent activity of any of your activities there and the operating system will take care of the navigation for you.
They also added convenience classes to help you manage your back stack and activities. Take a look at the online documentation of the TaskStackBuilder class at http://developer.android.com/reference/android/app/TaskStackBuilder.html.
Multi-tasking
Android is a true multi-tasking operating system. Users can switch between apps seamlessly at any time by tapping the multi-tasking button on newer generation phones or holding the Home button on older phones. Figure 7-3 shows an example of the multi-tasking menu on Android 4.0.
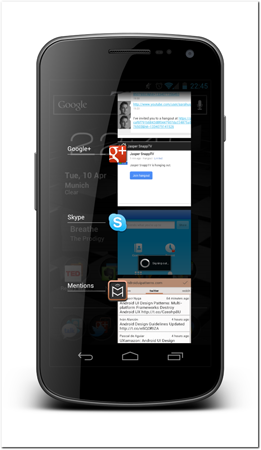
Figure 7-3: Android 4.0, ICS, multi-tasking menu.
Source: Android
A true multi-tasking environment is challenging to its developers. The Android operating system can kill any activities and apps that are not active at any time. The operating system does this to clear up memory that is needed for other operations. Android APIs provide developers ways to save the activity state before it is killed by the operating system. You should make sure that your app’s state persists, especially when your activity holds data that is difficult to fetch again. This kind of data could be, for example, retrieved from a server or data that required heavy calculation to obtain. Write this kind of data to long-term memory whenever the operating system is killing the activity. Read more about activity lifecycle from the Android documentation at http://developer.android.com/reference/android/app/Activity.html.
Where does an app start?
Although using an application icon is a common place to start an app, it isn’t by far the only option. In fact, many apps are rarely launched from the launcher icon. Some apps are more commonly opened using intents from other apps or from status bar notifications.
In either of these cases, it is likely that the app should not be opened from its landing screen. Tapping notification should always take the users directly to the corresponding info and an intent from another app should initialize the app with all the data from the intent. Should the back stack be empty in these cases? What does the user expect to happen when he or she presses Back?
This begs a question or two. Where does an app start? Or, what is the app’s starting screen? Consider an email app as an example. The app has a launcher icon, but when is it used? Let’s look at the following three use cases:
• A user wants to be notified when a new email arrives and read it if he so decides.
• A user wants to write a new email.
• A user wants to send a photo she just took to someone using email.
When a user wants to be notified when a new email arrives, the app is most likely going to use a status bar notification to let him know that there’s a new email. The user can then tap the notification, and the app should take him directly to the corresponding email screen, where he can read the message if he chooses.
When the user wants to compose an email, the app is triggered by the user and he is likely to use the launcher icon to start the app. Most email apps open to a message list, which also has an action link for composing a new email.
When the user wants to send a photo she just took to someone using email, the user will start the app from another app using Android intents. The email app should open in the email compose screen and attach the image automatically.
In all three examples, the app opens from a different screen and from a different place within the app. The app must function logically in each of these cases, and the user must easily be able to navigate within the app. Android apps have multiple entry points.
Exiting an app
As explained previously, pressing the Back button in normal cases terminates the active activity. When there are no more activities left in the app’s back stack, the app exists. The user will return to the device’s home screen. Or, if the app was launched from another app using intents, the user will return to the previous app.
But what is the difference between the Android Home button and pressing Back on the last activity? To users the functionality looks exactly the same and they won’t be able to tell the difference. What is happening under the hood is vastly different, though. The Back button terminates the app, but the Home button leaves it running.
As the users won’t be able to tell the difference, you must make sure that they don’t have to. An app must save all the data and be able to continue where the user left off.
Making sure that users know where they are
The user must always know where they are in the app screen hierarchy by glancing to the screen. You must not require users to remember how they navigated to the screen to know where they are. Each screen should have clear labeling or other methods helping users to remember. Users won’t always remember what they did last time they were using the app.
Navigating to another app
A well designed app takes advantage of services provided by other apps by using intents to call functionality from them (see the previous chapter). If you simply trigger an intent to, for example, view a web page, the browser activity is placed on your app’s activity stack. This will be confusing to your users, and multi-tasking won’t work the way they are expecting. They won’t be able to navigate back to your app in any other way than pressing the Back button in the browser to close it. Or if they leave the app at this point and return to your app using the multi-tasking menu, they will be presented with the browser page.
The solution is to start a new task. Telling the operating system that viewing the web page is a new task will place the browser activity in a different activity stack. Your user can now return to your app with the multi-tasking menu. Then, if they return to the app after viewing the website, they will be presented with the last screen of your app that was visible when the browser was launched.
See the following code example for how to trigger an URL view intent as a new task.
Intent browserIntent = new Intent(Intent.ACTION_VIEW,
Uri.parse(“http://twitter.com/lehtimaeki”));
browserIntent.setFlags(Intent.FLAG_ACTIVITY_NEW_TASK);
startActivity(browserIntent);
Consider an example. An example app lets users tap a button to open a tweet in a Twitter application. Figure 7-4 shows how I have modified the code and removed the intent flag. After tapping the button and opening the Twitter app, I press the Home button and open the multi-tasking menu. As you can see, there’s only one active app. The open app has the name and icon of the example app, but the screen capture is from the Twitter app. Selecting that app would open the Twitter app.

Figure 7-4: An example of multi-tasking menu after opening an app from another app without the new task intent flag.
Source: Android
Figure 7-5 shows how I have fixed the problem by adding the new task flag to the intent and performing the exact same actions. Now you can see that there are two separate apps in the multi-tasking menu. Users won’t be confused when they return to the original app.
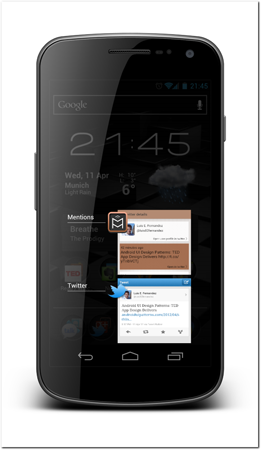
Figure 7-5: App opened correctly from another app. The two applications are separate.
Source: Android
Navigating from notification
If your app uses notifications, you need to make sure that the back stack is correct when the user enters your app by tapping the notification. Even with very simple apps it is easy to get this wrong. Consider for example an app that has only two screens—a list of items and an item details screen. The app notifies the users using the Android notifications whenever new items are added to the list and the notification will trigger an intent to open the list activity. What happens when the user taps the notification? Every time a new list activity is created, the old one is placed in the back stack.
To users this will seem right until they press Back and end up in the same activity as before. It is possible to create a situation whereby you have many of the same activities in the back stack, causing users to have to press Back multiple times to exit the app.
For notifications, it usually makes sense to use the FLAG_ACTIVITY_CLEAR_TOP intent flag to make sure that the activity is not recreated. This also takes care of situations where users have the item detail page open, as in the previous example, and then tap the notification. The operating system will activate the list activity from the back stack and close all activities on top of it, including any item details activities. Now the Back button behaves as users expect.
See the following code for an example of creating a notification with the clear top activity flag.
Intent notificationIntent = new Intent(this.context, BlogTrackAddictActivity.class);
notificationIntent.setFlags(Intent.FLAG_ACTIVITY_CLEAR_TOP);
PendingIntent contentIntent = PendingIntent.getActivity(this.context,
NOTIFICATION_ID_GOOGLEPLUS, notificationIntent, 0);
Non-activity navigation
Not all on-screen user interactions cause new activities to be created. Probably the best example is the tabbed user interface. All tabs are on the same activity. From the user’s point of view, this can cause problems. Using the Back button is an unconscious action for most users. If your app’s root activity has a tabbed view, users who tap the Back button because they’re trying to return to the previous tab will exit the app instead.
Users are not going to use the Back button to move back in navigation when they use gestures to move between content of same level. There are no easy answers for this conundrum. One way to think about user expectations is that if your navigation is something users can do by accident, they are probably going to use the Back button to remedy their error without thinking about it.
Stopping running processes with the back button
An important special function of the Back button is to terminate ongoing operations. Knowing when the Back button should stop the operation and when it should navigate to the previous screen is important.
The Back button should not terminate the running process when the corresponding user interface component is not the dominant component of the screen. If the process indicator is part of the screen design, the Back button should take the users to the previous screen and leave the process running in the background. Figures 7-6 and 7-7 show examples of processes that should not end when the Back button is pressed.

Figure 7-6: Google Play displays an installation progress bar as a small part of the user interface. Users won’t expect the Back button to terminate the progress, but to navigate to the previous page instead.
Source: Google Inc.

Figure 7-7: The Twitter feeds process indicator in the Twitter app is just a small part of the screen and should therefore not be terminated by the Back button.
Source: Twitter
When the process indicator dominates the user interface, users will expect the Back button to end the process. Especially when there’s a pop-up dialog box indicating the running process, the Back button should dismiss the pop-up and end the process. Figure 7-8 shows an example of a pop-up dialog box progress indicator.
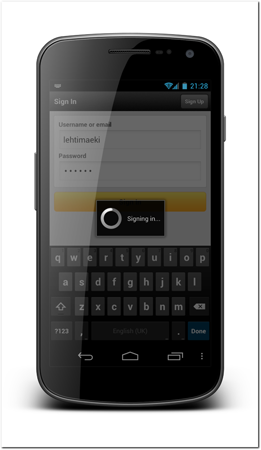
Figure 7-8: A pop-up progress indicator is used to log in to the Twitter app. The Back button should terminate the process and dismiss the pop-up window.
A bit more on the fine line are progress indicators that are on the screen but are a dominating feature of the screen. This can be a confusing situation to users and should be carefully considered. The best approach in general is not to end the process and navigate to previous screen. If the process is something that consumes a lot of data or time, you should add a notification that users can use to get back to the screen where they can terminate the process. Figure 7-9 shows an example of a screen that is dominated by the progress indicator. In this case, users are likely to expect the Back button to terminate the process.

Figure 7-9: An example app downloading a large file. The dominating component on the screen is the progress indicator. Users are likely going to expect the Back button to terminate this process.
Using Transition animations
The Android operating system has a built-in mechanism to enhance users’ mental models and make it easier to understand how screens relate to each other. When new activities are launched, they are not simply placed on the screen, but an animation is played. The function of the animation is not just to make the app look and feel nice but also to give subtle clues to users as what is happening. The default transition animation for animations is defined by the system. Different Android versions and different manufacturer phones have different animations. Early Android versions had a simple sliding animation from right to left when a new activity was started and vice versa when Back button was pressed.
Developers can replace the transition animations, but doing so breaks the platform consistency. Even if users don’t pay attention to the transition animations they probably associate them unconsciously to navigation actions. They know that if the correct transition animation plays, it is likely that the Back button will take them back to the previous screen.
Tip: In Android 4.1 Jelly Bean, the activity transition animations can now be made to easily appear to start from a source view. For example, selecting an app from the multi-tasking menu animates the app in a way that it appears to zoom in from the selected app preview. The same applies to starting apps from shortcuts from the home screen or app launcher. You can utilize this same improvement on your apps when running on Android 4.1 or newer. See the Android documentation for more details at http://developer.android.com/reference/android/app/ActivityOptions.html.
Use animations carefully. Always think about what you want to convey with the animation. Do not add animations just to make the user interface look “cool.” Excessive use of animations can make the app perform poorly and consume more battery due to added CPU consumption as well as make it look restless and unnecessarily flashy or even confusing.
Summary
On the simplest level, Android navigation involves starting activities. Although many apps can get by with that level of simplicity, more complex apps need more careful navigation design. You must understand all the different entry points and know how to properly handle communication with other apps. The Android platform provides a lot of tools. When you use these tools correctly, your apps will be easy and intuitive to use.
The Back button forms a core of navigation controls in any Android app, whereas the newer Up button tries to improve the distinction between in-app navigation and navigating between different apps. The complex interaction between activities in one app and externally with other apps can create difficult-to-navigate hierarchies as well as confusion with users. It is important to design the navigation carefully and follow the platform guidelines to make apps behave consistently. Consistent use of navigation controls will make it easier for your users to understand how to reach their goals.