
Chapter 16: Implementing Responsive User Interfaces
The previous chapter introduced the theory behind using responsive design to support multiple screen sizes. This chapter dives into the technical side of the same concept. You’ll learn all about fragments, including how to use them to create responsive user interfaces. After introducing the concept of fragments, the chapter goes through a full example of a responsive layout and also talks about migrating existing apps.
Introduction to Fragments
Fragments are the key to implementing responsive user interfaces on Android. A fragment is an independent user interface section that can be added to a layout. Probably the best way to think about fragments is to think of them as sub-activities. Fragments are always controlled by an activity and their lifecycle is bound to the activity’s lifecycle unless you manually change this aspect.
You implement fragments in a very similar way that you create activities. You create the implementing class and set a layout to draw the fragment’s user interface. Fragments aren’t required to have a user interface, but the fragments discussed in the scope of this book do all have fragments.
Creating fragments
To create a fragment, you extend the Fragment class or one of its subclasses (DialogFragment, ListFragment, PreferenceFragment, or WebViewFragment).
Most of your knowledge of working with activities is applicable to working with fragments, with a few notable exceptions. First, many of the utility methods you might want to use are not provided by the fragment superclass, and fragment is not a Context object. To get a Context object, call the getActivity() method. It will return the activity that your fragment is currently attached to. You can use that to call the method you need from a Context object. Note that the method can return null if the fragment instance isn’t currently attached to any activity.
The second big difference is that you cannot call the setContentView() method to set the fragment’s user interface. Instead, the fragment’s user interface is created using the onCreateView() method. You must override the method and return the user interface view from that method.
Fragment lifecycle
Fragments have similar lifecycle methods to activities. You can use them to stop and start functionality the same way you do with activities. For the full lifecycle method specification, you should take a look at the Android documentation at http://developer.android.com/guide/topics/fundamentals/fragments.html.
The important lifecycle methods within the scope of this book are onCreateView(),whereby you create your fragment’s user interface and the onActivityCreated(), which is called after the onCreateView() when the parent activity is created. That is a good place to initialize components that require a Context object.
Adding fragments to layouts
Fragments alone are not very useful. You must add them to layouts. There are two ways to do this. The simplest way to place fragments on a user interface is to use an XML element in a layout file. The fragment element can be placed anywhere in any layout file where you would place any other user interface components. Its size and location is defined the same way as other user interface components. You define the fully qualified class name of the implementing fragment class and that’s all. Whenever the layout is displayed by any activity, the fragment is automatically initialized and the user interface is placed on the screen. Your fragment must implement a constructor without any parameters for this to work properly.
The following code example shows you how to define a fragment element:
<fragment
android:id=”@+id/<id goes here>”
android:layout_width=”match_parent”
android:layout_height=”match_parent”
class=”<fully qualified class name of the fragment class>” />
You can also add fragments dynamically to layouts from your code by using the FragmentManager class.
FragmentManager and FragmentTransaction
FragmentManager and FragmentTransaction are the helper classes you can use to add, remove, and replace fragments in your activities. To acquire a FragmentManager instance, you call the getFragmentManager() method in your activity.
You can change the fragments in the user interface by using transactions. A transaction is an atomic group of operations that are executed together. With fragment transactions, you can define multiple operations—such as replace multiple fragments—that are executed simultaneously. To create a fragment transaction, you must begin the transaction and then define all the actions. Calling commit on the transaction will execute it.
Usually when replacing or adding fragments to/from code it makes sense to add a dedicated frame layout into your layout XML as a placeholder for the fragments. This makes it easier to define the size and location of the fragment.
The following source code shows a very simple example of replacing a fragment in a container:
FragmentTransaction ft = getFragmentManager().beginTransaction();
ft.replace(R.id.<container id>, <fragment object>);
ft.commit();
Tip: Replacing fragments isn’t the only option you have. The fragment transaction also allows you to add, remove, show, and hide fragments. For the full specification of the fragment transaction, see the Android documentation at http://developer.android.com/reference/android/app/FragmentTransaction.html.
Fragment Transitions
As with activities, when fragments are replaced they can also display transition animations. The animation is set to the fragment transactions. You can set fully custom animations using the setCustomAnimations() method to define enter and exit animations in the same way you would define activity transition animations. You can also use setTransition() to set one of the default transition animations.
Fragments and the Back Stack
By default fragment transactions don’t affect the back stack. You can, however, easily add any transaction to the back stack by calling addToBackStack()with the fragment transaction. The operating system takes care of the rest. When the user presses the Back button a reverse operation automatically executes.
Tip: To ensure maximum flexibility of your fragments, take care to build each fragment in a scalable manner. Use the layouts and best practices introduced earlier in this book. If each of your fragments is scalable alone it means that the user interfaces built using the fragments are scalable and will easily adapt to layout changes.
Fragment and Activity architecture
The way you build interaction between your activities and fragments defines how flexible the user interface will be. Fragments are modules of the user interface, but they should also be modular in your code. The less the fragments have to know about other fragments and even about their parent activities, the more flexibly you can use them in different user interface configurations.
The most important rule to follow is that fragments should never communicate directly with each other. All communication should always go through the activities. If they must communicate directly, you will be forced to always display them at the same time, which forces undesired coupling in your architecture.
To be most flexible you can create an interface that defined communication from your fragment to the activity. By doing this you can use the fragment in any activity that implements the interface, and you’re not tied into just one activity.
Activities control the flow and layout
Activities have been controlling your app flow before fragments appeared and should remain controlling them. Whenever a control in a fragment needs to update other parts of the user interface, the fragment should call the parent activity. Figure 16-1 shows an example control flow. In this example, the user presses a button in fragment A that affects the user interface beyond the fragment itself. The control is sent to the parent activity, which decides based on the current layout whether a new activity needs to be launched or an existing fragment needs to be replaced or updated. A structure like this guarantees that you can use fragments A and B in the same activity or in separate activities.
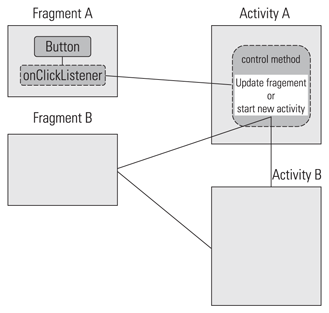
Figure 16-1: Example control flow architecture from one fragment to another, using a parent.
Using Fragments on Older Devices
Fragments were introduced to the Android platform in the Android 3.0 Honeycomb release (API level 11). Using them on projects that target older platform versions is possible but requires few small code changes. You also need to import the Android support package to the project. Read more about support package in the Android documentation at http://developer.android.com/sdk/compatibility-library.html.
First, all the activities that handle fragments must extend the FragmentActivity class from the support package instead of the activity class. Second, you need to make sure that you refer to classes in the support package instead of the Android package whenever using any fragment related classes.
It is very easy to accidentally refer to a class from a wrong package when writing the code. The Lint tool, which is integrated to the Android Eclipse plug-in, will warn you if you are using classes that are not available on all devices your app is targeted to. These warnings are worth paying attention to as they can prevent runtime crashes on older devices.
Isolated fragment functionality increases modularity
To keep your code clean and modular, you should keep the fragments’ internal control managed by the fragments themselves. There’s no need to give control back to the activity class when updates are made internally in the fragment and do not affect the rest of the user interface. Fragments that populate their own data and handle their own user interface updates are much easier to place in the user interface. The activities managing them need only to create them and place them into a layout and everything is done.
Migrating existing apps
Hundreds of Android apps were built before any Android tablets were announced. Android versions 2.3 and older didn’t really support building truly responsive user interfaces anyway. It is very likely that you have old apps on Google Play or in some other stores that do not yet have a tablet layout and have not been build using the fragments. The question is what to do with these applications. Should you try to update their user interfaces slowly toward a more responsive approach to support tablets or fully redesign the user interface from scratch?
Moving slowly: An iterative approach to new design
If you work for a company that has commercial software in the market, it is likely that the product management team is unwilling to invest in a full redesign and reimplementation of your app. Full redesign and implementation takes time and resources away from maintaining the software. In this kind of situation I recommend working slowly towards the responsive user interface. You can start by identifying the possible fragments in the old user interface, and sketch a possible large screen layout based on them. Doing the design and validating it with user testing can show whether the old interface can be turned into a responsive approach. If the results are negative it might not be worth spending the time needed for a gradual transformation, as it will probably be in vain.
Once you have identified the possible fragments, you can start turning them into fragments one by one. You can simply replace your activity’s layout with a fragment where possible. Also move the independent functionality to the fragment to make reusing it easier later.
You can do the slow one-by-one replacement of the fragments while updating the user interface and fixing any bugs. The user interface won’t change at all during this phase. Also, because there are no visible changes in your user interface all automated user interface testing should still work; you can easily verify that you haven’t accidentally broken anything. You will most likely have to reimplement your unit tests however.
At some point your app is either fully or nearly fully transformed into the new fragment technology. You can now start experimenting with different layouts and creating activities that manage the responsive user interface. At this point it is probably also easier to take the last steps toward supporting larger screens, as the investment is considerably smaller and safer.
Get it over with: Full redesign at once
Of course, if your app design isn’t good enough for making a slow transformation, you might need to do a one-off redesign. Before you jump into doing that, remember to utilize your old app in usability testing to find out what the users really do with your app. Having an old app version can be very valuable in the design process for understanding real user needs. From there, the redesign is like building a new app.
Looking at an Example app
This section looks at an example app that ties in everything from this and from the previous chapters. This simple app demonstrates how to reuse fragments and lay them out in different configurations, as well as how to manage the communication between the fragments and activities.
The app function is simple. Users can select a color from three provided choices. After the selection, the users see the color and can then choose to see more information about it.
 Scan the QR code with your Android phone to open the companion app and try out a functional example.
App design
Let’s start exploring the app design from the phone interface wireframes. This is probably something you’ll be doing for your own app, too. Phones are still the most important target group for most apps and probably will be for a long time in the future.
The phone app consists of three screens. Figure 16-2 shows the wireframes. The user will press one of the buttons on the first screen to select a color (color picker screen). That selection will open up a second screen with that color shown (color screen). Pressing the button on the second screen will take user to the last screen, which contains textual information about the selected color (color info screen).
Now, taking that design to larger screen the first step is to look at smaller tablets and how to better utilize the available space. On a smaller tablet, you can nicely fit two of the screens together. For this available space, I’ve created two screens that unify two of the three phone screens into one. Figure 16-3 shows how this would look on a portrait tablet.
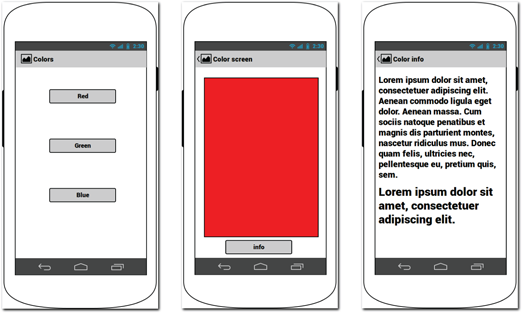
Figure 16-2: The example app smartphone screen design wireframes.
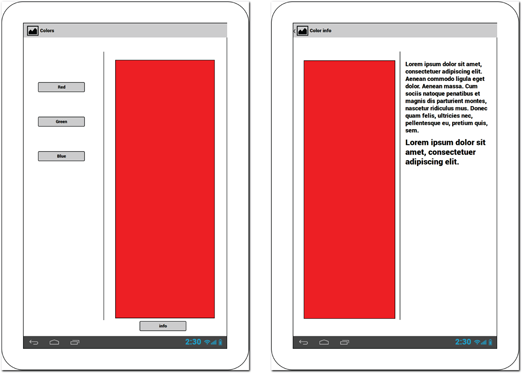
Figure 16-3: The example app two-column layout design wireframes.
The two-column layout is not optimal for larger 10-inch tablets. For a larger tablet, I’ve created a three-column layout that unifies all the three phone screens into one (see Figure 16-4). Note that the button on the color screen is not needed in this design, because the info text is always visible.
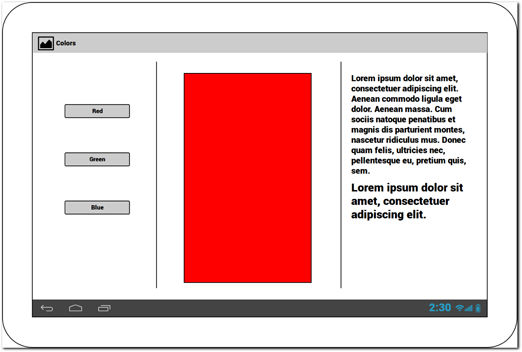
Figure 16-4: Example app with three-column design wireframes.
Building the phone user interface with fragments
In this state it is easy to see that there clearly are three fragments in this design. Each of the phone design screen forms one design. When you’re starting to build the app (whether or not you plan to support larger screens in the first release), it makes sense to build these three screens using fragments. Each one of the screens is an activity.
Color Picker Screen
Let’s look at the activity and the fragment of the color picker screen.
Activity
The color picker screen activity at this point sets a simple content layout that only points to the fragment. See the following example code:
<FrameLayout
android:id=”@+id/color_picker_frame”
android:layout_width=”300dp”
android:layout_height=”match_parent” >
<fragment
android:id=”@+id/color_picker_fragment”
android:layout_width=”match_parent”
class=”com.androiduipatterns.smashingandroidui.
examples.responsive.PickColorFragment”/>
</FrameLayout>
The activity class (ResponsiveExampleActivity) has one extra method that is called from the fragment to handle the color change as well as constants defining the colors:
public static final int COLOR_RED = 0;
public static final int COLOR_GREEN = 1;
public static final int COLOR_BLUE = 2;
public void setColor(int color) {
Intent intent = new Intent(this, ResponsiveExampleColorDetailsActivity.class);
intent.putExtra(“color”, color);
startActivity(intent);
}
Fragment
The PickColorFragment class uses a simple layout that displays the buttons in a linear layout.
<?xml version=”1.0” encoding=”utf-8”?>
<LinearLayout xmlns:android=”http://schemas.android.com/apk/res/android”
android:layout_width=”match_parent”
android:layout_height=”match_parent”
android:gravity=”center_horizontal”
android:orientation=”vertical” >
<Button
android:id=”@+id/responsive_example_red”
android:layout_width=”100dp”
android:layout_height=”wrap_content”
android:layout_margin=”10dp”
android:text=”Red” />
<!-- the other buttons -->
</LinearLayout>
In the fragment class code, the only method that is implemented is the onCreateView where the fragment layout is set and the button listeners are initialized.
public class PickColorFragment extends Fragment {
@Override
public View onCreateView(LayoutInflater inflater, ViewGroup container,
Bundle savedInstanceState) {
View view = inflater.inflate(R.layout.responsive_example_color_picker,
container, false);
Button redButton = (Button) view
.findViewById(R.id.responsive_example_red);
redButton.setOnClickListener(new View.OnClickListener() {
@Override
public void onClick(View v) {
((ResponsiveExampleActivity) getActivity())
.setColor(ResponsiveExampleActivity.COLOR_RED);
}
});
//.. listeners for the other buttons
return view;
}
}
Figure 16-5 shows the activity being displayed on a phone screen.
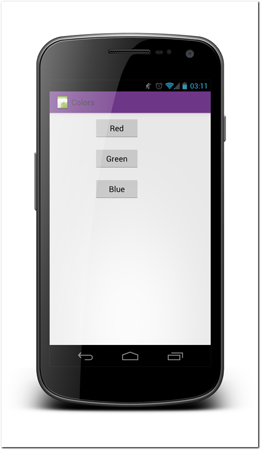
Figure 16-5: The example app’s color picker screen on a phone screen.
Color Screen and Color Info Screen
The other two screens, shown in Figures 16-6 and 16-7, are built the same way. The layout the activity uses points to the fragment and the fragment creates a scalable layout that is placed on the screen.
From phone interface to two- and three-column interfaces
Now to the interesting part—making this phone interface responsive and ensuring that the design scales up nicely to larger screens. Because the interface is already fragment-based, the job of converting this interface to work on a larger screen is much easier.
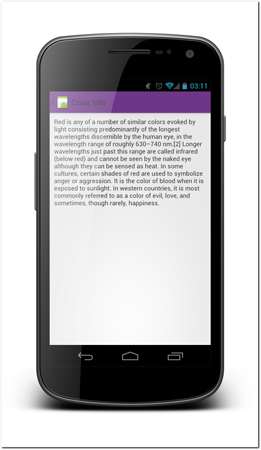
Figure 16-6: The example app’s color screen on a phone screen.
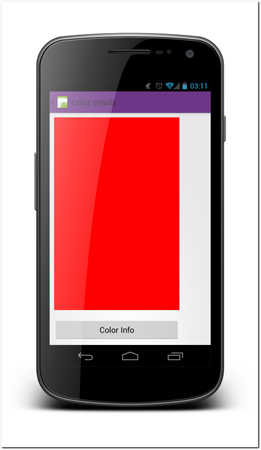
Figure 16-7: The example app’s color info screen on a phone screen.
Layouts
As you can see on the wireframe designs, the first activity can have any of the three layouts—a one-column phone screen, two columns on a small tablet screen, or three columns on a large tablet screen. The first thing to do is to build these three layout files. The first one is already done in the previous phase and it is placed in the res/layout/resource folder. That is the safest layout, and it is the one that is going to be used if nothing else is better.
To add the other layouts, you need to create two more layout folders and add resource qualifiers to them in order to define the minimum screen width. The values used in the example code are based on my evaluation of what looks best in one-, two-, or three-column layouts.
For the two-column layout, I created a res/layout-w550dp folder (which is used when the available width is at least 550dp). Then I created a layout XML file with the same filename used in the phone layout with the following content:
<?xml version=”1.0” encoding=”utf-8”?>
<RelativeLayout xmlns:android=”http://schemas.android.com/apk/res/android”
android:layout_width=”match_parent”
android:layout_height=”match_parent” >
<FrameLayout
android:id=”@+id/color_picker_frame”
android:layout_width=”300dp”
android:layout_height=”match_parent”
android:layout_alignParentLeft=”true” >
<fragment
android:id=”@+id/color_picker_fragment”
android:layout_width=”match_parent”
android:layout_height=”match_parent”class=”com.androiduipatterns.smashingandroidui.examples.responsive. PickColorFragment” />
</FrameLayout>
<FrameLayout
android:id=”@+id/color_frame”
android:layout_width=”300dp”
android:layout_height=”match_parent”
android:layout_alignParentRight=”true”
android:layout_toRightOf=”@id/color_picker_frame” >
</FrameLayout>
</RelativeLayout>
Note that only PickColorFragment is defined in this layout. The second fragment is added dynamically from the activity code. The layout has an empty frame layout as a fragment container that you can easily use from code to change the fragments whenever the user selects a color. Figure 16-8 shows how this layout looks on a tablet in portrait mode.
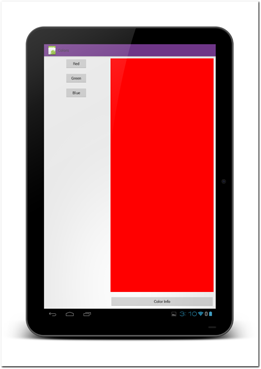
Figure 16-8: The example activity with a two-column layout.
For the three-color layout, I add the res/layout-w1200dp folder (used when the available width is at least 1200dp) and a layout XML file, again with the same name, that has a three-column layout:
<?xml version=”1.0” encoding=”utf-8”?>
<RelativeLayout xmlns:android=”http://schemas.android.com/apk/res/android”
android:layout_width=”match_parent”
android:layout_height=”match_parent” >
<FrameLayout
android:id=”@+id/color_picker_frame”
android:layout_width=”300dp”
android:layout_height=”match_parent”
android:layout_alignParentLeft=”true” >
<fragment
android:id=”@+id/color_picker_fragment”
android:layout_width=”match_parent”
android:layout_height=”match_parent”
class=”com.androiduipatterns.smashingandroidui. examples.responsive.PickColorFragment” />
</FrameLayout>
<FrameLayout
android:id=”@+id/color_frame”
android:layout_width=”300dp”
android:layout_height=”match_parent”
android:layout_toRightOf=”@id/color_picker_frame” >
</FrameLayout>
<FrameLayout
android:id=”@+id/color_info_frame”
android:layout_width=”300dp”
android:layout_height=”match_parent”
android:layout_alignParentRight=”true”
android:layout_toRightOf=”@id/color_frame” >
</FrameLayout>
</RelativeLayout>
As with the two-column layout, only PickColorFragment is added to the layout file. The other two fragments are added dynamically from the code into the frame layout fragment containers. Figure 16-9 shows how this layout looks on a large tablet screen.
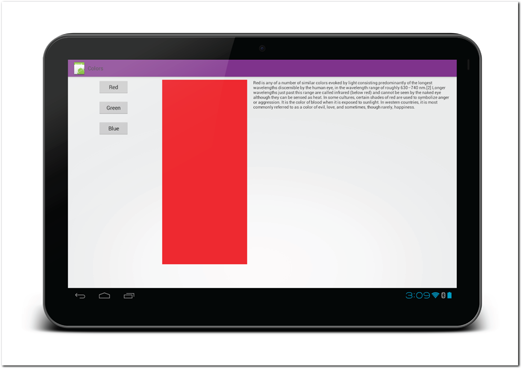
Figure 16-9: The example activity with a three-column layout.
Because all these layouts use the same filename but are placed in different folders, the operating system will take care of using the correct layout in correct devices.
Activity
The activity needs to be changed to manage all the different layouts. Although the operating system already chooses the correct layout automatically on runtime, the activity still needs to react correctly to user interactions. The first step is to make the activity aware of which layout is currently used. You can do that by adding control constants and checking which fragment containers are available.
private static int LAYOUT_ONE_COLUMN = 1;
private static int LAYOUT_TWO_COLUMN = 2;
private static int LAYOUT_THREE_COLUMN = 3;
private int currentLayout = LAYOUT_ONE_COLUMN;
@Override
protected void onCreate(Bundle savedInstanceState) {
super.onCreate(savedInstanceState);
setContentView(R.layout.example_fragment_layout);
View colorFrame = findViewById(R.id.color_frame);
View colorInfoFrame = findViewById(R.id.color_info_frame);
// determine which layout is in use so the actions can be
// redirected correctly
if (colorInfoFrame != null) {
currentLayout = LAYOUT_THREE_COLUMN;
} else if (colorFrame != null) {
currentLayout = LAYOUT_TWO_COLUMN;
} else {
currentLayout = LAYOUT_ONE_COLUMN;
}
}
Another change you must make is to the setColor method. Right now, it launches an activity (when on a phone), replaces one fragment (for the two-column layout), or replaces two fragments (for the three-column layout).
public void setColor(int color) {
if (currentLayout == LAYOUT_THREE_COLUMN
|| currentLayout == LAYOUT_TWO_COLUMN) { // just change
// fragments
ColorFragment colorFragment = (ColorFragment) getFragmentManager()
.findFragmentById(R.id.color_frame);
if (colorFragment == null || colorFragment.getColorShown() != color) {
if (currentLayout == LAYOUT_THREE_COLUMN) {
colorFragment = ColorFragment.newInstance(color, false);
} else {
colorFragment = ColorFragment.newInstance(color, true);
}
FragmentTransaction ft = getFragmentManager()
.beginTransaction();
ft.replace(R.id.color_frame, colorFragment);
// info only shown on three-column layout
if (currentLayout == LAYOUT_THREE_COLUMN) {
ColorInfoFragment colorInfoFragment = (ColorInfoFragment) getFragmentManager()
.findFragmentById(R.id.color_info_frame);
if (colorInfoFragment == null
|| colorInfoFragment.getColorShown() != color) {
colorInfoFragment = ColorInfoFragment
.newInstance(color);
ft.replace(R.id.color_info_frame, colorInfoFragment);
}
}
ft.setTransition(FragmentTransaction.TRANSIT_FRAGMENT_FADE);
ft.commit();
}
} else { // launch other activity
Intent intent = new Intent(this,
ResponsiveExampleColorDetailsActivity.class);
intent.putExtra(“color”, color);
startActivity(intent);
}
}
One More Activity
The other two-column screen is still missing. That screen should be shown when the user presses the color info button on the two-column layout. To make the screen accessible, you need to add another method to the previous activity that is handling the color info button press. This method is called from the color fragment when the user presses the button. In this case, you don’t need conditional statements, because the Info button is visible only if the app is in the two-column layout.
public void setColorDetailsSelected(int color) {
Intent intent = new Intent(this,
ResponsiveExampleColorDetailsActivity.class);
intent.putExtra(“color”, color);
startActivity(intent);
overridePendingTransition(android.R.anim.fade_in,
android.R.anim.fade_out);
}
The same activity also starts when you’re using the one-column phone layout. This means that you need to make this other activity responsive as well. That activity will be used only in the one- and two-column layouts, so you need to add only one extra layout. Figure 16-10 shows how this two-column layout is rendered. This is the same activity you saw in Figure 16-6.
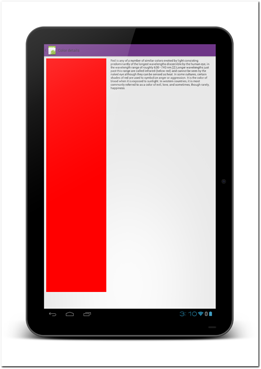
Figure 16-10: The second example activity with two-column layout.
Older Android versions
The example you’ve seen in this chapter uses the newer qualifier that is available only on Android 3.2 or newer as well as the fragment APIs, which are only available on Android 3.0 and newer. To make this example backward compatible, you need to use the support package for all fragment-related classes, as explained earlier in this chapter.
When it comes to the layouts, you have two choices. Folders with qualifiers that are not understood by the runtime are simply ignored by the system. In this case it means that older devices will always use the single-column layout. Often that is good enough as a large majority of Android tablets run Android 3.2 or newer. If you want to bring the responsive user interface to older devices, you can use the old size qualifiers (-large, -xlarge). Unfortunately, they are not as fine-grained as the new ones. If you end up using both the old and the new qualifiers, you should avoid copying your layouts, and use the include and merge elements introduced in Chapter 13.
Summary
Android provides great tools for implementing responsive user interfaces. You can create modular user interfaces using Android fragments and dynamically let the operating system pick the correct layouts using the Android Resource Manager. Modular and independent fragments can easily be reused in different layout configurations while letting activities handle the workflow control.