
16
Implementing Frontend Microservices with ASP.NET Core
Chapter 14, Implementing Microservices with .NET, described general techniques for implementing microservices in .NET but focused mainly on worker microservices, that is, on microservices that perform background jobs without communicating with anything outside of the application.
Microservices that communicate with the world outside of the application bring with them other problems and need further techniques.
More specifically, microservices that communicate with a human user must implement a presentation layer, while microservices that expose APIs must conform with well-established standards and should preferably have documentation. Moreover, web APIs that target single-page applications (SPAs) must conform with browser policies; that is, either they are exposed on a single domain that is the same domain the SPA was downloaded from, or they must configure CORS policies.
Finally, all frontend microservices must put in place solid security policies to defend the application from hackers.
Techniques for implementing public self-documented web APIs were described in Chapter 13, Applying Service-Oriented Architectures with .NET, while techniques for implementing presentation layers were covered in Chapter 15, Presenting ASP.NET Core MVC, Chapter 17, Blazor WebAssembly, and Chapter 18, Native versus Web Clients. Moreover, general techniques for implementing microservices were covered in Chapter 5, Applying a Microservice Architecture to Your Enterprise Application, Chapter 11, Understanding the Different Domains in Software Solutions, and Chapter 14, Implementing Microservices with .NET.
Therefore, in this chapter, after a short section about concepts and techniques specific to frontend microservices, we will show you how to put all these concepts and techniques together in the practical implementation of a frontend microservice through a simple, but not trivial, example based on ASP.NET Core MVC.
More specifically, this chapter covers the following topics:
- Frontends and micro-frontends
- Example application specifications and architecture
- Defining the domain layer abstraction
- Defining the data layer
- Defining the application layer
- Defining controllers and views
The example application is based on the onion architecture and on the patterns described in Chapter 11, Understanding the Different Domains in Software Solutions. After a short description of the application specifications and architecture, we will move to the domain layer interface, and then up through all layers to the presentation layer, which consists of ASP.NET Core controllers and views.
Technical requirements
This chapter requires the free Visual Studio 2022 Community edition or better with all database tools installed.
All the necessary concepts in this chapter will be covered while describing in detail a practical example application based on the WWTravelClub book use case. The code for this chapter is available at https://github.com/PacktPublishing/Software-Architecture-with-C-10-and-.NET-6-3E.
Frontends and micro-frontends
The main peculiarity of frontend microservices is that they need a robust web server that is able to optimize all the whole request/response handling and ensure the needed level of security. Moreover, high-traffic applications also need a load balancer.
If the frontend service is hosted on a Kubernetes cluster, both an adequate web server and load balancing can be provided through an Ingress, as described in the Ingresses subsection of Chapter 6, Azure Kubernetes Service.
Otherwise, Azure App Service (see the Further reading section) might be a good option, since it offers a scalable level of load balancing, excellent security, monitoring services, and so on.
A frontend microservice doesn’t need to interface directly with anything outside of an application. In fact, in micro-frontend architectures, there is no unique frontend, but the role of the frontend is split among several microservices. In these architectures, typically, the role of directing traffic toward the right frontend, and/or of combining several responses into a unique response, is taken by an interface frontend that is load balanced and takes the burden of ensuring the right level of security.
The reasons for using micro-frontends are the same as the ones for using other microservices. We discussed them in detail in Chapter 5, Applying a Microservice Architecture to Your Enterprise Application, but it is worth repeating here the more important ones:
- Optimizing the usage of hardware resources, by scaling just the microservices that need more resources
- Having independent software lifecycles for each microservice, so each microservice can evolve independently from the others to match the user needs, and so that each microservices developer team can work independently from the others
Micro-frontend architectures use quite different techniques for HTML websites, like the ASP.NET Core MVC websites, and for web APIs. Actually, the word ‘micro-frontend’ is usually used just with HTML websites/SPAs, while web APIs exposed to the outside world are referred to as public web APIs. We will describe public web APIs and HTML micro-frontends, and the techniques they use, in two dedicated subsections.
Public web APIs
In the case of web APIs, all microservices are accessible through a unique load-balanced piece of software called an API gateway that sits in between the clients and the various API services. The basic role of an API gateway is making the whole API accessible from a unique domain to both avoid problems with the browsers’ unique domain policy and to make simpler the usage of all API services.
However, the API gateway offers the opportunity to centralize other functions that are common to all API services, such as:
- Authentication, that is, validating and decoding the authentication token that comes with each request (please do not confuse authentication with login).
- Caching, that is, caching responses according to configurable caching policies.
- Translation, that is, adapting the interface, as seen by the client, to the actual signature of the various API methods. This way, each API can change its interface without affecting existing clients.
- Versioning, that is, directing each request toward a compatible version of each API service.
- Documentation, that is, offering a unique documentation endpoint.
API gateways have continued to evolve, absorbing and offering more and more functions, giving rise to the so-called API management systems that now automate and take care of most of the burden of handling public web APIs.
Azure, like all clouds, offers a good API management service. You can find more information about it in the Further reading section.
It is also worth mentioning Ocelot, a library for creating easily custom API gateways. You can either use it to fill in configuration files or as a base for a completely custom API gateway. The Further reading section contains both a link to its GitHub repository and a link to the Microsoft documentation on how to use it.
HTML micro-frontends
Several HTML micro-frontends can cooperate on the same application by furnishing each a different set of web pages. In this case, coordinating them requires nothing more than links pointing to the other micro-frontends and a common sign-in, so that users don’t need to log in each time they move to a different micro-frontend.
However, very often, several micro-frontends cooperate in the construction of the same page, by supplying various page areas. In this case, a software component must take the burden of assembling the various parts into a unique page.
In the case of classic web applications that build the HTML on the server side, an interface application furnishes the page layout and then calls the various micro-frontends to fill the various layout areas. Both the layout to use and which calls to make to the involved micro-frontends are obtained by processing the request URL according to rules that are either hardwired in the code or better, stored in one or more configuration sources (in the simplest case, a unique configuration file).
In the case of SPAs, the assembling process takes place on the client, that is, in the browser:
- A kernel application furnishes the initial HTML page.
- The kernel application downloads a JavaScript file from each micro-frontend. Each of these JavaScript files is a micro-SPA that creates page areas.
- The kernel application, based on the current URL, decides which URL to pass to each micro-SPA and then puts the HTML produced by each micro-SPA in the right place.
The various micro-SPAs do not interfere with each other because each of them runs in a separate JavaScript scope. Therefore, for instance, we can mix micro-SPAs implemented with different and incompatible versions of Angular and/or React.
Micro-frontends can also be implemented using WebAssembly frameworks, like Blazor (see Chapter 17, Blazor WebAssembly), that run .NET code. However, in this case, the various micro-SPAs do not run in separate environments, so they must be based on compatible .NET versions.
In the next section, we will introduce the example and its architecture.
Application specifications and architecture
In this chapter, as an example of an ASP.NET Core MVC frontend microservice, we will implement the administrative panel for managing the destinations and packages of the WWTravelClub book use case. The application will be implemented with the Domain-Driven Design (DDD) approach and associated patterns described in Chapter 11, Understanding the Different Domains in Software Solutions. So, having a good understanding of that chapter is a fundamental prerequisite to reading this chapter. The subsections that follow describe the overall application specifications and organization.
Defining application specifications
The destinations and packages were described in Chapter 7, Interacting with Data in C# – Entity Framework Core. Here, we will use exactly the same data model, with the necessary modifications to adapt it to the DDD approach. The administrative panel must allow packages, a destinations listing, and CRUD operations on it. To simplify the application, the two listings will be quite simple: the application will show all destinations sorted according to their names, while all packages will be sorted starting from the ones with a later validity date.
Furthermore, we make the following assumptions:
- The application that shows destinations and packages to the user shares the same database used by the administrative panel. Since only the administrative panel application needs to modify data, there will be just one write copy of the database with several read-only replicas.
- Price modifications and package deletions are immediately used to update the user’s shopping carts. For this reason, the administrative application must send asynchronous communications about price changes and package removals. We will not implement all of the communication logic here, but we will just add all such events to an event table, which should be used as input to a parallel thread that’s in charge of sending these events to all relevant microservices.
Here, we will give the full code for just package management; most of the code for destination management is left as an exercise for you. The full code is available in the ch16 folder of the GitHub repository associated with this book. In the remainder of this section, we will describe the application’s overall organization and discuss some relevant samples of code.
Defining the application architecture
The application is organized based on the guidelines described in Chapter 11, Understanding the Different Domains in Software Solutions, while considering the DDD approach and using SOLID principles to map your domain sections. That is, the application is organized into three layers, each implemented as a different project:
- There’s a data layer, which contains the repository’s implementation and the classes describing database entities. It is a .NET library project. However, since it needs some interfaces, like
IServiceCollection, which are defined inMicrosoft.NET.Sdk.web, and since the layerDBContextmust inherit from the identity framework in order to also handle the application authentication and authorization database tables, we must add a reference not only to the .NET SDK, but also to the ASP.NET Core SDK. This can be done as follows:- Right-click on the project icon in the solution explorer and select Edit project file, or just double-click the project name.
- In the edit window, add:
<ItemGroup>
    <FrameworkReference Include="Microsoft.AspNetCore.App" />
</ItemGroup>
- There’s also a domain layer abstraction, which contains repository specifications; that is, interfaces that describe repository implementations and DDD aggregates. In our implementation, we decided to implement aggregates by hiding the forbidden operations/properties of root data entities behind interfaces. Hence, for instance, the
Packagedata layer class, which is an aggregate root, has a correspondingIPackageinterface in the domain layer abstraction that hides all the property setters of thePackageentity. The domain layer abstraction also contains the definitions of all the domain events, while the event handlers that will subscribe to these events are defined in the application layer. - Finally, there’s the application layer – that is, the ASP.NET Core MVC application – where we define DDD queries, commands, command handlers, and event handlers. Controllers fill query objects and execute them to get ViewModels they can pass to Views. They update storage by filling command objects and executing their associated command handlers. In turn, command handlers use
IRepositoryinterfaces andIUnitOfWorkinstances coming from the domain layer to manage and coordinate transactions.
The application uses the Command Query Responsibility Segregation (CQRS) pattern; therefore, it uses command objects to modify the storage and the query object to query it.
The query is simple to use and implement: controllers fill their parameters and then call their execution methods. In turn, query objects have direct LINQ implementations that project results directly onto the ViewModels used by the controller Views with Select LINQ methods. You may also decide to hide the LINQ implementation behind the same repository classes used for the storage update operations, but this would turn the definition and modification of simple queries into very time-consuming tasks.
In any case, it can be beneficial to encapsulate query objects behind interfaces so that their implementations can be replaced by fake implementations when you test controllers.
However, the chain of objects and calls involved in the execution of commands is more complex. This is because it requires the construction and modification of aggregates, as well as a definition of the interaction between several aggregates and between aggregates and other applications through domain events to be provided.
The following diagram is a sketch of how storage update operations are performed. The circles are data being exchanged between the various layers, while rectangles are the procedures that process them. Moreover, dotted arrows connect interfaces with types that implement them:

Figure 16.1: Diagram of command execution
Here’s the flow of action through Figure 16.1 as a list of steps:
- A controller’s action method receives one or more ViewModels and performs validation.
- One or more ViewModels containing changes to apply are hidden behind interfaces (
IMyUpdate) defined in the domain layer. They are used to fill the properties of a command object. These interfaces must be defined in the domain layer since they will be used as arguments of the repository aggregate methods defined there. - A command handler matching the previous command is retrieved via Dependency Injection (DI) in the controller action method (through the
[FromServices]parameter attribute we described in the Defining controllers and views subsection). Then, the handler is executed. During its execution, the handler interacts with various repository interface methods and with the aggregates they return. - When creating the command handler discussed in step 3, the ASP.NET Core DI engine automatically injects all parameters declared in its constructor. In particular, it injects all
IRepositoryimplementations needed to perform all command handler transactions. The command handler performs its job by calling the methods of theseIRepositoryimplementations received in its constructor to build aggregates and modify the built aggregates. Aggregates either represent already-existing entities or newly created ones. Handlers use theIUnitOfWorkinterface contained in eachIRepository, as well as the concurrency exceptions returned by the data layer, to organize their operations as transactions. It is worth pointing out that each aggregate has its ownIRepository, and that the whole logic for updating each aggregate is defined in the aggregate itself, not in its associatedIRepository, to keep the code more modular. - Behind the scenes, in the data layer,
IRepositoryimplementations use Entity Framework to perform their job. Aggregates are implemented by root data entities hidden behind interfaces defined in the domain layer, whileIUnitOfWorkmethods, which handle transactions and pass changes to the database, are implemented withDbContextmethods. In other words,IUnitOfWorkis implemented with the application’sDbContext. - Domain events are generated during each aggregate process and are added to the aggregates themselves by us calling their
AddDomainEventmethods. However, they are not triggered immediately. Usually, they are triggered at the end of all the aggregates’ processing and before changes are passed to the database; however, this is not a general rule. - The application handles errors by throwing exceptions. A more efficient approach would be to define a request-scoped object in the dependency engine, where each application subpart may add its errors as domain events. However, while this approach is more efficient, it increases the complexity of the code and the application development time.
The Visual Studio solution is composed of three projects:
- There’s a project containing the domain layer abstraction called
PackagesManagementDomain, which is a .NET Standard 2.1 library. When a library doesn’t use features or NuGet packages that are specific to a .NET version, it is a good practice to implement it as a .NET Standard library because this way, it doesn’t need modifications when the application is moved to a newer .NET version. - There’s a project containing the whole data layer called
PackagesManagementDB, which is a .NET 6.0 library. - Finally, there’s an ASP.NET Core MVC 6.0 project called
PackagesManagementthat contains both the application and presentation layers. When you define this project, select No Authentication; otherwise, the user database will be added directly to the ASP.NET Core MVC project instead of to the database layer. We will add the user database manually in the data layer.
Let’s start by creating the PackagesManagement ASP.NET Core MVC project so that the whole solution has the same name as the ASP.NET Core MVC project. Then, we’ll add the other two library projects to the same solution.
Finally, let the ASP.NET Core MVC project reference both projects, while PackagesManagementDB references PackagesManagementDomain. We suggest you define your own projects and then copy the code of this book’s GitHub repository into them as you read this section.
The next subsection describes the code of the PackagesManagementDomain data layer project.
Defining the domain layer abstraction
Once the PackagesManagementDomain Standard 2.1 library project has been added to the solution, we’ll add a Tools folder to the project root. Then, we’ll place all the DomainLayer tools contained in the code associated with ch11. Since the code contained in this folder uses data annotations and defines DI extension methods, we must also add references to the System.ComponentModel.Annotations and Microsoft.Extensions.DependencyInjection.Abstration NuGet packages.
Then, we need an Aggregates folder containing all the aggregate definitions (remember, we implemented aggregates as interfaces), namely, IDestination, IPackage, and IPackageEvent. Here, IPackageEvent is the aggregate associated with the table where we will place events to be propagated to other applications.
As an example, let’s analyze IPackage:
public interface IPackage : IEntity<int>
{
    void FullUpdate(IPackageFullEditDTO packageDTO);
    string Name { get; set; }
    string Description { get;}
    decimal Price { get; set; }
    int DurationInDays { get; }
    DateTime? StartValidityDate { get;}
    DateTime? EndValidityDate { get; }
    int DestinationId { get; }

}
It contains the same properties of the Package entity, which we saw in Chapter 7, Interacting with Data in C# – Entity Framework Core. The only differences are the following:
- It inherits from
IEntity<int>, which furnishes all basic functionalities of aggregates - It has no
Idproperty since it is inherited fromIEntity<int> - All properties are read-only, and it has a
FullUpdatemethod since all aggregates can only be modified through update operations defined in the user domain (in our case, theFullUpdatemethod)
Now, let’s also add a DTOs folder. Here, we place all interfaces used to pass updates to the aggregates. Such interfaces are implemented by the application layer ViewModels used to define such updates. In our case, it contains IPackageFullEditDTO, which we can use to update existing packages. If you would like to add the logic to manage destinations, you must define an analogous interface for the IDestination aggregate.
An IRepositories folder contains all repository specifications; namely, IDestinationRepository, IPackageRepository, and IPackageEventRepository. Here, IPackageEventRepository is the repository associated with the IPackageEvent aggregate. As an example, let’s have a look at the IPackageRepository repository:
public interface IPackageRepository:
        IRepository<IPackage>
{
    Task<IPackage> Get(int id);
    IPackage New();
    Task<IPackage> Delete(int id);
}
Repositories always contain just a few methods since all business logic should be represented as aggregate methods – in our case, just the methods to create a new package, to retrieve an existing package, and to delete an existing package. The logic to modify an existing package is included in the FullUpdate method of IPackage.
Finally, as with all domain layer projects, PackagesManagementDomain contains an event folder containing all domain event definitions. In our case, the folder is named Events and contains the package-deleted event and the price-changed event:
public class PackageDeleteEvent: IEventNotification
{
    public PackageDeleteEvent(int id, long oldVersion)
    {
        PackageId = id;
        OldVersion = oldVersion;
    }
    public int PackageId { get; }
    public long OldVersion { get; }

}
public class PackagePriceChangedEvent: IEventNotification
{
    public PackagePriceChangedEvent(int id, decimal price,
        long oldVersion, long newVersion)
    {
            PackageId = id;
            NewPrice = price;
            OldVersion = oldVersion;
            NewVersion = newVersion;
     }
    public int PackageId { get; }
    public decimal NewPrice { get; }
    public long OldVersion { get; }
    public long NewVersion { get; }
}
When an aggregate sends all its changes to another application, it should have a version property. The application that receives the changes uses this version property to apply all changes in the right order. An explicit version number is necessary because changes are sent asynchronously, so the order they are received in may differ from the order they were sent in. For this purpose, events that are used to publish changes outside of the application have both OldVersion (the version before the change) and NewVersion (the version after the change) properties. Events associated with delete events have no NewVersion since, after being deleted, an entity can’t store any versions.
The next subsection explains how all interfaces defined in the domain layer are implemented in the data layer.
Defining the data layer
The data layer project contains references to the Microsoft.AspNetCore.Identity.EntityFrameworkCore and Microsoft.EntityFrameworkCore.SqlServer NuGet packages, since we are using Entity Framework Core with SQL Server. It references Microsoft.EntityFrameworkCore.Tools and Microsoft.EntityFrameworkCore.Design, which are needed to generate database migrations, as explained in the Entity Framework Core migrations section of Chapter 7, Interacting with Data in C# – Entity Framework Core.
We have a Models folder that contains all database entities. They are similar to the ones in Chapter 7, Interacting with Data in C# – Entity Framework Core. The only differences are as follows:
- They inherit from
Entity<T>, which contains all basic features of aggregates. Please note that inheriting fromEntity<T>is only needed for aggregate roots; all other entities must be defined as explained in Chapter 7, Interacting with Data in C# – Entity Framework Core. In our example, all entities are aggregate roots. - They have no
Idsince it is inherited fromEntity<T>. - Some of them have an
EntityVersionproperty that is decorated with the[ConcurrencyCheck]attribute. It contains the entity version that is needed for sending a property all entity changes to other applications. TheConcurrencyCheckattribute is needed to prevent concurrency errors while updating the entity version. This prevents suffering the performance penalty implied by a transaction.
More specifically, when saving entity changes, if the value of a field marked with the ConcurrencyCheck attribute is different from the one that was read when the entity was loaded in memory, a concurrency exception is thrown to inform the calling method that someone else modified this value after the entity was read, but before we attempted to save its changes. This way, the calling method can repeat the whole operation with the hope that, this time, no one will write the same entity in the database during its execution.
It is worth analyzing the Package entity:
public class Package: Entity<int>, IPackage
{
    public void FullUpdate(IPackageFullEditDTO o)
    {
        if (IsTransient())
        {
            Id = o.Id;
            DestinationId = o.DestinationId;
        }
        else
        {
            if (o.Price != this.Price)
                this.AddDomainEvent(new PackagePriceChangedEvent(
                        Id, o.Price, EntityVersion, EntityVersion+1));
        }
        Name = o.Name;
        Description = o.Description;
        Price = o.Price;
        DurationInDays = o.DurationInDays;
        StartValidityDate = o.StartValidityDate;
        EndValidityDate = o.EndValidityDate;
    }
    [MaxLength(128)]
    public string Name { get; set; }
    [MaxLength(128)]
    public string? Description { get; set; }
    public decimal Price { get; set; }
    public int DurationInDays { get; set; }
    public DateTime? StartValidityDate { get; set; }
    public DateTime? EndValidityDate { get; set; }
    public Destination MyDestination { get; set; }
    [ConcurrencyCheck]
    public long EntityVersion{ get; set; }
    public int DestinationId { get; set; }
}
The FullUpdate method is the only way to update the IPackage aggregate. When the price changes add PackagePriceChangedEvent to the entity list of events.
The MainDBContext.cs file contains the data layer database context definition. It doesn’t inherit from DBContext but from the following predefined context class:
IdentityDbContext<IdentityUser<int>, IdentityRole<int>, int>
This context defines the user’s tables needed for the authentication. In our case, we opted for the IdentityUser<T> standard and IdentityRole<S> for users and roles, respectively, and used integers for both the T and S entity keys. However, we may also use classes that inherit from IdentityUser and IdentityRole and then add further properties.
In the OnModelCreating method, we must call base.OnModelCreating(builder) in order to apply the configuration defined in IdentityDbContext.
MainDBContext implements IUnitOfWork. The following code shows the implementation of all methods that start, roll back, and commit a transaction:
public async Task StartAsync()
{
    await Database.BeginTransactionAsync();
}
public Task CommitAsync()
{
    Database.CommitTransaction();
    return Task.CompletedTask;
}
public Task RollbackAsync()
{
    Database.RollbackTransaction();
    return Task.CompletedTask;
}
However, they are rarely used by command classes in a distributed environment. This is because retrying the same operation until no concurrency exception is returned usually ensures better performance than transactions.
It is worth analyzing the implementation of the method that passes all changes applied to DbContext to the database:
public async Task<bool> SaveEntitiesAsync()
{
    try
    {
        return await SaveChangesAsync() > 0;
    }
    catch (DbUpdateConcurrencyException ex)
    {
        foreach (var entry in ex.Entries)
        {
            entry.State = EntityState.Detached;

        }
        throw;
    }
}
The preceding implementation just calls the SaveChangesAsync DbContext context method, which saves all changes to the database, but then it intercepts all concurrency exceptions and detaches all the entities involved in the concurrency error from the context. This way, the next time a command retries the whole failed operation, their updated versions will be reloaded from the database.
The Repositories folder contains all repository implementations. It is worth analyzing the implementation of the IPackageRepository.Delete method:
public async Task<IPackage> Delete(int id)
{
    var model = await Get(id);
    if (model is not Package package) return null;
    context.Packages.Remove(package);
    model.AddDomainEvent(
        new PackageDeleteEvent(
            model.Id, package.EntityVersion));
    return model;
}
It reads the entity from the database and formally removes it from the Packages dataset. This will force the entity to be deleted in the database when changes are saved to the database. Moreover, it adds PackageDeleteEvent to the aggregate list of events.
The Extensions folder contains the DBExtensions static class, which, in turn, defines two extension methods to be added to the application DI engine and the ASP.NET Core pipeline, respectively. Once added to the pipeline, these two methods will connect the database layer to the application layer.
The IServiceCollection extension of AddDbLayer accepts (as its input parameters) the database connection string and the name of the .dll file that contains all migrations. Then, it does the following:
services.AddDbContext<MainDbContext>(options =>
                options.UseSqlServer(connectionString,
                b => b.MigrationsAssembly(migrationAssembly)));
That is, it adds the database context to the DI engine and defines its options, namely, that it uses SQL Server, the database connection string, and the name of the .dll file that contains all migrations.
Then, it does the following:
services.AddIdentity<IdentityUser<int>, IdentityRole<int>>()
                .AddEntityFrameworkStores<MainDbContext>()
                .AddDefaultTokenProviders();
That is, it adds and configures all the types needed to handle database-based authentication. In particular, it adds the UserManager and RoleManager types, which the application layer can use to manage users and roles. AddDefaultTokenProviders adds the provider that creates the authentication tokens using data contained in the database when users log in.
Finally, it discovers and adds to the DI engine all repository implementations by calling the AddAllRepositories method, which is defined in the DDD tools we added to the domain layer project.
The UseDBLayer extension method ensures migrations are applied to the database by calling context.Database.Migrate() and then populates the database with some initial objects. In our case, it uses RoleManager and UserManager to create an administrative role and an initial administrator, respectively. Then, it creates some sample destinations and packages.
context.Database.Migrate() is useful to quickly set up and update staging and test environments. When deploying in production, instead, an SQL script should be produced from the migrations using the migration tools. Then, this script should be examined before being applied by the person in charge of maintaining the database.
To create migrations, we must add the aforementioned extension methods to the ASP.NET Core MVC Program.cs file, as shown here:
    ...
    builder.Services.AddRazorPages();
    builder.Services.AddDbLayer(
        builder.Configuration.GetConnectionString("DefaultConnection"),
        "PackagesManagementDB");
    ...
    app.UseAuthentication();
    app.UseAuthorization();
    ...
Please be sure that both the authorization and authentication middleware have been added to the ASP.NET Core pipeline in the right order; otherwise, the authentication/authorization engine will not work.
Then, we must add the connection string to the appsettings.json file, as shown here:
{
    "ConnectionStrings": {
        "DefaultConnection": "Server=(localdb)\mssqllocaldb;Database=package-management;Trusted_Connection=True;MultipleActiveResultSets=true"

    },
    ...
}
Finally, let’s add Microsoft.EntityFrameworkCore.Design to the ASP.NET Core project.
At this point, let’s open Visual Studio Package Manager Console, select PackageManagementDB as the default project, and then launch the following command:
Add-Migration Initial -Project PackageManagementDB
The preceding command will scaffold the first migration. We may apply it to the database with the Update-Database command. Please note that if you copy the project from GitHub, you don’t need to scaffold migrations since they have already been created, but you still need to update the database.
The next subsection describes the application layer that contains the business logic for manipulating the aggregates.
Defining the application layer
As a first step, for simplicity, let’s freeze the application culture to en-US by adding the following code to the ASP.NET Core pipeline:
app.UseAuthorization();
// Code to add: configure the Localization middleware
var ci = new CultureInfo("en-US");
app.UseRequestLocalization(new RequestLocalizationOptions
{
    DefaultRequestCulture = new RequestCulture(ci),
    SupportedCultures = new List<CultureInfo>
    {
        ci,
    },
     SupportedUICultures = new List<CultureInfo>
    {
        ci,
    }
});
Then, let’s create a Tools folder and place the ApplicationLayer code there, which you can find in the ch11 code of the GitHub repository associated with this book. With these tools in place, we can add the code that automatically discovers and adds all queries, command handlers, and event handlers to the DI engine, as shown here:
...
...
builder.Services.AddAllQueries(this.GetType().Assembly);
builder.Services.AddAllCommandHandlers(this.GetType().Assembly);
builder.Services.AddAllEventHandlers(this.GetType().Assembly);
Then, we must add a Queries folder to place all queries and their associated interfaces. As an example, let’s have a look at the query that lists all packages:
public class PackagesListQuery:IPackagesListQuery
{
    private readonly MainDbContext ctx;
    public PackagesListQuery(MainDbContext ctx)
    {
        this.ctx = ctx;
    }
    public async Task<IReadOnlyCollection<PackageInfosViewModel>> GetAllPackages()
    {
        return await ctx.Packages.Select(m => new PackageInfosViewModel
        {
            StartValidityDate = m.StartValidityDate,
            EndValidityDate = m.EndValidityDate,
            Name = m.Name,
            DurationInDays = m.DurationInDays,
            Id = m.Id,
            Price = m.Price,
            DestinationName = m.MyDestination.Name,
            DestinationId = m.DestinationId
        })
            .OrderByDescending(m=> m.EndValidityDate)
            .ToListAsync();
    }
}
The query object is automatically injected into the application DB context. The GetAllPackages method uses LINQ to project all of the required information into PackageInfosViewModel and sorts all results in descending order on the EndValidityDate property.
PackageInfosViewModel is placed in the Models folder together with all other ViewModels. It is common practice to organize ViewModels into folders by defining a different folder for each controller. It is worth analyzing the ViewModel used for editing packages:
public class PackageFullEditViewModel: IPackageFullEditDTO
    {
        public PackageFullEditViewModel() { }
        public PackageFullEditViewModel(IPackage o)
        {
            Id = o.Id;
            DestinationId = o.DestinationId;
            Name = o.Name;
            Description = o.Description;
            Price = o.Price;
            DurationInDays = o.DurationInDays;
            StartValidityDate = o.StartValidityDate;
            EndValidityDate = o.EndValidityDate;
        }
        ...
        ...
It has a constructor that accepts an IPackage aggregate. This way, package data is copied into the ViewModel that is used to populate the edit view. It implements the IPackageFullEditDTO DTO interface defined in the domain layer. This way, it can be directly used to send IPackage updates to the domain layer.
All properties contain validation attributes that are automatically used by client-side and server-side validation engines. Each property contains a Display attribute that defines the label to give to the input field that will be used to edit the property. It is better to place the field labels in the ViewModels than it is to place them directly into the views since, this way, the same names are automatically used in all views that use the same ViewModel. The following code block lists all its properties:
public int Id { get; set; }
[StringLength(128, MinimumLength = 5), Required]
[Display(Name = "name")]
public string Name { get; set; }
[Display(Name = "package infos")]
[StringLength(128, MinimumLength = 10), Required]
public string Description { get; set; }
[Display(Name = "price")]
[Range(0, 100000)]
public decimal Price { get; set; }
[Display(Name = "duration in days")]
[Range(1, 90)]
public int DurationInDays { get; set; }
[Display(Name = "available from"), Required]
public DateTime? StartValidityDate { get; set; }
[Display(Name = "available to"), Required]
public DateTime? EndValidityDate { get; set; }
[Display(Name = "destination")]
public int DestinationId { get; set; }
The Commands folder contains all commands. As an example, let’s have a look at the command used to modify packages:
public class UpdatePackageCommand: ICommand
{
    public UpdatePackageCommand(IPackageFullEditDTO updates)
    {
        Updates = updates;
    }
    public IPackageFullEditDTO Updates { get; private set; }
}
Its constructor must be invoked with an implementation of the IPackageFullEditDTO DTO interface, which, in our case, is the edit ViewModel we described previously. Command handlers are placed in the Handlers folder. It is worth analyzing the command that updates packages:
private readonly IPackageRepository repo;
private readonly IEventMediator mediator;
public UpdatePackageCommandHandler(IPackageRepository repo, IEventMediator mediator)
{
    this.repo = repo;
    this.mediator = mediator;
}
Its constructor has automatically injected the IPackageRepository repository and an IEventMediator instance needed to trigger event handlers. The following code also shows the implementation of the standard HandleAsync command handler method:
public async Task HandleAsync(UpdatePackageCommand command)
{
    bool done = false;
    IPackage model;
    while (!done)
    {
        try
        {
            model = await repo.Get(command.Updates.Id);
            if (model == null) return;
            model.FullUpdate(command.Updates);
            await mediator.TriggerEvents(model.DomainEvents);
            await repo.UnitOfWork.SaveEntitiesAsync();
            done = true;
        }
        catch (DbUpdateConcurrencyException)
        {
          // add some logging here
        }
    }
}
Command operations are repeated until no concurrency exception is returned. HandleAsync uses the repository to get an instance of the entity to modify. If the entity is not found (it has been deleted), the commands stop its execution. Otherwise, all changes are passed to the retrieved aggregate. Immediately after the update, all events contained in the aggregate are triggered. In particular, if the price has changed, the event handler associated with the price change is executed. The concurrency check declared with the [ConcurrencyCheck] attribute on the EntityVersion property of the Package entity ensures that the package version is updated properly (by incrementing its previous version number by 1), as well as that the price-changed event is passed the right version numbers.
Also, event handlers are placed in the Handlers folder. As an example, let’s have a look at the price-changed event handler:
public class PackagePriceChangedEventHandler :
    IEventHandler<PackagePriceChangedEvent>
{
    private readonly IPackageEventRepository repo;
    public PackagePriceChangedEventHandler(IPackageEventRepository repo)
    {
        this.repo = repo;
    }
    public Task HandleAsync(PackagePriceChangedEvent ev)
    {
        repo.New(PackageEventType.CostChanged, ev.PackageId,
            ev.OldVersion, ev.NewVersion, ev.NewPrice);
      return Task.CompletedTask;
    }
}
The constructor has automatically injected the IPackageEventRepository repository, which handles the database table and all the events to send to other applications. The HandleAsync implementation simply calls the repository method that adds a new record to this table.
All records in the table are handled by IPackageEventRepository, which can be retrieved and sent to all interested microservices by a parallel task defined in the DI engine with a call such as builder.Services.AddHostedService<MyHostedService>();, as detailed in the Using generic hosts subsection of Chapter 5, Applying Microservice Architecture to Your Enterprise Application. However, this parallel task is not implemented in the GitHub code associated with this chapter.
The next subsection describes how controllers and views are designed.
Defining controllers and views
We need to add two more controllers to the one automatically scaffolded by Visual Studio, namely, AccountController, which takes care of user login/logout and registration, and ManagePackageController, which handles all package-related operations. It is enough to right-click on the Controllers folder and then select Add | Controller. Then, choose the controller name and select the empty MVC controller to avoid the possibility of Visual Studio scaffolding code you don’t need.
For simplicity, AccountController just has login and logout methods, so you can log in just with the initial administrator user. However, you can add further action methods that use the UserManager class to define, update, and delete users. The UserManager class can be provided through DI, as shown here:
private readonly UserManager<IdentityUser<int>> userManager;
private readonly SignInManager<IdentityUser<int>> signInManager;
public AccountController(
    UserManager<IdentityUser<int>> userManager,
    SignInManager<IdentityUser<int>> signInManager)
{
    this.userManager = userManager;
    this.signInManager = signInManager;
}
SignInManager takes care of login/logout operations. The Logout action method is quite simple and is shown here:
[HttpPost]
public async Task<IActionResult> Logout()
{
    await signInManager.SignOutAsync();
    return RedirectToAction(nameof(HomeController.Index), "Home");
}
It just calls the signInManager.SignOutAsync method and then redirects the browser to the home page. To avoid it being called by clicking a link, it is decorated with HttpPost, so it can only be invoked via a form submit.
Login, on the other hand, requires two action methods. The first one is invoked via Get and shows the login form, where the user must place their username and password. It is shown here:
[HttpGet]
public async Task<IActionResult> Login(string? returnUrl = null)
{
    // Clear the existing external cookie
    //to ensure a clean login process
    await HttpContext
         .SignOutAsync(IdentityConstants.ExternalScheme);
    ViewData["ReturnUrl"] = returnUrl;
    return View();
}
It receives returnUrl as its parameter when the browser is automatically redirected to the login page by the authorization module. This happens when an unlogged-in user tries to access a protected page. returnUrl is stored in the ViewState dictionary that is passed to the login view. The form in the login view passes it back, together with the username and password, to the controller when it is submitted, as shown in this code:
<form asp-route-returnurl="@ViewData["ReturnUrl"]" method="post">
...
</form>
The form post is intercepted by an action method with the same Login name but decorated with the [HttpPost] attribute, as shown here:
[ValidateAntiForgeryToken]
public async Task<IActionResult> Login(
    LoginViewModel model,
    string? returnUrl = null)
        {
            ...
The preceding method receives the Login model used by the login view, together with the returnUrl query string parameter. The ValidateAntiForgeryToken attribute verifies a token (called an anti-forgery token) that MVC forms automatically. This is then added to a hidden field to prevent XSRF/CSRF attacks.
As a first step, the action method logs the user out if they are already logged in:
if (User.Identity.IsAuthenticated)
{
      await signInManager.SignOutAsync();

}
Otherwise, it verifies whether there are validation errors, in which case it shows the same view filled with the data of the ViewModel to let the user correct their errors:
if (ModelState.IsValid)
{
     ...
}
else
 // If we got this far, something failed, redisplay form
 return View(model);
If the model is valid, signInManager is used to log the user in:
var result = await signInManager.PasswordSignInAsync(
    model.UserName,
    model.Password, model.RememberMe,
    lockoutOnFailure: false);
If the result returned by the operation is successful, the action method redirects the browser to returnUrl if it’s not null; otherwise, it redirects the browser to the home page:
if (result.Succeeded)
{
    if (!string.IsNullOrEmpty(returnUrl))
        return LocalRedirect(returnUrl);
    else
        return RedirectToAction(nameof(HomeController.Index), "Home");
}
else
{
    ModelState.AddModelError(string.Empty,
        "wrong username or password");
    return View(model);
}
If the login fails, it adds an error to ModelState and shows the same form to let the user try again.
ManagePackagesController contains an Index method that shows all packages in table format:
[HttpGet]
public async Task<IActionResult> Index(
    [FromServices] IPackagesListQuery query)
{
    var results = await query.GetAllPackages();
    var vm = new PackagesListViewModel { Items = results };
    return View(vm);
}
The query object is injected into the action method by DI. Then, the action method invokes it and inserts the resulting IEnumerable into the Items property of a PackagesListViewModel instance. It is a good practice to include IEnumerables in ViewModels instead of passing them directly to the views so that, if necessary, other properties can be added without the need to modify the existing view code.
Moreover, it is good practice to define enumerable properties of ViewModels as IReadOnlyCollection<T> if the enumerables are read-only or as IList<T> if the enumerables can be modified or if they are involved in model binding. In fact, ICollection<T> has a Count property, which may be very useful when rendering ViewModels in views, while IList<T> also has indexers that are necessary for rendering all items with appropriate names for model binding to succeed (see the Phil Haack post in the Further reading section). IEnumerable<T> should be preferred only in the case that one needs the typical lazy evaluation of IEnumerable<T>.
Results are shown in a Bootstrap 4 table since Bootstrap 4 CSS is automatically scaffolded by Visual Studio.
The result is shown here:
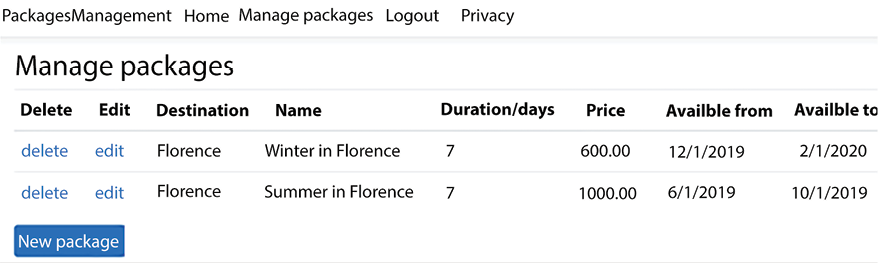
Figure 16.2: Application packages handling page
The New package link (it is shaped like a Bootstrap 4 button, but it is a link) invokes a controller Create action method, while the delete and edit links in each row invoke a Delete and Edit action method, respectively, and pass them the ID of the package shown in the row.
Here is the implementation of the two-row links:
@foreach(var package in Model.Items)
{
<tr>
    <td>
        <a asp-controller="ManagePackages"
            asp-action="@nameof(ManagePackagesController.Delete)"
            asp-route-id="@package.Id">
            delete
        </a>
    </td>
    <td>
        <a asp-controller="ManagePackages"
            asp-action="@nameof(ManagePackagesController.Edit)"
            asp-route-id="@package.Id">
            edit
        </a>
    </td>
    ...
    ...
It is worth describing the code of the HttpGet and HttpPost Edit action methods:
[HttpGet]
public async Task<IActionResult> Edit(
    int id,
    [FromServices] IPackageRepository repo)
{
    if (id == 0) return RedirectToAction(
        nameof(ManagePackagesController.Index));
    var aggregate = await repo.Get(id);
    if (aggregate == null) return RedirectToAction(
        nameof(ManagePackagesController.Index));
    var vm = new PackageFullEditViewModel(aggregate);
    return View(vm);
}
The Edit method of HttpGet uses IPackageRepository to retrieve the existing package. If the package is not found, that means it has been deleted by some other user, and the browser is redirected again to the list page to show the updated list of packages. Otherwise, the aggregate is passed to the PackageFullEditViewModel ViewModel, which is rendered by the Edit view.
The view used to render the package must render an HTML select with all possible package destinations, so it needs an instance of the IDestinationListQuery query that was implemented to assist with the destination selection HTML logic. This query is injected directly into the view since it is the view’s responsibility to decide how to enable the user to select a destination. The code that injects the query and uses it is shown here:
@inject PackagesManagement.Queries.IDestinationListQuery destinationsQuery
@{
    ViewData["Title"] = "Edit/Create package";
    var allDestinations =
        await destinationsQuery.AllDestinations();
}
The action method that processes the post of the view form is given here:
[HttpPost]
public async Task<IActionResult> Edit(
    PackageFullEditViewModel vm,
    [FromServices] ICommandHandler<UpdatePackageCommand> command)
{
    if (ModelState.IsValid)
    {
        await command.HandleAsync(new UpdatePackageCommand(vm));
        return RedirectToAction(
            nameof(ManagePackagesController.Index));
    }
    else
        return View(vm);
}
If ModelState is valid, UpdatePackageCommand is created and its associated handler is invoked; otherwise, the View is displayed again to the user to enable them to correct all the errors.
The new links to the package list page and login page must be added to the main menu, which is in the _Layout view, as shown here:
<li class="nav-item">
    <a class="nav-link text-dark"
        asp-controller="ManagePackages"
            asp-action="Index">Manage packages</a>
</li>
@if (User.Identity.IsAuthenticated)
{
    <li class="nav-item">
        <a class="nav-link text-dark"
            href="javascript:document.getElementById('logoutForm').submit()">
            Logout
        </a>
    </li>
}
else
{
    <li class="nav-item">
        <a class="nav-link text-dark"
            asp-controller="Account" asp-action="Login">Login</a>
    </li>
}
logoutForm is an empty form whose only purpose is to send a post to the Logout action method. It has been added to the end of the body, as shown here:
@if (User.Identity.IsAuthenticated)
{
    <form asp-area="" asp-controller="Account"
            asp-action="Logout" method="post"
            id="logoutForm" ></form>
}
Now, the application is ready! You can run it, log in, and start to manage packages.
Summary
In this chapter, we analyzed the peculiarities of frontend microservices and the techniques used to implement them.
Then, we used an example to put together the techniques learned in this chapter and in previous chapters in the complete implementation of a frontend microservice.
We used an onion architecture with a data layer and a domain layer abstraction and we implemented each as a separate project. The application layer and the presentation layer were implemented together in the same ASP.NET Core MVC project.
The microservice used the CQRS pattern, and used an queue implemented with a database table to store the events to send to other microservices.
The next chapter explains how to implement a presentation layer as an SPA with the new Blazor WebAssembly framework.
Further reading
Since this chapter just put into practice concepts explained in other chapters (mainly Chapter 5 and Chapter 11), here we will include just a few links on how to use API gateways and further information on the MediateR library, which was mentioned in the example:
- Ocelot GitHub repository: https://github.com/ThreeMammals/Ocelot
- How to implement your API gateway with Ocelot: https://docs.microsoft.com/en-us/dotnet/architecture/microservices/multi-container-microservice-net-applications/implement-api-gateways-with-ocelot
- Azure API Management: https://azure.microsoft.com/en-us/services/api-management/#overview
- Azure App Service: https://azure.microsoft.com/en-us/services/app-service/
- More information on MediatR can be found on MediatR’s GitHub repository: https://github.com/jbogard/MediatR