
23
Testing Your Enterprise Application
When developing software, it is essential to ensure that an application is as bug-free as possible, and that it satisfies all requirements. This can be done by testing all the modules while they are being developed, or when the overall application has been either completely or partially implemented.
Performing all the tests manually is not a feasible option since most of the tests must be executed each time the application is modified and, as explained throughout this book, modern software is being continuously modified to adapt applications to the needs of a fast-changing market. This chapter discusses the most common types of tests needed to deliver reliable software, and how to organize and automate them.
More specifically, this chapter covers the following topics:
- Understanding unit and integration tests and their usage
- Understanding the basics of Test-Driven Development (TDD)
- Functional tests
- Defining C# test projects in Visual Studio
- Automating functional tests in C#
- Use case – automating unit and functional tests
In this chapter, we’ll see which types of tests are worth implementing, and what unit tests are. We’ll see the different types of projects available and how to write tests in them. At the end of the chapter, the book use case will explain how to define and execute your automatic unit and functional tests.
Technical requirements
This chapter requires the Visual Studio 2022 free Community Edition or better, with all database tools installed. All concepts in this chapter are clarified with the help of practical examples based on the WWTravelClub book use case.
The code for this chapter is available at https://github.com/PacktPublishing/Software-Architecture-with-C-10-and-.NET-6-3E.
Understanding unit and integration tests
Delaying application testing until immediately after most of its functionalities have been implemented in their entirety must be avoided for the following reasons:
- If a class or module has been incorrectly designed or implemented, it might have already influenced the way other modules were implemented. Therefore, at this point, fixing the problem might have a very high cost.
- The possible combination of input that is needed to test all possible paths that execution can take grows exponentially with the number of modules or classes that are tested together. Thus, for instance, if the execution of a class method
Acan take three different paths, while the execution of another methodBcan take four paths, then testingAandBtogether would require 3 x 4 different inputs. In general, if we test several modules together, the total number of paths to test is the product of the number of paths to test in each module. If modules are tested separately, instead, the number of inputs required is just the sum of the paths needed to test each module. - If a test of an aggregate made of N modules fails, then locating the origin of the bug among the N modules is usually a very time-consuming activity.
- When N modules are tested together, we have to redefine all tests involving the N modules, even if just one of the N modules changes during the application’s CI/CD cycle.
These considerations show that it is more convenient to test each module method separately. Unluckily, a battery of tests that verifies all methods independently from their context is incomplete because some bugs may be caused by incorrect interactions between modules.
Therefore, tests are organized into three stages:
- Unit tests: These verify that all execution paths of each module behave properly. They should be free from external dependencies, such as storage and databases, and should be quite complete; that is, they should cover all possible paths. This is feasible because there are not many possible execution paths of each method or module compared to the possible execution paths of the whole application.
- Integration tests: These are executed once the software passes all its unit tests. Integration tests verify that all modules interact properly to get the expected results. Integration tests do not need to be complete since unit tests will have already verified that all execution paths of each module work properly. They need to verify all patterns of interaction, that is, all the possible ways in which the various modules may cooperate.
- Acceptance tests: These are executed at the end of each sprint and/or before releasing the application. They verify that the output of a sprint or the final application satisfies both functional and non-functional requirements. Tests that verify functional requirements are called functional tests, while tests that verify performance requirements are called performance tests.
Usually, each interaction pattern has more than one test associated with it: a typical activation of a pattern, and some extreme cases of activation. For instance, if a whole pattern of interaction receives an array as input, we will write a test for the typical size of the array, a test with a null array, a test with an empty array, and a test with a very big array. This way, we verify that the way the single module was designed is compatible with the needs of the whole interaction pattern.
With the preceding strategy in place, if we modify a single module without changing its public interface, we need to change the unit tests for that module.
If, instead, the change involves the way some modules interact, then we also have to add new integration tests or to modify existing ones. However, usually, this is not a big problem since most of the tests are unit tests, so rewriting a large percentage of all integration tests does not require too big an effort. Moreover, if the application was designed according to the Single Responsibility, Open/Closed, Liskov Substitution, Interface Segregation, or Dependency Inversion (SOLID) principles, then the number of integration tests that must be changed after a single code modification should be small since the modification should affect just a few classes that interact directly with the modified method or class.
Automating unit and integration tests
At this point, it should be clear that both unit tests and integration tests must be reused during the entire lifetime of the software. That is why it is worth automating them. The automation of unit and integration tests avoids possible errors of manual test execution and saves time. A whole battery of several thousand automated tests can verify software integrity following each small modification in a few minutes, thereby enabling the frequent changes needed in the CI/CD cycles of modern software.
As new bugs are found, new tests are added to discover them so that they cannot reappear in future versions of the software. This way, automated tests always become more reliable and protect the software more from bugs added as a result of new changes. Thus, the probability of adding new bugs (that are not immediately discovered) is greatly reduced.
The next subsection will give us the basics for organizing and designing automated unit and integration tests, as well as practical details on how to write a test in C# in the Defining C# test projects in Visual Studio section.
Writing automated (unit and integration) tests
Tests are not written from scratch; all software development platforms have tools that help us to both write tests and launch them (or some of them). Once the selected tests have been executed, these tools usually show a report and give the possibility to debug the code of all failed tests.
More specifically, by and large, all unit and integration test frameworks are composed of three important parts:
- Facilities for defining all tests: They verify whether the actual results correspond to expected results. Usually, a test is organized into test classes, where each test call tests either a single application class or a single class method. Each test is split into three stages:
- Test preparation: The general environment needed by the test is prepared. This stage only prepares the global environment for tests, such as objects to inject into class constructors or simulations of database tables; it doesn’t prepare the individual inputs for each of the methods we’re going to test. Usually, the same preparation procedure is used in several tests, so test preparations are factored out into dedicated modules.
- Test execution: The methods to test are invoked with adequate input and all results of their executions are compared with expected results with constructs such as
Assert.Equal(x, y)andAssert.NotNull(x). - Tear-down: The whole environment is cleaned up to avoid the execution of a test influencing other tests. This step is the converse of step 1.
- Mock facilities: While integration tests use all (or almost all) classes involved in a pattern of object cooperation, in unit tests, the use of other application classes should be avoided because their purpose is to test each isolated method. Thus, if a class under test, say,
A, uses a method of another application class,B, that is injected into its constructor in one of its methods,M, and then, in order to testM, we must inject a fake implementation ofB. It is worth pointing out that only classes that do some processing are not allowed to use another class during unit tests, while pure data classes can. Mock frameworks contain facilities to define implementations of interfaces and interface methods that return data that can be defined in tests. Typically, mock implementations are also able to report information on all mock method calls. Such mock implementations do not require the definition of actual class files but are done online in the test code by calling methods such asnew Mock<IMyInterface>(). - Execution and reporting tool: This is a visual configuration-based tool that the developer may use to decide which tests to launch and when to launch them. Moreover, it also shows the final outcome of the tests as a report containing all successful tests, all failed tests, each test’s execution time, and other information that depends on the specific tool and on how it was configured. Usually, execution and reporting tools that are executed in development IDEs such as Visual Studio also give you the possibility of launching a debug session on each failed test.
Since only interfaces allow a complete mock definition of all their methods, we should inject interfaces or pure data classes (that don’t need to be mocked) in class constructors and methods if we want to mock all dependencies in our unit tests. Therefore, for each cooperating class that we want to inject into another class and that we want to mock, we must define a corresponding interface.
Moreover, classes should use instances that are injected in their constructors or methods, and not class instances available in the public static fields of other classes; otherwise, the results of the unit tests might appear not deterministic, since these static values might not be set properly during the tests.
The subsection that follows focuses on functional and performance tests.
Acceptance tests: writing functional and performance tests
Acceptance tests define the contract between the project stakeholders and the development team. They are used to verify that the software developed actually behaves as agreed with them. Acceptance tests verify not only functional specifications but also constraints on the software usability and user interface (UI). Since they also have the purpose of showing how the software appears and behaves on actual computer monitors and displays, they are never completely automatic but consist mainly of lists of recipes and verifications that must be followed by an operator.
Sometimes, automatic functional tests are developed to verify just functional requirements, but such tests usually bypass the user interface and inject the test input directly in the logic that is immediately behind the user interface. For instance, in the case of an ASP.NET Core MVC application, the whole website is run in a complete environment that includes all the necessary storage filled with test data. Input is not provided to HTML pages, but is injected directly into the ASP.NET Core controllers. Tests that bypass the user interface are called subcutaneous tests. ASP.NET Core supplies various tools to perform subcutaneous tests and also tools that automate interaction with HTML pages.
Subcutaneous tests are usually preferred in the case of automated tests, while full tests are executed manually for the following reasons:
- No automatic test can verify how the user interface appears and how usable it is
- Automating the actual interaction with the user interface is a very time-consuming task
- User interfaces are changed frequently to improve their usability and to add new features, and small changes in a single application screen may force a complete rewrite of all tests that operate on that screen
In a few words, user interface tests are very expansive and have low reusability, so it’s rarely worth automating them. A common approach is to use playback tools like Selenium IDE (https://www.selenium.dev/selenium-ide/) during manual tests so that each manual test can be repeated automatically. It’s likely that the code generated automatically by such tools is not robust enough to resist non-trivial changes in the HTML. Selenium IDE playback code tries to resist HTML changes by attempting several selectors to identify each HTML element, but this only helps concerning small changes. Therefore, in general, playback code can be reused only for the parts of the application UI that are not affected by changes.
ASP.NET Core supplies the Microsoft.AspNetCore.Mvc.Testing NuGet package to run the whole website in a testing environment. Using it together with the AngleSharp NuGet package, which parses HTML pages into DOM trees, you can write automated full tests with an acceptable programming effort. Functional tests, in general, will be discussed in detail in the Functional tests section, while the automated ASP.NET Core functional tests framework will be described in detail in the Automating functional tests in C# section.
Performance tests apply a fake load to an application to see whether it can handle the typical production load, discover its load limits, and locate bottlenecks. The application is deployed in a staging environment that is a copy of the actual production environment in terms of hardware resources.
Then, fake requests are created and applied to the system, and response times and other metrics are collected. Fake request batches should have the same composition as the actual production batches. They can be generated from the actual production request logs if they are available.
If response times are not satisfactory, other metrics are collected to discover possible bottlenecks (low memory, slow storage, or slow software modules). Once located, a software component that is responsible for the problem can be analyzed in the debugger to measure the execution time of the various method calls involved in a typical request.
Failures in the performance tests may lead either to a redefinition of the hardware needed by the application or to the optimization of some software modules, classes, or methods.
Both Azure and Visual Studio offer tools to create fake loads and to report execution metrics. However, they have been declared obsolete and will be discontinued, and so we will not describe them. As an alternative, there are both open source and third-party tools that can be used. Some of them are listed in the Further reading section.
The next section describes a software development methodology that gives a central role to tests.
Understanding test-driven development
Test-driven development (TDD) is a software development methodology that gives a central role to unit tests. According to this methodology, unit tests are a formalization of the specifications of each class, so they must be written before the code of the class. Actually, a full test that covers all code paths univocally defines the code behavior, so it can be considered a specification for the code. It is not a formal specification that defines the code behavior through some formal language, but a specification based on examples of behavior.
The ideal way to test software would be to write formal specifications of the whole software behavior and to verify with some wholly automatic tools whether the software that was actually produced conforms to them. In the past, some research effort was spent defining formal languages for describing code specifications, but expressing the behavior the developer has in mind with similar languages was a very difficult and error-prone task. Therefore, these attempts were quickly abandoned in favor of approaches based on examples. At that time, the main purpose was the automatic generation of code.
Nowadays, automatic code generation has been largely abandoned and survives in small application areas, such as the creation of device drivers. In these areas, the effort of formalizing the behavior in a formal language is worth the time saved in trying to test difficult-to-reproduce behaviors of parallel threads.
Unit tests were initially conceived as a way to encode example-based specifications in a completely independent way, as part of a specific agile development methodology called extreme programming. However, nowadays, TDD is used independently of extreme programming and is included as an obligatory prescription in other agile methodologies.
While it is undoubtedly true that unit tests refined after finding hundreds of bugs act as reliable code specifications, it is not obvious that developers can easily design unit tests that can be immediately used as reliable specifications for the code to be written. In fact, generally, you need an infinite or at least an immense number of examples to univocally define a code’s behavior if examples are chosen at random.
The behavior can be defined with an acceptable number of examples only after you have understood all possible execution paths. In fact, at this point, it is enough to select a typical example for each execution path. Therefore, writing a unit test for a method after that method has been completely coded is easy: it simply requires the selection of a typical instance for each execution path of the already existing code. However, writing unit tests this way does not protect from errors in the design of the execution paths themselves. Arguably, writing the tests beforehand doesn’t prevent someone from forgetting to test a value, or combination of values – no one is perfect! It does, however, force you to think about them explicitly prior to implementation, which is why you’re less likely to accidentally omit a test case.
We may conclude that, while writing unit tests, the developer must somehow forecast all execution paths by looking for extreme cases and by possibly adding more examples than strictly needed. However, the developer can make mistakes while writing the application code, and they can also make mistakes in forecasting all possible execution paths while designing the unit tests.
We have identified the main drawback of TDD: unit tests themselves may be wrong. That is, not only application code, but also its associated TDD unit tests, may be inconsistent with the behavior the developer has in mind. Therefore, in the beginning, unit tests can’t be considered software specifications, but rather a possibly incorrect and incomplete description of the software behavior. Therefore, we have two descriptions of the behavior we have in mind: the application code itself, and its TDD unit tests that were written before the application code.
What makes TDD work is the fact that the probability of making exactly the same error while writing the tests and while writing the code is very low. Therefore, whenever a test fails, there is an error either in the tests or in the application code, and, conversely, if there is an error either in the application code or in the test, there is a very high probability that a test will fail. That is, the use of TDD ensures that most of the bugs are found immediately!
Writing a class method or a chunk of code with TDD is a loop composed of three stages:
- Red stage: In this stage, the developer writes empty methods that either throw
NotImplementedExceptionor have empty bodies and designs new unit tests for them that must necessarily fail because, at this time, no code implements the behavior they describe. - Green stage: In this stage, the developer writes the minimum code or makes the minimum modifications to existing code that are necessary to pass all unit tests.
- Refactoring stage: Once the test is passed, code is refactored to ensure good code quality and the application of best practices and patterns. In particular, in this stage, some code can be factored out in other methods or other classes. During this stage, we may also discover the need for other unit tests because new execution paths or new extreme cases are discovered or created.
The loop stops as soon as all tests pass without writing new code or modifying the existing code.
Sometimes, it is very difficult to design the initial unit tests because it is quite difficult to imagine how the code might work and the execution paths it might take. In this case, you can get a better understanding of the specific algorithm to use by writing an initial sketch of the application code. In this initial stage, we need to focus just on the main execution path, completely ignoring extreme cases and input verifications. Once we get a clear picture of the main ideas behind an algorithm that should work, we can enter the standard three-stage TDD loop.
The next section discusses functional tests in detail.
Functional tests
Functional tests use the same techniques and tools as unit and integration tests, but differ from them in that they are run only at the end of each sprint. They have the fundamental role of verifying that the current version of the entire software complies with its specifications.
Since functional tests also involve the user interface (UI), they need further tools to simulate, somehow, how the user acts in the UI. We will discuss this point further throughout the chapter. The need for extra tools is not the only challenge the UI brings with it, because UIs also see frequent and major changes. Thus, we mustn’t design tests that depend on the UI’s graphical details or we might be forced to completely rewrite all the tests at each UI change. That’s why it is sometimes better to renounce automatic tests and fall back to manual tests.
Whether automatic or manual, functional testing must be a formal process that is performed for the following purposes:
- Functional tests represent the most important part of the contract between stakeholders and the development team, the other part being the verification of non-functional specifications. The way this contract is formalized depends on the nature of the relationship between the development team and stakeholders:
- In the case of a supplier-customer relationship, the functional tests become part of the supplier-customer business contract for each sprint, and a team that works for the customer writes them. If the tests fail, then the sprint is rejected and the supplier must run a supplementary sprint to fix all problems.
- If there is no supplier-customer business relationship because the development team and the stakeholder belong to the same company, there is no business contract. In this case, the stakeholder, together with the team, writes an internal document that formalizes the requirements of the sprint. If the tests fail, usually, the sprint is not rejected but the results of the tests are used to drive the specifications for the next sprints. Of course, if the failure percentage is high, the sprint may be rejected and should be repeated.
- Formalized functional tests that run at the end of each sprint prevent any results achieved in previous sprints from being destroyed by new code.
- When using an agile development methodology, maintaining an updated battery of functional tests is the best way to get a formal representation of the final system specifications since, during agile development, the specifications of the final system are not decided before development starts but are the result of the system’s evolution.
Since the output of the first sprints may differ a lot from the final system in these early stages, it is not worth spending too much time writing detailed manual tests and/or automatized tests. Therefore, you may limit the user stories to just a few examples that will be used both as inputs for software development and as manual tests.
As system functionalities become more stable, it is worth investing time in writing detailed and formal functional tests for them. For each functional specification, we must write tests that verify their operation in extreme cases. For instance, in a cash withdrawal use case, we must write tests that verify all possibilities:
- Not enough funds
- Card expired
- Wrong credentials
- Repeated wrong credentials
The following diagram sketches the whole process with all possible outcomes:

Figure 23.1: Withdrawal example
In the case of manual tests, for each of the preceding scenarios, we must give all the details of all the steps involved in each operation and, for each step, the expected result.
An important decision is whether you want to automate all or a part of the functional tests since it is very expensive to write automated tests that simulate a human operator that interacts with a system’s UI. The final decision depends on the cost of the test implementation divided by the expected number of times it will be used.
In the case of CI/CD, the same functional test can be executed several times but, unluckily, functional tests are strictly tied to the way the UI is implemented, and, in modern systems, the UI is changed frequently. Therefore, in this case, a test is executed with exactly the same UI no more than a couple of times.
In order to overcome most of the problems related to the UI, some functional tests can be implemented as subcutaneous tests, that is, as tests that bypass the UI. For instance, some functional tests for an ASP.NET Core application can call controller action methods directly instead of sending an actual request through a browser.
Unfortunately, subcutaneous tests can’t verify all possible implementation errors since they can’t detect errors in the UI itself. Moreover, in the case of a web application, subcutaneous tests usually suffer from other limitations because they bypass the whole HTTP protocol.
In particular, in the case of ASP.NET Core applications, if we call controller action methods directly, we bypass the whole ASP.NET Core pipeline that processes each request before passing it to the right action method. Therefore, authentication, authorization, CORS, and the behavior of other middleware in the ASP.NET Core pipeline will not be analyzed by the tests.
A complete automated functional test of a web application should do the following things:
- Start an actual browser on the URL to be tested
- Wait so that any JavaScript on the page completes its execution
- Then, send commands to the browser that simulate the behavior of a human operator
- Finally, after each interaction with the browser, automatic tests should wait so that any JavaScript that was triggered by the interaction completes
While browser automatization tools exist, tests implemented with browser automatization, as mentioned earlier, are very expensive and difficult to implement. Therefore, the suggested approach of ASP.NET Core MVC is to send actual HTTP requests to an actual copy of the web application, with a .NET HTTP client instead of using a browser. Once the HTTP client receives an HTTP response, it parses it in a DOM tree and verifies that it received the right response.
The only difference with the browser automatization tools is that the HTTP client is not able to run any JavaScript. However, other tests may be added to test the JavaScript code. These tests are based on test tools that are specific to JavaScript, such as Jasmine and Karma.
In the next section, we will list all test projects available in Visual Studio and describe xUnit in detail.
Defining C# test projects in Visual Studio
.NET SDK contains project templates for three types of unit testing frameworks, namely, MSTest, xUnit, and NUnit. Once you start the new project wizard, to visualize the version of all of them that is adequate for .NET C# applications, set Project type as Test, Language as C#, and Platform as Linux, since .NET projects are the only ones that can be deployed on Linux.
The following screenshot shows the selection that should appear:
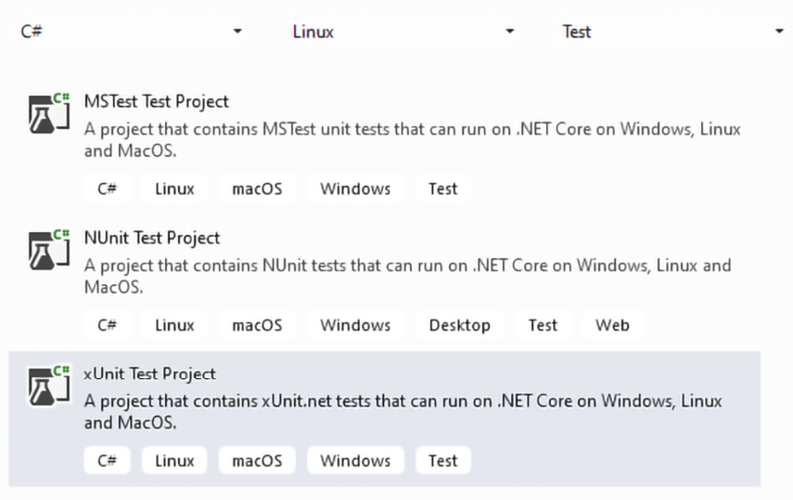
Figure 23.2: Adding a test project
All the preceding projects automatically include the NuGet package for running all the tests in the Visual Studio test user interface (Visual Studio test runner). However, they do not include any facility for mocking interfaces, so you need to add the Moq NuGet package, which contains a popular mocking framework.
All these test projects must contain a reference to the project to be tested.
In the next subsection, we will describe xUnit, since it is probably the most popular of the three frameworks. However, all three frameworks are quite similar and differ mainly in the names of the assert methods and in the names of the attributes used to decorate various testing classes and methods.
Using the xUnit test framework
In xUnit, tests are methods decorated with either the [Fact] or [Theory] attributes. Tests are automatically discovered by the test runner, which lists all of them in the user interface so the user can run either all of them or just a selection of them.
A new instance of the test class is created before running each test, so the test preparation code contained in the class constructor is executed before each test of the class. If you also require tear-down code, the test class must implement the IDisposable interface so that the tear-down code can be included in the IDisposable.Dispose method.
The test code invokes the methods to be tested and then tests the results with methods from the Assert static class, such as Assert.NotNull(x), Assert.Equal(x, y), and Assert.NotEmpty(IEnumerable x). Some methods verify whether a call throws an exception of a specific type, for instance:
Assert.Throws<MyException>(() => {/* test code */ ...}).
When an assertion fails, an exception is thrown. A test fails if a not-intercepted exception is thrown either by the test code or by an assertion.
The following is an example of a method that defines a single test:
[Fact]
public void Test1()
{
    var myInstanceToTest = new ClassToTest();
    Assert.Equal(5, myInstanceToTest.MethodToTest(1));
}
The [Fact] attribute is used when a method defines just one test, while the [Theory] attribute is used when the same method defines several tests, each on a different tuple of data. Tuples of data can be specified in several ways and are injected into the test as method parameters.
The previous code can be modified to test MethodToTest on several inputs, as follows:
[Theory]
[InlineData(1, 5)]
[InlineData(3, 10)]
[InlineData(5, 20)]
public void Test1(int testInput, int testOutput)
{
    var myInstanceToTest = new ClassToTest();
    Assert.Equal(testOutput,
        myInstanceToTest.MethodToTest(testInput));
}
Each InlineData attribute specifies a tuple to be injected into the method parameters. Since just simple constant data can be included as attribute arguments, xUnit also gives you the possibility to take all data tuples from a class that implements IEnumerable, as shown in the following example:
public class Test1Data: IEnumerable<object[]>
{
    public IEnumerator<object[]> GetEnumerator()
    {
        yield return new object[] { 1, 5};
        yield return new object[] { 3, 10 };
        yield return new object[] { 5, 20 };
    }
    IEnumerator IEnumerable.GetEnumerator()=>GetEnumerator();

}
...
...
[Theory]
[ClassData(typeof(Test1Data))]
public void Test1(int testInput, int testOutput)
{
    var myInstanceToTest = new ClassToTest();
    Assert.Equal(testOutput,
        myInstanceToTest.MethodToTest(testInput));
}
The type of class that provides the test data is specified with the ClassData attribute.
It is also possible to take data from a static method of a class that returns IEnumerable with the MemberData attribute, as shown in the following example:
[Theory]
[MemberData(nameof(MyStaticClass.Data),
    MemberType= typeof(MyStaticClass))]
public void Test1(int testInput, int testOutput)
{
    ...
The MemberData attribute is passed the method name as the first parameter, and the class type in the MemberType named parameter. If the static method is part of the same test class, the MemberType parameter can be omitted.
The next subsection shows how to deal with some advanced preparation and tear-down scenarios.
Advanced test preparation and tear-down scenarios
Sometimes, the preparation code contains very time-consuming operations, such as opening a connection with a database, that don’t need to be repeated before each test, but that can be executed once before all the tests contained in the same class. In xUnit, this kind of test preparation code can’t be included in the test class constructor; since a different instance of the test class is created before every single test, it must be factored out in a separate class called a fixture class.
If we also need corresponding tear-down code, the fixture class must implement IDisposable. In other test frameworks, such as NUnit, the test class instances are created just once instead, so they don’t need the fixture code to be factored out in other classes. However, test frameworks such as NUnit, which do not create a new instance before each test, may suffer from bugs because of unwanted interactions between test methods.
The following is an example of an xUnit fixture class that opens and closes a database connection:
public class DatabaseFixture : IDisposable
{
    public DatabaseFixture()
    {
        Db = new SqlConnection("MyConnectionString");
    }
    public void Dispose()
    {
        Db.Close()
    }
    public SqlConnection Db { get; private set; }
}
Since a fixture class instance is created just once before all tests associated with the fixture are executed and the same instance is disposed of immediately after the tests, then the database connection is created just once when the fixture class is created and is disposed of immediately after the tests when the fixture object is disposed of.
The fixture class is associated with each test class by letting the test class implement the empty IClassFixture<T> interface, as follows:
public class MyTestsClass : IClassFixture<DatabaseFixture>
{
    private readonly DatabaseFixture fixture;
    public MyDatabaseTests(DatabaseFixture fixture)
    {
        this.fixture = fixture;
    }
    ...
    ...
}
A fixture class instance is automatically injected into the test class constructor in order to make all data computed in the fixture test preparation available for the tests. This way, for instance, in our previous example, we can get the database connection instance so that all test methods of the class can use it.
If we want to execute some test preparation code on all tests contained in a collection of test classes instead of a single test class, we must associate the fixture class with an empty class that represents the collection of test classes, as follows:
[CollectionDefinition("My Database collection")]
public class DatabaseCollection : ICollectionFixture<DatabaseFixture>
{
    // this class is empty, since it is just a placeholder
}
The CollectionDefinition attribute declares the name of the collection, and the IClassFixture<T> interface has been replaced with ICollectionFixture<T>.
Then we declare that a test class belongs to the previously defined collection by applying it to the Collection attribute with the name of the collection, as follows:
[Collection("My Database collection")]
public class MyTestsClass
{
    DatabaseFixture fixture;
    public MyDatabaseTests(DatabaseFixture fixture)
    {
        this.fixture = fixture;
    }
    ...
    ...
}
The Collection attribute declares which collection to use, while the DataBaseFixture argument in the test class constructor provides an actual fixture class instance, so it can be used in all class tests.
The next section shows how to mock interfaces with the Moq framework.
Mocking interfaces with Moq
Mocking capabilities are not included in any of the test frameworks we listed in this section as they are not included in xUnit. Therefore, they must be provided by installing a specific NuGet package. The Moq framework available in the Moq NuGet package is the most popular mock framework available for .NET. It is quite easy to use and will be briefly described in this section.
Once we’ve installed the NuGet package, we need to add a using Moq statement to our test files. A mock implementation is easily defined, as follows:
var myMockDependency = new Mock<IMyInterface>();
The behavior of the mock dependency on specific inputs of the specific method can be defined with the Setup/Return method pair as follows:
myMockDependency.Setup(x=>x.MyMethod(5)).Returns(10);
We can add several Setup/Return instructions for the same method. This way, we can specify an indefinite number of input/output behaviors.
Instead of specific input values, we may also use wildcards that match a specific type as follows:
myMockDependency.Setup(x => x.MyMethod(It.IsAny<int>()))
                  .Returns(10);
Once we have configured the mock dependency, we may extract the mocked instance from its Object property and use it as if it were an actual implementation, as follows:
var myMockedInstance=myMockDependency.Object;
...
myMockedInstance.MyMethod(10);
However, mocked methods are usually called by the code under test, so we just need to extract the mocked instance and use it as an input in our tests.
We may also mock properties and async methods as follows:
myMockDependency.Setup(x => x.MyProperty)
                  .Returns(42);
...
myMockDependency.Setup(x => x.MyMethodAsync(1))
                    .ReturnsAsync("aasas");
var res=await myMockDependency.Object
    .MyMethodAsync(1);
With async methods, Returns must be replaced by ReturnsAsync.
Each mocked instance records all calls to its methods and properties, so we may use this information in our tests. The following code shows an example:
myMockDependency.Verify(x => x.MyMethod(1), Times.AtLeast(2));
The preceding statement asserts that MyMethod has been invoked with the given arguments at least twice. There are also Times.Never, and Times.Once (which asserts that the method was called just once), and more.
The Moq documentation summarized up to now should cover 99% of the needs that may arise in your tests, but Moq also offers more complex options. The Further reading section contains the link to the complete documentation.
The next section describes how to define functional tests with ASP.NET Core.
Automating functional tests in C#
Automated functional tests use the same test tools as unit and integration tests. That is, these tests can be embedded in the same xUnit, NUnit, or MSTest projects that we described in the previous section. However, in this case, we must add further tools that can interact with and inspect the UI.
In the remainder of this chapter, we will focus on web applications since they are the main focus of this book. Accordingly, if we are testing web APIs, we just need HttpClient instances since they can easily interact with web API endpoints in both XML and JSON.
In the case of ASP.NET Core MVC applications that return HTML pages, the interaction is more complex, since we also need tools for parsing and interacting with the HTML page DOM tree. The AngleSharp NuGet package is a great solution since it supports state-of-the-art HTML and minimal CSS and has extension points for externally provided JavaScript engines, such as Node.js. However, we don’t advise you to include JavaScript and CSS in your tests, since they are strictly tied to target browsers, so the best option for them is to use JavaScript-specific test tools that you can run directly in the target browsers themselves.
There are two basic options for testing a web application with the HttpClient class:
- Staging application. An
HttpClientinstance connects with the actual staging web application through the internet/intranet, together with all other humans who are beta-testing the software. The advantage of this approach is that you are testing the real stuff, but tests are more difficult to conceive since you can’t control the initial state of the application before each test. - Controlled application. An
HttpClientinstance connects with a local application that is configured, initialized, and launched before every single test. This scenario is completely analogous to the unit test scenario. Test results are reproducible, the initial state before each test is fixed, tests are easier to design, and the actual database can be replaced by a faster and easier-to-initialize in-memory database. However, in this case, you are far from the actual system’s operation.
A good strategy is to use a controlled application, where you have full control of the initial state, for testing the extreme cases, and then use a staging application for testing random average cases on the real stuff.
The two subsections that follow describe both approaches. The two approaches differ only in the way that you define the fixtures of your tests.
Testing the staging application
In this case, your tests need just an instance of HttpClient, so you must define an efficient fixture that supplies HttpClient instances, avoiding the risk of running out of Windows connections. We faced this problem in the .NET HTTP clients section of Chapter 13, Applying Service-Oriented Architectures with .NET. It can be solved by managing HttpClient instances with IHttpClientFactory and injecting them with dependency injection.
Once we have a dependency injection container, we can enrich it with the capability of efficiently handling HttpClient instances with the following code snippet:
services.AddHttpClient();
Here, the AddHttpClient extension belongs to the Microsoft.Extensions.DependencyInjection namespace and is defined in the Microsoft.Extensions.Http NuGet package. Therefore, our test fixture must create a dependency injection container, call it AddHttpClient, and finally build the container. The following fixture class does this job:
public class HttpClientFixture
{
    public HttpClientFixture()
    {
        var serviceCollection = new ServiceCollection();
        serviceCollection
            .AddHttpClient();
         ServiceProvider = serviceCollection.BuildServiceProvider();
    }
    public ServiceProvider ServiceProvider { get; private set; }
}
After the preceding definition, your tests should look as follows:
public class MyUnitTestClass:IClassFixture<HttpClientFixture>
{
    private readonly ServiceProvider _serviceProvider;
    public UnitTest1(HttpClientFixture fixture)
    {
        _serviceProvider = fixture.ServiceProvider;
    }
    [Fact]
    public void MyTest()
    {
        var factory =
            _serviceProvider.GetService<IHttpClientFactory>())

            HttpClient client = factory.CreateClient();
            //use client to interact with application here

    }
}
In Test1, once you get an HTTP client, you can test the application by issuing an HTTP request and then by analyzing the response returned by the application. More details on how to process the response returned by the server will be given in the Use case – automating unit and functional tests section.
Testing the staging application with Selenium
AngleSharp is a valuable tool for testing fundamental behaviors that must be ensured to be cross-browser with reliability that approaches 100%.
Most of the remaining behaviors are tested either manually, or with playback tools like Selenium IDE, on various browsers.
The code of important and stable UI tests that are tightened to the adopted browsers can be created manually with the help of browser-based tools such as Selenium WebDriver, and tried on various browsers.
Tests based on Selenium WebDriver require the Selenium.WebDriver NuGet package and a driver for each browser that you would like to adopt, such as, for instance, the Selenium.WebDriver.ChromeDriver NuGet package for the Chrome browser.
Tests based on Selenium WebDriver look like this:
using OpenQA.Selenium;
using OpenQA.Selenium.ChromeDriver;
public class MyUnitTestClass:IClassFixture<HttpClientFixture>
{
    [Fact]
    public void MyTest()
    {
        Using (IWebDriver driver = new ChromeDriver())
        {
            driver.Navigate().GoToUrl("https://localhost:5001/mypage");
            //use driver to interact with the loaded page here
            ...
            var title = driver.Title;
           Assert().Equal("My Application – My Page", title);
           ...
           Var submitButton = driver.FindElement(By.ClassName("confirm-changes"));
 submitButton.Clikck();
 ...
       }

    }
}
Once the page to test has been loaded, driver is used to explore the page content, and to interact with page elements, like buttons, links, and input fields. As shown in the preceding code, the syntax for interacting with the browser is very similar to the AngleSharp syntax that we will show in the example of the Use case – automating unit and functional tests section.
Adding CSS classes that characterize their role with HTML elements is a good technique for building robust UI tests.
The next subsection explains how to test an application that runs in a controlled environment.
Testing a controlled application
In this case, we create an ASP.NET Core server within the test application and test it with an HttpClient instance. The Microsoft.AspNetCore.Mvc.Testing NuGet package contains all that we need to create both an HTTP client and the server running the application.
Microsoft.AspNetCore.Mvc.Testing contains a fixture class that does the job of launching a local web server and furnishing a client for interacting with it. The predefined fixture class is WebApplicationFactory<T>. The generic T argument must be instantiated with the Startup class or with the Program class of your web project, that is, with an entry point of the web application.
Tests look like the following class:
public class MynitTest
    : IClassFixture<WebApplicationFactory<MyProject.Program>>
{
    private readonly
        WebApplicationFactory<MyProject.Program> _factory;
    public UnitTest1 (WebApplicationFactory<MyProject.Program> factory)
    {
        _factory = factory;
    }
    [Theory]
    [InlineData("/")]
    [InlineData("/Index")]
    [InlineData("/About")]
    ....
    public async Task MustReturnOK(string url)
    {
        var client = _factory.CreateClient();
        // here both client and server are ready
        var response = await client.GetAsync(url);
        //get the response
        response.EnsureSuccessStatusCode();
        // verify we got a success return code.
    }
    ...
    ---
}
Either the Program or Startup classes must exist and must be defined as public, otherwise, WebApplicationFactory has no entry point for starting the application. Therefore, if no Startup class is defined and if the code in Program.cs is not enclosed in a public class, as in the default project scaffolded by Visual Studio, you must turn the internal Program class automatically generated by the C# compile into a public class. This is easily achieved by adding the following code at the end of the Program.cs file:
public partial class Program { }
If you want to analyze the HTML of the returned pages, you must also reference the AngleSharp NuGet package. We will see how to use it in the example in the next section. The simplest way to cope with databases in this type of test is to replace them with in-memory databases that are faster and automatically cleared whenever the local server is shut down and restarted. Likely, in-memory databases are not 100% compatible with the actual database used, so some tests might fail. Therefore, at least some of the tests might require the actual database.
This can be done by creating a new deployment environment, say, AutomaticStaging, and an associated configuration file that is specific to the tests. After having created this new deployment environment, go to the ConfigureServices method of your application’s Startup class and locate the place where you add your DBContext configuration. Once you’ve located that place, add an if statement there that, if the application is running in the AutomaticStaging environment, replaces your DBContext configuration with something like this:
services.AddDbContext<MyDBContext>(options => options.UseInMemoryDatabase(databaseName: "MyDatabase"));
As an alternative, you can also add all the required instructions to clear or recreate from the scratch a standard database in the constructor of a custom fixture that inherits from WebApplicationFactory<T>. Note that deleting all database data is not as easy as it might appear owing to integrity constraints. You have various options, but none is the best for all cases:
- Delete the whole database and recreate it using migrations, that is,
DbContext.Database.Migrate(). This always works, but it is slow and requires a database user with high privileges. - Enclose a test database in a Docker image, and recreate a new container at each new test. This is faster than recreating a new database from scratch, but still slow.
- Disable the database constraints and then clear all tables in any order. This technique sometimes doesn’t work and requires a database user with high privileges.
- Delete all data in the right order, thus without violating all database constraints. This is not difficult if you keep an ordered delete list of all tables while the database grows and you add tables to the database. This delete list is a useful resource that you may also use to fix issues in database update operations and to remove old entries during production database maintenance. Unfortunately, this method also fails in the rare case of circular dependencies, such as a table that has a foreign key referring to itself.
I prefer method 4 and revert to method 3 only in the rare case of difficulties due to circular dependencies. As an example of method 4, we can write a fixture that inherits from WebApplicationFactory<Startup> and deletes all the test records of the application from Chapter 16, Implementing Frontend Microservices with ASP.NET Core.
It is enough to delete the data of packages, destinations, and events if you don’t need to test the authentication/authorization subsystem. The deletion order is straightforward; events must be deleted first since nothing depends on them, and then we can delete packages that depend on destinations, and finally the destinations themselves. The code is quite easy:
public class DBWebFixture: WebApplicationFactory<Program>
{
    public DBWebFixture() : base()
    {
        var context = Services
            .GetService(typeof(MainDBContext))
                as MainDBContext;
        using (var tx = context.Database.BeginTransaction())
        {
            context.Database
                .ExecuteSqlRaw
                    ("DELETE FROM dbo.PackgeEvents");
            context.Database
                .ExecuteSqlRaw
                    ("DELETE FROM dbo.Packges");
            context.Database
                 .ExecuteSqlRaw
                    ("DELETE FROM dbo.Destinations");
            tx.Commit();
        }
    }
}
We get a DBContext instance from the services inherited from WebApplicationFactory<Startup>, so you can perform database operations. The only way to delete all data from a table simultaneously is through a direct database command. Therefore, since in this case, we can’t use the SaveChanges method to enclose all changes in a single transaction, we are forced to create a transaction manually.
The next section shows how to define both unit and functional tests in practice with the help of the book use case.
Use case – automating unit and functional tests
In this section, we add some unit and functional test projects to the example application we built in Chapter 16, Implementing Frontend Microservices with ASP.NET Core. If you don’t have it, you can download it from the section of the GitHub repository associated with the book in the aforementioned chapter.
As a first step, let’s make a new copy of the solution folder and name it PackagesManagementWithTests. Then, open the solution and add it to an xUnit .NET C# test project named PackagesManagementTest. Finally, add a reference to the ASP.NET Core project (PackagesManagement), since we will test it, and a reference to the latest version of the Moq NuGet package, since we require mocking capabilities. At this point, we are ready to write our tests.
As an example, we will write unit tests for the Edit method decorated with [HttpPost] of the ManagePackagesController controller, which is shown as follows:
[HttpPost]
public async Task<IActionResult> Edit(
    PackageFullEditViewModel vm,
    [FromServices] ICommandHandler<UpdatePackageCommand> command)
{
    if (ModelState.IsValid)
    {
        await command.HandleAsync(new UpdatePackageCommand(vm));
        return RedirectToAction(
            nameof(ManagePackagesController.Index));
    }
    else
        return View(vm);
}
Before writing our test methods, let’s rename the test class that was automatically included in the test project as ManagePackagesControllerTests.
The first test verifies that if there are errors in ModelState, the action method renders a view with the same model it received as an argument so that the user can correct all errors. Let’s delete the existing test method and write an empty DeletePostValidationFailedTest method, as follows:
[Fact]
public async Task DeletePostValidationFailedTest()
{
}
The method must be async and the return type must be Task since the Edit method that we have to test is async. In this test, we don’t need mocked objects since no injected object will be used. Thus, as a preparation for the test, we just need to create a controller instance, and we must add an error to ModelState as follows:
var controller = new ManagePackagesController();
controller.ModelState
    .AddModelError("Name", "fake error");
Then we invoke the method, injecting ViewModel and a null command handler as its arguments, since the command handler will not be used:
var vm = new PackageFullEditViewModel();
var commandDependency =
                new Mock<ICommandHandler<UpdatePackageCommand>>();
var result = await controller.Edit(vm, commandDependency.Object);
In the verification stage, we verify that the result is ViewResult and that it contains the same model that was injected into the controller:
var viewResult = Assert.IsType<ViewResult>(result);
Assert.Equal(vm, viewResult.Model);
Now, we also need a test to verify that if there are no errors, the command handler is called, and then the browser is redirected to the Index controller action method. We call the DeletePostSuccessTest method:
[Fact]
public async Task DeletePostSuccessTest()
{
}
This time, the preparation code must include the preparation of a command handler mock, as follows:
var controller = new ManagePackagesController();
var commandDependency =
    new Mock<ICommandHandler<UpdatePackageCommand>>();
commandDependency
    .Setup(m => m.HandleAsync(It.IsAny<UpdatePackageCommand>()))
    .Returns(Task.CompletedTask);
var vm = new PackageFullEditViewModel();
Since the handler HandleAsync method returns no async value, we can’t use ReturnsAsync, but we have to return just a completed Task (Task.Complete) with the Returns method. The method to test is called with both ViewModel and the mocked handler:
var result = await controller.Edit(vm,
    commandDependency.Object);
In this case, the verification code is as follows:
commandDependency.Verify(m => m.HandleAsync(
    It.IsAny<UpdatePackageCommand>()),
    Times.Once);
var redirectResult=Assert.IsType<RedirectToActionResult>(result);
Assert.Equal(nameof(ManagePackagesController.Index),
    redirectResult.ActionName);
Assert.Null(redirectResult.ControllerName);
As the first step, we verify that the command handler has actually been invoked once. A better verification should also include a check that it was invoked with a command that includes ViewModel passed to the action method. We will take it up as an exercise.
Then we verify that the action method returns RedirectToActionResult with the right action method name and with no controller name specified.
Once all the tests are ready, if the test window does not appear on the left bar of Visual Studio, we may simply select the Run all tests item from the Visual Studio Test menu. Once the test window appears, further invocations can be launched from within this window.
If a test fails, we can add a breakpoint to its code, so we can launch a debug session on it by right-clicking on it in the test window and then selecting Debug selected tests.
In the next subsection, we will also add some functional tests.
Automating functional tests
Our test approach is based on the Microsoft.AspNetCore.Mvc.Testing and AngleSharp NuGet packages we described before.
The functional test must be placed in a different library project, since they must be executed in different steps of the CI/CD cycle, and CI/CD automation tools, usually, execute all texts contained in a library. Let’s call PackagesManagementFTest a new xUnit project, and add to it a reference to the ASP.NET Core project under test and a reference to the Moq NuGet package.
To perform functional tests, we must also reference the Microsoft.AspNetCore.Mvc.Testing and AngleSharp NuGet packages.
Before starting any tests, we must ensure that our web application has an entry point class that WebApplicationFactory<> can invoke. Therefore, as explained in the previous Testing a controlled application subsection, we must add the following code at the end of Program.cs:
public partial class Program { }
Now, let’s add a class file called UIExampleTest.cs to our new test project. We need using statements to reference all the necessary namespaces. More specifically, we need the following:
using PackagesManagement;: This is needed to reference your application classesusing Microsoft.AspNetCore.Mvc.Testing;: This is needed to reference the client and server classesusing AngleSharp;andusing AngleSharp.Html.Parser;: These are needed to referenceAngleSharpclassesSystem.IO: This is needed in order to extract HTML from HTTP responsesusing Xunit: This is needed to reference allxUnitclasses
Summing up, the whole using block is as follows:
using PackagesManagement;
using System.Threading.Tasks;
using Xunit;
using Microsoft.AspNetCore.Mvc.Testing;
using AngleSharp;
using AngleSharp.Html.Parser;
We will use the standard fixture class we introduced in the previous Testing a controlled application subsection to write the following test class:
public class UIExampleTestcs:
         IClassFixture<WebApplicationFactory<Program>>
{
    private readonly
       WebApplicationFactory<Program> _factory;
    public UIExampleTestcs(WebApplicationFactory<Program> factory)
    {
       _factory = factory;
    }
}
Now, we are ready to write a test for the home page! This test verifies that the home URL returns a successful HTTP result and that the home page contains a link to the package management page, which is the /ManagePackages relative link.
It is very important to understand that automatic tests must not depend on the details of the HTML, but that they must just verify logical facts, to avoid frequent changes following each small modification of the application HTML. That’s why we just verify that the necessary links exist without putting constraints on where they are.
Let’s call our home page test TestMenu:
[Fact]
public async Task TestMenu()
{
    var client = _factory.CreateClient();
    ...
    ...
}
The first step of each test is the creation of a client. Then, if the test requires an analysis of some HTML, we must prepare the so-called AngleSharp browsing context:
//Create an angleSharp default configuration
var config = Configuration.Default;
//Create a new context for evaluating webpages
//with the given config
var context = BrowsingContext.New(config);
The configuration object specifies options such as cookie handling and other browser-related properties. At this point, we are ready to require the home page:
var response = await client.GetAsync("/");
As a first step, we verify that the response we received contains a success status code, as follows:
response.EnsureSuccessStatusCode();
The preceding method call throws an exception in the case of an unsuccessful status code, hence causing the test to fail. HTML analysis needs to be extracted from the response. The following code shows a simple way to do it:
string source = await response.Content.ReadAsStringAsync();
Now, we must pass the extracted HTML to our previous AngleSharp browsing context object so that it can build a DOM tree. The following code shows how to do it:
var document = await context.OpenAsync(req => req.Content(source));
The OpenAsync method executes a DOM-building activity with the settings contained in context. The input for building the DOM document is specified by the Lambda function passed as an argument to OpenAsync. In our case, req.Content(...) builds a DOM tree from the HTML string passed to the Content method, which is the HTML contained in the response received by the client.
Once a document object is obtained, we can use it as we would use it in JavaScript. In particular, we can use QuerySelector to find an anchor with the required link:
var node = document.QuerySelector("a[href="/ManagePackages"]");
All that remains is to verify that node is not null:
Assert.NotNull(node);
We have done it! If you want to analyze pages that require a user to be logged in or other more complex scenarios, you need to enable cookies and automatic URL redirects in the HTTP client. This way, the client will behave like a normal browser that stores and sends cookies and that moves to another URL whenever it receives a Redirect HTTP response. This can be done by passing an options object to the CreateClient method, as follows:
var client = _factory.CreateClient(
    new WebApplicationFactoryClientOptions
    {
        AllowAutoRedirect=true,
        HandleCookies=true
    });
With the preceding setup, your tests can do everything a normal browser can do. For instance, you can design tests where the HTTP client logs in and accesses pages that require authentication since HandleCookies=true lets the authentication cookie be stored by the client and be sent in all subsequent requests.
Connecting to an Azure DevOps repository
Tests play a fundamental role in the application CI/CD cycle, and specifically in continuous integration. They must be executed at least each time the master branch of the application repository is modified in order to verify that changes don’t introduce bugs.
The following steps show how to connect our solution to an Azure DevOps repository, where we will define an Azure DevOps pipeline that builds the project, and that also launches all the unit tests we defined in the PackagesManagementTest project at each build.
However, the functional tests that we defined in the PackagesManagementFTest project must be executed only before a sprint is released. Therefore, they must be placed in a different pipeline that takes care of delivering the application.
In this way, every day after all developers have pushed their changes, we can launch the pipeline to verify that the repository code compiles and passes all the unit tests:
- As a first step, we need a free DevOps subscription. If you don’t already have one, please create one by clicking the Start free button on this page: https://azure.microsoft.com/en-us/services/devops/. Here, let’s follow the wizard to define an organization and then a project.
- On the project page, select the files menu, click on the Repos menu item, and then copy the repository URL:

Figure 23.3: Copying the repository URL
- Ensure you are logged in to Visual Studio with your Azure account (the same used in the creation of the DevOps account). In the Git Changes tab, click the Create Git Repository... button:

Figure 23.4: Opening the connection window
- In the window that opens, select Existing remote from the left menu and copy and paste the remote repository URL:

Figure 23.5: Connection window
- Then, click the Create and Push button and wait until the ready icon in the bottom-left corner of Visual Studio is checked:

Figure 23.6: Operation completed
- At this point, the repository has been created locally, connected with the selected remote repository, and all changes have been committed and pushed to the remote repository.
- Now, click the Pipelines menu item to create a DevOps pipeline to build and test your project. In the window that appears, click the button to create a new pipeline:
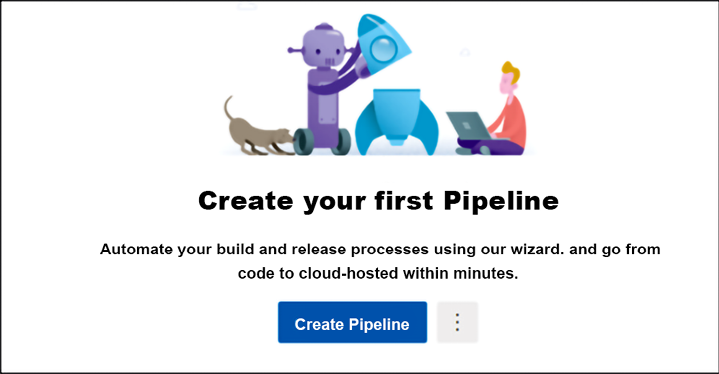
Figure 23.7: Pipeline page
- You will be prompted to select where your repository is located:

Figure 23.8: Repository selection
- Select Azure Repos Git and then your repository. Then you will be prompted about the nature of the project:

Figure 23.9: Pipeline configuration
- Select ASP.NET Core. A pipeline for building and testing your project will be automatically created for you. Save it by committing the newly created
.yamlfile to your repository:
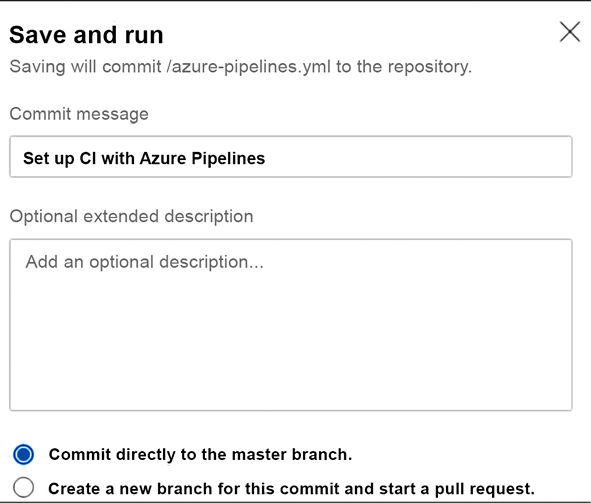
Figure 23.10: Pipeline properties
- The pipeline can be run by selecting the Queue button, but since the standard pipeline scaffolded by DevOps has a trigger on the master branch of the repository, it is automatically launched each time changes to this branch are committed and each time the pipeline is modified. The pipeline can be modified by clicking the Edit button:
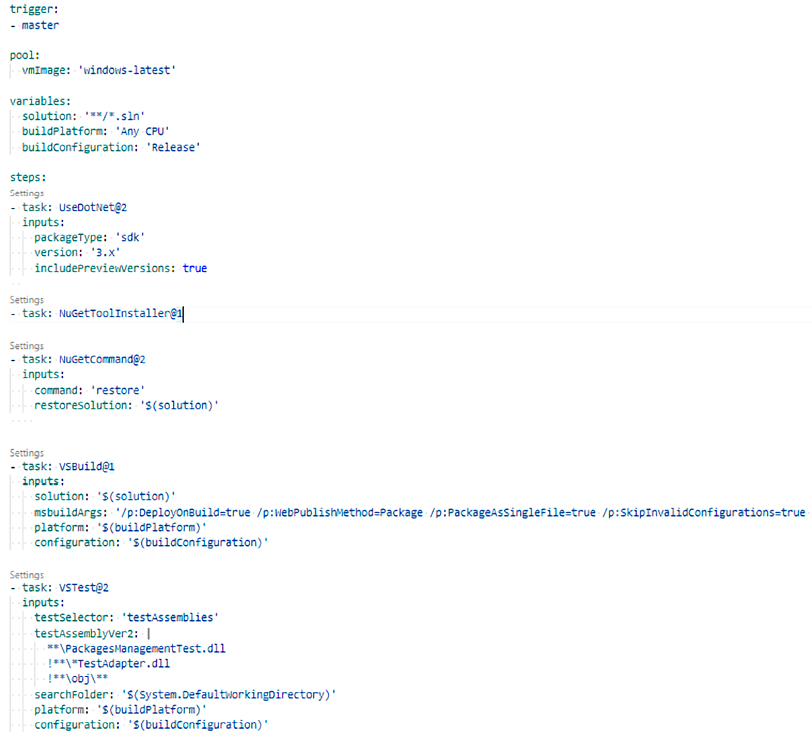
Figure 23.11: Pipeline code
- Once in edit mode, all pipeline steps can be edited by clicking the Settings link that appears above each of them. New pipeline steps can be added as follows:
- Write
- task:where the new step must be added and then accept one of the suggestions that appear while you are typing the task name. - Once you have written a valid task name, a Settings link appears above the new step. Click it.
- Insert the desired task parameters in the window that appears and then save.
- Write
- In order to have our test working, we need to specify the criteria to locate all assemblies that contain tests. In our case, since we have to execute just the tests contained in
PackagesManagementTest.dlland not the ones contained inPackagesManagementFTest.dll, we must specify the exact .ddlname.Click the Settings link of the
VSTest@2test task and replace the content that is automatically suggested for the Test files field with the following:**PackagesManagementTest.dll !***TestAdapter.dll !**obj**
- Then, click Add to modify the actual pipeline content. As soon as you confirm your changes in the Save and run dialog, the pipeline is launched, and if there are no errors, test results are computed. The results of tests launched during a specific build can be analyzed by selecting the specific build in the pipeline Runs tab and by clicking the Tests tab on the page that appears. In our case, we should see something like the following screenshot:

Figure 23.12: Test results
Summing up, we created a new Azure DevOps repository, published the solution to the new repository, and then created a build pipeline that executes our tests after each build. The build pipeline is executed as soon as we save it and will be executed each time someone commits to the master branch.
Summary
In this chapter, we explained why it is worth automating software tests, and then we focused on the importance of unit tests. We also listed the various types of tests and their main features, focusing mainly on unit tests and functional tests. We analyzed the advantages of TDD, and how to use it in practice. With this knowledge, you should be able to produce software that is both reliable and easy to modify.
Then, this chapter analyzed when it is worth automating some or all functional tests and described how to automate them in ASP.NET Core applications.
Finally, we analyzed the main test tools available for .NET projects, focusing on the description of xUnit, Moq, Microsoft.AspNetCore.Mvc.Testing, and AngleSharp, and showed how to use them in practice, with the help of the book’s use case.
Questions
- Why is it worth automating unit tests?
- What is the main reason why TDD is able to discover most bugs immediately?
- What is the difference between the
[Theory]and[Fact]attributes of xUnit? - Which xUnit static class is used in test assertions?
- Which methods allow the definition of the
Moqmocked dependencies? - Is it possible to mock
asyncmethods withMoq? If yes, how? - Is it always worth automating UI functional tests in the case of quick CI/CD cycles?
- What is the disadvantage of subcutaneous tests for ASP.NET Core applications?
- What is the suggested technique for writing ASP.NET Core, code-driven functional tests?
- What is the suggested way of inspecting the HTML returned by a server?
Further reading
While the documentation on xUnit included in this chapter is quite complete, it doesn’t include the few configuration options offered by xUnit. The full xUnit documentation is available at https://xunit.net/. Documentation for MSTest and NUnit can be found at https://github.com/microsoft/testfx and https://docs.nunit.org/, respectively.
Full Moq documentation is available at https://github.com/moq/moq4/wiki/Quickstart.
Here are some links to performance test frameworks for web applications:
- https://jmeter.apache.org/ (free and open source)
- https://www.neotys.com/neoload/overview
- https://www.microfocus.com/en-us/products/loadrunner-load-testing/overview
- https://www.microfocus.com/en-us/products/silk-performer/overview
More details on the Microsoft.AspNetCore.Mvc.Testing NuGet package and AngleSharp can be found in their respective official documentation at https://docs.microsoft.com/en-US/aspnet/core/test/integration-tests and https://anglesharp.github.io/.
More information on Selenium IDE can be found on the official website: https://www.selenium.dev/selenium-ide/.
More information on Selenium WebDriver can be found on the official website: https://www.selenium.dev/documentation/webdriver/.