
21
Understanding DevOps Principles
DevOps is a process that everybody is learning and putting into practice these days. But as a software architect, you need to understand and propagate DevOps not only as a process, but as a philosophy. This chapter will cover the main concepts, principles, and tools you need to develop and deliver your software with DevOps.
In considering the DevOps philosophy, this chapter will focus on service design thinking, that is, keeping in mind the software you are designing is a service offered to an organization/part of an organization. The main takeaway of this approach is that the highest priority is the value your software gives to the target organization. Moreover, you are not offering just working code and an agreement to fix bugs, but a solution for all the needs that your software was conceived for. In other words, your job includes everything it needs to satisfy those needs, such as monitoring users’ satisfaction and adapting the software when the user needs change. Finally, service design thinking makes it easier to monitor the software to reveal issues and new requirements, and to modify it to adapt it quickly to ever-changing needs.
Service design thinking is strictly tied to the Software as a Service (SaaS) model, which we discussed in Chapter 4, Deciding on the Best Cloud-Based Solution. In fact, the simplest way to offer solutions based on web services is to offer the usage of web services as a service instead of selling the software that implements them.
The following topics will be covered in this chapter:
- Describing what DevOps is and looking at an example of how to apply it in the
WWTravelClubproject - Understanding DevOps principles and deployment stages to leverage the deployment process
- Understanding continuous delivery with Azure DevOps
- Defining continuous feedback, and discussing the related tools in Azure DevOps
- Understanding SaaS and preparing a solution for a service scenario
- Use case – deploying our package-management application with Azure Pipelines
In contrast with other chapters, the WWTravelClub project will be presented during the topics, and we will offer an additional conclusion at the end of the chapter, giving you the opportunity to understand how the DevOps philosophy can be implemented. All the screenshots exemplifying the DevOps principles come from the main use case of the book, so you will be able to understand the DevOps principles easily. By the end of this chapter, you will be able to design software according to service design thinking principles and use Azure Pipelines to deploy your application.
Technical requirements
This chapter requires Visual Studio 2022 Community Edition or better with all the Azure tools installed. You may also need an Azure DevOps account, as described in Chapter 3, Documenting Requirements with Azure DevOps. It requires a free Azure account too. If you have not already created one, the Creating an Azure account subsection of Chapter 1, Understanding the Importance of Software Architecture, explains how to do so. This chapter uses the same code as Chapter 23, Testing Your Enterprise Application, which is available here: https://github.com/PacktPublishing/Software-Architecture-with-C-10-and-.NET-6-3E
Describing DevOps
DevOps comes from a union of the words Development and Operations, and this process simply unifies actions in these areas. However, when you start to study a little bit more about it, you will realize that just connecting these two areas is not enough to achieve the true goals of this philosophy.
We can also say that DevOps is the process that answers the current needs of people, regarding software delivery.
Donovan Brown, Partner Program Manager at Microsoft, has a spectacular definition of what DevOps is: DevOps is the union of people, process, and products to enable continuous delivery of value to our end users (http://donovanbrown.com/post/what-is-devops).
A way to deliver value continuously to our end users, using process, people, and products: this is the best description of the DevOps philosophy. We need to develop and deliver customer-oriented software. As soon as all areas of the company understand that the key point is the end user, your task as a software architect is to present the technology that will facilitate the process of delivering.
It is worth mentioning that all the content of this book is connected to this approach. It is never a matter of knowing a bunch of tools and technologies. As a software architect, you must understand that there is always a way to bring faster solutions to your end user easily, linked to their real needs. For this reason, you need to learn the DevOps principles, which will be discussed during this chapter.
Understanding DevOps principles
Considering DevOps as a philosophy, it is worth mentioning that there are some principles that enable the process to work well in your team. These principles are continuous integration, continuous delivery, and continuous feedback.
Microsoft has a specific web page for defining the DevOps overview, culture, practices, tools, and its relation to the cloud. Please check this out at https://azure.microsoft.com/en-us/overview/what-is-devops/.
DevOps is represented by the symbol of infinity in many books and technical articles. This symbol represents the necessity for a continuous approach in the software development life cycle. During the cycle, you will need to plan, build, continuously integrate, deploy, operate, get feedback, and start all over again. The process must be a collaborative one since everybody has the same focus—to deliver value to the end user. Together with these principles, you as a software architect will need to decide on the best software development process that fits this approach. We discussed these processes in Chapter 1, Understanding the Importance of Software Architecture.
Defining continuous integration
When you start building enterprise solutions, collaboration is the key to getting things done faster and to meeting the users’ needs. Version control systems, as we discussed in Chapter 20, Best Practices in Coding C# 10, are essential for this process, but these tools do not do the job by themselves, especially if the tool is not well configured.
As a software architect, you must know that continuous integration (CI) will help you to have a concrete approach for software development collaboration. When you implement it, as soon as a developer commits their code, the main code is automatically built and tested.
The good thing when you apply CI is that you can motivate developers to merge their changes as fast as they can to minimize merge conflicts. Besides, they can share unit tests, which will improve the quality of software.
It is very simple to set up CI in Azure DevOps. In the build pipeline, you can find the option by editing the configuration, as you can see in the following screenshot:

Figure 21.1: The Enable continuous integration checkbox
It is worth mentioning that if you have a solution set with unit tests and functional tests, as soon as you commit the code, it will automatically be compiled and tested. This will make your master branch stable and safe after every commit from your team.
The key point of CI is the ability to identify problems more quickly. You will have this opportunity when you allow the code to be tested and analyzed by others. The only thing the DevOps approach helps with is making sure this happens as quickly as possible.
Understanding continuous delivery with Azure DevOps
Once every single commit of your application is built, and this code is tested with both unit tests and functional tests, you may also want to deploy it continuously. Doing this is not just a matter of configuring the tool. As a software architect, you need to be sure that the team and the process are ready to go to this step. We will check how to enable this first scenario of deployment using this book’s use case.
In this section, we will configure an automatic deployment to the Azure App Service platform for the DevOps project that we defined in the use case at the end of Chapter 23, Testing Your Enterprise Application. Azure DevOps can also automatically create a new web app, but to prevent configuration errors (which might consume all your free credit), we will create it manually and let Azure DevOps just deploy the application. All the required steps are organized into the following subsections.
Creating the Azure Web App and the Azure database
An Azure Web App can be defined by following these simple steps:
- Go to the Azure portal, search for and select App Services, and then click the + Create button to create a new web app. Fill in all data as follows:
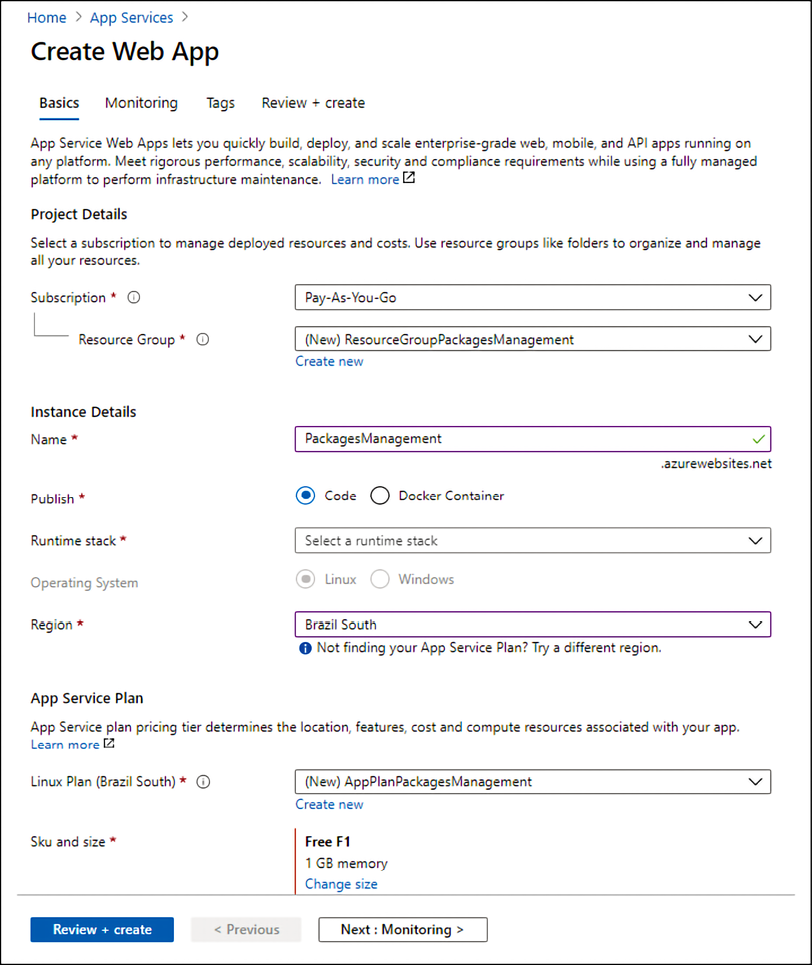
Figure 21.2: Creating an Azure Web App
- Clearly, you may use a Resource Group you already have, and the most convenient region for you. For Runtime stack, please select the same .NET version you used in the Visual Studio solution.
- Now, if you have enough credit, let’s create a SQL Server database for the application, and let’s call it
PackagesManagementDatabase. If you do not have enough credit, do not worry—you can still test application deployment, but the application will return an error when it tries to access the database. Please refer to the Relational databases subsection of Chapter 8, How to Choose Your Data Storage in the Cloud, to see how to create a SQL Server database.
It is important to mention that the approach presented here can be useful if you have a simple scenario to manage, or if you are studying Azure. In real-world scenarios, where you have many different components and services to deal with, you must consider studying the Infrastructure as Code (IaC) approach. You may find good information about it at https://docs.microsoft.com/en-us/dotnet/architecture/cloud-native/infrastructure-as-code.
Configuring your Visual Studio solution
Once you have defined the Azure Web App, you need to configure the application for running in Azure by following these simple steps:
- If you have defined an Azure database, you need two different connection strings in your Visual Studio solution, one for the local databases for development and another one for your Azure Web App.
- Now, open both
appsettings.Development.jsonandappsettings.jsonin your Visual Studio solution, as follows:

Figure 21.3: Opening settings in Visual Studio
- Then, copy the whole
ConnectionStringsnode ofappsettings.jsonintoappsettings.Development.json, as follows:"ConnectionStrings": { "DefaultConnection": "Server=(localdb)....." }, - Now you have the local connection string in the development settings, so you can change
DefaultConnectioninappsettings.jsonto one of the Azure databases. - Using the database created in Chapter 8, How to Choose Your Data Storage in the Cloud, in the Relational databases subsection, go to the database in the Azure portal, and check the Connection String section.
- Copy the connection string, filling it with the username and password you got when you defined the database server.
- Finally, commit your changes locally and then synchronize with the remote repository. Now, your changes are on DevOps Pipelines, which is already processing them to get a new build.
Now that you have the application ready for running in Azure, it is time to configure Azure Pipelines. Let’s take a look at it in the next section.
Configuring Azure Pipelines
Finally, you can configure an Azure pipeline for the automatic delivery of your application on Azure by following these steps:
- Connect Visual Studio with your DevOps project by clicking the Manage Connections link in the Connections tab of the Visual Studio Team Explorer window. Then, click the DevOps link to go to your online project.
- Modify the
PackagesManagementWithTestbuild pipeline by adding a further step after the unit test step. In fact, we need a step that prepares all files to be deployed in a ZIP file. - Click the Edit button of the
PackagesManagementWithTestpipeline, and then go to the end of the file and write the following:- task: PublishBuildArtifacts@1 - When the Settings link appears above the new task, click it to configure the new task:
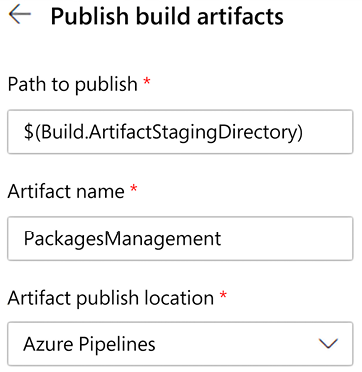
Figure 21.4: Configuring the Publish build artifacts pane
- Accept the default Path to publish since it is already synchronized with the path of the task that will deploy the application, insert the artifact name, and then select Azure Pipelines as the location. As soon as you save, the pipeline will start, and the newly added task should succeed.
- Deployments and other release artifacts are added to different pipelines called Release Pipelines, to decouple them from build-related artifacts. With Release Pipelines, you cannot edit a
.yamlfile, but you will work with a graphic interface. - Click the Releases left menu tab to create a new Release Pipeline. As soon as you click Add a new pipeline, you will be prompted to add the first task of the first pipeline stage. In fact, the whole release pipeline is composed of different stages, each grouping sequences of tasks. While each stage is just a sequence of tasks, the stages diagram can branch, and we can add several branches after each stage. This way, we can deploy to different platforms that each require different tasks. In our simple example, we will use a single stage.
- Select the Deploy Azure App Service task. As soon as you add this task, you will be prompted to fill in missing information.
- Click the error link and fill in the missing parameters:

Figure 21.5: Configuring the publish stage
- Select your subscription, and then, if an authorization button appears, please click it to authorize Azure Pipelines to access your subscription. Then, select Windows as the deployment platform, and finally, select the app service you created from the App service name drop-down list. Task settings are automatically saved while you write them, so you need just to click the Save button for the whole pipeline.
- Now, we need to connect this pipeline to a source artifact. Click the Add Artifact button and then select Build as the source type, because we need to connect the new release pipeline with the ZIP file created by our build pipeline. A settings window appears:

Figure 21.6: Defining the artifact to publish
- Select our previous build pipeline from the drop-down list and keep Latest as the version. Accept the suggested name in Source alias.
- Our release pipeline is ready and can be used as-is. The image of the source artifact you just added contains a trigger icon in its top-right corner, as follows:
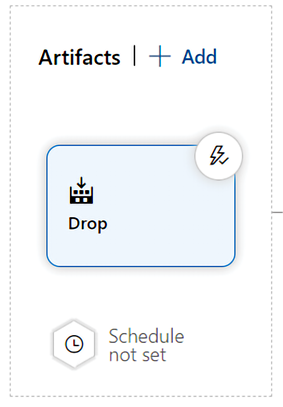
Figure 21.7: Artifact ready to publish
- If you click on the trigger icon, you are given the option to automatically trigger the release pipeline as soon as a new build is available:

Figure 21.8: Enabling the continuous deployment trigger
- Keep it disabled; we can enable it after we have completed and manually tested the release pipeline.
As we mentioned earlier, in preparation for an automatic trigger, we need to add a human approval task before the application is deployed.
Adding a manual approval for the release
Since tasks are usually executed by software agents, we need to embed human approval in a manual job. Let’s add it with the following steps:
- Click the three dots on the right of the Stage 1 header:

Figure 21.9: Adding human approval to a stage
- Then, select Add an agentless job. Once the agentless job has been added, click the Add button and add a Manual intervention task. The following screenshot shows the Manual intervention settings:

Figure 21.10: Configuring human approval for a stage
- Add instructions for the operator and select your account in the Notify users field.
- Now, drag the whole Agentless job with the mouse and place it before the application deployment task. It should look like this:

Figure 21.11: Setting the human approval deployment tasks list
- Finished! Click the Save button in the top-left to save the pipeline.
Now, everything is ready to create our first automatic release.
Creating a release
Once you have everything in place, a new release can be prepared and deployed as follows:
- Let’s click the Create release button to start the creation of a new release, as shown in the following screenshot:
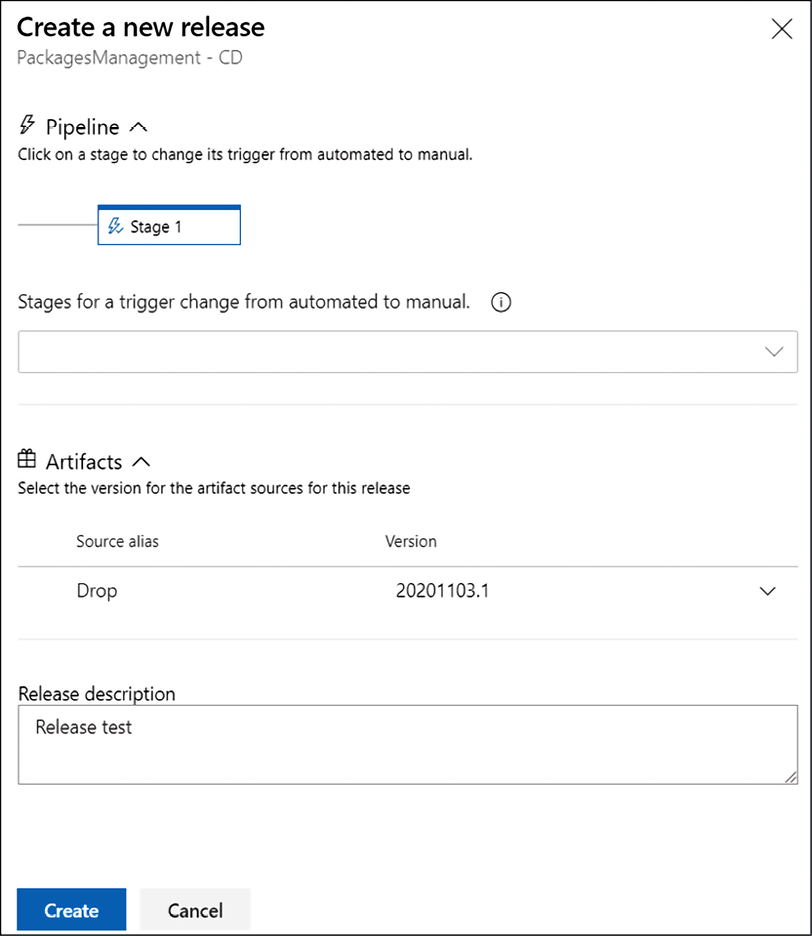
Figure 21.12: Creating a new release
- Verify that the Source alias is the last available one, add a Release description, and then click Create. In a short time, you should receive an email for release approval. Click the link it contains and go to the approval page:
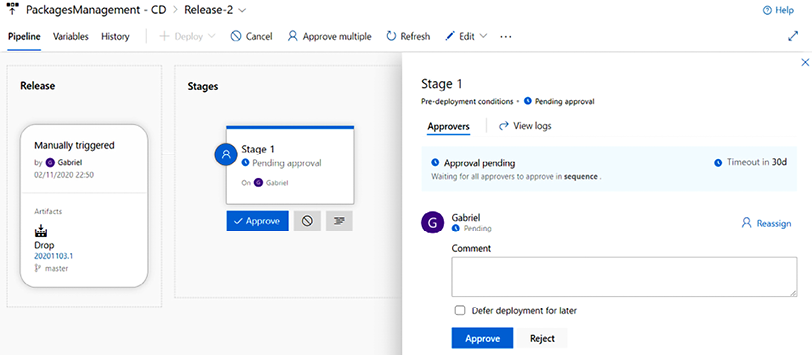
Figure 21.13: Approving a release
- Click the Approve button to approve the release. Wait for the deployment to complete. You should have all the tasks successfully completed, as shown in the following screenshot:
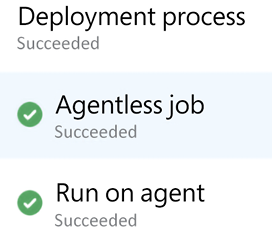
Figure 21.14: Release deployed
In a real-life project, the release pipeline would contain more tasks. In fact, applications (before being deployed in the actual production environment) are deployed in a staging environment where they are beta-tested. Hence, probably, after this first deployment, there would be some manual tests, manual authorization for the deployment in production, and the final deployment in production.
The multistage environment
The approach associated with continuous delivery (CD) needs to guarantee that the production environment will be kept safe in each new deployment. To do so, a multistage pipeline needs to be adopted. The following screenshot shows an approach with common stages, using this book’s use case as a demonstration:

Figure 21.15: Release stages using Azure DevOps
As you can see, these stages were configured using the Azure DevOps release pipeline. Each stage has its own purpose, which will affect the quality of the product delivered in the end. Let’s look at the stages:
- Development/tests: This stage is used by developers and testers to build new functionality. This environment will certainly be the one that is most exposed to bugs and incomplete functions.
- Quality assurance: This environment gives a brief version of new functionalities to areas of the team not related to development and tests. Program managers, marketing, vendors, and others can use it as an area of study, validation, and even preproduction. Besides, the development and quality teams can guarantee that the new releases are correctly deployed, considering both functionality and infrastructure.
- Production: This is the stage where customers have their solution running. The goal for a good production environment, according to CD, is to have it updated as quickly as possible. The frequency will vary according to team size, but there are some approaches where this process happens more than once a day.
The adoption of these three stages of deploying your application will impact the quality of the solution. It will also enable the team to have a safer deployment process, with fewer risks and better stability of the product. This approach may look a bit expensive at first sight, but without it, the results of bad deployment will generally be more expensive than this investment.
Besides all the safety, you will have to consider the multistage scenario. You can set up the pipeline in a way where only with defined authorizations will you be able to move from one stage to another:
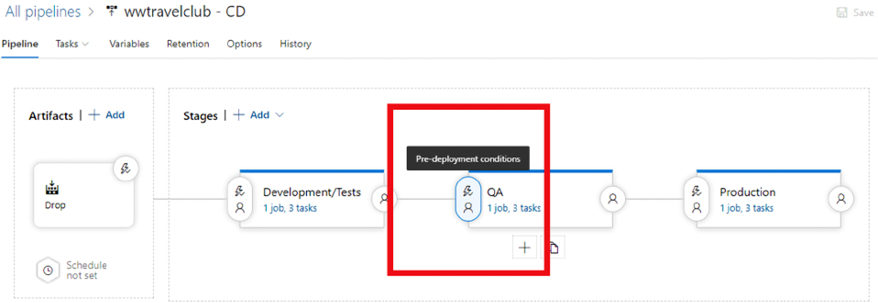
Figure 21.16: Defining pre-deployment conditions
As you can see in the preceding screenshot, it is quite simple to set up pre-deployment conditions, and you can see in the following screenshot that there is more than a single option to customize the authorization method. This allows you to refine the CD approach, exactly meeting the needs of the project you are dealing with.
The following screenshot shows the options provided by Azure DevOps for pre-deployment approval. You can define the people who can approve the stage and set policies for them, that is, revalidate the approver identity before completing the process. You, as a software architect, will need to identify the configuration that fits the project you are creating with this approach:
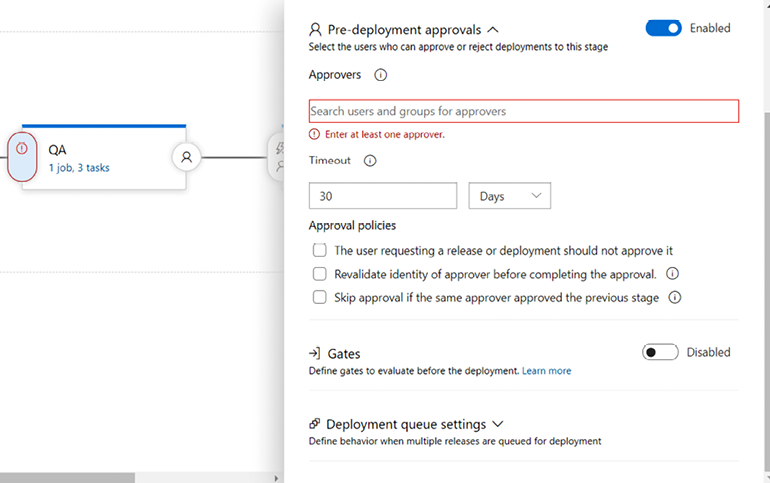
Figure 21.17: Pre-deployment approval options
It is worth mentioning that although this approach is far better than a single-stage deployment, a DevOps pipeline will direct you, as a software architect, to another stage of monitoring. Continuous feedback will be an incredible tool for this, and we will discuss this approach in the next section.
Defining continuous feedback and the related DevOps tools
Once you have a solution that is running perfectly in the deployment scenario described in the last section, feedback will be essential for your team to understand the results of the release and how the version is working for the customers. To get this feedback, some tools can help both the developers and the customers, bringing these people together to fast-track the process of feedback. Let’s have a look at these tools.
Monitoring software with Application Insights
Application Insights is a feature that any software architect must have for continuous feedback on their solution. It is worth mentioning that Application Insights is part of Azure Monitor, a wider suite of monitoring features that also includes alerting, dashboards, and workbooks. As soon as you connect your app to it, you start receiving feedback on each request made to the software. This enables you to monitor not only the requests made but your database performance, the errors that the application may be suffering from, and the calls that take the most time to process.
Obviously, you will have costs relating to having this tool plugged into your environment, but the facilities that the tool provides will be worth it. It might be worth noting that for simple applications it could even be free because you pay for data ingested, for which there is a free quota. Besides, you need to understand that there is a very small performance cost since all the requests to store data in Application Insights run in a separate thread.
It may be worth noting that several services, such as App Services, Functions, and so on, will have an option to add Application Insights as part of the initial creation process, so you may have already created it while following through this book.
Even so, the following screenshot shows how easily you can create a tool in your environment:

Figure 21.18: Creating Application Insights resources in Azure
If you want to set up Application Insights in your app using Visual Studio, you may find this Microsoft tutorial useful: https://docs.microsoft.com/en-us/azure/azure-monitor/learn/dotnetcore-quick-start#configure-app-insights-sdk.
For instance, let’s suppose you need to analyze the requests that take more time in your application. The process of attaching Application Insights to your web app is quite simple: it can be done as soon as you set up your web app. If you are not sure whether Application Insights is configured for your web app, you can find out using the Azure portal. Navigate to App Services and look at the Application Insights settings, as shown in the following screenshot:

Figure 21.19: Enabling Application Insights in App Services
The interface will give you the opportunity to create or attach an already-created monitor service to your web app. It is worth mentioning that you can connect more than one web app to the same Application Insights component.
The following screenshot shows how to add a web app to an already-created Application Insights resource:

Figure 21.20: Enabling App Insights in App Services
Once you have Application Insights configured for your web app, you will find the following screen in App Services:

Figure 21.21: App Insights in App Services
Once it is connected to your solution, the data collection will happen continuously, and you will see the results in the dashboard provided by the component. You can find this screen in two places:
- At the same place as you configured Application Insights, inside the web app portal
- In the Azure portal, after navigating through the Application Insights resource:

Figure 21.22: Application Insights in action
This dashboard gives you an idea of failed requests, server response time, and server requests. You may also turn on the availability check, which will make requests to your selected URL from any of the Azure data centers.
But the beauty of Application Insights is related to how deeply it analyzes your system. In the following screenshot, for instance, it is giving you feedback on the number of requests made on the website. You can analyze it by ranking the ones that took more time to process or the ones that were called more often:

Figure 21.23: Analyzing app performance using Application Insights
Considering this view can be filtered in different ways and you receive the info just after it happens in your web app, this is certainly a tool that defines continuous feedback. This is one of the best ways you can use DevOps principles to achieve exactly what your customer needs.
Application Insights is a technical tool that does exactly what you as a software architect need to monitor modern applications in a real analytic model. It is a continuous feedback approach based on the behavior of users on the system you are developing.
Using the Test and Feedback tool to enable feedback
Another useful tool in the process of continuous feedback is the Test and Feedback tool, designed by Microsoft to help product owners and quality assurance users in the process of analyzing new features.
Using Azure DevOps, you may ask for feedback for your team by selecting an option inside each working item, as you can see in the following screenshot:

Figure 21.24: Requesting feedback using Azure DevOps
Once you receive a feedback request, you may use the Test and Feedback tool to analyze and give the correct feedback to the team. You will be able to connect the tool to your Azure DevOps project, giving you more features while analyzing the feedback request.
You can download this tool from https://marketplace.visualstudio.com/items?itemName=ms.vss-exploratorytesting-web.
It is worth mentioning that this tool is a web browser extension that you will need to install before use. The following screenshot shows how to set up an Azure DevOps project URL for the Test and Feedback tool:

Figure 21.25: Connecting Test and Feedback to an Azure DevOps organization
The tool is quite simple. You can take screenshots, record a process, or even make a note. The following screenshot shows how easily you can write a message inside a screenshot:

Figure 21.26: Giving feedback with the Test and Feedback tool
The good thing is that you record all this analysis in a session timeline. As you can see in the next screenshot, you can have more feedback in the same session, which is good for the analysis process:

Figure 21.27: Giving feedback with the Test and Feedback tool
Once you have done the analysis and you are connected to Azure DevOps, you will be able to report a bug, create a task, or even start a new test case:

Figure 21.28: Opening a bug in Azure DevOps
The result of the bug created can be checked on the Work items board in Azure DevOps. It is worth mentioning that you do not need an Azure DevOps developer license to have access to this area of the environment. This enables you, as a software architect, to spread this basic and useful tool to as many key users of the solution as you have.
The following screenshot shows the bug created by the tool once you have connected it to your Azure DevOps project:
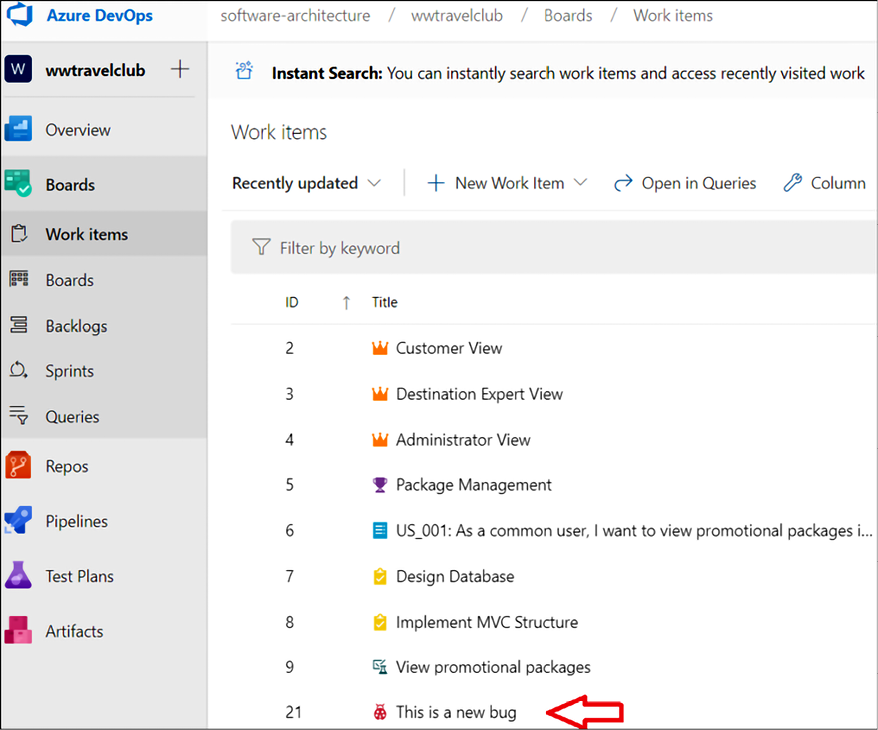
Figure 21.29: New reported bug in Azure DevOps
It is important to have a tool like this to have good feedback on your project. But, as a software architect, you may have to find the best solutions to accelerate this process. The tools explored in the book are good ways to do so. You may consider this approach every time you need to implement one more step in the development process. Continuous feedback is an important step in the process of developing software that will obtain new features continuously. Another very important approach that can take advantage of DevOps is SaaS. Let’s learn about it in the next section.
Understanding SaaS
As we learned in the previous section, DevOps principles are deeply connected to the way we build, deploy, and monitor our solution. When it comes time to sell or use software, following the SaaS approach, understanding DevOps is important to get the best of this way of delivering products.
It is important to say that SaaS relates to a wider set of solution design principles called service design thinking. Service design thinking is not just a software development technique and/or a software deployment approach, but it impacts several business areas, namely organization and human resources, software development processes, and finally, hardware infrastructures and software architecture.
In the subsections that follow, we will briefly discuss the implications for each of the business areas we listed, and in the last subsection, we will focus specifically on the SaaS deployment model.
Adapting your organization to a service scenario
The first organizational implication comes from the need to optimize the value of the software for the target organization. This requires a human resource or a team to oversee planning and monitoring the impact of the software in the target organization in order to maximize the value added by the software. This strategic role is not needed just during the initial design stage, but during the whole lifetime of the application. In fact, this role oversees keeping the software fine-tuned with the ever-changing needs of the target organization.
Another important area of impact is human resource management. In fact, since the main priority is the value added by the software (and not exploiting existing resources and competencies), human resources must be adapted to the project needs. This means acquiring new people as soon as they are needed and developing the required competencies through adequate training.
The next subsection deals with the implications of all the processes involved in software development.
Developing software in a service scenario
The main constraint that impacts software development processes is the need to keep the software fine-tuned to the organization’s needs. This need can be satisfied by any agile methodology based on a CI/CD approach. For a short review of CI/CD, please refer to the Organizing your work using Azure DevOps section of Chapter 3, Documenting Requirements with Azure DevOps. It is worth pointing out that any well-designed CI/CD cycle should include the processing of user feedback and user satisfaction reports.
Moreover, to optimize the value added by the software, it is good practice to organize stages where the development team (or part of it) is placed in close contact with the system users so that developers can better understand the impact of the software on the target organization.
Finally, the value added by the software must always be kept in mind when writing both functional and non-functional requirements. For this reason, it is useful to annotate user stories with a consideration of why and how they contribute to value. The process of collecting requirements is discussed in Chapter 2, Non-Functional Requirements.
More technical implications are discussed in the next subsection.
Technical implications of a service scenario
In a service scenario, both the hardware infrastructure and software architecture are constrained by three main principles, which are an immediate consequence of the requirement to keep the software fine-tuned to the organization’s needs, namely, the following:
- The software needs to be monitored to discover any kind of issue that might have been caused by system malfunctions or changes in software usage and/or user needs. This implies extracting health checks and load statistics from all hardware/software components. Good hints for discovering changes in the organization’s needs are also given by statistics on the operations performed by the users—more specifically, the average time spent by both the user and the application on each operation instance, and the number of instances of each operation performed per unit of time (day, week, or month).
- It is also necessary to monitor user satisfaction. Feedback on user satisfaction can be obtained by adding to each application screen a link to an easy-to-fill user-satisfaction report page.
- Finally, there is the need to adapt both hardware and software quickly, both to the traffic received by each application module and to the changes in the organization’s needs. This means the following:
Making the hardware easy to adapt means allowing hardware scaling, which in turn implies either the adoption of cloud infrastructures or hardware clusters, or both. It is also important to keep the door open to changes in cloud service suppliers, which in turn means encapsulating the dependence on the cloud platform in a small number of software modules.
The maximization of the value added by the software can be achieved by choosing the best technology available for the implementation of each module, which in turn means being able to mix different technologies. This is where container-based technologies, such as Docker, come into play. Docker and related technologies were described in greater depth in:
- Chapter 5, Applying a Microservice Architecture to Your Enterprise Application
- Chapter 6, Azure Kubernetes Service
- Chapter 14, Implementing Microservices with .NET
Summing up, all the requirements we have listed converge toward most of the advanced technologies we have described in this book, such as cloud services, scalable web applications, distributed/scalable databases, Docker, Kubernetes, SOA, and microservices architectures.
More details on how to prepare your software for a service environment are given in the next section, while the next subsection focuses specifically on the advantages and disadvantages of SaaS applications.
Deciding when to adopt a SaaS solution
The main attraction of SaaS solutions is their flexible payment model, which offers the following advantages:
- You can avoid abandoning big investments in favor of more affordable monthly payments
- You can start with a cheap system and then move toward more expensive solutions only when the business grows
However, SaaS solutions also offer other advantages, namely the following:
- In all cloud solutions, you can easily scale up your solution
- The application is automatically updated
- Since SaaS solutions are delivered over the public internet, they are accessible from any location
Unfortunately, SaaS advantages come at a cost, since SaaS also has some not negligible disadvantages, namely the following:
- Your business is strictly tied to the SaaS provider, which might discontinue the service and/or modify it in a way that is not acceptable to you anymore.
- Usually, you cannot implement any kind of customization, being limited to the few standard options offered by the SaaS supplier. However, sometimes SaaS suppliers also offer the possibility of adding custom modules written either by them or by you.
Summing up, SaaS solutions offer interesting advantages but also some disadvantages, so you, as a software architect, must perform a detailed analysis to decide how to adopt them.
The next section explains how to adapt software to be used in a service scenario.
Preparing a solution for a service scenario
First, preparing a solution for a service scenario means designing it specifically for the cloud and/or for a distributed environment. In turn, this means designing it with scalability, fault tolerance, and automatic fault recovery in mind.
The main implications of the preceding three points are concerned with the way the state is handled. Stateless module instances are easy to scale and to replace, so you should carefully plan which modules are stateless and which ones have states. Moreover, as explained in Chapter 8, How to Choose Your Data Storage in the Cloud, you must keep in mind that write and read operations scale in a completely different way. Read operations are easier to scale with replication, while write operations do not scale well with relational databases and often require NoSQL solutions.
High scalability in a distributed environment prevents the usage of distributed transactions and of synchronous operations in general. Therefore, data coherence and fault tolerance can be achieved only with more complex techniques based on asynchronous messages, such as the following:
- One technique is storing all messages to send in a queue so that asynchronous transmissions can be retried in the event of errors or timeouts. Messages can be removed from the queue either when confirmation of reception is received or when the module decides to abort the operation that produced the message.
- Another is handling the possibility that the same message is received several times because timeouts caused the same message to be sent several times.
- If needed, use techniques such as optimistic concurrency and event sourcing to minimize concurrency problems in databases. Optimistic concurrency is explained in the Defining the data layer section of Chapter 16, Implementing Frontend Microservices with ASP.NET Core, while event sourcing is described together with other data layer stuff in Chapter 11, Understanding the Different Domains in Software Solutions.
The first two points in the preceding list are discussed in detail together with other distributed processing techniques in the How does .NET deal with microservices? section of Chapter 5, Applying a Microservice Architecture to Your Enterprise Application.
Fault tolerance and automatic fault recovery require that software modules implement health check interfaces that the cloud framework might call, to verify whether the module is working properly or whether it needs to be killed and replaced by another instance. ASP.NET Core and all Azure microservices solutions offer basic off-the-shelf health checks, so the developer does not need to take care of them. However, more detailed custom health checks can be added by implementing a simple interface.
The difficulty increases if you have the goal of possibly changing the cloud provider of some of the application modules. In this case, the dependency from the cloud platform must be encapsulated in just a few modules, and solutions that are too strictly tied to a specific cloud platform must be discarded.
If your application is conceived for a service scenario, everything must be automated: new version testing and validation, the creation of the whole cloud infrastructure needed by the application, and the deployment of the application on that infrastructure.
All cloud platforms offer languages and facilities to automate the whole software CI/CD cycle, that is, building the code, testing it, triggering manual version approvals, hardware infrastructure creation, and application deployment.
Azure Pipelines allows the complete automatization of all the steps listed. The use case in Chapter 23, Testing Your Enterprise Application, shows how to automate all steps up to and including software testing with Azure Pipelines. The use case in the next section will show how to automate the application deployment on the Azure Web Apps platform.
Automation has a more fundamental role in SaaS applications, since the whole creation of a new tenant for each new customer must be automatically triggered by the customer subscription. More specifically, multi-tenant SaaS applications can be implemented with three fundamental techniques:
- All customers share the same hardware infrastructure and data storage. This solution is the easiest to implement since it requires the implementation of a standard web application. However, it is possible only for very simple SaaS services since, for more complex applications, it becomes increasingly difficult to ensure that storage space and computation time are split equally between users. Moreover, as the database becomes more and more complex, it is always more difficult to keep the data of different users safely isolated.
- All customers share the same infrastructure, but each customer has their own data storage. This option solves all the database problems of the previous solution, and it is quite easy to automate since the creation of a new tenant just requires the creation of a new database. This solution offers a simple way to define pricing strategies by linking them to storage consumption.
- Each customer has their own private infrastructure and data storage. This is the most flexible strategy. From the user’s point of view, its only disadvantage is the higher price. Therefore, it is convenient only above a minimum threshold of computational power required by each user. It is more difficult to automate since a whole infrastructure must be created for each new customer and a new instance of the application must be deployed on it.
Whichever of the three strategies is chosen, you need to be able to scale out your cloud resources as your consumers increase.
If you also need the possibility to ensure your infrastructure creation scripts work across several cloud providers, then, on the one hand, you can’t use features that are too specific to a single cloud platform, and on the other, you need a unique infrastructure creation language that can be translated into the native languages of the more common cloud platforms. Terraform and Ansible are two very common choices for describing hardware infrastructures.
The WWTravelClub project approach
During this chapter, screenshots from the WWTravelClub project have shown the steps needed to implement a good DevOps cycle. The WWTravelClub team has decided to use Azure DevOps because they understand that the tool is essential for getting the best DevOps experience for the whole cycle.
The requirements were written using user stories, which can be found in the Work items section of Azure DevOps. The code is placed in the repository of the Azure DevOps project. Both concepts were explained in Chapter 3, Documenting Requirements with Azure DevOps.
The management life cycle used for getting things done is Scrum, presented in Chapter 1, Understanding the Importance of Software Architecture. This approach divides the implementation into Sprints, which forces value to be delivered by the end of each cycle. Using the CI facilities we learned in this chapter, code will be compiled each time the team concludes a development to the master branch of the repository.
Once the code is compiled and tested, the first stage of the deployment is done. The first stage is normally named Development/Test because you enable it for internal tests. Both Application Insights and Test and Feedback can be used to get the first feedback on the new release.
If the tests and the feedback of the new release pass, it is time to go to the second stage, Quality Assurance. Application Insights and Test and Feedback can be used again, but now in a more stable environment.
The cycle ends with the authorization to deploy in the production stage. This certainly is a tough decision, but DevOps indicates that you must do it continuously so you can get better feedback from customers. Application Insights keeps being a useful tool, since you can monitor the evolution of the new release in production, even comparing it to the past releases.
The WWTravelClub project approach described here can be used in many other modern application development life cycles. As a software architect, you must oversee the process. The tools are ready to go, and it depends on you to make things right!
Summary
In this chapter, we have learned that DevOps is not only a bunch of techniques and tools used together to deliver software continuously, but a philosophy to enable continuous delivery of value to the end user of the project you are developing.
Considering this approach, we saw how CI/CD and continuous feedback are essential to the purpose of DevOps. We also saw how Azure, Azure DevOps, and Microsoft tools help you to achieve your goals.
We described service design thinking principles and the SaaS software deployment model. Now, you should be able to analyze all the implications of these approaches for an organization, and you should be able to adapt pre-existing software development processes and hardware/software architectures to take advantage of the opportunities they offer.
We also explained the need for, and the techniques involved in, the automation of the software cycle, cloud hardware infrastructure configuration, and application deployment.
Once you have implemented the examples shown, you should be able to use Azure Pipelines to automate infrastructure configuration and application deployment. This chapter elucidated this approach using WWTravelClub as an example, enabling CI/CD inside Azure DevOps, and using Application Insights and the Test and Feedback tool for both technical and functional feedback. In real life, these tools will enable you to understand the current behavior of the system you are developing more quickly, as you will have continuous feedback on it.
In the next chapter, we will learn about continuous integration in detail, which plays a fundamental role in service scenarios and the maintenance of SaaS applications.
Questions
- What is DevOps?
- What is continuous integration?
- What is continuous delivery?
- What is continuous feedback?
- What is the difference between the build and release pipelines?
- What is the main purpose of Application Insights in the DevOps approach?
- How can the Test and Feedback tool help in the process of DevOps?
- What is the main goal of service design thinking?
- Is it true that service design thinking requires the optimal usage of all competencies already available in the company?
- Why is complete automation fundamental in the life cycle of SaaS applications?
- Is it possible to define hardware cloud infrastructures with a platform-independent language?
- What is the preferred Azure tool for the automation of the whole application life cycle?
- If two SaaS suppliers offer the same software product, should you use the most reliable or the cheapest one?
- Is scalability the only important requirement in a service scenario?
Further reading
These are some websites where you will find more information on the topics covered in this chapter:
- http://donovanbrown.com/
- https://azure.microsoft.com/en-us/overview/what-is-devops/
- https://www.packtpub.com/networking-and-servers/devops-fundamentals-video
- https://docs.microsoft.com/en-us/azure/devops/learn/what-is-devops
- https://azuredevopslabs.com/labs/devopsserver/exploratorytesting/
- https://docs.microsoft.com/en-us/azure/azure-monitor/app/app-insights-overview
- https://marketplace.visualstudio.com/items?itemName=ms.vss-exploratorytesting-web
- https://docs.microsoft.com/en-us/azure/devops/test/request-stakeholder-feedback
- https://docs.microsoft.com/en-us/azure/devops/pipelines/?view=azure-devops
- https://www.terraform.io/
- https://www.ansible.com/
- https://docs.microsoft.com/en-us/devops/deliver/what-is-infrastructure-as-code
- https://docs.microsoft.com/en-us/dotnet/architecture/cloud-native/infrastructure-as-code
Download the example code files
The code bundle for the book is hosted on GitHub at https://github.com/PacktPublishing/Software-Architecture-with-C-10-and-.NET-6-3E.
Join our book’s Discord space
Join the book’s Discord workspace for a Ask me Anything session with the authors:
https://packt.link/SAcsharp10dotnet6
