Adding a Network Printer |
A network printer is a hardware device that is connected directly to the network. A print server can access the network printer without actually being connected to it with a cable. The network printer has its own system name and IP address.
You should always set up a print server for each network printer so that print clients submit print jobs through the print server to the network printer.
NOTE
Although you could configure every single system as a print server for a network printer so each system could submit print jobs directly, in practice, these printers tend to lock up or act strangely if you configure more than 16 systems as print servers.
Figure 52 shows the path of a print request that is submitted from a print client through a print server to a network printer.
Figure 52. Printing to a Network Printer

Network printers may use one or more special protocols that require a printing program supplied by the vendor. The procedures to set up the vendor-supplied printing program vary. If the printer does not come with vendor-supplied support, you can use the Solaris network printer support with most devices. Sun strongly advises that you use the print vendor software whenever possible.
If the vendor supplies an SVR4 printer interface script to replace the standard printer interface script, this interface script will call the vendor-supplied printing program to send the job to the printer. If the vendor does not provide an SVR4 printer interface script, you need to modify the standard interface script to call the vendor-supplied printing program.
Adding a Network Printer with Vendor-Supplied Tools
Vendors who provide network printers usually provide an interface script. For example, for HP LaserJet printers, Hewlett Packard provides JetAdmin/JetDirect software and drivers for Solaris. JetAdmin/JetDirect includes the necessary filters and interface scripts to recognize pure text and PostScript jobs.
LPRng is an alternative print spooler that provides support for network printers. LPRng a descendant of the LPD/BSD family of spoolers that provides administrative control over printing operations. For example, LPRng provides IFHP, which is its own implementation of the HP JetAdmin/JetDirect software. LPRng is available free from www.lprng.org.
Use the following steps to add a network printer with vendor-supplied tools.
1. |
Consult the vendor's installation documentation for information about the hardware switches and cabling requirement. |
2. |
Connect the printer to the network and turn on the power to the printer. |
3. |
Get an IP address and select a name for the printer node. This step is equivalent to adding any node to the network. |
4. |
Follow the printer vendor instructions to add the network printer to a Solaris system. |
5. |
Add client access to the new printer. |
Adding a Network Printer with Solaris Print Manager |
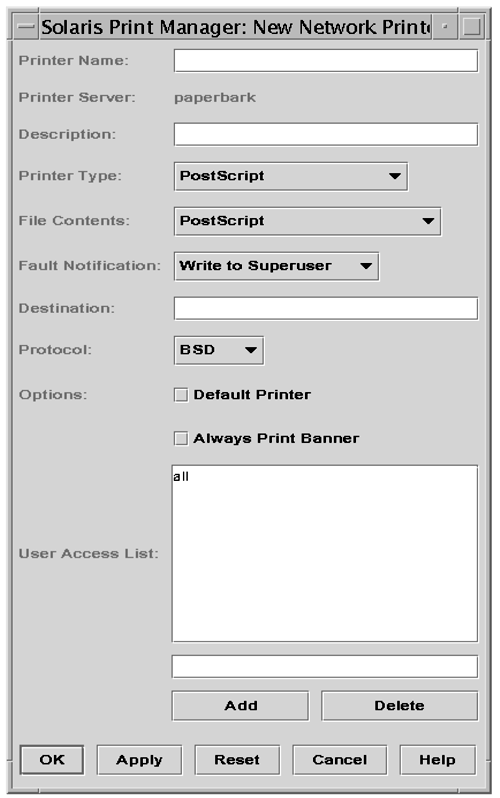
You can use Solaris Print Manager to configure a network printer. To add a new network printer, you need the following information.
Printer name.
Description.
Printer type.
File contents.
Fault notification policy.
Destination—The internal name of the printer node that is used by the printer subsystem to access the printer. It is the name of the printer node or the name of the printer node with a printer vendor port designation. The print vendor documentation explicitly defines the printer vendor port designation.
Protocol—The over-the-wire protocol used to communicate with the printer. The printer vendor documentation supplies the information about the protocol. The network printer support supplies both BSD Printer Protocol and raw TCP. Because of implementation variations, you may want to try both.
Whether this printer is the default.
Whether to always print banners.
User access list.
Use the following steps to add a new network printer.
1. | |
2. |
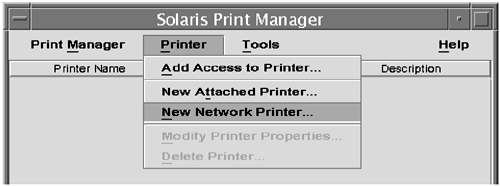
From the Print menu, choose New Network Printer, as shown in Figure 53. Figure 53. Choose New Network Printer from the Print Menu
The New Network Printer window is displayed, as shown in Figure 54. Figure 54. New Network Printer Window
Click on the Help button if you need help with details about values that are required for the text fields. |
3. |
Fill in the form and click on the OK button. The printer is added to the Print Manager and the appropriate databases and files are updated. |
4. |
If the file does not print correctly or is not printed on the correct printer, see the section “Solving Printing Problems” for help. |
Adding a Network Printer with LP Commands
This section describes the steps needed to set up a network printer with the Solaris network printer support software. Use these steps only for printers that do not come with vendor-supplied software.
You need the following information to configure a network printer.
- Printer name— The name of the printer.
- Printer server name— The name of the print server that spools and schedules the jobs for a printer.
- Destination— The internal name of the printer node that is used by the printer subsystem to access the printer. It is the name of the printer node or the name of the printer node with a printer vendor port designation. The print vendor documentation explicitly defines the printer vendor port designation.
- Protocol— The over-the-wire protocol used to communicate with the printer. The printer vendor documentation supplies the information about the protocol. The network printer support supplies both BSD Printer Protocol and raw TCP. Because of implementation variations, you may want to try both.
- Timeout— A seed number specifying the number of seconds to wait between attempting connections to the printer. The timeout is the smallest amount of time to wait between attempted connections. It increases with an increase in failed connections. After repeated failures to connect to the printer, a message is returned to the user requesting possible human intervention. Attempts to reconnect continue until successful or the until the job owner cancels the job.
Use the following steps to add a network printer with the LP commands.
1. |
Consult the vendor's installation documentation for information about the hardware switches and cabling requirement. |
2. |
Connect the printer to the network and turn on the power to the printer. |
3. |
Get an IP address and select a name for the printer node. This step is equivalent to adding any node to the network. |
4. |
Become superuser. |
5. |
Type lpadmin -p
printer-name
-v /dev/null and press Return. This step defines the printer name and the port device the printer will use. |
6. |
Type lpadmin -p printer-name -m netstandard and press Return. This step identifies the interface script the printer will use. |
7. |
Type lpadmin -p
printer-name
-o dest=access-name:port
-o protocol=protocol
-o timeout=value and press Return. This step sets the printer destination, protocol, and timeout values. |
8. |
Type lpadmin -p
printer-name
-I
content-type
-T
printer-type and press Return. This step specifies the file content type and the printer type. |
9. | |
10. |
Type for filter in *.fd;do > name=`basename $filter .fd` > lpfilter -f $name -F $filter > done You have added the filters to the print server. |
11. |
Type accept
printer-name and press Return. |
12. |
Type enable
printer-name and press Return. You have enabled the printer to accept print requests. |
13. |
Type lpstat -p
printer-name and press Return. Verify that the printer is configured correctly. |
14. |
Add client access to the new printer. The following example uses the following information. The information you provide will vary. |
Printer name: seachild
Server: castle
Network printer access name: seachild:9100
Protocol: tcp
Timeout: 5
Interface: /usr/lib/lp/model/netstandard
Printer type: PS
Content types: postscript
Device: /dev/null
castle% su
Password:
# lpadmin -p seachild -v /dev/null
# lpadmin -p seachild -m netstandard
# lpadmin -p seachild -o dest=seachild:9100 -o protocol=tcp -o timeout=5
# lpadmin -p seachild -I postscript -T PS
# cd /etc/lp/fd
# ls
catv.fd         postdaisy.fd    postior.fd      postplot.fd     posttek.fd
download.fd     postdmd.fd      postmd.fd       postprint.fd    pr.fd
dpost.fd        postio.fd       postpages.fd    postreverse.fd
# for filter in *.fd;do
> name=`basename $filter .fd`
> lpfilter -f $name -F filter
> done
# lpfilter -f all -l
(Filter "download")
Input types: postscript
Output types: postdown
Printer types: PS,PSR,PS-b,PS-r,PS-br
Printers: any
Filter type: fast
Command: /usr/lib/lp/postscript/download
Options: PRINTER * = -p*
...(Additional lines deleted from this example)
# lpadmin -p seachild accept
# lpadmin -p seachild enable
# lpadmin -d seachild
# lpstat -p seachild
printer seachild now printing seachild-3. enabled since Thu Jan 25 12:09:30
 WST 2001. available.
#


