Introducing Solaris Print Manager |
In the Solaris 8 release, the Solaris Print Manager is the preferred method for managing printers. This Java-based graphical user interface centralizes printing information when used in conjunction with a nameservice. Using a nameservice to store printer configuration information centralizes printer information and makes printer information available to all systems on the network.
You can use Print Manager in the following nameservice environments.
files.
NIS.
NIS+.
NIS+ with Federated Naming Service (xfn).
See “The Nameservice Switch” and “Enhanced Network Printer Support” for additional information about the /etc/nsswitch.conf file.
In the Solaris 8 release, you can use the Solaris Print Manager to manage printer configuration information in the NIS+ nameservice without the underlying xfn application layer. Eliminating the underlying xfn application layer provides better performance when accessing printer configuration information. See “Converting Printer Configuration in NIS+ (xfn) to NIS+ Format” for more information.
You must be superuser, have rights to administer printers, or be a member of a role that grants you rights to manage printing functions to use the Solaris Print Manager. See Chapter 23, “Role-Based Access Control,” for information about rights.
Solaris Print Manager recognizes existing printer information on the printer servers, print clients, and in the nameservice databases. You do not need to convert print clients to use the new Solaris Print Manager as long as the print clients are running the Solaris 2.6 release or compatible versions.
Using Solaris Print Manager to perform printer-related tasks automatically updates the appropriate printer databases. Solaris Print Manager also includes a command-line console that displays the lp command line for the add, modify, and delete printer operations. Errors and warnings are also displayed when Printer Manager operations are performed.
You can run Solaris Print Manager on a remote system with the display sent to the local system. Use the following syntax to set the DISPLAY environment variable for the Bourne and Korn shells.
DISPLAY=hostname:display_number;export DISPLAY
hostname is the name of the remote system and display_number is the name of the display. For example, to display the Solaris Print Manager from paperbark on the system castle, type the following command on castle.
$ su
Password:
# DISPLAY=paperbark:0;export DISPLAY
$ /usr/sadm/admin/bin/printmgr&
Solaris Print Manager Prerequisites
Before you use Solaris Print Manager to configure printers, verify that the following prerequisites are met.
Use an X Window server, displaying Solaris Print Manager either remotely—by setting the DISPLAY environment variable to display the Print Manager on your screen—or locally.
Log in as superuser to the print server to install an attached or network printer, or to the print client to add access to a printer.
Have the required access privileges for the NIS, NIS+, or NIS+ (xfn) nameservice.
For NIS, you need the root password for the NIS master server.
For NIS+, you may need to identify the group that owns the printers table.
For NIS+ (xfn), you may need to identify the group that owns the federated naming table.
 Make sure the /etc/nsswitch.conf file for each individual print server and client is configured to examine the nameservice you modified above.
Identifying the NIS+ Group That Owns the printers Table
Use the following steps to identify the NIS+ group that owns the printers table.
1. |
Log in as superuser to the NIS+ master server. |
2. |
Type niscat -o printers.org_dir.domainname and press Return. The group that owns the printers table is displayed. In the following example, the printers.org_dir table is not found. nismaster% su Password: # niscat -o printers.org_dir.wellard.com. printers.org_dir.wellard.com.: Not found. # |
3. |
If you get a Not Found message, configure an NIS+ printer with the Solaris Print Manager. See “Adding a New Attached Printer with Print Manager” for instructions. If the printers.org_dir table does not exist, Solaris Print Manager creates it when you add a printer and modifies it, as needed, when you change a printer configuration. The following example identifies the group that owns the printers table as admin. The group line is highlighted in bold. nismaster# niscat -o printers.org_dir.wellard.com. Object Name : "printers" Directory : "org_dir.wellard.com." Owner : "nismaster.wellard.com." Group : "admin.wellard.com." Access Rights : r---rmcdrmcdr--- Time to Live : 12:0:0 Creation Time : Mon Oct 30 14:13:16 2000 Mod. Time : Mon Oct 30 14:13:16 2000 Object Type : TABLE Table Type : printers_tbl Number of Columns : 2 Character Separator : Search Path : Columns : [0] Name : key Attributes : (SEARCHABLE, TEXTUAL DATA, CASE SENSITIVE) Access Rights : ---------------- [1] Name : datum Attributes : (TEXTUAL DATA) Access Rights : ---------------- nismaster# |
4. |
If the name of the system running Solaris Print Manager is not included as part of the Owner name in the output from the niscat command—"nismaster.wellard.com." in the previous example—add the system that runs Solaris Print Manager to the NIS+
admin group authorized to update the printers.org_dir table. Type nisgrpadm -a admin.domainname
hostname and press Return. |
5. |
Log in as superuser to the system that runs Solaris Print Manager. Depending on your NIS+ configuration, you may also need to run the /usr/bin/keylogin command. See keylogin(1) for more information. |
See “Starting Solaris Print Manager” for instructions on how to start Solaris Print Manager.
Identifying the NIS+ (xfn) Group That Owns the printers Table
Use the following steps to identify the NIS+ (xfn) group that owns the printers table.
1. |
Log in as superuser to the NIS+ master server. |
2. |
Type niscat -o printers.org_dir.domainname and press Return. |
3. |
If the system name is not include as part of the Owner name in the output from the niscat command, add the system that runs Solaris Print Manager to the NIS+
admin group authorized to update the fns.ctx_dir.wq file, type nisgrpadm -a admin.domainname
hostname and press Return. |
4. |
Log in as superuser to the system that runs Solaris Print Manager. Depending on your NIS+ configuration, you may also need to run the /usr/bin/keylogin command. See keylogin(1) for more information. |
Starting Solaris Print Manager
Use the following steps to start Solaris Print Manager from the Workspace menu.
1. |
From the Workspace menu, choose Tools > Printer Administrator. The Action: Print Administrator window is displayed. |
2. |
Type the name of the system you want to configure with Solaris Print Manager and click on the OK button. The Invoker—Password screen is displayed, |
3. |
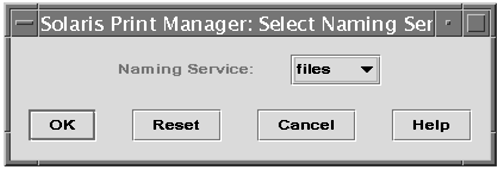
Type the root password for the system. NOTE Alternatively, you can start Solaris Print Manager from a command line. Become superuser in a Terminal window and type /usr/sadm/admin/bin/printmgr&. If you use Solaris Print Manager frequently, you may want to add /usr/sadm/admin/bin to your root path. Figure 45. Print Manager Select Naming Service Window
|
4. |
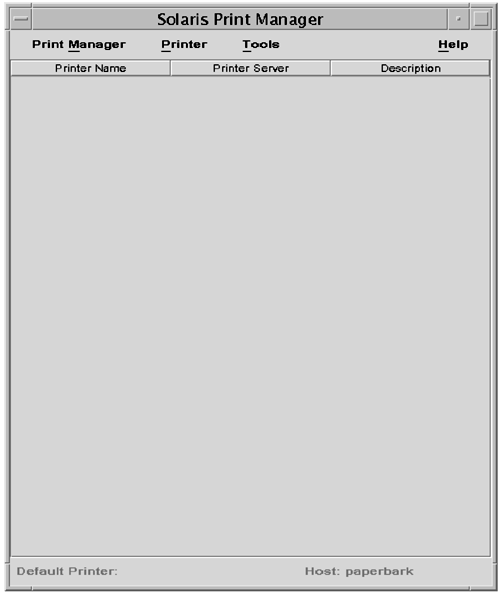
Choose the appropriate nameservice from the Naming Service menu and click on the OK button. The nameservice you choose should match the nameservice specified on the printers line in the /etc/nsswitch.conf file. The Print Manager window is displayed, as shown in Figure 46. Figure 46. Solaris Print Manager Window
|
Adding a New Attached Printer with Print Manager |
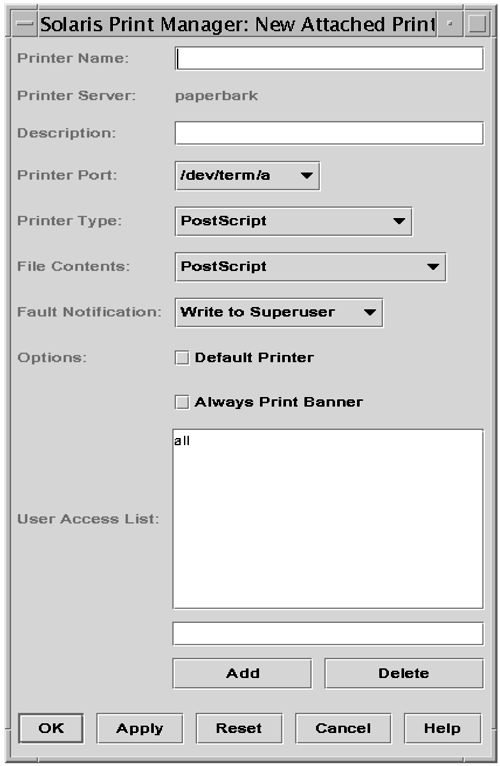
The first task in setting up a print server is to set the printer up as a local Solaris printer. To add a new printer directly cabled to a print server, you need the following information.
Printer name.
Description.
Printer port.
Printer type.
File contents.
Fault notification policy.
Whether this printer is the default.
Whether to always print banners.
User access list.
Once you have physically attached the printer to the computer, use the following steps to make the printer available to the local computer.
1. |
Start the Solaris Print Manager (if necessary). See “Starting Solaris Print Manager” for more information. |
2. |
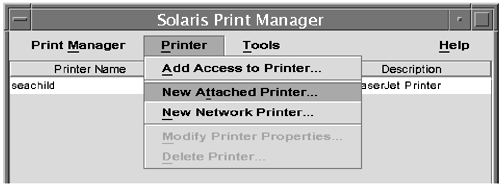
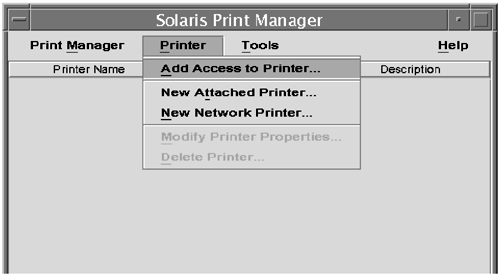
From the Printer menu, choose New Attached Printer, as shown in Figure 47. Figure 47. Choose New Network Printer from the Printer Menu
The New Attached Printer window is displayed, as shown in Figure 48. Figure 48. New Attached Printer Window
Click on the Help button if you need help with details about values that are required for the text fields. |
3. |
Fill in the form and click on the OK button. The printer is added to the Solaris Print Manager, and the appropriate databases and files are updated. |
4. |
If files do not print correctly or are not printed on the correct printer, see the section “Solving Printing Problems” for help. |
Adding a New Network Printer with Print Manager |
You can use Solaris Print Manager to configure a network printer—that is, a printer that is connected directly to the network as its own node. See “Adding a Network Printer” for information about network printers and “Adding a Network Printer with Solaris Print Manager” for instructions on adding a network printer with Solaris Print Manager.
Adding Access to a Printer with the Print Manager |
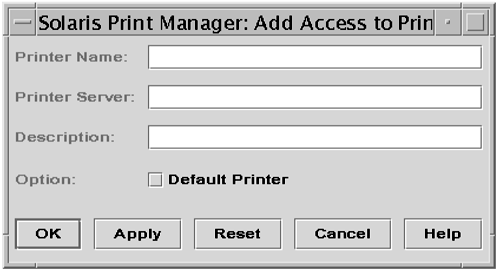
To add access to a printer, you need the following information.
Printer name.
Print server name.
Description of the printer.
Whether this printer is the default printer.
Use the following steps to add access to a printer.
1. | |
2. | |
3. |
Type the printer name, name of the printer server, and description in the text fields. If you want this printer to be the default printer, click on the Default Printer check box. |
4. |
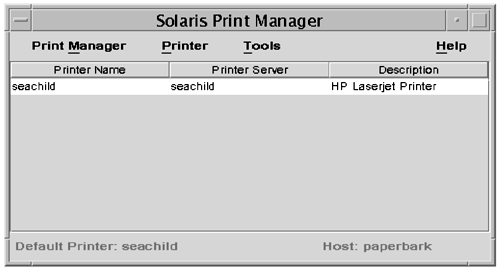
Click on the OK button. The printer is configured, the printer information is added to the list in the Solaris Print Manager window, and the relevant files are updated. The name of the default printer is displayed at the bottom of the window, as shown in Figure 51. Figure 51. Solaris Print Manager Window
|
5. |
If files do not print correctly or are not printed on the correct printer, see the section “Solving Printing Problems” for help. |
Converting Printer Configuration in NIS+ (xfn) to NIS+ Format |
This section describes how to convert printer configuration information in NIS+ (xfn) format to NIS+ format. You can run the following conversion script only on a system running the Solaris 8 Operating Environment.
Log in as superuser to the NIS+ master.
Copy the following conversion script and name it something like /tmp/convert.
#!/bin/sh
        #
        # Copyright (C) 1999 by Sun Microsystems, Inc.
        # All Rights Reserved
        #
        PRINTER=""
        for LINE in `lpget -n xfn list | tr "	 " "Control A Control B?"` ; do
         LINE=`echo ${LINE} | tr "Control A ControlB" "	 " | sed -e 's/^
  	//g'`
         case "${LINE}" in
          *:)
           PRINTER=`echo ${LINE} | sed -e 's/://g'`
           ;;
          *=*)
           lpset -n nisplus -a "${LINE}" ${PRINTER}
           ;;
         esac
        done
