Application Center administration is easy. It should be: The product is designed primarily to make administration of Web farms easier. Application Center actually introduces only a few new technologies to a Web farm, and leverages the underlying capabilities of IIS and Windows to improve Web farm management tasks. In this chapter, I’ll introduce you to the core management tasks that an Application Center administrator is expected to perform. I’ll also show you some of the things that most often go wrong with Application Center, and how to fix them.
Application Center provides fairly centralized management through the Application Center Microsoft Management Console (MMC) snap-in, shown in Figure 16.1. The snap-in provides access to all of Application Center’s features and functionality, including cluster management, content synchronization and deployment, and so forth.

Application Center also includes a Web-based administrative interface that provides a subset of the snap-in’s functionality. The Web-based interface makes it easier to monitor an Application Center cluster from any computer, even if the snap-in isn’t available.
| For more information on the Application Center Web-based administrative interface, see “Application Center,” p. 728 |
By default, Application Center installs the snap-in on every Application Center cluster member. You can also install the snap-in on your administrative workstation by running Application Center Setup and selecting the Client Tools Only option.
Tip
Almost all of the .NET Enterprise Servers provide a “Client Tools only” (or similarly named) installation option that installs the components needed to remotely manage the servers. I recommend that you always install the client tools on an administrative workstation running Windows 2000 Professional or Windows XP Professional. Doing so will enable you to manage your entire enterprise from a single remote console.
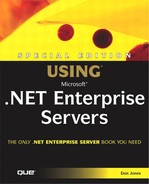
I also consider Network Monitor to be an invaluable tool when dealing with Application Center. Network Monitor, or NetMon, isn’t included with Application Center. However, it is included with Windows server operating systems, including Windows 2000 Server. NetMon, shown in Figure 16.2, enables you to capture and analyze the raw packets transmitted across a network.
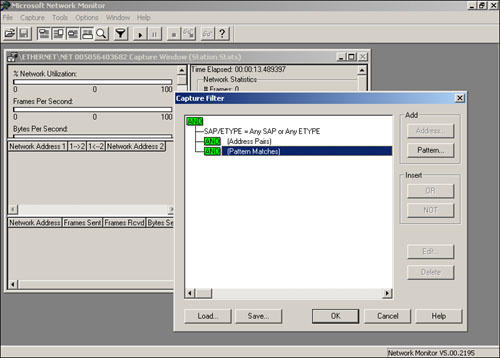
The version of NetMon included with Windows is limited, and only enables you to capture packets sent to or from the server that NetMon is running on. For that reason, I recommend installing NetMon on all of your Application Center servers. NetMon is installed through the Windows Components portion of Add/Remove Programs, which is part of the Windows Control Panel. Figure 16.3 shows the NetMon installation option.
Note
Microsoft Systems Management Server (SMS) includes the full version of NetMon, which is capable of capturing network packets no matter who sent them or where they were sent to.
Using NetMon effectively takes a little practice. Throughout this chapter, I’ll show you how to use NetMon (when appropriate) to troubleshoot Application Center operational and performance problems.
Most of the time that you spend with Application Center will be spent managing Web clusters. After all, Web clusters are pretty much the whole point of Application Center! Fortunately, Application Center doesn’t actually add much in the way of management tasks to a Web cluster; you’ll actually spend most of your time with IIS on Web cluster controllers. Application Center does most of its work in the background, ensuring that the other cluster members mirror the controller’s configuration. In the next few sections, I’ll cover the tasks that you do perform with Application Center, including cluster creation and expansion, cluster monitoring, and basic cluster maintenance.
Creating a new Web cluster isn’t difficult, but there are a number of preliminary steps that you should complete so that Application Center can create a cluster that works correctly the first time out. These steps include
Ensure that each cluster member contains two network adapters. One will become the load-balanced adapter, and the other will become a back-end adapter used to maintain communications within the cluster.
Determine which cluster member will be the controller, and configure that computer’s load-balanced adapter with the IP addresses that the entire cluster will respond to. In other words, configure the adapter with the IP addresses that you want users to use to contact the cluster’s Web applications.
Note
Keep in mind that a single cluster can host multiple Web sites, because IIS has the capability of hosting multiple Web sites. Generally, each Web site will be identified with a unique IP address. The cluster controller will need to be configured with each of these IP addresses on its load-balanced network adapter.
Ensure that the back-end network adapter on each cluster member is configured with a valid DNS server address and, if appropriate, a WINS server address.
Ensure that the back-end network adapters are each configured with a unique IP address, and that the IP address is on a different subnet than the load-balanced network adapters’ IP addresses.
Since you’ve got two network adapters to keep track of, I recommend renaming them to something other than the default “Local Area Connection” and “Local Area Connection 2.” For example, I usually rename the adapters to “Load Balanced” and “Back End,” so that I can easily determine which network connection belongs to which network adapter.
If the cluster members’ load-balanced network adapters are connected to a switch, consider replacing the switch with a hub. At the very least, you’ll need to configure the switch to send all incoming traffic to all switch ports that are connected to a cluster member. In order for NLB to function properly, each cluster member must receive all traffic directed to the cluster’s IP address.
| If only one cluster member seems to be receiving traffic on its load-balanced NIC, and the cluster members are connected to a switch, see “Switch Is Preventing NLB from Working” in the “Troubleshooting” section at the end of this chapter. |
When you’ve prepared your soon-to-be cluster members, you’re ready to form your new cluster. You can either install Application Center on each cluster member now, or install it as you join each member to the cluster. At the very least, you’ll need to start by installing Application Center on the computer that will become the cluster controller. Once Application Center (and any recent Application Center service packs) is ready to go, follow these steps to create your new cluster:
Launch the Application Center console.
Right-click Application Center and select Connect from the pop-up menu.
Type the name of the server that you want to connect to. If you’re running the console on the new cluster controller, you’ll use that server’s name.
Select Create a new cluster in the dialog box and click OK.
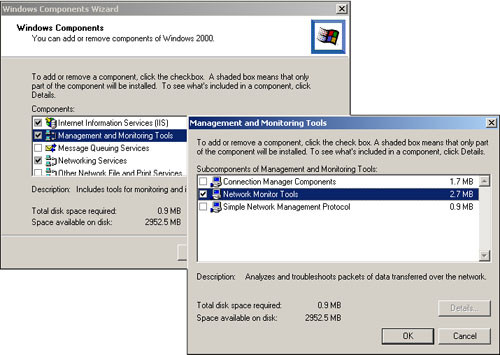
The New Cluster Wizard will appear. You’ll become familiar with this wizard, as it’s used to create every type of new cluster that Application Center supports. In this case, select General/Web cluster from the first screen (shown in Figure 16.4) and click Next.
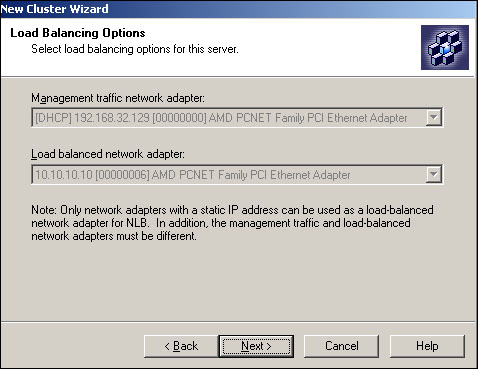
On the Load Balancing Options page, decide whether your new cluster will use NLB or an external load balancing solution. Note that the NLB option will only be available if the server contains two network adapters and at least one of them has a static IP address.
As shown in Figure 16.5, select the network adapter that the cluster will use as its load balanced and back-end adapter. Of course, you’ll only see this screen if you selected NLB as your load balancing method.
Note
The load balanced network adapter must have a static IP address, although the back-end network adapter may use DHCP or have a static address. In Figure 16.5, only one adapter is using a static IP address, and so the choice of adapter for each function is fixed.
Optionally, provide an email address and email server name on the Monitoring Options page. Doing so will enable the cluster to send cluster notifications automatically. If you don’t configure this option now, you can always do so later.
Click Finish. Application Center will create the new cluster, which can take several minutes.
Congratulations! You’ve got a new, single-member Web cluster, all ready to go. Although it only contains one member, the cluster will behave like any other cluster. You can begin using it immediately or, more likely, you can start adding members to it.
Joining a new member to a Web cluster is easy. Simply launch the Application Center console, right click Application Center, and select Connect from the pop-up menu. Type the name of the new member, and select the option to Manage cluster for the specified server. A dialog box will pop up offering to join the server to an existing cluster, and you just have to enable Application Center to do so. Keep in mind that the new member must already have Application Center installed.
There’s another way to add new members that I find to be a little faster:
Launch the Application Center console and connect to the controller of the cluster you want to add a member to.
Right-click the cluster that you want to add a member to.
Select All Tasks from the pop-up menu, and then select Add Cluster Member.
The Add Cluster Member Wizard will appear. Provide the server name of the new cluster member.
You’ll also need to provide logon credentials which have administrative rights on both the cluster controller and the new member.
Tip
I usually build clusters from servers that belong to the same domain. That way, I can create a domain user account and grant it administrative rights on all cluster members, including the controller. Doing so enables that single user account to function on all cluster members, and makes cluster creation and management much easier.
After you’ve provided the necessary information, Application Center will require several minutes to add the new member to the cluster.
If you’ve already configured Web applications on the cluster’s controller, and you’ve configured automatic synchronization, Application Center will automatically deploy the applications to the new member. This is a great feature, as it enables you to quickly add new members to a cluster without having to spend the time to manually add the Web sites’ content to the new member. Basically, you just install Windows and Application Center on a new server, add the server to an existing cluster, and you’re done.
Tip
I often work in environments that have multiple Application Center Web clusters running. In order to meet sudden increase in Web site traffic, I keep a spare Windows 2000 Server computer handy, with Application Center preinstalled. Whenever a particular Web cluster needs an additional server, I just add that server to the cluster and let Application Center deploy the appropriate content. If the cluster demand dies down later, I can remove the server from the cluster, delete the Web site content, and it’s ready to be added to another needy cluster on a moment’s notice.
Application Center monitoring is accomplished in part by the Microsoft Health Monitor, which is included with the Application Center default installation. Application Center also collects operating system and Application Center events from cluster members, enabling you to view these events in a single location.
To view a cluster member’s current status, simply select the member in the Application Center console. The member’s status appears in the right pane, and is updated every 30 seconds. To view events associated with a cluster or member, expand the cluster or member in the console, and select Events. The events will be listed in the right pane of the console, as shown in Figure 16.6.
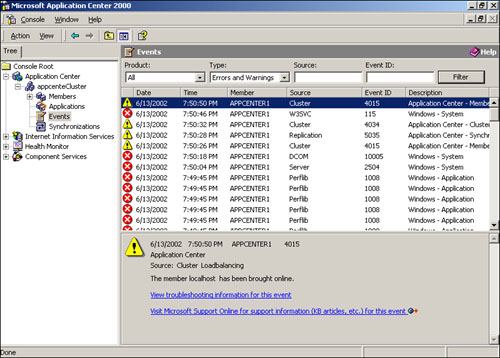
Note
The events listing isn’t updated automatically. Press F5 to refresh the list and display any new events that have occurred.
You can also view performance counters for a particular cluster member, or aggregate performance counters for the entire cluster. To do so, simply select the cluster or member in the Application Center console. As shown in Figure 16.7, performance counters are displayed in the right pane of the console.

Note
By default, there are no performance counters selected. You can click the Add button to choose performance counters to be displayed in the performance chart. The chart is automatically updated every 30 seconds.
Viewing events and performance data for an entire cluster from a single window is very useful. However, both assume that you’ve got the time to sit and watch the cluster on a regular basis, looking for problems. Unfortunately, few of us have that kind of time! Busy Application Center administrators learn to take advantage of the Microsoft Health Monitor, which is designed to watch a variety of performance and other data and categorize each as “healthy” or “unhealthy.” Basically, Health Monitor sits and watches performance data for you, and lets you know when performance data starts to move from acceptable ranges into ranges that you need to worry about. At that time, Health Monitor can take actions to alert you, execute corrective actions, and so forth.
You use Health Monitor by configuring one or more monitors. Each monitor contains a data collector, which retrieves performance and other data about a server. Each monitor includes thresholds, which define performance conditions that you consider to be acceptable, marginal, or critical. Monitors can also include actions—such as notifications—that are triggered when the data collector moves from normal to warning, or from warning to critical.
Note
You can view monitors’ status in the Application Center console. However, you can only view monitors for individual members; there’s no way to view aggregate monitor status for an entire cluster. Each member does include a summary health status (OK [normal], Warning, or Critical, as well as special indications for No Connection, Disabled, Processing, and Scheduled Outage). The summary reflects the lowest common denominator for all of that member’s monitors. In other words, if any one monitor is Critical, the member’s summary status is also Critical. The member’s summary status will only be Normal if all of the member’s monitors have a status of Normal.
Start using Health Monitor by creating a basic notification action, which can be used to inform you of a problem with a particular monitor. To do so
Open the Health Monitor console, or add the Health Monitor snap-in to another console that you’re using.
Expand the All Monitored Computers section of the snap-in, and then expand the appropriate Application Center cluster member.
Right-click Actions and select New E-Mail Action from the pop-up menu.
Enter the appropriate email configuration options, including the outgoing email server’s name. If you have Exchange 5.5 or higher in your environment, you can generally use an Exchange server as an outgoing mail server.
Make sure you provide a name—such as “Email Notification”—on the General tab, and click OK.
Once created, this action can be reused by multiple monitors. The next step is to create a data collector to watch a particular performance point:
Right-click a data group and select New from the pop-up menu. Then, select Data Collector and select a data collector type—such as WMI Event Query—from the list.
Specify the details for the new collector. Each type of collector requires different information; consult the Application Center documentation for information on what each type of collector can do.
Click Apply.
On the Actions tab, click New Action Association. Select the appropriate action—such as the “Email notification” action you created earlier—to go with this data collector.
Specify the conditions that will trigger the action: either Critical or Warning. The action will execute only when the collector’s data moves into the appropriate range.
Click OK.
You’ve now created a collector that uses your action. All you need to do now is define the thresholds that indicate Normal, Warning, or Critical status for your collector. To do so, follow these steps:
Right-click the data collector and select New Threshold from the pop-up menu.
Define your threshold criteria. Each threshold specifies specific conditions that change the status of the data collector to OK, Warning, or Critical.
Click OK.
That’s it! You’ve now created a new monitor which will watch a specific performance condition, change its status from OK to Warning or Critical as appropriate, and notify you (or take other actions) as appropriate. You can view the status of individual monitors in the Application Center console, as shown in Figure 16.8.
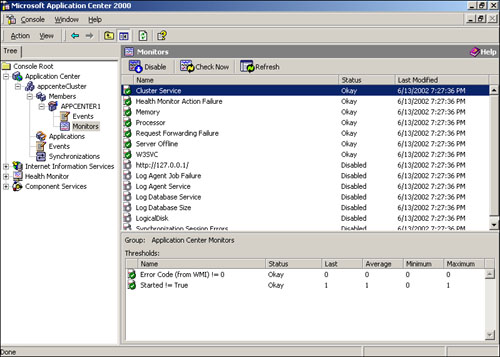
Tip
Application Center includes a whole set of sample monitors, which you can use as a timesaving starting point for your monitoring process. These samples are installed by default with the Health Monitor, and you can use Application Center’s Setup to install additional sample monitors that include expanded monitoring capabilities.
Maintaining a Web cluster is just as easy as creating one. Again, most of the maintenance you do is going to be normal IIS stuff, such as configuring new Web sites or adding Web content. Application Center plays a role in that type of administration, but it’s a background role: Application Center handles content and IIS configuration synchronization from the cluster controller to all cluster members.
There are a few common Application Center-specific tasks that you’ll need to perform from time to time, including taking a member out of the cluster for maintenance (or permanently), moving the cluster controller role, and restarting members after you’ve deployed new content or performed some kind of maintenance. I’ll cover those tasks in the next three sections.
Sometimes you’ll need to remove a member from the cluster so that you can install service packs or perform other maintenance; sometimes you’ll want to completely remove a member from the cluster, either to redeploy the server elsewhere in your organization, or to retire an older server completely.
If you just need to temporarily remove a member from the cluster (say, for maintenance), just right-click the member in the Application Center console and select Set Offline from the pop-up menu. Offline members can still synchronize with the cluster controller, but they won’t accept any new requests from clients. When you set the member offline, you can specify a drain time, as shown in Figure 16.9. The default is 20 minutes, which is designed to allow all existing client connections to close naturally. That way, clients won’t suddenly be cut off; instead, they’ll be able to finish whatever they’re doing. In most cases, “finishing” simply means receiving whatever Web page they just requested; once the member is set to offline, clients will re-load balance to another cluster member for subsequent page requests.

Caution
Setting a member offline can have negative effects for clients if you’re using NLB’s client affinity feature. The now-offline member contained the only copy of clients’ ASP session variables. Although clients will still re-balance to a new cluster member, that member won’t contain the clients’ session information, so it will appear to clients as if they are starting over all of a sudden. Unfortunately, there’s no way around this problem other than avoiding session variables (and, hence, client affinity) completely.
If you need to take a member offline immediately, select Take offline now in the Set Offline dialog box. The member will immediately stop responding to client requests, even ones that it was in the middle of processing. Clients who were waiting on a response from the member will receive a 401 or 404 HTTP error message, which indicates that the server was unavailable. If clients retry their request, they will be re-balanced to a different cluster member, which should be able to fulfill their request normally.
When you’re done working on the offline member, use the Application Center console to set the member back online: Right-click the member and select Set Online from the pop-up menu. The member will immediately re-enter the load balancing loop and begin accepting new client requests.
If you want to permanently remove a member from a cluster, right-click the cluster member, select All Tasks, and then select Remove Cluster Member. Removing the member won’t delete any Web content; you’ll need to manually remove the Web content if you wish to do so. After you remove a member from the cluster, there is no way to add it back in other than re-joining it to the cluster from scratch.
| If you’re trying to permanently remove a cluster member, and receive error messages indicating that settings could not be removed from the member, see “Couldn’t Remove Settings from Member” in the “Troubleshooting” section at the end of this chapter. |
Generally, the cluster controller should be the most powerful server in the cluster, because the controller has the task of synchronizing content and IIS configuration throughout the cluster. Eventually, you’ll probably want to designate a different cluster member as the controller; perhaps you’ll add a new, more powerful server, or perhaps the existing controller is ready for retirement.
Note
You can only move the controller role to another cluster member. If the server you want to be the controller isn’t in the cluster already, join it to the cluster as a regular member first.
Moving the controller role is relatively easy: Right-click the appropriate member in the Application Center console, and select All Tasks from the pop-up menu. Then, select Designate as Controller. Application Center will spend a few minutes making the appropriate changes, and the original controller will become a regular cluster member, which you can remove from the cluster if you want to.
Caution
Ensure that the original controller is not in the middle of synchronizing content, and ensure that the new controller is completely synchronized. Application Center will let you move the controller role regardless, and if the new controller isn’t up-to-date, it will synchronize its out-of-date content to the rest of the cluster once it obtains the controller role.
If the original controller has failed, you may not be able to use the Application Center console to select a new cluster controller. That’s because the console prefers to do an orderly transfer of power, and if it’s unable to contact the original controller during the transfer, it will balk at designating another member as controller. In those cases, open a command-line window on the server that you want to be the cluster controller. Execute the command AC CLUSTER /SETCONTROLLER /FORCE to force that server to become the cluster controller. Make absolutely certain that you never return the original controller to the network, because it will still think it’s the controller and will cause serious synchronization problems. If you are able to later repair the original controller and return it to service, your best bet is to format it and start over with a fresh install of Windows and Application Center. You can then rejoin the server to the cluster as a regular member, and even designate it as the controller again, if you like.
Tip
Another way to ensure that the original controller won’t cause problems when placed back on the network is to use the AC CLUSTER /CLEAN command-line tool to remove the member’s cluster configuration settings. You should then be able to re-join the server to the cluster without reinstalling Windows or Application Center.
You may need to restart a cluster member from time to time, such as after installing new ISAPI filters or COM+ components. Although you can simply restart the server normally by using the Shutdown option on the Start menu, you shouldn’t. Simply restarting the server will cut off any in-process client requests, making it appear to clients as if your Web site suddenly became unavailable.
Instead, set the member offline first, using the procedure I described earlier. Doing so will ensure that client connections drain, providing your users with a better Web browsing experience. Once the member’s status changes to offline, you can even restart it from the Application Center console. Simply open the Application Center console, right-click the member, and select All Tasks from the pop-up menu. Then, select Restart Cluster Member.
Caution
Restarting the member from the Application Center console is no different from restarting it by using the Start menu’s Shutdown option. Restarting does not drain client connections, and instead causes the server to immediately begin restarting. Always set members offline first, wait for their connections to drain, and only then have them restart. Doing so will provide the best possible experience for your users.
You can also restart members using a command-line tool (you can set them offline this way, too). This capability enables you to set a member offline and/or restart the member as a Health Monitor action. For example, if Health Monitor determines that a member is no longer responding to HTTP requests, it might notify you via email and attempt to restart the server automatically to resolve the problem.
| For more information on Application Center’s command-line tools, see “Application Center,” p. 717 |
If you’re using NLB as your load balancing solution, you can do a number of things to optimize its performance. Keep in mind a few basic facts about how NLB works:
All cluster members communicate with one another about how busy they are. The least-busy server accepts the next few incoming client requests.
Client affinity can be used to force members to always handle certain clients, which enables NLB to work with ASP session variables.
The request forwarder enables you to send administrative and publishing traffic to a cluster’s load-balanced network, and have that traffic automatically redirect to the controller. The forwarder can also accommodate session variable use.
| For more information on NLB’s capabilities, see “Technology Capabilities,” p. 180 |
Note
Remember that Application Center is compatible with external load balancing solutions. If you’re using one of them, then you won’t be able to make changes to NLB’s configuration (there’d be no need, since you wouldn’t be using NLB at all). The next four sections assume that you’re using NLB as your load balancing solution.
Although Web farms are often built with identical servers, that isn’t always the case. As you expand your Web farm, newer servers will likely be more powerful than your original ones. NLB enables you to assign each cluster member a weight, which indicates each member’s relative ability to handle the Web farm’s traffic.
To begin with, you’ll need to identify your least powerful Web servers and assign them an arbitrary weight of, say, 10. The actual number isn’t important; what’s important is the relationship between other server’s weights. After configuring your least-powerful servers, move on to the next–most-powerful servers. If those are twice as powerful as the least-powerful servers, assign them double the weight: 20. This tells Application Center that the server can handle twice the load as a server with a weight of 10.
Note
The weights you assign aren’t a measurement of anything in particular. The numbers are simply compared to the weights of the other servers and used to determine which servers should handle more load.
Configure each of your cluster members with an appropriate weight. Your numbers are sure to be somewhat arbitrary, as it’s difficult to determine when a server is exactly twice as powerful (for example) as another server. Do your best, and don’t worry about being too exact. The idea is to give Application Center a rough idea of which servers are more powerful, and approximately how much more powerful they are.
Tip
If you want to be more precise in your weight assignments, use one of the many IIS stress-testing tools that are available. Test each server individually, and use their final results as the basis for your weight assignments. Both the IIS and Application Center Resource Kits include IIS stress-testing tools that can provide a valuable starting point in more precisely determining servers’ relative capabilities.
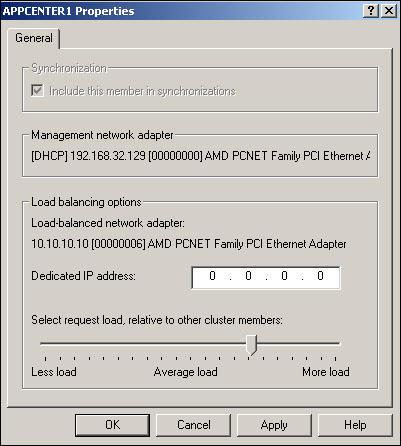
Once you’ve determined the server weights for each cluster member, you can configure Application Center with the appropriate weight values. To do so
Right-click a member in the Application Center console and select Properties from the pop-up menu.
Move the Select request load slider to reflect each member’s relative weight, as shown in Figure 16.10. Note that you don’t actually enter a weight number, since you’re just providing a relative indication of the member’s capabilities compared to the other members in the cluster. If you want to enter a numeric value instead of using the slider, you can do so by modifying the NLB service properties on the load balanced adapter itself.
Click OK.
Tip
Don’t just set your member’s weights and leave them. Use the Application Center console to monitor the cluster’s overall performance, and compare that to each member’s individual performance. Adjust the server weights so that each member is experiencing about the same level of utilization. Processor utilization is often a good measure: Make sure that each member is running at about the same level of processor utilization.
The ideal configuration for client affinity is the default: Off. Remember that client affinity’s entire purpose is to partially defeat load balancing in order to provide ASP session variable compatibility. If you don’t use session variables in your Web applications, leave client affinity completely off. If you do, however use session variables in your applications then you’re going to have to use client affinity, too.
| For more information on how client affinity works, see “Technology Capabilities,” p. 180 |
You configure client affinity in the properties of a Web cluster. Open the Application Center console, right-click a cluster, and select Properties from the pop-up menu. You’ll see the dialog box shown in Figure 16.11. Select either Single Client or Class C affinity, as appropriate, and click OK. The cluster controller will synchronize the change to all cluster members.

Which client affinity setting should you choose? If your Web site operates in an intranet, select Single Client affinity. Each new user that connects to the Web farm will be load balanced to the least-busy server, and will continue to use that server for the remainder of their session. On the Internet, you’ll need to select Class C affinity, because a single client may appear to be using multiple IP addresses due to their Internet service provider’s (ISP) Network Address Translation techniques. In Class C affinity, each request from a new class C IP address range (such as 131.127.15.x) will be load balanced to the least-busy cluster member, and that member will be responsible for handling all future requests from all clients using that same class C IP address range.
Caution
The danger of Class C affinity is that literally thousands of users may be sharing a single class C range of IP addresses. With the affinity in place, a single cluster member will handle all requests for that range. It’s possible for a relatively low-powered server to be assigned an entire class C range if that server happens to be the least-busy when the first request from that range comes into the server.
Practically speaking, Class C affinity means that a single server will handle all requests from a given ISP, or at least from a large portion of the ISP’s customers. This means a single server could end up handling all of the traffic from mid-Atlantic America Online members, which can be a significant load. While required for ASP session variable compatibility, Class C affinity can so undermine Application Center’s capability to load balance user connections that it might not seem to be worth using load balancing at all, especially on busy Web sites. I recommend that you eliminate your site’s dependency on session variables as quickly as possible.
Tip
Microsoft’s new ASP.NET enables you to replace the built-in session variables (which store information in server RAM) with your own session variable implementation, which can utilize a back-end database or some other common data store for session data. Take advantage of this feature, as removing the reliance on server RAM for session storage will also eliminate the need for client affinity.
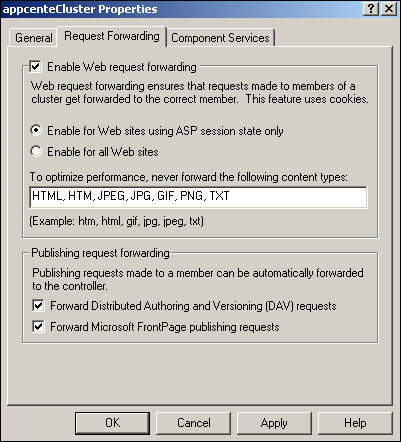
The Request Forwarder is designed to examine incoming Web traffic after it has been load balanced to a particular cluster member, and then redirect the traffic if necessary. To enable the request forwarder, open the cluster’s properties dialog box and select the check box to enable Web request forwarding, as shown in Figure 16.12.

Web request forwarding is an alternative to client affinity for ASP session variable compatibility. Essentially, each incoming HTTP request contains a cookie that indicates which cluster member is handling that client’s session information. The request forwarder examines this cookie and redirects the incoming request to the appropriate member. As shown in Figure 16.12, you can also configure the request forwarder to forward publishing requests, which include content updates and administrative traffic. These requests are always redirected to the cluster controller.
The request forwarder places a significant additional burden on Application Center clusters. The cluster must still use NLB to load balance requests, and only then will the request forwarder examine each incoming request and redirect it if necessary. If at all possible, you should avoid the use of the request forwarder: Use client affinity, if necessary, to support ASP session variables, and manage your clusters from their back-end network adapters (ensuring that you can explicitly connect to the controller without the need for request forwarding).
You may choose to use the request forwarder if you have only a couple of ASP pages that rely on session variables, and if the majority of your site’s content is contained in static HTML files. As shown in Figure 16.13, you can configure the request forwarder to ignore certain types of content based on their file extension, such as HTM or HTML for static Web pages. Doing so will reduce the negative performance impact of the forwarder, since it won’t bother examining those pages for cookies that indicate a redirect is necessary.
Applications are the basis of Application Center’s content synchronization and deployment capabilities. Applications represent all of the resources—such as files, registry keys, data source names, and so forth—that are required for a Web application to operate. By defining an application that includes the necessary resources, you can work with those resources as a single unit, deploying the application within or across clusters, and synchronizing the application within a cluster.
As shown in Figure 16.14, the Application Center console enables you to work with applications. When you install Application Center, it automatically creates several default applications, which are listed in Figure 16.14.
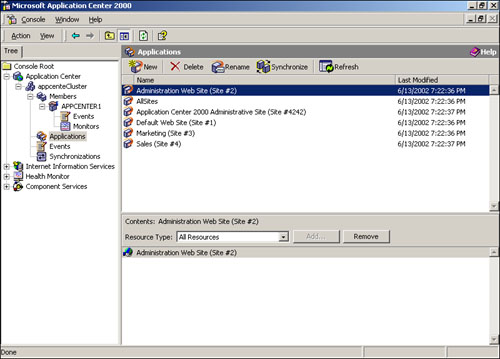
The default applications include one application for each Web site that is configured in IIS when Application Center is installed, including Application Center’s own administrative Web site. Application Center also creates an application that includes all Web sites on the server, and automatically updates the contents of that application as you add and delete Web sites under IIS.
Note
The default applications only include the files under the appropriate Web site. The default applications do not include any registry keys or other resources that may be necessary for the Web sites to function; you’ll need to modify the default applications, if necessary, to include any additional resources.
You can remove any of the default applications except for the “all sites” default application, and you can, of course, configure your own applications to represent the Web sites that the cluster will host. You can also modify the default applications to include additional resources. Since Application Center creates a default application for each Web site on the server, you’ll generally just modify one of the default applications to make it more complete.
To add a new application, just click the New button in the toolbar, shown in Figure 16.14. All you’ll provide is a name for the application; it starts out with no resources included. To modify the resources in an application—whether a default application or one that you’ve just created—you’ll use the Add and Remove buttons at the bottom half of the right-hand side of the console.
To modify an application’s resources, you’ll need to start by selecting the resource type, as shown in Figure 16.15. You can’t use the Add button when All Resources is selected in the drop-down list box; you must select a specific type of resource in order to add the resource to the application.

Note
You can think of an application as an inventory list for your Web sites. The application’s resources are the only items that will be synchronized and deployed with the application.
Don’t include COM+ applications along with your Web site applications. Any application including a COM+ application (which I’ll call a COM+ component) cannot be synchronized, because installing a COM+ component on a server requires the server to restart. Instead, applications that include COM+ components must be deployed, which is a manual process. The best strategy is to create one application for all of your Web site’s resources except COM+ components, and then create standalone applications for each of the COM+ components required by your Web site.
When you create an application and add a COM+ resource, you’ll only be able to select from a list of COM+ components that are already installed on the computer, as shown in Figure 16.16.

I always create a separate application for each COM+ component, or for each group of closely related components. That may seem like overkill, but it enables me to easily deploy new versions of the components without having to deploy every other component associated with my Web site.
Synchronization is the process of ensuring that cluster members contain the same application resources as the cluster controller. You can synchronize an application on demand by selecting the application in the Application Center console and clicking the Synchronize button, shown previously in Figure 16.14. Generally, though, you’ll have your applications synchronize with the controller automatically. To configure automatic synchronization, modify the cluster properties as shown in Figure 16.17.

By default, Application Center’s automatic synchronization is triggered by file changes on the cluster. Whenever a file changes, Application Center synchronizes that file. When a large number of files change at once, it’s possible for Application Center to “miss” some of them, which is where the full-synchronization interval comes in. This interval specifies how often Application Center will attempt to completely synchronize each cluster member with the controller. Note that only changes are actually synchronized, but Application Center does check each and every resource to see if a synchronization is necessary on each member. This time interval acts as a backup for the change-based synchronization, ensuring that all changes are eventually deployed to each cluster member.
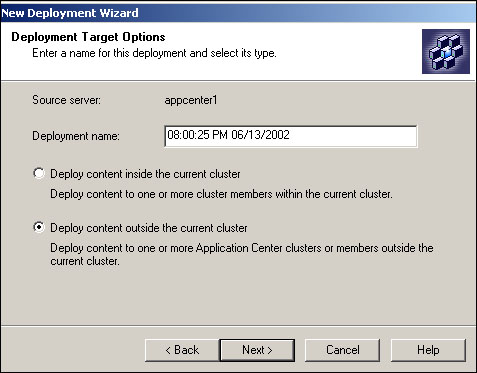
You use the Application Center console to manage application deployments. You can create a new deployment by right-clicking the cluster name in the console and selecting New Deployment from the pop-up menu. You’ll create a name for the deployment and, as shown in Figure 16.18, determine whether the deployment will occur between clusters or within a cluster.
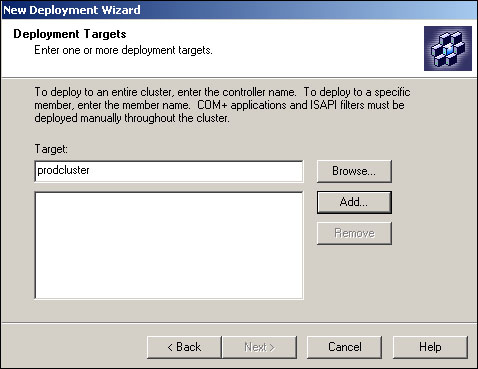
You’ll also need to specify the deployment’s target servers, as shown in Figure 16.19. Here are some tips for using deployments:
When you need to deploy a COM+ application within a cluster, target each cluster member individually.
When you’re deploying a regular application between clusters—such as from a development cluster to a production or testing cluster—target the destination cluster controller. The controller can then synchronize the content to its cluster members.
When you’re deploying a COM+ application between clusters, you’ll need to target each destination cluster member individually, since the controller of that cluster can’t synchronize the COM+ components.
Tip
As shown in Figure 16.17, a cluster’s properties include a default drain time for deployments. You can configure this drain time so that the deployment can gracefully take each target server offline and restart it, if necessary. The default drain time is 20 minutes, which should be sufficient for each member to finish any in-process user requests. I don’t recommend a drain time of less than 10 minutes, as it won’t allow sufficient time for the Web server to finish existing requests and stop responding to users as gracefully as possible.
Component Load Balancing (CLB) is the second type of cluster that Application Center can create and manage. CLB is designed to create a scalable middle tier of servers that execute COM+ components on behalf of clients, which are usually your Web servers.
| For more information on CLB, see “Technology Capabilities,” p. 180 |
In an NLB cluster (which Application Center calls a General Web cluster), each cluster member communicates with the others, enabling the members to determine which server is the least busy and will handle the next incoming user request. CLB clusters, however, don’t include this information. Instead, each cluster client is responsible for maintaining a list of CLB cluster members, called the CLB routing list. Each client is also responsible for communicating with each CLB server to determine which one is the least busy. The routing list is maintained as part of a Web cluster’s properties, as shown in Figure 16.20.
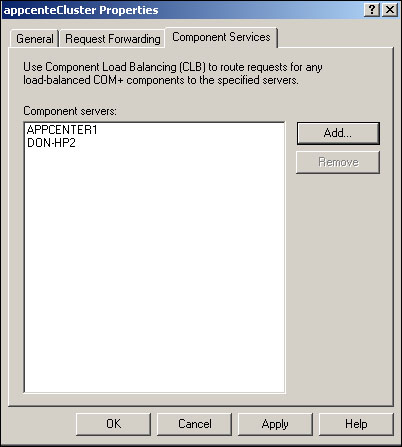
Application Center doesn’t perform any validation to ensure that the servers you enter are, in fact, Application Center CLB cluster members. Application Center simply verifies that it can connect to each server, and enables you to add it to the list.
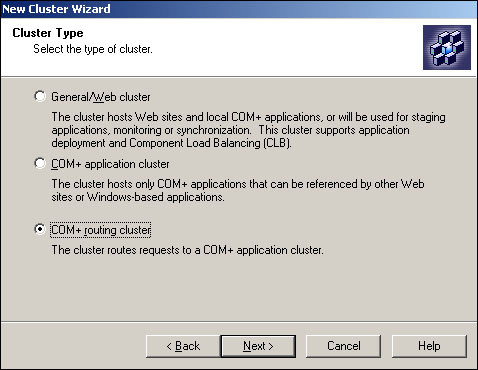
CLB clusters are created in much the same way as NLB clusters—right-click Application Center in the Application Center console and select Connect from the pop-up menu. Then, provide the name of the new cluster’s controller, and select the option to create a new cluster. As shown in Figure 16.21, you’ll select the COM+ cluster option instead of the General Web cluster option to begin creating a CLB cluster.

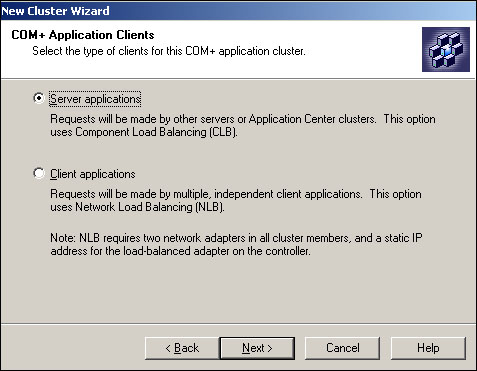
Application Center will then prompt you to select a load balancing option, as shown in Figure 16.22. Your choices are to use CLB or NLB. Generally, you’ll select CLB, which assumes that the new cluster will be accessed by other Application Center computers (most often Web clusters). However, you can create COM+ clusters that use NLB instead, making them accessible to non-Application Center computers. If you select NLB, then you’re really just creating a different type of Web cluster, as opposed to a true CLB cluster.
COM+ routing clusters use a combination of NLB and CLB. The cluster uses a virtual name and IP address, just like an NLB cluster, to accept client requests on load balanced network adapters. The cluster then uses CLB to forward COM+ requests from its back-end network adapters to a standard CLB cluster. The purpose of routing clusters is to provide better accessibility to CLB clusters for non-Application Center clients, and to enable a single Application Center Web cluster to access multiple CLB-based middle tiers.
| For a more detailed discussion of network designs that utilize routing clusters, see “Technology Capabilities,” p. 180 |
When you create a new cluster in Application Center, you have the option to create a COM+ routing cluster, as shown in Figure 16.23.
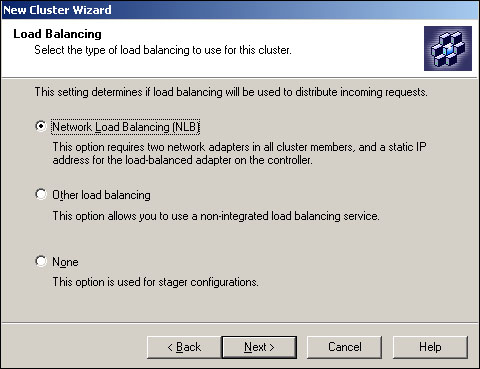
You’ll also need to select a front-end load balancing option, just as you would for a Web cluster. If the computer doesn’t have at least two network adapters installed, you won’t be able to select NLB, and will be required to use an external load balancing solution. Figure 16.24 shows the selection screen.
You’ll finish configuring the new cluster in much the same way as a Web cluster, including selecting the load balanced and back-end network adapters, and so forth. You’ll also need to configure the new cluster’s CLB routing list with the names of the CLB cluster members that the routing cluster will route requests to. Keep in mind that any COM+ components that will be routed must be locally installed on the routing cluster and configured for load balancing, which I’ll cover next.
The COM+ components used in a CLB cluster must be installed on both the CLB cluster members, where the components will physically execute, and on the CLB cluster’s clients. The clients must have the components so that they have the components’ registration information, which is configured when the component is installed. The clients must also specifically configure the components for load balancing, using the Windows Component Services console. As shown in Figure 16.25, each component that can be load balanced will include the appropriate checkbox on its Activation tab. You must select this checkbox on each CLB cluster client. Doing so ensures that, when the component is instantiated on the client, the COM+ request is intercepted and sent to a server on the CLB routing list instead of executing locally.

No special COM+ component configuration is required on the CLB cluster members.
Disaster recovery planning is an important part of any application, and Web applications managed with Application Center are no exception. In the next two sections, I’ll discuss the basic concepts behind disaster recovery in an Application Center environment, and then walk you through the main disaster recovery tasks that you’ll perform.
Application Center is used to build scale-out applications, where you grow the application by adding additional cluster members. This type of scaling contrasts with scale-up applications, where growth is enabled by buying bigger and more powerful server hardware, but not necessarily increasing the number of servers in use. The big disadvantage to scale-up applications is that all of your eggs are in one basket: the one server you’re using. Scale-out applications, on the other hand, have significantly lower risk because each server in the application is identical. In other words, if a Web cluster member fails, it’s no big deal. Sure, the other servers may have to work harder to take up the slack, but you won’t lose any data, because each cluster member is essentially an identical copy of the others. The only way you can really lose all of your application’s files is in a major disaster, such as a meteor strike on your data center that wipes out all of your cluster members at once.
The primary strategy in Application Center disaster recovery planning, then, is to back up the cluster controller. This ensures that the cluster configuration remains intact, and provides you with a copy of your application files, which you can store offsite. Actual disaster recovery operations, however, will almost never need to utilize that offsite backup. If the cluster controller fails, you have a couple easy-to-implement options:
Repair the controller and return it to service. Application Center clusters can work just fine without their controller, although you won’t be able to use cluster synchronization. You can still deploy new content to each cluster member individually, if necessary. If you do, make sure that same content makes it over to the repaired controller, or the controller will overwrite the new content when it synchronizes again.
Give up on the failed controller and move the controller role to another cluster member. You’ll lose any content that was synchronizing when the controller failed, but otherwise you’ll be able to use the cluster’s synchronization features again.
If a cluster member other than the controller fails, just fix it and re-add it to the cluster. Or, if it’s a really bad failure that you can’t repair, just replace it with a new server. In either case, Application Center will make sure the cluster members receive the correct content, although you’ll need to use deployments to set up new members with any COM+ components.
The core disaster recovery tasks for Application Center are easy: Use Windows Backup or your favorite backup software to regularly make a backup tape of the cluster controller. Be sure to capture the controller’s system state, which includes the system registry. I never bother backing up the other cluster members, since they’re essentially already backups of the controller itself.
If you need to forcibly transfer the cluster controller role to another server, log on to that server and use the AC CLUSTER /SETCONTROLLER /FORCE command. Doing so will make that server the cluster controller.
I’ve accumulated a few useful tips for administering Application Center that I think you’ll find helpful. These should help you save time and avoid problems with Application Center administration:
Rather than administering clusters remotely by installing the Application Center client tools on a workstation, I prefer to use Terminal Services’ Remote Administration mode to log on directly to my cluster controllers and manage them. I find this method of administration to be faster and more reliable.
Always set up monitors that include an email action, so that you can receive an email notification when a monitor goes into warning or critical status. I’ll often configure the monitors with the email address of a mobile phone or pager, so that I can receive critical notifications no matter where I am.
Make use of Application Center’s capability to aggregate performance and event information for an entire cluster. Create cluster-wide trends that show you when the cluster will become overwhelmed, and use those trends to expand the cluster before it actually reaches that point.
For each Web site, create an application that includes no COM+ components, and use that application for synchronization. Create additional applications that you can use to deploy COM+ components. Create a “master” application that includes everything, and use that application to deploy your Web site to new Application Center cluster members, or across clusters.
My cluster members are connected to a switch, but only one of them is receiving incoming Web traffic.
Let me briefly review how switches work, and why they can break NLB. Normally, a switch accepts incoming traffic and examines the MAC address that the traffic is destined to. The first time the switch sees a MAC address, it sends the traffic out to all of its ports. When a computer replies, the switch remembers the port that the reply came from. Future traffic to the same MAC address will only be sent to that port. The idea is to reduce traffic broadcasts by only sending the traffic to the switch port that contains the recipient.
NLB, however, uses a virtual MAC address to represent all of a cluster’s members. This means the switch’s normal behavior will send all incoming cluster traffic to a randomly selected cluster member. The easiest resolution for this is to connect all cluster members to one switch port, using a hub, or simply connect the members to a hub to begin with. Hubs aren’t as smart as switches, and send all incoming traffic to all hub ports without examining the MAC address. The other solution is to configure the switch ports containing cluster members to be promiscuous, which means all traffic received by the switch will be sent to all cluster members. How you configure your switch (or whether or not you even can configure it) depends on the model of switch you use; consult the switch’s documentation for more details.
Unfortunately, promiscuous operation places a lot of overhead on some less-expensive switches, because they simply aren’t designed to operate at peak efficiency in that mode. If you’re not using a high-quality switch (such as one from Cisco or Foundry), you might achieve better network throughput by simply using a hub.
I’ve tried to permanently remove a cluster member, but Application Center says it couldn’t remove the member’s settings.
This is a pretty common error when you’re removing a cluster member. Application Center is simply unable, for some reason, to remove all of the cluster’s settings from the member. If you plan to format the member and reinstall Windows, you can safely ignore the error messages, because formatting will definitely remove the settings!
On the other hand, if you’d like to make the member a spare Application Center server without reinstalling everything, you’ll need to clean up the prior cluster’s settings. Until you do, you won’t be able to successfully use Application Center on the server again. Fortunately, removing the settings is easy. Just open a command line window and run ac cluster /clean on the recently-removed member. AC is Application Center’s command-line administrative tool, and the /clean switch forcibly removes all cluster configuration information.
Caution
Don’t use the /clean switch until after you’ve tried to remove the member from the cluster using the Application Center console. /clean only removes the local cluster configuration information; it does not inform the cluster controller that the member is no longer in the cluster. If you clean a member without first removing it, you’ll create management and synchronization problems for the cluster controller, and those problems can be difficult to fix.
Application Center is a powerful tool for managing large Web sites, and it’s one of my favorite .NET Enterprise Servers because it works right out of the box. In this chapter, you learned about all of Application Center’s core administrative tasks, including cluster creation and management, client affinity configuration, application creation and maintenance, and disaster recovery tasks. With this information, you should be ready to start implementing Application Center in your own Web farms for easier and more efficient Web site management.