Exchange Server’s administrative model is split firmly between two locations: the Exchange System Manager console and the Active Directory Users and Computers console. This split administrative model reflects Exchange’s split architecture, with Exchange providing storage for user mailboxes and public folders, and Active Directory itself acting as Exchange’s directory service. In this chapter, I’ll cover the core administrative tasks associated with Exchange Server, from both the System Manager and Users and Computers viewpoint. I won’t focus on instant messaging or chat management, since both require relatively little administrative effort and are well-covered in the Exchange documentation.
Exchange administrators perform a variety of management tasks:
Configuring Exchange to support various messaging protocols.
Configuring storage groups and databases to store mailboxes and public folders.
Configuring mailboxes and user access to Exchange.
Maintaining Outlook Web Access (OWA), perhaps the most popular alternative means of accessing Exchange.
Monitoring Exchange for performance and health.
I’ll cover all of these tasks throughout this chapter.
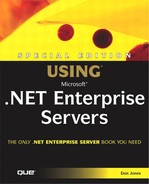
Exchange’s System Manager console, shown in Figure 20.1, provides a management interface for dealing directly with Exchange Server computers. System Manager enables you to configure databases and storage groups, Exchange protocol support, server monitoring, and so forth. Essentially, anything relating to an entire Exchange computer is handled from the System Manager console.
System Manager can be configured to manage all of your Exchange computers from a single window, making it a one-stop shop for Exchange management.
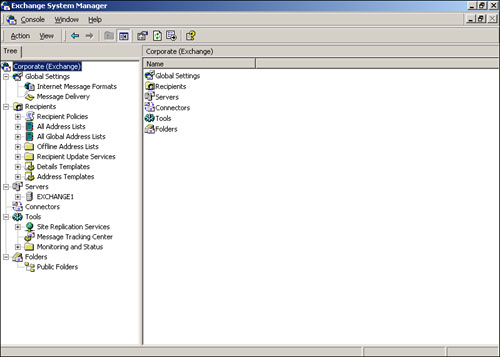
Windows 2000’s Active Directory Users and Computers console, shown in Figure 20.2, provides access to user management tasks. From an Exchange standpoint, this includes mailbox creation and management, since mailboxes are tied directly to Active Directory security principals.
Tip
I like to configure a custom MMC console that includes both the System Manager and Active Directory Users and Computers snap-ins. That way, I have a single window that allows me to manage both Exchange Server computers and Exchange users’ mailboxes.
Exchange actually extends the functionality of the Active Directory Users and Computers snap-in, providing additional configuration tabs for Active Directory objects (primarily users). You’ll need to install the Exchange Client Tools (which is an option within Exchange Setup) on any computer that you’ll use to manage mailboxes; the Client Tools extend the Active Directory Users and Computers console.
As an Exchange administrator, you’ll spend most of your time managing users’ mailboxes, which means you’ll be working primarily within the Active Directory Users and Computers console.
Note
Remember, you can’t use the default Active Directory Users and Computers console to manage mailboxes. You’ll need to use a version that’s been installed or modified by Exchange Setup’s installation of the Exchange Client Tools.
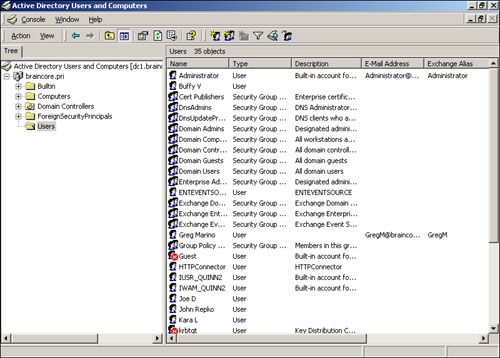
The first step in managing mailboxes is to actually create them. You can mailbox-enable different types of objects—primarily users—within Active Directory by right-clicking the object and selecting Exchange tasks from the pop-up menu. As shown in Figure 20.3, you have an initial selection of three tasks to choose from.
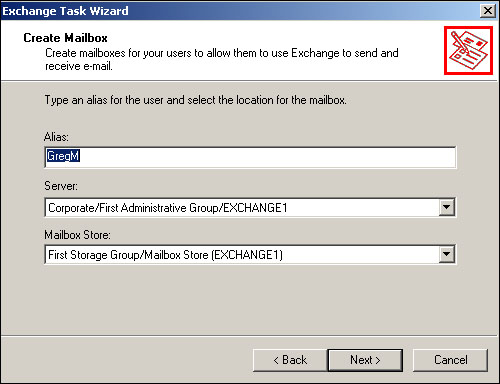
To create a mailbox for the user you’ve selected, just select the Create Mailbox task and click the Next button. As shown in Figure 20.4, you’ll need to establish an alias for the user, which becomes their shorthand email address.
Tip
Before you start creating mailboxes, establish a naming convention for aliases. Some companies use the first name and last initial, others use the first initial and last name, and others allow the users to select their own alias.
You’ll also select the Exchange Server computer which will act as the home server for the user. The home server is simply the one that contains the user’s mailbox. If you have multiple servers, you can spread your users across them to help balance the workload more evenly. Once you select a server, you’ll also select one of the mailbox stores on that server to become the physical repository for the user’s mailbox.
After you create a mailbox for a user, the tasks offered by the Exchange Task Wizard change, as shown in Figure 20.5. Since the user already has a mailbox, there’s no point in offering to mail-enable the user, so Exchange offers to move or delete the user’s mailbox.

Once a user has been mailbox-enabled, you can open the user’s properties—by double-clicking the user in Active Directory Users and Computers—to edit their mailbox’s properties. Figure 20.6 shows the E-mail Addresses tab, which allows you to configure email addresses for foreign mail systems and the default addresses for Exchange’s built-in SMTP and X.400 mail transports.
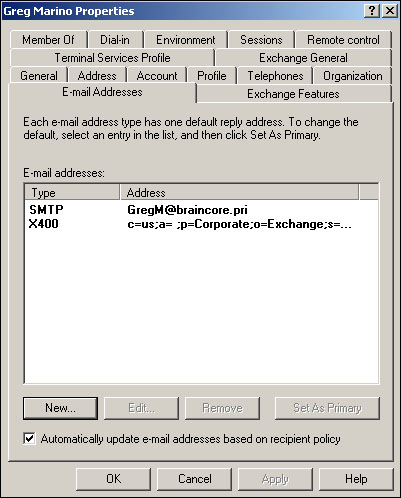
Exchange mailboxes always include an X400 email address, for backward-compatibility with older versions of Exchange, and an SMTP address, which is used natively by Exchange 2000 Server and higher. The SMTP address consists of the user’s alias, followed by the user’s email domain (you can change this default construction for SMTP addresses). If you’ve installed Microsoft connectors to other mail systems, like cc:Mail, Lotus Notes, or MS Mail, then Exchange will create email addresses for these systems, as well.
You can create additional addresses for your users, if desired. For example, suppose that a user named Nicole Valentine recently married and changed her name. For at least a short while, she’ll probably want email addresses that reflect both her maiden and married names. Exchange enables you to create additional mail addresses to handle this, and will deliver all email sent to either address to Nicole’s mailbox. You designate only one email address per system (SMTP, X400, and so forth) as the primary for that system. Primary addresses are displayed in boldface, and they are used as the return address when the user sends mail through that system. In Nicole’s case, her new married name would most likely be set as primary.
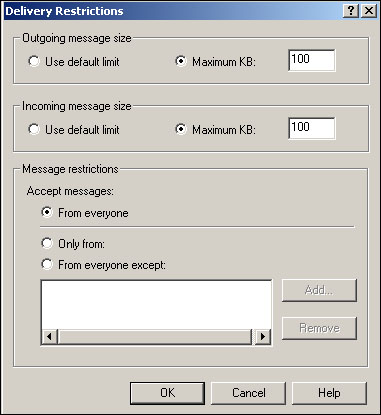
Figure 20.7 shows the Exchange General tab, opened to the Delivery Restrictions dialog box. This dialog allows you to specify the maximum incoming and outgoing message sizes for a user. By default, new mailboxes are configured to use the default message size limits, which you configure in System Manager.
Caution
Message size limits are in kilobytes, not megabytes. Figure 20.7 is limiting users to sending and receiving messages less than 100KB in size, which is quite small. Be sure you’re doing your math correctly when setting these values!
The Delivery Restrictions dialog box also allows you to determine who may send messages to the mailbox. By default, Exchange allows mailboxes to receive messages from anyone. You may want to restrict that for some internal users, to prevent outside users from abusing internal mailboxes. Or, you may use delivery restrictions to protect privileged users. For example, members of your company’s executive team might not be able to receive email from the rank and file members of the company, forcing everyone to “go through channels” instead of sending an email straight to the bigwigs.
Figure 20.8 shows the Delivery Options dialog box. This dialog enables you to give other users the permission to send mail on behalf of the selected mailbox user. For example, an executive’s assistant might have permission to send email on behalf of the executive. Mail sent “on behalf of” usually appears as if it came directly from the “on behalf of” mailbox (depending on the email client used to read the message), so this permission should only be given to trusted individuals.
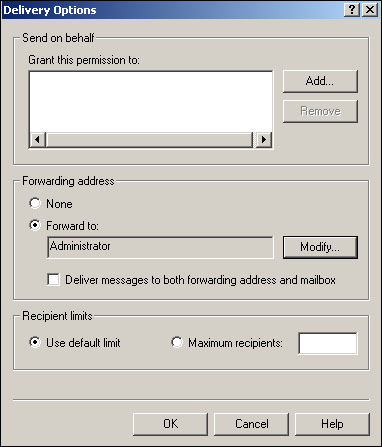
Delivery options can also include forwarding information. For example, when an employee leaves the company, you may configure Exchange to forward email to their boss instead of to the user’s old mailbox. Or, if an employee is going on vacation, you might configure Exchange to forward messages to an alternate mailbox in addition to the employee’s own mailbox, so that important messages can still be handled. Finally, delivery options can include a maximum number of recipients that the user can send outgoing messages to. Most often, this will be set to “Use default limit,” with the default limit set to be no limit at all, allowing users to send email to an unlimited number of recipients.
Additional Exchange configuration options are only available when Active Directory Users and Computers is configured for its advanced view. To enable this view mode, simply select Advanced from the View menu. When you open a user’s properties again, you’ll see an additional tab: Exchange Advanced, shown in Figure 20.9.
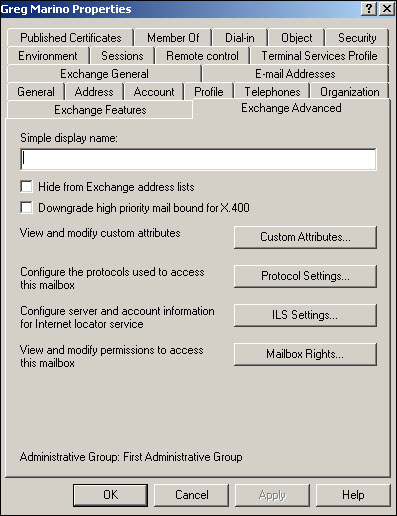
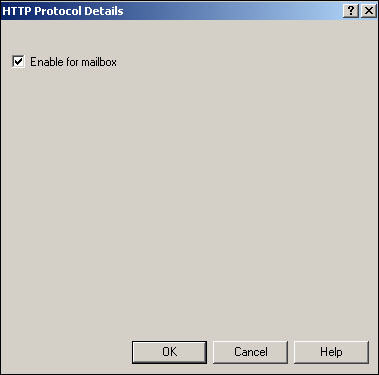
Advanced features enable you to hide the recipient from all address lists (useful for special internal-use mailboxes or mailboxes that you use to test Exchange). You can also force any messages sent to an X.400 mail system (such as older versions of Exchange) to lose their high-priority message flag, if the sender enabled one. Perhaps the most useful settings on this tab, however, are displayed when you click the Protocol Settings button. The Protocols dialog box enables you to determine which protocols the user can use with Exchange. As shown in Figure 20.10, enabling some protocols—such as HTTP—is simply a matter of checking a box.
Other protocols, such as IMAP4 and POP3, require a bit more configuration, as shown in Figure 20.11. For both IMAP4 and POP3, you can force the mailbox to use server-wide default configuration settings, or configure specific message encoding and character set settings.

Of course, by disabling any of these protocols, you’ll prevent the user from using that protocol to access their Exchange email. Note that you cannot disable RPC access, which is used by Mail Application Programming Interface (MAPI) clients such as Microsoft Outlook.
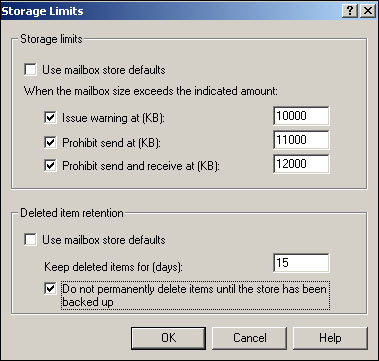
One last configuration option, back on the Exchange General tab, is Storage Limits. As shown in Figure 20.12, you can either allow each user’s mailbox to use the default mailbox store space limitations, or configure separate limitations for specific mailboxes. When you configure a storage limit, you actually configure up to three separate limits:
Issue warning causes Exchange to deliver a space limit warning email to the user when their mailbox occupies a specified amount of space in the server. If no other limit options are selected, nothing else will happen.
Prohibit send prevents the user from sending email when their mailbox reaches the designated size. Users can continue to receive email unless the third limit option is selected. Note that POP3 and IMAP4 clients ignore this setting and send email anyway, giving clever users a potential workaround.
Prohibit send and receive completely disables the user’s mailbox when it reaches the designated size.
There are some caveats you should be aware of regarding space limitations:
All email under the user’s profile—Inbox, Outbox, Sent Items, Deleted Items, and so forth—counts against their space limit.
Exchange uses compression and single-instance storage to reduce the size of the mailbox store. However, user’s space limits are debited with messages’ uncompressed sizes. For example, if you send a 10KB message to 10 users, the message will only exist once within the mailbox store and might only occupy 7KB when compressed. However, all 10 users will each be debited 10KB from their space limit.
The Storage Limits dialog box also enables you to override the mailbox store’s default deleted item retention policy. Deleted item retention maintains a copy of messages that have been deleted from users’ Deleted Items folder. This retention is intended to provide users with a “second chance” to recover items they didn’t mean to delete, without forcing the administrator to restore the user’s mailbox store (thus affecting all users within that store). You can specify a specific number of days to retain deleted items, and you can force Exchange to keep all deleted items regardless of age until the store has been backed up (which ensures that you can always restore the message from backup if necessary).
Caution
Items retained by Deleted Item Retention count against users’ mailbox storage limits, but users have no control over the retention of these items. Once users empty their Deleted Items folder, retention kicks in for the number of days you specify. Take this fact into account when you come up with your mailbox space limitations.
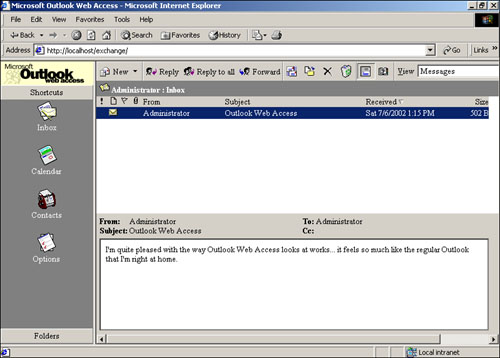
OWA is a Web-based interface that enables users to access their email, contacts, calendar, and other Exchange Server-based information from anywhere with a Web connection. OWA uses a lightweight client—namely, a Web browser—and requires very little bandwidth to provide a great email experience. OWA 2000 is a huge improvement over the previous version of OWA (included with Exchange 5.5), offering a user experience very similar in appearance and functionality to the full Outlook 2000 client. Figure 20.13 shows the main OWA window, which looks very similar to Outlook 2000. It even offers a preview pane, just like the full-fledged Outlook 2000 client.
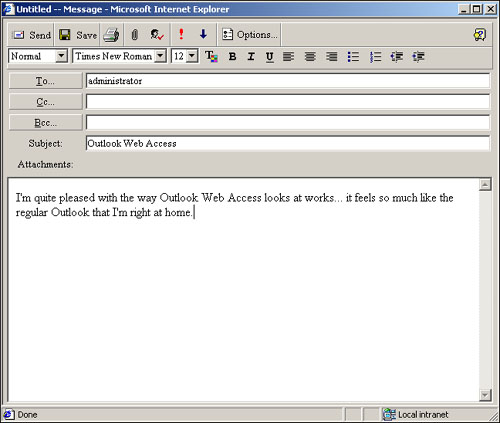
OWA’s Compose Message window also looks similar to Outlook 2000, as shown in Figure 20.14. Perhaps the most noticeable difference is the lack of an address book list like the one in Outlook 2000. Because OWA is designed to be a low-bandwidth Web application, it can’t download the entire Global Address List (GAL) for users to browse through. Instead, OWA offers an address book search function to help users locate specific recipients from the GAL.
Keep in mind that OWA can only be used to access mailboxes which have the HTTP protocol enabled. OWA can also be used to access public folders, if you’ve configured them, by directing a Web browser to the server’s Public virtual root (http://servername/public). By default, OWA installs to the Default Web Site on each Exchange Server computer, in a virtual folder named Exchange. Users can access the system through the URL http://servername/exchange, or jump right to their mailbox by using http://servername/exchange/alias.
Note
If you open Internet Services Manager, you’ll notice additional virtual roots created by Exchange. One is named exadmin. This virtual root is used by OWA, and is not a Web-based administrative interface for Exchange.
| Users having problems accessing OWA from outside your network? See “Can’t Access Outlook Web Access from the Internet,” in the “Troubleshooting” section at the end of this chapter. |
You’ll use the Exchange System Manager to manage the Exchange Server computers in your organization. I’ll cover a number of distinct management tasks, including virtual server management, storage management, and message tracking.
Caution
Just as Active Directory enables you to delegate administrative control over certain objects, such as organization units, Exchange can be configured with delegated administrative access. Unfortunately, delegating access requires you to use the Security tab for the objects in System Manager, and System Manager hides that tab by default. To enable the tab, you’ll need to modify the registry. See Microsoft Knowledge Base article Q259221 for instructions on performing this modification.
Exchange uses a virtual server to handle connections on each protocol it supports. You can manage most of these virtual servers within System Manager. Simply expand the desired server, open the Protocols container, and you’ll see folders for each supported protocol:
HTTP, IMAP4, NNTP, POP3, SMTP, and X.400. Open each folder to display the virtual servers configured for that protocol. To modify a virtual server’s configuration, right-click it and select Properties from the pop-up menu.
Note
The HTTP virtual server cannot be managed from within System Manager. Use the Internet Services Manager console to manage this virtual server. Exchange’s virtual directories can, however, be managed from within System Manager. In order to ensure Exchange’s proper operation, you should always use System Manager to manage these virtual directories.
Figure 20.15 shows the IMAP4 virtual server. As shown, you can configure the IP address the server listens to, limit the number of incoming connections, and specify that public folders be included when IMAP4 users request a list of folders to which they have access.

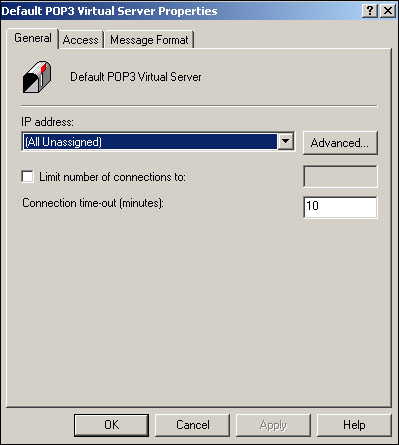
Figure 20.16 shows the configuration dialog box for a POP3 virtual server. As you can see, it doesn’t offer the IMAP4-specific options for fast message retrieval or folder list control. You can simply limit the number of incoming connections, select an IP address to listen to, and specify a POP3 connection time-out limit.
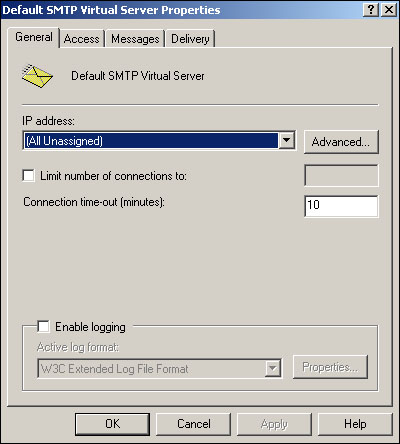
The SMTP virtual server offers the additional capability of enabling logging for SMTP connections. As shown in Figure 20.17, this virtual server type also includes a Delivery tab, which is used to configure delivery options for outgoing SMTP messages. The SMTP virtual server is Exchange’s primary means of sending and receiving messages, since SMTP is Exchange’s native messaging protocol.
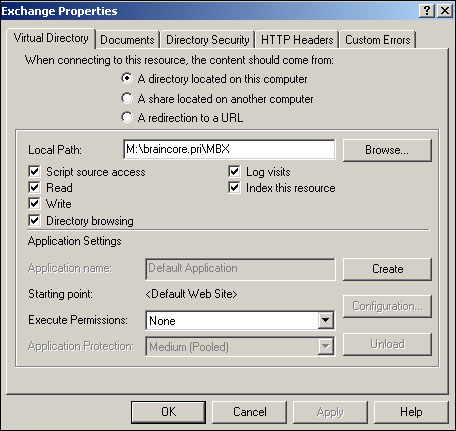
Finally, Figure 20.18 shows the configuration dialog box for the HTTP virtual server. As I mentioned already, you must configure this virtual server from the Internet Services Manager console, since the HTTP virtual server is actually implemented by IIS, not by Exchange. The configuration dialog shown is for the Exchange virtual directory, which is used to access OWA.
Keep in mind that you can deploy dedicated front-end Exchange Server computers to handle HTTP, IMAP4, and POP3 connections. On those servers, the virtual server configuration will be the primary task you need to worry about, since the front-end servers won’t actually store any mailbox information.
I usually start Exchange storage management with a look at my storage groups. Keep in mind that a storage group is a collection of Exchange databases that share a common transaction log. You can have multiple storage groups on a single computer, which spreads out the risk of a failure. Figure 20.19 shows the properties for a storage group, which you access by right-clicking the group in the System Manager and selecting Properties from the pop-up menu.

Storage groups contain stores, which can include mailbox stores and public folder stores. Stores are simply databases, which actually consist of multiple physical database files: an .edb file for primary storage and an .stm file for streaming media storage. You can access the properties of a store by right-clicking it in the System Manager and selecting Properties from the pop-up window. Figure 20.20 shows a mailbox store’s properties.
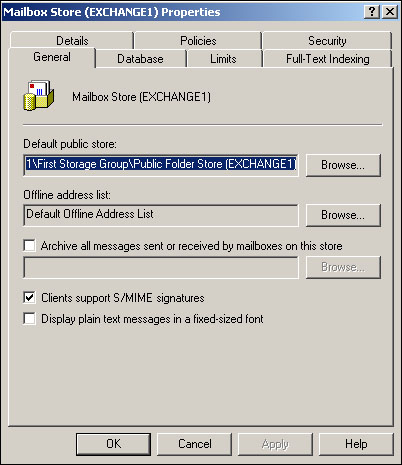
With this dialog box, you can
Move the store’s database files.
Associate the store with a public folder store.
Designate the offline address list that the store’s users will have access to.
Archive all of the store’s messages to a separate database.
Establish default policies for storage limits, security, and other configuration settings.
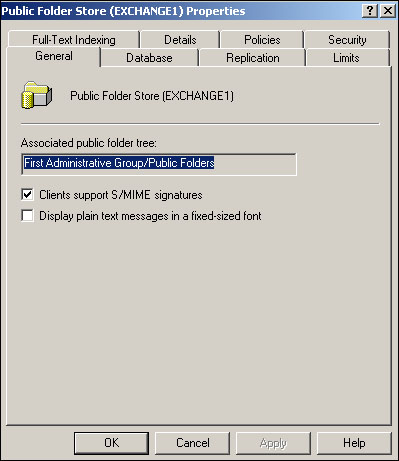
Figure 20.21 shows the properties dialog for a public folder store, which is similar to a mailbox store and offers many of the same configuration options.
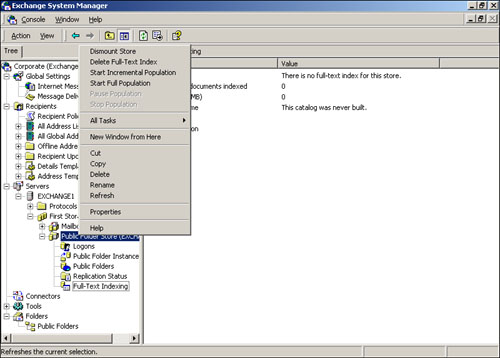
Maintaining stores isn’t difficult. A major benefit of Exchange 2000 Server is that stores can be individually stopped and started, limiting the impact of maintenance and disaster recovery operations. Figure 20.22 shows the pop-up menu that System Manager displays when you right-click a store; one of the options is to dismount the store, which takes the store offline so that you can restore it or perform other offline maintenance tasks.

Full-text indexing is another storage management task you’ll want to become familiar with. Full-text indexes enable users to quickly search the contents of a store and retrieve a list of search results to which they have access. Full-text indexes are most commonly used on public folders, but they can also be applied to mailbox stores. To create a full-text index on a store, simply right-click the store and select Create Full-Text Index from the pop-up menu. System Manager will ask you to designate a folder to contain the index, and will then create the new index. As shown in Figure 20.23, right-clicking the store now provides additional options to delete the index or start an incremental or full population of the index.
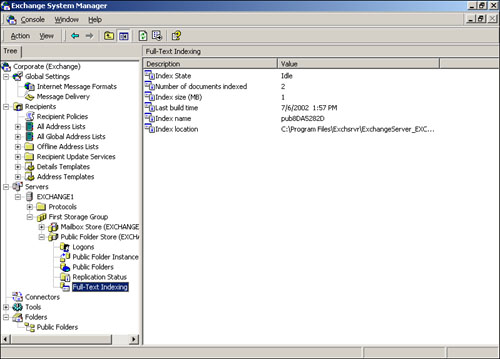
A full population empties the index and re-creates it from scratch. This is normally only necessary when you populate the index for the first time or if the index becomes corrupted. Once populated, incremental populations add new material to the index, bringing it up to date. Once you’ve populated an index, you can view its properties under the Full-Text Indexing item, which is located under the store itself in System Manager, as shown in Figure 20.24. Be sure to select the This index is currently available for searching by clients option, or users won’t be able to use the new index.
Message tracking is a useful troubleshooting tool, as it enables you to determine why messages aren’t being delivered, or are slow in being delivered, within your Exchange system. Message tracking consumes additional server overhead and must be explicitly enabled (and should only be used when needed for troubleshooting). To do so, open System Manager and right-click the server on which you want to enable messaging. Select Properties from the pop-up menu and, as shown in Figure 20.25, enable message tracking by selecting the checkbox.
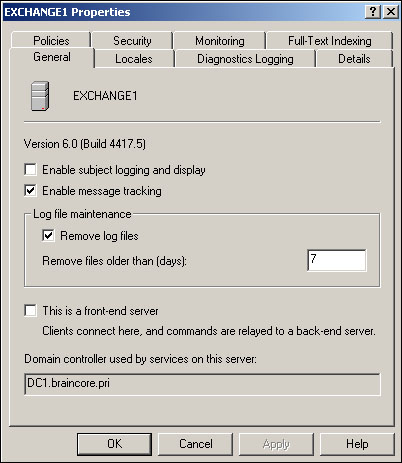
Note
This dialog box is also where you configure an Exchange Server Enterprise Edition computer to be a front-end protocol server, by selecting the appropriate checkbox.
To track a message, open System Manager. Under the Tools item, right-click the Message Tracking Center and select Track message from the pop-up menu. The Message Tracking Center dialog box displays, which is where you’ll type the search criteria for the message you’re trying to track. As shown in Figure 20.26, the Tracking Center displays search results in a message list. Note that message tracking only tracks messages that are sent while message tracking itself is enabled; you can’t track messages sent prior to enabling message tracking.

Once you’ve located the message that you’re trying to troubleshoot, select it and click the Message History button. As shown in Figure 20.27, the Tracking Center will display complete details for the message. In this example, the message was submitted from an Exchange user, placed in Exchange’s queue for delivery, categorized and delivered as a local message, and then placed within the appropriate location within the message store. The message’s complete ID is shown in the top part of the dialog box. The message ID can be useful if you’re working with more advanced tracking and troubleshooting utilities.
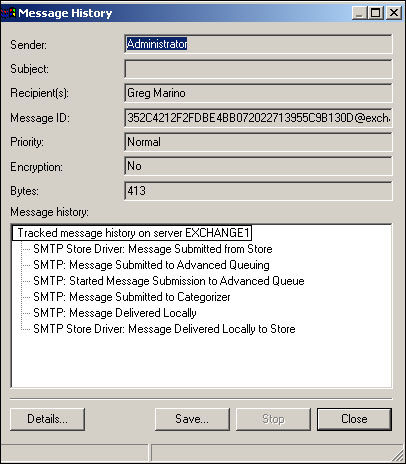
Message tracking can be a useful first step in troubleshooting message delivery problems, as it enables you to see exactly how Exchange handled the message and the results of each step in Exchange’s message processing cycle.
Exchange includes a rudimentary built-in server health monitoring system. To configure the system, right-click an Exchange Server computer in System Manager, select Properties from the pop-up menu, and click on the Monitoring tab. As shown in Figure 20.28, you can configure a monitor for each major server resource, such as member, processor (CPU) utilization, and so forth.

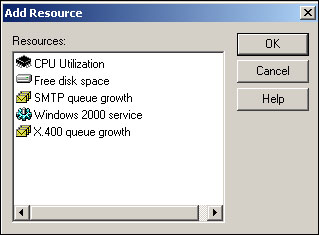
To add a new monitor, click the Add button. As shown in Figure 20.29, you’ll select the type of component you want to monitor from a list.
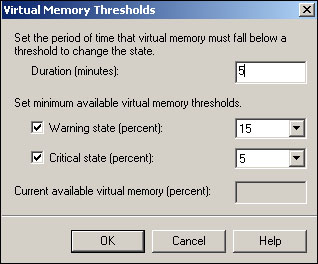
After adding the resource to the monitor list, you can double-click it to display its threshold configuration, shown in Figure 20.30. Most resources enable you to configure a threshold duration. The monitor will only consider a threshold to be passed if it remains passed for the duration you specify; this feature enables the monitor to ignore temporary spikes or other transient performance conditions. Once the monitor exceeds your specified warning or critical threshold, however, the monitor will generate a notification, which can be viewed in the System Manager under Tools, Monitoring and Status, Notifications.
Optimizing Exchange performance is primarily a matter of spreading the workload as widely as possible:
Use fast drive arrays in your Exchange computer. Whenever possible, configure databases and their log files on separate drives or arrays. Ideally, place databases on RAID 5 arrays consisting of as many physical drives as possible, and place log files on separate arrays, or mirrors (RAID 1 arrays).
Use multiple servers to spread your users’ workload. Identify the heaviest mail users and spread them evenly across multiple servers to distribute the worst of the messaging workload.
Use front-end servers to offload client connections. This technique utilizes Exchange’s full multi-tier architecture most effectively.
If you’ve set up front-end servers but they don’t appear to be utilized, see “Front-End Servers Aren’t Front-Ending,” in the “Troubleshooting” section at the end of this chapter. |
Another useful feature in Exchange is advanced diagnostic logging. Configured from the properties dialog box of each server, this feature (shown in Figure 20.31) enables you to specify the level of detail Exchange uses to log its operations. When you’re troubleshooting a problem, bumping the appropriate services and logging categories to Medium or Maximum logging can generate useful messages that help identify the source of the problem, or at least eliminate potential problem candidates.

Messages are logged to the Windows Application event log; you’ll want to make sure that log is sized to accommodate the messages generated by Exchange. When you’re done troubleshooting, be sure to reset the logging to None (or the appropriate level used within your organization) to reduce the server overhead associated with generating masses of logging messages.
Exchange is perhaps one of the most difficult .NET Enterprise Servers—with the possible exception of SharePoint Portal Server—to back up and restore. Exchange doesn’t include its own native backup/restore functionality; instead, it extends Windows Backup to include Exchange backup capabilities.
Caution
You must use a backup solution specifically designed for Exchange. You cannot simply make a file backup of the Exchange databases; such a backup is useless and cannot be used to restore Exchange.
Unfortunately, Windows Backup is about the least-robust solution you can get for managing disaster recovery on a complex product like Exchange Server. You’ll need to acquire an Exchange-compatible backup solution from a third-party software vendor like Veritas or Computer Associates. Most high-end disaster recovery packages have optional add-ins which enable them to handle Exchange backup and restore operations.
Active Directory is also a key in Exchange’s operations, and must be tolerant of failures. Generally, having multiple Active Directory domain controllers will ensure that a server failure doesn’t significantly impact Exchange, but you should also make regular backups of the entire Active Directory database. Again, third-party solutions provide the best features and functionality for this task.
I’ve worked with various versions of Exchange for several years, and I’ve found that the following tips can make administration easier:
Establish reasonable defaults for mailbox space limitations, messages sizes, and so forth. Your default values should apply to the largest percentage of your users. Then, you can establish per-mailbox values for the exceptions. Keep in mind that some values, such as mailbox store limits, are configured on a per-store basis, so you can distribute your users across message stores according to their storage limit needs, and rely on default values as much as possible.
Before you start mail-enabling or mailbox-enabling Active Directory objects, use System Manager to establish your default user details and email addresses, using the Details Templates and Address Templates items under the Recipients container, and the Recipient Policies. Doing so will enable Exchange to create useful defaults for these values and save you time.
Obtain a reliable third-party disaster recovery solution. Windows’s built-in backup doesn’t provide enough functionality for properly managing disaster recovery in an Exchange environment.
I’ve configured Exchange front-end servers for my Outlook clients, but the front-end servers aren’t doing anything. The clients are connecting directly to the back-end servers. What’s wrong?
Actually, nothing’s wrong. Exchange’s front-end architecture only applies to Exchange’s Internet protocols: POP3, IMAP4, HTTP, and so forth. RPC clients such as Outlook must connect directly to the server containing the user’s mailbox. In fact, if your entire environment consists of nothing but RPC clients such as Outlook, then there’s no point whatsoever in configuring front-end servers.
Our users are unable to connect to our Outlook Web Access server from the Internet, although it works fine internally.
OWA uses TCP port 80 by default, and it’s likely that your Internet firewall isn’t configured to allow port 80 traffic through to your OWA server. Ideally, your firewall should be configured to perform reverse publishing, where the firewall acts as a Web server and proxies requests to OWA; this configuration provides much better protection against attackers for your OWA server. Internet Security and Acceleration (ISA) Server is capable of reverse publishing. You can make OWA even more secure by configuring IIS to only accept SSL connections, configuring the server with an encryption certificate, and instructing your users to access OWA by using the https:// URL prefix instead of http://.
| For more details on ISA’s capabilities, see “Technology Capabilities,” p. 324 |
Exchange Server is easily the most popular of the .NET Enterprise Servers, as its prior versions have been the most popular of Microsoft’s old BackOffice line. The newest version of Exchange provides a whole new management paradigm, with server management occurring in one console and user and mailbox management occurring in Active Directory Users and Computers. In many ways, this split administrative model is easier to administer, and is certainly easier to delegate control across your enterprise, if desired.