Managing Content Management Server (CMS) is relatively straightforward. In fact, most of CMS’s actual management is up-front site setup work and periodic maintenance. CMS is designed so that the majority of its day-to-day maintenance will be handled by content owners, such as department managers or Web authors within your organization. Your task will simply be to make sure CMS is set up to support the site that they will create and manage.
Managing CMS requires you to create and manage the folder structure for your site, create and manage related channels, and assign users to rights groups, giving them permissions within the folders and channels. Depending on your environment, you may also need to deploy the Site Stager or Content Connector tools.
Note
I won’t cover the Site Stager or Content Connector tools in this chapter; refer to the CMS documentation for details on these add-ins.
| For more information on channels, folders, rights groups, and other CMS concepts, see “Technology Capabilities,” p. 260 |
Management does not include the actual creation of Web content. Most likely that will be handled within your organization by dedicated Web authors, or by other non-administrative personnel. I will introduce you to the Web authoring interface, since you may be responsible for helping Web authors learn to use it.
The CMS Site Builder, shown in Figure 19.1, is the tool you’ll use to create folders and channels, manage rights groups, and so forth. Site Builder uses a simple graphical user interface, similar in many ways to Outlook. Just click a category—channels, folders, and so forth—on the left-hand icon bar to manage the objects in that category.
Note
The Site Builder is the only major .NET Enterprise Servers administrative tool that isn’t implemented in the Microsoft Management Console (MMC). Expect future versions of CMS to use an MMC snap-in rather than a standalone application.
Only site administrators have a use for Site Builder; Web authors have their own user interface. Administrators can also use the Server Configuration Application (SCA), which I’ll cover later in this chapter, to manage server settings and configuration parameters.
The Web Author, shown in Figure 19.2, is a Web-based user interface that content authors can use to modify and create content for your site. Authors create new pages by starting with standardized templates, which help provide a consistent look and feel across your site. Special content authors referred to as template designers create and manage these templates. Authors can use graphics and other media from your site’s resource library, enabling designated resource managers to determine the types of content that will be approved for use in your site.

Note
Although the current version of CMS has its own internal authoring tools, I would expect some future version to use Microsoft FrontPage instead. Remember that CMS wasn’t initially developed by Microsoft; future versions will likely integrate more fully with the rest of Microsoft’s products.
Administrators can access the Web author interface through Site Builder; Web authors can access the interface directly on any CMS computer that has authoring enabled.
While Site Builder is used to manage the structure and security of your site, the SCA is used to modify the site’s overall configuration. The SCA is an HTML application, which means it’s basically a little Web site that looks and behaves as a 32-bit Windows application. The SCA has five categories: General Configuration, Cache, Web Servers, Security, and Domains. The SCA’s General Configuration window is shown in Figure 19.3.

In this window, you can determine the URL format used within the site, set the site’s maintenance parameters, and map channel names to host header names. This mapping capability can be useful in especially large sites. Host headers are an IIS feature that enables a single Web server to host multiple Web sites on a single IP address. IIS examines the host header sent by clients, which includes the URL the client is attempting to access. IIS can then direct the client to the correct virtual Web server (or Web site). CMS’s mapping capability allows channels to become individual virtual Web servers, rather than subsections of a single Web site. This might be useful if your company has multiple subdivisions: You can create a separate Web site and URL for each subdivision, while maintaining them internally as channels to support a unified publishing process.
The URL format—hierarchical or not—plays an important role in how users access your site. Suppose a user attempts to browse to a posting named Events, located within a channel named News, which is a child of a channel named CompanyInformation. The resulting URL would be something like http://www.company.com/CompanyInformation/News/Events.htm. That’s a hierarchical URL, because the URL itself reflects the hierarchy of your site. In a multilingual site, CMS will attempt to create URLs using the localized names of your channels. In some languages, this may require the use of non-ASCII characters, which mean the URL might not work correctly. If you’re building a multilingual site that uses non-ASCII characters, disable hierarchical URLs. CMS will use a flat URL namespace and eliminate any potential problems.
Figure 19.4 shows the SCA’s cache configuration window. In this window, you can configure your site’s cache folder and determine the size of the cache. The cache size can be configured on a server-wide basis (referred to as the global configuration), or on a per-server basis (the local override value). The cache enables CMS to temporarily store dynamically produced Web pages so that it doesn’t have to dynamically produce them for each and every user. The cache—which should be at least 100MB in size—therefore helps improve CMS’s performance and enables it to support more users. Global configuration items are stored in the SQL Server database for the site, where they are accessible to all site servers; local configuration items are stored locally on each server.

Tip
Ideally, locate each server’s cache on a hard disk that’s separate from the disks used to store content. This configuration will improve throughput to the cache, thereby improving overall server performance.
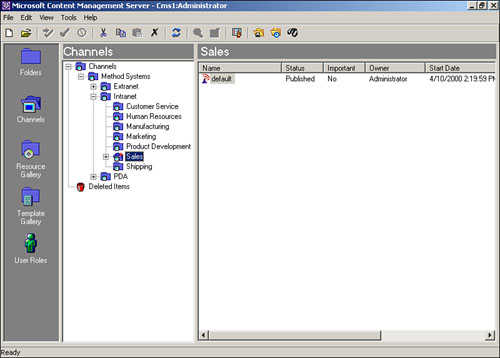
Figure 19.5 shows the SCA’s Web Server configuration window. In this window, you can determine which IIS virtual Web servers, or Web sites, will be used by CMS, and which will have authoring enabled. As shown, only the Default Web Site is managed by CMS, and it has authoring enabled. The other Web sites on the server are not used by CMS.
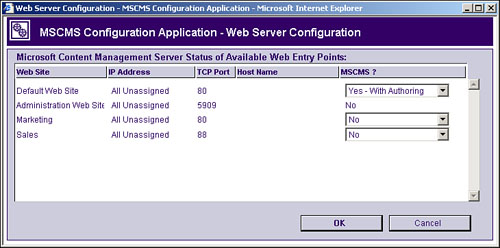
Figure 19.6 shows the SCA Access window, which is used to configure the domains that CMS imports user accounts from. CMS rights groups can only contain users from these domains, so make sure you specify all of the domains that contain users who will be Web authors, moderators, or editors within your site. As shown in this example, you can also include local user accounts on the CMS server by including the server name as a domain.
SCA’s last configuration window, Security, is shown in Figure 19.7. In this window, you can configure the user account and password used by CMS’s service, determine whether guests are permitted to access the site (and determine which user account will be used to represent guests), and configure the Web browser cookie settings for your users.
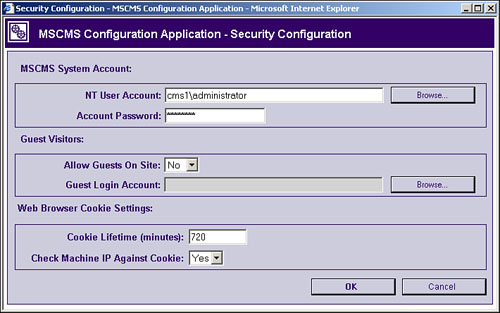
If you’re using CMS to host your sites on the Internet, you’ll need to enable guest access in order for public users to access your site. You’ll simply choose a Guest login account, and assign that account as a subscriber to the appropriate rights groups within your site. All unauthenticated users will be mapped to the Guest login account and receive the access granted through their rights groups.
You’ll normally only launch the SCA to initially configure a new server; once configured, you probably won’t need to change the server’s configuration very often. Running the SCA should be one of the first things you do when you install CMS. In fact, CMS Setup will offer to launch the SCA for you when Setup completes, reminding you to configure your new server.
Note
Each new CMS server must be individually configured. However, you’ll notice that there’s no place to designate which CMS computers are a part of a site. When you install CMS, you point it to a SQL Server database. Every CMS computer using the same database belongs to the same site. There’s no centralized “cluster configuration” like you have with Application Center.
With the SCA out of the way and your servers properly configured, you can begin creating your site’s overall structure.
Note
CMS includes sample data, which is a separate installation item. If you’d like to work with CMS for a while before creating your site, install the sample data. That will give you actual Web pages and a folder/channel structure to work with.
There are five tasks that need to be completed before Web authors can begin creating pages:
Of these tasks, the first three are handled by an administrator. I like to start by creating the folder and channel structure within Site Builder. Generally, the two structures will be similar. Remember that folders are used to organize authoring, while channels are used to organize actual Web site navigation. Keeping the two hierarchies the same simplifies CMS management and Web content creation and publishing.
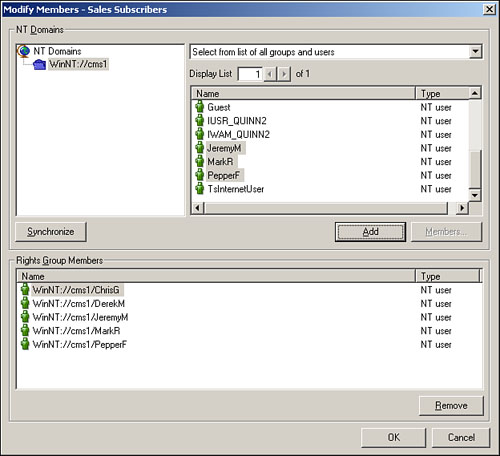
Once your folders and channels are created, start creating rights groups. As shown in Figure 19.8, you can select users from any domain that CMS is importing them from, and add them to the rights group. You can click the Synchronize button to force CMS to import any new user accounts from the domain; this import process normally occurs automatically about every 10–15 minutes.
Caution
Avoid using domain user groups that contain other user groups. CMS doesn’t do well with nested user groups and you can run into access problems if you use them.
Figure 19.9 shows how you can assign the rights group to particular channels. In this example, the channels with a checkmark are accessible by the rights groups, while channels with an “X” are not.

Caution
Subscribers must have a complete chain of access throughout the hierarchy. In other words, they will only be able to access lower-down items if they also have access to those items’ parents in the hierarchy.
Once you’ve set up your rights groups, you can assign them to folders. When you create a rights group, you designate it as an author, editor, or moderator; as shown in Figure 19.10, you can select the appropriate rights groups to assign to each folder in your site.
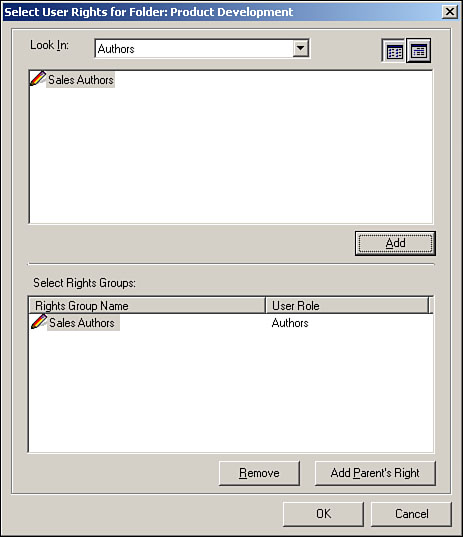
In this example, I’ve assigned the Sales Authors rights group as an author of the Product Development folder. Your organization might use a single group of authors for all folders; if so, the rights group might simply be named “Authors,” and you would assign the group as an author to all of the folders in your site.
Note
Rights groups provide a sort of abstraction between your domain users and CMS itself. I would expect future versions of CMS to enable you to assign users and domain user groups directly to channels and folders, without using the middleman rights groups.
While you’re working with your folder properties, you can select the channel that each folder will publish to. Figure 19.11 shows the selection dialog. You’ll make CMS management easier if every folder has a corresponding channel to which it publishes content.

Once your folders are configured, you can configure the properties for the corresponding channels. Figure 19.12 shows a channel’s configuration dialog box with the Publishing tab selected. This tab enables you to hide the channel, set the channel’s lifetime (which determines when the channel is available to subscribers), and set the channel’s template and cover page.

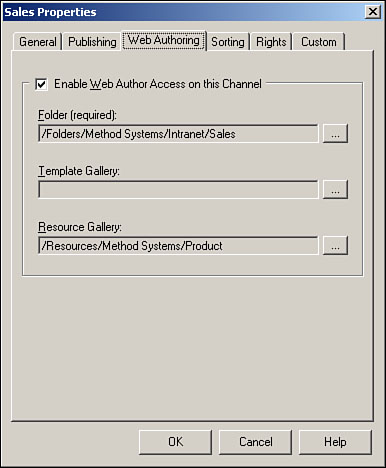
Figure 19.13 shows the channel’s Web Authoring configuration, which enables you to decide whether or not authors can post content to the channel. If they can, then you’ll need to specify the channel’s corresponding folder, template gallery, and resource gallery.
Caution
The user interface will allow you to have multiple channels sharing a folder, but it’s a bad idea; you’ll have a harder time managing permissions and publishing schedules and your site’s navigation will be more difficult to work with.
The Sorting tab, shown in Figure 19.14, enables you to determine the precedence of postings within the channel. For more information on this feature and its impact on your site, consult the CMS documentation. In general you shouldn’t have to modify this configuration.

Finally, as shown in Figure 19.15, you’ll configure the channel’s rights. Clicking the Modify button displays a window similar to that shown in Figure 19.10, while the main Rights tab shows a summary of the rights groups assigned to the channel.

When you’re dealing with rights groups, channels, and folders, keep the following tips in mind:
A folder without an editor rights group will automatically publish everything created by authors.
A channel without moderators will automatically approve all author- or editor-created postings.
A channel without subscribers is inaccessible to Web site users.
Channels and folders can contain multiple rights groups for a single role. For example, the Sales folder might contain the Sales Authors rights group, as well as the company-wide Authors rights group. Members of both groups would have authoring access to the folder.
The same user can belong to multiple rights groups, and will receive all the privileges of all of the rights groups he or she belongs to. For example, if Cathy is a member of an Authors and Moderators rights group, she will be able to author content, create postings, and approve those postings by herself.
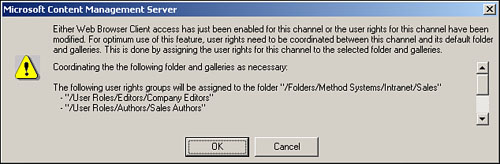
CMS likes folders and their corresponding channels to have identical rights configurations. If they don’t, CMS will display an error message, as shown in Figure 19.16, offering to synchronize the rights between the channel and folder.
| If your channels are automatically posting and publishing pages, and you can’t figure out why, see “Documents Are Automatically Publishing,” in the “Troubleshooting” section at the end of this chapter. |
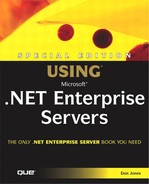
Once all of your channels, folders, and other objects are in place, your authors, editors, and moderators can go to work. Editors and moderators will need to use Site Builder (or Web Author) to approve content for publishing and posting; as shown in Figure 19.17, Site Builder displays changed content by placing a “Yes” in the Is Replacement column of the folder. You can right-click any content item to approve it, or you can revert to the previous version of the content.

CMS optimization basically comes from scalability, or in other words, adding more CMS computers to your Web site. A single SQL Server computer can be expected to support four or five CMS computers, and a single CMS computer, properly configured, can be expected to support about 65 page views per second.
| For details on CMS’s capacities, see “Integrating Content Management Server into Your Design,” p. 273 |
Other than adding more CMS computers, your only real optimization option is to fine-tune CMS’s cache settings, which were shown in Figure 19.4. The cache enables CMS to serve a greater quantity of pre-generated dynamic pages, which can be served much more quickly—thousands of pages per second—than pages that CMS must generate on the fly.
Of course, optimizing SQL Server to provide CMS with the fastest possible database access can help your site support more users, too.
| For tips on optimizing SQL Server, see “Optimizing SQL Server Performance,” p. 625 |
Since everything of value in CMS is stored in SQL Server, disaster recovery for a CMS-based Web site is primarily a matter of SQL Server disaster recovery. You’ll also need to make sure that your domain is well-protected against failure, since CMS relies on the domain to authenticate users.
| For more information on SQL Server disaster recovery, see “Disaster Recovery Operations,” p. 628 |
To keep CMS from occupying more administrative time than necessary, follow these basic tips for making CMS more efficient:
Create parallel channel and folder hierarchies. Each folder should post to a single, identically named channel.
Don’t name any folders or channels “NR.” That’s a reserved name used by CMS.
Import users directly from your domain. While CMS enables you to import groups, it really just imports the group’s members, so changes to the group in the domain won’t necessarily be reflected within CMS automatically.
Think about setting up a separate rights group at least for every top-level channel and folder in your site. While the same users may belong to those groups today, as your site grows you may want to split the responsibility across different users. Creating multiple site groups in the beginning will make the split easier when the time comes.
Only configure authoring on one server in your CMS site. That’ll allow the others to focus on serving pages to subscribers and guests. If the authoring server fails, you can always use the SCA on another server to enable authoring on it.
Use the start and expiry dates of your channels. For example, suppose that you have an existing Web site, but that your company is preparing to launch an entirely new one. You can create both sets of channels on CMS at the same time. Set the old channels to expire on the cutover day, and set the new channels to begin. CMS will automatically flip your site around as the channels start and expire, and then you can delete the old channels from the server.
If you want to assign subscriber rights to individuals outside your company—such as in an extranet situation—create a separate domain for the external users, and let CMS import the user accounts from that domain.
I have authors and editors assigned to my folders and channels, but whenever an author creates a posting for a document, the document is automatically approved.
When authors create new content, the content isn’t published until an editor approves it. Of course, you set your folders to automatically approve documents for publication, but if you’ve already assigned editors then the documents probably aren’t being published without approval.
Once an editor approves a document, the document is officially published. However, subscribers can’t view the document until a channel moderator approves the posting. Remember, each folder is associated with a channel. Both authors and editors can create postings from documents. If either an editor or author creates a posting from a document, and the channel the posting goes to doesn’t have a moderator, then CMS will automatically approve the posting and make the published document available to subscribers.
The solution is to ensure that each channel has a moderator rights group assigned. That way there will be users who can approve the postings, so that CMS won’t need to automatically approve them.
CMS administration is primarily up-front, involving site creation, access control, and so forth. Day-to-day operations will mostly be handled by designated authors, editors, and moderators. You will need to optimize both CMS and SQL Server to keep your site running at peak efficiency. CMS’s dependence on SQL Server is so total, in fact, that CMS doesn’t really have any disaster recovery concerns of its own. Simply protecting SQL Server (and the domain that CMS belongs to) is sufficient to ensure the safety of your site’s content.