Commerce Server management can be broken into two distinct categories, which I’ll call site management and business management. Business management encompasses the tasks that a business professional might perform: maintaining a product catalog, managing discounts and ad campaigns, and so forth. Site management includes the tasks that a technical professional performs: data source configuration, Web server maintenance, and so forth. Although these two task categories seem completely separate, they’re closely related. Business professionals can’t work unless a technical professional has configured the site properly, and the business professionals’ configuration tasks change the way the site is used—thus requiring the technical professional to configure the site appropriately. In this chapter, I’ll cover both types of tasks. Administrators often tell me that they don’t care what their business professionals are doing, so long as they’re able to work; I find that effective administration of Commerce Server, however, requires a firm understanding of what those business professionals are actually doing.
Typical tasks for a business professional include maintaining products and product catalogs, managing customer orders and profiles, performing analyses of site data, and so forth. Technical professionals usually focus on higher-end site configuration, including database resources, Web server configuration, and so on. Technical professionals are also responsible for background tasks such as disaster recovery operations, performance optimization, and so forth (which I’ll also cover in this chapter).
While business professionals only need to understand how to complete their tasks within Commerce Server’s Business Desk interface, technical professionals working on Commerce Server need to have a wider range of knowledge and experience. Managing Commerce Server also means managing IIS and SQL Server, understanding how to manage Active Directory (if your Commerce Server site is Active Directory-integrated), and working with Windows’s performance and event tools.
| For details on managing SQL Server, see “Management Overview,” p. 604 |
The Commerce Server Manager is a Microsoft Management Console (MMC) snap-in, as shown in Figure 18.1. Figure 18.1 actually shows the default Commerce Server Manager console, which is installed by Commerce Server Setup. This console not only includes the Commerce Server Manager snap-in, but also a number of other snap-ins that you’ll use to manage Commerce Server:
The Windows Event Viewer, which enables you to view error messages and other events from applications and the operating system.
Internet Information Services, which enables you to manage IIS Web sites.
Microsoft SQL Servers, which provides access to SQL Server configuration settings.
Active Directory Users & Computers, which enables you to manage security accounts in Active Directory.
Performance Logs and Alerts, which exposes Windows’s performance monitoring tools.
Analysis Servers, which enables you to work with SQL Server Analysis Services.
System Monitor, which is the main performance-monitoring snap-in included with the operating system.

These additional snap-ins pretty much make the default Commerce Server Manager console a one-stop shop for Commerce Server management. The trick with the console, though, is that it’s not fully configured out of the gates. By default, the Commerce Server Manager snap-in connects to the local computer; if you want to manage a different Commerce Server computer, you’ll need to manually connect to it by right-clicking the snap-in and selecting Connect from the pop-up menu. The other snap-ins don’t always connect to anything by default. With the SQL Server snap-in in particular, you’ll need to right-click the snap-in name, select New SQL Server Registration from the pop-up menu, and connect to the SQL Server computers that support your Web site.
Note
The Commerce Server Manager console is one of the best examples of effectively using the MMC that I’ve seen. Rather than simply including the Commerce Server Manager snap-in, the console brings together all of the snap-ins you need to manage Commerce Server in a single location, which is really the whole point of the MMC.
There’s one snap-in that may be missing from the Commerce Server Manager console: Application Center. If you’re using Application Center to manage your Web servers, I recommend creating a new MMC console from scratch, and including Application Center’s snap-in along with Commerce Server, SQL Server, IIS, and so forth.
Figure 18.2 shows the Commerce Server Business Desk, an HTML Application (HTA) used by business professionals to manage a Commerce Server site. As you can see, the left side of the Business Desk provides a menu of modules that you can select from. Each module—Analysis, Campaigns, Catalogs, Orders, Profiles, and Security—provides management capabilities for a specific area of Commerce Server.

Although the Business Desk executes within Internet Explorer (which is a prerequisite for running the application), it doesn’t look or behave like a typical Web page. That’s because HTAs override certain IE security features, enabling IE to look and behave more like a traditional Windows application.
Note
When you install the Business Desk, you may, depending on your computer’s configuration, have to accept a security warning regarding HTAs. The warning is designed to prevent malicious HTAs from installing themselves on your computer without your knowledge.
The Business Desk uses a standard visual style for its administration pages. As shown in Figure 18.3, these pages usually include a toolbar across the top of the window, which contains action buttons. The main portion of the window consists of one or more expandable sections. By clicking on the right-pointing arrow icons, you can expand and collapse these sections. Within each section, you’ll find one or more input fields Required fields—those which you must complete in order to save information—are indicated by a red diamond icon. Some fields may include the ability to store values in multiple languages; these are indicated by a small globe icon.

You will need to install the Business Desk before you can use it. Commerce Server sites all, by default, include an installer. Generally, the installer is configured in the Business Desk Web site. For example, if you unpacked a Commerce Server site on a server named ServerA, and named the site MyStore, Commerce Server will create the Business Desk Web site at http://servera/mystorebizdesk. Visiting that URL with Internet Explorer will enable you to install the Business Desk for the site.
| If you’re having problems installing the Business Desk, see “Business Desk Won’t Install” in the “Troubleshooting” section at the end of this chapter. |
Business management consists of all the tasks necessary to run a business from a non-technical point of view. These tasks include managing your site’s product catalog, advertising campaigns, customer orders, business analytics system, and profiles.
Product and catalog management is probably one of the most complex tasks in Commerce Server, mainly because Commerce Server’s product catalog system is so flexible. I like to start by creating by catalog’s category definitions. Generally, you’ll only use a single category definition: department. All of your products will be organized into departments (such as Books, Clothes, and so forth), and you’ll tier your categories to create sub-departments and sub-sub-departments, as necessary.
Note
You don’t have to start with category definitions. But you do have to start someplace, and I find that getting my definitions in order first provides a more efficient workflow.
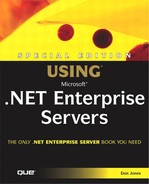
Figure 18.4 shows Commerce Server’s list of category definitions, with a Department category already defined.

Category definitions include all of the properties associated with the category, such as a title, and perhaps an image that relates to the category. As shown in Figure 18.5, you can edit category definitions to include additional properties. For example, in Figure 18.5 I’ve added units of measure to the category, because I plan to organize my products by unit of measure.
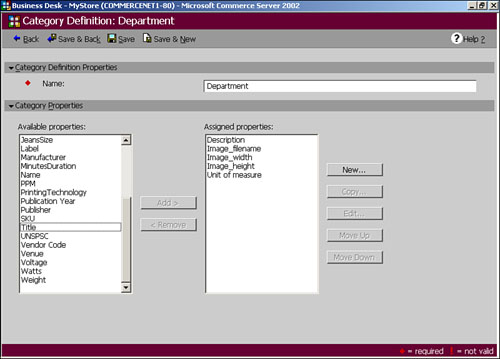
With your category definitions out of the way, you might create a new catalog. Start by creating a new base catalog, which contains actual products. Figure 18.6 shows how to create a new catalog. As you can see, catalogs don’t have a lot of their own properties. One of their important properties is their starting and ending date, which determines when the catalog becomes valid and when it stops being valid. These properties can help you manage sale catalogs and other short-term catalogs more effectively.
If you have a number of catalogs in the system, you can use the Business Desk’s Find feature (located in the toolbar) to filter the catalog list. For example, in Figure 18.7, I’ve configured Business Desk to only display catalogs with the word “summer” in their name.

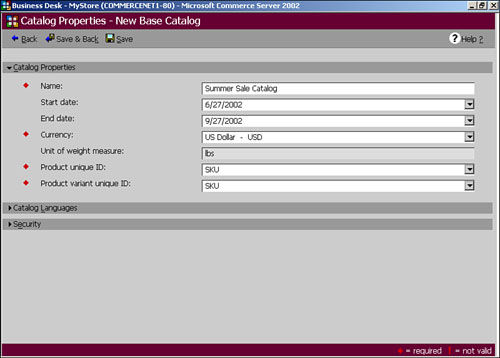
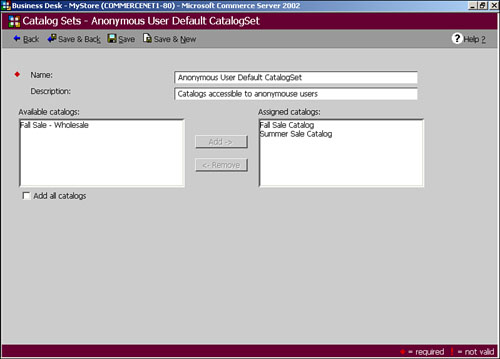
With the necessary catalogs in the system, you’ll need to create catalog sets. These are simply groups of catalogs that you use to control catalog access. As shown in Figure 18.8, Commerce Server starts with a catalog set for anonymous users and one for registered users. You can create your own catalog sets as necessary. For example, you might create a catalog set for wholesale customers, one for retail customers, and another for special business partners. When users log on to your site, they’ll have access to the catalogs in their set. Users who don’t log on will have access to the catalogs in the anonymous set.
When you edit a catalog set, as shown in Figure 18.9, you can either include all catalogs in the set by checking the appropriate checkbox, or decide which catalogs the set will include.
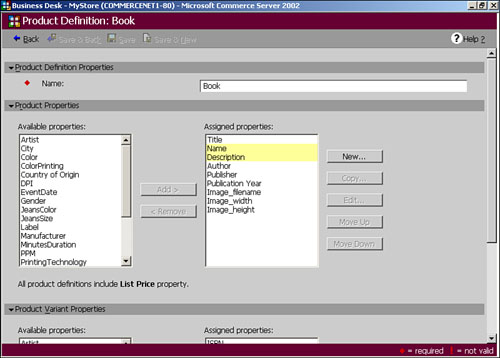
Now that you’ve set up catalogs, you can import product information into them. If you already have a product database—perhaps from another system in your organization—importing the data into Commerce Server can save you from having to hand-enter the data. On the other hand, if you’re just starting out your business, you may need to create your catalogs from scratch. In that case, your next step will be to create product definitions, which define the types of products you will carry. Figure 18.10 shows the list of product definitions included with one of the Commerce Server sample sites. As you can see, product definitions represent types of products, such as books, rather than actual physical products.

Tip
To access the product definition list, click on the Catalog Definition Designer in the Business Desk. Then, click on the View button in the toolbar to choose from Category Definitions, Property Definitions, or Product Definitions.
Editing a product definition enables you to decide what properties will be associated with that product. Figure 18.11 shows a product definition being edited. As with category definitions, you can only select predefined properties to associate with a product.
If you want to add a property—either to a category definition or to a product definition—that isn’t in Commerce Server’s list of default properties, you can use the Business Desk’s Property Definitions editor, shown in Figure 18.12, to add your own properties.

Figure 18.13 shows a property definition being edited. When you create property definitions, try to make them as generic as possible. For example, a property definition named “BookTitle” can only be used by a “Book” product definition and make sense; if you create a property definition named “Title,” on the other hand, you might be able to use that property in a variety of product definitions. Creating property definitions that can be reused across many types of products is more efficient.
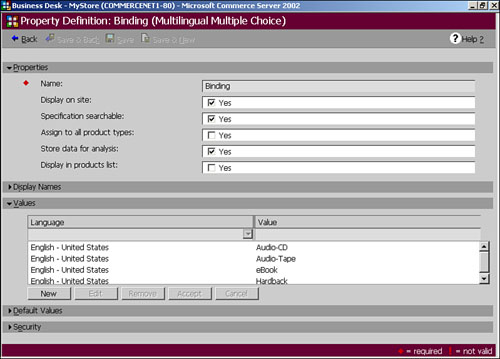
Property definitions can contain different types of data. For example, a simple property might require a text or numeric entry. More complex properties, however, can include drop-down lists for users to select values from. For example, you might create a Size property that only allows the values “S,” “M,” “L,” and “XL.” Creating this type of property enables you to ensure that the products using the property all use consistent values.
With a catalog created and your categories definitions, property definitions, and product definitions out of the way, you’re ready to begin creating actual products in your catalog. The first step is to define your product hierarchy by configuring categories. Back in the Catalog Editor, open one of your catalogs and create a new category. Figure 18.14 shows the category creation screen, where you provide values for the category’s properties.

After you’ve created several categories, you can relate them to one another. A category can contain other categories (called child categories), and a category can be contained by other categories (called its parent categories). Figure 18.15 shows how you can edit the relationships between categories to create a hierarchy.

Commerce Server’s category structure is infinitely flexible. Each category can have any number of parents, and any number of children. For example, a “Unisex Hats” category might be a child of a “Men’s Clothing” category and a “Women’s Clothing” category. All the products contained in the hats category would then be available to shoppers browsing for either men’s or women’s clothing, increasing the exposure of the products and the likelihood that someone will buy them.
Tip
Use categories to group your products into logical units, and then arrange your categories into a hierarchy that will make sense to your customers. For example, you might create a category named “Science Fiction Books” that contains all science fiction books. That category could be made a child of a “Books” category and a “Science Fiction Products” category, helping customers easily find the products they’re looking for.
With your categories set up, you can begin entering products into the catalog, as shown in Figure 18.16. You’ll provide all of the values for the product, based on the properties contained within the product’s product definition.

Some products may contain variants. A variant is some version of a product. For example, a book might be available in hardcover, paperback, and audio CD editions. It’s the same book either way, just slightly different packaging. Each version becomes a variant in your catalog. Each product variant shares certain properties, such as title, and has variant properties, such as binding type and price. Figure 18.17 shows how to configure product variants.

Figure 18.17 also shows how you can assign a product to one or more categories. Assign a product to the categories that it belongs to. Avoid assigning a product to two categories that share a parent-child relationship; doing so will make your product appear in two places in your catalog’s hierarchy and might confuse your customers.
Tip
As a best practice, I always create categories that contain products, and separate categories that only contain other categories. For example, a “Books” category simply acts as a parent to other categories for “Romance” and “Science Fiction”; “Books” itself never contains products. Creating your hierarchy in this fashion will help keep it organized and understandable.
Once your products are entered, you’re done! You’ve got a completely populated catalog that includes categories and products that your customers can browse.
Campaigns can nearly rival catalogs in their complexity. Campaigns are managed using the Business Desk’s Campaigns module, which includes six sub-modules. The most important of these is the Campaign Manager, shown in Figure 18.18.

In Figure 18.18, you’re looking at a company with only one campaign customer, itself. That’s not unusual for many online retailers, who only want to promote their own products. Commerce Server, however, also enables you to set up multiple campaign customers for Web sites that accept paid advertising. Each campaign customer can have multiple marketing campaigns running at once. Each marketing campaign—such as the Back to School and Spring Fling campaigns shown in Figure 18.18—have their own start and end dates and their own goals. For example, a campaign might have a goal to target ten thousand shoppers. Once the campaign reaches its goal, Commerce Server will stop displaying the campaign’s items as aggressively.
Each campaign can have multiple campaign items, and there are three types of campaign items to choose from:
Ads, which can include banner ads, multimedia ads, and other types of ads.
Discounts, which can apply to specific products or to entire shopping baskets.
Direct mail, which utilizes Commerce Server’ Direct Mailer feature to send personalized, targeted email messages to customers.
Each campaign item can have its own goals and weight within the campaign. These values determine how often Commerce Server will display the item. Commerce Server uses a complex Content Selection Framework (CSF) to decide what ads to display. For example, the CSF can ensure that ads from competing companies aren’t displayed on the same page, and that ads with high goals are displayed more frequently than ones with lower goals.
Note
The CSF is used by your site’s developers to select and display content. Commerce Server provides several programming objects that enable developers to implement dynamically selected content.
The Campaigns module has other sub-modules:
The List Manager enables you to import and manage mailing lists, which are used by the Direct Mailer to send email messages. The Direct Mailer system can also maintain an “opt-out” list of customers who do not wish to receive email from you.
The Campaign Expressions sub-module enables you to create customer and product expressions. Expressions are like queries, which result in particular sets of customer profiles or products. Using expressions, you can have Commerce Server only display certain ads to customers meeting particular demographic requirements, or target discounts to specific products in your catalog.
The Target Groups sub-module enables you to specify groups of Web pages for ad targeting. For example, you might only want a certain ad to appear on the Web pages for related products. You can create a target group for those Web pages, and then create an ad that only displays on that target group of pages.
The Reference Tables and Publish Campaigns sub-modules allow you to manage and activate campaigns on your site.
Note
The Commerce Server campaigns system is complex enough that I can’t cover it completely in this book. If you’re using Commerce Server 2002, I encourage you to pick up a copy of Que’s Special Edition Using Commerce Server 2002 by Don Jones and Mark Scott. The book not only covers campaign management in more detail, but also covers the software development aspects of implementing Commerce Server’s campaign capabilities on your Web site.
Commerce Server’s campaigns system can also track campaign results, telling you how many shoppers clicked on an ad, how many responded to an email message, or how many took advantage of a discount. This information is all exported to Commerce Server’s Analysis system, where you can easily evaluate the success of your campaigns.
Commerce Server’s Orders modules enable you to view orders that have been placed on your site and configure information relating to customer orders. For example, the Shipping Methods sub-module enables you to define the shipping methods and charges available to your customers, and the Tax Rates sub-module enables you to define the taxes you must charge your customers. Figure 18.19 shows the Shipping Methods sub-module.

Here’s what the Orders module enables you to do:
Using the Basket Manager, locate shopper’s baskets, view them, and delete them, if necessary.
Using the Location Codes sub-module, manage the two-letter location code for the locations you deal with. For example, you can define “US” to represent the United States, “JP” for Japan, and so forth.
Using the Order Status Codes sub-module, define codes for the various states an order can be in. You can define code for “New Order,” “Shipped,” “Processing,” and so forth.
Using the Order Status sub-module, locate and delete customer orders. Orders are basically shopping baskets that have been through Commerce Server’s Order Processing Pipeline. In other words, you can think of orders as committed baskets which customers have paid for.
Using the Shipping Methods sub-module, as you have seen, to manage the shipping methods and prices available to your customers. You can create shipping prices based on an order’s subtotal, its weight, or the quantity of items ordered.
Using the Tax Rates sub-module, define the tax rates that you are responsible for collecting. Generally, you have to collect taxes for orders shipped to your own state or province, but you may be responsible for other taxes, too. The Tax Rates sub-module works with Commerce Server’s built-in tax calculator component; you can obtain more flexible third-party tax calculator components that are compatible with Commerce Server. These components often come preloaded with current tax rates, making your job easier.
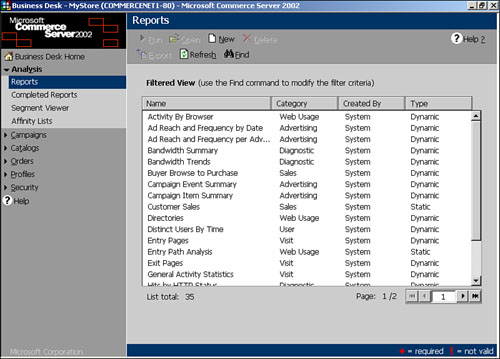
The Business Desk’s Analysis module enables you to work with reports and other analysis tools. As shown in Figure 18.20, Commerce Server comes preloaded with several different kinds of reports. Many of these reports are dynamic, which means they enable you to interact with the report to analyze the data more effectively. These reports rely on Commerce Server’s data warehouse, which I’ll cover in more detail in a bit. Static reports are more traditional types of reports, and may take longer to run. When you run a static report, its results appear in the Complete Reports sub-module of the Analysis module.
Commerce Server’s data warehouse is the key to most of Commerce Server’s reports. The data warehouse doesn’t contain a real-time copy of your site’s data, but instead contains a specially constructed copy of that data. The data warehouse can return report results much more quickly than the site’s transactional database, but the data warehouse must be populated before it can be used. Populating the data warehouse requires the use of several SQL Server Data Transformation Services (DTS) tasks, which read data from your site’s transaction database, Web server log files, and other sources, and reconstruct the data into the data warehouse.
Tip
Most companies configure DTS to automatically populate (or load) the data warehouse each evening. That way, the data warehouse is ready to provide reports when everyone arrives at work the next day.
| For more information on what DTS can do, see “Technology Capabilities,” p. 374 |
Commerce Server’s dynamic reports utilize the Office XP Web Controls, which are included with both Commerce Server 2002 and Office XP. Specifically, Commerce Server relies on the PivotTable control, which is normally a part of Excel 2002. The PivotTable enables you to customize dynamic reports to display the exact information you need, making data analysis more convenient and efficient.
Note
To enjoy the full functionality of the dynamic reports, each Business Desk user must have a licensed copy of Office XP, Access 2002, Excel 2002, or FrontPage 2002. Without one of those preinstalled on their computer, Business Desk users will only be able to view dynamic reports in their default configuration (using the limited version of the controls provided with Commerce Server), and won’t be able to interact with the reports they run.
Because Commerce Server’s data warehouse is preconfigured, you won’t need a skilled data warehouse architect or administrator. That means the data warehouse—and thus, the entire Analysis module—can be a powerful, inexpensive addition to your Web site.
The Business Desk’s Profiles module provides access to the profiles contained within Commerce Server. Profiles are mainly used to represent the users of your site—primarily shoppers, in other words. Commerce Server can be configured to use either its own database for profiles, an external database, or Active Directory.
| For more information on what the Profiles System can do, see “Technology Capabilities,” p. 230 |
One of the most important tasks in the Profiles system is using the Profile Definition Designer to decide exactly what type of information you’ll store in your profiles. For example, you might track age, gender, and annual income for your shoppers. By storing that information in shoppers’ profiles, you’ll enable Commerce Server to target ads and other content to shoppers based on that demographic information. Figure 18.21 shows the Profile Definition Designer in action.

Note
How you use your profiles leads to an important site-design decision. Most e-commerce sites don’t require shoppers to log in until they buy something. Commerce Server handles this by tracking anonymous users’ activities and transferring that information into a shopper’s profile if they do log in. For shoppers who don’t log in, you’ll retain their activity information but won’t be able to associate demographic or other profile information with them. An option is to require shoppers to log in to use your site. That will enable you to always match their activities with their profiles, but may not be acceptable in a public e-commerce site, since most customers won’t want to log in simply to browse.
The business side of site management—what you do with Business Desk—is important. Equally important, however, is the lower-level site management accomplished by a technical professional by using the Commerce Server Manager console and other Commerce Server administrative tools.
Global resources are configured in a Commerce Server administrative database and can potentially be used by multiple Commerce Server sites utilizing that same database. For example, suppose you have two distinct Web sites running on the same computer: one for the public, and one for private wholesale customers. Both might share the same profiles system, making it easier to convert a public customer into a private wholesale customer. By configuring both sites to utilize the same global profile resource, you can accomplish this goal.
Global resources are managed through the Commerce Server Manager snap-in, as shown in Figure 18.22. On the left side of the MMC, you’ll see the list of available global resources; details appear in the right pane. You can also right-click any global resource and select Properties from the pop-up menu to edit the resource. In Figure 18.22, for example, the profile resource’s connection string is being edited.

Note
Connection strings are one of the most common settings you’ll change in a global resource. For example, if you move a resource (such as profiles) to a new, larger SQL Server, you’ll need to edit the connection strings to point to the new server.
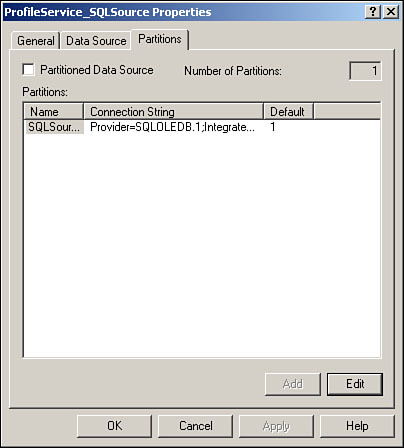
Figure 18.23 shows another important global resource property being edited: partitioning. Available for the profiles resource only, partitions enable you to split your profiles data across multiple data sources. Generally, a single SQL Server computer can support profile systems with up to 25 million users; Active Directory can support about 10 million. If you have more profiles than that—and large Web sites often do—partitioning is necessary. Figure 18.23 shows that this server’s global profiles resource is configured with only a single partition; you can click the Add button to create another one.
Note
All partitions must use the same type of data source. You can choose OLE DB for SQL Server, or LDAP for Active Directory.
It’s not common for a large company to run multiple Web sites from a single Commerce Server administrative database. Typically, companies will use a single back-end administrative database to manage a single Web site, which means the database’s global resources won’t be shared. In a development environment, you may find multiple sites sharing the same administrative database, but not usually in a production environment.
Note
The administrative database contains the configuration information for one or more Commerce Server sites, including global resource configuration. The administrative database isn’t usually used very heavily by the site (compared to the other databases Commerce Server uses), and usually exists on the same SQL Server computer as the site’s transaction database or another database.
Individual Web sites maintain their own private resources, as well, which you manage with the Commerce Server Manager snap-in. Figure 18.24 shows a site (or local) resource’s properties. As with global resources, much of what you’ll manage with site resources are connection strings.
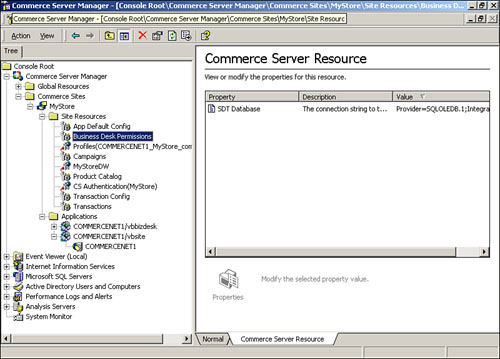
Why might you need to edit connection strings? It’s not unusual for a Web site to start small, with all of its databases on a single SQL Server computer. As the site grows, that computer may not be adequate for the site’s needs. Commerce Server enables you to distribute its databases across multiple SQL Servers. For example, you might keep your profiles on one server, your Direct Mail database on another, and your site’s primary transaction database on a third. Because the Commerce Server Manager snap-in enables you to modify these resources’ connection strings, you can program your site to look at the new servers for the appropriate data.
Site management also requires individual application management. Most sites have two Web applications: one for the site itself, and another for the Business Desk application. As shown in Figure 18.25, you can use the Commerce Server Manager snap-in to manage the properties of these applications.

You can think of Commerce Server applications as distinct portions of the overall Commerce Server Web site. For example, the main application is the one that users utilize to browse your product catalog and make purchases; the Business Desk application is the one you use to manage your site’s catalog, orders, and other features. Both exist within the same Commerce Server site, although they serve distinct purposes. Also, you probably won’t have the Business Desk application physically installed on every Web server. For security reasons, it makes far more sense to only install the Business Desk application on an internal Web server where only your employees can access it.
Caution
If you’re using the Commerce Server Site Packager to unpack a site onto your production Web servers, select the Custom Unpack option. That will enable you to unpack only the main Web site application and not the Business Desk application, which really shouldn’t be installed on Web servers that the public can access.
Perhaps the biggest pain in the neck when it comes to Web sites is deploying them. Commerce Server sites can be especially difficult because they involve so many different components: COM objects, Web pages, data sources, and much more. Fortunately, Microsoft provides a Site Packager with Commerce Server. The Site Packager knows about all the little components that a Commerce Server site uses, and it knows how to search them out and bundle them all up into a single, easy-to-distribute PUP file, called a package.
Note
The PUP files created by the Site Packager are identical to the PUP files that Microsoft provides for the Commerce Server Solution Sites and sample sites. These packages can be deployed to a fresh server by simply copying the PUP file and double-clicking it. Provided Commerce Server itself is properly installed, the package will unpack itself and your Web site will be ready to run on the new server.
Running the Site Packager couldn’t be easier. Just run it from the Start menu (under the Commerce Server folder), and, as shown in Figure 18.26, select the site you want to package and a location for the PUP file to be created. The Site Packager will do its thing and you’ll end up with a fully packaged Web site ready to be deployed.

| If the Site Packager quits with an error before even copying any files, see “Site Packager Won’t Package” in the “Troubleshooting” section at the end of this chapter. |
The Site Packager is probably the best way to deploy a site to a freshly installed Commerce Server computer. Deploying incremental changes to a site—new Web pages, a change to a data source, and so forth—is completely unsuited to the Site Packager. Incremental changes and ongoing site maintenance are best handled by Application Center, which is designed to synchronize the content and configuration settings within a Web farm.
| For more information on what Application Center can do, see “Technology Capabilities,” p. 180 |
Commerce Server’s performance can be difficult to analyze simply because there are so many factors involved. Commerce Server is dependent on the network that supports it, the Web servers running it, and the SQL Server computers storing its data. In the next few sections, I’ll show you some of the most common performance problems and how to correct them, and some of the best techniques for tracking down performance issues.
The Commerce Server Manager console includes the Windows System Monitor, which enables you to manage multiple performance counters in real-time. As shown in Figure 18.27, there are a number of performance counters I like to watch on a regular basis.

My preferred counters include
Processor: % Processor Time. This staple performance counter shows how busy a server’s processor (or processors) are. You should shoot for a total average utilization of less than 85%; more than that and the server’s working too hard. That doesn’t necessarily mean you need to upgrade the server; other bottlenecks could be causing the processor to work unusually hard.
Network: Bytes Total/sec. This counter shows the amount of data transmitted and received over the network. Look for it to stay at about 75% of your network bandwidth. For example, in a 100Mbps environment, you shouldn’t exceed about 75Mbps. If you are, then you’re saturating the network. Be sure to watch this counter on each network interface: That will show you how much network traffic is coming and going to the Internet, and how much is being used to communicate between Web servers and SQL Server computers.
Memory: Pages/sec. This counter should always be pretty low—under 10 or so. Any higher and it means your server doesn’t have enough RAM to effectively run the applications you’ve installed.
Memory: Available MBytes. This counter shows the amount of free RAM. If this counter ever gets close to zero, it’s definitely past time to add RAM to the computer.
Web Service: Bytes Total/sec. This counter shows the number of bytes being received and transmitted by the Web service. If you’re also monitoring Bytes Total/sec for the network interface used by the Web service, the two numbers should closely match. If they don’t, you’ve got a lot of extra traffic running on the Web service’s interface, and the service will run better if you decrease or eliminate the extra traffic.
Web Service: Current Connections. This counter shows the number of current connections. This counter is almost always used to give you some context for the other counters. For example, if this counter shows 1,000 connections and everything else is running high, that’s to be expected: The Web server is busy. If the number of connections is quite low and other performance counters are still high, you have a problem: Something other than the Web service is making your server work hard, which isn’t acceptable on a Web server.
Commerce Server: Catalog: Catalog Queries/sec. This counter shows how active your Commerce Server catalog is. Use this counter much as you would the Web Service: Current Connections counter, to provide some context for the type of work the Web server is performing.
Tip
Application Center’s Health Monitor, as well as Microsoft Operations Manager, provides a more efficient means of monitoring Web site performance. Both tools can continually monitor Commerce Server, network, memory, processor, and SQL Server performance and alert you when performance begins to fall below acceptable thresholds. These products eliminate the need to constantly monitor performance yourself, and enable you to be more proactive in managing performance problems.
| For more information on how Application Center and Health Monitor can help manage Commerce Server performance, see “Technology Capabilities,” p. 180 |
Local network utilization is rarely an issue in Web applications, because the local network’s bandwidth usually far exceeds the Internet bandwidth to begin with. Where local network utilization can become an issue is on the back-end, between the Web servers and your middle-tier servers of back-end SQL Server computers. Optimizing that connection lies mostly on the developer, although there are a few things that you as an administrator can do:
Use switches and high-speed connections to achieve maximum throughput.
Use a tool such as Network Monitor to identify top talkers, which are the servers generating the most traffic. Analyze these servers’ traffic to determine what is producing the traffic.
Ask developers to revise queries in the Web site so that queries return the minimum amount of data possible. Developers often write “lazy” queries that return far more information—and consume more network bandwidth—than is actually required for the task at hand.
Optimizing your Internet connection’s utilization is solely a matter for your Web developers. They should create Web pages that are as small as possible, use size-optimized graphics, and ideally serve graphics from a distributed network such as Akamai (www.akamai.com) so that the graphics don’t consume your site’s own Internet bandwidth.
There are two ways to improve Commerce Server database performance: efficiency and scaling. From an efficiency standpoint, developers should use stored procedures instead of ad-hoc queries, because SQL Server can execute stored procedures more efficiently. All queries should return the minimum amount of information required, and should be optimized to use indexes and other SQL Server features to improve performance.
| For more information on optimizing SQL Server, see “Optimizing SQL Server Performance,” p. 625 |
Scaling is another means of improving SQL Server performance. Scaling up simply means using more powerful hardware for SQL Server, while scaling out means using more SQL Server computers. Commerce Server lends itself especially well to scaling out by enabling you to split the various Commerce Server databases among several servers. You can even use read-only copies of databases such as the product catalog to improve performance.
| For more information on higher-performance SQL Server designs in a Commerce Server environment, see “Incorporating Commerce Server into Your Design,” p. 250 |
There are two ways to get better performance from a Web server. The first is to simply add another Web server and load balance between them, a feature provided by Windows’s Network Load Balancing (NLB) software (which is also included with Application Center). The second, more subtle way is to dedicate Web servers to a task, effectively partitioning your Web site. For example, you might have one set of servers dedicated to serving up product pages, while another set handles the checkout process. A third set might handle customer searching. Partitioning enables a Web server to focus on a single task, and also enables you to scale the individual tasks more easily. For example, if your search servers are overloaded, you can simply add another dedicated search server.
| For more examples of partitioned Commerce Server Web sites, see “Incorporating Commerce Server into Your Design,” p. 250 |
There are two sides to Commerce Server disaster recovery: Web servers and SQL Server. Web server disaster recovery is usually pretty easy, especially if you’re using Application Center to manage your Web farm: Just add a new server and copy the Web content from another server. For Commerce Server Web sites, you might use the Site Packager to package your Web site from an existing Web server to deploy to the new Web server. I usually don’t bother making backups of Web servers, because each Web server acts as a backup for the others in the farm.
Tip
Always make backups of development servers, in case your developers need you to retrieve an older version of a Web page or other site component.
Backing up SQL Server is an entirely different issue. Not only should you back up SQL Server, you should back it up a lot. Doing so will minimize the amount of data you lose in the event of a failure.
| For details on SQL Server disaster recovery strategies and techniques, see “Disaster Recovery Operations,” p. 628 |
I’ve been working with Commerce Server for a long time—since it was called Microsoft Merchant Server, in fact. Here are some tips I’ve picked up over the years to make Commerce Server administration easier and more effective:
Always have at least two Web servers. That way they can serve as a backup for one another and provide load balancing for your users.
Install the Business Desk on a server that’s not accessible by the public. I often install the Business Desk on the same server that’s used to test new Web site changes; that makes the server a little more useful and keeps the Business Desk away from the public.
Install Office XP—or at least Excel, Access, or FrontPage—on any computer that will need to access Commerce Server’s Analysis reports. Doing so will provide the necessary Office components to make dynamic reports fully interactive.
If you’re not using Application Center to deploy and synchronize new content, you’re working way too hard. I’ve found Application Center to be worth every penny simply in its ability to make content deployment less of a pain in the neck.
I can connect to the Business Desk installation page, but it just sits there and doesn’t actually install the Business Desk.
The Business Desk install page uses an ActiveX control to install the Business Desk HTA on your computer. Your browser must be configured to allow ActiveX controls to load and execute, and your browser must obviously support the use of ActiveX controls (Internet Explorer does; most other browsers do not). If the Business Desk install page isn’t prompting you for an installation location after a couple of minutes, you probably have ActiveX controls disabled in Internet Explorer’s Security options. Modify your options to permit ActiveX controls to execute, close Internet Explorer, and try again.
I run the Site Packager, but it quits almost immediately and just says there was an error.
The most likely cause is that the path you provided for the destination PUP file doesn’t exist. The folder you want the PUP package to be created in must exist before you run the Site Packager tool. Other common problems include an inability to connect to the SQL Server computers supporting your site; make sure your site is fully functional before running the Packager and you should have no problems.
You can troubleshoot the Site Package by using its log file, which is c:pup.log. Every time the Packager runs—whether packing or unpacking a site—it appends information to this log. I recommend that you archive or delete this log file before running the Packager; that way, the log file will only contain your most recent Packager session and you won’t have to scroll through a huge log file looking for relevant information. When packaging a site, the relevant errors will usually appear near the bottom of the log file, so start looking there first.
Contrary to popular thought, Commerce Server isn’t “just a developer’s tool.” It’s a powerful server product that requires plenty of administration, both from business and technical professionals. In this chapter, you learned how to use the Business Desk and the Commerce Server Manager snap-in, monitor and tune Commerce Server performance, perform disaster recovery operations, and much more. You also learned how to package Commerce Server sites for deployment. Of course, Commerce Server administration isn’t complete without a healthy dose of SQL Server administration, so you’ll want to read through Chapter 25 and get a good feel for how to administer SQL Server, as well.