Managing Host Integration Server (HIS) is no small feat, particularly if you’re new to mainframe or midrange connectivity. HIS requires you to configure link services, connections, and logical units (LUs), as well as manage the user accounts used in connections.
| For a brief discussion of link services, LUs, and other HIS concepts, see “Technology Capabilities,” p. 308 |
In the next few sections, I’ll introduce you to the core HIS management tasks and the handful of applications and administrative utilities that you’ll use to accomplish those tasks.
When you install HIS, it automatically includes all of the software required for the standard link services, including DLC, 3270, 5250, and more. However, you’ll need to manually configure the appropriate link services for your environment, enabling HIS to recognize the connectivity options that your host system supports. You’ll also need to configure actual connections to the host, create LUs for your users to utilize, and create and manage user accounts. If you’re looking to do more than just provide end-user connectivity, you may also have to work with HIS’s application and data integration tools to integrate your PC-based applications and data sources with the hosts system.
Note
I’ll cover each of these tasks from the HIS administrator’s perspective. Due to the wide range of host systems that HIS can integrate with, I won’t be able to cover the host-side tasks that go along with HIS configuration. Where possible, I’ll outline those tasks, but you’ll need to rely primarily on the expertise of your host systems’ administrators to accomplish host-side configuration.
This administrative tool provides a user interface for creating COMTI (COM Transaction Integration) components. COMTI components are essentially type libraries that represent applications on your host system and make them available to PC-based applications. The COMTI Component Builder generates Windows-standard type libraries, which are referred to as COMTI components. The type libraries are compatible with the Visual C++ OLE View, and the Visual Basic 5.0 (or later) Object Browser. These languages can be used to write applications that rely on host-based code, which you have exposed as COMTI components.
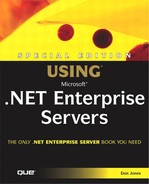
The COMTI Manager, shown in Figure 21.1, provides a graphical user interface for administering COMTI. COMTI Manager enables you to create and configure remote environments, manage COMTI components and the COMTI run-time environment, and deploy COMTI applications within COM+ applications. The COMTI Manager console also includes the Windows Component Services snap-in, which gives you a single window to work with both Windows-side components and COMTI components (which represent host-side software applications).
Remember that the purpose of COMTI is to provide integration between PC-based and host-based systems; COMTI essentially enables host- and PC-based systems to participate in the same software transactions. The COMTI Manager provides a means to manage these interactions, ensuring that the PC-based systems have everything they need to communicate and integrate with the host-based applications.
The Trace Initiator is a graphical user interface that allows you to enable and disable HIS tracing options. Tracing (which I’ll discuss later in this chapter) allows you to view the internals of HIS’s processes. Tracing is a valuable technique in troubleshooting performance and connectivity problems. Essentially, tracing records the activity between (or within) HIS’s various components, providing you with a view of the exact sequence of events that occur within HIS and between HIS and host systems on your network.
Trace Viewer is a companion application to Trace Initiator, and enables you to view the trace files you create with Trace Initiator. Trace Viewer enables you to view all traces for a particular component of HIS, filter traces based on various criteria, view partial trace details, and so forth.
The Data Descriptions console provides access to OLE DB data descriptions, as shown in Figure 21.2. Using this console, you can manage the data descriptions contained within the OLE DB Provider for AS/400 and VSAM. Essentially, this console enables you to describe the tables within your host system, making those tables easily available to PC-based applications through Microsoft’s OLE DB data provider.

Creating data descriptions requires a thorough understanding of how your host data is structured; Microsoft includes a number of samples—and detailed documentation—within the HIS Software Development Kit (SDK) documentation, which is included on the HIS distribution media.
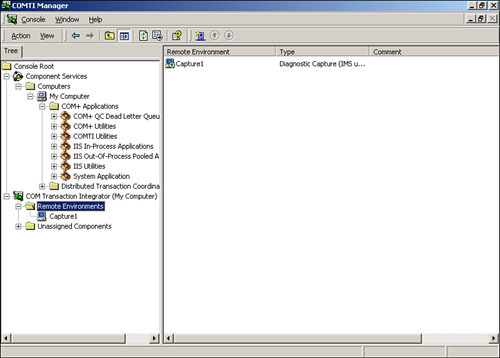
As shown in Figure 21.3, the browser is simply an Explorer window that displays the data sources configured on the server. You can use this window to create new data sources or, more commonly, to modify your existing data sources. To work with an existing data source, simply right-click it and select Properties from the pop-up menu.
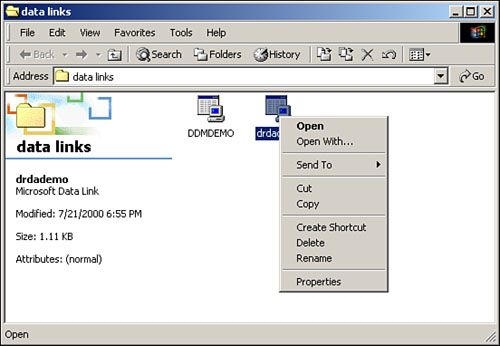
The properties of an OLE DB data source are shown in Figure 21.4. You’ll need to configure a number of properties, including the host’s language and basic character set, so that OLE DB can perform the necessary connection translations between the host and your PC-based systems. I’ll cover these tasks in a bit more detail later in this chapter, but you’ll need to rely primarily on your host system’s administrator to provide you with the correct values for the OLE DB connections.
The main purpose of these OLE DB data sources is to provide OLE DB clients—which can include most PC-based applications—with the information necessary to read and write data from host systems. OLE DB is a universal data access technology; software developers use OLE DB to access SQL Server and Microsoft Access databases, and can use OLE DB to access host systems just as easily. Since the OLE DB data source definition contains the information necessary to connect to the host system, your PC-based software applications won’t need any special configuration. They can simply access the data source as they would any other, relying on the OLE DB technology itself—in conjunction with HIS—to handle the tasks necessary to connect to the host system.
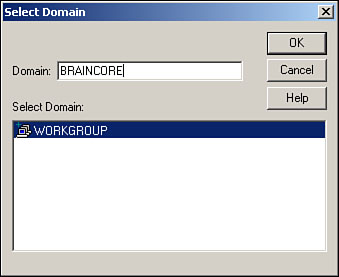
HIS includes a Host Accounts application, which enables you to configure password synchronization and single sign-on capabilities for your users. As shown in Figure 21.5, you’ll need to specify a Windows NT or Active Directory domain for HIS to connect to; passwords will be synchronized with this domain (HIS prompts you for this information when you run Setup on your domain’s PDC emulator). The domain must contain at least one domain controller running the HIS synchronization service, and you must run the Host Accounts utility as a member of the Domain Admins group for the target domain.
| For more information about HIS security, including single sign-on and password synchronization, see “Host Integration Server,” p. 672 |
SNA Manager is the primary administrative interface for HIS. As shown in Figure 21.6, SNA Manager is a Microsoft Management Console (MMC) snap-in that you can use to manage all of the network connectivity, shared folders, and other features of HIS.
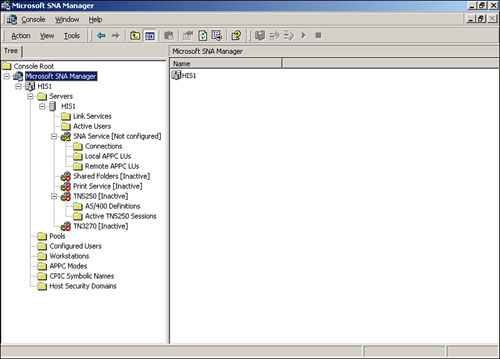
SNA Manager provides the user interface for most of HIS’s administrative functions, and it’s the tool I’ll focus on the most throughout the rest of this chapter.
Now that you’ve got an idea of what HIS administration involves, I’ll walk you through some of the most common configuration tasks, including link service configuration, user management, and so forth. I’ll also briefly cover application and data integration configuration; however, those tasks can require a strong software development background. When configuring both application and data integration, you’ll need the assistance not only of your host system’s administrator, but also of a host system programmer and PC-based software developer in order to create the correct configuration for your environment.
Link services provide the underlying mechanism for HIS to connect to your host system. Link services essentially represent physical connectivity, including the communications protocol used by your host system. You can create and configure link services that use DLC 802.2, 3270, 5250, LU1 printers, and LU3 printers.
Note
Because link services simply represent existing host configurations, you’ll need the assistance of your host system’s administrator to configure link services with the correct values.
If your host system supports multiple link services (most do), you can create multiple link services within HIS to represent them. For example, many AS/400 systems support 5250 link services for client connections and either LU1 or LU3 link services for shared print devices. To create a new link service
Open SNA Manager.
Right-click the HIS server that you want to add link services to. Select New from the pop-up menu, and then select Link Service.
Select the link service you want to add—DLC 802.2, 3270, 5250, LU1, or LU2.
Provide the basic information for the link service. This usually includes a title for the link service, and may include an adapter name, Local Service Access Point (SAP), and so forth.
Click Finish when you’re done inserting link services.
Right-click Link Services and select Save configuration from the pop-up menu. SNA Manager will display the new link services once they have been inserted, or have established physical connectivity to the host system.
You’ll probably need to perform additional configuration to match the link services to your environment. To do so, simply right-click the appropriate link service and select Properties from the pop-up menu. You’ll see the service’s Properties dialog box. Click the Configure button to display the link service’s configuration dialog box, as shown in Figure 21.7.

Link services don’t do anything by themselves; they simply enable HIS to make a connection to your host system. You’ll also need to create and configure those connections to the host system.
HIS includes wizards for creating 3270 and 5250 connections, and also enables you to manually create new connections.
Note
3270 connections are typical in a mainframe environment; 5250 connections are most commonly found in AS/400 environments.
To create a new 5250 connection using the wizard—which is far easier than creating it manually—follow these steps:
Open SNA Manager.
Right-click the HIS server that will contain the new connection, and select All Tasks from the pop-up menu. Then, select AS/400 Wizard.
Click Next on the Welcome screen.
Select the computer where the SNA Service resides and click Next.
Enter a name for the new connection and click Next.
Select the appropriate SNA link service and click Next.
Accept the default network name and control point name, unless your host system administrator advises differently, and click Next.
Accept the default physical unit (PU) information, unless your host system administrator advises differently, and click Next.
Click Finish to complete the wizard, and click OK in the wizard’s final dialog box.
Right-click the SNA Service folder and select Save configuration from the pop-up menu.
Stop and restart the SNA Service to force the new changes to take affect.
Note
Creating a new 3270 connection with the wizard requires substantially identical steps, with slightly different configuration options that reflect the 3270 protocol’s operating features.
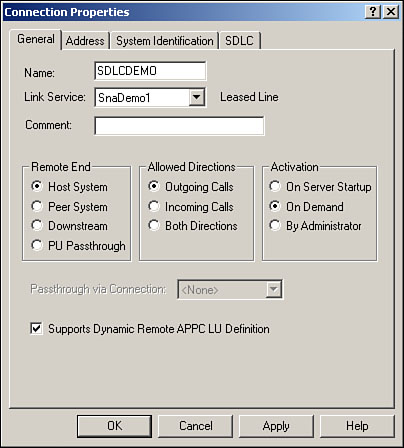
If you want more control over the connection creation process, or simply don’t like dealing with wizards, you can manually create the new connection. To do so, right-click the Connections folder in SNA Manager, select New from the pop-up menu, and then select the type of connection that you want to create. You’ll see a dialog box like the one in Figure 21.8. Make sure you complete the configuration on each tab in the dialog box before closing it. Then, save the configuration and restart the SNA Service, as described previously in steps 10 and 11.
The connection creation process collects the necessary configuration information for the connection to work; you won’t generally have to modify the connection’s configuration unless your host system’s configuration changes. If you do need to modify the connection, simply right-click it in SNA Manager and select Properties from the pop-up menu.
With your link services and connections configured, you can begin creating LUs. The LUs you create can represent terminals (through terminal emulation, also called display LUs), printers, applications, or downstream LUs. Each LU is configured based on the type of connection you’re using; channel, 802.2, X.25, and SDLC LUs require an LY number that identifies the LU on that connection. You can configure up to 254 LUs for each connection. HIS enables you to create LUs one at a time, or in a range—effectively enabling you to, for example, configure 254 display LUs in a single step.
Note
DFT (Distributed Functional Terminal) type connections only enable you to create LUs one at a time, and the LUs do not require LU numbers. Instead, they use the port number of the host-based DFT adapter that the connection uses, and a logical terminal number, which is configured on the host for the coaxial cable.
To create a display LU, follow these steps (the steps for connections other than 3270 will differ slightly; refer to a HIS documentation for specifics):
Open SNA Manager.
Right-click the connection that will contain the new LU and select New from the pop-up menu. Then, select Display LU.
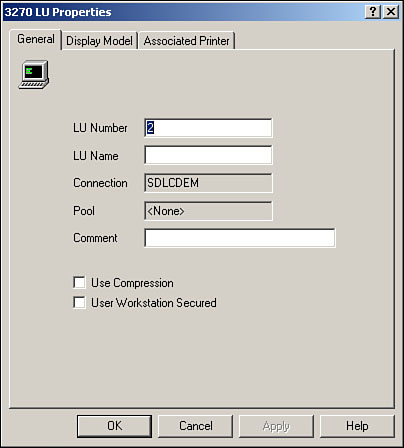
The 3270 LU Properties dialog box appears, as shown in Figure 21.9. Enter the LU number, name, and a comment. You can also indicate the display model, which isn’t normally necessary if your users will be using software terminal emulators. Finally, you can associate a printer LU—if you’ve previously created one—with the new display LU.
Click OK to close the dialog box. SNA Manager will display the new LU under the appropriate connection.
Note
Configuring other LU types requires substantially the same steps; consult the HIS documentation for specifics.
If you need to reconfigure an LU at any point, simply right-click it and select Properties from the pop-up menu. LU configuration changes take effect immediately.
Your last step in configuring HIS is to configure users. Add users by right-clicking the Configured Users container in SNA Manager, selecting New, and then selecting User. As shown in Figure 21.10, you’ll see a standard Windows user-selection dialog box, which enables you to select either user or group accounts to add to HIS. After assigning users to HIS, you can right-click the users and assign them to a specific LU. This gives the user permission to use that LU. Figure 21.11 shows how a single user—or user group—can be assigned to any number of LUs.


Tip
You’ll simplify user management by simply assigning an all-encompassing user group, such as Domain Users, to all of the LUs that your users may utilize. If you have restricted LUs, such as an administrative terminal, you can change that LU specifically and only permit the appropriate users to utilize it.
As I’ve already mentioned, configuring application integration through COMTI can be a complex process that requires a good deal of software development knowledge. In general, you’ll follow these steps:
Ensure that your host system’s transaction program (TP) can be invoked by COMTI, and make any necessary modifications to the TP to support COMTI. Your host system administrator can advise you on what will need to be done.
Install COMTI.
Create a remote environment using the COMTI Manager. The remote environment specifies the information COMTI needs to interact with your host system.
Use the COMTI Component Builder to turn the data definition section of a COBOL TP into a COMTI component. The COMTI Component Builder includes wizards that assist in this task, and you’ll want to have a host system programmer on-hand, as well.
Deploy the COMTI component within a COM+ application (or in an MTS application for Windows NT 4.0 systems). This will create the COMTI Automation server, which PC-based systems can utilize.
PC application programs should utilize the COM+ component’s methods to invoke the host system’s TP.
Data access integration exposes host-based data through OLE DB or ODBC data sources, making the host-based data more easily accessible to PC-based applications that can utilize OLE DB or ODBC data sources.
Note
Most PC-based developers use Microsoft’s ActiveX Data Objects (ADO) to access data. ADO can use both OLE DB and ODBC data sources to connect to databases. OLE DB provides faster access and is a newer universal data access technology; ODBC is a legacy technology intended for use with older applications.
HIS includes an OLE DB provider for AS/400 and VSAM, an OLE DB provider for IBM DB2, and an ODBC provider for IBM DB2. HIS also includes a File Transfer driver, which enables PC-based applications to move files to and from a host system.
You configure data sources by using the ODBC console or the OLE DB data source utility, both of which are included in the HIS folder on the Start menu.
Tracing is a great way to collect internal information about HIS. Reading traces can be difficult though, so traces definitely aren’t the best starting point. Always carefully review the Windows event logs first, since the event messages are much more straightforward than trace logs. However, if you really need to get “under the hood” in HIS, fire up a trace.
To start a trace, run Trace Initiator, as shown in Figure 21.12. Tracing is actually performed by HIS; Trace Initiator simply tells HIS what you want to trace. Trace output is stored in a series of nearly twenty log files; the HIS Online Books contain a list of file names and the HIS component they relate to.

HIS supports three types of traces:
Internal traces include activity within a software component of HIS. Traces can be configured to include fatal conditions, errors, debug conditions, function entry/exit information, state transitions, and custom conditions. Internal traces are designed mainly for Microsoft’s use; about the only time you’ll use them is when Microsoft Product Support asks you to.
Message traces include the messages passed between HIS components, including those sent across the network. Message traces can be set to include internal messages, 3270 messages, and LU 6.2 messages.
API traces include the information passes between HIS DLL files. API traces can include communications between the APPC, CPI-C, LUA, and CSV APIs.
Here are some examples of how you—or a software developer—might use traces:
Trace DLC and 3720 messages for the SnaServer (PU 2.1) node in a message trace when HIS can’t connect to your host.
If SNA Manager doesn’t reflect changes in network services, trace the SnaServer’s internal messages and the Manage Agent’s internal tracing.
If a Windows client can’t connect to HIS, enable internal tracing on the client. For 3270 or LUA clients, trace 3270 messages, and for an APPC or CPI-C client, trace LU 6.2 messages.
HIS extends Windows’s System Monitor with a number of performance objects, enabling you to obtain performance information on your HIS infrastructure. Network adapters often present the first bottleneck in an HIS system, so be sure to use quality, bus-mastering network adapters with Microsoft-certified device drivers. Also provide the highest possible bandwidth between your HIS computers and your host system.
HIS is relatively easy to back up and restore. Most of HIS’s critical information is contained within its configuration file, which is contained within the server’s COMCFG share. Backing up the files in that share on a regular basis, especially after any configuration changes, will enable you to restore your HIS configuration in the event of a server failure.
You should also perform a full backup of your HIS servers on a regular basis, making sure to capture the registry (system state) data. Doing so will make it easier to restore failed computers to their original operating condition.
I’ve implemented HIS primarily in AS/400 environments, which represent HIS’s biggest customer base. Earlier versions of HIS (Microsoft SNA Server) were designed primarily for AS/400 environments. As a result, most of the tips I can offer you apply to AS/400 environments, although many of them also carry over to mainframe environments.
Never do anything without checking with your host system administrator first. I learned this the hard way! Likewise, make sure your host system administrator coordinates any host-side changes with you, so that you can update HIS’s configuration accordingly.
Microsoft’s 3270 and 5250 clients work far better with HIS than other terminal emulators. While Microsoft’s clients aren’t necessarily the most full-featured (host software developers, for example, have some special features that they like to have in a terminal emulator), Microsoft’s clients provide the best experience with HIS.
If you can afford two HIS servers, buy them. Configure one as a backup, so that you’ll always have a spare copy of your HIS configuration on the network.
When implementing HIS for the first time, do lots of testing to determine the load that HIS will place on your host system. If you’re migrating from coaxial terminals, you may find that HIS requires a bit more effort from your host system. The best way to manage this additional overhead is to configure all HIS-based sessions in their own interactive subsystem within the host. This technique enables you to manage the performance of the subsystem separately from batch and other interactive subsystems.
HIS is a complex product, which is due mainly to the fact that host systems are complex products using old protocols, and in many cases, outdated management techniques. The good news is that once configured with the proper link services, connections, LUs, servers, and so forth, you don’t have to pay a lot of attention to HIS. In this chapter, I walked you through examples of configuring all of these items, but you’ll need to spend plenty of time with your host system administrator to make sure everything you do on HIS matches what your host system is configured to handle.